ASP.NET Core MVC
By Frederik Prijck
This tutorial demonstrates how to add user login to an ASP.NET Core application.We recommend that you log in to follow this quickstart with examples configured for your account.
I want to integrate with my app
15 minutesI want to explore a sample app
2 minutesGet a sample configured with your account settings or check it out on Github.
Configure Auth0
Get Your Application Keys
When you signed up for Auth0, a new application was created for you, or you could have created a new one. You will need some details about that application to communicate with Auth0. You can get these details from the Application Settings section in the Auth0 dashboard.
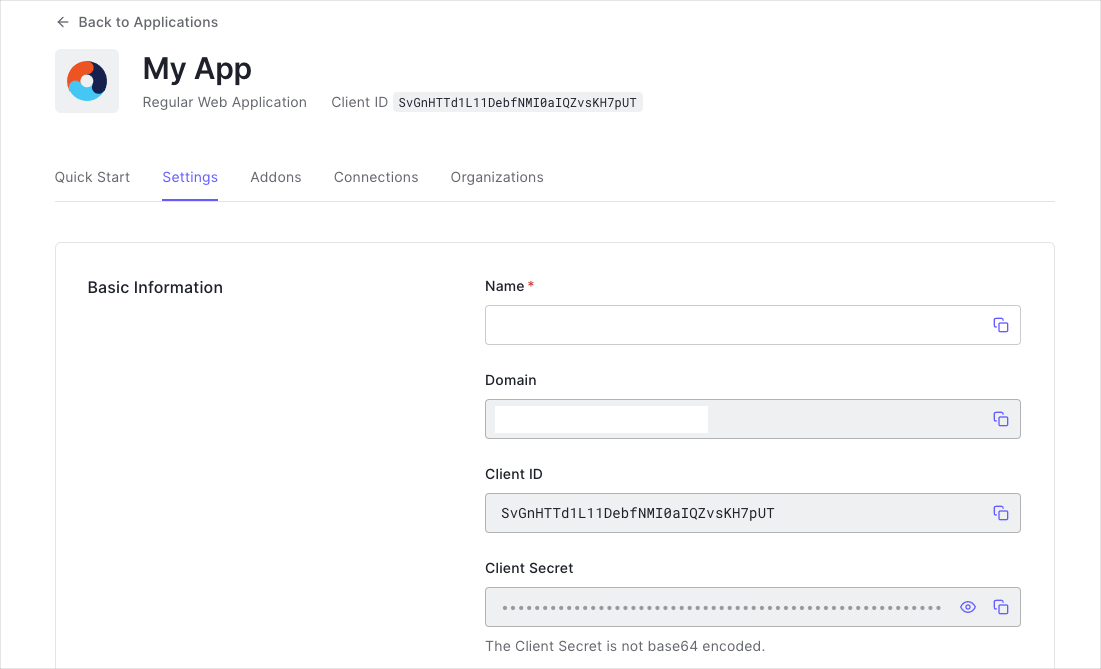
You need the following information:
- Domain
- Client ID
Configure Callback URLs
The Callback URL of your application is the URL where Auth0 will redirect to after the user has authenticated in order for the SDK to complete the authentication process.
You will need to add this URL to the list of Allowed URLs for your application in your Application Settings, this URL will mostly take the format https://YOUR_APPLICATION_URL/callback.
Configure Logout URLs
A logout URL is a URL in your application that Auth0 can return to after the user has been logged out of the authorization server. This is specified in the returnTo query parameter. The logout URL for your app must be added to the Allowed Logout URLs field in your Application Settings. If this field is not set, users will be unable to log out from the application and will get an error.
Integrate Auth0
Universal Login is the easiest way to set up authentication in your application. We recommend using it for the best experience, best security and the fullest array of features. This guide will use it to provide a way for your users to log in to your ASP.NET Core application.
Install dependencies
To integrate Auth0 with ASP.NET Core you can use our SDK by installing the Auth0.AspNetCore.Authentication Nuget package to your application.
Install-Package Auth0.AspNetCore.AuthenticationWas this helpful?
Install and configure the SDK
To enable authentication in your ASP.NET Core application, use the middleware provided by the SDK. Go to the Program.cs file and call builder.Services.AddAuth0WebAppAuthentication() to configure the Auth0 ASP.NET Core SDK.
Ensure to configure the Domain and ClientId, these are required fields to ensure the SDK knows which Auth0 tenant and application it should use.
var builder = WebApplication.CreateBuilder(args);
// Cookie configuration for HTTP to support cookies with SameSite=None
builder.Services.ConfigureSameSiteNoneCookies();

// Cookie configuration for HTTPS
//  builder.Services.Configure<CookiePolicyOptions>(options =>
//  {
//     options.MinimumSameSitePolicy = SameSiteMode.None;
//  });
builder.Services.AddAuth0WebAppAuthentication(options =>
{
    options.Domain = builder.Configuration["Auth0:Domain"];
    options.ClientId = builder.Configuration["Auth0:ClientId"];
});
builder.Services.AddControllersWithViews();
var app = builder.Build();
Was this helpful?
Make sure you have enabled authentication and authorization in your Program.cs file:
app.UseAuthentication();
app.UseAuthorization();
Was this helpful?
Login
To add the Login, call ChallengeAsync and pass "Auth0" (Auth0Constants.AuthenticationScheme) as the authentication scheme. This will invoke the OIDC authentication handler that our SDK registers internally.
After the OIDC middleware signs the user in, the user is also automatically signed in to the cookie middleware. This allows the user to be authenticated on subsequent requests.
using Microsoft.AspNetCore.Authentication;
using Microsoft.AspNetCore.Authentication.Cookies;
using Auth0.AspNetCore.Authentication;

public class AccountController : Controller
{
    public async Task Login(string returnUrl = "/")
    {
        var authenticationProperties = new LoginAuthenticationPropertiesBuilder()
            // Indicate here where Auth0 should redirect the user after a login.
            // Note that the resulting absolute Uri must be added to the
            // **Allowed Callback URLs** settings for the app.
            .WithRedirectUri(returnUrl)
            .Build();

        await HttpContext.ChallengeAsync(Auth0Constants.AuthenticationScheme, authenticationProperties);
    }
}
Was this helpful?
Display User Profile
The SDK extracts the user's information from the ID Token and makes them available as the User.Claims property on the controller.
You can create a custom user profile page for displaying a user's name, email address, and profile image, by passing the corresponding information to the view from inside your controller.
public class AccountController : Controller
{
    [Authorize]
    public IActionResult Profile()
    {
        return View(new
        {
            Name = User.Identity.Name,
            EmailAddress = User.Claims.FirstOrDefault(c => c.Type == ClaimTypes.Email)?.Value,
            ProfileImage = User.Claims.FirstOrDefault(c => c.Type == "picture")?.Value
        });
    }
}
Was this helpful?
Logout
To add Logout, you need to sign the user out of both the Auth0 middleware as well as the cookie middleware.
using Microsoft.AspNetCore.Authentication;
using Microsoft.AspNetCore.Authentication.Cookies;
using Auth0.AspNetCore.Authentication;

public class AccountController : Controller
{
    [Authorize]
    public async Task Logout()
    {
        var authenticationProperties = new LogoutAuthenticationPropertiesBuilder()
            // Indicate here where Auth0 should redirect the user after a logout.
            // Note that the resulting absolute Uri must be added to the
            // **Allowed Logout URLs** settings for the app.
            .WithRedirectUri(Url.Action("Index", "Home"))
            .Build();

        await HttpContext.SignOutAsync(Auth0Constants.AuthenticationScheme, authenticationProperties);
        await HttpContext.SignOutAsync(CookieAuthenticationDefaults.AuthenticationScheme);
    }
}
Was this helpful?
What's next?
We put together a few examples of how to use the SDK in more advanced use cases: