Java EE
By Jim Anderson
This tutorial demonstrates how to add user login to a Java EE web application.We recommend that you log in to follow this quickstart with examples configured for your account.
I want to integrate with my app
15 minutesI want to explore a sample app
2 minutesGet a sample configured with your account settings or check it out on Github.
Configure Auth0
Get Your Application Keys
When you signed up for Auth0, a new application was created for you, or you could have created a new one. You will need some details about that application to communicate with Auth0. You can get these details from the Application Settings section in the Auth0 dashboard.
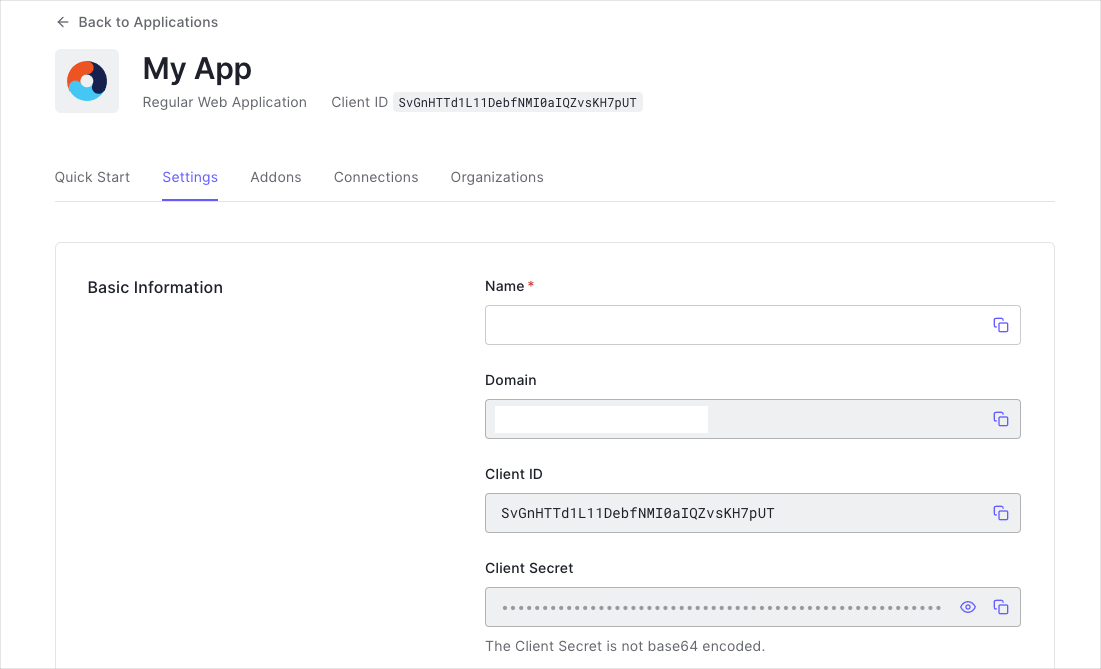
You need the following information:
- Domain
- Client ID
- Client Secret
Configure Callback URLs
A callback URL is a URL in your application where Auth0 redirects the user after they have authenticated. The callback URL for your app must be added to the Allowed Callback URLs field in your Application Settings. If this field is not set, users will be unable to log in to the application and will get an error.
Configure Logout URLs
A logout URL is a URL in your application that Auth0 can return to after the user has been logged out of the authorization server. This is specified in the returnTo query parameter. The logout URL for your app must be added to the Allowed Logout URLs field in your Application Settings. If this field is not set, users will be unable to log out from the application and will get an error.
Configure Java EE to use Auth0
Set up dependencies
To integrate your Java EE application with Auth0, add the following dependencies:
- javax.javaee-api: The Java EE 8 API necessary to write applications using Java EE 8. The actual implementation is provided by the application container, so it does not need to be included in the WAR file.
- javax.security.enterprise: The Java EE 8 Security API that enables handling security concerns in an EE application. Like the
javax.javaee-apidependency, the implementation is provided by the application container, so is not included in the WAR file. - auth0-java-mvc-commons: The Auth0 Java MVC SDK allows you to use Auth0 with Java for server-side MVC web applications. It generates the Authorize URL that your application needs to call in order to authenticate a user using Auth0.
If you are using Maven, add these dependencies to your pom.xml:
<!-- pom.xml -->

<dependency>
    <groupId>com.auth0</groupId>
    <artifactId>mvc-auth-commons</artifactId>
    <version>[1.0, 2.0)</version>
</dependency>
<dependency>
    <groupId>javax</groupId>
    <artifactId>javaee-api</artifactId>
    <version>8.0.1</version>
    <scope>provided</scope>
</dependency>
<dependency>
    <groupId>javax.security.enterprise</groupId>
    <artifactId>javax.security.enterprise-api</artifactId>
    <version>1.0</version>
    <scope>provided</scope>
</dependency>
Was this helpful?
If you are using Gradle, add them to your build.gradle:
// build.gradle

providedCompile 'javax:javaee-api:8.0.1'
providedCompile 'javax.security.enterprise:javax.security.enterprise-api:1.0'
implementation 'com.auth0:mvc-auth-commons:1.+'
Was this helpful?
Configure your Java EE application
Your Java EE application needs some information in order to authenticate users with your Auth0 application. The deployment descriptor web.xml file can be used to store this information, though you could store them in a different secured location. The required information is:
<!-- `src/main/webapp/WEB-INF/web.xml`-->

<env-entry>
    <env-entry-name>auth0.domain</env-entry-name>
    <env-entry-type>java.lang.String</env-entry-type>
    <env-entry-value>{yourDomain}</env-entry-value>
</env-entry>
<env-entry>
    <env-entry-name>auth0.clientId</env-entry-name>
    <env-entry-type>java.lang.String</env-entry-type>
    <env-entry-value>{yourClientId}</env-entry-value>
</env-entry>
<env-entry>
    <env-entry-name>auth0.clientSecret</env-entry-name>
    <env-entry-type>java.lang.String</env-entry-type>
    <env-entry-value>YOUR_CLIENT_SECRET</env-entry-value>
</env-entry>
<env-entry>
    <env-entry-name>auth0.scope</env-entry-name>
    <env-entry-type>java.lang.String</env-entry-type>
    <env-entry-value>openid profile email</env-entry-value>
</env-entry>
Was this helpful?
This information will be used to configure the auth0-java-mvc-commons library to enable users to login to your application. To learn more about the library, including its various configuration options, see the README of the library.
Check populated attributes
If you downloaded this sample using the Download Sample button, the domain, clientId and clientSecret attributes will be populated for you. You should verify that the values are correct, especially if you have multiple Auth0 applications in your account.
Configure Java EE Security
The Java EE 8 Security API introduced the HttpAuthenticationMechanism interface to enable applications to obtain a user's credentials. Default implementations exist for Basic and form-based authentication, and it provides an easy way to configure a custom authentication strategy.
To authenticate with Auth0, provide custom implementations of the following interfaces:
HttpAuthenticationMechanism: Responsible for obtaining a user's credentials and notifying the container of successful (or not) login status (JavaDoc).IdentityStore: Responsible for validating the user's credentials (JavaDoc).CallerPrincipal: Represents the caller principal of the current HTTP request (JavaDoc).Credential: Represents the credential the caller will use to authenticate (JavaDoc).
First, make your Auth0 settings available to the application by creating an @ApplicationScoped bean to retrieve the values from the web context and make them available via getters:
// src/main/java/com/auth0/example/security/Auth0AuthenticationConfig.java

@ApplicationScoped
public class Auth0AuthenticationConfig {

    private String domain;
    private String clientId;
    private String clientSecret;
    private String scope;

    @PostConstruct
    public void init() {
        // Get authentication config values from env-entries in web.xml
        try {
            Context env = (Context)new InitialContext().lookup("java:comp/env");

            this.domain = (String) env.lookup("auth0.domain");
            this.clientId = (String) env.lookup("auth0.clientId");
            this.clientSecret = (String) env.lookup("auth0.clientSecret");
            this.scope = (String) env.lookup("auth0.scope");
        } catch (NamingException ne) {
            throw new IllegalArgumentException("Unable to lookup auth0 configuration properties from web.xml", ne);
        }

        if (this.domain == null || this.clientId == null || this.clientSecret == null || this.scope == null) {
            throw new IllegalArgumentException("domain, clientId, clientSecret, and scope must be set in web.xml");
        }
    }

    public String getDomain() {
         return domain;
    }

    public String getClientId() {
         return clientId;
    }

    public String getClientSecret() {
         return clientSecret;
    }

    public String getScope() {
        return scope;
    }
}
Was this helpful?
Next, create a custom CallerPrincipal that represents the caller of the current request:
// src/main/java/com/auth0/example/security/Auth0JwtPrincipal.java

public class Auth0JwtPrincipal extends CallerPrincipal {
    private final DecodedJWT idToken;

    Auth0JwtPrincipal(DecodedJWT idToken) {
        super(idToken.getClaim("name").asString());
        this.idToken = idToken;
    }

    public DecodedJWT getIdToken() {
        return this.idToken;
    }
}
Was this helpful?
You can now implement a custom Credential that will be used to represent the user's credentials. It will hold information about the principal:
// src/main/java/com/auth0/example/security/Auth0JwtCredential.java

class Auth0JwtCredential implements Credential {
    private Auth0JwtPrincipal auth0JwtPrincipal;

    Auth0JwtCredential(String token) {
        DecodedJWT decodedJWT = JWT.decode(token);
        this.auth0JwtPrincipal = new Auth0JwtPrincipal(decodedJWT);
    }

    Auth0JwtPrincipal getAuth0JwtPrincipal() {
        return auth0JwtPrincipal;
    }
}
Was this helpful?
You now have defined the classes that represent a calling principal and credential. Next, create a custom implementation of IdentityStore. This class will be responsible for validating the user's credentials:
// src/main/java/com/auth0/example/security/Auth0JwtIdentityStore.java

@ApplicationScoped
public class Auth0JwtIdentityStore implements IdentityStore {

    @Override
    public CredentialValidationResult validate(final Credential credential) {
        CredentialValidationResult result = CredentialValidationResult.NOT_VALIDATED_RESULT;
        if (credential instanceof Auth0JwtCredential) {
            Auth0JwtCredential auth0JwtCredential = (Auth0JwtCredential) credential;
            result = new CredentialValidationResult(auth0JwtCredential.getAuth0JwtPrincipal());
        }
        return result;
    }
}
Was this helpful?
If the credential is an Auth0Credential, the calling user is authenticated and valid, so a CredentialValidationResult created with the credential is returned to indicate success. If it is not an Auth0Credential, return CredentialValidationResult.NOT_VALIDATED_RESULT.
Before implementing the HttpAuthenticationMechanism interface that will use all these collaborators, create a bean that will provide a configured instance of the AuthenticationController from the Auth0 Java MVC SDK. The AuthenticationController is used to build the authorization URL where users will login, and handle the token exchange to authenticate users.
- If your Auth0 Application is configured to use the RS256 signing algorithm (the default when creating a new Auth0 Application), you need to configure a
JwkProviderto fetch the public key used to verify the token's signature. See the jwks-rsa-java repository to learn about additional configuration options. - If your Auth0 Application is configured to use the HS256 signing algorithm, there is no need to configure the
JwkProvider.
The sample below shows how to configure the AuthenticationController for use with the RS256 signing algorithm:
// src/main/java/com/auth0/example/security/Auth0AuthenticationProvider.java

@ApplicationScoped
public class Auth0AuthenticationProvider {

    @Produces
    public AuthenticationController authenticationController(Auth0AuthenticationConfig config) {
        JwkProvider jwkProvider = new JwkProviderBuilder(config.getDomain()).build();
        return AuthenticationController.newBuilder(config.getDomain(), config.getClientId(), config.getClientSecret())
                .withJwkProvider(jwkProvider)
                .build();
    }
}
Was this helpful?
Finally, implement a custom HttpAuthenticationMechanism
// src/main/java/com/auth0/example/security/Auth0AuthenticationMechanism.java

@ApplicationScoped
@AutoApplySession
public class Auth0AuthenticationMechanism implements HttpAuthenticationMechanism {
    private final AuthenticationController authenticationController;
    private final IdentityStoreHandler identityStoreHandler;

    @Inject
    Auth0AuthenticationMechanism(AuthenticationController authenticationController, IdentityStoreHandler identityStoreHandler) {
        this.authenticationController = authenticationController;
        this.identityStoreHandler = identityStoreHandler;
    }

    @Override
    public AuthenticationStatus validateRequest(HttpServletRequest httpServletRequest,
                                                HttpServletResponse httpServletResponse,
                                                HttpMessageContext httpMessageContext) throws AuthenticationException {

        // Exchange the code for the ID token, and notify container of result.
        if (isCallbackRequest(httpServletRequest)) {
            try {
                Tokens tokens = authenticationController.handle(httpServletRequest, httpServletResponse);
                Auth0JwtCredential auth0JwtCredential = new Auth0JwtCredential(tokens.getIdToken());
                CredentialValidationResult result = identityStoreHandler.validate(auth0JwtCredential);
                return httpMessageContext.notifyContainerAboutLogin(result);
            } catch (IdentityVerificationException e) {
                return httpMessageContext.responseUnauthorized();
            }
        }
        return httpMessageContext.doNothing();
    }

    private boolean isCallbackRequest(HttpServletRequest request) {
        return request.getRequestURI().equals("/callback") && request.getParameter("code") != null;
    }
}
Was this helpful?
The class overrides the validateRequest method, which is called on every request to our application, and is responsible for notifying the container of the authentication status.
This sample uses the Authorization Code Flow to exchange an Authorization Code for a token during the authentication flow. If this request is to the /callback endpoint and contains the code request parameter, it does a few important things:
- Calls the
handlemethod of theAuthenticationControllerto exchange the Authorization Code for an ID token and an access token. - Uses the ID token to create a new
Auth0Credential. - Calls the
validatemethod of the customIdentityStoreimplementation to obtain the validation result. - Notifies the application container of the login status.
If the requested resource is not /callback, return httpMessageContext.doNothing() to allow the request processing to continue. You will see shortly how to use the authentication information when triggering authentication and displaying web views.
Finally, note that the @AutoApplySession annotation has been added to allow the container to create a session for the authenticated user.
Trigger authentication
To enable a user to log in, create a Servlet that will handle requests to the /login path:
// src/main/java/com/auth0/example/web/LoginServlet.java

@WebServlet(urlPatterns = "/login")
public class LoginServlet extends HttpServlet {
    private final Auth0AuthenticationConfig config;
    private final AuthenticationController authenticationController;

    @Inject
    LoginServlet(Auth0AuthenticationConfig config, AuthenticationController authenticationController) {
        this.config = config;
        this.authenticationController = authenticationController;
    }

    @Override
    public void doGet(HttpServletRequest request, HttpServletResponse response) throws ServletException, IOException {
        // URL where the application will receive the authorization code (e.g., http://localhost:3000/callback)
        String callbackUrl = String.format(
                "%s://%s:%s/callback",
                request.getScheme(),
                request.getServerName(),
                request.getServerPort()
        );

        // Create the authorization URL to redirect the user to, to begin the authentication flow.
        String authURL = authenticationController.buildAuthorizeUrl(request, response, callbackUrl)
                .withScope(config.getScope())
                .build();

        response.sendRedirect(authURL);
    }
}
Was this helpful?
The LoginController is responsible for redirecting the request to the proper authorization URL, where the user can authenticate with Auth0. It uses the AuthenticationController from the Auth0 Java MVC SDK to build the correct authorization URL, using the configuration values injected via Auth0AuthenticationConfig. By default, this sample requests the "openid profile email" scopes, to allow the application to retrieve basic profile information from the authenticated user. You can read more about these scopes in the OpenID Connect Scopes documentation.
Once the user has entered their credentials and authorized the requested permissions, Auth0 will issue a request to the callbackUrl, and include a code query parameter which can be exchanged for an ID token and an access token. Recall that the Auth0HttpAuthenticationMechanism created above handles this exchange so that it can notify the application container of authentication status. This allows the Servlet that handles requests to the /callback path to simply forward the request on to the originally requested resource prior to logging in, or simply redirect to the home page:
// src/main/com/auth0/example/web/CallbackServlet.java

@WebServlet(urlPatterns = {"/callback"})
public class CallbackServlet extends HttpServlet {

    @Override
    public void doGet(HttpServletRequest request, HttpServletResponse response) throws IOException {
        String referer = (String) request.getSession().getAttribute("Referer");
        String redirectTo = referer != null ? referer : "/";

        response.sendRedirect(redirectTo);
    }
}
Was this helpful?
Display user information
You can use the Auth0JwtPrincipal to get profile information for the authenticated user. The following code sample demonstrates how to use the claims on the ID token to set profile data as a request attribute:
// src/main/java/com/auth0/example/web/HomeServlet.java

@WebServlet(urlPatterns = "")
public class HomeServlet extends HttpServlet {

    @Override
    public void doGet(HttpServletRequest request, HttpServletResponse response) throws ServletException, IOException {
        Principal principal = request.getUserPrincipal();

        if (principal instanceof Auth0JwtPrincipal) {
            Auth0JwtPrincipal auth0JwtPrincipal = (Auth0JwtPrincipal) principal;
            request.setAttribute("profile", auth0JwtPrincipal.getIdToken().getClaims());
        }
        request.getRequestDispatcher("/WEB-INF/jsp/home.jsp").forward(request, response);
    }
}
Was this helpful?
You can then use that profile information in your view to display information about the user:
<!-- src/main/webapp/WEB-INF/jsp/fragments/navbar.jspf -->

<c:choose>
    <c:when test="${empty profile}">
        <li>
            <form action="/login" method="GET">
                <input type="submit" value="Login"/>
            </form>
        </li>
    </c:when>
    <c:otherwise>
        <li>
            <a href="#">
                <!-- Profile image should be set to the profile picture from the id token -->
                <img src="${profile.get('picture').asString()}" alt="Profile picture"/>
            </a>
            <div>
                <!-- Show the user's full name from the id token here -->
                <div>"${profile.get('name').asString()}"</div>
                <a href="/profile">Profile</a>
                <a href="/logout">Log out</a>
            </div>
        </li>
    </c:otherwise>
</c:choose>
Was this helpful?
Handle logout
To log a user out, you should clear the application session and log the user out of Auth0. This is handled in the LogoutServlet.
First, clear the session by calling request.getSession().invalidate(). Then construct the logout URL, being sure to include the returnTo query parameter, which is where the user will be redirected to after logging out. Finally, redirect the response to the application's logout URL:
// src/main/java/com/auth0/example/web/LogoutServlet.java

@WebServlet(urlPatterns = "/logout")
public class LogoutServlet extends HttpServlet {
    private final Auth0AuthenticationConfig config;

    @Inject
    LogoutServlet(Auth0AuthenticationConfig config) {
        this.config = config;
    }

    @Override
    protected void doGet(final HttpServletRequest request, final HttpServletResponse response) throws ServletException, IOException {
        clearSession(request);
        response.sendRedirect(getLogoutUrl(request));
    }

    private void clearSession(HttpServletRequest request) {
        if (request.getSession() != null) {
            request.getSession().invalidate();
        }
    }

    private String getLogoutUrl(HttpServletRequest request) {
        String returnUrl = String.format("%s://%s", request.getScheme(), request.getServerName());
        int port = request.getServerPort();
        String scheme = request.getScheme();

        if (("http".equals(scheme) && port != 80) ||
                ("https".equals(scheme) && port != 443)) {
            returnUrl += ":" + port;
        }

        returnUrl += "/";

        // Build logout URL like:
        // https://{YOUR-DOMAIN}/v2/logout?client_id={YOUR-CLIENT-ID}&returnTo=http://localhost:3000/
        String logoutUrl = String.format(
                "https://%s/v2/logout?client_id=%s&returnTo=%s",
                config.getDomain(),
                config.getClientId(),
                returnUrl
        );

        return logoutUrl;
    }
}
Was this helpful?
Run the sample
To build and run the sample, execute the wildfly:run Maven goal to start an embedded WildFly application server with this application deployed to it. See the WildFly Maven Plugin documentation for more information.
If you are using Linux or MacOS:
./mvnw clean wildfly:runWas this helpful?
Windows:
mvnw.cmd clean wildfly:runWas this helpful?
Point your browser to http://localhost:3000. Follow the Log In link to log in or sign up to your Auth0 tenant.
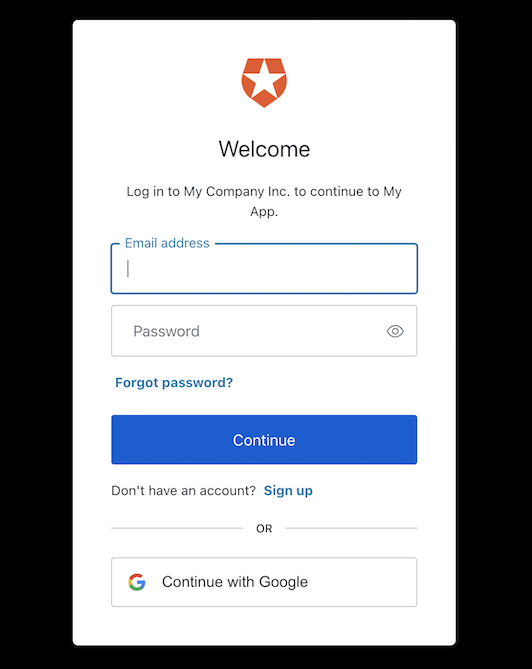
Upon successful login, you will see the user's profile picture and a drop-down menu where the Log In link was. You can then view the user's profile page by clicking the Profile link. You can log out by clicking the Logout link in the drop-down menu.