

Transcript
Good afternoon. This is Kassandra with Auth0. This webinar is about JWTs. So what I'm going to do is go over what JWTs are used for and then I'm actually going to write a small note application that generates JWTs and show you how they're used in the debugger so that you can write and debug your own JWTs. I have a questions panel open and I will check it from time to time. So if you have a question, feel free to put it in there. Let's get started. I'm going to start by sharing my screen and going over here.
This rather dry looking document is the RFC for JSON web tokens. It hasn't been changed since 2015. However, I like to bring this up because it's actually one of the easier documents I've found to read. The reason I pull it up is to start talking about what a JWT is. A JWT is a series of JSON objects that are base 64 encoded and then signed with a key. So the reason you would use these, the two most common are used as authentication tokens because you can verify the sender using the key, which is usually signed with a secret, or passing data between two parties, knowing that the party that sent the data is who they say they are, again, because the key is signed with a secret.
So when we talk about the JSON objects that make up a JWT we're going to start talking about claims. Claims is really just a fancy word for JSON key value pairs, but there are three types of claims, and I'm going to go over them. On my screen now is a list of what are called the reserved or registered claims. These are claims that are held by the JWT standard itself in order to make sure that JWTs can be globally used. These claims are three letters long. That is so you basically have a more compact JSON object. One of the reasons we use JWTs is because they're compact. Registered ones include issuer, expiration time, issued at, which we'll use in our application, and you'll definitely want to look up some of these because they are used on a regular basis, especially GTI, which is an ID or a globally used ID for that particular JSON web token. We'll check the questions. Nope, nothing yet.
As for public claims, these are claims that are registered in this particular document, and they are again to make JWTs more global. It's just this way with public claims you don't have to modify the RFC every time you want to add a new global claim. As you can see, a lot of the public claims that are available are due to Open ID. Open ID Connect, which is the standard that gives identity to...it's an identity wrapper around the 0Auth authentication specification, is where a lot of our public claims come from, including things like name, email, picture, phone number, things that you would use in an Open ID Connect identity.
So the last website I'm going to show you before we start working on our JWT generator is the JWT debugger. This is located at JWT.io, and you click on Debugger. What we've got here is, on this left side we've got our JSON web token or JWT. It puts the header in red, the body magenta, and the key in this light blue color. As you can see on the right, it's decoded the header and payload, and it's verifying the signature. Now, you can see the secret is changeable, and this is where the validity of your JSON web tokens comes into play. If I put a different secret than the one that it's expecting, it will say "Invalid signature." So we'll know that it was not sent with the correct secret. We'll talk a little bit more about secrets as we generate our JSON web tokens. No questions in the bin, so I'll keep going.
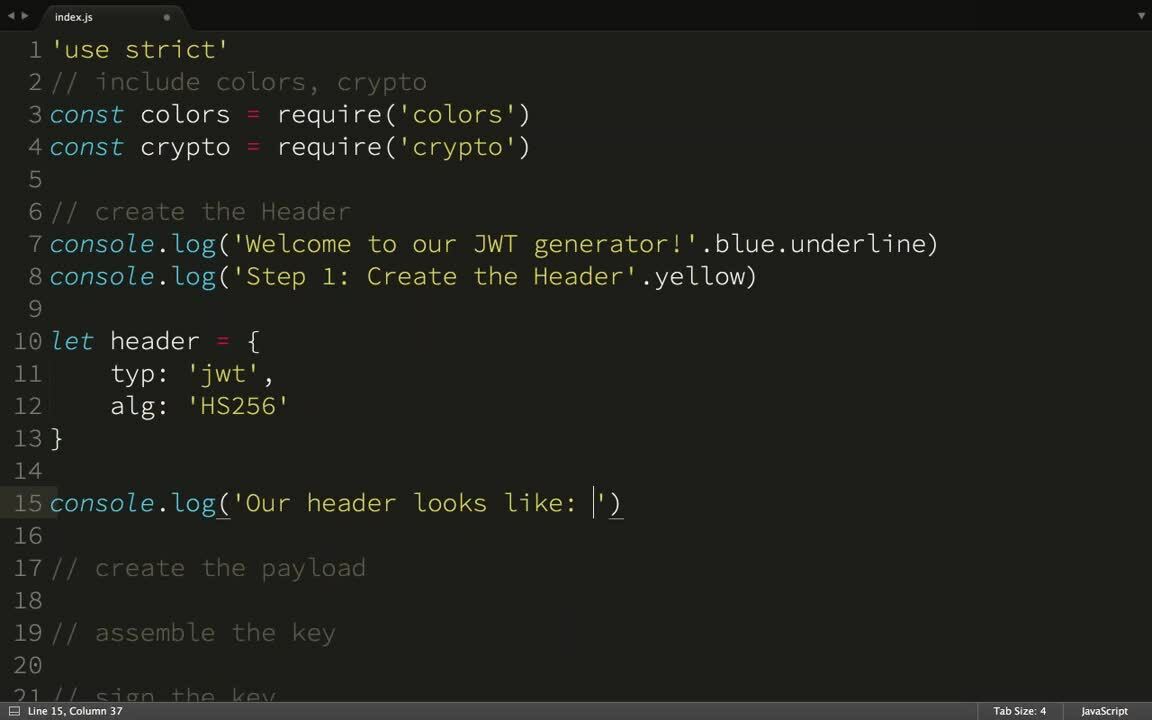
What I'm going to start with is I have my terminal open and I'm going to run Node Mon, which is a process that will run my little node scripts. Every time I save it it will refresh it. What I've got in that node file right now is just a bunch of comments. Those are mostly so I don't forget anything. First, some basic house tidying. I'm going to bring in the colors module, which I'm going to use so that our console output is colored in a way that we can see what's going on, and the crypto-module. We're bringing this in for use with the key. When we sign the key we'll use that. I'm also going to set strict mode. It would help if I get...there we go. I'm going to go back to my terminal. Okay, cool. Nothing's gone wrong.
Like I said, the JSON web token consists of a header, a payload, and a key. What we're going to do is welcome the user to our little application here. The reason I used colors is, like I said, it makes it easier to see what's going on in the terminal. So now you can see this, "Welcome to our JWT generator." I'll make this a little bigger. So I've got our JWT generator. Now I'm going to say step one is creating our header. Checking it, and it works.
So our header usually only consists of two registered claims. These claims are TYP, which stands for type, and it's JWT because it's a JSON web token, and ALG, which stands for algorithm. We're going to use HST56. Now, you can sign JSON web tokens symmetrically, which is what we're doing here. What you use is a secret. That's usually in the form of a string which is shared with the server and the client. However, you can also sign JWTs asymmetrically with a public and private key pair using RSA256. So keep that in mind if you're interested in an asymmetrical way to check that the party is valid. You can use a public/private key pair.
So now that we have our header, let's show our user what our header looks like. Actually, before I do that I'm going to say that our header is JSON.stringify. That's so our header is already in a string. Then I go over here, and as you can see, you can now see what our header looks like as a string. So in order to get our header from that to in the debugger, what we're going to do is base 64 encode it. In order to do that, what we're going to do is say the header is a new buffer with the contents of the original string header, and then call two string on it with base 64 as the argument. That will create our base 64 encoded string.
Then we're going to show our users what that base 64 encoded header looks like. Then we're going to tell the user the header is complete. I'm going to make my header that's encoded red to make it a little easier to see. So when I go over to my terminal you can now see again that same JSON object, and then you can see it base 64 encoded. So our header is complete. Now I'm going to set up our JSON payload.
First I'm going to tell the user that that is step two. Then I'm going to actually create my payload object. Now, I'm going to use a few different claims to go over, again, the difference between registered claims, public claims, and private claims. So I went over registered and public, but I didn't go over private. Private is any claim that you wish to use yourself that's not preregistered either with the specification or with the database. I'm going to check the questions. I just realized it's been a bit. Okay, cool.
I'm going to use one of each in this payload. First I'm going to use IAT, which is a registered claim. That stands for issued at. So I'm going to use date.now. That will be our issued at time. I'm going to use the public claim of name because, like I showed you over here, in our public claim database, you can see name, full name, and that's registered by the Open ID Connect. So it's actually my full given name. So I'm going to put that there instead. Then finally a private claim. I'm just going to call it My Claim. Again, this is any claim that is not registered either with the specification or the public database. I'm just going to call that True.
So now I'm going to show the user what my payload looks like. I almost forgot, JSON.stringify. Then payload.green. Let's check the output. As you can see, I've got my time stamp for IAT and then my name, and the private claim My Claim. So now just like before I'm going to base 64 encode this. I'm going to say Payload = New Buffer with the original payload.twostring with the argument base 64. Then I'm going to show this to the user.
Now you can see our payload right there. So now that we have our header and our payload, it's time to construct the key. Now, there are two steps to constructing the key, assembly and then signing it. I'm going to tell the users that the payload is complete. Now I'm going to assemble the key. The key is the header concatenated with the period concatenated with the payload all base 64 encoded. So I'm going to say, "Let key equal header plus a period plus the payload." Then I'm going to show this to the user. Also, notice that step 3A is assembling the key.
Our key looks like this. Now when I look at the terminal, as you can see I've got my key here and it looks like the header and then a dot and then the payload, just like I said. Now that we've assembled our key, it's time to sign it. This is where the secret comes in. I'm going to tell the user that step 3B is signing the key. So I'm going to create a secret. My secret is going to be a string. Remember, you can use a string with the HST56 or you can use a public/private key pair. However, public/private key pair isn't regularly used. So that's why we're using symmetric today.
So we've got our secret and we're going to say our secret is 'nyancat'. I'm going to tell our user the secret is...it would help if I put Secret instead of 'nyancat', because otherwise there would be a bit of a problem. So we've got our secret, and I go here, and you can see our secret is 'nyancat'. Now we've got our secret and our unsigned key. We're going to sign our key. This is why we required it in the crypto-library earlier. Notice my Const HMAC is a crypto.create HMAC. I want to use the SHA256 encryption and I'm going to pass out my secret. Then I'm going to update the HMAC with my key. Then finally I'm going to say, "Key = HMAC.digest base 64." So it's base 64 encoded after signing, just like everything else. I'll make sure I did all that right. I did.
So now we can show the user . . . Key.red. So you can see our key here. All right. Now that we have the key and it's signed, the last step is putting it all together. I'm going to tell the user, and the key is complete.
To put it all together, it will look remarkably like when we put together the key. A finished JWT is the header concatenated with a period, concatenated with the payload, concatenated with a period, concatenated with a signed key. So now I'm going to show the user.
So when I go over here, as you can see, our JWT is here. Now, I mentioned the debugger earlier and I'm going to show it to you again. First I'm going to check the questions bin. Okay, I don't see anything. Now that we have our finished JWT I'm going to show you how the debugger works with our JWT as opposed to the pre-populated one. So when we go back to JWT.io I'm going to paste our brand new key in there. Just like before I highlighted the header, payload, and the key for us. Now you'll note when I leave it alone and it says Secret, this is an invalid signature. However, everything else is there. That's because we didn't encrypt any of the header or the payload. We just base 64 encoded it. So getting all of that data back out was just base 64 unencoding it, but this invalid signature means we don't have the same secret as our server. So we can't trust that it came from the right source.
So what I'm going to do is type the secret that we used in our application, 'nyancat', and as you can see the signature is now verified. That's where the security of JWTs comes in. If that signature isn't verified, you cannot trust that the JWT came from the source that it claims to be coming from. Otherwise they would have either that shared secret or a public/private key match.
I'm Kassandra with Auth0, and that's our webinar on JWTs. Thanks for listening!