.NET 8 introduces a powerful and flexible approach to rendering Blazor applications. The well-known Server and WebAssembly hosting models allow you to render your application's UI on the server or in the browser. Now you can control where and how your UI is rendered at the component level of a Blazor application. This allows you to improve the performance and user experience of your application. However, the downside of this new model is that authentication and authorization management becomes more complex.
This article will show you how to add Auth0 authentication to a Blazor application using the most dynamic render mode and give you the foundation to understand how to use the other Blazor render modes.
The New Blazor Render Modes
Before .NET 8, Blazor supported two hosting models:
- Blazor Server, which runs your application on the server, and user UI interactions that occur in the browser are sent to the server via SignalR.
- Blazor WebAssembly (WASM), which runs your application compiled in WebAssembly entirely in the browser.
To learn more about adding authentication to Blazor Server and WebAssembly applications in .NET 7.0, check out these articles:
These hosting models allow you to render your application UI on the server or in the browser and manage its interactivity accordingly.
.NET 8 introduces a new flexible way to control UI rendering and interactivity through render modes. The following render modes are available:
- Static Server-Side Rendering (Static SSR). This mode renders the UI on the server side without any interactivity. This means that your users won't be able to interact with the UI.
- Interactive Server Rendering. This mode renders the UI on the server, but allows you to add interactivity. User interaction with the UI is handled on the server via SignalR, just as it is with Blazor Server.
- Interactive WASM Rendering. With this render mode, your UI is rendered in the browser and its interactivity is also handled in the browser.
- Interactive Auto Rendering. This mode mixes the Server and WASM modes. The first time a UI component is requested, it is rendered on the server while a WASM version is downloaded to the browser in the background. Subsequent requests of the UI component are rendered on the browser.
To learn more about Blazor's render modes, read this excellent introduction.
The render modes can be applied at the component or application level, giving you a flexible range of rendering and interactivity from static websites (Static SSR) to SPAs (Blazor WebAssembly).
Prior to the official release of .NET 8, this new Blazor application model had many different names: Blazor United, Blazor Full Stack, etc. Now that .NET 8 is out, we call it Blazor Web App, the same name as the built-in template in Visual Studio and the .NET CLI.
For more details about using the Blazor render modes, see the official documentation.
Why Is Blazor Authentication More Complicated Now?
Adding authentication and managing authorization is pretty straightforward for the classic Blazor Server and WebAssembly hosting models. In the case of Blazor Server, all the rendering happens on the server. You can think of it as a regular web application, so you can use the Auth0 ASP.NET Core Authentication SDK as explained here. In the case of Blazor WebAssembly, all rendering happens in the browser. You can consider it a SPA and use the WebAssembly authentication package as shown here.
However, the new render modes allow you to create Blazor applications whose UI can be rendered on the server or the client at the component level. This means that your application is the result of combining a regular web app and a SPA. In addition, the Interactive Auto mode can render the same component on the server and in the browser. In other words, you no longer have a clear separation between what is rendered on the server and what is rendered on the browser.
The real difficulty in managing authentication and authorization in this context is not where the rendering takes place per se, but how to determine whether or not a user can see a specific component based on its authentication state. If a user authenticates after the WebAssembly part of your Blazor application has been downloaded to the browser, how does the browser know the new user authentication state?
This is the big problem with the new Blazor application model. You will learn how to deal with it using a Blazor application that uses the Interactive Auto render mode as a reference. This render mode contains the nuances of all the other modes, so it turns out to be the more challenging render mode for authentication and authorization.
Adding Auth0 Authentication
To see how authentication and protected access to the UI in an Interactive Auto Blazor app works in practice, you will create a new Blazor application and add support for Auth0 authentication.
Create the basic Blazor application
Let's start by creating a new Blazor application with Interactive Auto render mode. Make sure you have .NET 8 installed on your machine and run the following command in a terminal window:
dotnet new blazor -int Auto -o BlazorIntAuto
This command creates a new BlazorIntAuto folder with a .NET solution consisting of two projects:
- The
BlazorIntAutoproject, which contains the server part of your Blazor application, - The
BlazorIntAuto.Clientproject, which contains the WebAssembly components that will run in the browser.
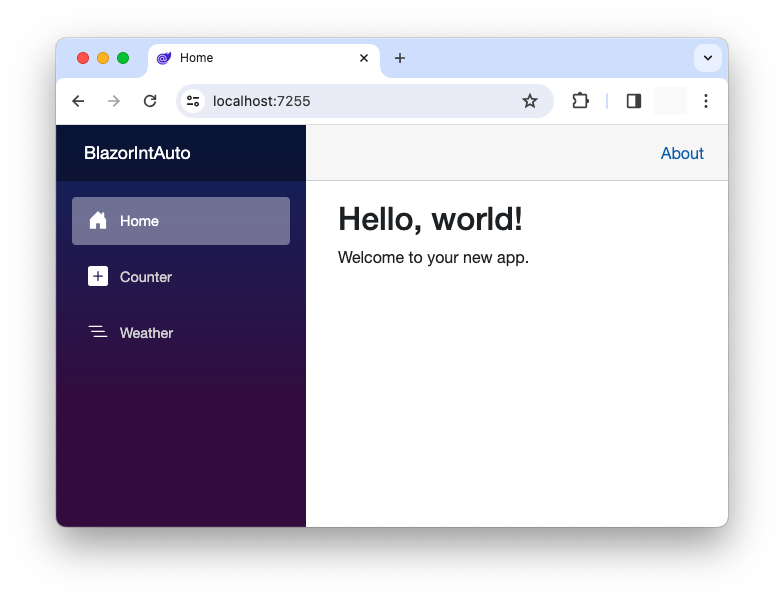
The resulting application is the classic weather forecast app that comes with the built-in .NET templates, as you can see by running the following command in the root folder of the .NET solution:
dotnet run --project BlazorIntAuto --launch-profile https
By default, the Blazor project runs with the HTTP profile, which is not appropriate for our context, where HTTPS is required. Read this document to learn more about launch profiles.
You will see the following page in your browser:
In the rest of this article, you will add Auth0 authentication to this Blazor app and see how to customize its code to manage the user authentication state for access control.
This application has a server-rendered component (BlazorIntAuto/Components/Pages/Weather.razor) and an Interactive Auto rendered component (BlazorIntAuto.Client/Pages/Counter.razor). You will focus on these components to see how authentication state checking works.
If you look at the source code of the
Weather.razorcomponent, you will see that it is marked with theStreamRenderingattribute. This is a special case of the Interactive Server render mode, which improves the user experience for long-running asynchronous tasks. To learn more about streaming rendering, read this document.
Register your Blazor app with Auth0
First, access the Auth0 dashboard to register your Blazor application. If you don't have an Auth0 account, you can sign up for a free one now.
In the dashboard, move to the Applications section and follow these steps:
- Click on Create Application.
- Enter a friendly name for your application (for example, Blazor Web App) and select Regular Web Applications as an application type.
- Finally, click the Create button.
These steps will make Auth0 aware of your Blazor application.
Once the application is registered, go to the Settings tab and take note of your Auth0 domain and client ID. Then, in the same form, assign the value http://localhost:<YOUR_PORT_NUMBER>/callback to the Allowed Callback URLs field and the value http://localhost:<YOUR_PORT_NUMBER>/ to the Allowed Logout URLs field. Replace the <YOUR_PORT_NUMBER> placeholder with the actual port number assigned to your application. In my case, these values are https://localhost:7255/callback and https://localhost:7255/.
The first value tells Auth0 which URL to call back after the user authentication. The second value tells Auth0 what URL to redirect a user to after they log out.
Click the Save Changes button to apply them.
Configure your Blazor App
Now, back in your Blazor application, open the appsettings.json file in the BlazorIntAuto subfolder and replace its content with the following:
// BlazorIntAuto/appsettings.json
{
  "Logging": {
    "LogLevel": {
      "Default": "Information",
      "Microsoft.AspNetCore": "Warning"
    }
  },
  "AllowedHosts": "*",
  "Auth0": {
    "Domain": "YOUR_AUTH0_DOMAIN",
    "ClientId": "YOUR_CLIENT_ID"
  }
}
Replace the placeholders YOUR_AUTH0_DOMAIN and YOUR_CLIENT_ID with the respective values taken from the Auth0 dashboard.
Next, install the Auth0 ASP.NET Core Authentication SDK by running the following command in the BlazorIntAuto subfolder:
dotnet add package Auth0.AspNetCore.Authentication
The Auth0 ASP.NET Core SDK allows you to easily integrate OpenID Connect-based authentication into your application without having to worry about all the low-level details.
Finally, open the BlazorIntAuto/Program.cs file and modify its content as follows:
// BlazorIntAuto/Program.cs

using BlazorIntAuto.Client.Pages;
using BlazorIntAuto.Components;
using Auth0.AspNetCore.Authentication; // 👈 new code

var builder = WebApplication.CreateBuilder(args);

// 👇 new code
builder.Services
    .AddAuth0WebAppAuthentication(options => {
      options.Domain = builder.Configuration["Auth0:Domain"];
      options.ClientId = builder.Configuration["Auth0:ClientId"];
    });
// 👆 new code

// Add services to the container.
builder.Services.AddRazorComponents()
    .AddInteractiveServerComponents()
    .AddInteractiveWebAssemblyComponents();

// ...existing code...

app.Run();
You have added a reference to the Auth0.AspNetCore.Authentication namespace. You then invoked the AddAuth0WebAppAuthentication() method with the Auth0 domain and client id as arguments. These Auth0 configuration parameters come from the appsetting.json configuration file that you prepared earlier.
With these changes, your Blazor application has the infrastructure to support authentication via Auth0.
Secure your Blazor application
Now you can prevent unauthenticated users from accessing specific areas of your Blazor application.
Protect your Blazor app's UI
Let's say you want to protect the weather forecast and the counter page. First, you need to enable access control in your application. You can do this by replacing the content of the BlazorIntAuto/Components/Routes.razor component as follows:
<!-- BlazorIntAuto/Components/Routes.razor -->

<Router AppAssembly="@typeof(Program).Assembly" AdditionalAssemblies="new[] { typeof(Client._Imports).Assembly }">
    <Found Context="routeData">
        <AuthorizeRouteView RouteData="@routeData" DefaultLayout="@typeof(Layout.MainLayout)" />
        <FocusOnNavigate RouteData="@routeData" Selector="h1" />
    </Found>
</Router>
You have replaced the <RouteView> component with the <AuthorizeRouteView> component, which allows your app to display protected components only to authorized users.
Next, open the BlazorIntAuto/Components/Pages/Weather.razor file and add the Authorize attribute as shown in the following code snippet:
<!-- BlazorIntAuto/Components/Pages/Weather.razor -->
@page "/weather"
@attribute [Authorize] <!-- 👈 new code -->
@attribute [StreamRendering]

<PageTitle>Weather</PageTitle>

<h1>Weather</h1>

<!-- ...existing code... -->
Do the same with the Counter.razor component:
<!-- BlazorIntAuto.Client/Pages/Counter.razor -->

@page "/counter"
@attribute [Authorize] <!-- 👈 new code -->
@rendermode InteractiveAuto

<PageTitle>Counter</PageTitle>

<h1>Counter</h1>

<!-- ...existing code... -->
To make these changes effective, you need to enable authorization support for both Blazor projects. Open BlazorIntAuto/Components/_Imports.razor and add the lines highlighted below:
// BlazorIntAuto/Components/_Imports.razor

@using System.Net.Http
@using System.Net.Http.Json
@using Microsoft.AspNetCore.Components.Forms
@using Microsoft.AspNetCore.Components.Routing
@using Microsoft.AspNetCore.Components.Web
@using static Microsoft.AspNetCore.Components.Web.RenderMode
@using Microsoft.AspNetCore.Components.Web.Virtualization
@using Microsoft.JSInterop
@using BlazorIntAuto
@using BlazorIntAuto.Client
@using BlazorIntAuto.Components
@using Microsoft.AspNetCore.Authorization             // 👈 new code
@using Microsoft.AspNetCore.Components.Authorization  // 👈 new code
Then, open the BlazorIntAuto.Client/_Imports.razor file and add the line highlighted in the following code:
// BlazorIntAuto.Client/_Imports.razor

@using System.Net.Http
@using System.Net.Http.Json
@using Microsoft.AspNetCore.Components.Forms
@using Microsoft.AspNetCore.Components.Routing
@using Microsoft.AspNetCore.Components.Web
@using static Microsoft.AspNetCore.Components.Web.RenderMode
@using Microsoft.AspNetCore.Components.Web.Virtualization
@using Microsoft.JSInterop
@using BlazorIntAuto.Client
@using Microsoft.AspNetCore.Authorization  // 👈 new code
Your UI components are now protected from unauthorized access.
Add login and logout support
Now you need a way to let your users authenticate and access the protected areas of your application. For this purpose, open the Program.cs file in the BlazorIntAuto folder and make the changes highlighted in the following code:
// BlazorIntAuto/Program.cs

using BlazorIntAuto.Client.Pages;
using BlazorIntAuto.Components;
using Auth0.AspNetCore.Authentication;
using Microsoft.AspNetCore.Authentication;          // 👈 new code
using Microsoft.AspNetCore.Authentication.Cookies;  // 👈 new code

var builder = WebApplication.CreateBuilder(args);

// ...existing code...

app.UseAntiforgery();

// 👇 new code
app.MapGet("/Account/Login", async (HttpContext httpContext, string returnUrl = "/") =>
{
  var authenticationProperties = new LoginAuthenticationPropertiesBuilder()
          .WithRedirectUri(returnUrl)
          .Build();

  await httpContext.ChallengeAsync(Auth0Constants.AuthenticationScheme, authenticationProperties);
});

app.MapGet("/Account/Logout", async (HttpContext httpContext) =>
{
  var authenticationProperties = new LogoutAuthenticationPropertiesBuilder()
          .WithRedirectUri("/")
          .Build();

  await httpContext.SignOutAsync(Auth0Constants.AuthenticationScheme, authenticationProperties);
  await httpContext.SignOutAsync(CookieAuthenticationDefaults.AuthenticationScheme);
});
// 👆 new code

app.MapRazorComponents<App>()
    .AddInteractiveServerRenderMode()
    .AddInteractiveWebAssemblyRenderMode()
    .AddAdditionalAssemblies(typeof(Counter).Assembly);

app.Run();
You have added a reference to the Microsoft.AspNetCore.Authentication and Microsoft.AspNetCore.Authentication.Cookies namespaces and added two API endpoints: /Account/Login and /Account/Logout.
The /Account/Login endpoint creates a set of authentication properties required for the login and triggers the authentication process through Auth0.
The /Account/Logout endpoint closes the user's session on your Blazor application and on Auth0.
Now let's make these endpoints available on the UI.
Create a Login.razor file in the BlazorIntAuto/Components folder with the following code:
<!-- BlazorIntAuto/Components/Login.razor -->

<AuthorizeView>
    <Authorized>
        <a href="Account/Logout">Log out</a>
    </Authorized>
    <NotAuthorized>
        <a href="Account/Login">Log in</a>
    </NotAuthorized>
</AuthorizeView>
This markup defines a component that displays a login link when the user is not authenticated and a logout link when the user is authenticated.
Add the Login.razor component to the UI by editing the MainLayout.razor component in the BlazorIntAuto/Components/Layout folder as follows:
<!-- BlazorIntAuto/Components/Layout/MainLayout.razor -->

@inherits LayoutComponentBase

<div class="page">

  <!-- ...existing code... -->

      <div class="top-row px-4">
          <Login />  <!-- 👈 new code -->
          <a href="https://learn.microsoft.com/aspnet/core/" target="_blank">About</a>
      </div>

  <!-- ...existing code... -->
</div>
Now you have added support for users to log in and out of your application.
Test your Blazor application
Your Blazor application now has a Log in link in the upper right corner of the page, as shown in this image:
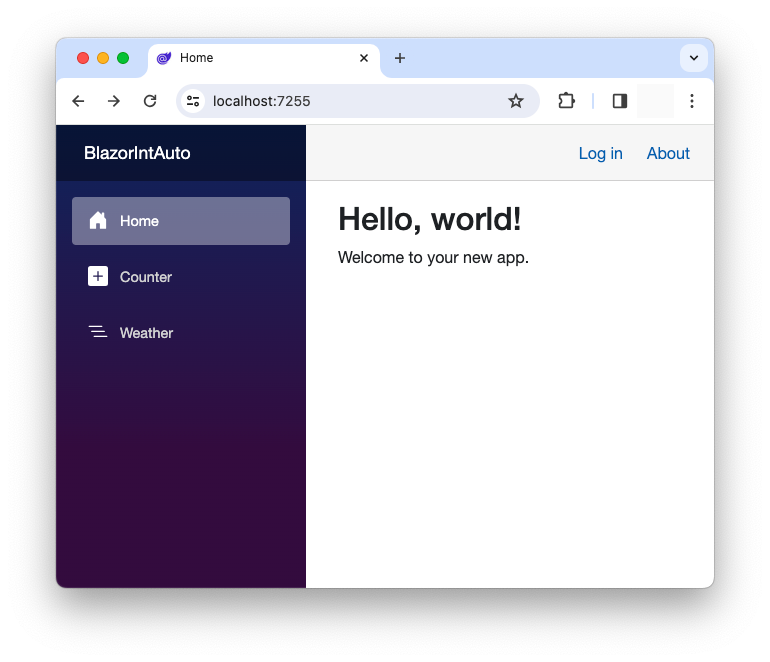
If you try to navigate to the Counter and Weather pages, you will be redirected to the Auth0 Universal Login page because these pages are protected. After logging in, you will see the Log in link replaced with a Log out link and you will be able to access the Counter and Weather pages.
Awesome! You have added authentication to your Interactive Auto Blazor application and protected your UI from unauthorized access! 🎉
Actually, your work is not finished yet, as you will learn soon.
A new Auth0-powered .NET app in less than a minute? Try out our templates
Install the NuGet package
Accessing the User Profile
Most of the time, your application will need to access some information about the authenticated user, such as their name, email address, picture, etc. The Auth0 ASP.NET Core Authentication SDK takes care of retrieving this information for you during the authentication process and it will be available in the Blazor context through the AuthenticationState.
Suppose you want to display the user's name on the Weather page. You need to change its code as shown below:
// BlazorIntAuto/Components/Pages/Weather.razor

@page "/weather"
@attribute [Authorize]
@attribute [StreamRendering]

<PageTitle>Weather</PageTitle>

<h1>Weather</h1>

<p>Hello @Username!</p>  <!-- 👈 new code -->
<p>This component demonstrates showing data.</p>

<!-- ...existing code... -->

@code {
  private WeatherForecast[]? forecasts;
  // 👇 new code
  [CascadingParameter]
  private Task<AuthenticationState>? authenticationState { get; set; }

  private string Username = "";
  // 👆 new code

    protected override async Task OnInitializedAsync()
    {
      // ...existing code...

      // 👇 new code
      if (authenticationState is not null)
      {
        var state = await authenticationState;

        Username = state?.User?.Identity?.Name ?? string.Empty;
      }
      // 👆 new code
    }

  // ...existing code...
}
You have defined the authenticationState property and marked it with the CascadingParameter attribute. A cascading parameter ensures that data flows along a hierarchy of Razor components and that they are kept in sync. The authenticationState cascading parameter gives you information about the user's current authentication state. You get the actual authentication state when you invoke it with await authenticationState. Thanks to the authentication state, you can extract the name of the current user and assign it to the Username variable. The Username variable is used in the markup of the component to display the user's name.
Note: The steps leading up to this stage of the application are those that allow to integrate Auth0 into a Blazor application in Interactive Server mode. In other words, if you are building an application that does not use WebAssembly components, as opposed to the application we are creating in this article, you can stop at this point.
You can do the same thing with the Counter component. Edit the Counter.razor file in the BlazorIntAuto.Client/Pages folder and make the following changes:
// BlazorIntAuto.Client/Pages/Counter.razor

@page "/counter"
@attribute [Authorize]
@rendermode InteractiveAuto

<PageTitle>Counter</PageTitle>

<h1>Counter</h1>

<p>Hello @Username!</p>  <!-- 👈 new code -->

<!-- ...existing code... -->

@code {
  private int currentCount = 0;
  // 👇 new code
  [CascadingParameter]
  private Task<AuthenticationState>? authenticationState { get; set; }

  private string Username = "";

  protected override async Task OnInitializedAsync()
  {
    if (authenticationState is not null)
    {
      var state = await authenticationState;

      Username = state?.User?.Identity?.Name ?? string.Empty;
    }
    await base.OnInitializedAsync();
  }
  // 👆 new code

  private void IncrementCount()
  {
      currentCount++;
  }
}
As you can see, you have made similar changes here as you did with the Weather component.
Unlike the server project, where we have already installed support for authentication and authorization with the Auth0 SDK, in the client project we need to install specific support for authentication state. So, go to the BlazorIntAuto.Client folder and run the following command:
dotnet add package Microsoft.AspNetCore.Components.WebAssembly.Authentication
Then, add the line highlighted below to the _Imports.razor file:
// BlazorIntAuto.Client/_Imports.razor

@using System.Net.Http
@using System.Net.Http.Json
@using Microsoft.AspNetCore.Components.Forms
@using Microsoft.AspNetCore.Components.Routing
@using Microsoft.AspNetCore.Components.Web
@using static Microsoft.AspNetCore.Components.Web.RenderMode
@using Microsoft.AspNetCore.Components.Web.Virtualization
@using Microsoft.JSInterop
@using BlazorIntAuto.Client
@using Microsoft.AspNetCore.Authorization
@using Microsoft.AspNetCore.Components.Authorization  // 👈 new code
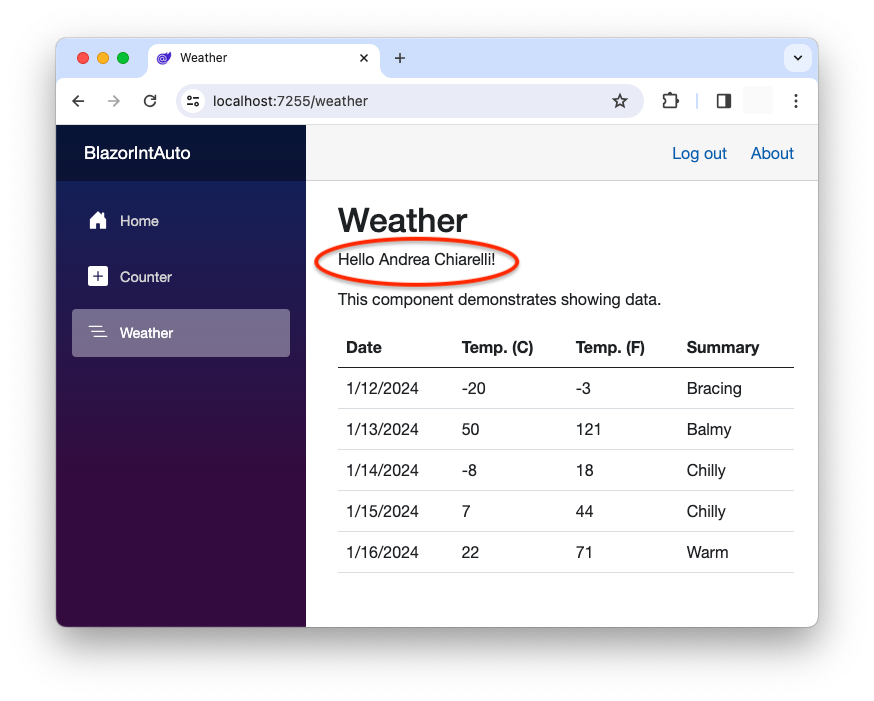
Now you can run your Blazor application, log in, and go to the Weather page. You will see your name as expected, as shown in the following picture:
However, if you go to the Counter page, you will not see your name there:
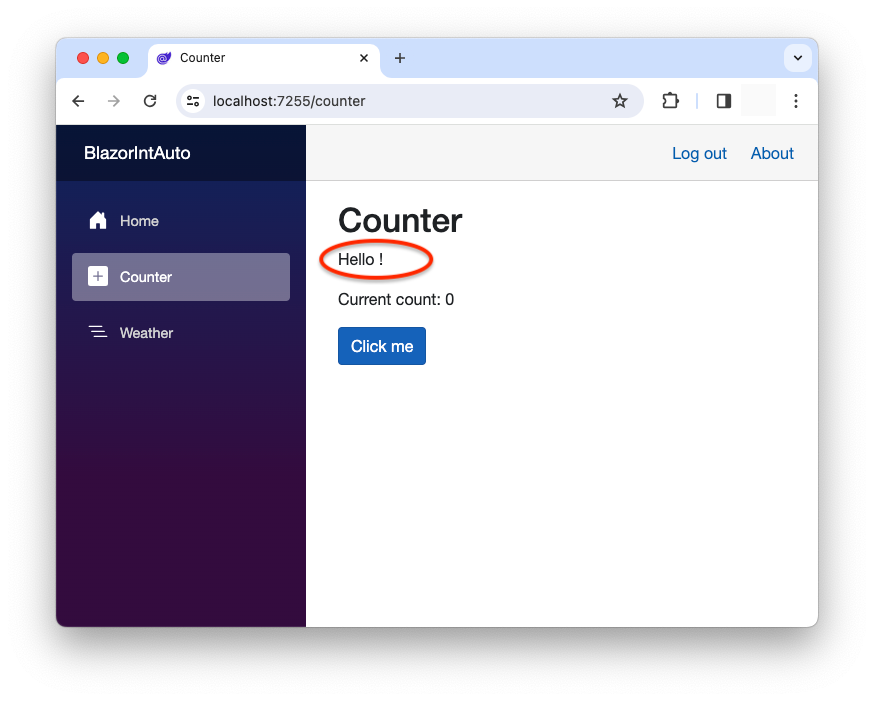
What is happening? Why is the username not showing? 🤔
Consider this.
The user authentication process takes place on the server side of your Blazor application. In particular, the user authentication state remains in the server part of your application.
The Weather page is a server-rendered component. When it's rendered, the user authentication state is available and up-to-date on the server side.
The Counter page is a client-rendered component. This means that it lives on the browser and does not have access to the user's authentication state that lives on the server.
How can you sync the authentication state of the WebAssembly part with the authentication state of the server part of your Blazor app?
Syncing the Authentication State
To sync the client authentication state with the server authentication state, you can rely on the PersistingRevalidatingAuthenticationStateProvider class. This class is an AuthenticationStateProvider that lives on the server side and uses the PersistentComponentState to pass the user authentication state to the client. Let's see how to use this class in our case.
Serialize the authentication state on the server
First, create an AuthenticationStateSyncer folder in the BlazorIntAuto project folder and add a UserInfo.cs file with the following code:
// BlazorIntAuto/AuthenticationStateSyncer/UserInfo.cs

public class UserInfo
{
  public string UserId { get; set; }
  public string Name { get; set; }
  public string Email { get; set; }
}
This class represents the main user data. You can customize it based on your needs, provided that your ID token has the proper claims.
In the same folder, create a second file named PersistingRevalidatingAuthenticationStateProvider.cs and add the following code:
// BlazorIntAuto/AuthenticationStateSyncer/PersistingRevalidatingAuthenticationStateProvider.cs

using Microsoft.AspNetCore.Components;
using Microsoft.AspNetCore.Components.Authorization;
using Microsoft.AspNetCore.Components.Server;
using Microsoft.AspNetCore.Components.Web;
using Microsoft.AspNetCore.Identity;
using Microsoft.Extensions.Options;
using System.Diagnostics;
using System.Security.Claims;

public class PersistingRevalidatingAuthenticationStateProvider : RevalidatingServerAuthenticationStateProvider
{
  private readonly IServiceScopeFactory _scopeFactory;
  private readonly PersistentComponentState _state;
  private readonly IdentityOptions _options;

  private readonly PersistingComponentStateSubscription _subscription;

  private Task<AuthenticationState>? _authenticationStateTask;

  public PersistingRevalidatingAuthenticationStateProvider(
      ILoggerFactory loggerFactory,
      IServiceScopeFactory scopeFactory,
      PersistentComponentState state,
      IOptions<IdentityOptions> options)
      : base(loggerFactory)
  {
    _scopeFactory = scopeFactory;
    _state = state;
    _options = options.Value;

    AuthenticationStateChanged += OnAuthenticationStateChanged;
    _subscription = state.RegisterOnPersisting(OnPersistingAsync, RenderMode.InteractiveWebAssembly);
  }

  protected override TimeSpan RevalidationInterval => TimeSpan.FromMinutes(30);

  protected override async Task<bool> ValidateAuthenticationStateAsync(
      AuthenticationState authenticationState, CancellationToken cancellationToken)
  {
    // Get the user manager from a new scope to ensure it fetches fresh data
    await using var scope = _scopeFactory.CreateAsyncScope();
    return ValidateSecurityStampAsync(authenticationState.User);
  }

  private bool ValidateSecurityStampAsync(ClaimsPrincipal principal)
  {
    if (principal.Identity?.IsAuthenticated is false)
    {
      return false;
    }
    return true;
  }

  private void OnAuthenticationStateChanged(Task<AuthenticationState> authenticationStateTask)
  {
    _authenticationStateTask = authenticationStateTask;
  }

  private async Task OnPersistingAsync()
  {
    if (_authenticationStateTask is null)
    {
      throw new UnreachableException($"Authentication state not set in {nameof(RevalidatingServerAuthenticationStateProvider)}.{nameof(OnPersistingAsync)}().");
    }

    var authenticationState = await _authenticationStateTask;
    var principal = authenticationState.User;

    if (principal.Identity?.IsAuthenticated == true)
    {
      var userId = principal.FindFirst(_options.ClaimsIdentity.UserIdClaimType)?.Value;
      var name = principal.FindFirst("name")?.Value;
      var email = principal.FindFirst("email")?.Value;

      if (userId != null && name != null)
      {
        _state.PersistAsJson(nameof(UserInfo), new UserInfo
        {
          UserId = userId,
          Name = name,
          Email = email
        });
      }
    }
  }

  protected override void Dispose(bool disposing)
  {
    _subscription.Dispose();
    AuthenticationStateChanged -= OnAuthenticationStateChanged;
    base.Dispose(disposing);
  }
}
This is the key class that starts the authentication state synchronization. Roughly speaking, it periodically checks the user authentication state and persists it in a JSON object that is sent to the client.
Let's take a look at the relevant parts of its code, starting with the class constructor:
// BlazorIntAuto/AuthenticationStateSyncer/PersistingRevalidatingAuthenticationStateProvider.cs

// ...other code...

  public PersistingRevalidatingAuthenticationStateProvider(
      ILoggerFactory loggerFactory,
      IServiceScopeFactory scopeFactory,
      PersistentComponentState state,
      IOptions<IdentityOptions> options)
      : base(loggerFactory)
  {
    _scopeFactory = scopeFactory;
    _state = state;
    _options = options.Value;

    AuthenticationStateChanged += OnAuthenticationStateChanged;
    _subscription = state.RegisterOnPersisting(OnPersistingAsync, RenderMode.InteractiveWebAssembly);
  }

// ...other code...
Apart from receiving the dependencies, the primary task of the constructor is to define the management of two events.
The first event is AuthenticationStateChanged, which occurs when the user authentication state changes, for example, when the user logs in to the application or logs out. It attaches the OnAuthenticationStateChanged() handler defined further on.
The second event is OnPersisting. This event fires when the Blazor application is about to switch from server to client rendering. The class constructor registers the OnPersistingAsync() handler to properly create the authentication state to send to the client.
This is the code of the OnPersistingAsync() handler:
// BlazorIntAuto/AuthenticationStateSyncer/PersistingRevalidatingAuthenticationStateProvider.cs

// ...other code...

  private async Task OnPersistingAsync()
  {
    if (_authenticationStateTask is null)
    {
      throw new UnreachableException($"Authentication state not set in {nameof(RevalidatingServerAuthenticationStateProvider)}.{nameof(OnPersistingAsync)}().");
    }

    var authenticationState = await _authenticationStateTask;
    var principal = authenticationState.User;

    if (principal.Identity?.IsAuthenticated == true)
    {
      var userId = principal.FindFirst(_options.ClaimsIdentity.UserIdClaimType)?.Value;
      var name = principal.FindFirst("name")?.Value;
      var email = principal.FindFirst("email")?.Value;

      if (userId != null && name != null)
      {
        _state.PersistAsJson(nameof(UserInfo), new UserInfo
        {
          UserId = userId,
          Name = name,
          Email = email
        });
      }
    }
  }

// ...other code...
Basically, it extracts the current user claims from the authentication state and builds a JSON object based on the structure of the UserInfo class. This JSON will be sent to the WebAssembly client as persisted state.
Deserialize authentication state on the client
The persisted authentication state must be deserialized on the client in order to be used by the WebAssembly application. Let's add the necessary code to the BlazorIntAuto.Client project.
Add an AuthenticationStateSyncer folder to the BlazorIntAuto.Client project folder and copy the UserInfo.cs file you created into the BlazorIntAuto/AuthenticationStateSyncer folder. The best option would be to create a new project with this class and share it with both projects, but I preferred to simplify here, although I'm aware that duplicating code is a bad practice. Don't do this at home! 😅
In the same folder, add a PersistentAuthenticationStateProvider.cs file with the following content:
// BlazorIntAuto.Client/AuthenticationStateSyncer/PersistentAuthenticationStateProvider.cs

using Microsoft.AspNetCore.Components;
using Microsoft.AspNetCore.Components.Authorization;
using System.Security.Claims;

public class PersistentAuthenticationStateProvider(PersistentComponentState persistentState) : AuthenticationStateProvider
{
  private static readonly Task<AuthenticationState> _unauthenticatedTask =
      Task.FromResult(new AuthenticationState(new ClaimsPrincipal(new ClaimsIdentity())));

  public override Task<AuthenticationState> GetAuthenticationStateAsync()
  {
    if (!persistentState.TryTakeFromJson<UserInfo>(nameof(UserInfo), out var userInfo) || userInfo is null)
    {
      return _unauthenticatedTask;
    }

    Claim[] claims = [
        new Claim(ClaimTypes.NameIdentifier, userInfo.UserId),
        new Claim(ClaimTypes.Name, userInfo.Name ?? string.Empty),
        new Claim(ClaimTypes.Email, userInfo.Email ?? string.Empty)];

    return Task.FromResult(
        new AuthenticationState(new ClaimsPrincipal(new ClaimsIdentity(claims,
            authenticationType: nameof(PersistentAuthenticationStateProvider)))));
  }
}
This class is the client counterpart of the PersistingRevalidatingAuthenticationStateProvider class of the server. It deserializes the user data from the persistent state by using the UserInfo class as its structure. It then creates a ClaimsPrincipal based on the user data and embeds it in the authentication state that is made available to the WebAssembly code running on the browser.
Enable authentication state sync
Once you have prepared the building blocks for serializing and deserializing the user authentication state, you need to enable both projects to use these classes.
Open the Program.cs file of the BlazorIntAuto project and apply the changes highlighted here:
// BlazorIntAuto/Program.cs

using BlazorIntAuto.Client.Pages;
using BlazorIntAuto.Components;
using Auth0.AspNetCore.Authentication;
using Microsoft.AspNetCore.Authentication;
using Microsoft.AspNetCore.Authentication.Cookies;
using Microsoft.AspNetCore.Components.Authorization; // 👈 new code

var builder = WebApplication.CreateBuilder(args);

// 👇 new code
builder.Services.AddCascadingAuthenticationState();
builder.Services.AddScoped<AuthenticationStateProvider, PersistingRevalidatingAuthenticationStateProvider>();
// 👆 new code

// ...existing code...
You added a reference to the Microsoft.AspNetCore.Components.Authorization namespace and added two services:
CascadingAuthenticationState. This service propagates the authentication state throughout the hierarchy of components in the application.PersistingRevalidatingAuthenticationStateProvider. This is the class we defined to persist the user authentication state.
On the BlazorIntAuto.Client project, you will make similar changes. Edit the Program.cs file and modify its content as follows:
// BlazorIntAuto.Client/Program.cs

using Microsoft.AspNetCore.Components.WebAssembly.Hosting;
using Microsoft.AspNetCore.Components.Authorization; // 👈 new code

var builder = WebAssemblyHostBuilder.CreateDefault(args);

// 👇 new code
builder.Services.AddAuthorizationCore();
builder.Services.AddCascadingAuthenticationState();
builder.Services.AddSingleton<AuthenticationStateProvider, PersistentAuthenticationStateProvider>();
// 👆 new code

await builder.Build().RunAsync();
You have added a reference to the Microsoft.AspNetCore.Components.Authorization namespace and registered three services, including the PersistentAuthenticationStateProvider service that you implemented to deserialize the user authentication state.
Now your application is ready for testing.
Syncing the Authentication State in .NET 9.0
.NET 9.0 simplifies the way you can sync the authentication state between the server and the WebAssembly parts of your Blazor application. You don't need to create the syncing classes yourself anymore. You can leverage two new services to serialize and deserialize the authentication state for you.
In the BlazorIntAuto project, open the Program.cs file and add the code highlighted here:
// BlazorIntAuto/Program.cs

using BlazorIntAuto.Client.Pages;
using BlazorIntAuto.Components;
using Auth0.AspNetCore.Authentication;
using Microsoft.AspNetCore.Authentication;
using Microsoft.AspNetCore.Authentication.Cookies;
using Microsoft.AspNetCore.Components.Authorization; // 👈 new code

var builder = WebApplication.CreateBuilder(args);

// ...existing code...

builder.Services.AddCascadingAuthenticationState(); // 👈 new code

builder.Services.AddRazorComponents()
    .AddInteractiveServerComponents()
    .AddInteractiveWebAssemblyComponents()
    .AddAuthenticationStateSerialization();  // 👈 new code

// ...existing code...
In the BlazorIntAuto.Client project, edit the Program.cs file as follows:
// BlazorIntAuto.Client/Program.cs

using Microsoft.AspNetCore.Components.WebAssembly.Hosting;
using Microsoft.AspNetCore.Components.Authorization; // 👈 new code

var builder = WebAssemblyHostBuilder.CreateDefault(args);

// 👇 new code
builder.Services.AddAuthorizationCore();
builder.Services.AddCascadingAuthenticationState();
builder.Services.AddAuthenticationStateDeserialization();
// 👆 new code

await builder.Build().RunAsync();
Now your application is ready for testing.
Test the Blazor app
This time, when you run your application, log in, and go to the Counter page, you will see your name, as shown in the following image:
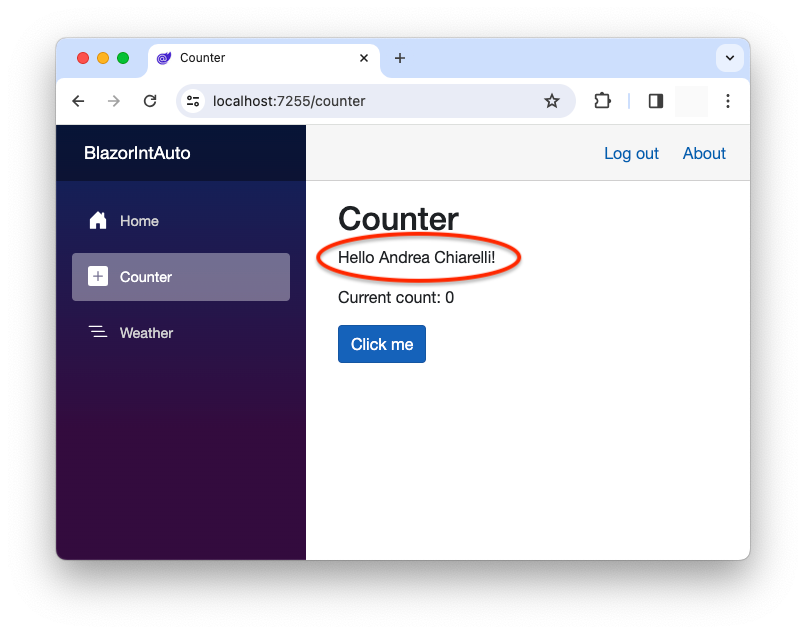
Now, when your application switches from server to client rendering, the user authentication state is serialized on the server, sent to the client, deserialized, and used in the Blazor WASM context.
Leverage Auth0's authentication and authorization services in your .NET applications.
DOWNLOAD THE FREE EBOOK
Recap
If you have reached the end of this article, congratulations! 🎉 It has been a long journey to add Auth0 authentication to a Blazor application using the Interactive Auto render mode.
You learned that .NET 8.0 introduced a new granular way to define the UI rendering of your Blazor app. This new feature improves the performance and user experience of your application. However, it makes authentication and access control more complex.
To see how you can integrate Auth0 with this new Blazor application model, you started by creating a basic Blazor app with Interactive Auto render mode. Then you registered the app with Auth0 and configured it to support authentication.
You secured the pages of your application and created the login and logout functionality. Finally, you used the user authentication state to get the user profile and display the user's name on the protected pages.
At this stage, you found out that the server-rendered component worked as expected, while the client-rendered component didn't. You learned that the reason for this malfunction was a lack of sync between the client's authentication state and the server's authentication state.
You saw that .NET provides a pair of classes that allow you to set up the missing synchronization, and you were able to have a working Blazor web application with Auth0 authentication.
The full code built in this article can be downloaded from this GitHub repository.
Now that you know how to add Auth0 authentication to your Blazor Web Apps, you may be interested in how to call a protected API. If so, then this article is for you.
About the author

Andrea Chiarelli
Principal Developer Advocate
I have over 20 years of experience as a software engineer and technical author. Throughout my career, I've used several programming languages and technologies for the projects I was involved in, ranging from C# to JavaScript, ASP.NET to Node.js, Angular to React, SOAP to REST APIs, etc.
In the last few years, I've been focusing on simplifying the developer experience with Identity and related topics, especially in the .NET ecosystem.