Blazor web applications built with .NET 8 need extra work to use authentication and authorization correctly. In Add Auth0 Authentication to Blazor Web Apps, you have seen how to add authentication to a Blazor web application that uses the most dynamic render mode: the Interactive Auto render mode. This article will show you how to call protected APIs from a Blazor application using the same render mode.
The Sample Project
To show you how a Blazor web application can call protected APIs, you will use a sample project that is the result of the aforementioned article Add Auth0 Authentication to Blazor Web Apps. Let's download the sample project by running the following command in a terminal window:
git clone -b starting-point --single-branch https://github.com/auth0-blog/blazor-interactive-auto-call-api
You will get a folder named blazor-interactive-auto-call-api containing three subfolders, each of which contains a .NET project:
BlazorIntAuto. This is the project hosting the server side of the Blazor application.BlazorIntAuto.Client. This project contains the Blazor WebAssembly part of the Blazor application.ExternalAPI. This folder includes a minimal Web API project that you will use to test API calls.
Follow the instructions from the mentioned article to register the Blazor app with Auth0 and configure it. Follow the instructions in the README.md file stored in the ExternalAPI folder to register the API with Auth0 and configure it.
In both cases, you need an Auth0 account. If you don't have one, you can get a free account by signing up now.
Internal and External APIs
The architecture of a modern Blazor web application built with .NET 8 consists of a Blazor server application and a Blazor WebAssembly application. The Blazor server app hosts the WebAssembly app, and, in the case of the Interactive Auto render mode, it's also responsible for pre-rendering client-side Razor components.
To learn more about Blazor's render modes, read this introduction.
From Auth0's perspective, you have a regular web application (the Blazor server app) and a Single-Page Application (the Blazor WebAssembly app). This opens up some points about what it means to call a protected API in the context of this architecture.
In the case where it is the server application that calls the protected API, the solution is fairly straightforward. This is nothing else than a regular ASP.NET Core application calling an API. You can refer to this article to learn how to call an API in this case.
The more interesting (and also tricky) case is when the Blazor WebAssembly app wants to call the protected API. We need to distinguish two subcases:
- The Blazor WebAssembly app wants to call an API implemented and exposed by the Blazor server app. Let's call this case the internal API case.
- The Blazor WebAssembly app wants to call an API implemented by a separate application. Let's call this case the external API case.
How can you deal with these two scenarios?
Call an Internal API
Let's start by analyzing the first case of calling an API: the call to an internal API.
The problem with internal APIs
You might think that all you need is an access token so that you can create authorized requests to the internal API by embedding the token in the Authorization header. But how can you get that access token?
Remember that the user authentication happens on the server side of the Blazor application (see this article to learn more about how authentication is implemented). So, your Blazor server application can get the access token from Auth0, and then it should provide this token to the Blazor WebAssembly app so that it can make authorized calls to the internal API. This idea has at least a couple of drawbacks:
- From the access token security perspective, the server is more secure than the client. Sending the access token to the Blazor WebAssembly app exposes it to potential stealing risks. There are scenarios where the client gets the access token to call an API. Still, in these scenarios, the client receives the access token directly from the authorization server, not an intermediary. Why change the security level from a more secure one (the token held by the server) to a less secure one (the token held by the client)?
- Assuming you want to pass the access token to the client anyway, in order to use the token, you need to determine when a Razor component is running on the server and when it's running on the browser. In the first case, you don't need to make an HTTP request to call a functionality implemented on the server. In the second case, you need to make an HTTP request with the embedded access token. While you can determine this in a static way, the Interactive Auto render mode makes things complicated since the same component is initially rendered on the server and subsequentially runs on the client.
To make things easy, I suggest not relying on an access token to make authorized requests to an internal API. In this case, the easiest way is to rely on classical cookie-based authentication. After all, your Blazor WebAssembly and server apps run on the same domain.
Build the internal API
Let's explore how to use the cookie-based approach to call an internal API from your Blazor WebAssembly app. Let's start by implementing the internal API, of course.
Open the Blazor server's Program.cs file in the BlazorIntAuto folder and add the code highlighted below:
// BlazorIntAuto/Program.cs

// ...existing code...

// 👇 new code
app.MapGet("/api/internalData", () =>
{
    var data = Enumerable.Range(1, 5).Select(index =>
        Random.Shared.Next(1, 100))
        .ToArray();

    return data;
})
.RequireAuthorization();
// 👆 new code

app.MapRazorComponents<App>()
    .AddInteractiveServerRenderMode()
    .AddInteractiveWebAssemblyRenderMode()
    .AddAdditionalAssemblies(typeof(Counter).Assembly);

app.Run();
The code snippet added here implements a minimal Web API endpoint /api/internalData that simply returns an array of five randomly generated integers between one and one hundred. Notice the RequireAuthorization() invocation that protects endpoint access by allowing it only to authenticated users.
Then, in the same file, locate the section where you define the application services and add the statement shown here:
// BlazorIntAuto/Program.cs

// ...existing code...

builder.Services.AddRazorComponents()
    .AddInteractiveServerComponents()
    .AddInteractiveWebAssemblyComponents();

// 👇 new code
builder.Services.AddHttpClient();
// 👆 new code


var app = builder.Build();

// ...existing code...
You simply added the service to create HttpClient instances.
Why do you need to add
HttpClientto the server? The client is going to make HTTP requests, not the server.You are right, but this is a Blazor requirement when you use the Interactive WebAssembly and Interactive Auto render modes. Since the components in these render modes are pre-rendered on the server, you need to abstract the API call to prevent errors.
Check out this question on Stack Overflow and the documentation to learn more.
You don't need to make anything else on the server side.
Notice that support for cookie-based authentication is already enabled by the Auth0 ASP.NET Core Authentication SDK used in the sample project.
Call the internal API
Let's move to the BlazorIntAuto.Client folder to enable the Blazor WebAssembly app to call the internal API. Add the Microsoft.Extensions.Http package to make the HttpClient service available to the client app:
dotnet add package Microsoft.Extensions.Http
Then, open the Program.cs file of the Blazor WebAssembly app and add the following code:
// BlazorIntAuto.Client/Program.cs

// ...existing code...
PersistentAuthenticationStateProvider>();

// 👇 new code
builder.Services.AddHttpClient("ServerAPI",
      client => client.BaseAddress = new Uri(builder.HostEnvironment.BaseAddress));
builder.Services.AddScoped(sp => sp.GetRequiredService<IHttpClientFactory>()
  .CreateClient("ServerAPI"));
// 👆 new code

await builder.Build().RunAsync();
This code creates a named instance of HttpClient bound to the base address of the application. This causes all calls from the client to be directed to the base address of the server, so we do not need to use absolute URLs.
Next, go to the BlazorIntAuto.Client/Pages folder, open the Counter.razor file, and make the changes highlighted below:
@* BlazorIntAuto.Client/Pages/Counter.razor *@ @page "/counter" @attribute [Authorize] @rendermode InteractiveAuto @inject HttpClient Http <!-- 👈 new code --> <PageTitle>Counter</PageTitle> <h1>Counter</h1> <p>Hello @Username!</p> <p role="status">Current count: @currentCount</p> <button class="btn btn-primary" @onclick="IncrementCount">Click me</button> <!-- 👇 new code --> <div> <p> </p> <button class="btn btn-primary" @onclick="CallInternalApi">Call internal API</button> <p>@ApiResponse</p> </div> <!-- 👆 new code --> @code { private int currentCount = 0; [CascadingParameter] private Task<AuthenticationState>? authenticationState { get; set; } private string Username = ""; private string ApiResponse = ""; //👈 new code protected override async Task OnInitializedAsync() { if (authenticationState is not null) { var state = await authenticationState; Username = state?.User?.Identity?.Name ?? string.Empty; } await base.OnInitializedAsync(); } private void IncrementCount() { currentCount++; } //👇 new code private async Task CallInternalApi() { var data = await Http.GetFromJsonAsync<int[]>("api/internalData"); ApiResponse = $"This data comes from an internal API: {string.Join(",", data)}"; } //👆 new code }
You injected the HttpClient instance into the Razor component, then added a new button to let the user call the internal API. The response of the API will be shown in the paragraph containing the variable @ApiResponse.
In the code area of the component, you declared the ApiResponse private variable and implemented the CallInternalApi() method, which simply uses the HttpClient instance to make an HTTP request to the api/internalData endpoint. The response of the call is combined with a message string and assigned to the ApiResponse variable.
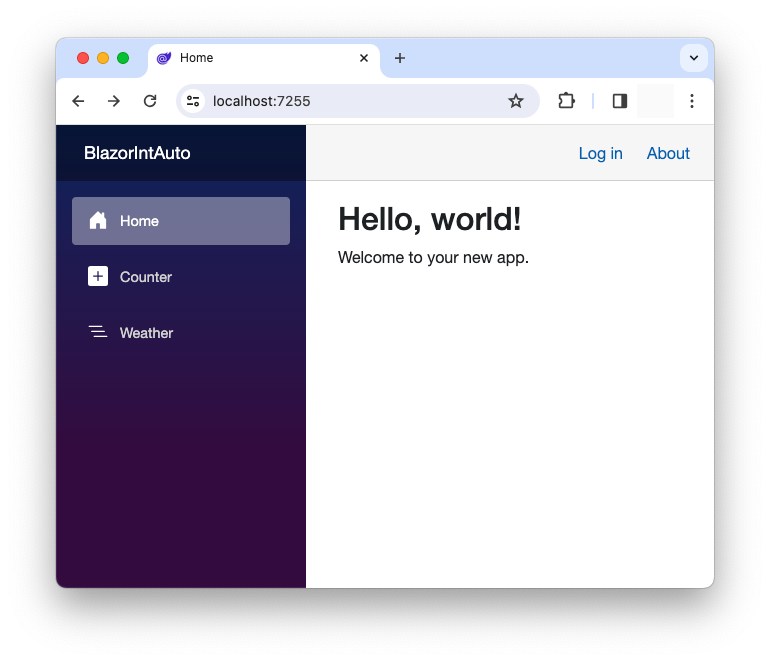
Run the Blazor app by going to the BlazorIntAuto folder and launching the dotnet run command. Use your preferred browser to navigate to the app, and you should see a page like the following:
Click the Login link to authenticate and access the app, and then navigate to the Counter page. You should see the new button as shown below:
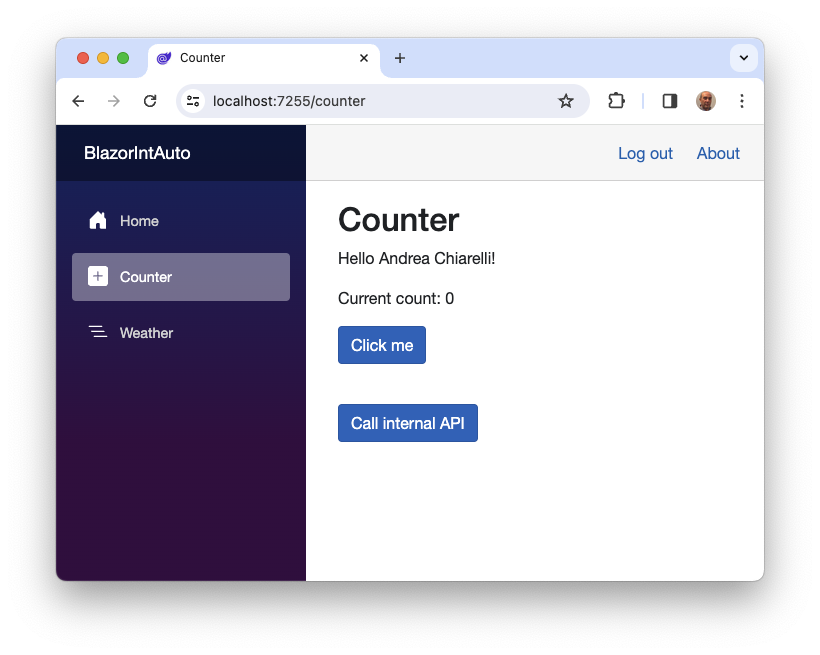
Click the Call internal API button, and you should see the API response below it, as shown in the following image:

Cool! You implemented your call to the protected internal API.
To verify that the endpoint is actually protected, log out of the application and navigate directly to the API endpoint URL. You will be redirected to the Auth0 Universal Login page to authenticate.
Call an External API
Let's now analyze how to call a protected external API, i.e., an API not implemented by your Blazor server application but by an additional application you can't modify. Let's assume that this external API requires an access token.
The sample project you downloaded at the beginning of this journey contains a simple protected Web API that exposes the /data endpoint, which returns an array of randomly generated integers as well. Let's assume it's already up and running.
The problem with external APIs
How can your Blazor WebAssembly application call the /data endpoint of the external API? You may think that this time, your Blazor WebAssembly application needs an access token because you can't modify the external API. I would say you are right, but remember the drawbacks discussed while looking for a solution for the internal API. Your Blazor server app receives the access token, so the same problems apply to the external API case. How to solve this problem?
My proposal is to apply a common design pattern: the Backend for Frontend (BFF) pattern. Using this pattern, the access token will still be handled by the Blazor server application as for the internal API case. Additionally, the Blazor server app will proxy the requests coming from the Blazor WebAssembly app to the external API. The general architecture is shown in the following diagram:
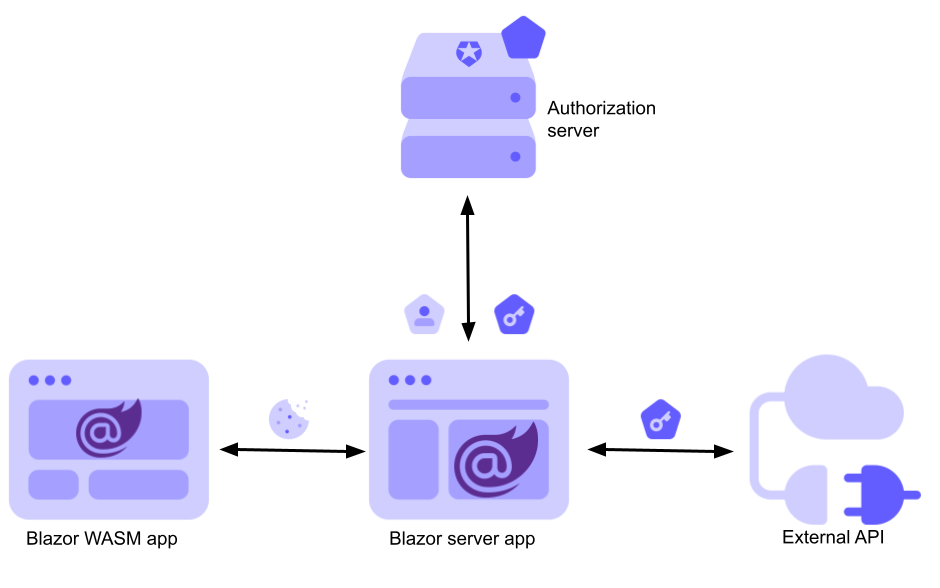
This way, the Blazor WebAssembly app will continue to call an internal API using the cookie-based authentication approach. The Blazor server app will take charge of calling the external API using the access token and return the results to the caller.
Get the access token
Let's start implementing this pattern by getting an access token on the Blazor server side.
You need to make some changes to the application configuration and authentication handshake. First, you need to specify your client secret (see here to learn why) and the API audience to get access to the external API. You get both values from your Auth0 dashboard: you will find the client secret from the Settings tab of your Blazor app registration page; you take the audience from the Identifier field in the Settings tab of your API registration page.
Once you have this data, go to the BlazorIntAuto folder and add these values to the appsettings.json file as shown below:
// BlazorIntAuto/appsettings.json

{
  "Logging": {
    "LogLevel": {
      "Default": "Information",
      "Microsoft.AspNetCore": "Warning"
    }
  },
  "AllowedHosts": "*",
  "Auth0": {
    "Domain": "YOUR_AUTH0_DOMAIN",
    "ClientId": "YOUR_CLIENT_ID",
    "ClientSecret": "YOUR_CLIENT_SECRET", // 👈 new key
    "Audience": "YOUR_UNIQUE_IDENTIFIER"  // 👈 new key
  }
}
Now, apply the changes highlighted below to use these new settings and get the access token at authentication time:
// BlazorIntAuto/Program.cs

// ...existing code...

builder.Services
    .AddAuth0WebAppAuthentication(options => {
      options.Domain = builder.Configuration["Auth0:Domain"];
      options.ClientId = builder.Configuration["Auth0:ClientId"];
      // 👇 new code
      options.ClientSecret = builder.Configuration["Auth0:ClientSecret"];
      // 👆 new code
    })
    // 👇 new code
    .WithAccessToken(options =>
      {
          options.Audience = builder.Configuration["Auth0:Audience"];
      });
    // 👆 new code

// ...existing code...
You added the client secret to the SDK parameters and invoked the WithAccessToken() method passing the API audience.
Handle the access token
Your Blazor server application needs to manage the access token in order to make it available when needed.
For a detailed explanation of the process followed here, read this article about calling protected APIs in ASP.NET Core.
In the BlazorIntAuto folder, create a file named TokenHandler.cs with the following code:
//BlazorIntAuto/TokenHandler.cs

using System.Net.Http.Headers;
using Microsoft.AspNetCore.Authentication;

public class TokenHandler : DelegatingHandler {
    private readonly IHttpContextAccessor _httpContextAccessor;

    public TokenHandler(IHttpContextAccessor httpContextAccessor)
    {
      _httpContextAccessor = httpContextAccessor;
    }

    protected override async Task<HttpResponseMessage> SendAsync(HttpRequestMessage request, CancellationToken cancellationToken) {
      var accessToken = await _httpContextAccessor.HttpContext.GetTokenAsync("access_token");

      request.Headers.Authorization =
          new AuthenticationHeaderValue("Bearer", accessToken);
      return await base.SendAsync(request, cancellationToken);
    }
}
This code defines the TokenHandler class, which is responsible for injecting the access token into HTTP requests.
Then, register the TokenHandler class as a message handler for your application. Edit the Program.cs file and add the lines highlighted below:
// BlazorIntAuto/Program.cs

// ...existing code...

builder.Services.AddRazorComponents()
    .AddInteractiveServerComponents()
    .AddInteractiveWebAssemblyComponents();

// 👇 new code
builder.Services.AddHttpContextAccessor();
builder.Services.AddScoped<TokenHandler>();
// 👆 new code

builder.Services.AddHttpClient();

var app = builder.Build();

// ...existing code...
The next step is to define the service that will make an HttpClient instance available to call the external API. Still in the Program.cs file, replace the existing statement that defined a generic HttpClient service with a specific one, as shown in the following:
// BlazorIntAuto/Program.cs

// ...existing code...

builder.Services.AddScoped<TokenHandler>();

// builder.Services.AddHttpClient();  // 👈 old code

// 👇 new code
builder.Services.AddHttpClient("ExternalAPI",
      client => client.BaseAddress = new Uri(builder.Configuration["ExternalApiBaseUrl"]))
      .AddHttpMessageHandler<TokenHandler>();

builder.Services.AddScoped(sp => sp.GetRequiredService<IHttpClientFactory>()
  .CreateClient("ExternalAPI"));
// 👆 new code

var app = builder.Build();

// ...existing code...
To make the app independent from the specific base URL of the external API, the code above refers to an ExternalApiBaseUrl configuration key. You need to add this key to the appsettings.json file as well:
// BlazorIntAuto/appsettings.json

{
  "Logging": {
    "LogLevel": {
      "Default": "Information",
      "Microsoft.AspNetCore": "Warning"
    }
  },
  "AllowedHosts": "*",
  "Auth0": {
    "Domain": "YOUR_AUTH0_DOMAIN",
    "ClientId": "YOUR_CLIENT_ID",
    "ClientSecret": "YOUR_CLIENT_SECRET",
    "Audience": "YOUR_UNIQUE_IDENTIFIER"
  },
  "ExternalApiBaseUrl": "https://localhost:7130" // 👈 new key
}
Notice that the ExternalApiBaseUrl key has not been included in the Auth0 section because it is unrelated to Auth0 settings.
Map the API call
Now, let's create an API endpoint in the Blazor server app that maps the external API endpoint:
// BlazorIntAuto/Program.cs

// ...existing code...

app.MapGet("/api/internalData", () =>
{
    var data = Enumerable.Range(1, 5).Select(index =>
        Random.Shared.Next(1, 100))
        .ToArray();

    return data;
})
.RequireAuthorization();

// 👇 new code
app.MapGet("/api/externalData", async (HttpClient httpClient) =>
{
    return await httpClient.GetFromJsonAsync<int[]>("data");
})
.RequireAuthorization();
// 👆 new code

// ...existing code...
As you can see, there is a new endpoint /api/externalData, which simply calls the external API endpoint data and returns the result to the caller.
For more complex calls, you may want to consider using a reverse proxy library such as Yarp.
Call the external API
Finally, your Blazor WebAssembly application can call the external API via your Blazor server app.
In the BlazorIntAuto.Client/Pages folder, apply the following changes to the Counter.razor component:
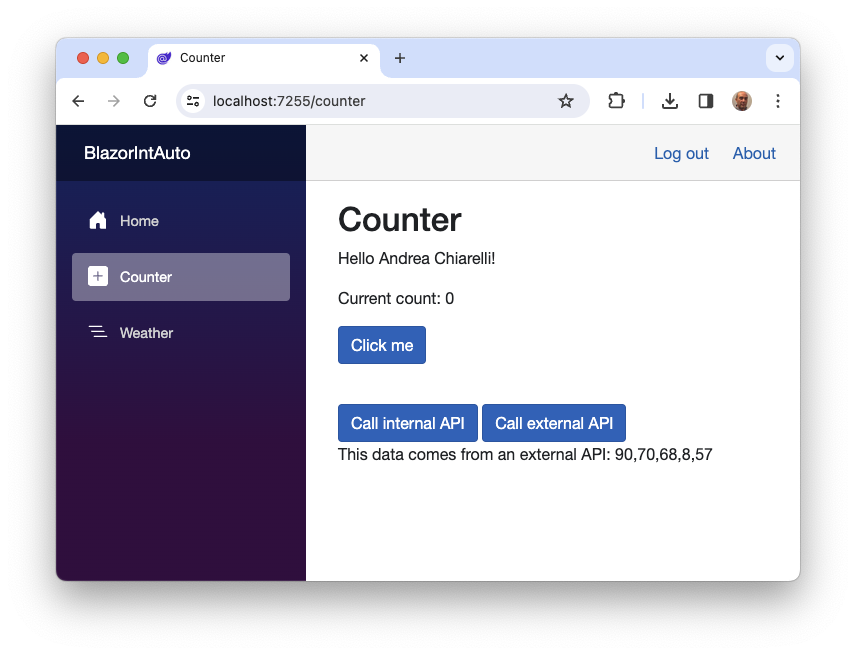
@* BlazorIntAuto.Client/Pages/Counter.razor *@ @page "/counter" @attribute [Authorize] @rendermode InteractiveAuto @inject HttpClient Http <!-- ...existing code... --> <div> <p> </p> <button class="btn btn-primary" @onclick="CallInternalApi">Call internal API</button> <!-- 👇 new code --> <button class="btn btn-primary" @onclick="CallExternalApi">Call external API</button> <!-- 👆 new code --> <p>@ApiResponse</p> </div> @code { // ...existing code... //👇 new code private async Task CallExternalApi() { var data = await Http.GetFromJsonAsync<int[]>("api/externalData"); ApiResponse = $"This data comes from an external API: {string.Join(",", data)}"; } //👆 new code }
You added a new button to call the external API and implemented the new method CallExternalApi() to call the api/externalData endpoint.
When clicking the new button, you'll see a message like the one shown in the following image:
You are done! Your Blazor WebAssembly application is now able to call both internal and external protected APIs.
Summary
It has been a long journey to understand the best approach to call protected APIs from a Blazor application built with .NET 8. As you can see, the main issues are related to both the new Blazor rendering modes and the application architecture itself.
To overcome these issues, you used traditional cookie-based authentication to make calls to internal APIs. You then used the same infrastructure to implement the BFF pattern, which allowed you to turn the Blazor server into a reverse proxy for calls to the external API.
I hope that everything is clear. If not, please leave a comment below.
The final version of the sample project can be downloaded from this GitHub repository.
About the author

Andrea Chiarelli
Principal Developer Advocate
I have over 20 years of experience as a software engineer and technical author. Throughout my career, I've used several programming languages and technologies for the projects I was involved in, ranging from C# to JavaScript, ASP.NET to Node.js, Angular to React, SOAP to REST APIs, etc.
In the last few years, I've been focusing on simplifying the developer experience with Identity and related topics, especially in the .NET ecosystem.