One of the most common approaches to authorizing users to access applications is through roles. Users are allowed or denied to access to a section of an application or to perform an action based on their specific roles. In this article, you'll learn how Auth0 allows you to define roles for your users and how to use these roles to authorize them to access your Blazor application, whether it uses the Server or WebAssembly hosting model.
Prerequisites
This article will guide you through the features supported by Blazor for role-based authorization. It assumes that you are familiar with Blazor and know how to add authentication using Auth0. If not, you can read the following articles to learn more about Blazor and Auth0:
The code shown in this article is based on .NET 6.0 or higher.
Role-Based Access Control and Auth0
Role-Based Access Control (RBAC) is an authorization model that simplifies the process of assigning permissions to users. In this model, users who belong to a role have a specific set of permissions.
 Want to take your Authorization to the next level? → fga.dev
Roles and permissions
Suppose you have an application that allows your users to create, view, modify, and delete documents. You can define a list of roles that identify a set of permissions. For example, you might create the following roles:
Author. This role includes the permission to create, view, modify, and delete documents.
Editor. This role allows your users to view and modify a document.
Reader. This role only includes the permission to view a document.
When you assign a role to a user, you implicitly assign the user all the permissions associated with that role.
Creating roles
You can easily create roles in Auth0 through its dashboard. All you need is an Auth0 account. If you don't have one yet, you can sign up for free. If you have more complex or specific needs, you can also manage users and roles by using the Auth0 Management API. This article focuses on using the dashboard to manage users and roles.
To create the roles defined earlier, head to your Auth0 dashboard and select Roles from the User Management section of the side menu. Click the Create Role button in the upper right corner and fill in the form with the following data:
- Author as the role name.
- Author of the document as the role description.
Your screen should look like the following picture:
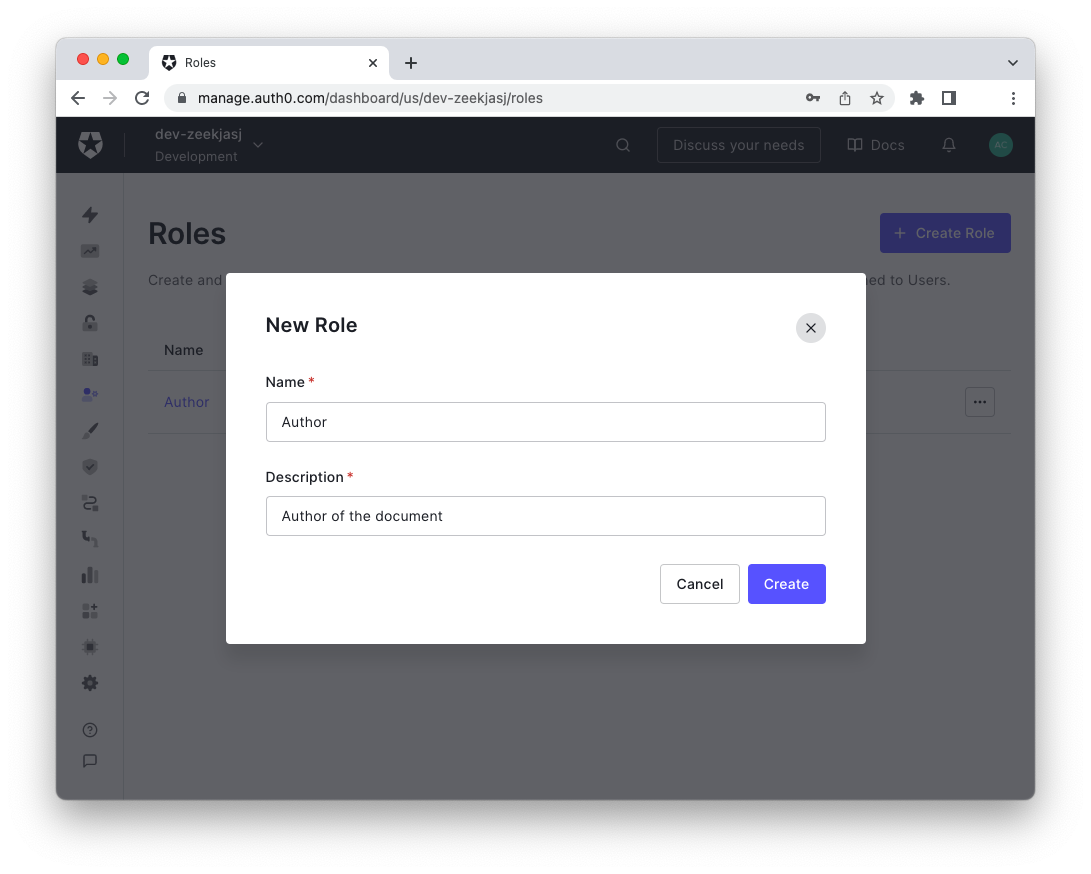
Click the Create button to save this data.
Now, repeat the same process to create the Editor and Reader roles.
If your application includes an API protected with Auth0, you should explicitly assign permissions to the roles so that the API can check them. See this article to learn more about using RBAC in an ASP.NET Core Web API.
Assigning roles
Once you have created the roles, you can assign them to users. You can do this from the Roles section or from the Users section of the dashboard.
In the Roles section, select the role you want to assign and then click the Users tab. In the resulting view, click the "Add Users" button to add one or more users to the current role.
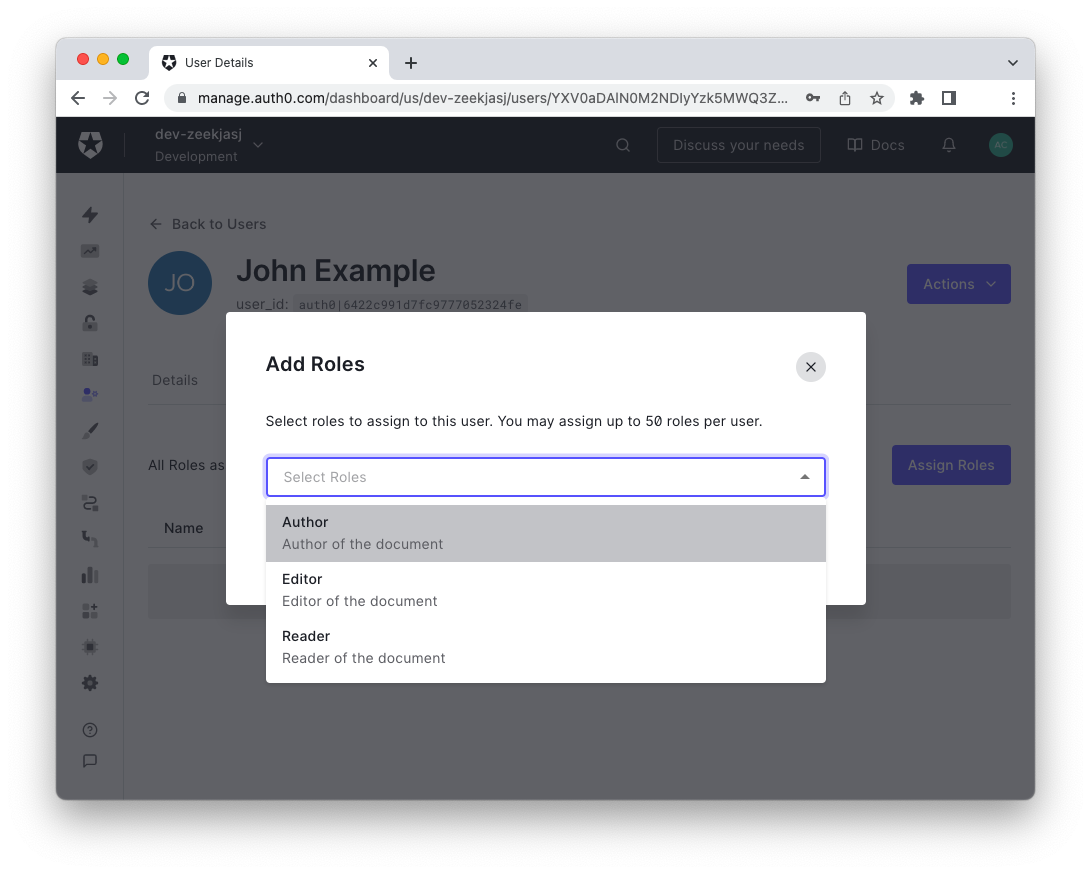
Alternatively, select the user in the Users section and then click the Roles tab. In the resulting view, click the "Assign Roles" button to add one or more roles to the current user. Your screen should look like the following:
Making Roles Available to the Application
The roles you have created and assigned to the users so far are only visible in the Auth0 dashboard. To make them available to your application, you must include them in the ID or access token that will be issued by Auth0 at login time.
Check out this article to learn more about ID and access tokens.
In the case of Blazor, you will include the user roles in the ID token.
Why should I add roles to the ID token?
Your Blazor application may receive both an ID token and an access token when a user logs in.
The ID token tells you that the user has been successfully authenticated and may contain user profile information. The access token allows your Blazor application to call a protected API.
While the intended recipient of the ID token is your Blazor application, the intended recipient of the access token is the protected API. The ID token format is standard and you know what to expect there. In contrast, the access token format is an agreement between the authorization server and the API (the intended recipient). Even if you may know the actual format of the access token, your Blazor application should never decode and rely on the information stored in it. In fact, the access token format may change without notice and your Blazor application may break unexpectedly.
Role inclusion doesn't happen automatically, so you need to create an Auth0 Action to include the current user's roles in the ID token at login time.
In your Auth0 dashboard, go to the Actions section, select Flows, and then select the Login flow. Add the following custom Action to the flow:
exports.onExecutePostLogin = async (event, api) => {
  const roleClaim = 'http://schemas.microsoft.com/ws/2008/06/identity/claims/role';

  if (event.authorization) {
    api.idToken.setCustomClaim(roleClaim, event.authorization.roles);
  }
};
Save the Action and deploy it by clicking the "Deploy" button.
If you are wondering why you need to use this weird string as the name for the role claim in the ID token, you need to read this article.
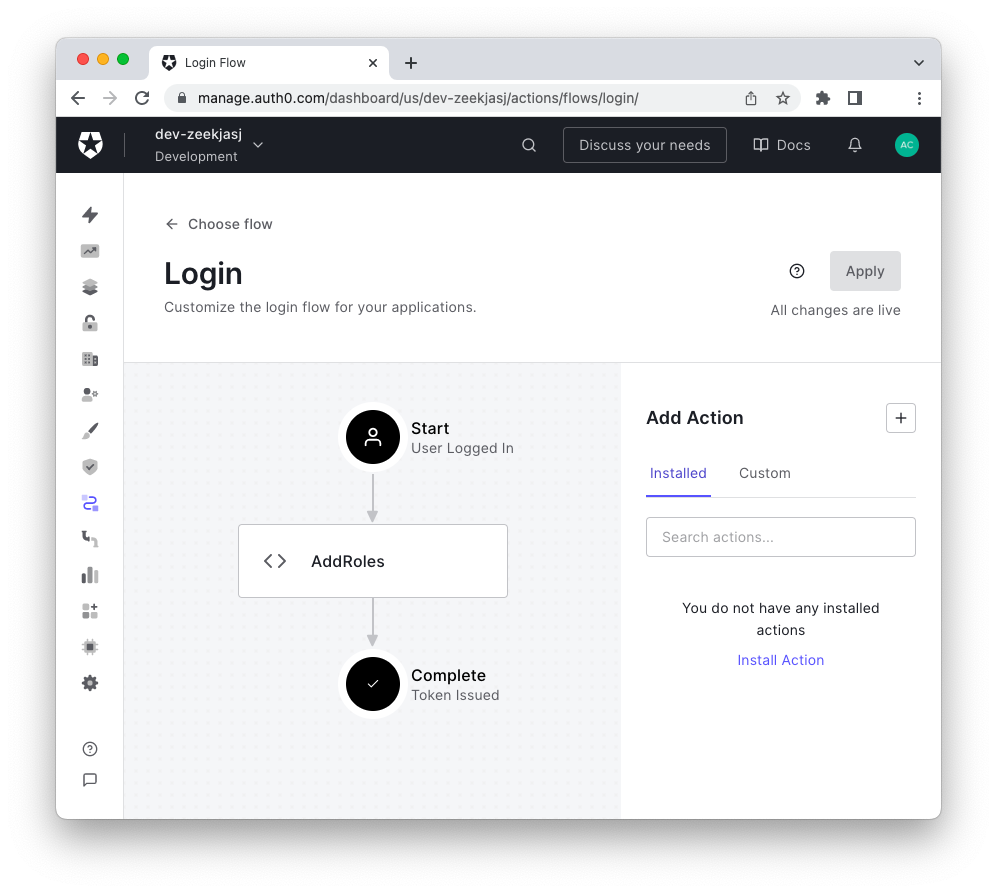
The final step to attach this Action to the user login flow is to drag and drop it into the Login Action's editor. The Login flow editor should look as shown in the following picture:
To learn more about dealing with Auth0 Actions, read the documentation and some articles on the Auth0 blog.
Now everything is ready. You have created the roles you need, assigned them to your users, and injected them into the ID token that Auth0 will issue at login time. All you need to do is use these roles in your Blazor application.
Applying Role-Based Authorization
Whether your application is a Blazor Server or a Blazor WebAssembly app, you will apply Role-Based Access Control in the same way. Let's explore how you can do this in different parts of your application.
RBAC within the UI
To enable users with a given role to see and access a specific portion of the user interface, use the <AuthorizeView> component with the Roles attribute. For example, to allow only users with the Editor role to see the "Update" button on your UI, add the markup shown in the following snippet:
<AuthorizeView Roles="Editor">
  <button>Update</button>
</AuthorizeView>
Role name comparison is case-sensitive by default. This means that
Editoris not considered to be the same role aseditor.
If that button should be available to both editors and authors, rearrange the markup as follows:
<AuthorizeView Roles="Author, Editor">
  <button>Update</button>
</AuthorizeView>
You have specified both roles in the Roles attribute. This means that a user must have either the Author or the Editor role to see this button.
In case you want a user to have both Author and Editor roles, you need to nest two AuthorizeView components, as shown below:
<AuthorizeView Roles="Author">
  <AuthorizeView Roles="Editor" Context="innerContext">
    <button>Update</button>
  </AuthorizeView>
</AuthorizeView>
The nested AuthorizeView component is assigned a specific name for the Context attribute. This is required to prevent authentication state collisions. Check out this document to learn more.
RBAC on pages
The <AuthorizeView> component is useful when you need to control access to portions of your application's UI. If you need to control access to an entire page, you should use the Authorize attribute.
For example, to allow only authors and editors to access the editing page of a document, you should use the Authorize attribute as follows:
@page "/edit"
@attribute [Authorize(Roles = "Author, Editor")]

<h1>Editing page</h1>

<!-- Other markup and code -->
Similar to the AuthorizeView case, you allow users with the Author or Editor roles to access this page by specifying a list of roles. If you want a user to have both roles, you must apply the Authorize attribute multiple times, as shown in the following example:
@page "/edit"
@attribute [Authorize(Roles = "Author")]
@attribute [Authorize(Roles = "Editor")]

<h1>Editing page</h1>

<!-- Other markup and code -->
RBAC in code
Of course, not all access control is done at the markup level. Sometimes, you need to check whether a user has a particular role within your code. In this case, you need to access the current authentication state object to get the user's role. Consider the following code snippet:
@page "/myProtectedPage"

<h1>Only authors can click this button</h1>

<button @onclick="@SetAuthor">Set me as the author</button>

@code {
    [CascadingParameter]
    private Task<AuthenticationState> authenticationStateTask { get; set; }

    private async Task SetAuthor()
    {
      var authenticationState = await authenticationStateTask;

      if (authenticationState.User.IsInRole("Author"))
      {
        // set the current user as the author
      }
    }
}
This page allows a user to set themselves as the author of a document using a button. Only an author is allowed to use this function by calling the SetAuthor() method. Instead of hiding the button, the authorization check is performed when the user clicks the button.
You see that a property named authenticationStateTask is defined. This property is marked with the CascadingParameter attribute. This ensures that the page receives the current authentication state object from the parent components. See the Blazor documentation to learn more about the CascadingParameter attribute.
Within the SetAuthor() method, you use the authenticationStateTask property to access the actual authentication state object. This object allows you to access the current user and check their role using the IsInRole() method.
A Quirk Behavior with Roles in Blazor WASM
You might think that now everything is ready to make your Blazor application work well with Role-Based Access Control. Actually, with the role settings shown so far, you should be able to run your Blazor Server application without any problems.
However, in your Blazor WebAssembly application, you will notice that users are not allowed to see a portion of the UI or access a page, even though they have the required role. Why is this happening?
The cause of the role mapping problem
If you take a look at the Auth0 Action you used to add roles to the ID token, you will see that this code assigns an array to the role claim. Here is that assignment for convenience:
api.idToken.setCustomClaim(roleClaim, event.authorization.roles);
If you decode the ID token issued by Auth0 with jwt.io, you will see an array of roles as shown below:
{
  "http://schemas.microsoft.com/ws/2008/06/identity/claims/role": [
    "Author",
    "Editor"
  ],
  "nickname": "john",
  "name": "John Example",

  //... other claims...

 }
In this particular case, you have two roles, but the same thing happens with just one role.
Note that this is not an Auth0 problem. This is required by the JSON standard, on which JWT is based, since you can't have multiple properties with the same name.
The Blazor WASM claim handler expects a string as the value for the role claim, not an array. So, referring to the ID token in the example above, it assigns the string value "["Author", "Editor"]" to the role claim. Obviously, this will not match any of your user roles.
This problem has been reported to Microsoft a few times in the past (issue1, issue2), but it looks like there are no plans to fix it at the moment.
Solving the role mapping problem
To work around the role mapping problem, you need to take action at the user creation stage. In other words, you need to create your own account factory class. Create a new class with the following code:
//CustomAccountFactory.cs

using Microsoft.AspNetCore.Components.WebAssembly.Authentication;
using Microsoft.AspNetCore.Components.WebAssembly.Authentication.Internal;
using System.Security.Claims;
using System.Text.Json;

public class CustomAccountFactory : AccountClaimsPrincipalFactory<RemoteUserAccount>
{
  public CustomAccountFactory(IAccessTokenProviderAccessor accessor)
      : base(accessor)
  { }

  public async override ValueTask<ClaimsPrincipal> CreateUserAsync(
    RemoteUserAccount account,
    RemoteAuthenticationUserOptions options)
  {
    // Step 1: create the user account
    var userAccount = await base.CreateUserAsync(account, options);
    var userIdentity = (ClaimsIdentity)userAccount.Identity;

    if (userIdentity.IsAuthenticated)
    {
      // Step 2: get the associated roles
      var roles = account.AdditionalProperties[userIdentity.RoleClaimType] as JsonElement?;

      if (roles?.ValueKind == JsonValueKind.Array)
      {
        // Step 3: remove the existing role claim with the serialized array
        userIdentity.TryRemoveClaim(userIdentity.Claims.FirstOrDefault(c => c.Type == userIdentity.RoleClaimType));

        // Step 4: add each role separately
        foreach (JsonElement element in roles.Value.EnumerateArray())
        {
          userIdentity.AddClaim(new Claim(userIdentity.RoleClaimType, element.GetString()));
        }
      }
    }

    return userAccount;
  }
}
You create a class that inherits from AccountClaimsPrincipalFactory<RemoteUserAccount>. The only method you override in this class is the CreateUserAsync() method, which returns the current user implemented as a ClaimsPrincipal. Let's analyze the macro steps of this method by following the comments in the code snippet marked Step n.
The first step (Step1) is to create the user by using the base class method that you are overriding. This is the user account as it would normally be created. You also define the userIdentity variable for convenience.
If the current user is not yet authenticated, the method returns the original user. Otherwise, you get the role value as a JSON element (Step 2). Note that you use the userIdentity.RoleClaimType value to determine the role associated with the user account. By default, this value is the http://schemas.microsoft.com/ws/2008/06/identity/claims/role string that you assigned as a custom claim to the ID token in the Auth0 Action.
In Step 3, you remove the current role claim from the user account. This is the same claim that contains the serialized array of all the roles. While you could leave it there, it's better to remove it to prevent possible security exploits.
In Step 4, you iterate over the array of roles and create a new role claim for each of them. The end result is a user account with a list of role claims of the same type (userIdentity.RoleClaimType).
Now you can make this class available to your Blazor WebAssembly application. Add the statement highlighted below to your Program.cs file:
// Program.cs

//...existing code...

builder.Services.AddScoped(typeof(AccountClaimsPrincipalFactory<RemoteUserAccount>),
  typeof(CustomAccountFactory));
// 👆new code

await builder.Build().RunAsync();
Finally you are done! Now your Blazor application is ready to support Role-Based Access Control.
Beyond UI Protection
So far, you have seen what Blazor has to offer for managing access control with roles. You have seen that you have components that allow you to filter the UI content based on the user's role, and you have learned that you can even check roles programmatically.
However, these features should not lead you to underestimate the risks that your application may be exposed to. The AuthorizeView component and the Authorize attribute that you have explored allow you to control the UI of your Blazor application, whether it is Blazor Server or Blazor WASM.
Managing roles through code gives you more granular control over the functionality of your application. For example, you can prevent code attached to a button from being executed by a user without a specific role. Alternatively, you can run different code based on the user's specific role. For example, the following code shows how to selectively run code based on the user's role:
@page "/myProtectedPage"

<h1>Process the document</h1>

<button @onclick="@ProcessDocument">Process</button>

@code {
    [CascadingParameter]
    private Task<AuthenticationState> authenticationStateTask { get; set; }

    private async Task ProcessDocument()
    {
      var authenticationState = await authenticationStateTask;

      if (authenticationState.User.IsInRole("Author"))
      {
        ProcessDocumentAsAuthor();
      } else {
        ProcessDocumentNormally();
      }
    }
}
Remember that your client code is publicly exposed. Even if it is minimized or obscured, its behavior can be analyzed and its output manipulated. For example, assume that the ProcessDocumentAsAuthor() and the ProcessDocumentNormally() functions in the example above call an API implemented in your Blazor Server or in a separate Web API project. You may think that there is no risk of calling the wrong API endpoint because you check the user role in your Blazor app.
In fact, an attacker could easily bypass this control by analyzing the HTTP requests. If your API is not protected as well, your protection on the Blazor side is useless. This is true for any client-side check, regardless of the technology you use.
To learn how to protect your ASP.NET Core Web API, read the following articles:
- Authorization for ASP.NET Web APIs
- Permission-Based Security for ASP.NET Web APIs
- Role-Based Authorization for ASP.NET Web APIs
- Securing ASP.NET Minimal Web APIs with Auth0
Leverage Auth0's authentication and authorization services in your .NET applications.
DOWNLOAD THE FREE EBOOK
Summary
This article has shown you how to deal with Role-Based Access Control in Auth0 and Blazor.
You started by learning how to create roles and assign them to users on the Auth0 side. Then you saw how to make roles available to applications by including them in the ID token through an Auth0 Action triggered at login time.
On the Blazor side, you explored the components available for checking authorization at the UI level. You also learned how to check roles using a programmatic approach.
All of this knowledge is applicable to both Blazor hosting models: Blazor Server and Blazor WebAssembly. However, while everything was ready to go for Blazor Server, Blazor WebAssembly needed a little more fine-tuning. You learned that roles are not interpreted correctly in Blazor WebAssembly, and you needed to add your custom code to fix the problem.
Finally, you received some warnings that you should be aware of to avoid exposing your application to security risks.
About the author

Andrea Chiarelli
Principal Developer Advocate
I have over 20 years of experience as a software engineer and technical author. Throughout my career, I've used several programming languages and technologies for the projects I was involved in, ranging from C# to JavaScript, ASP.NET to Node.js, Angular to React, SOAP to REST APIs, etc.
In the last few years, I've been focusing on simplifying the developer experience with Identity and related topics, especially in the .NET ecosystem.