


When it comes to national digital identity, Singapore has a lot to say. Singapore launched Singpass in 2003 and has been enhancing it over the years. Singpass’s initial goal was to authenticate citizens to government agencies and has since expanded to use in the private sector quite successfully. Today, Singapore residents use Singpass to securely access over 1,700 services from more than 460 government agencies and private sector organisations.
With Auth0's customer base quickly growing in Southeast Asia, Singapore and Japan, it was about time to officially offer Singpass services on the Auth0 platform.
This is the first of a two-post series. In this post, we’ll learn how to integrate Singpass QR Login with Auth0 Universal Login. In the next post, we’ll look into integrating Myinfo to share selective personal data such as name and email address.
How Singpass QR Login Works
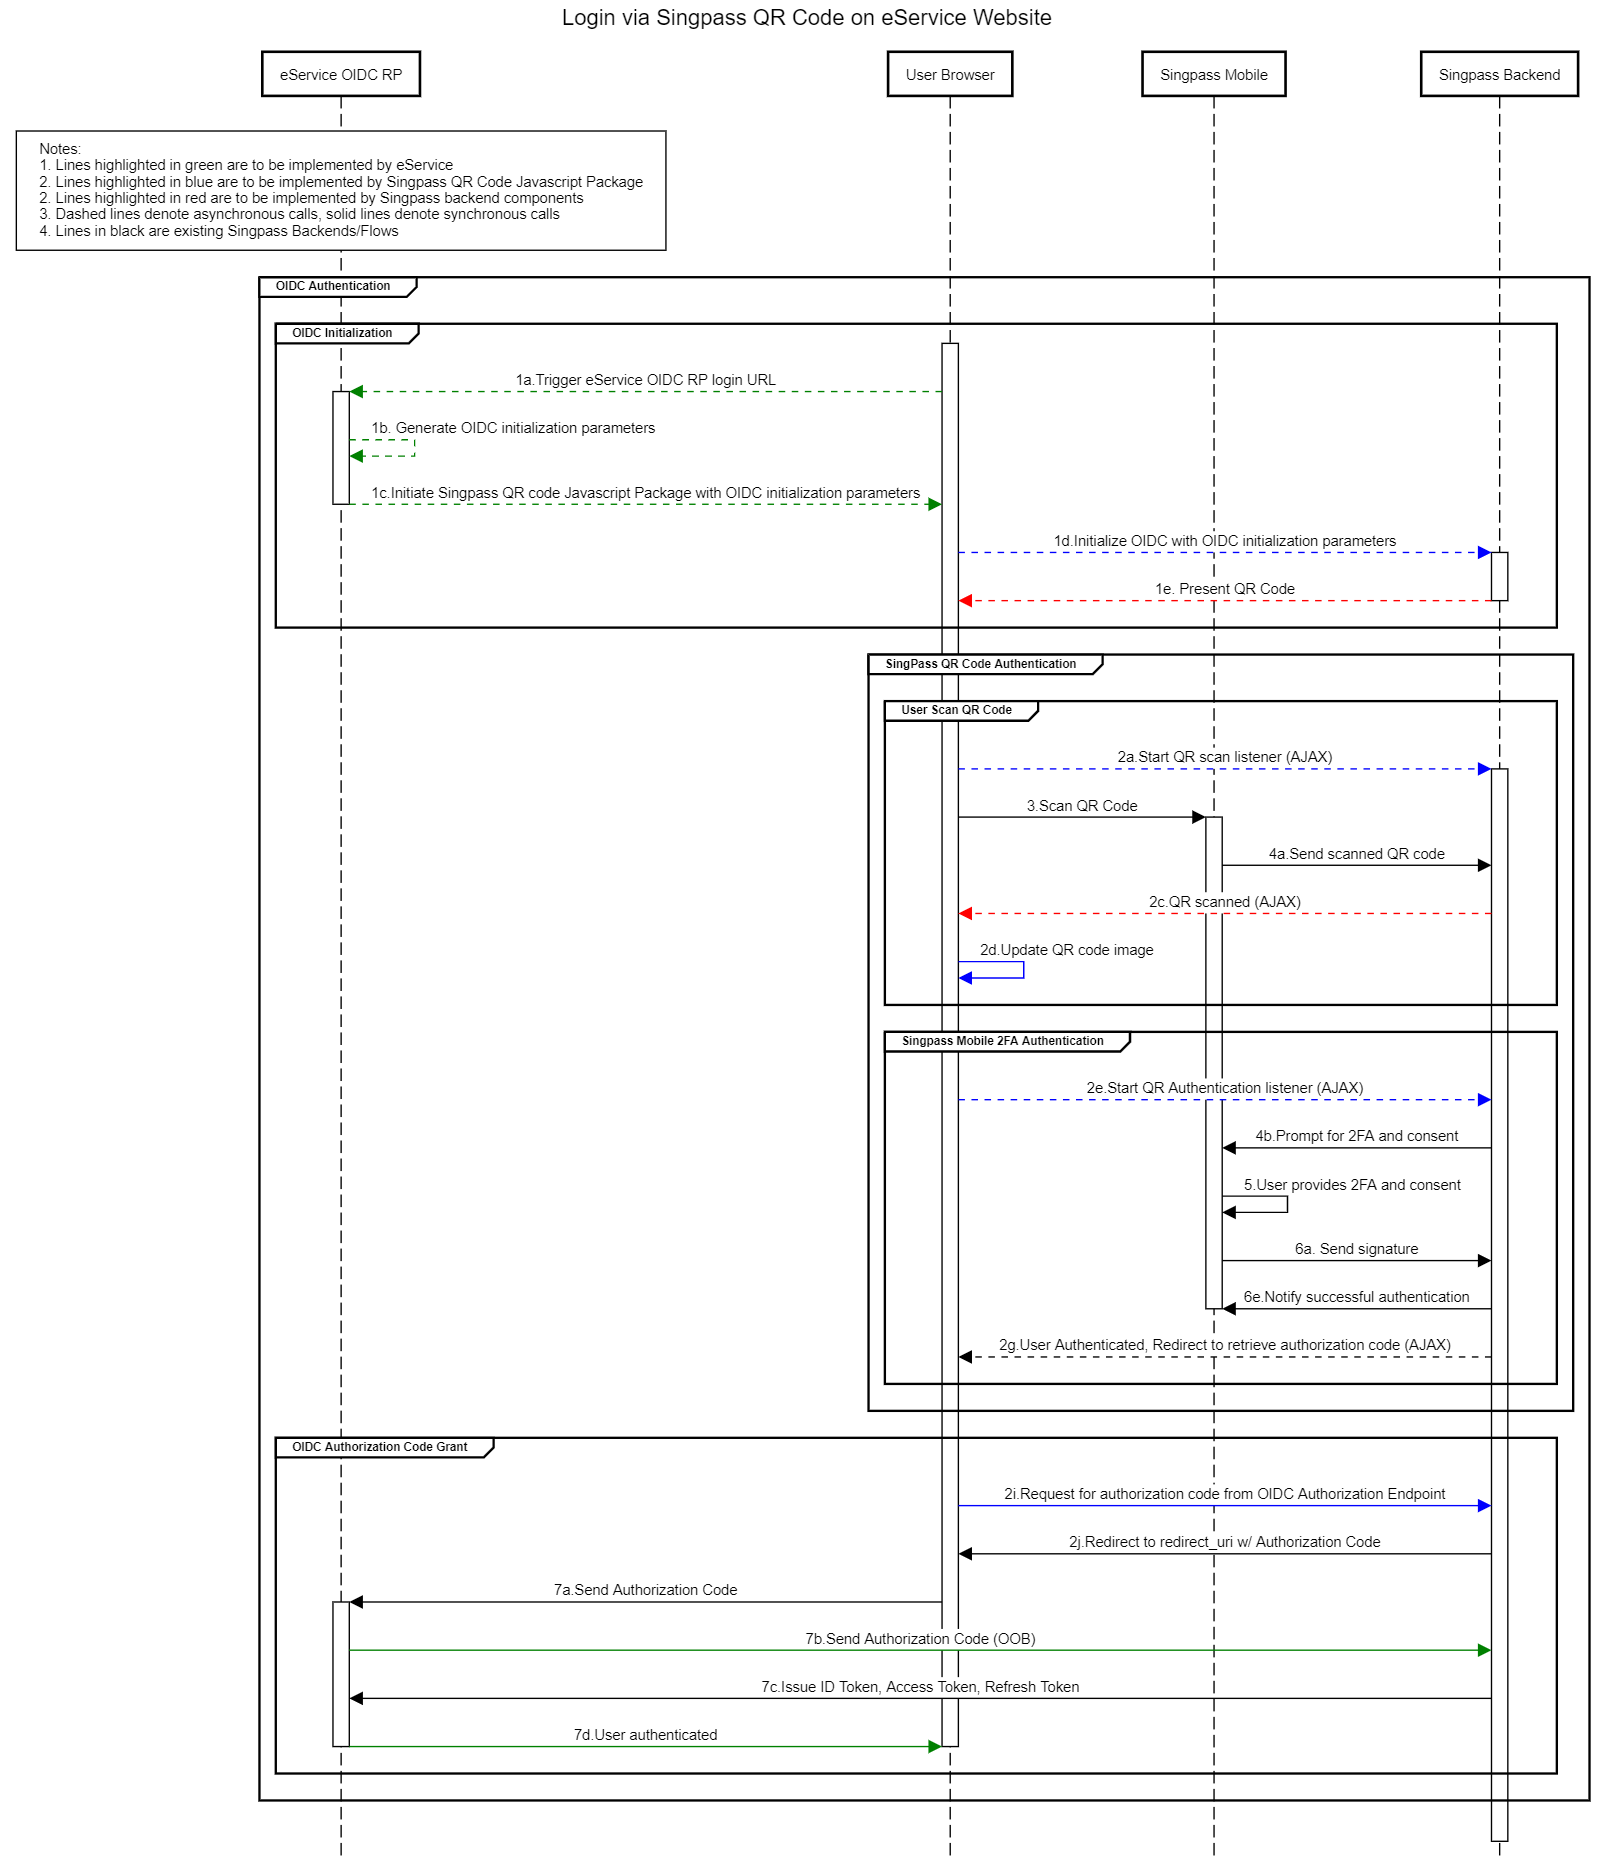
Singpass QR login uses OIDC authorization code flow. Singpass offers an embedded SDK that renders a QR code returned from the authorization endpoint.
<script src=”https://id.singpass.gov.sg/static/ndi_embedded_auth.js”></script>
Websites integrate with Singpass by hosting NDI embedded Javascript SDK. On page load, the Singpass SDK starts an authorization flow, with the state and nonce loaded to the page from the backend.
const authParamsSupplier = async () => {
      return { state: "my-state", nonce: "my-nonce"};
  };

const onError = (errorId, message) => {
    console.log(`Error. errorId:${errorId} message:${message}`);
};

const initAuthSessionResponse = window.NDI.initAuthSession(
    'ndi-qr',
    {
        clientId: SINGPASS_CLIENT_ID,
        redirectUri: SINGPASS_REDIRECT_URL,
        scope: 'openid',
        responseType: 'code'
    },
    authParamsSupplier,
    onError
);
NDI clients call authorization endpoint to return an embedded QR code. The Singpass app then scans the generated QR code, and the user then confirms the login. Next, the Embedded SDK receives a confirmation over Websocket and redirects to the client’s callback URL with an authorization code and state.
After the exchange, id_token’s sub claim contains either an opaque digital identifier known as UUID or a combination of UUID and NRIC.
{
   "sub" : "s=S8829314B,u=1c0cee38-3a8f-4f8a-83bc-7a0e4c59d6a9",
   "aud" : "xxNsTfleQMHoW6tbUgSVNwnLWQ0xTeV0",
   "iss" : "https://stg-id.singpass.gov.sg",
   "exp" : 1609907975,
   "iat" : 1609907375,
   "nonce" : "alh5DS2Gfndv9i0jXYViqGIhiQdP4+4BrUvBhDXBYKk=",
   "amr" : [ "pwd", "swk" ]
}
Depending on the information requested, id_token is either signed or encrypted.

Integrate Singpass with Auth0
During the discovery phase, we noticed some gaps between what Auth0 offers for integration with external OIDC providers and what Singpass required.
First challenge was that the nonce parameter that applications send to Auth0 is not available within UL where we wanted to initiate the NDI SDK.
Second, Auth0 currently does not support the client-assertion for token endpoints of OIDC connections.
Singpass expects clients to use asymmetric client_assertion JWT and customers should follow NDI’s process to generate an Elliptic-curve keypair and host public key in a public-facing jwks.json file.
Customer’s public-key URL is shared with Singpass during lodging the application.
Lastly, Singpass’s id_token signing signature (id_token_signing_alg_values_supported), is ES256 as pointed in their openid-configuration.
Auth0 only supports RS256 signed id_tokens from upstream connections.
While integrating Singpass with Auth0 is not a native feature, we hope to build a simpler and easier solution in the future.
Want to get up to speed with OAuth2 and OpenID Connect?
Download the free ebook
Technical Details
Our field team decided to challenge themselves by taking available tools within the Auth0 extensibility platform and develop an integration path for Singpass on Auth0.
We decided to proxy both authorization and token endpoints. The proxied version adds missing features of appending nonce, performing exchange with client_assertion, and validating the ES256 signature in return.
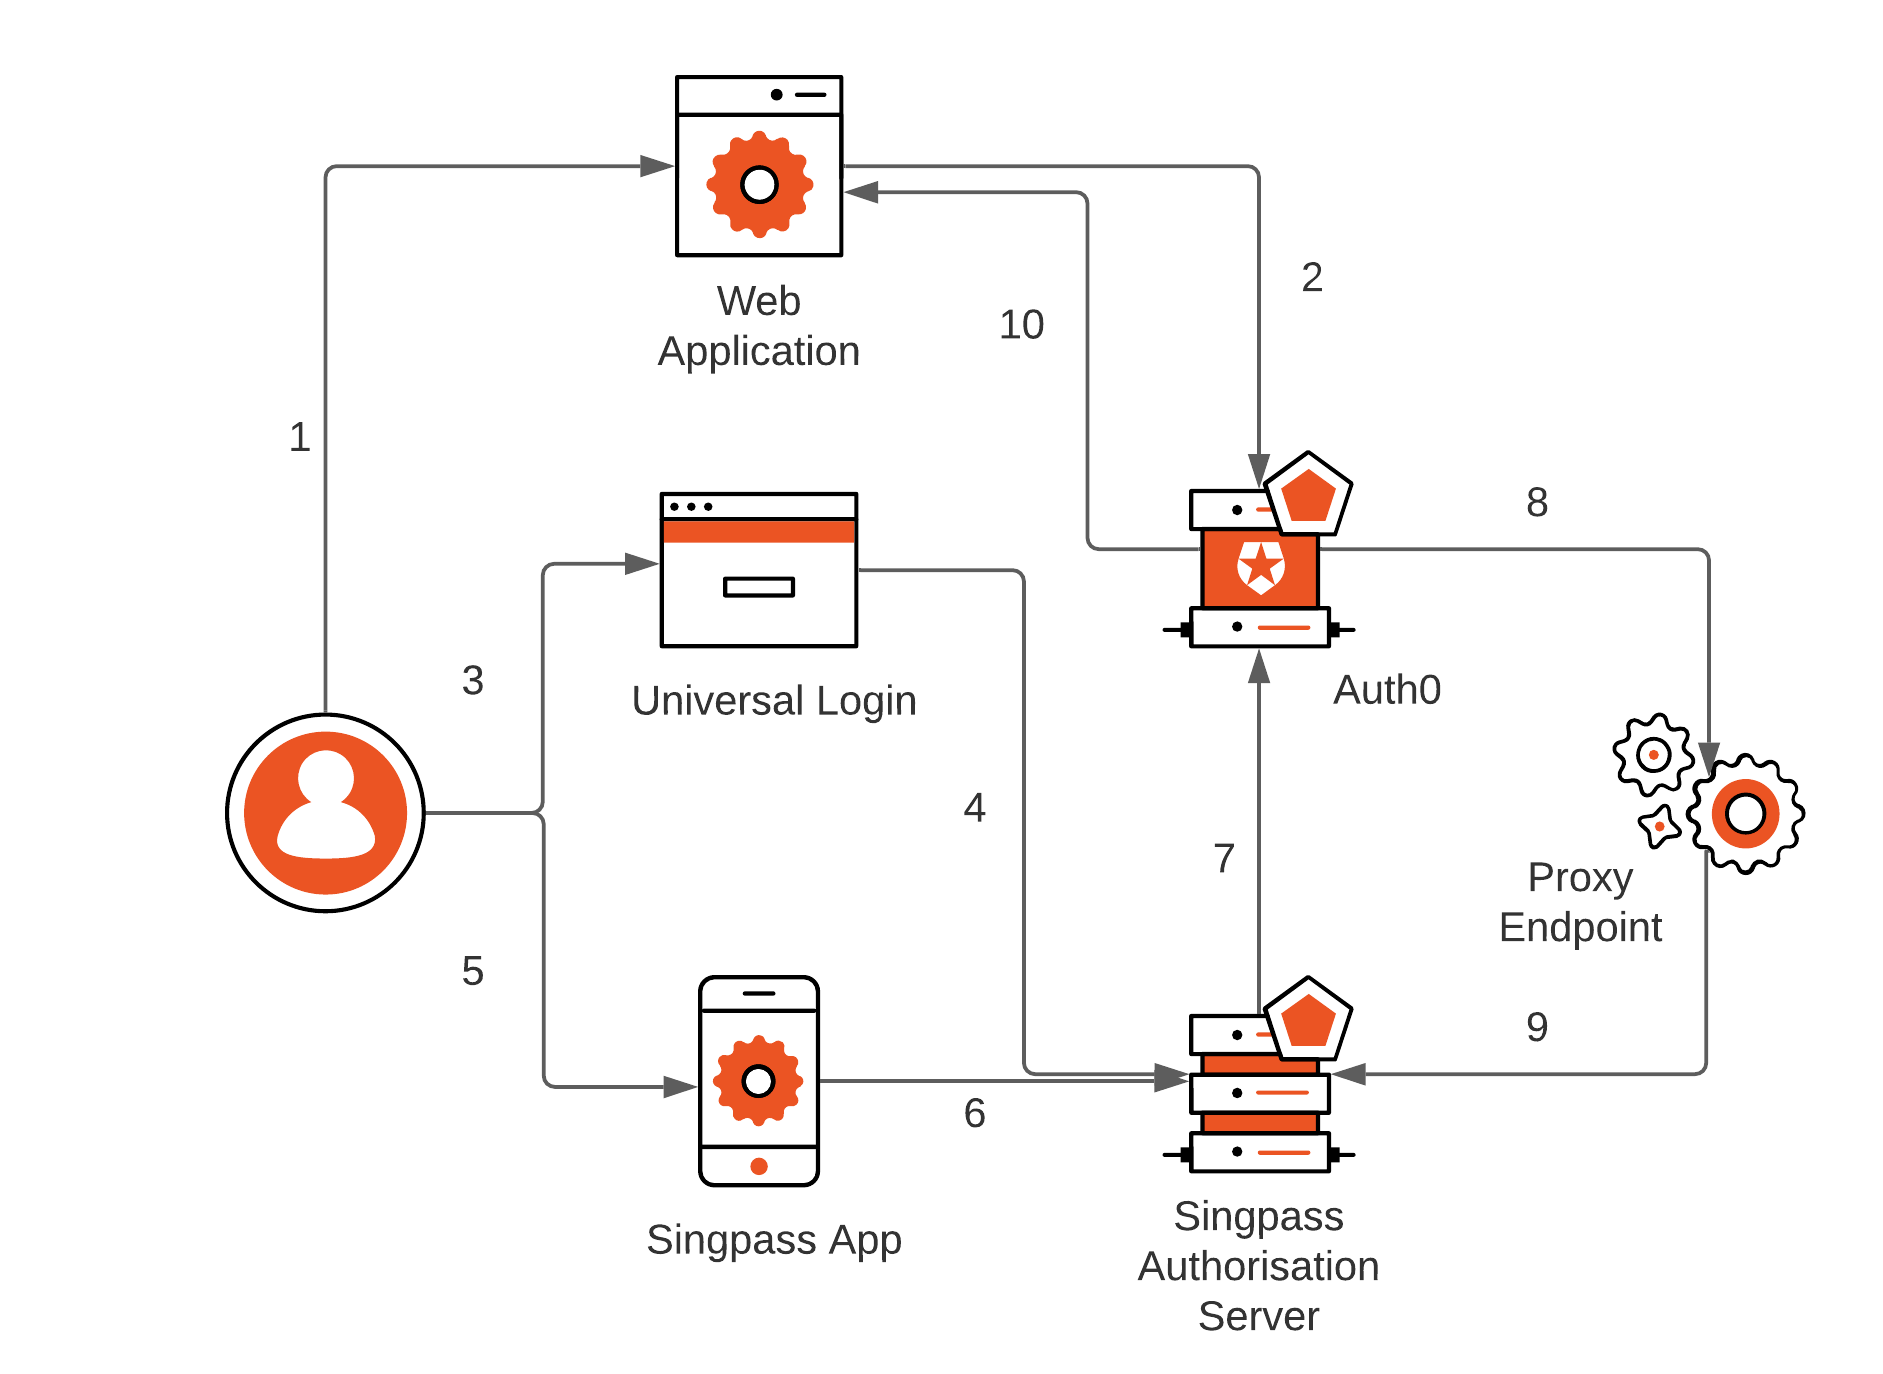
- User visits an application that requires authentication against Auth0
- Auth0 detects no session and redirects to Universal Login page for interactive authentication
- User selects login with Singpass from available logon options
- NDI library inside UL page initiates connection with Singpass, fetches QR code, and displays it
- User opens up Singpass app and scans the QR code
- Singpass app communicates to Singpass authorization server in back-channel and accepts logon
- Singpass redirects a callback to Auth0’s/login/callback endpoint using the front channel from the NDI SDK on the UL page
- Auth0 connects to the proxy /token endpoint to exchange authorization code. Token endpoint validates client credentials
- Proxy endpoint creates private_jwt client assertion and exchanges authorization code, validates response and returns results to Auth0
- Auth0 decodes returning
id_tokenfrom Singpass and issues its ownid_tokento the application, completing the sign-in flow
We developed four open-source versions of proxy endpoint; hosted on Auth0, AWS Lambda, Cloudflare Workers, and vanilla Express.js. In the rest of this article, we will focus on the configuration of the Singpass integration proxy inside Auth0. For production use, we suggest hosting proxy endpoints in your environment.
Deploying Singpass Integration Proxy
First, create a SPA companion app with Allowed Callback URLs set to "https://your-custom-domain/login/callback".
Then head to Extensions, click on "Create Extension" and enter GitHub URL https://github.com/auth0-extensions/auth0-singpass-extension. During installation populate with the correct values as follows:
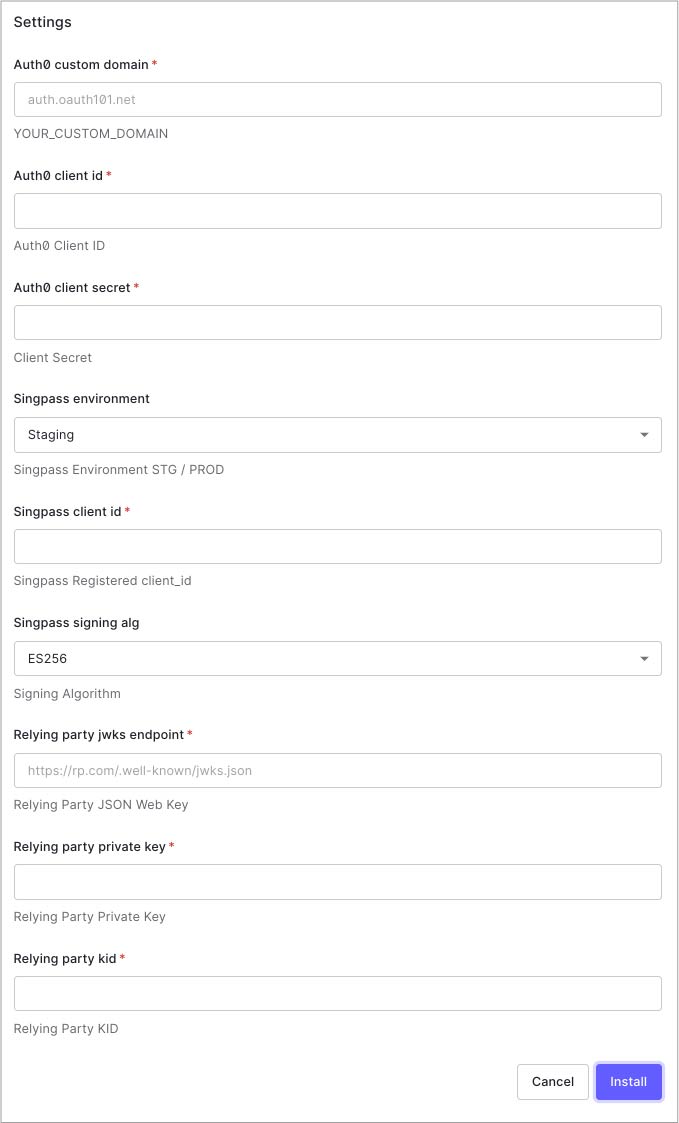
Values are:
- Auth0 custom domain
This is your Auth0 custom domain name. You need to have a custom domain name enabled in Auth0 - Auth0 client id
client_idof companion app in Auth0 - Auth0 client secret
client_secretof companion app in Auth0 - Singpass environment
Is set to Staging only. - Singpass client id
client_idassigned to you from Singpass - Singpass signing alg
AlwaysES256 - Relying on party jwks endpoint
This is your JWKS endpoint used during Singpass onboarding registration - Relying on party private key
Your Elliptic-curve private key used during Singpass onboarding registration. This is not required if the proxy endpoint is running in your own infrastructure, which is the preferred deployment method for production - Relying on party kid
This is your JWKS key ID used during Singpass onboarding registration
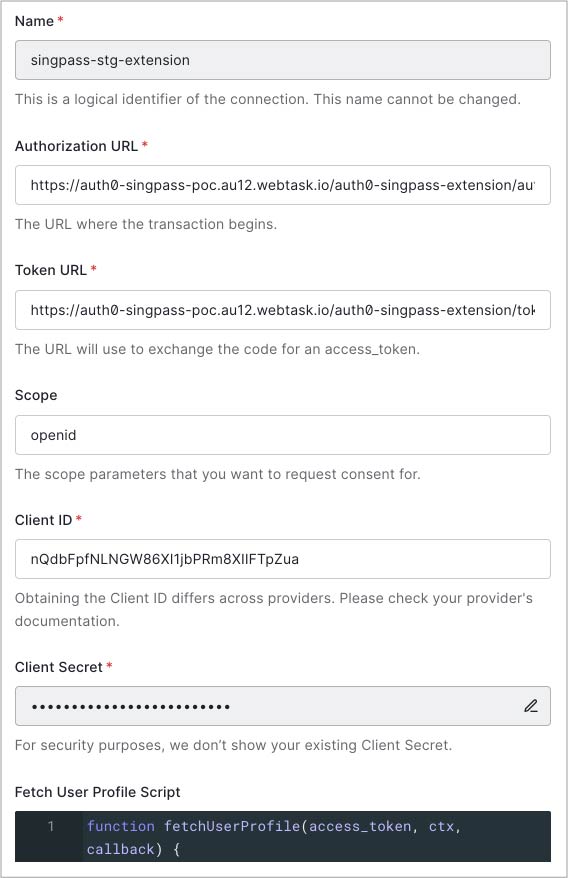
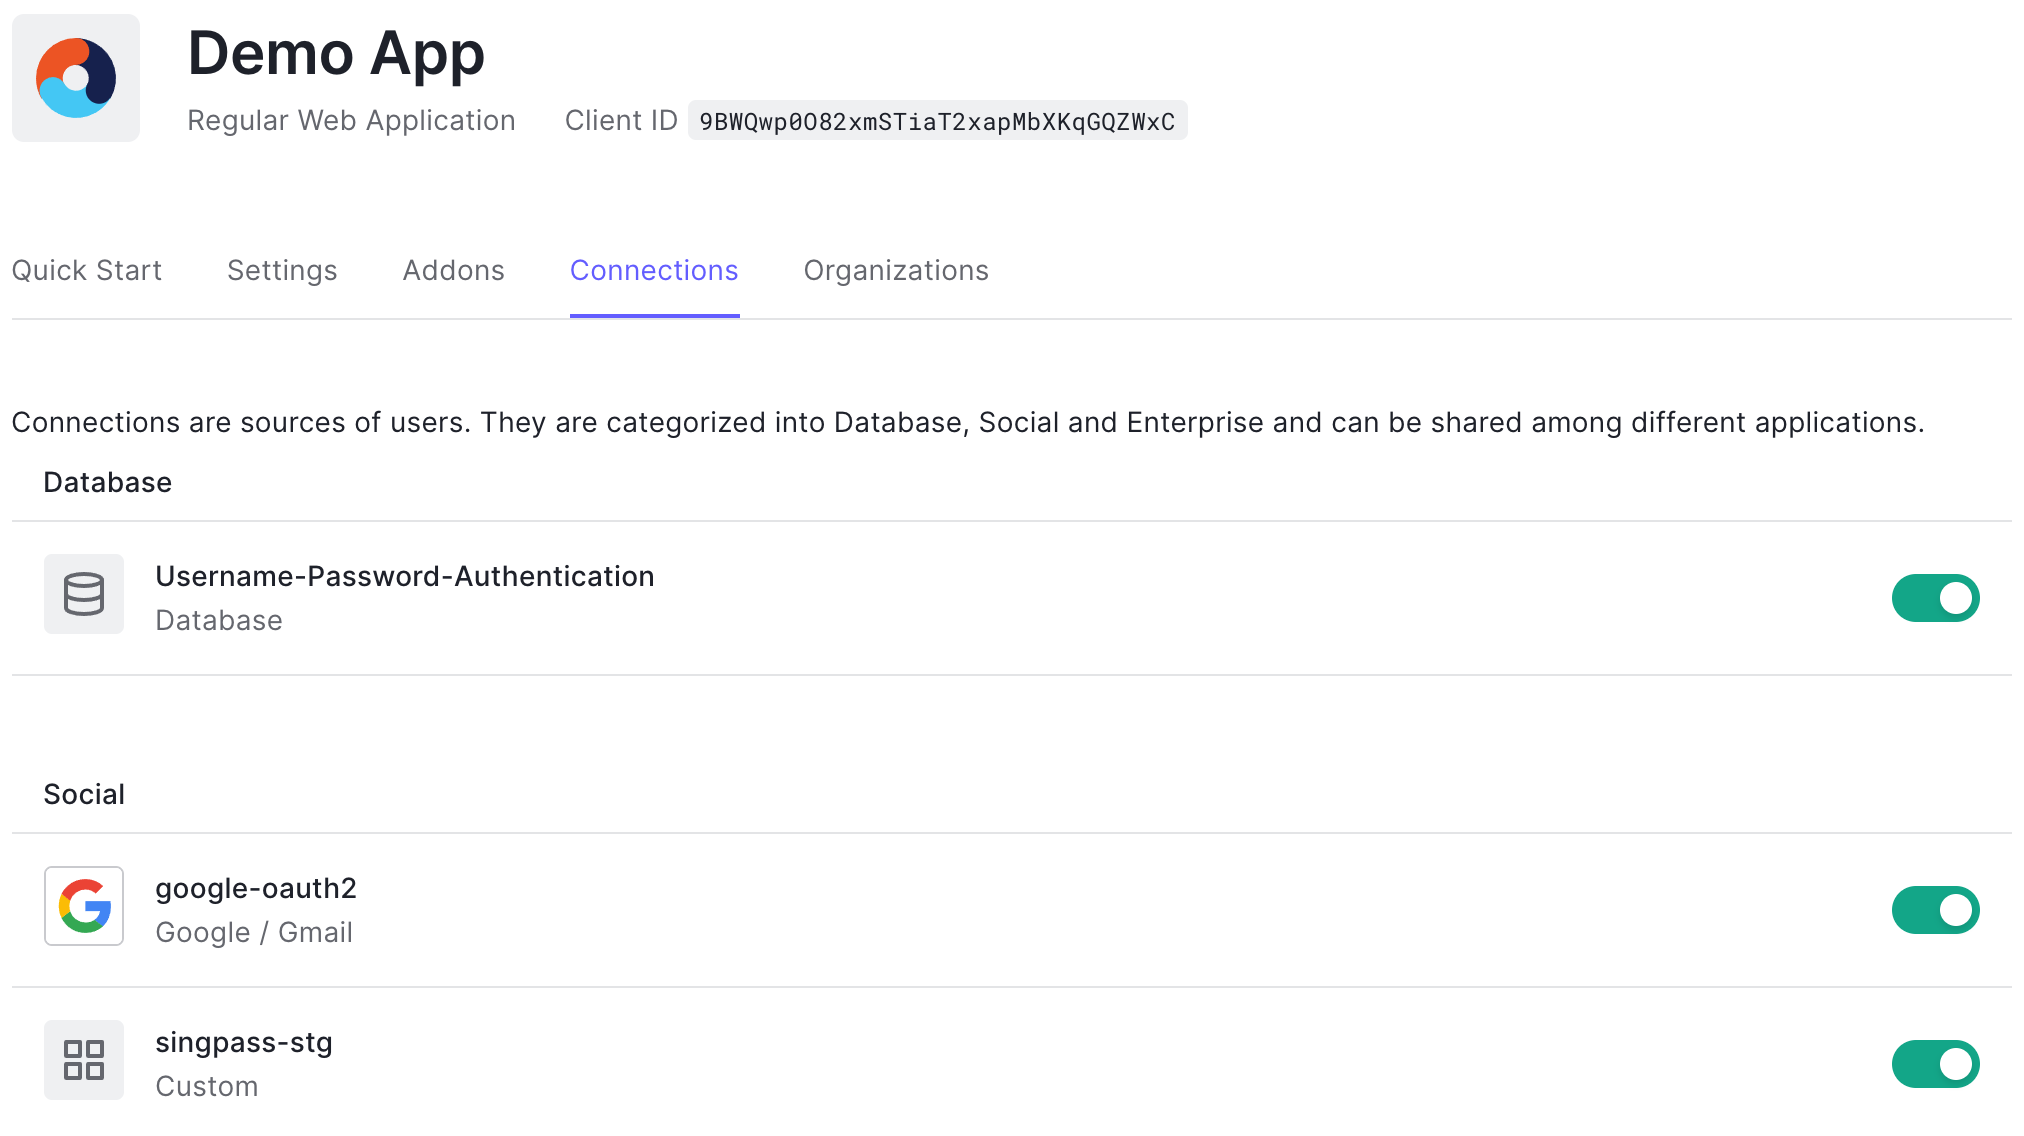
Once installed, you’ll need to Singpass connection under Authentication > Social > Create Connection > Create Custom. Use client_id and secret from companion app and populate URLs depending on your tenant region and node version as documented here. Fetch User Profile script template is also available in Github repo. Ultimately enable PKCE on this connection.
Then enable this connection to applications that require sign-in with Singpass:
Universal Login
Next, configure Universal Login to host NDI SDK and render QR login code when requested. Head to Branding > Universal Login > Login. Enable “Customize Login Page” and configure page HTML.
    <script src="https://cdn.auth0.com/js/lock/11.30/lock.min.js"></script>
    <!-- ADDED for Singpass -->
    <script src="//code.jquery.com/jquery-3.1.0.min.js"></script>
    <script src="https://stg-id.singpass.gov.sg/static/ndi_embedded_auth.js"></script>
    <!-- /ADDED -->
Add authButtons under theme object of Lock configuration:
var lock = new Auth0Lock(config.clientID, config.auth0Domain, {
    // ...
    theme: {
      authButtons: {
        "singpass": {
          displayName: "Singpass",
          primaryColor: "#cf0b15",
          foregroundColor: "#FFFFFF",
          icon: "https://app.singpass.gov.sg/apple-touch-icon.png"
        }
      }
    }
  });
And logic to render QR code as following:
lock.once('signin ready', function () {
  console.log('siginin ready');
  if (config.extraParams.singpass) {
    $(".auth0-lock.auth0-lock").removeProp("box-sizing");
    var connectionConfig = initConnectionConfig();
    addEnterpriseConnections(connectionConfig);
    init();
  }
});

lock.show();

function initConnectionConfig() {
  return {
    general: {
      backButton: '<span class="auth0-lock-back-button"><svg focusable="false" enable-background="new 0 0 24 24" version="1.0" viewBox="0 0 24 24" xml:space="preserve" xmlns="http://www.w3.org/2000/svg" xmlns:xlink="http://www.w3.org/1999/xlink"> <polyline fill="none" points="12.5,21 3.5,12 12.5,3 " stroke="#000000" stroke-miterlimit="10" stroke-width="2"></polyline> <line fill="none" stroke="#000000" stroke-miterlimit="10" stroke-width="2" x1="22" x2="3.5" y1="12" y2="12"></line> </svg></span>',
      enterprise_panel: '<div id="ndi-qr" class="auth0-enterprise-button-content"></div>'
    }
  };
}

function addEnterpriseConnections(connectionConfig) {
  var backButton = $(connectionConfig.general.backButton);
  $('.auth0-lock-submit').hide();
  backButton.appendTo('.auth0-lock-header');
  backButton.on('click', function (e) {
    e.preventDefault();
    window.history.back();
  });
  var enterprisePanel = $(connectionConfig.general.enterprise_panel);
  enterprisePanel.appendTo('.auth0-lock-body-content');
  $('.auth0-lock-content').hide();
  enterprisePanel.show();
}

function init() {
  const authParamsSupplier = async () => {
    // Replace the below with an `await`ed call to initiate an auth session on your backend
    // which will generate state+nonce values, e.g
    return { state: decodeURIComponent(config.extraParams.ndi_state), nonce: decodeURIComponent(config.extraParams.ndi_nonce) };
  };

  const onError = (errorId, message) => {
    console.log(`onError. errorId:${errorId} message:${message}`);
  };

  const initAuthSessionResponse = window.NDI.initAuthSession(
          'ndi-qr',
          {
            clientId: SINGPASS_CLIENT_ID, // Replace with your Singpass client ID
            redirectUri: SINGPASS_AUTH0_CALLBACK,        // Replace with your Auth0 custom domain
            scope: 'openid',
            responseType: 'code'
          },
          authParamsSupplier,
          onError,
          {
            renderDownloadLink: false,
            appLaunchUrl: '' // Replace with your iOS/Android App Link
          },
  );

  console.log('initAuthSession: ', initAuthSessionResponse);
}
You can find the full version of the custom Universal Login page here.
How it Looks in Action
You should be able to see Log in with Singpass as connections options on the login page.

Click on "Log in with Singpass. QR code renders.

Scan the QR code with the Singpass mobile app.

User Profile
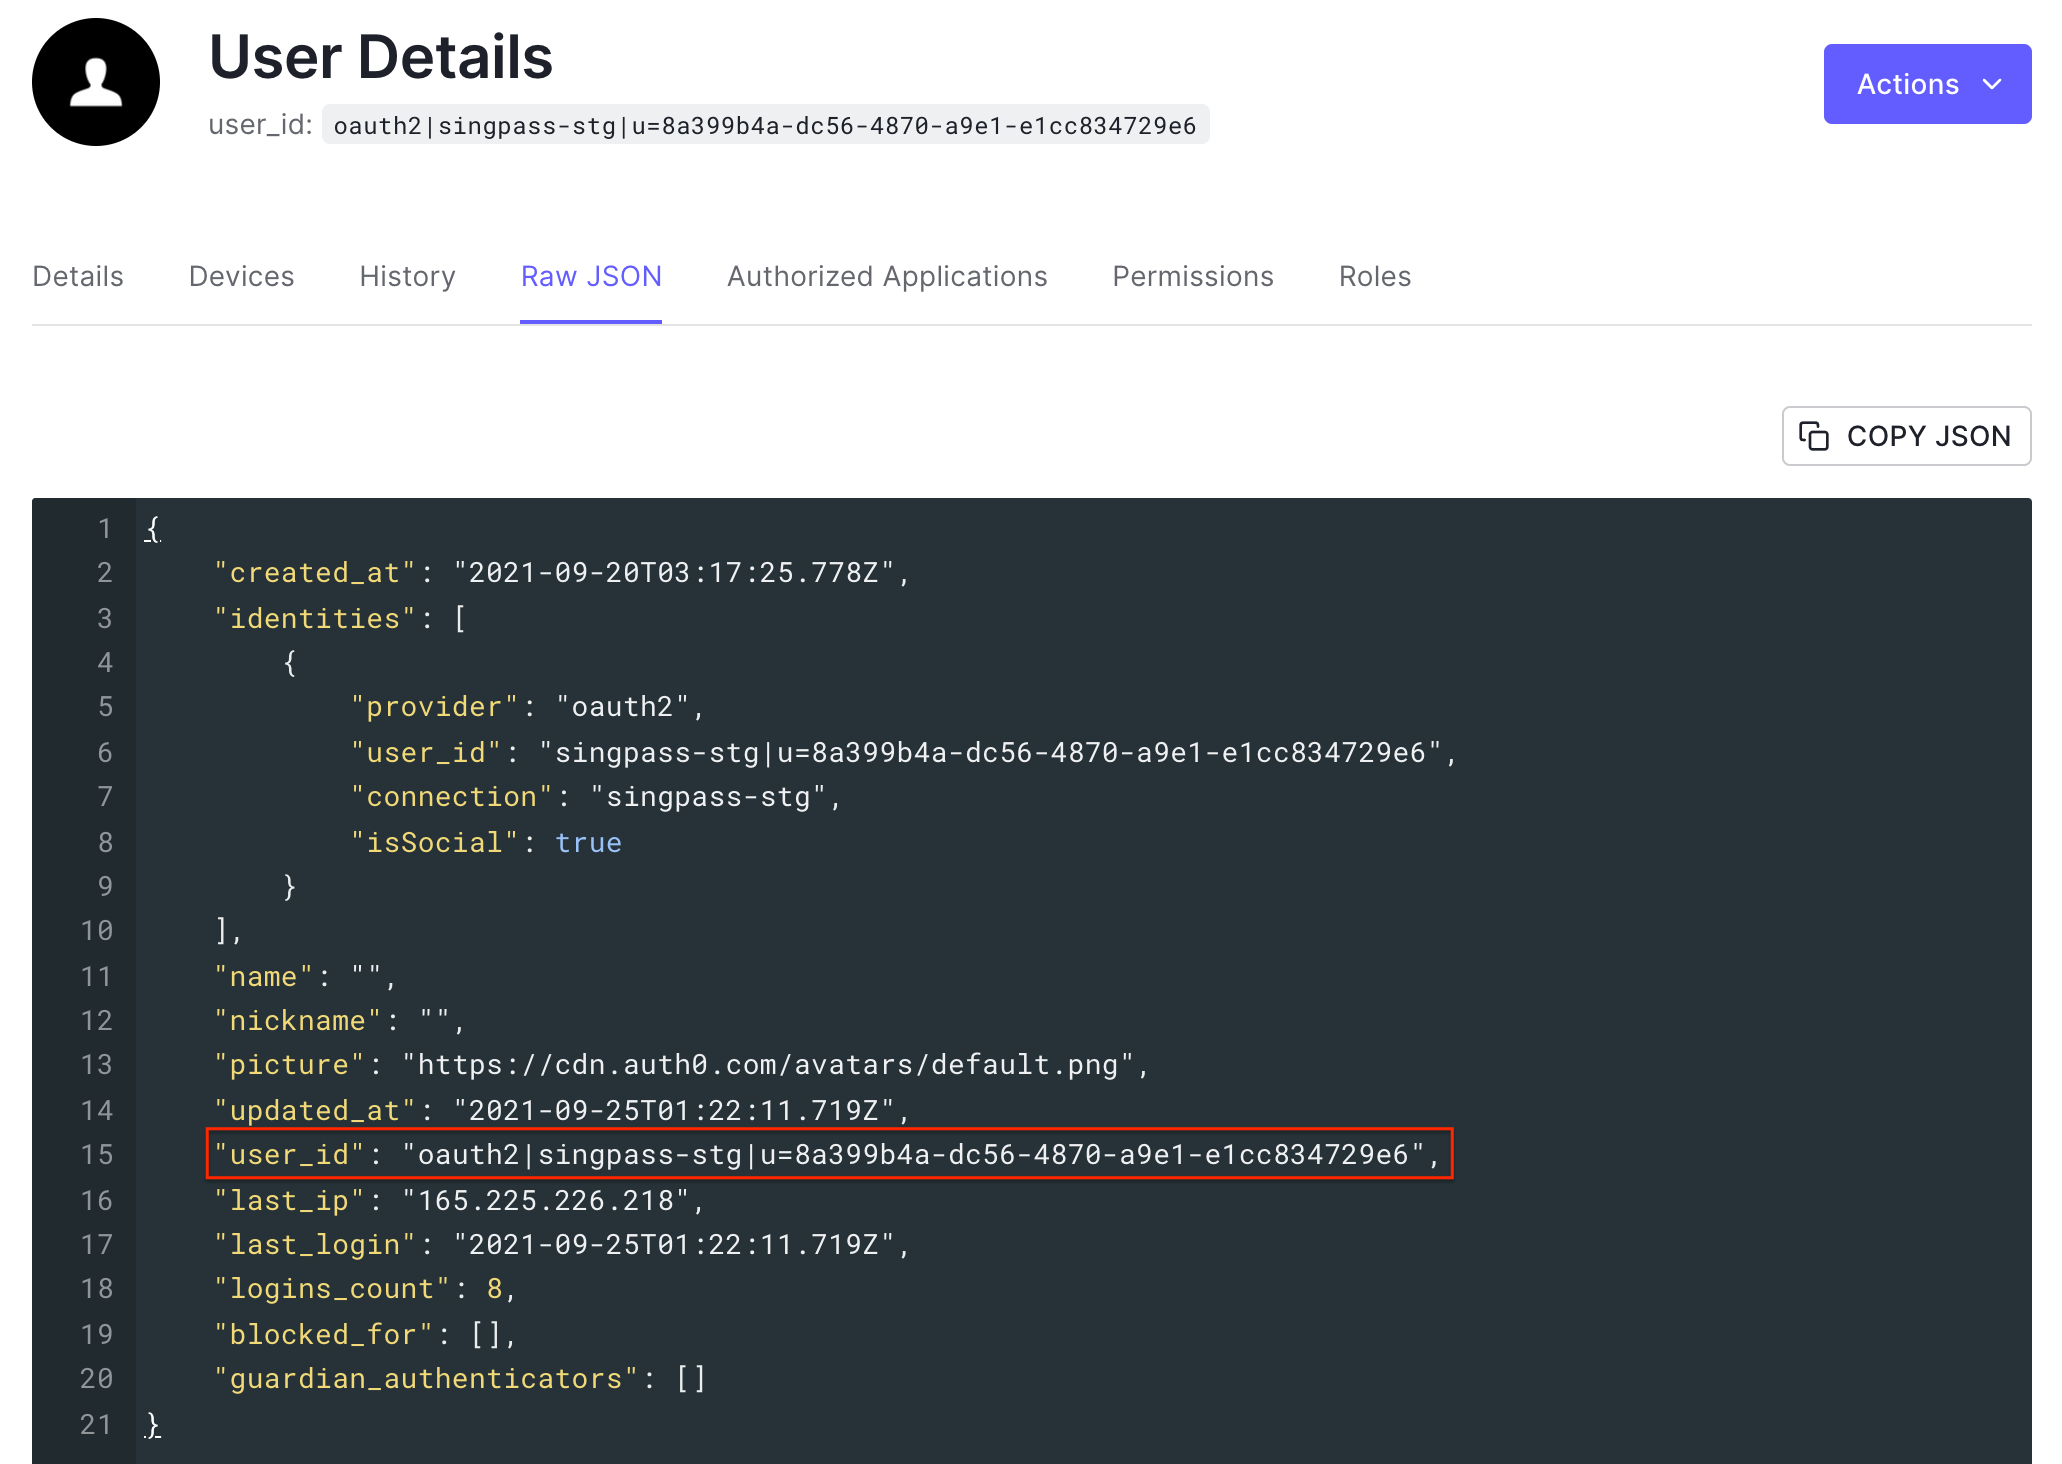
We’re taking Singpass UUID to form Auth0 user_id. That logic is sitting in the Fetch User Profile script of the Singpass connection.
In the next article, we will enable Myinfo, where you will fetch email and name information and use it to link Singpass users with existing customers with matching details. Stay tuned!
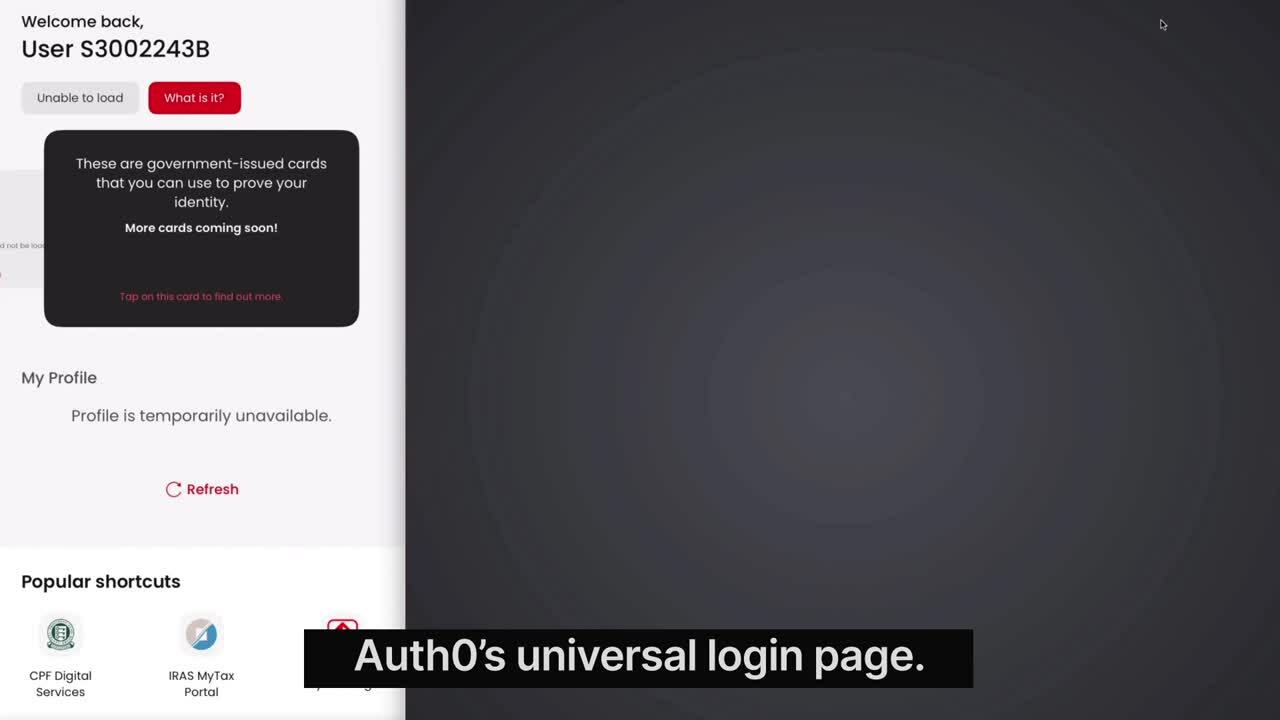
Login experience in Action
Note: This video is captured with staging app (v13.0.0-stg) in the staging environment. The actual app interface might be different.
About Auth0
Auth0 by Okta takes a modern approach to customer identity and enables organizations to provide secure access to any application, for any user. Auth0 is a highly customizable platform that is as simple as development teams want, and as flexible as they need. Safeguarding billions of login transactions each month, Auth0 delivers convenience, privacy, and security so customers can focus on innovation. For more information, visit https://auth0.com.