
When building an application, ensuring a great user experience is a key to user engagement, ultimately impacting how happy your users are with your product. A critical aspect of how a user experiences your application is latency. This is especially true when end-users are globally distributed, as latency is dependent on the distance between the end-user and where the application is being served.
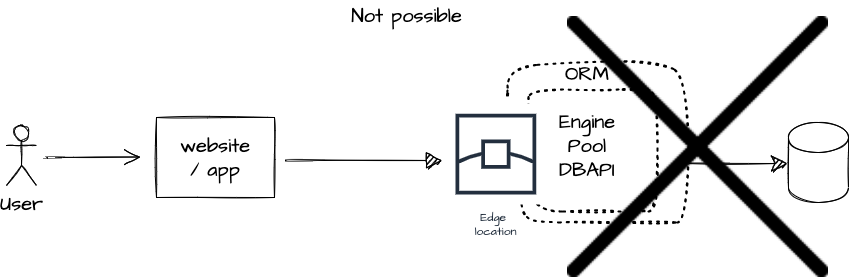
Yesterday’s applications didn’t need to provide millisecond response times for users anywhere in the world, so most compute and database options found in production today cannot handle the use case. But with edge computing, there may finally be an easy way to move applications closer to the end-user, if only databases were quick to adapt to this new architecture. If you’re building an API today, you cannot simply “deploy” any database at the edge like the picture shown below, as the edge cannot fully replace the function of a true server.
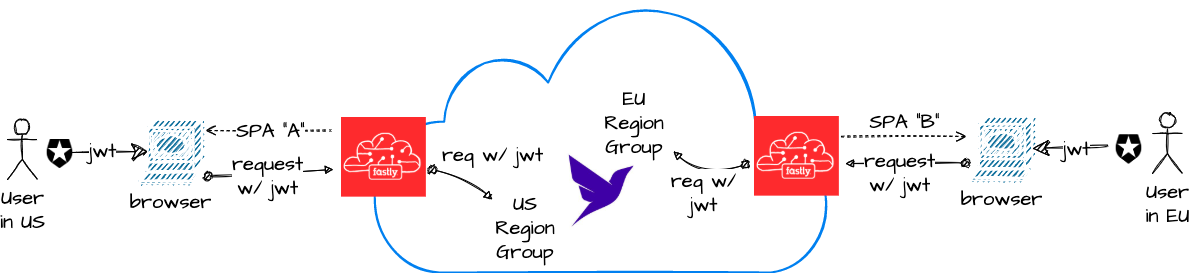
So what you’re left with is placing the API (still requiring the app server, database, and all) behind the edge, in the configuration shown below:
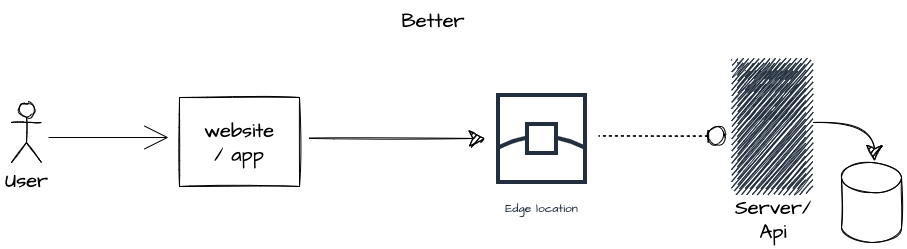
This is still an improvement, as it adds resiliency and reduces latency by caching results where possible. But if speed is the goal, can you do better? Notice the database still has to sit somewhere relative to the edge locations everywhere. What if the database is far from the user? Engineers have solved this by implementing globally sharded databases. But that’s complicated and expensive.
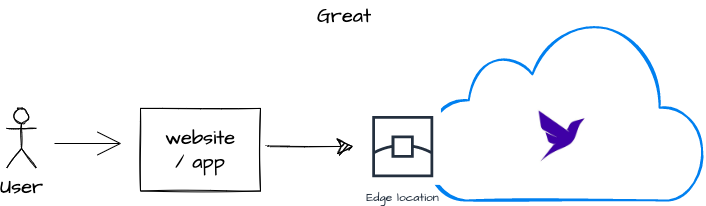
If you have the luxury of starting fresh and want to realize the full promise of scale, resiliency, and performance that edge computing provides, you need a globally distributed, serverless database that edge functions simply access using fetch. This is where Fauna comes into the picture.
What We’re Building
See the full sample of this tutorial’s content.
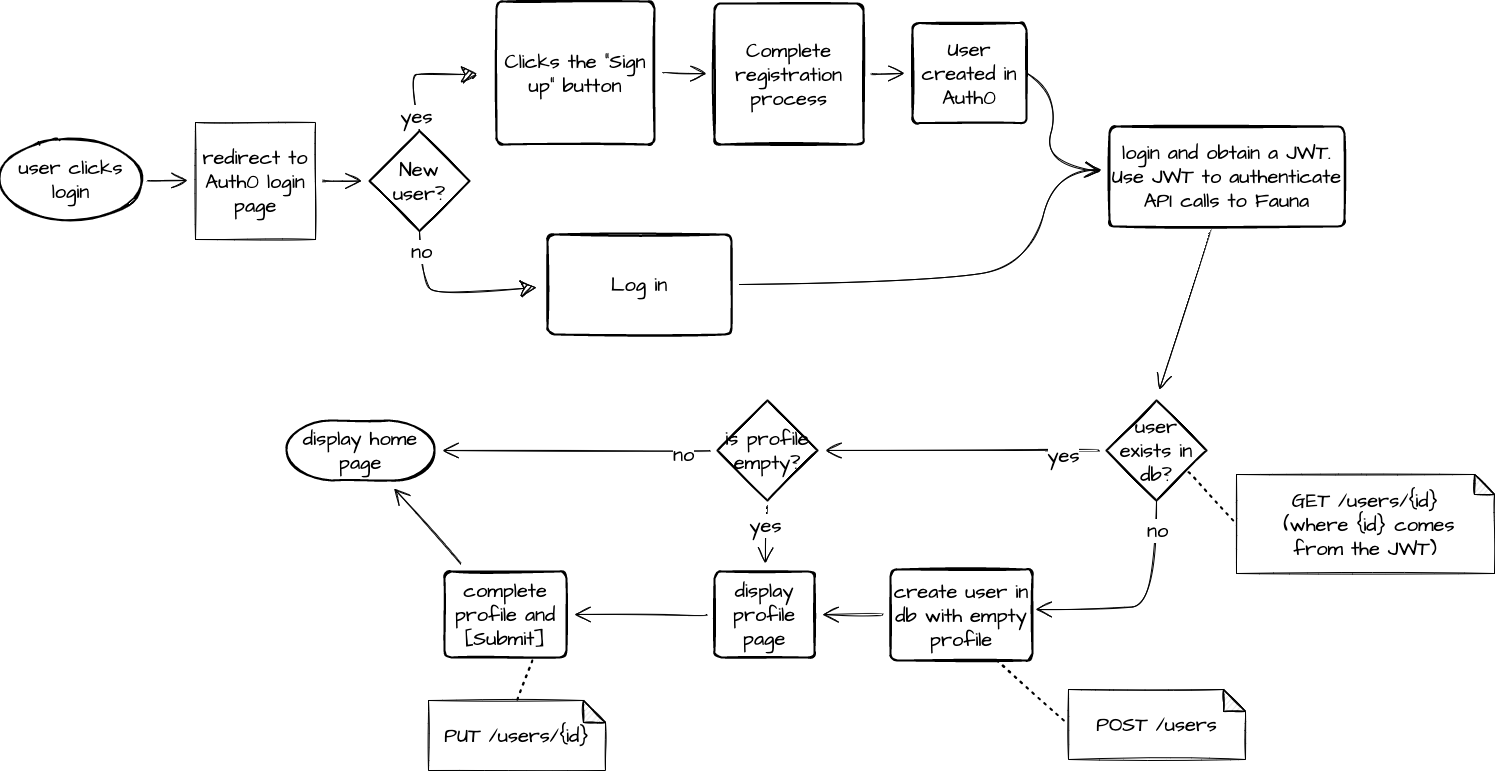
In this tutorial, we’ll explore architecting REST APIs in a fully serverless manner by leveraging edge computing and Fauna, and we’re going to secure the API requests with Auth0. In the interest of emphasizing speed, we’ll use Fastly’s Compute@Edge, which provides ultralow startup times and a low memory footprint via its WASI runtime. The examples below will walk you through building a user registration flow for a website. You’ll be implementing the /users resource and its GET, POST, and PUT methods.
We’ll also demonstrate two powerful features of Fauna:
- With Region Groups you can create your databases in geographic regions of your choice. You can then easily build GDPR compliant architectures by routing requests to specific region groups — with the help of the edge — depending on where the user is making the request from. The performance also benefits by having the request from the client to edge to the database being as close to each other as possible.
- Fauna supports external authentication with any Identity Provider (IdP) that supports the OpenID Connect protocol, allowing you to leverage a service such as Auth0 so that you can focus on developing features instead of worrying about security.
What’s Needed to Complete This Tutorial?
- An Auth0 account
- A Fauna account
- A Fastly account
- An API Client such as Postman or curl
- Node.js installed on your system
...and nothing else! No infrastructure is required because you won’t be standing up or deploying any servers.
Setting up Fauna
Your first step will be to configure a database through Fauna's dashboard. Login to the dashboard, and create a new database named client-serverless-api:
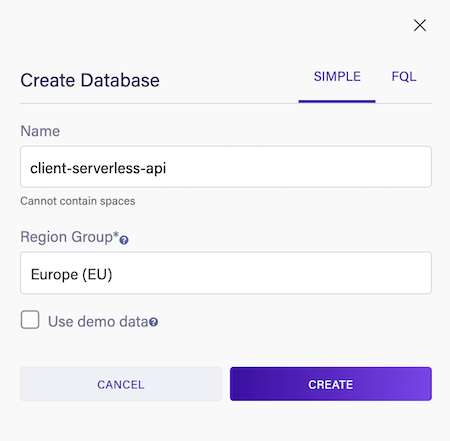
- For Region Group, choose Europe (EU) (for the sake of demonstrating Fauna’s multi Region Group capability).
Create the User Collection
From the left navigation, select Collections and click NEW COLLECTION. Provide a name, i.e. User and click SAVE.

The user model
Below is the design of our User model:
{
"user_id": "57a9160561254be4229bca97",
"email": "rainer.theo@mailinator.com"
"profile": {
"name": "Rainer Theo",
"countryCode": "DE",
"age": "23"
}
}
user_id— stores the Auth0 user idemail— A required fieldprofile— An optional field freeform JSON object
Create an index
There will be a GET /users/{id} and a POST /users/{id} API. So you’ll need to create an index which will allow you to query by user_id.
In the interest of learning, we’ll execute all our Fauna commands in the shell going forward, even though some resource configurations (such as creating and updating Collections and Indexes) are available using the UI.
From your Fauna dashboard, use the left navigation and select Shell. Enter the following query into the shell at the bottom of the screen then click RUN QUERY.
CreateIndex({
  name: "user_by_id",
  source: Collection("User"),
  terms: [
    { field: ["data", "user_id"] }
  ],
  unique: true
})
Since user_id should be unique, we specify the unique: true argument.
User defined functions

The feature-rich, expressive nature of FQL combined with the ability to save them as UDFs makes our implementation straightforward. The key approach will be to map each of the three API calls to their own UDF and then push as much logic as possible down to Fauna (the UDF) so that code running at the edge is really lightweight.
Let's start with POST /users, which we spec out as such:
POST /users
Parameters: JSON body containing email (optional) and an embedded profile JSON (optional). Headers: Authorization Bearer {{token}} Request example:
curl -X POST -H "Content-Type: application/json" \
-H "Authorization: Bearer eyJhb..." \
-d '{"email":"rainer.theo@mailinator.com", "profile": { "name": "Rainer Theo" } }' \

https://example.domain.eu/api/users
Response example:
{
"user_id": "57a9160561254be4229bca97",
"email": "rainer.theo@mailinator.com",
"profile": {
"name": "Rainer Theo"
}
}
user_idis automatically populated using thesub(subject) claim in the bearer token. Anyuser_idvalue provided in aPOST /usersrequest body will be ignored.- Auth0 populates
subwith its internaluser_id, e.g.auth0|57a9160561254be4229bca97.
The first thing you’ll do is create your first role. Custom roles can be defined and attached to UDFs, providing them permissions to operate on resources. You’ll need a role that can read, write, and create Users (you’ll then attach this role to the “Create User” UDF). Run the following query:
CreateRole({
  name: "usersCRUD",
  privileges: [
    {
      resource: Collection("User"),
      actions: {
        read: true,
        write: true,
        create: true,
      }
    },
    {
      resource: Index("user_by_id"),
      actions: {
        unrestricted_read: true
      }
    }
  ]
})
- We’re also going to need this role later on when we implement GET and PUT, so it should also have the permission to read the userbyid index.
Now, run this query to create the CreateUser UDF:
CreateFunction({
  name: "CreateUser",
  body: Query(
    Lambda(
      ["body"],
      Let(
        {
          email: Select(["email"], Var("body"), null),
          profile: Select(["profile"], Var("body"), null),
          dataForCreate: {
            user_id: CurrentIdentity(),
            email: Var("email"),
            profile: Var("profile")
          }
        },
        Do(
          Create(Collection("User"), { data: Var("dataForCreate") }),
          Var("dataForCreate")
        )
      )
    )
  ),
  role: Role("usersCRUD")
})
- When you authenticate Fauna with a JWT (External Authentication), the CurrentIdentity() function returns the
subclaim of the JWT. - FQL allows us to return precise responses to the caller. Because we want the API response to look like what we defined in our spec, we call
Var("dataForCreate")right at the end. Otherwise, we'll get the standard response ofCreate(), which won't look the same.
Auth0 AccessProvider setup
You’re almost ready to test CreateUser, but first, you’ll need a JWT from Auth0 and there’s an integration to complete.
Step 1: Create an AccessProvider in Fauna: Create a role that has access to call the CreateUser function:
CreateRole({
  name: "APIsRole",
  privileges: [
    {
      resource: Function("CreateUser"),
      actions: {
        call: true
      }
    }
  ],
})
This sets up a custom role for our Auth0 integration, which we’ll need when configuring the Auth0 AccessProvider.
Next, use the UI to create an AccessProvider: From the left navigation panel, select Security > Providers. Then click NEW ACCESS PROVIDER.
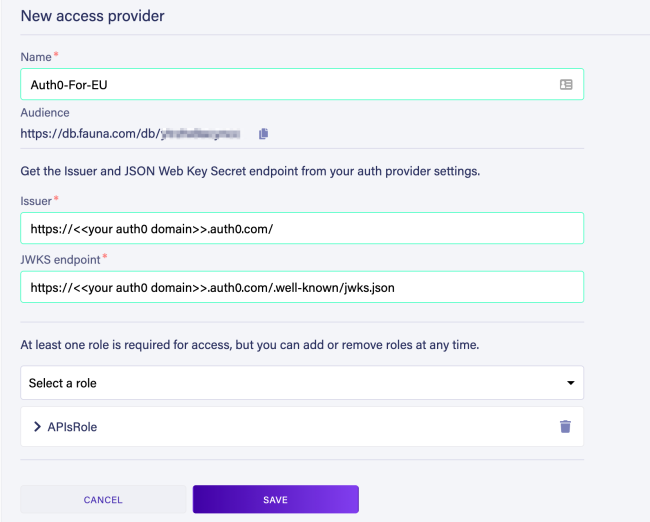
- Provide a name. e.g. Auth0-For-EU.
- Copy the Audience value for "Step 2" (after this section).
- Set Issuer =
https://<<your auth0 domain>>.auth0.com/and JWKS endpoint =https://<<your auth0 domain>>.auth0.com/.well-known/jwks.jsonand replace<<your auth0 domain>>with your own Auth0 domain name. (Your Auth0 domain can be found in the top left-hand corner of your Auth0 dashboard. See screenshot below.)

Note: Depending on the version of your Auth0 account, you may have a subdomain variation that includes region, e.g. https://mydomain.us.auth0.com/
- Select the APIsRole role (from the previous step) where the “Select a role” dropdown is.
- Click SAVE.
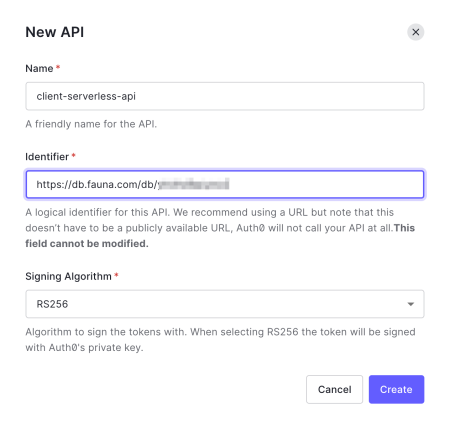
Step 2: Setup an API in Auth0:
Sign in to Auth0. From the left navigation panel, select Applications > APIs. Provide a Name, e.g. client-serverless-api, and paste the Audience value copied in the previous step into the Identifier field. Click Create.
Once that API is created, navigate to the Test tab. Copy the value of access_token from the sample response (see screenshot below), then head back to the Fauna shell.
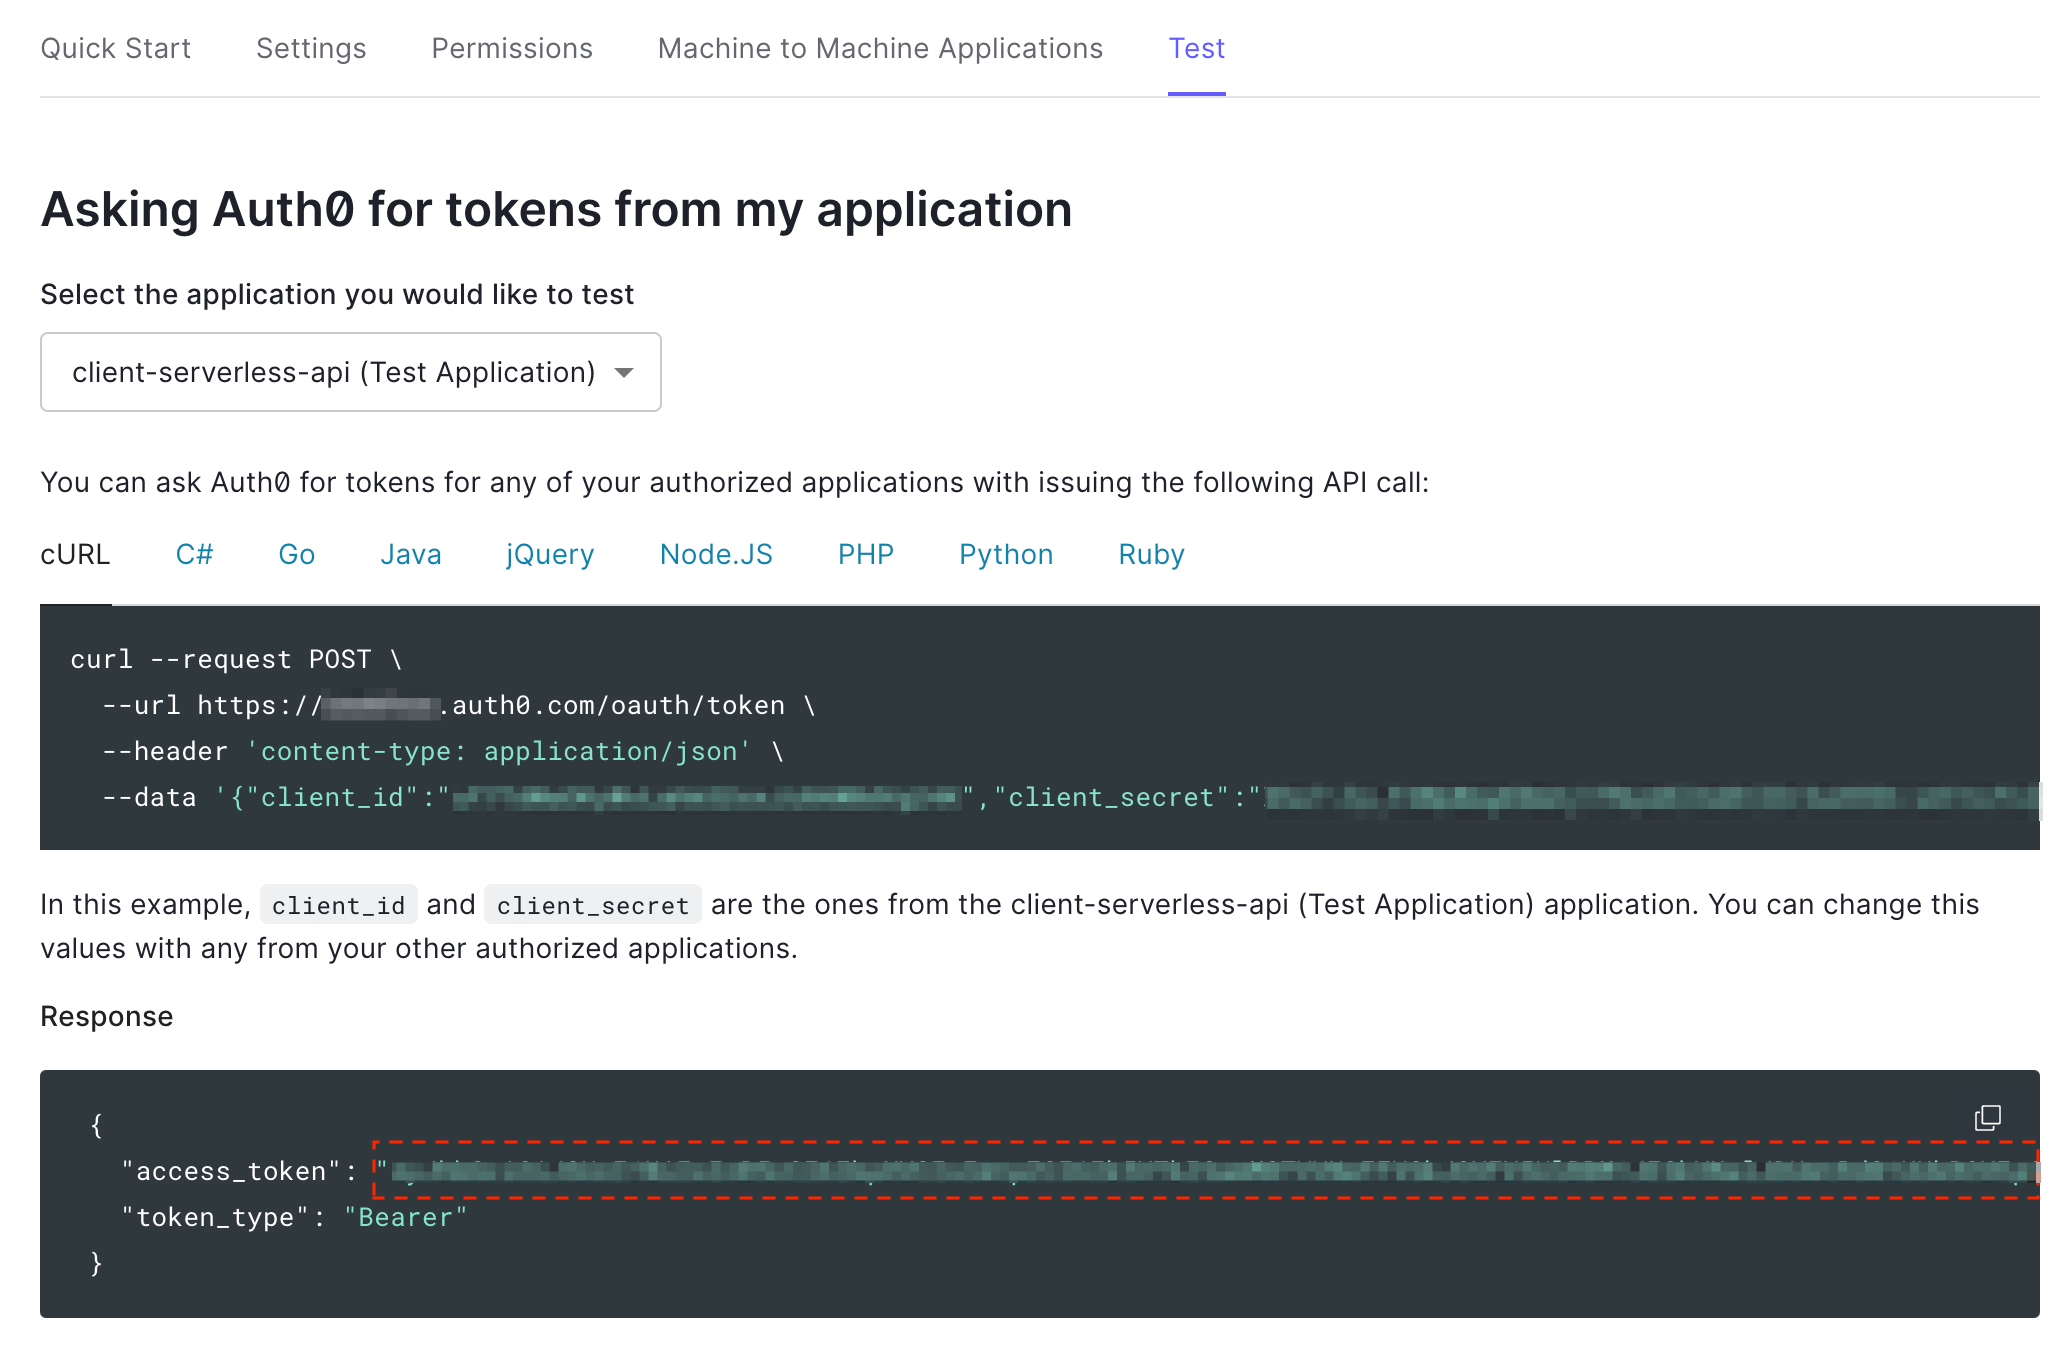
Note: When you created the API, Auth0 automatically created a test application that can use the
client_credentialsgrant, which allows generation ofaccess_tokenswithout a user logging in. Thesub(subject) claim in the access_token above refers to the test application instead of any user and you’ll notice that it has a different format. e.g.uf7TdWaOKyWvLahkO2oxJi0AWBdVg24K@clients.
Step 3: Use the sample access_token in the Fauna shell
At the bottom of the screen, next to the RUN QUERY button, click “RUN AS” and change the value of the dropdown from “Admin” to “Specify a secret.“ Paste the access_token copied from the previous step into the box next to it, as shown below:

Test your CreateUser UDF by executing this query:
Call(
  Function('CreateUser'),
  {
    email: "rainer.theo@mailinator.com",
    profile: {
      name: "Rainer Theo",
      country: "DE"
    }
  }
)
Here’s a sample response:
{
  user_id: "uf7TdWaOKyWvLahkO2oxJi0AWBdVg24K@clients",
  email: "rainer.theo@mailinator.com",
  profile: {
    name: "Rainer Theo",
    country: "DE"
  }
}
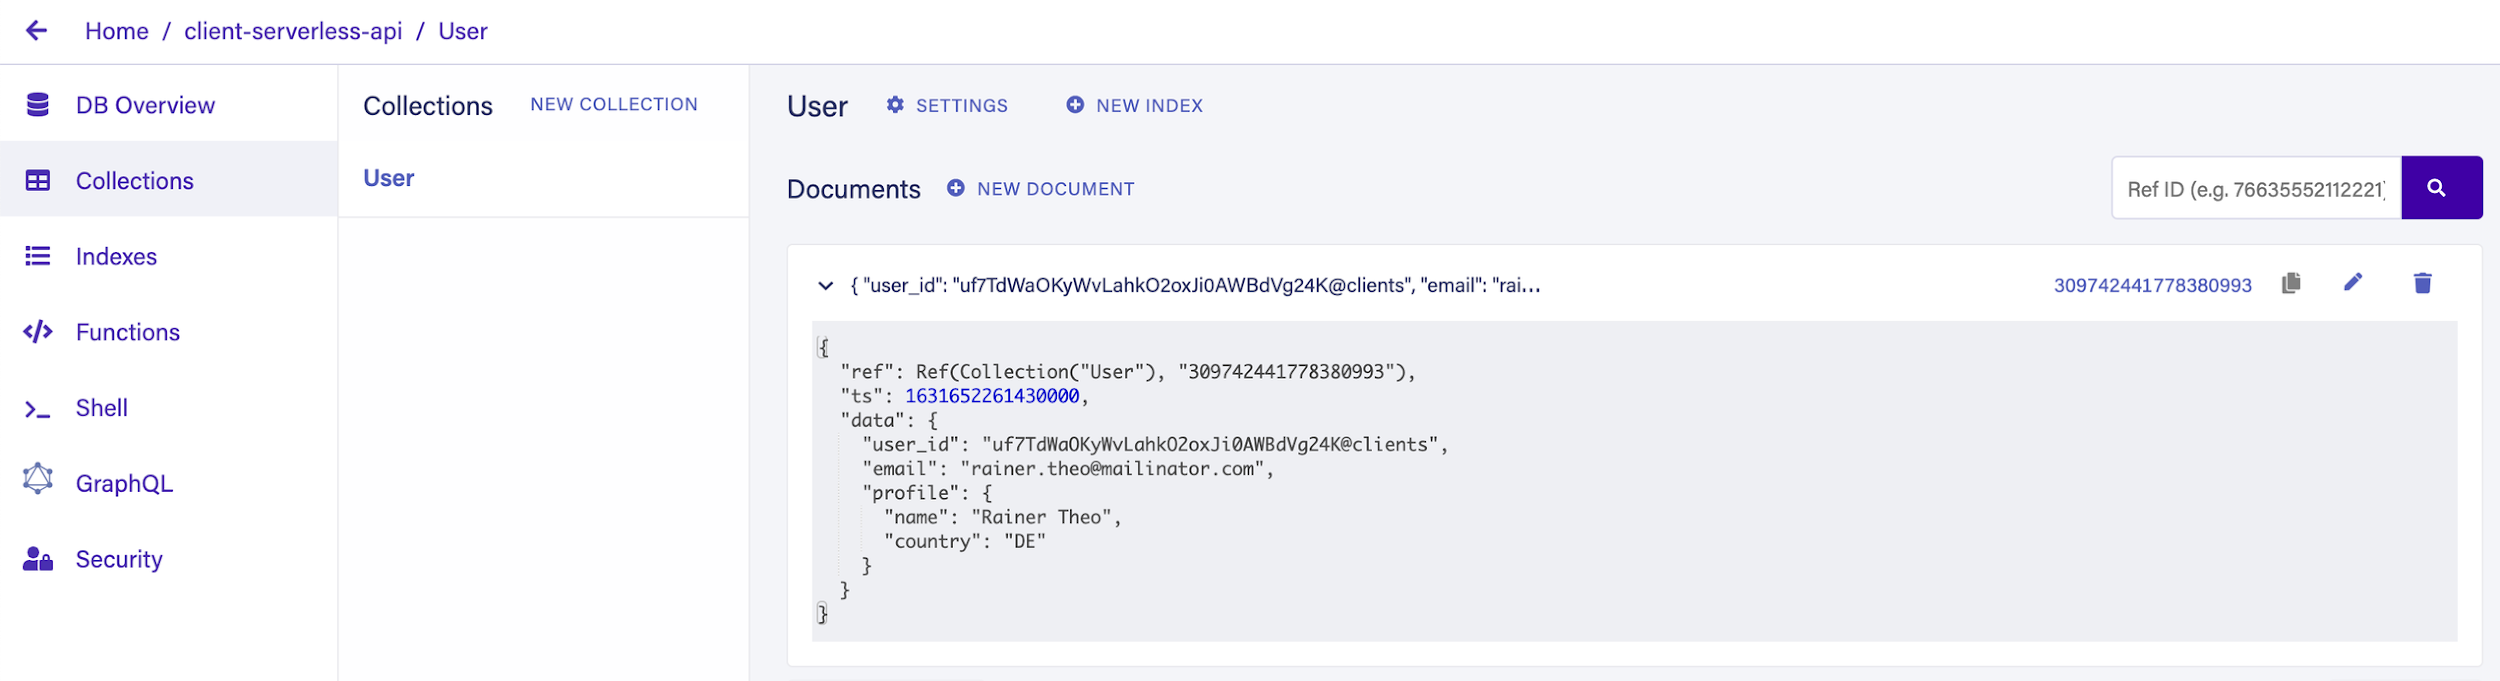
You should see a response similar to the above, confirming that the UDF is working. To be certain that it created the User, navigate to Collections, then click on User to inspect the collection. The UI allows us to preview all its documents. Notice that a new User document has been successfully created. This should confirm that the UDF is working.
Compute@Edge
With the UDF and Auth0 integration completed, let’s finally get down to implementing the POST /users endpoint (and take it live) with Compute@Edge.
Create a service
Sign in to Fastly. Navigate to the “Compute“ tab at the top of the screen and click Create a Compute service.

After the screen updates, update the default name by clicking on it. Change it to something descriptive, e.g. client-serverless-api as we’re going to reference it again later.

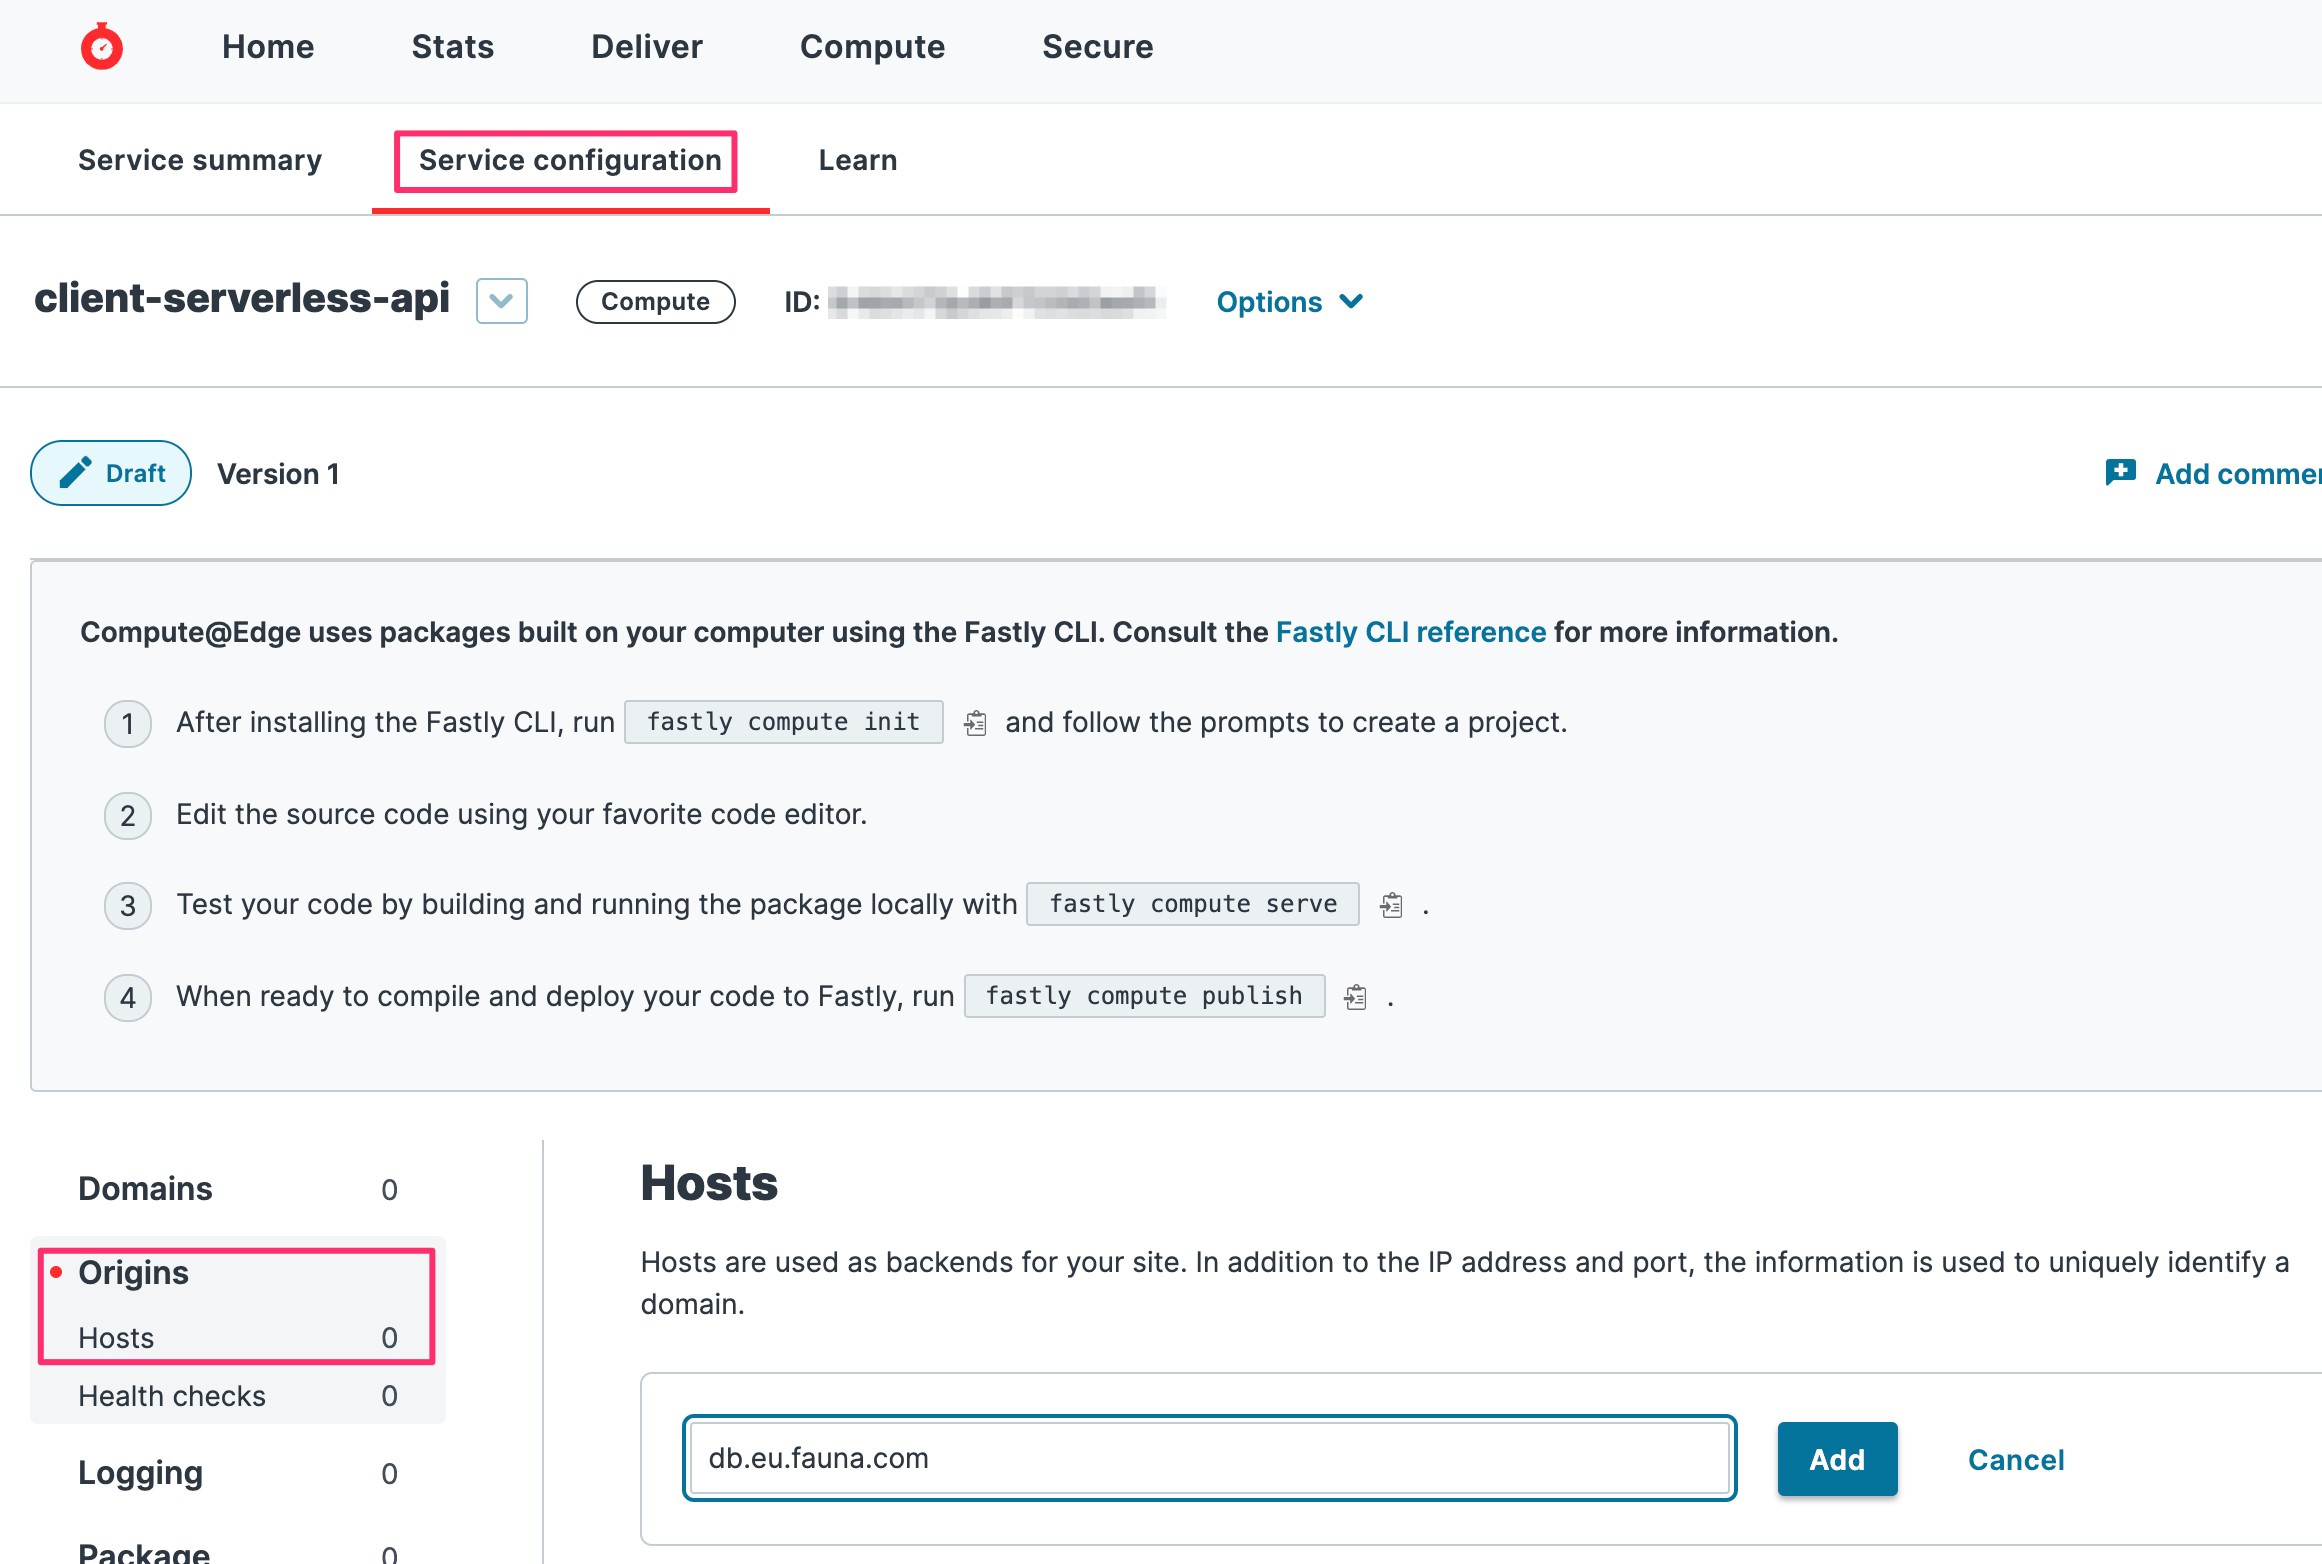
Click on the “Service configuration” tab. From there, use the left navigation pane and select Origins > Hosts. In the empty field, add the value db.eu.fauna.com and click Add. Doing this whitelists Fauna’s EU domain for use as a valid host.
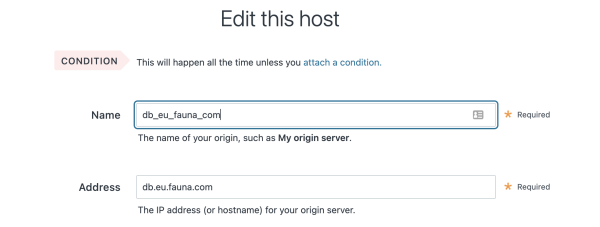
After adding the host, it is given a default name that you’ll now override to something more descriptive, since later on in the tutorial, you’ll be referencing this value. To edit the name, first click on it to enter edit mode. Enter the new value db_eu_fauna_com then scroll to the bottom of the screen and click Update.
Get a personal API token
From the top right corner of your Fastly dashboard, click on your username to activate a dropdown menu. Choose “Account” to enter the Account Settings page. Use the left navigator panel and select Personal API Tokens. Click Create Token and configure these settings:
- Provide a name, e.g. client-serverless-api.
- Service Access = A specific service. From the dropdown, select the service you created earlier.
- Scope = Global API access
- Expiration = Never expire
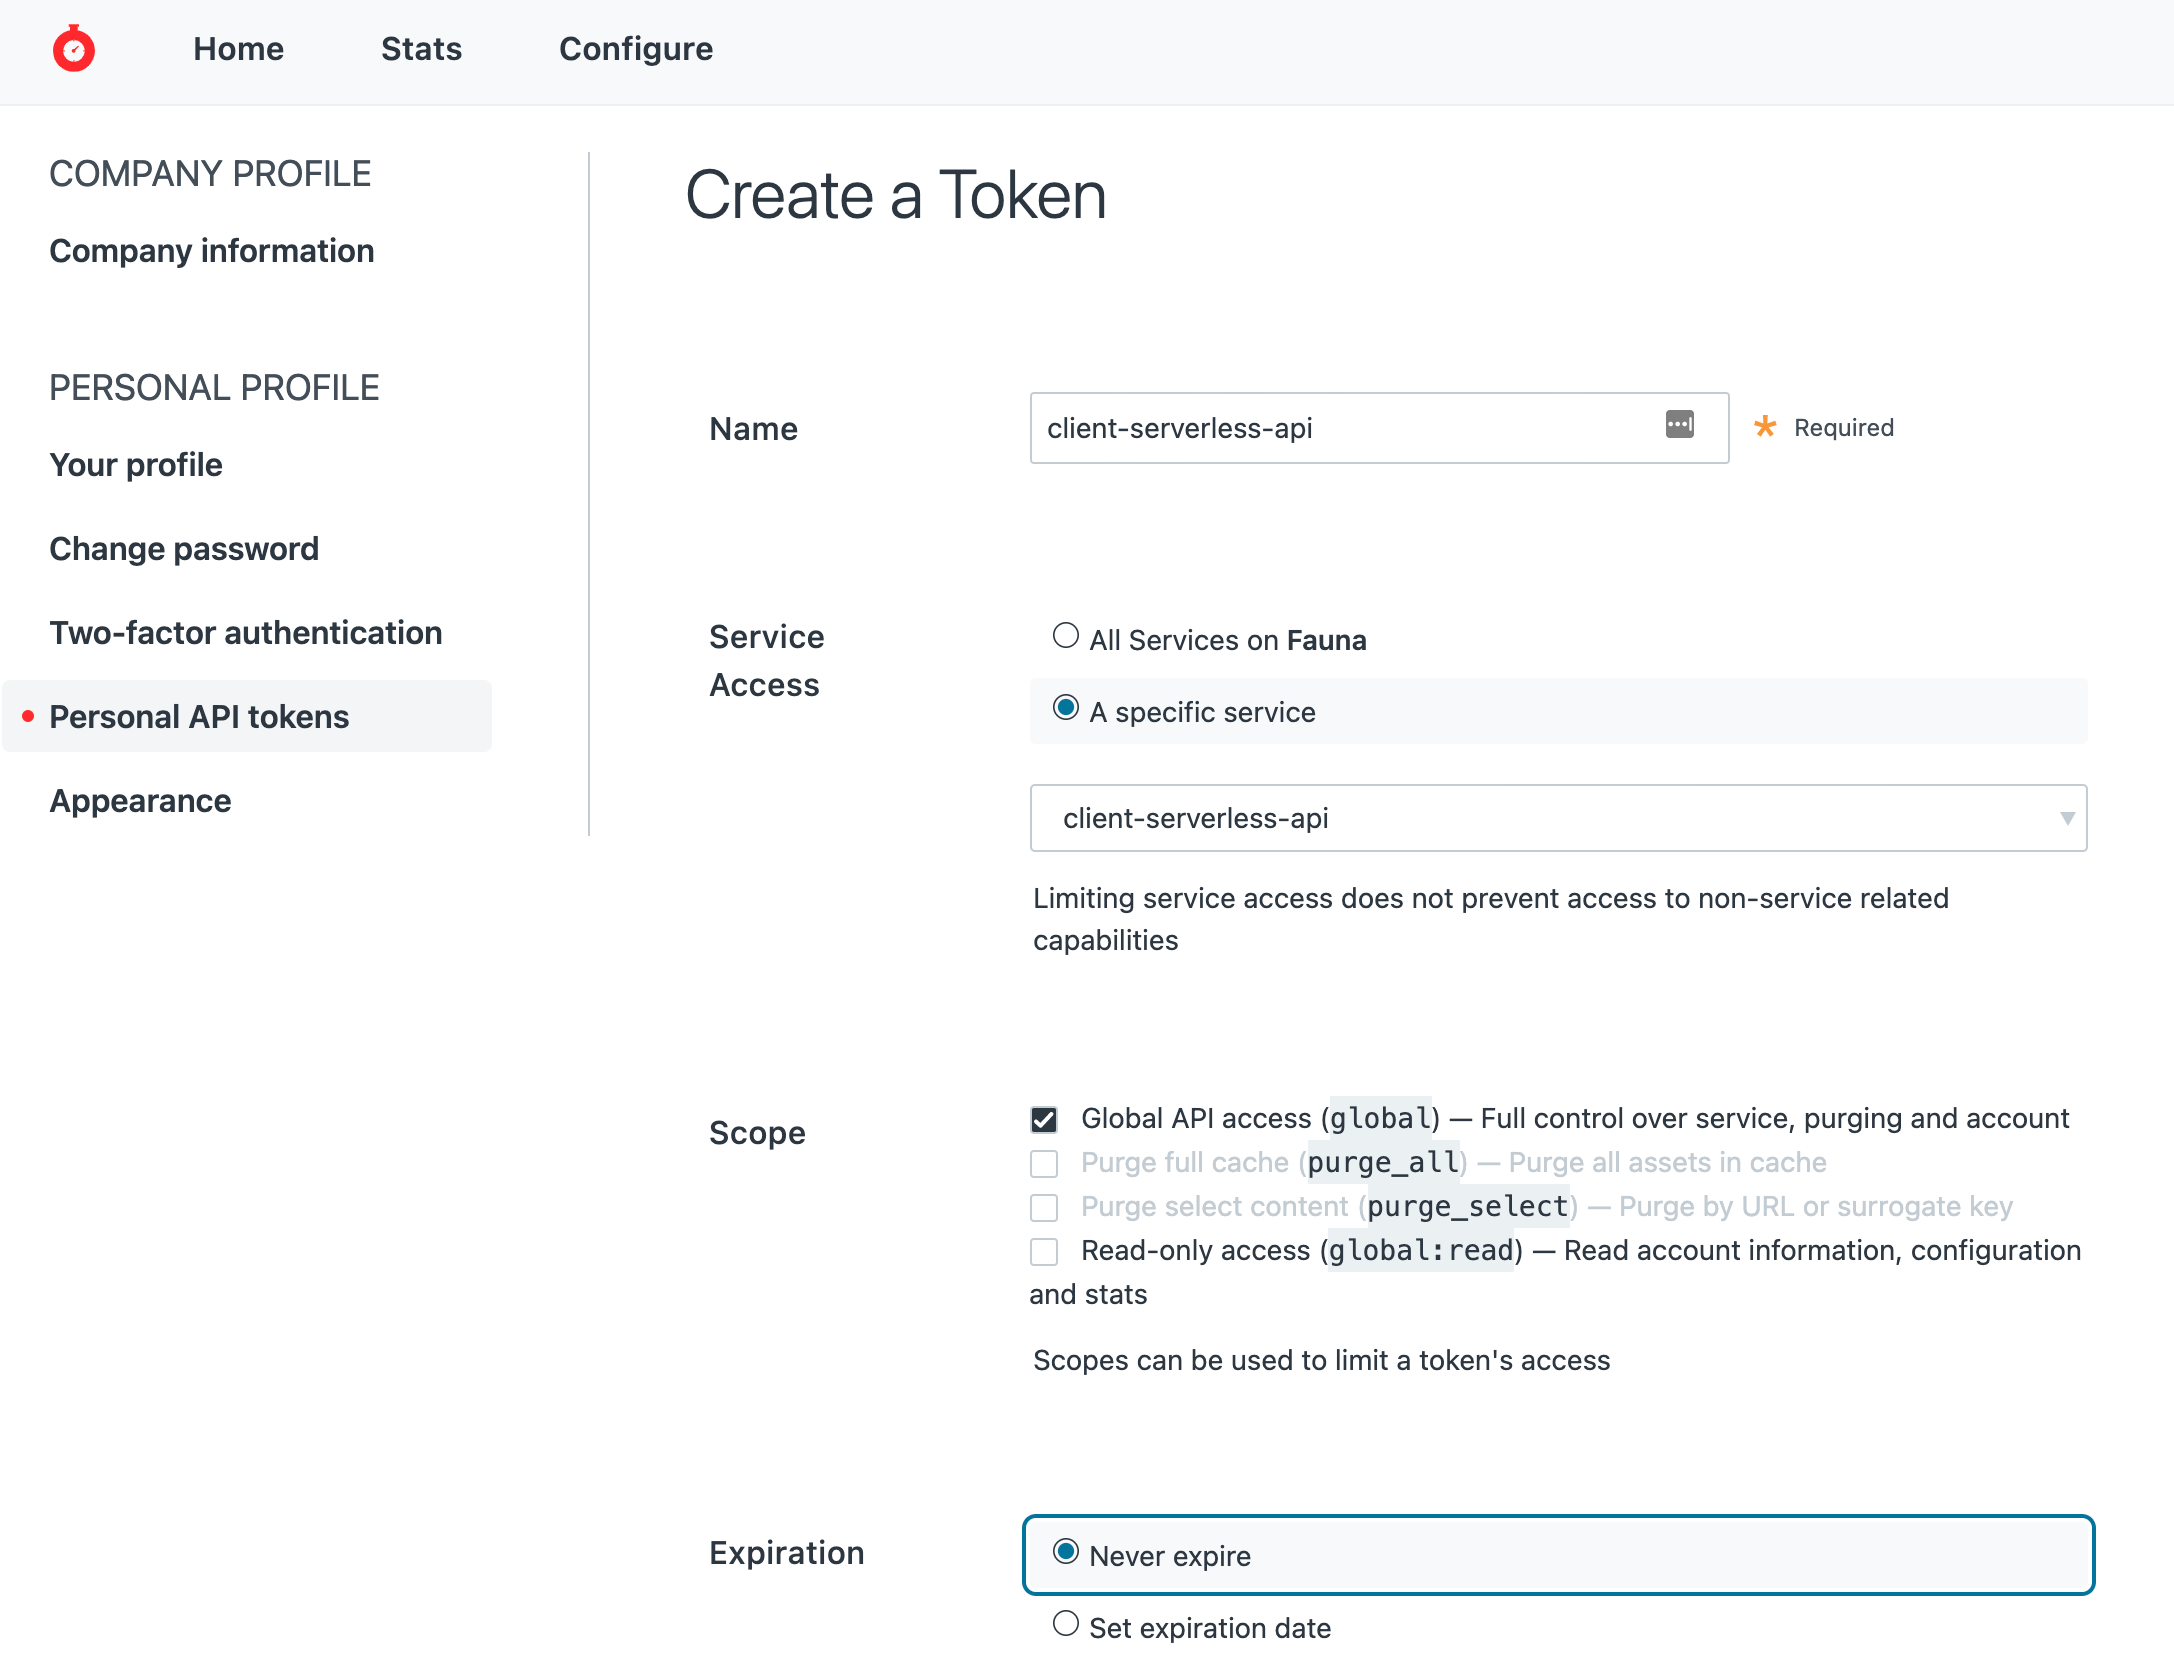
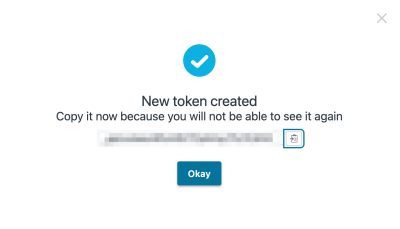
- Click Create Token. On the next screen, copy the generated value and save it somewhere safe for future reference. You won’t be able to access this value again.
Use the Fastly CLI and edit the service handlers
Install the Fastly CLI. Create a project directory and cd into it. Run fastly compute init and follow the prompts to create a project.
- When prompted for Language, choose Javascript.
- When prompted for Starter kit, select the Default.Open up your favorite IDE to the project that was cloned into the directory. Within the project, create a file
utils.jsin the/srcfolder with the following content:
/*
 * Fauna embeds its own error “codes” (actually string text) in the response body.
 * This function parses out the error codes and translate it back to HTTP error codes.
 */
export function getFaunaError(response) {
  try {
    const errors = response.errors[0]
    let { code, description, cause } = errors;
    let status;

    try {
      // report on the inner errors if they exist
      code = cause[0].code;
      description = cause[0].description;
      if (code == 'transaction aborted') {
        // Inside UDFs use 'transaction aborted' status to bubble up the actual error code in the description.
        code = description;
      }
    } catch {
      // no error causes
    }

    switch (code) {
      case 'instance not found':
        status = 404;
        break;
      case 'instance not unique':
        status = 409;
        break;
      case 'permission denied':
        status = 403;
        break;
      case 'unauthorized':
      case 'authentication failed':
        status = 401;
        break;
      default:
        status = 500;
    }
    return { code, description, status };
  } catch {
    // no errors in response
    return false;
  }
}

/*
 * Doesn’t do much for now. We'll come back here later when we
 * utilize Geo-IP at the edge functionality
 */
export function resolveBackend(request) {
  try {
    const bearerToken = request.headers.get('Authorization').split('Bearer ')[1];

    let backend = 'db_eu_fauna_com';
    let backendUrl = 'https://db.eu.fauna.com';

    return { backend, backendUrl, bearerToken };
  } catch (e) {
    console.log(`${e}`);
    throw e;
  }
}

/*
 * Fauna’s UDF needs to distinguish arguments between scalar and object types.
 * Objects must be wrapped with "object".
 * Example: a UDF input argument of type object:
 * {
 *   foo: {
 *     bar: {
 *        key: 'value'
 *     }
 *   }
 * }
 * ...must be formatted for REST call:
 * object: {
 *   foo: {
 *     object: {
 *       bar: {
 *         object: {
 *           key: 'value'
 *         }
 *       }
 *     }
 *   }
 * }
 */
export function wrapWithObject(obj) {
  let result = {};
  for (const [key, value] of Object.entries(obj)) {
    if (typeof value === 'object') {
      result[key] = {
        object: wrapWithObject(value)
      }
    } else {
      result[key] = value;
    }
  }
  return result;
}

/*
 * Translates Call(Function('name')) to REST
 */
export function formatFaunaCallFunction(functionName, id, requestBody) {
  let payload = {
    call: { function: functionName },
    arguments: []
  };
  if (id) {
    payload.arguments.push(id);
  }
  if (requestBody) {
    payload.arguments.push({ object: wrapWithObject(requestBody) });
  }
  return payload;
}

export function badRequest() {
  return new Response('Bad request', {
    headers: { "access-control-allow-origin": "*" },
    status: 400
  });
}
`
Then overwrite the file /src/index.js with these contents. Here’s where everything comes together.
import {
  badRequest, getFaunaError,
  resolveBackend, formatFaunaCallFunction
} from './utils.js';

addEventListener('fetch', event => event.respondWith(handleRequest(event)));

async function handleRequest(event) {
  const req = event.request;

  const VALID_METHODS = ["GET", "POST", "PUT"];
  if (!VALID_METHODS.includes(req.method)) {
    const response = new Response("This method is not allowed", {
      status: 405
    });
    return response;
  }

  const method = req.method;
  const url = new URL(event.request.url);
  const pathname = url.pathname;

  // POST /users
  if (method == "POST" && pathname == "/users") {
    try {
      const reqBody = await req.json();
      if (!reqBody.email) {
        return new Response('Email is required', { status: 400 });
      }
      return await callUDF(req, () => {
        return formatFaunaCallFunction('CreateUser', null, reqBody);
      });
    } catch {
      return badRequest();
    }
  }

  return new Response("The page you requested could not be found", {
    status: 404
  });
};

async function callUDF(request, formatHandler) {
  try {
    const { backend, backendUrl, bearerToken } = resolveBackend(request);

    // formatHandler translates REST request into FQL "Call(Function('name'))" equivalent
    const body = formatHandler();

    const headers = new Headers({
      "Authorization": `Bearer ${bearerToken}`,
      "Content-Type": "application/json"
    });

    const faunaRest = new Request(backendUrl, {
      method: "POST",
      headers: headers,
      body: JSON.stringify(body)
    });

    const res = await fetch(faunaRest, { backend: backend });

    let response = await res.json();

    // If FQL throws an error, return error
    const faunaErrors = getFaunaError(response);
    if (faunaErrors) {
      return new Response(
        faunaErrors.description, {
        headers: {
          "content-type": "application/json;charset=UTF-8",
          "Access-Control-Allow-Origin": "*"
        },
        status: faunaErrors.status
      });
    } else {
      return new Response(
        JSON.stringify(response.resource), {
        headers: {
          "content-type": "application/json;charset=UTF-8",
          "Access-Control-Allow-Origin": "*"
        },
        status: 200
      });
    }
  } catch (e) {
    console.log(`${e}`);
    return new Response(`${e}`, { status: 500 });
  }
}
Deploy the service
Set the environment variable FASTLY_API_TOKEN to the Personal API Token obtained previously.
export FASTLY_API_TOKEN=<<token>>
In your Fastly dashboard, locate the service ID (see the screenshot below for reference) then update the fastly.toml file and set the service_id to this value.

Build the project:
fastly compute build
Then deploy the service with this command:
fastly compute deploy
- When prompted to provide a domain, click Enter to accept the generated value. Wait a few seconds for the service to deploy. You should see the progress on the terminal. Once deployed (give it about 30 seconds to fully propagate), test out the live API.
Test your API
Back at your Fauna dashboard, from the left navigator pane, select Collections then click User. Next to the user record you created earlier, there should be a delete icon. Go ahead and delete that user. We’ll need to do this because user_id is unique, and we’re about to test with the same access_token.

Call the live API with your tool of choice, e.g. Postman, or curl:
curl --location --request POST 'https://frequently-faithful-mouse.edgecompute.app/users' \
--header 'Authorization: Bearer eyJhbGciOiJ...' \
--header 'Content-Type: application/json' \
--data-raw '{
    "email": "rainer.theo@mailinator.com",
    "profile": {
        "name": "Rainer Theo",
        "city": "Frankfurt",
        "country": "DE"
    }
}'
If the request goes through, check the response to see if it matches our spec. Then check the Fauna dashboard to see if the Users document was created successfully.
If everything checks out we’re ready to move on to the next API. So let’s spec out GET /users and PUT /users:
GET /users/{id}
Parameters:
{id}(Required)- Must match the “userid” embedded in the accesstoken’s
subclaim (users can read themselves).
- Must match the “userid” embedded in the accesstoken’s
Headers:
- Authorization Bearer {{token}}
Request Example:
curl -H "Authorization: Bearer eyJhb..." \

https://frequently-faithful-mouse.edgecompute.app/users/auth0%7C57a9160561254be4229bca97
Response example:
{
  "user_id": "auth0|57a9160561254be4229bca97",
  "email": "rainer.theo@mailinator.com"
  "profile": {
    "name": "Rainer Theo",
    "country": "DE",
    "age": "23"
  }
}
PUT /users/{id}
Parameters:
{id}(Required). Must match the “user_id” embedded in the accesstoken’ssubclaim (users can update only themselves_).- JSON body of our User schema.
Headers:
- Authorization Bearer {{token}}
Request Example:
curl -X PUT  -H "Content-Type: application/json" \
     -H "Authorization: Bearer eyJhb..."  \
     -d '{"email":"rainer.theo@mailinator.com", "profile": { "name": "Rainer Theo", "country": "DE", "age": 30 } }' \
     https://frequently-faithful-mouse.edgecompute.app/users/auth0%7C57a9160561254be4229bca97
Response example:
{
  "user_id": "auth0|57a9160561254be4229bca97",
  "email": "rainer.theo@mailinator.com"
  "profile": {
    "name": "Rainer Theo",
    "country": "DE",
    "age": 30
  }
}
Back in your Fauna dashboard. Navigate to the shell and change the run RUN QUERY AS back to Admin so that you can define these next UDFs.

Now define the GetUser UDF:
CreateFunction({
  name: 'GetUser',
  body: Query(
    Lambda(
      ["ID"],
      Let(
        { user: Select(["data"], Get(Match(Index("user_by_id"), Var("ID")))) },
        Do(
          If(
            Equals(CurrentIdentity(), Select(["user_id"], Var("user"))),
            true,
            Abort("permission denied")
          ),
          Var("user")
        )
      )
    )
  ),
  role: Role("usersCRUD")
})
- Per our API spec, user’s
user_idmust match thesubclaim. So we test it withIf(Equals(...)...)andAbort()iffalse.
And do the same for UpdateUser:
CreateFunction({
  name: 'UpdateUser',
  body: Query(
    Lambda(
      ["ID", "data"],
      Let(
        {
          match: Match(Index("user_by_id"), Var("ID")),
          user: Get(Var("match"))
        },
        Do(
          If(
            Equals(CurrentIdentity(), Select(["data", "user_id"], Var("user"))),
            true,
            Abort("permission denied")
          ),
          Let(
            {
              ref: Select(["ref"], Var("user"), null),
              email: Select(
                ["email"],
                Var("data"),
                Select(["data", "email"], Var("user"), null)
              ),
              profile: Select(
                ["profile"],
                Var("data"),
                Select(["data", "profile"], Var("user"), null)
              ),
              updateData: Merge(
                { email: Var("email") },
                { profile: Var("profile") }
              )
            },
            Update(Var("ref"), { data: Var("updateData") })
          ),
          Select(["data"], Get(Var("match")))
        )
      )
    )
  ),
  role: Role("usersCRUD")
})
- Similar to GetUser, the UDF allows updates only if the JWT
subis the same as the User being updated. - To enforce our REST APIs Users schema, any field other than
emailorprofilewill be ignored if present in the request body. So we useMerge({ email: ...}, { profile: ...})to do this.
Finally, update the APIsRole role so that it can execute the 2 new UDFs above:
Update(Role('APIsRole'),
  {
    privileges: [
      { resource: Function("CreateUser"), actions: { call: true } },
      { resource: Function("GetUser"), actions: { call: true } },
      { resource: Function("UpdateUser"), actions: { call: true } }
    ]
  }
)
As you’ve already realized, these UDFs got pretty elaborate as Fauna lets us do everything we need including validating the JWT for embedded permissions and formatting our specific API responses. This allowed us to stick to our goal of pushing the bulk of logic down to Fauna while keeping the implementation at the edge pretty lightweight.
Now we’ll just have to update /src/index.js to handle GET and PUT by calling the 2 new UDFs. While we’re at it, let's also finish the whole implementation by also handling GET /, which should return our Single Page Application (SPA). With this, our service is serving both REST APIs and the SPA.
import {
  badRequest, getFaunaError,
  resolveBackend, formatFaunaCallFunction
} from './utils.js';

addEventListener('fetch', event => event.respondWith(handleRequest(event)));

async function handleRequest(event) {
  const req = event.request;

  // Allows the edge to respond to CORS
  if (req.method === "OPTIONS" && req.headers.has("Origin") && (
    req.headers.has("access-control-request-headers") ||
    req.headers.has("access-control-request-method"))
  ) {
    return new Response(null, {
      status: 204,
      headers: {
        "access-control-allow-origin": "*",
        "access-control-allow-methods": "GET,HEAD,POST,PUT,OPTIONS",
        "access-control-allow-headers": req.headers.get('access-control-request-headers') || '',
        "access-control-max-age": 86400,
      }
    });
  }

  const VALID_METHODS = ["GET", "POST", "PUT"];
  if (!VALID_METHODS.includes(req.method)) {
    const response = new Response("This method is not allowed", {
      status: 405
    });
    return response;
  }

  const method = req.method;
  const url = new URL(event.request.url);
  const pathname = url.pathname;

  // GET "/", "/js", "/css", "/favicon.ico" returns static contents from Object store bucket
  if (method == "GET" &&
    ["", "js", "css", "favicon.ico"].includes(pathname.split("/")[1])) {

    // Below is an example. Update and point to your own bucket
    const SPA_HOST = 'example-bucket.s3-website-us-west-2.amazonaws.com';
    const SPA_BACKEND = 's3staticwebsite';

    const s3StaticWebsite = new Request(`http://${SPA_HOST}${pathname}`, {
      method: "GET"
    });

    const s3res = await fetch(s3StaticWebsite, { backend: SPA_BACKEND });

    let headers = new Headers();
    const resource = pathname.split("/")[1];
    if (resource == 'js')
      headers.set('Content-Type', 'application/javascript');
    else if (resource == 'css')
      headers.set('Content-Type', 'text/css; charset=utf-8');
    else if (resource == 'favicon.ico')
      headers.set('Content-Type', 'image/x-icon');
    else
      headers.set('Content-Type', 'text/html; charset=utf-8');

    return new Response(await s3res.text(), {
      status: 200,
      headers
    });
  }

  // POST /users
  if (method == "POST" && pathname == "/users") {
    try {
      const reqBody = await req.json();
      return await callUDF(req, () => {
        return formatFaunaCallFunction('CreateUser', null, reqBody);
      });
    } catch {
      return badRequest();
    }
  }

  if (pathname.match(`/users/[^/]+(/)?$`)) {

    const userId = decodeURI(pathname.split('/')[2]);

    // GET /users/{id}
    if (method == "GET") {
      return await callUDF(req, () => {
        return formatFaunaCallFunction('GetUser', userId, null);
      });
    }

    // PUT /users/{id}
    if (method == "PUT") {
      try {
        const reqBody = await req.json();
        return await callUDF(req, () => {
          return formatFaunaCallFunction('UpdateUser', userId, reqBody);
        });
      } catch {
        return badRequest();
      }
    }
  }

  return new Response("The page you requested could not be found", {
    status: 404
  });
};

async function callUDF(request, formatHandler) {
  try {
    const { backend, backendUrl, bearerToken } = resolveBackend(request);

    // formatHandler translates REST request into FQL "Call(Function('name'))" equivalent
    const body = formatHandler();

    const headers = new Headers({
      "Authorization": `Bearer ${bearerToken}`,
      "Content-Type": "application/json"
    });

    const faunaRest = new Request(backendUrl, {
      method: "POST",
      headers: headers,
      body: JSON.stringify(body)
    });

    const res = await fetch(faunaRest, { backend: backend });

    let response = await res.json();

    // If FQL throws an error, return error
    const faunaErrors = getFaunaError(response);
    if (faunaErrors) {
      return new Response(
        faunaErrors.description, {
        headers: {
          "content-type": "application/json;charset=UTF-8",
          "Access-Control-Allow-Origin": "*"
        },
        status: faunaErrors.status
      });
    } else {
      return new Response(
        JSON.stringify(response.resource), {
        headers: {
          "content-type": "application/json;charset=UTF-8",
          "Access-Control-Allow-Origin": "*"
        },
        status: 200
      });
    }
  } catch (e) {
    console.log(`${e}`);
    return new Response(`${e}`, { status: 500 });
  }
}
`
- In the above code, notice that Compute@Edge is performing a fetch from the object store that hosts the SPA, so the domain of SPA_HOST must also be whitelisted as a “host” in the Compute@Edge service’s Origins > Hosts settings. (We did this step with the Fauna EU domain endpoint)
Now build with the same command used previously:
fastly compute build
And then deploy:
fastly compute deploy
After the command completes, wait just a few seconds (about 30 seconds) for the service to fully propagate. Then you should be able to test:
Example GET /users/{id} test with curl
curl -H "Authorization: Bearer eyJhb..."

https://frequently-faithful-mouse.edgecompute.app/users/uf7TdWaOKyWvLahkO2oxJi0AWBdVg24K@clients
- Replace
uf7TdWaOKyWvLahkO2oxJi0AWBdVg24K@clientswith your own user_id
Response:
{
  "user_id": "uf7TdWaOKyWvLahkO2oxJi0AWBdVg24K@clients",
  "email": "rainer.theo@mailinator.com"
  "profile": {
    "name": "Rainer Theo",
    "country": "DE",
    "age": "23"
  }
}
Example PUT /users/{id} test with curl
curl -X PUT  -H "Content-Type: application/json" \
     -H "Authorization: Bearer eyJhb..."  \
     -d '{"email":"rainer.theo@mailinator.com", "profile": { "name": "Rainer Theo", "country": "DE", "age": 30 } }' \
     https://frequently-faithful-mouse.edgecompute.app/users/uf7TdWaOKyWvLahkO2oxJi0AWBdVg24K@clients
- Replace
uf7TdWaOKyWvLahkO2oxJi0AWBdVg24K@clientswith your own user_id
Response:
{
  "user_id": "uf7TdWaOKyWvLahkO2oxJi0AWBdVg24K@clients",
  "email": "rainer.theo@mailinator.com"
  "profile": {
    "name": "Rainer Theo",
    "country": "DE",
    "age": 30
  }
}
If you configured SPA_HOST and SPA_BACKEND (and have uploaded a SPA to the SPA_HOST), you’ll be able to see it by opening a browser to / at the Compute@Edge domain, e.g. https://frequently-faithful-mouse.edgecompute.app/.
Sample App
We’ve built a sample app to demonstrate how the solution comes together. One of the beauties of using Auth0 is we don’t even have to build a login and signup page as it is provided out-of-the-box.

Going to the Next Level
Being able to run logic at the edge provides you full control over the routing of your application. In addition to what’s already been covered in this tutorial, you can also:
- Stitch together multiple backends.
- Route to other resources (other than Fauna) and serve them under the same domain.
- Etc.
Take a look at some examples to get a feel of what you can achieve.
An advanced capability involves Geo-IP’ing the requests at the edge, allowing us to serve region specific traffic based on the location of the client. Let’s go back to this picture:
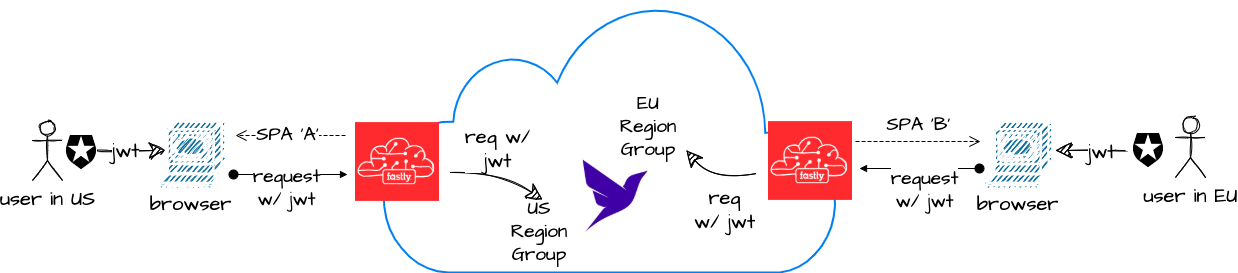
Let’s assume that our requirements are that EU users' data must be stored in the EU. As for users coming from anywhere else, it doesn’t matter. We’re also going to serve a different version of the SPA to EU users — one that has additional consent screening as well as EU-specific content.
A high-level walkthrough of how we’ll enhance our setup is as follows:
Use event.client.geo to detect if requests come from the EU or not. As an example, within handleRequest() of index.js, we can include the following code to logically send an EU or non-EU version of the SPA to users:
const clientGeo = event.client.geo;
if (clientGeo.continent == 'EU') {
    SPA_HOST = 'eu-version.s3-website-eu-central-1.amazonaws.com';
    SPA_BACKEND = 's3staticwebsite-eu';
} else {
    SPA_HOST = 'base-version.s3-website-us-east-1.amazonaws.com';
    SPA_BACKEND = 's3staticwebsite';
}
`
Then, create a US Region Group (or Classic Region Group) Fauna database and replicate everything we’ve setup in the tutorial. This includes setting up the AccessProvider in Fauna and corresponding API in Auth0. Thus, a user logging in to the EU website gets a different aud claim than a user logging in from the non-EU website. We then update resolveBackend() in utils.js to route API requests to the EU Region Group or US Region Group as follows:
export function resolveBackend(request) {
  try {
    const bearerToken = request.headers.get('Authorization').split('Bearer ')[1];

    const decodedPayload = JSON.parse(
      Buffer.from(jwtPayload, 'base64').toString('utf-8')
    );
    const aud = decodedPayload['aud'];

    // we can store and lookup our audiences in the edge dictionary
    const exampleDictionary = new Dictionary("example_dictionary");
    const audEU = exampleDictionary.get("aud_eu");

    if (aud == audEU) {
      backend = 'db_eu_fauna_com';
      backendUrl = 'https://db.eu.fauna.com';
    } else {
      backend = 'db_us_fauna_com';
      backendUrl = 'https://db.us.fauna.com';
    }

    return { backend, backendUrl, bearerToken };
  } catch (e) {
    console.log(`${e}`);
    throw e;
  }
}
And now, when the edge detects that the request is coming from the EU region, the EU version of the website is shown. And users are automatically created in the EU Region Group. Conversely, requests coming from outside the EU will be served the international version of the site and users created in the US/Classic Region Group.
Wrapping Up
Edge computing enables developers to deploy application logic closer to the end-user for reduced latency. But if the database is itself a performance bottleneck due to its distance from the user, we haven’t solved the latency problem. Fauna is a globally distributed database, making it a great fit for developers to pair with Fastly’s Compute@Edge – keeping both compute and the data close to the end-user, and in turn keeping global latency low.
Auth0 allows developers to focus on building applications and worry less about security and building their own authentication and identity solutions. And Fauna natively integrates with Auth0, further enhancing our promise to drive developer productivity. Finally, the architecture’s completely serverless footprint allows developers to focus more on building and less on managing infrastructure.
About the author

Zee Khoo
Head of Solution Architecture at Fauna Inc. (Auth0 Alumni)
Technology focused business professional with experience in Sales & BD, Solutions Architecture and Software Development. Armed with a top-tier MBA and extensive customer-facing experience, I combine technical and business expertise to converge business requirements with technology.
My experience in the art of pre-sales is combined with practical hands-on expertise in software SDLC, cloud architecture, containers, networking, APIs and gateways. A trusted advisor, I have the proven capacity to win over the most technically discerning customers and build long lasting relationships.