
This tutorial will guide you step by step in creating a Web API with ASP.NET. You will end up building a simple Web API project to manage a glossary of terms using the typical four CRUD (Create, Retrieve, Update, Delete) operations.
Prerequisites
Before starting to build your Web API, you need to ensure you have installed the right tools on your machine. In particular, since you are going to use ASP.NET, you need to check if you have installed the latest .NET SDK by typing the following command in a terminal window:
dotnet --version
The sample project that accompanies this tutorial has been built with .NET 5.0. If the previous command provides you with a result lower than 5.0.100, you should download the latest .NET SDK and install it on your machine.
In this tutorial, you are going to use the .NET CLI coming with the .NET SDK. If you are going to use Visual Studio, make sure to use the latest version of Visual Studio.
Note: If you update Visual Studio to the latest version, you will get the latest .NET SDK bundled.
Creating an ASP.NET Web API Project
Once the SDK is installed, you are ready to build your Web API with ASP.NET. The Web API you are going to build will provide a few endpoints that allow you to manage a glossary of terms. So, you will be able to perform the typical CRUD (Create, Retrieve, Update, Delete) operations on a list of term definitions.
In order to create this project, type the following commands in a terminal window:
dotnet new webapi -o Glossary
This command creates a folder named Glossary and generates inside it the content for the ASP.NET project from the webapi template.
If you are using Visual Studio, you can create your project by selecting the API template as shown in the following picture:
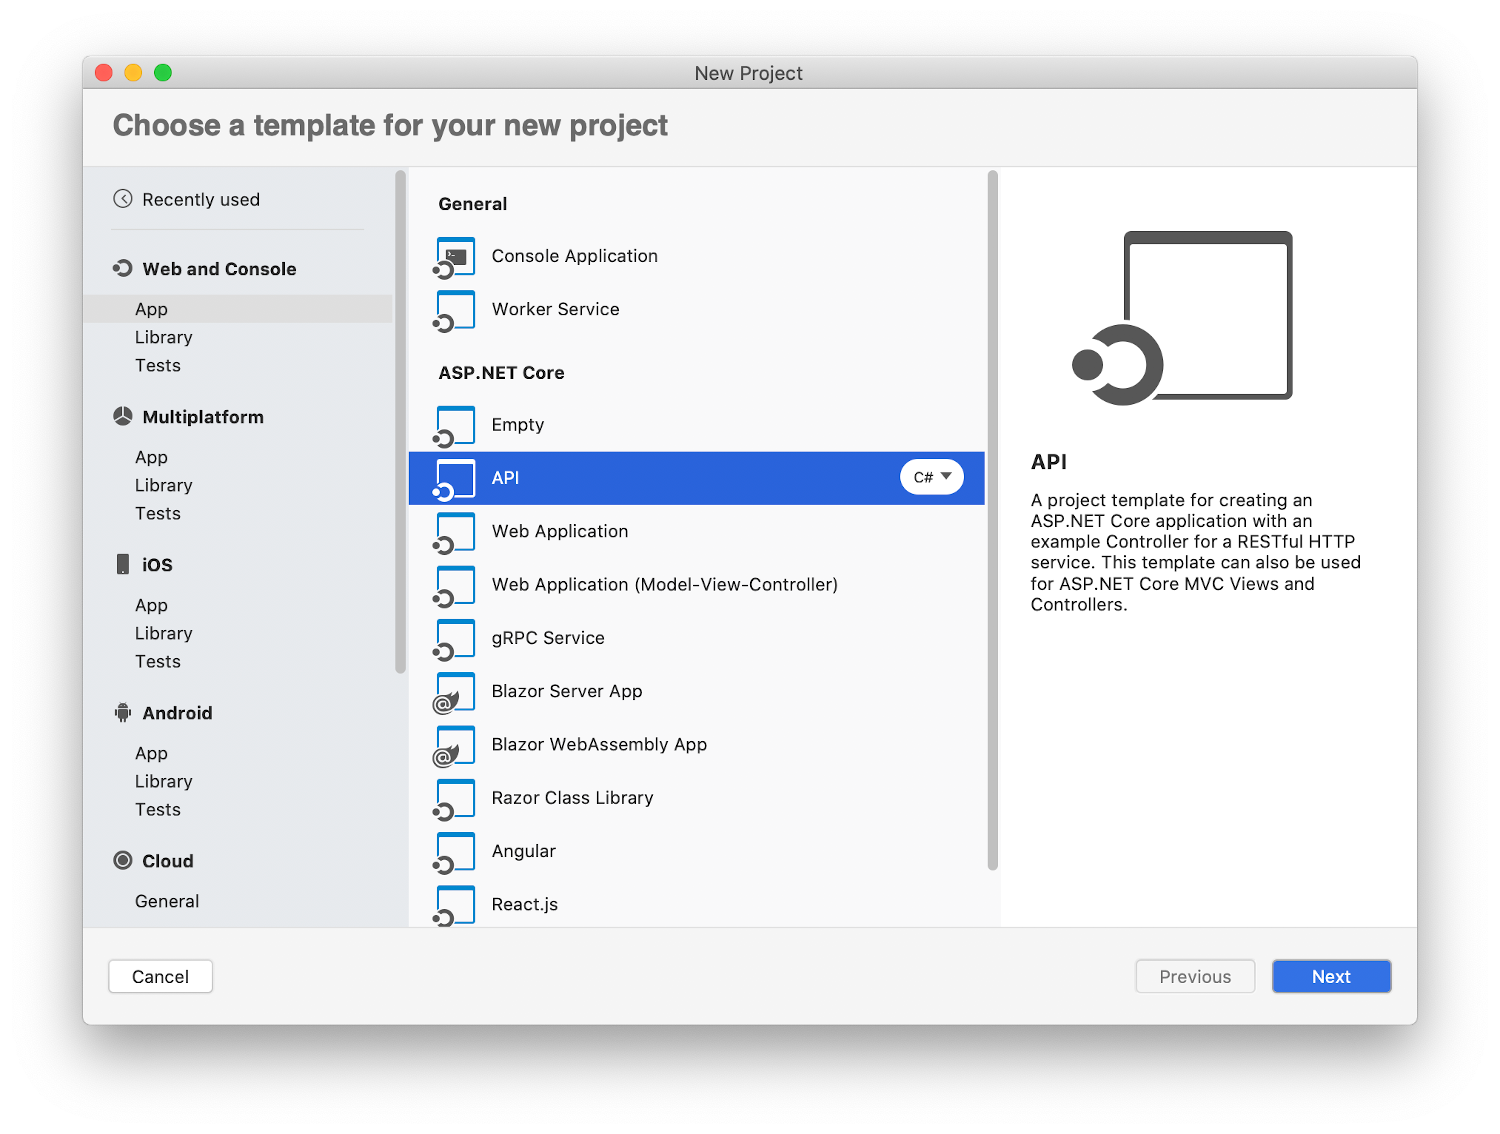
Then follow the steps shown by the wizard to generate the project.
Note: In the rest of the article, the .NET CLI will be used to manage the project, but you can run the same steps by using Visual Studio as well.
Running the Sample Project
Once the project has been created, you should make sure everything is okay. So, in the terminal window, move to the Glossary folder and launch the sample application by typing the following commands:
cd Glossary
dotnet run
If this is the very first time that you're running an ASP.NET application, you should trust the HTTPS development certificate included in the .NET Core SDK. This task depends on your operating system. Please, take a look at the official documentation to apply the proper procedure.
If everything is okay, point your browser to the address https://localhost:5001/weatherforecast. You should see a page similar to the following:
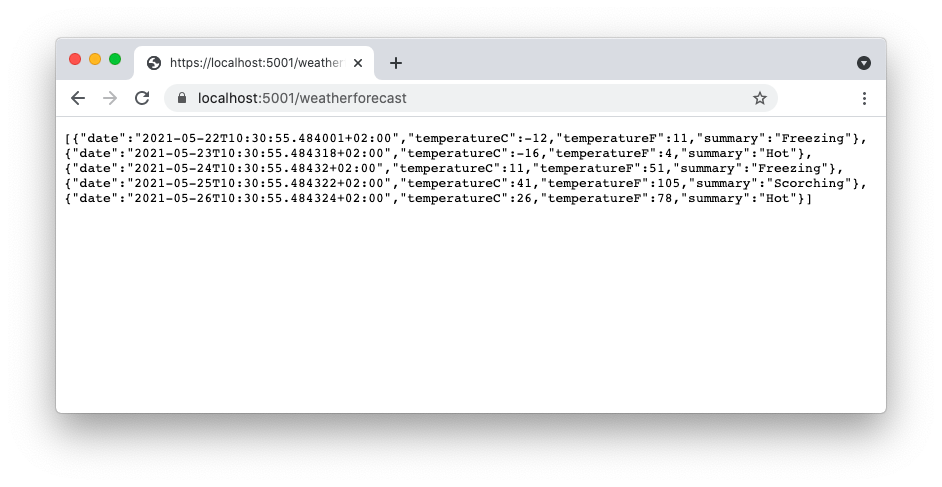
This is the output of the sample Web API application that comes with the webapi project template.
You should also be able to access interactive documentation about the Web API by navigating to the address https://localhost:5001/swagger. In this case, you would see the following page:
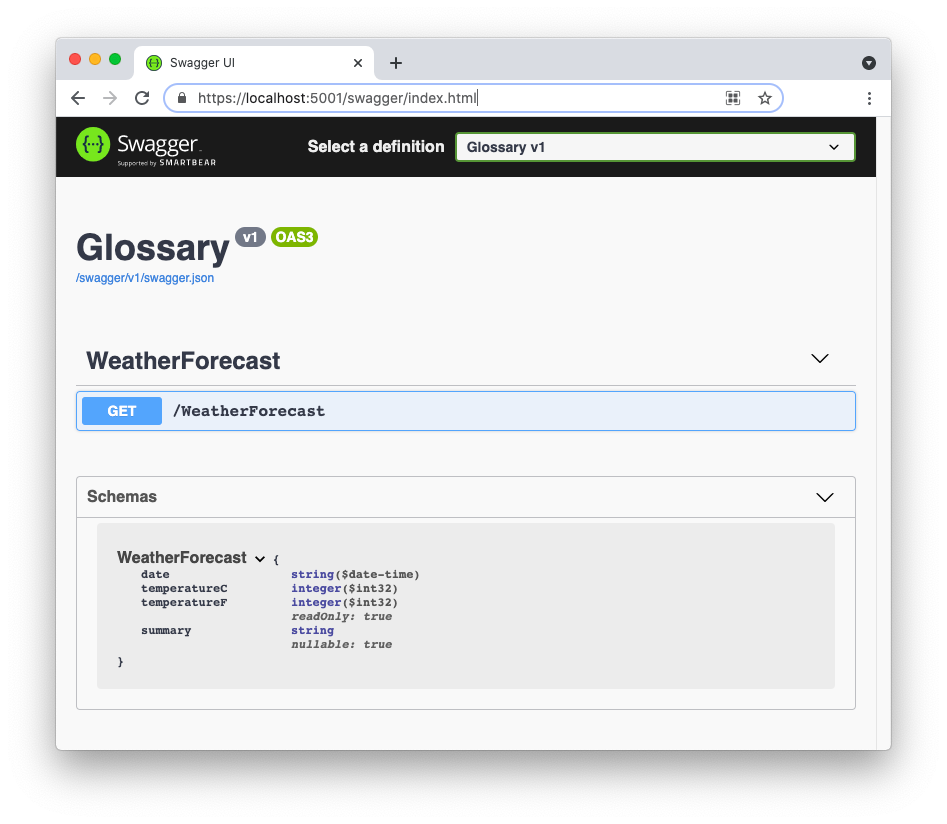
This page is automatically generated when the application runs in the development environment. The documentation generation is based on Swagger and allows you to get information about the endpoints exposed by the Web API. You can also test each endpoint directly from that page, so you don't need a real client or a tool such as curl, Postman, or Insomnia.
You will see how to use this page in more detail later on.
To stop the Web API application, simply hit CTRL+C in the terminal window that it's running in.
Anatomy of the Project
Regardless of whether you created your project with the .NET Core CLI or Visual Studio, you will get the same collection of files and folders, like the ones shown in the following picture:
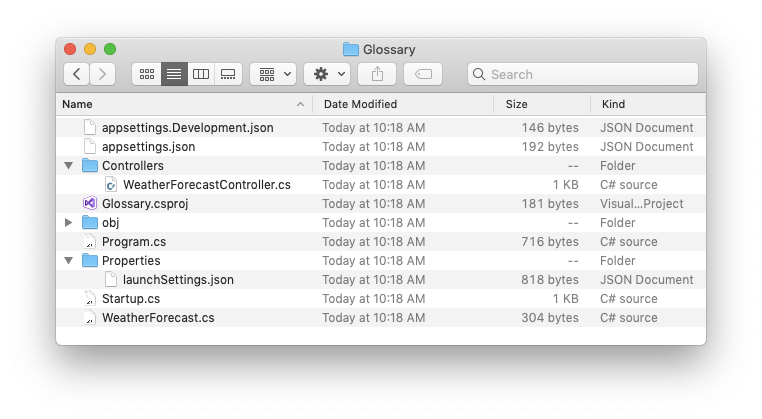
Taking a quick look at a few of these files gives you an idea of how a generic ASP.NET application works. In particular, the Program.cs file contains the starting point of the application. Its content looks like the following:
//Program.cs
using System;
using System.Collections.Generic;
using System.Linq;
using System.Threading.Tasks;
using Microsoft.AspNetCore.Hosting;
using Microsoft.Extensions.Configuration;
using Microsoft.Extensions.Hosting;
using Microsoft.Extensions.Logging;

namespace Glossary
{
    public class Program
    {
        public static void Main(string[] args)
        {
            CreateHostBuilder(args).Build().Run();
        }

        public static IHostBuilder CreateHostBuilder(string[] args) =>
            Host.CreateDefaultBuilder(args)
                .ConfigureWebHostDefaults(webBuilder =>
                {
                    webBuilder.UseStartup<Startup>();
                });
    }
}
The static Main() method is the method that is automatically called when the application starts. It simply calls the CreateHostBuilder() method to create and configure a host for the application and eventually to run it. A host is an object that collects and provides services for the application. For example, in the ASP.NET context, it provides an HTTP server implementation, middleware components, configuration services, and so on.
As you can see, the webBuilder.UseStartup() method refers to the Startup type. This type is defined by the Startup class in the Startup.cs file. The default content of this file is shown below:
//Startup.cs
using System;
using System.Collections.Generic;
using System.Linq;
using System.Threading.Tasks;
using Microsoft.AspNetCore.Builder;
using Microsoft.AspNetCore.Hosting;
using Microsoft.AspNetCore.HttpsPolicy;
using Microsoft.AspNetCore.Mvc;
using Microsoft.Extensions.Configuration;
using Microsoft.Extensions.DependencyInjection;
using Microsoft.Extensions.Hosting;
using Microsoft.Extensions.Logging;
using Microsoft.OpenApi.Models;

namespace Glossary
{
    public class Startup
    {
        public Startup(IConfiguration configuration)
        {
            Configuration = configuration;
        }

        public IConfiguration Configuration { get; }

        // This method gets called by the runtime. Use this method to add services to the container.
        public void ConfigureServices(IServiceCollection services)
        {

            services.AddControllers();
            services.AddSwaggerGen(c =>
            {
                c.SwaggerDoc("v1", new OpenApiInfo { Title = "Glossary", Version = "v1" });
            });
        }

        // This method gets called by the runtime. Use this method to configure the HTTP request pipeline.
        public void Configure(IApplicationBuilder app, IWebHostEnvironment env)
        {
            if (env.IsDevelopment())
            {
                app.UseDeveloperExceptionPage();
                app.UseSwagger();
                app.UseSwaggerUI(c => c.SwaggerEndpoint("/swagger/v1/swagger.json", "Glossary v1"));
            }

            app.UseHttpsRedirection();

            app.UseRouting();

            app.UseAuthorization();

            app.UseEndpoints(endpoints =>
            {
                endpoints.MapControllers();
            });
        }
    }
}
The Startup class allows you to set up services for the current application. In particular, it allows you to register services via the ConfigureServices() method and to configure the HTTP request pipeline via the Configure() method. In the body of the latter method, you'll find a few statements that declare the middleware to use. Please read the official documentation to get more information about the built-in middleware. Notice how Swagger is registered in the ConfigureServices() method and configured in the Configure() method.
The rest of the application code is located in the WeatherForecast.cs and WeatherForecastController.cs files. These files implement respectively the model and the Web APIs controller for the sample application coming with the .NET template. You are going to get rid of them and create your glossary application.
Setting up a CRUD API
Now that you have ensured that the whole development environment is working properly and have taken a tour to understand the project's main elements, start creating your Web API.
As said before, your API will implement the CRUD operations on a glossary. Like most Web APIs, your API will also use an approach inspired by the REST architecture.
To get started, remove the WeatherForecast.cs file from the root of the project and the WeatherForecastController.cs file from the Controllers folder.
Creating the model
As a first step, create the model for the glossary Web API. It will be the representation of the resource that will be exposed to the clients. In particular, it will be implemented as a class representing the single glossary item. So, add a file named GlossaryItem.cs in the root folder of the project and put the following content in it:
//GlossaryItem.cs
namespace Glossary
{
    public class GlossaryItem
    {
        public string Term { get; set; }
        public string Definition { get; set; }
    }
}
This class simply defines a glossary item as a term and its definition.
Creating the controller
Now, you need to create the API controller to handle HTTP requests. Create the GlossaryController.cs in the Controllers folder and put the following code inside it:
//Controllers/GlossaryController.cs
using System;
using System.Collections.Generic;
using Microsoft.AspNetCore.Mvc;

namespace Glossary.Controllers
{
    [ApiController]
    [Route("api/[controller]")]
    public class GlossaryController: ControllerBase
    {
        private static List<GlossaryItem> Glossary = new List<GlossaryItem> {
            new GlossaryItem
            {
                Term= "Access Token",
                Definition = "A credential that can be used by an application to access an API. It informs the API that the bearer of the token has been authorized to access the API and perform specific actions specified by the scope that has been granted."
            },
            new GlossaryItem
            {
                Term= "JWT",
                Definition = "An open, industry standard RFC 7519 method for representing claims securely between two parties. "
            },
            new GlossaryItem
            {
                Term= "OpenID",
                Definition = "An open standard for authentication that allows applications to verify users are who they say they are without needing to collect, store, and therefore become liable for a user’s login information."
            }
        };
    }
}
A controller in ASP.NET Core is a class inheriting from ControllerBase. The base class provides properties and methods that are useful for handling HTTP requests, as you will see later on.
At this stage, the GlossaryController class simply defines the static variable Glossary as a small list of glossary items. In a real-world scenario, the glossary items should be persisted into a database, but to keep things simple, your application will rely on this volatile solution.
The class is decorated with two attributes: ApiController and Route.
The ApiController attribute enables a few handy behaviors, like the automatic HTTP 400 responses when the model is in error, the automatic binding of URL parameters to method parameters, and similar.
The Route attribute allows you to map a URL pattern to the controller. In this specific case, you are mapping the api/[controller] URL pattern to the controller. At runtime, the [controller] placeholder is replaced by the controller class name without the Controller suffix. That means that the GlossaryController will be mapped to the api/glossary URL path, and this will be the base path for all the actions implemented by the controller. The Route attribute can be also applied to the methods of the controller, as you will see.
Getting a List of Items
Once you have the basic infrastructure for your controller, you need to add an action to it. An action is a public method of a controller mapped to an HTTP verb. So, add a new method to the GlossaryController class as shown in the following: :point_down:
//Controllers/GlossaryController.cs
using System;
using System.Collections.Generic;
using Microsoft.AspNetCore.Mvc;

namespace Glossary.Controllers
{
    [ApiController]
    [Route("api/[controller]")]
    public class GlossaryController: ControllerBase
    {
        private static List<GlossaryItem> Glossary = new List<GlossaryItem> {
        //...leave the glossary untouched...
        };

        //👇 new code
        [HttpGet]
        public ActionResult<List<GlossaryItem>> Get()
        {
            return Ok(Glossary);
        }
        //👆 new code
    }
}
The method Get() allows the client to get the whole list of glossary items. It is decorated with the HttpGet attribute which maps the method to HTTP GET requests sent to the api/glossary URL path.
The return type of the method is ActionResult<List<GlossaryItem>>. This means that the method will return a List<GlossaryItem> type object or an object deriving from ActionResult. The ActionResult type represents the HTTP status codes to be returned as a response. As said before, the ControllerBase class provides a few features to deal with HTTP requests. Some of these features are methods that create HTTP status code in a readable way, like Ok(), NotFound(), BadRequest(), and so on. The Ok(Glossary) value returned by the Get() method represents the 200 OK HTTP status code with the representation of the Glossary variable as the body of the response.
“In ASP.NET, an action is a public method of a controller mapped to an HTTP verb.”
Tweet This
Note: An ASP.NET action may return different types: a specific type,
IActionResult, orActionResult<T>. Each return type has pros and cons. See the documentation for more information.
To test this first action implementation, run the application by typing the following command in a terminal window:
dotnet run
Note: If you are already running your web app, stop it and run it again. If you don't want manually to stop and start your application while doing changes to the source files, you can run the following command:
dotnet watch runThis causes your application to automatically restart whenever you change the source code.
Then, navigate to https://localhost:5001/swagger with your browser. Now you should see your new endpoint as shown in the following picture:
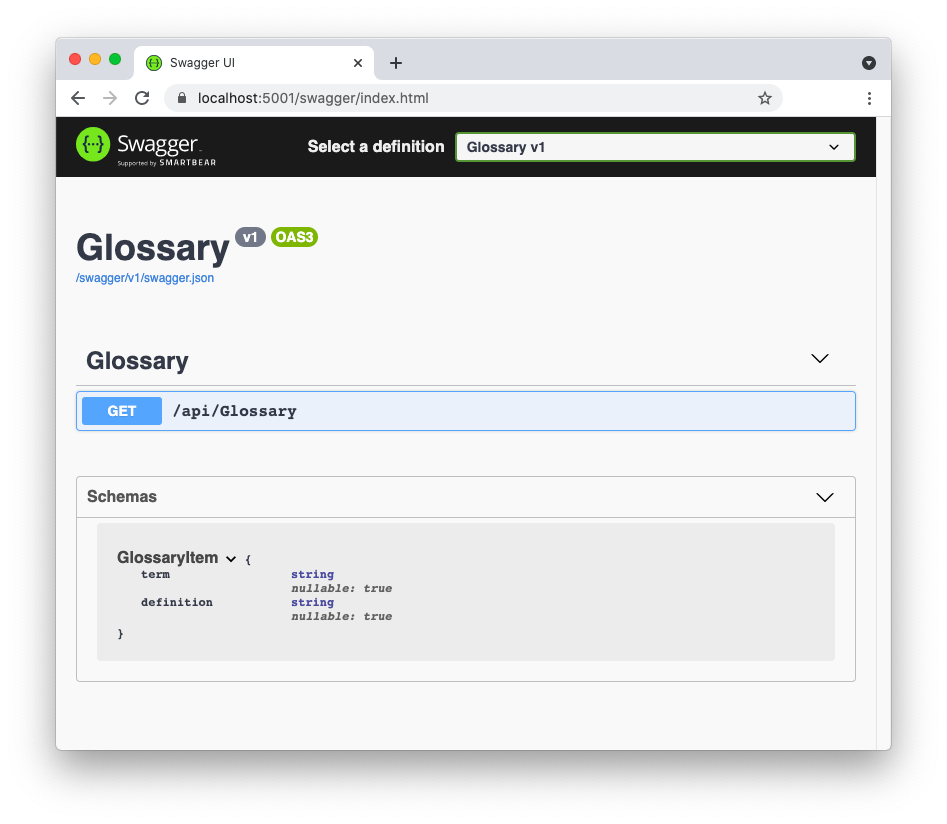
By clicking the Get button and then the Try it out button that appears, you can test the new endpoint. You should see a screen like the following:
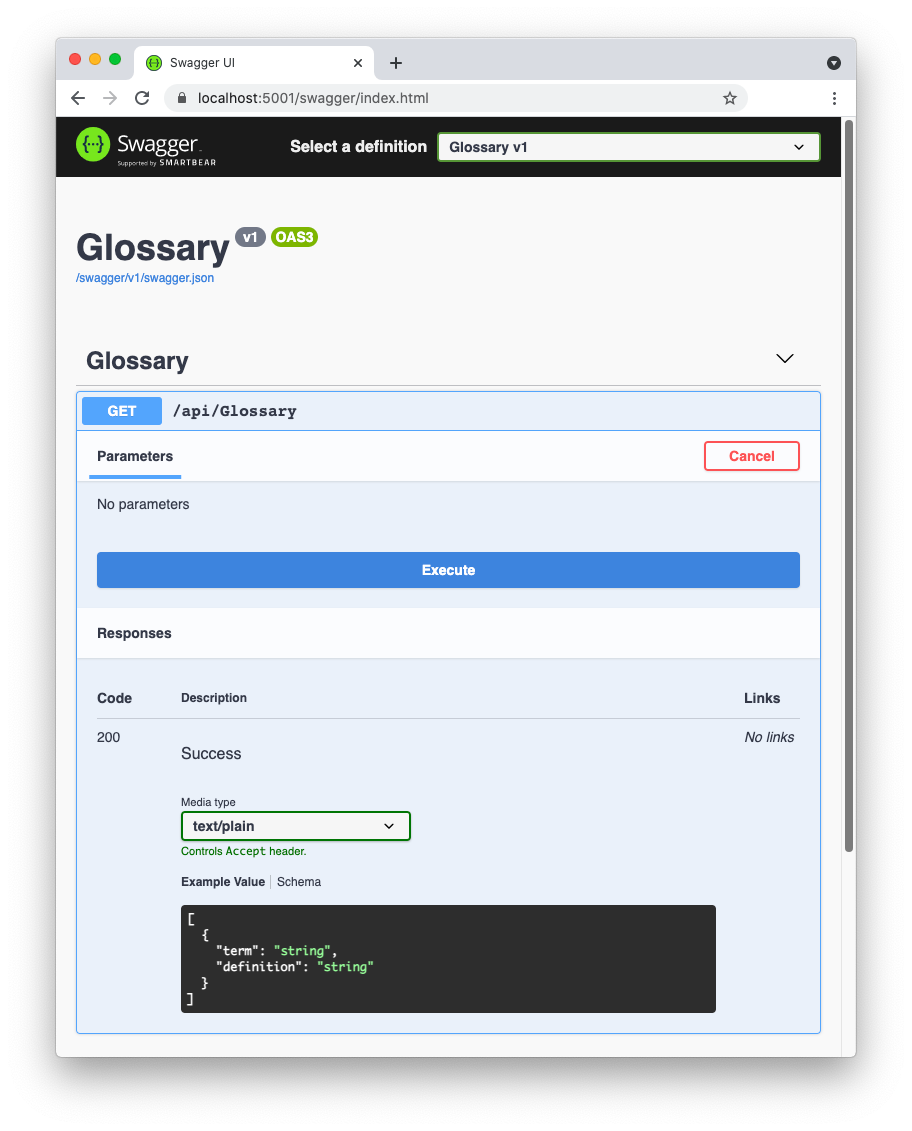
Here you can find some details about the endpoint. You know that it doesn't require parameters. Also, you see that the only response it provides is a successful one (status code 200) with an array of JSON objects with the term and definition string properties.
All you need to do at this point is to click on the Execute button and get the result, as shown below:
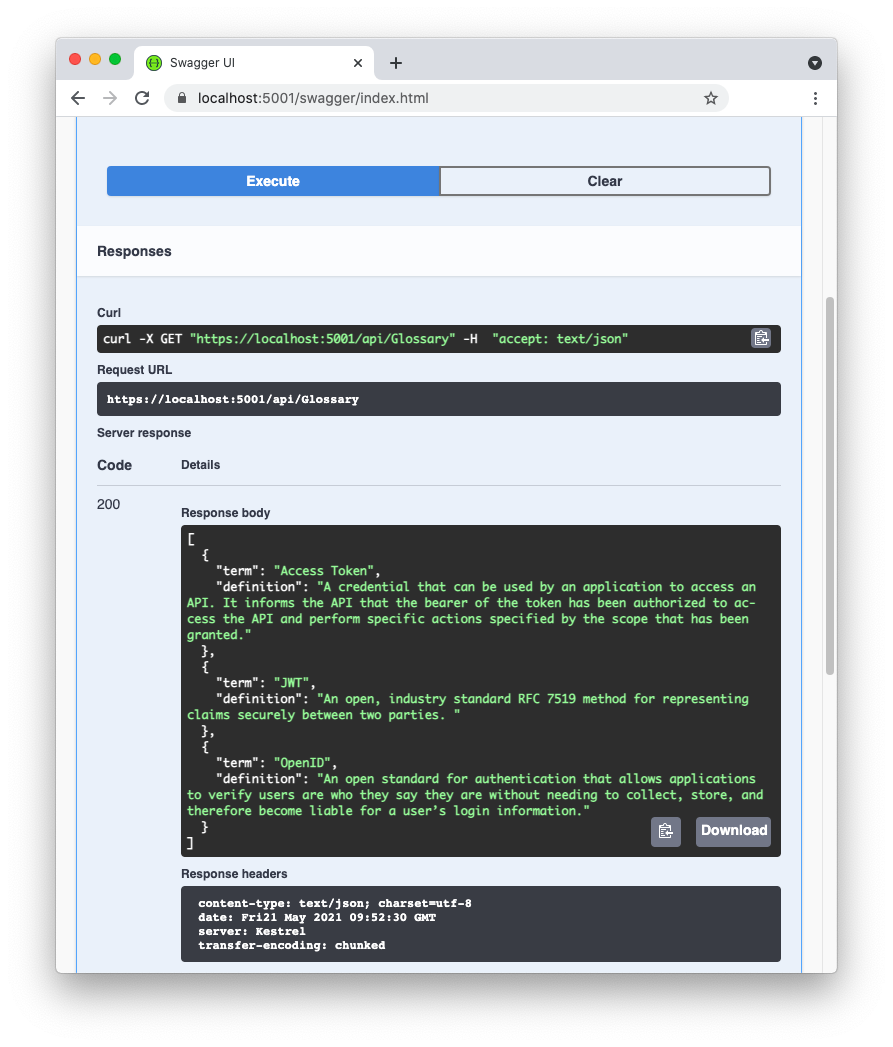
You get the command you should use to make the request with curl, the absolute URL of the Web API endpoint, and the actual Web API response. You see the glossary list implemented by the Glossary static variable and the headers sent by the server.
Getting a Single Item
The next action you are going to create will allow your client to get a single glossary item. The action will expect a term as input and will provide an instance of GlossaryItem as a result.
Add a new method definition to the controller class after the previous action definition, as in the following:
//Controllers/GlossaryController.cs
using System;
using System.Collections.Generic;
using Microsoft.AspNetCore.Mvc;

namespace Glossary.Controllers
{
    [ApiController]
    [Route("api/[controller]")]
    public class GlossaryController: ControllerBase
    {
        //...existing code...

        //👇 new code
        [HttpGet]
        [Route("{term}")]
        public ActionResult<GlossaryItem> Get(string term)
        {
            var glossaryItem = Glossary.Find(item =>
                    item.Term.Equals(term, StringComparison.InvariantCultureIgnoreCase));

            if (glossaryItem == null)
            {
                return NotFound();
            } else
            {
                return Ok(glossaryItem);
            }
        }
        //👆 new code
    }
}
As you can see, you have an overloaded definition of the Get() method mapped again to the HTTP GET verb. However, in this case, you have a Route attribute for the action. This attribute appends a new variable element to the URL of the action. So, this action will respond to the HTTP request sent to the URL pattern api/glossary/{term}. The {term} part of the pattern can be replaced by any non-empty string and its value will be mapped to the term parameter.
This method checks if the requested term exists in the Glossary list and returns the glossary item. If the term doesn't exist, it returns a 404 Not Found HTTP status code.
Now, restart the application and test this new action by navigating to https://localhost:5001/swagger.
This time, you have two endpoints on the page, as you can see in the following picture:
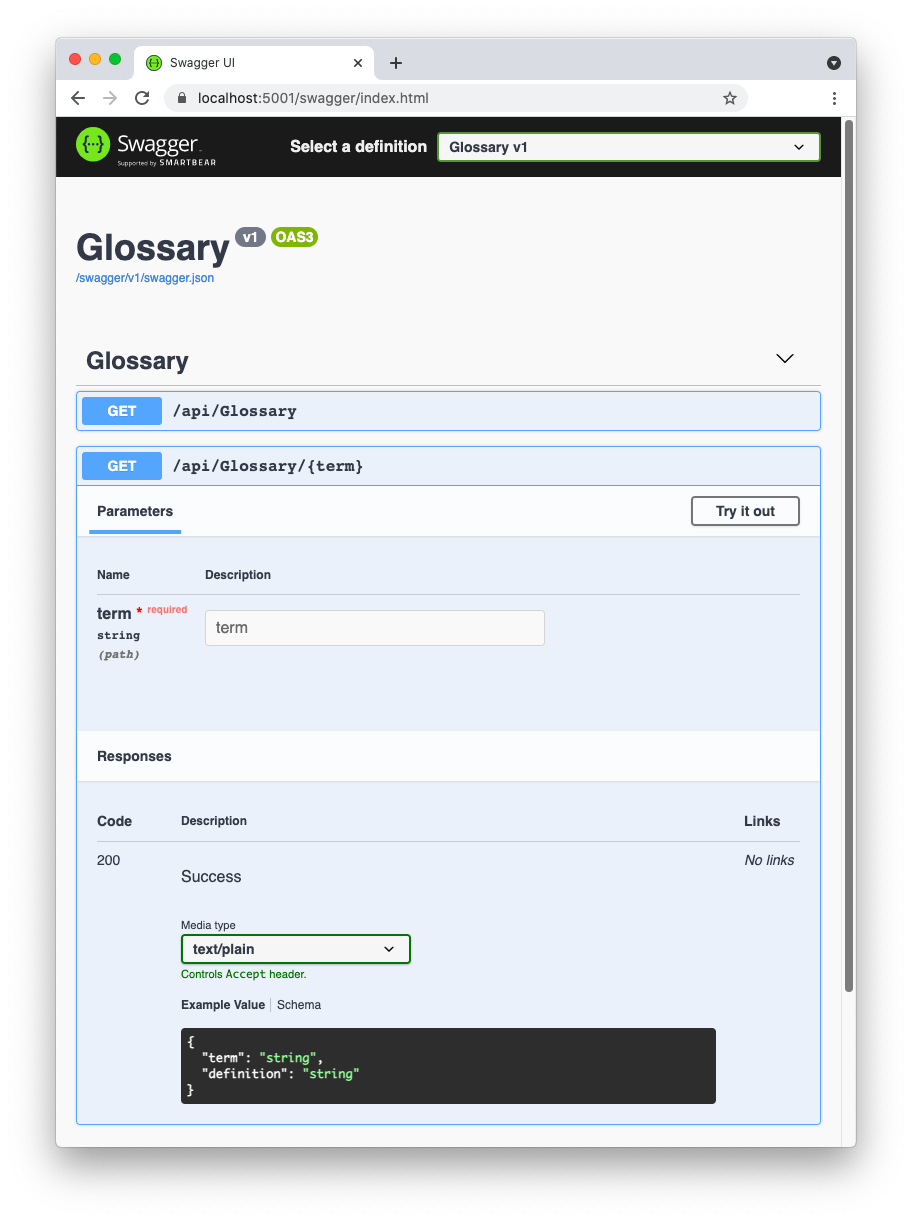
In this case, you have a mandatory parameter to provide before testing the endpoint. Try to insert the JWT value and you should get the definition of the JWT term as a response.
Interested in getting up-to-speed with JWTs as soon as possible?
Download the free ebook
Creating a New Item
Going ahead with the CRUD operations implementation, you need to allow the client to add a new term to the glossary. As a first step, include the System.IO namespace in the controller class by adding the using System.IO statement. The using section of the file GlossaryController.cs should look like the following code:
//Controllers/GlossaryController.cs
using System;
using System.Collections.Generic;
using Microsoft.AspNetCore.Mvc;
using System.IO;

namespace Glossary.Controllers
{
  //...existing code...
}
You need the System.IO namespace to use the Path object, as you will see very soon.
Then, append the Post() method to the controller class:
//Controllers/GlossaryController.cs
using System;
using System.Collections.Generic;
using Microsoft.AspNetCore.Mvc;
using System.IO;

namespace Glossary.Controllers
{
    [ApiController]
    [Route("api/[controller]")]
    public class GlossaryController: ControllerBase
    {
        //...existing code...

        //👇 new code
        [HttpPost]
        public ActionResult Post(GlossaryItem glossaryItem)
        {
            var existingGlossaryItem = Glossary.Find(item =>
                    item.Term.Equals(glossaryItem.Term, StringComparison.InvariantCultureIgnoreCase));

            if (existingGlossaryItem != null)
            {
                return Conflict("Cannot create the term because it already exists.");
            }
            else
            {
                Glossary.Add(glossaryItem);
                var resourceUrl = Path.Combine(Request.Path.ToString(), Uri.EscapeUriString(glossaryItem.Term));
                return Created(resourceUrl, glossaryItem);
            }
        }
        //👆 new code
    }
}
In this case, the action is mapped to the HTTP POST verb via the HttpPost attribute. The Post() method has also a glossaryItem parameter whose value comes from the body of the HTTP POST request. Here, the method checks if the term to be created already exists. If it is so, a 409 Conflict HTTP status code will be returned. Otherwise, the new item is appended to the Glossary list. By following the REST guidelines, the action returns a 201 Created HTTP status code. The response includes the newly created item in the body and its URL in the Location HTTP header.
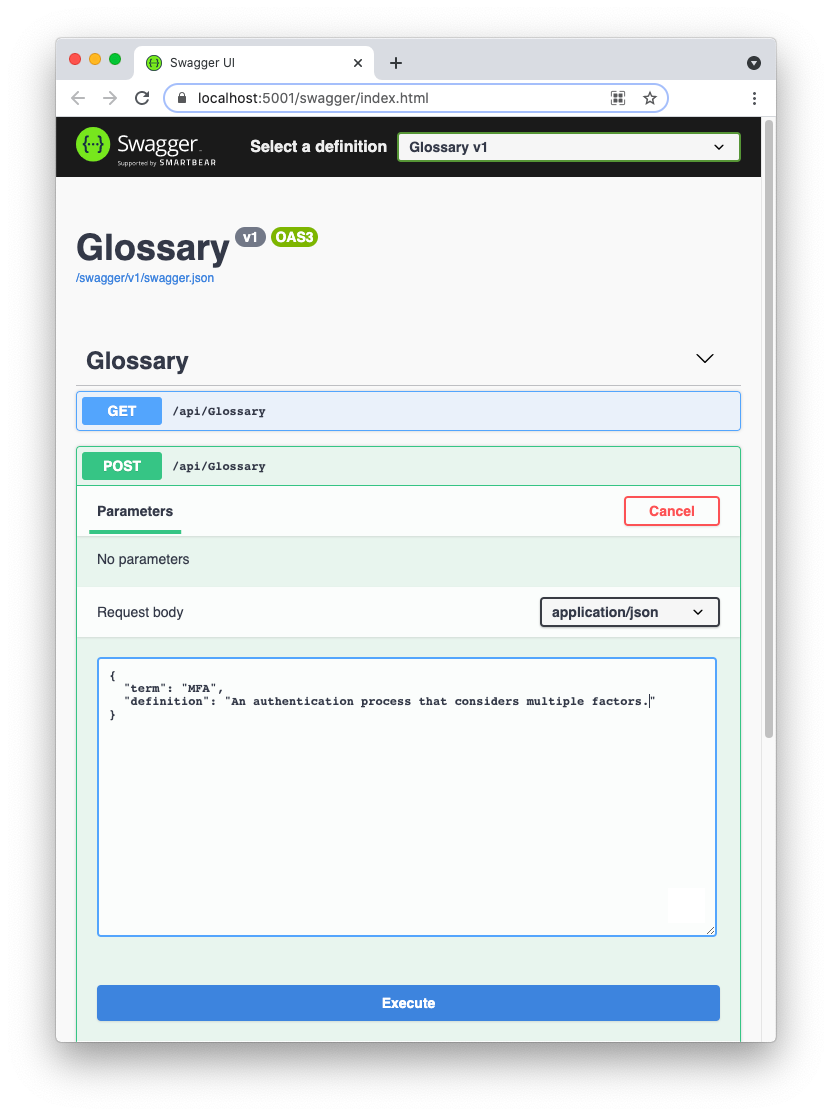
Run the application again and add a new glossary item as shown in the following picture:
As a result of executing this command, you should get a response as in the following:
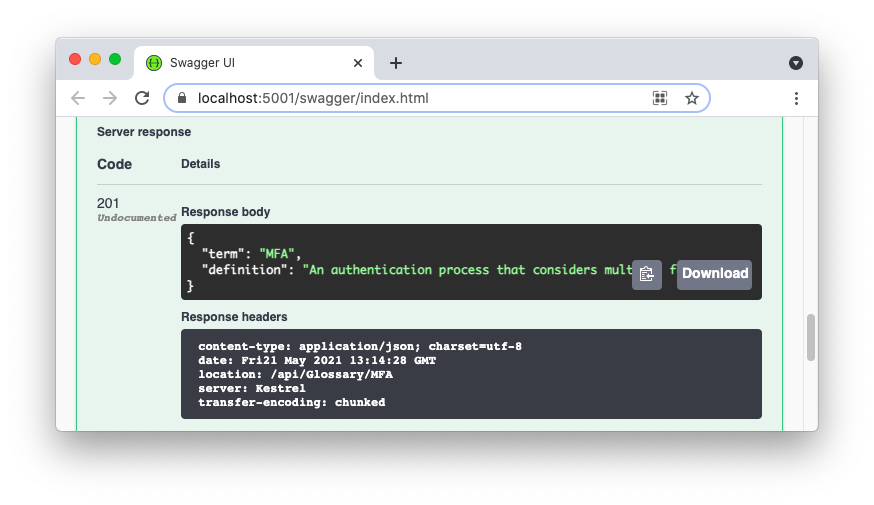
Notice the 201 Created HTTP status code, the value /api/glossary/MFA for the location header, and the content of the response body. This is what you said to return at the end of the action execution.
To verify that the new item has been actually added to the glossary, execute the GET verb on the api/glossary/{term} endpoint by providing the MFA term as a parameter.
You should get the newly added item.
Note: Be sure to not stop the application between the item addition and the item existence check. Remember that the glossary is implemented as a static variable, so, when the application stops, you lose any changes.
Updating an Item
After adding an item, allow the client of your Web API to update it by appending the Put() method to the controller class, as shown below:
//Controllers/GlossaryController.cs
using System;
using System.Collections.Generic;
using Microsoft.AspNetCore.Mvc;
using System.IO;

namespace Glossary.Controllers
{
    [ApiController]
    [Route("api/[controller]")]
    public class GlossaryController: ControllerBase
    {
        //...existing code...

        //👇 new code
        [HttpPut]
            public ActionResult Put(GlossaryItem glossaryItem)
            {
                var existingGlossaryItem = Glossary.Find(item =>
                item.Term.Equals(glossaryItem.Term, StringComparison.InvariantCultureIgnoreCase));

                if (existingGlossaryItem == null)
                {
                    return NotFound("Cannot update a nont existing term.");
                } else
                {
                    existingGlossaryItem.Definition = glossaryItem.Definition;
                    return Ok();
                }
            }
        //👆 new code
    }
}
The Put() method is decorated with the HttpPut attribute that maps it to the HTTP PUT verb. In short, it checks if the glossary item to be updated exists in the Glossary list. If the item doesn't exist, it returns a 404 Not Found HTTP status code. Otherwise, it updates the item's definition and returns a 200 OK HTTP status code.
Test this new action by using the new PUT button appearing on the Swagger page.
Deleting an Item
Finally, you implement the deletion of an item from the glossary by appending the Delete() method to the controller class:
//Controllers/GlossaryController.cs
using System;
using System.Collections.Generic;
using Microsoft.AspNetCore.Mvc;
using System.IO;

namespace Glossary.Controllers
{
    [ApiController]
    [Route("api/[controller]")]
    public class GlossaryController: ControllerBase
    {
        //...existing code...

        //👇 new code
        [HttpDelete]
        [Route("{term}")]
        public ActionResult Delete(string term)
        {
            var glossaryItem = Glossary.Find(item =>
                   item.Term.Equals(term, StringComparison.InvariantCultureIgnoreCase));

            if (glossaryItem == null)
            {
                return NotFound();
            }
            else
            {
                Glossary.Remove(glossaryItem);
                return NoContent();
            }
        }
        //👆 new code
    }
}
The HttpDelete attribute maps the method Delete() to the DELETE HTTP verb. The Route attribute appends a new element to the URL the same way you learned when implemented the action that gets a single glossary item. So, when a DELETE HTTP request hits the api/glossary/{term} URL pattern, the method checks if the item exists in the Glossary list. If it doesn't exist, a 404 Not Found HTTP status code is returned. Otherwise, the Delete() method removes the item from the Glossary list and returns a 204 No Content HTTP status code.
After you have added this code, run the application and test the new method by clicking the DELETE button.
Your CRUD Web API is ready!
Leverage Auth0's authentication and authorization services in your .NET applications.
DOWNLOAD THE FREE EBOOK
Recap
In this article, you learned to create a new Web API project with ASP.NET. You started by exploring the sample project generated by the CLI command dotnet new and continued by replacing the existing code with yours. You implemented the CRUD operations on a simple glossary and learned how to map methods to HTTP verbs by leveraging the proper attributes. Also, you discovered how ASP.NET lets you return HTTP responses in a readable way.
You can download the full source code of the application from this GitHub repository.
To learn how to secure your Web API, continue reading this article about authorization and ASP.NET.
About the author

Andrea Chiarelli
Principal Developer Advocate
I have over 20 years of experience as a software engineer and technical author. Throughout my career, I've used several programming languages and technologies for the projects I was involved in, ranging from C# to JavaScript, ASP.NET to Node.js, Angular to React, SOAP to REST APIs, etc.
In the last few years, I've been focusing on simplifying the developer experience with Identity and related topics, especially in the .NET ecosystem.