Overview
Auth0をアプリにシームレスに統合できる、iOS・macOS・tvOS・watchOS向けのSwift SDKです。ログインとログアウトを追加し、資格情報を安全に保管して、ユーザー情報にアクセスすることができます。参照 :GitHubリポジトリ v1からの移行: 移行ガイド を参照してください
ドキュメント
- Quickstart:Auth0.swiftをゼロからiOS/macOSアプリに統合する方法を説明します。
- Sample App:動作する完全なiOS/macOSアプリを試用できます。
- 例:ほとんどの機能の使用方法を説明します。
- APIのドキュメント:コードのコメントから自動生成されたドキュメントには、利用可能なすべての機能が説明されています。
- よくある質問:Auth0.swiftに関するよくある質問にお答えします。
- Auth0ドキュメント::ドキュメントサイトを探索して、Auth0について詳しく学ぶことができます。
使用を開始する
要件
- iOS 13.0+ / macOS 11.0+ / tvOS 13.0+ / watchOS 7.0+
- Xcode 14.x
- Swift 5.7+
インストール
Swift Package Manager
Xcodeで以下のメニュー項目を開きます: [File(ファイル)] > [Add Packages…(パッケージの追加)] [Search or Enter Package URL(パッケージURLを検索または入力)] 検索ボックスに次のURLを入力します。Cocoapods
以下のラインをPodfileに追加します。
pod installを実行します。
Carthage
以下のラインをCartfileに追加します。
carthage bootstrap --use-xcframeworksを実行します。
SDKを構成する
Auth0 Dashboardに移動し、新しい [Native(ネイティブ)] アプリケーションを作成します。 Auth0.swiftはAuth0と通信するためにAuth0アプリケーションの [(クライアントID)] と [Domain(ドメイン)] を必要とします。これらの詳細はAuth0アプリケーションの設定ページで確認できますカスタムドメインを使用している場合は、設定ページの値ではなく、カスタムドメインの値を使用してください。クライアントIDとドメインをplistで設定する
Auth0.plistという名前のplistファイルを、以下の内容でアプリバンドル内に作成します。
クライアントIDとドメインをプログラムで設定する
Web Authの場合
Authentication APIクライアントの場合
Management APIクライアント(ユーザー)の場合
Web Authを設定する(iOS/macOS)
コールバックURLとログアウトURLを設定する
コールバックURLとログアウトURLは、Auth0がアプリケーションにリダイレクトするために呼び出すURLです。Auth0は、ユーザー認証後にコールバックURLを呼び出し、セッションCookieを削除した後にログアウトURLを呼び出します。 コールバックURLとログアウトURLは操作できるため、Auth0アプリケーションの設定ページにある [Allowed Callback URLs(許可されているコールバックURL)] と [Allowed Logout URLs(許可されているログアウトURL)] のフィールドに使用するURLを追加する必要があります。これにより、Auth0はこれらのURLを有効なものと認識できるようになります。コールバックURLとログアウトURLを設定しないと、ユーザーはアプリケーションへのログインやログアウトが行えなくなり、エラーが発生します。 Auth0アプリケーションの設定ページを開き、アプリケーションのプラットフォームに応じて、対応するURLを [Allowed Callback URLs(許可されているコールバックURL)] と [Allowed Logout URLs(許可されているログアウトURL)] に追加します。カスタムドメインを使用している場合は、設定ページの値ではなく、{yourAuth0Domain}をカスタムドメインの値に置き換えてください。
iOS
macOS
com.example.MyAppでAuth0ドメインがexample.us.auth0.comの場合には、次の値になります。
カスタムURLスキームを設定する
Xcodeで、アプリターゲット設定の**[Info(情報)]** タブを開きます。[URL Types(URLタイプ)] セクションで**+ボタンをクリックして、新しいエントリを追加します。そこで、 [Identifier(識別子)]フィールドにauth0と入力し、 [URL Schemes(URLスキーム)]**フィールドに$(PRODUCT_BUNDLE_IDENTIFIER)と入力します。
これにより、バンドル識別子がカスタムURLスキームとして登録され、コールバックURLとログアウトURLがアプリに到達できるようになります。
Web Authのログイン(iOS/macOS)
ログインページを提示したいファイルにAuth0モジュールをインポートします。
async/awaitを使用する
Combineを使用する
Web Authのログアウト(iOS/macOS)
ユーザーをログアウトさせるには、ユニバーサルログインセッションのCookieをクリアし、アプリケーションからユーザーの資格情報を削除します。 [Logout(ログアウト)] ボタンのアクションでclearSession()メソッドを呼び出します。セッションCookieがクリアされたら、ユーザーの資格情報を削除します。
async/awaitを使用する
Combineを使用する
SSOアラートボックス(iOS/macOS)
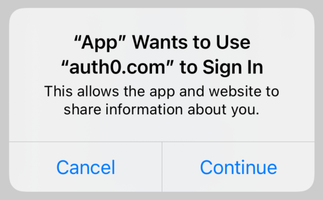
詳しくは、iOSでシームレスなモバイルSSO(シングルサインオン)エクスペリエンスを作成する方法も参照してください。
次の手順
ほとんどの機能については、例で説明されています。- 資格情報を保存する:ユーザーの資格情報をKeychainに安全に保存します。
- 保存されている資格情報を確認する:アプリの起動時に、ユーザーがすでにログインしているかどうかを確認します。
- 保存されている資格情報を取得する:Keychainからユーザーの資格情報を取得し、期限切れの場合は自動的に更新します。
- 保存されている資格情報を消去する:ユーザーの資格情報を削除して、ログアウトプロセスを完了します。
- ユーザー情報を取得する:
/userinfoエンドポイントから最新のユーザー情報を取得します。