Express.js APIアプリケーションに認可を追加する
このガイドは、新規または既存のExpress.js APIアプリケーションにexpress-oauth2-jwt-bearer
パッケージを使ってAuth0を統合する方法を説明します。
Auth0 DashboardでAPIをまだ作成していない場合は、対話型のセレクターを使ってAuth0 APIを新規作成します。そうでない場合は、既存のプロジェクトAPIを選択します。
Auth0 Dashboardを使って初めてAPIをセットアップする場合には、使用の開始ガイドを確認してください。それぞれのAuth0 APIにはAPI識別子があり、アプリケーションにアクセストークンの検証で使用されます。
アクセス許可は、ユーザーの代わりに、提供されたアクセストークンを使ってどのようにしてリソースにアクセスできるのかを定義できるようにします。たとえば、ユーザーがマネージャーアクセスレベルを持つ場合には、messages
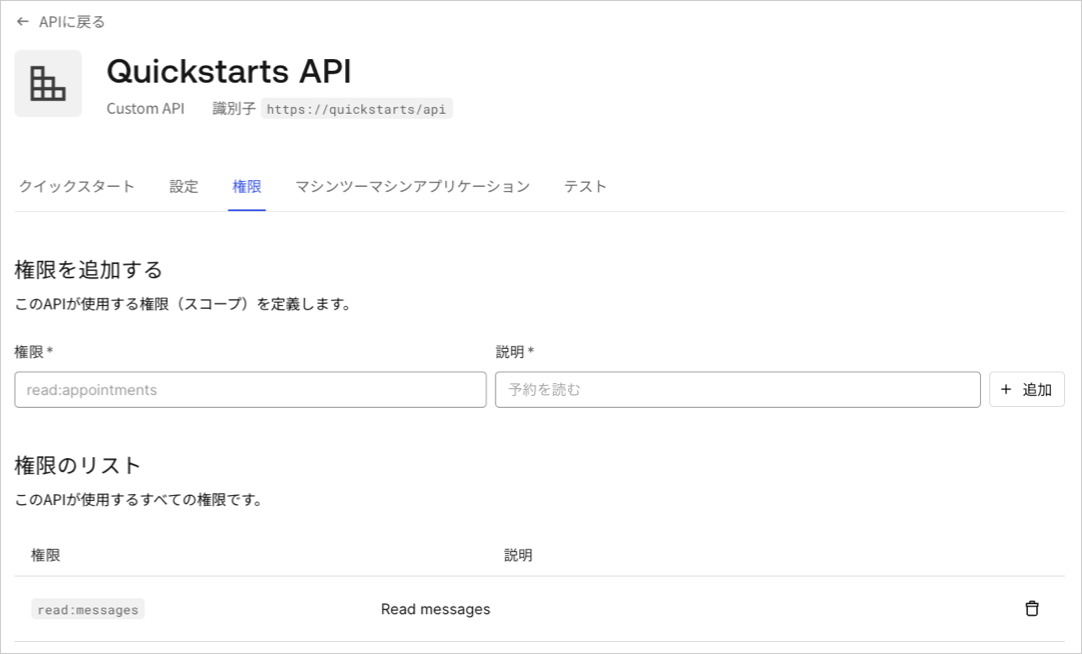
リソースに対して読み出しアクセスを付与し、管理者アクセスレベルを持つ場合には、書き込みアクセスを付与することができます。
Auth0 Dashboardの[APIs]セクションにある[Permissions(権限)]ビューで使用可能なアクセス許可を定義することができます。

まず、npm
でSDKをインストールします。
npm install --save express-oauth2-jwt-bearer
Was this helpful?
ドメインとAPI識別子を使って、express-oauth2-jwt-bearer
を構成します。
右に示したcheckJwt
ミドルウェアは、要求に含まれるユーザーのアクセストークンが有効かを確認します。トークンが有効でない場合、ユーザーがエンドポイントにアクセスしようとすると、「401 Authorization」というエラーが発生します。
ミドルウェアは、トークンに要求されたリソースにアクセスするだけの十分なスコープがあるかを確認しません。
有効なJWTを必須して個々のルートを保護するには、express-oauth2-jwt-bearer
から構築されたcheckJwt
ミドルウェアでルートを構成します。
特定のスコープを検索するために、個々のルートを構成することができます。これを実現するには、requiresScope
メソッドで別のミドルウェアをセットアップします。必要なスコープを提供し、認可を追加したいルートにミドルウェアを適用します。
checkJwt
とrequiredScopes
ミドルウェアを保護したいルートに渡します。
この構成では、read:messages
スコープを持つアクセストークンのみがエンドポイントにアクセスすることができます。
APIを呼び出す
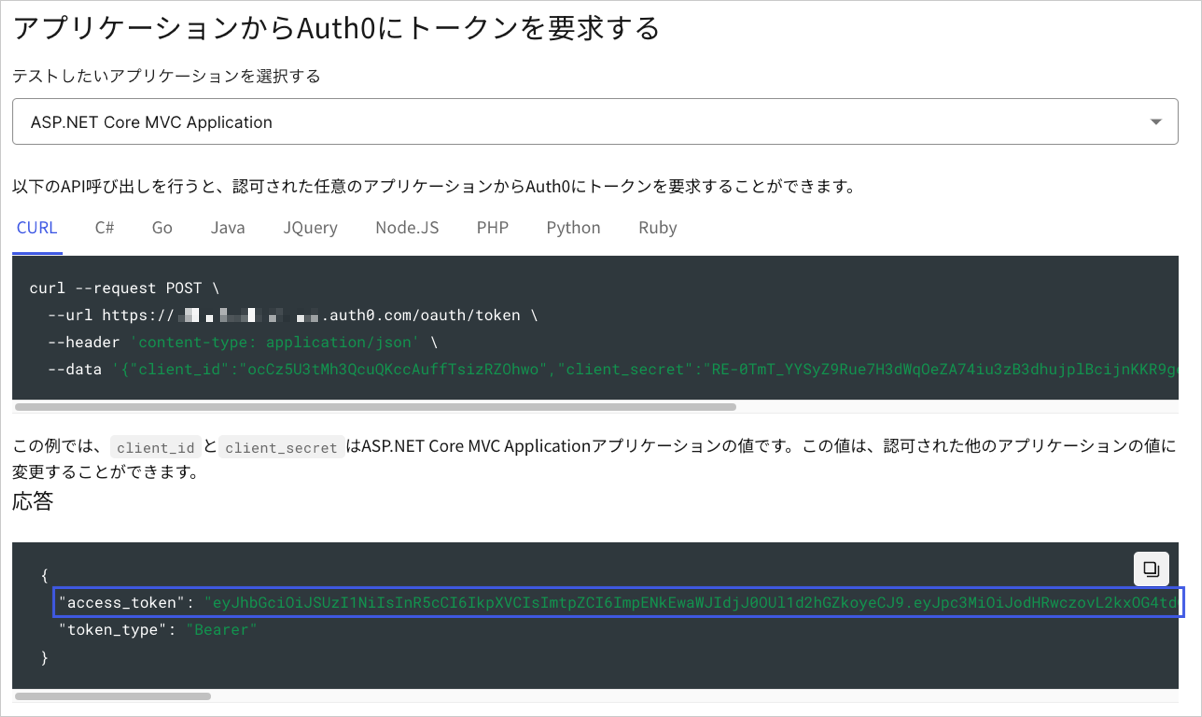
APIを呼び出すにはアクセストークンが必要です。テスト用のアクセストークンは、API設定の[Test(テスト)]ビューから取得することができます。

要求のAuthorization
ヘッダーにアクセストークンを指定します。
curl --request get \
--url http:///%7ByourDomain%7D/api_path \
--header 'authorization: Bearer YOUR_ACCESS_TOKEN_HERE'
Was this helpful?
var client = new RestClient("http:///%7ByourDomain%7D/api_path");
var request = new RestRequest(Method.GET);
request.AddHeader("authorization", "Bearer YOUR_ACCESS_TOKEN_HERE");
IRestResponse response = client.Execute(request);
Was this helpful?
package main
import (
"fmt"
"net/http"
"io/ioutil"
)
func main() {
url := "http:///%7ByourDomain%7D/api_path"
req, _ := http.NewRequest("get", url, nil)
req.Header.Add("authorization", "Bearer YOUR_ACCESS_TOKEN_HERE")
res, _ := http.DefaultClient.Do(req)
defer res.Body.Close()
body, _ := ioutil.ReadAll(res.Body)
fmt.Println(res)
fmt.Println(string(body))
}
Was this helpful?
HttpResponse<String> response = Unirest.get("http:///%7ByourDomain%7D/api_path")
.header("authorization", "Bearer YOUR_ACCESS_TOKEN_HERE")
.asString();
Was this helpful?
var axios = require("axios").default;
var options = {
method: 'get',
url: 'http:///%7ByourDomain%7D/api_path',
headers: {authorization: 'Bearer YOUR_ACCESS_TOKEN_HERE'}
};
axios.request(options).then(function (response) {
console.log(response.data);
}).catch(function (error) {
console.error(error);
});
Was this helpful?
#import <Foundation/Foundation.h>
NSDictionary *headers = @{ @"authorization": @"Bearer YOUR_ACCESS_TOKEN_HERE" };
NSMutableURLRequest *request = [NSMutableURLRequest requestWithURL:[NSURL URLWithString:@"http:///%7ByourDomain%7D/api_path"]
cachePolicy:NSURLRequestUseProtocolCachePolicy
timeoutInterval:10.0];
[request setHTTPMethod:@"get"];
[request setAllHTTPHeaderFields:headers];
NSURLSession *session = [NSURLSession sharedSession];
NSURLSessionDataTask *dataTask = [session dataTaskWithRequest:request
completionHandler:^(NSData *data, NSURLResponse *response, NSError *error) {
if (error) {
NSLog(@"%@", error);
} else {
NSHTTPURLResponse *httpResponse = (NSHTTPURLResponse *) response;
NSLog(@"%@", httpResponse);
}
}];
[dataTask resume];
Was this helpful?
$curl = curl_init();
curl_setopt_array($curl, [
CURLOPT_URL => "http:///%7ByourDomain%7D/api_path",
CURLOPT_RETURNTRANSFER => true,
CURLOPT_ENCODING => "",
CURLOPT_MAXREDIRS => 10,
CURLOPT_TIMEOUT => 30,
CURLOPT_HTTP_VERSION => CURL_HTTP_VERSION_1_1,
CURLOPT_CUSTOMREQUEST => "get",
CURLOPT_HTTPHEADER => [
"authorization: Bearer YOUR_ACCESS_TOKEN_HERE"
],
]);
$response = curl_exec($curl);
$err = curl_error($curl);
curl_close($curl);
if ($err) {
echo "cURL Error #:" . $err;
} else {
echo $response;
}
Was this helpful?
import http.client
conn = http.client.HTTPConnection("")
headers = { 'authorization': "Bearer YOUR_ACCESS_TOKEN_HERE" }
conn.request("get", "%7ByourDomain%7D/api_path", headers=headers)
res = conn.getresponse()
data = res.read()
print(data.decode("utf-8"))
Was this helpful?
require 'uri'
require 'net/http'
url = URI("http:///%7ByourDomain%7D/api_path")
http = Net::HTTP.new(url.host, url.port)
request = Net::HTTP::Get.new(url)
request["authorization"] = 'Bearer YOUR_ACCESS_TOKEN_HERE'
response = http.request(request)
puts response.read_body
Was this helpful?
import Foundation
let headers = ["authorization": "Bearer YOUR_ACCESS_TOKEN_HERE"]
let request = NSMutableURLRequest(url: NSURL(string: "http:///%7ByourDomain%7D/api_path")! as URL,
cachePolicy: .useProtocolCachePolicy,
timeoutInterval: 10.0)
request.httpMethod = "get"
request.allHTTPHeaderFields = headers
let session = URLSession.shared
let dataTask = session.dataTask(with: request as URLRequest, completionHandler: { (data, response, error) -> Void in
if (error != nil) {
print(error)
} else {
let httpResponse = response as? HTTPURLResponse
print(httpResponse)
}
})
dataTask.resume()
Was this helpful?
checkpoint.header
アプリケーションの構成が完了したら、アプリケーションを実行して次の点を確認します:
GET /api/public
が認証を必要としない要求に使用できる。GET /api/private
が認証された要求に使用できる。GET /api/private-scoped
がread:messages
スコープが付与されたアクセストークンを含む認証された要求に使用できる。
Next Steps
Excellent work! If you made it this far, you should now have login, logout, and user profile information running in your application.
This concludes our quickstart tutorial, but there is so much more to explore. To learn more about what you can do with Auth0, check out:
- Auth0 Dashboard - Learn how to configure and manage your Auth0 tenant and applications
- express-oauth2-jwt-bearer SDK - Explore the SDK used in this tutorial more fully
- Auth0 Marketplace - Discover integrations you can enable to extend Auth0’s functionality
Sign up for an or to your existing account to integrate directly with your own tenant.