

TL;DR In this tutorial, we are going to build a real-time to-do app backend with GraphQL APIs, secured using JSON Web Tokens.
Setup a Real-Time Backend With Hasura
Hasura gives instant real-time GraphQL APIs over PostgreSQL. It comes with built-in role-based access control and supports Authorization over webhooks and JWT. Hasura automatically generates types, queries, and mutations when connected to a PostgreSQL database, and the client can query directly with auth.
A front-end application has been implemented using React, and has the following features:
- A simple UI to list, add and delete our to-dos
- A collaborative real-time UI for public to-dos
- Authentication with Auth0
- Auth0 rules to automate syncing of user signup with a database
- Apollo client connecting to GraphQL APIs
We will focus more on building the backend with Hasura and Auth0, and use a React app demo as an example to show how everything integrates.
One-Click Deploy Hasura on Heroku
To start, deploy the Hasura GraphQL Engine to Heroku. This will give you an instance of the Hasura app that you can use to follow along with this article. A PostgreSQL database will be automatically provisioned along with Hasura. If you don't currently have a Heroku account, you would be required to sign up.
Note: You can sign up and deploy apps on Heroku for free
First, give your deployment a name. This name must be unique, but Heroku will tell you whether or not it has already been taken.
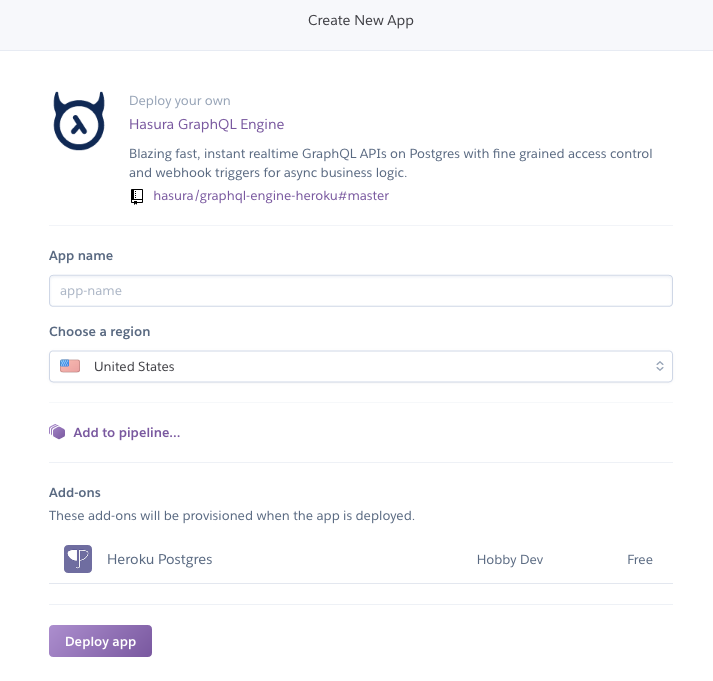
Next, click Deploy app to begin the deployment process. After a short period of time, your app will be ready.
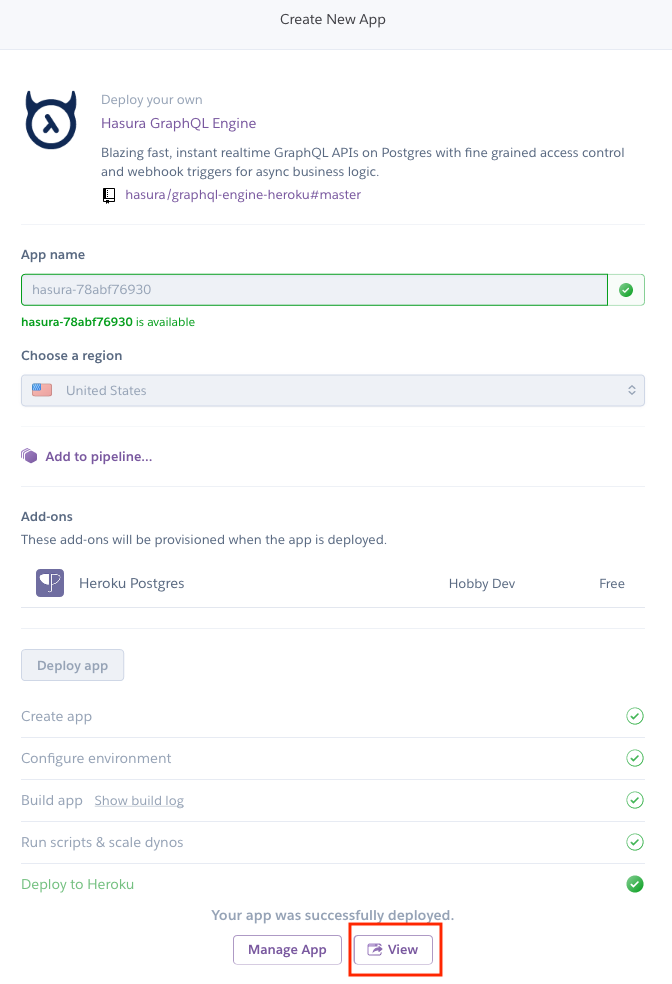
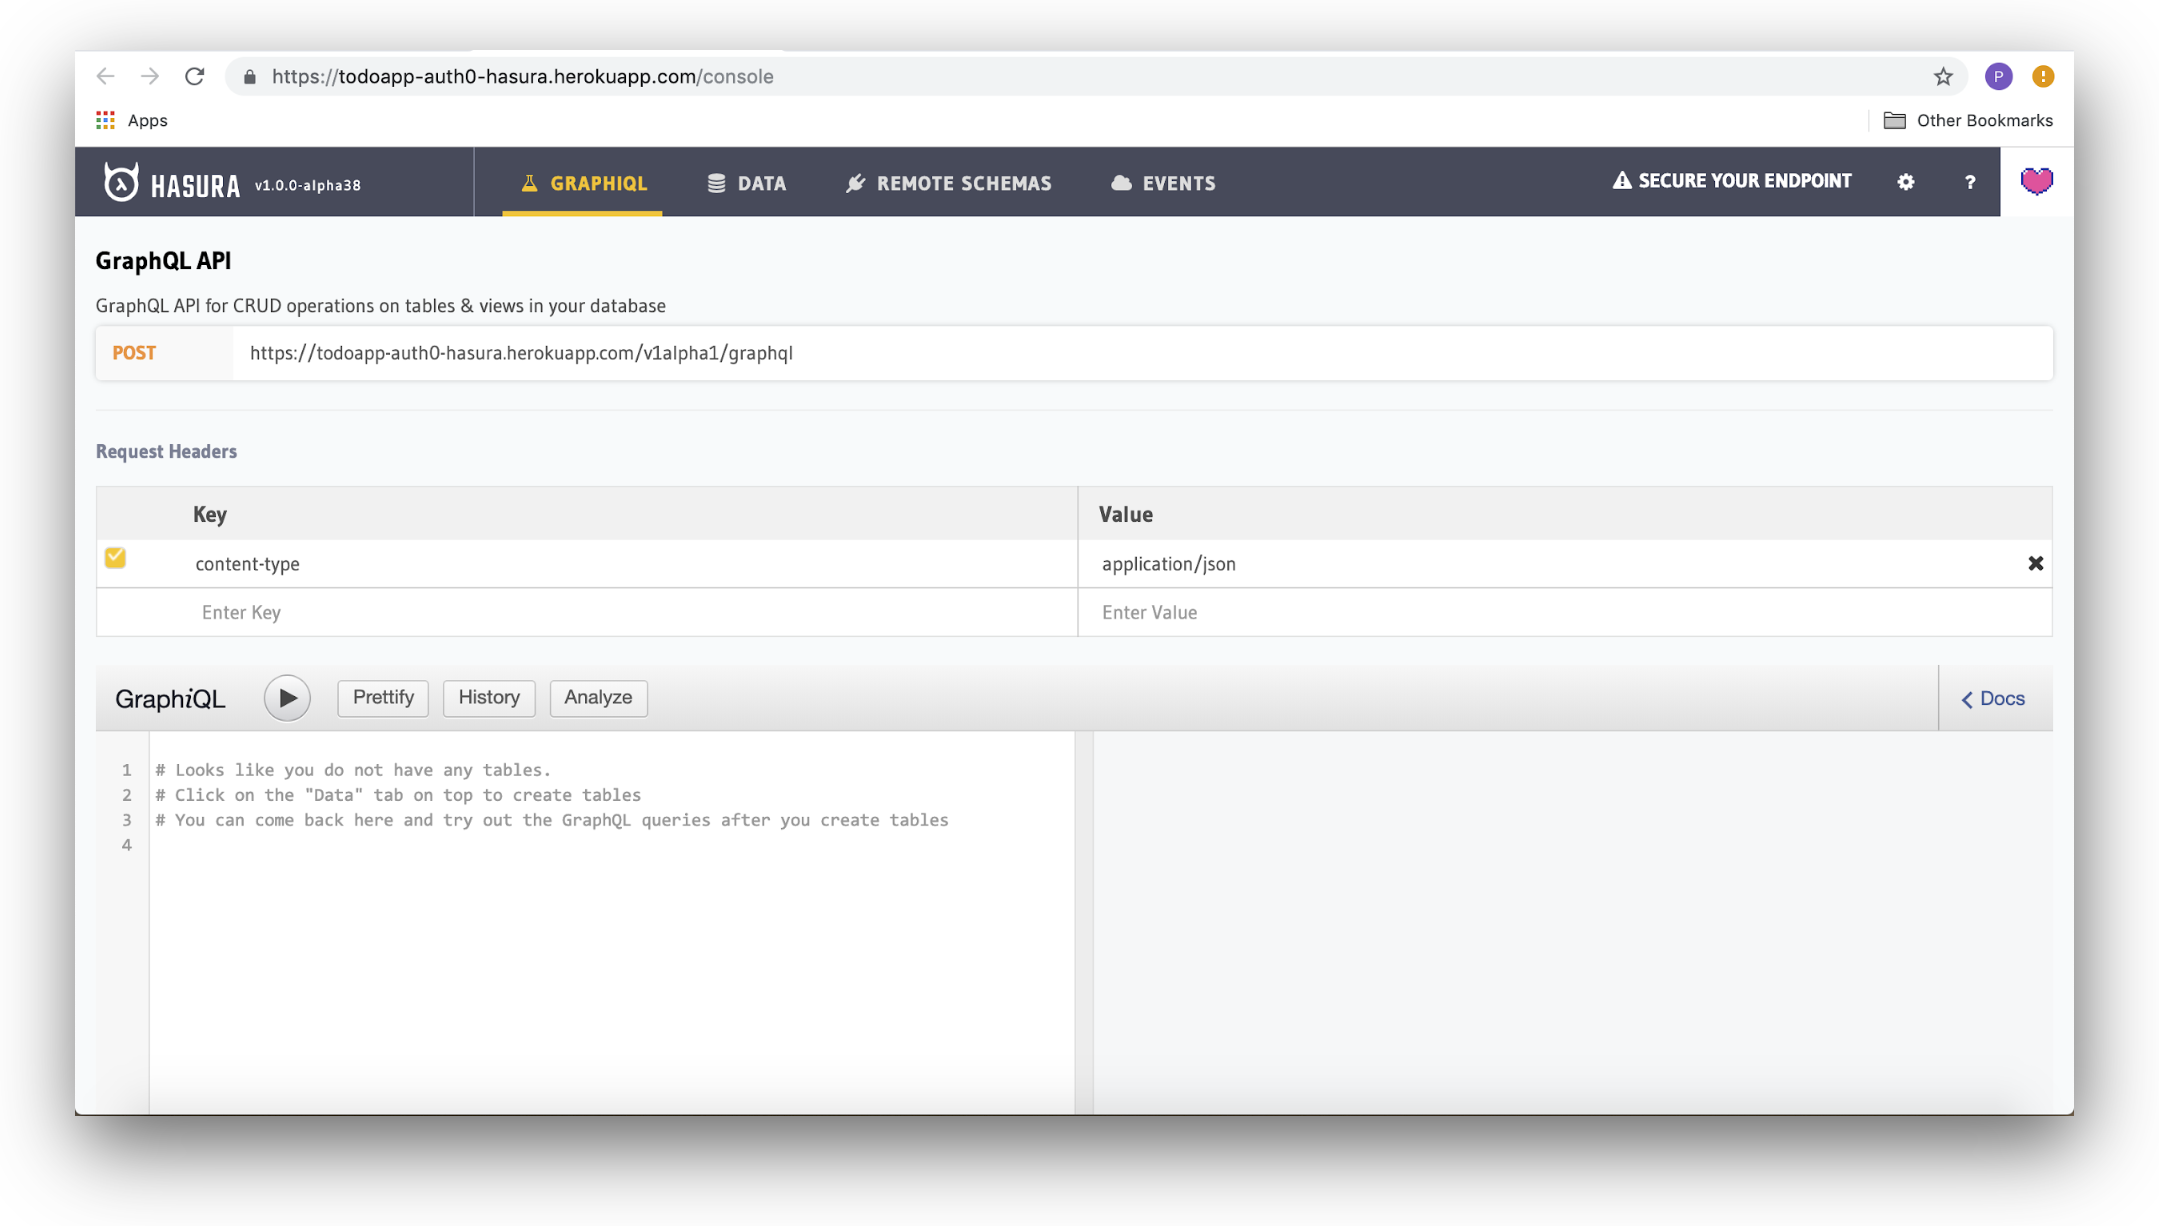
Click the View button to navigate to your Hasura instance, where you will be presented with the Hasura Console:
Creating Tables and Relationships
Now let's go ahead and create tables for the app. For this real-time to-do app, we need a table to store the to-dos, a table to store the users, and a view to track the list of online users.
Creating the 'users' table
Inside the Hasura Console, head over to the Data tab section and click on the Create Table button.
First, specify the name of the table as "users" using the Table Name field.
Next, add columns to the table using the values below. Where there is no default value specified, leave the field blank:
| Field name | Type | Default value |
|---|---|---|
id | Integer (auto-increment) | |
name | Text | |
auth0_id | Text | |
created_at | Timestamp | now() |
last_seen | Timestamp | now() |
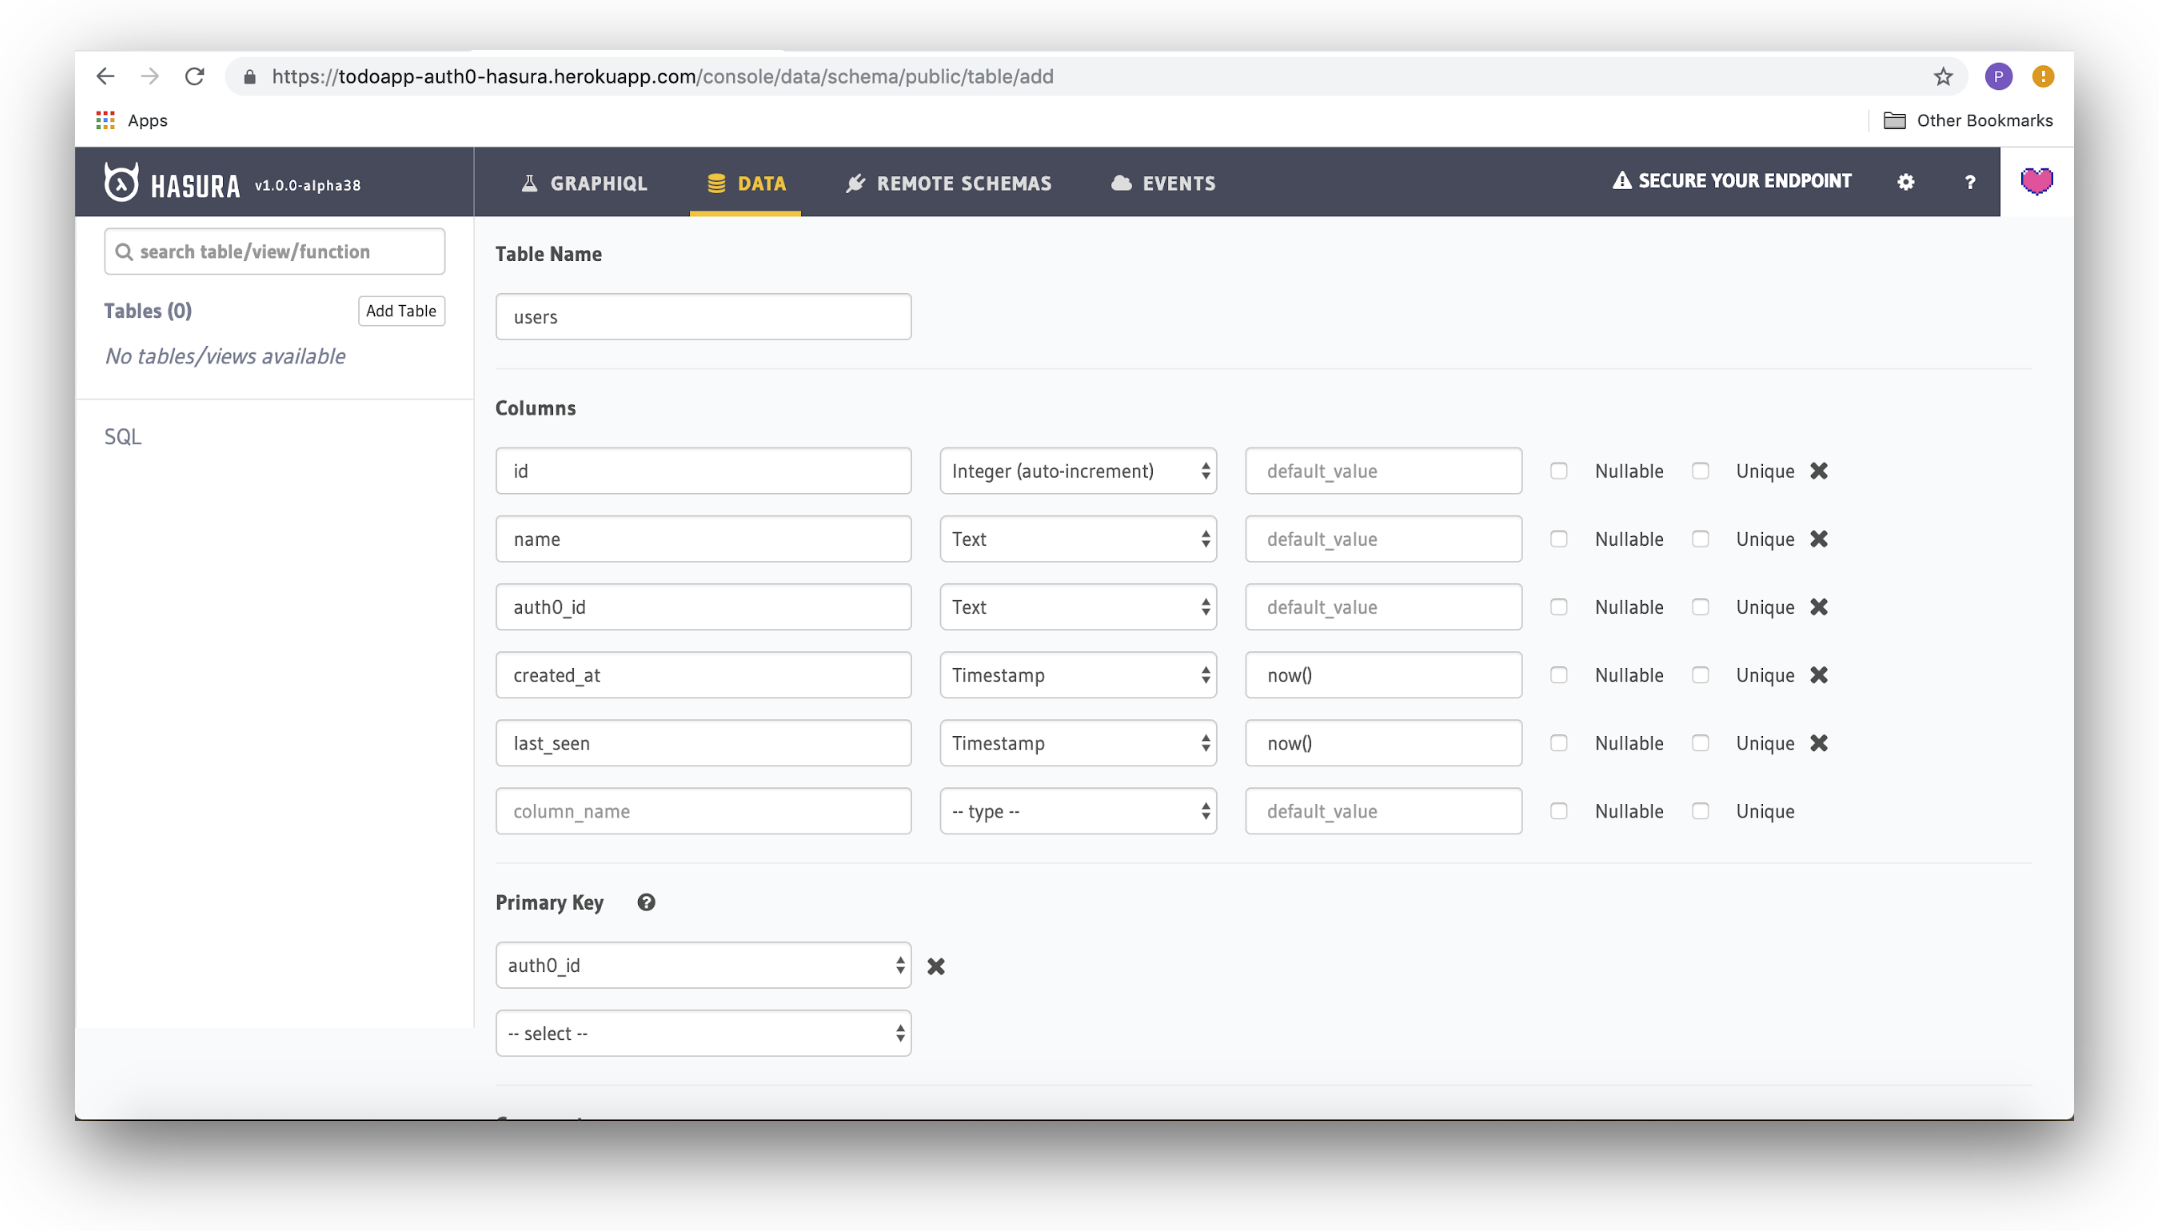
Finally, select the auth0_id field under Primary Key. When you are done, click the Create button at the bottom to add this table to the database.
Creating the 'todos' table
Next, create the todos table. You can either click the Add Table button on the left-hand side of the screen, or click the Data tab at the top, and then click Create Table.
Once again, specify the name of the table as "todos" using the Table Name field. Then, add columns to the table using the values below. Where there is no default value specified, leave the field blank:
| Field name | Type | Default value |
|---|---|---|
id | Integer (auto-increment) | |
text | Text | |
is_completed | Boolean | false |
created_at | Timestamp | now() |
updated_at | Timestamp | now() |
is_public | Boolean | false |
user_id | Text |
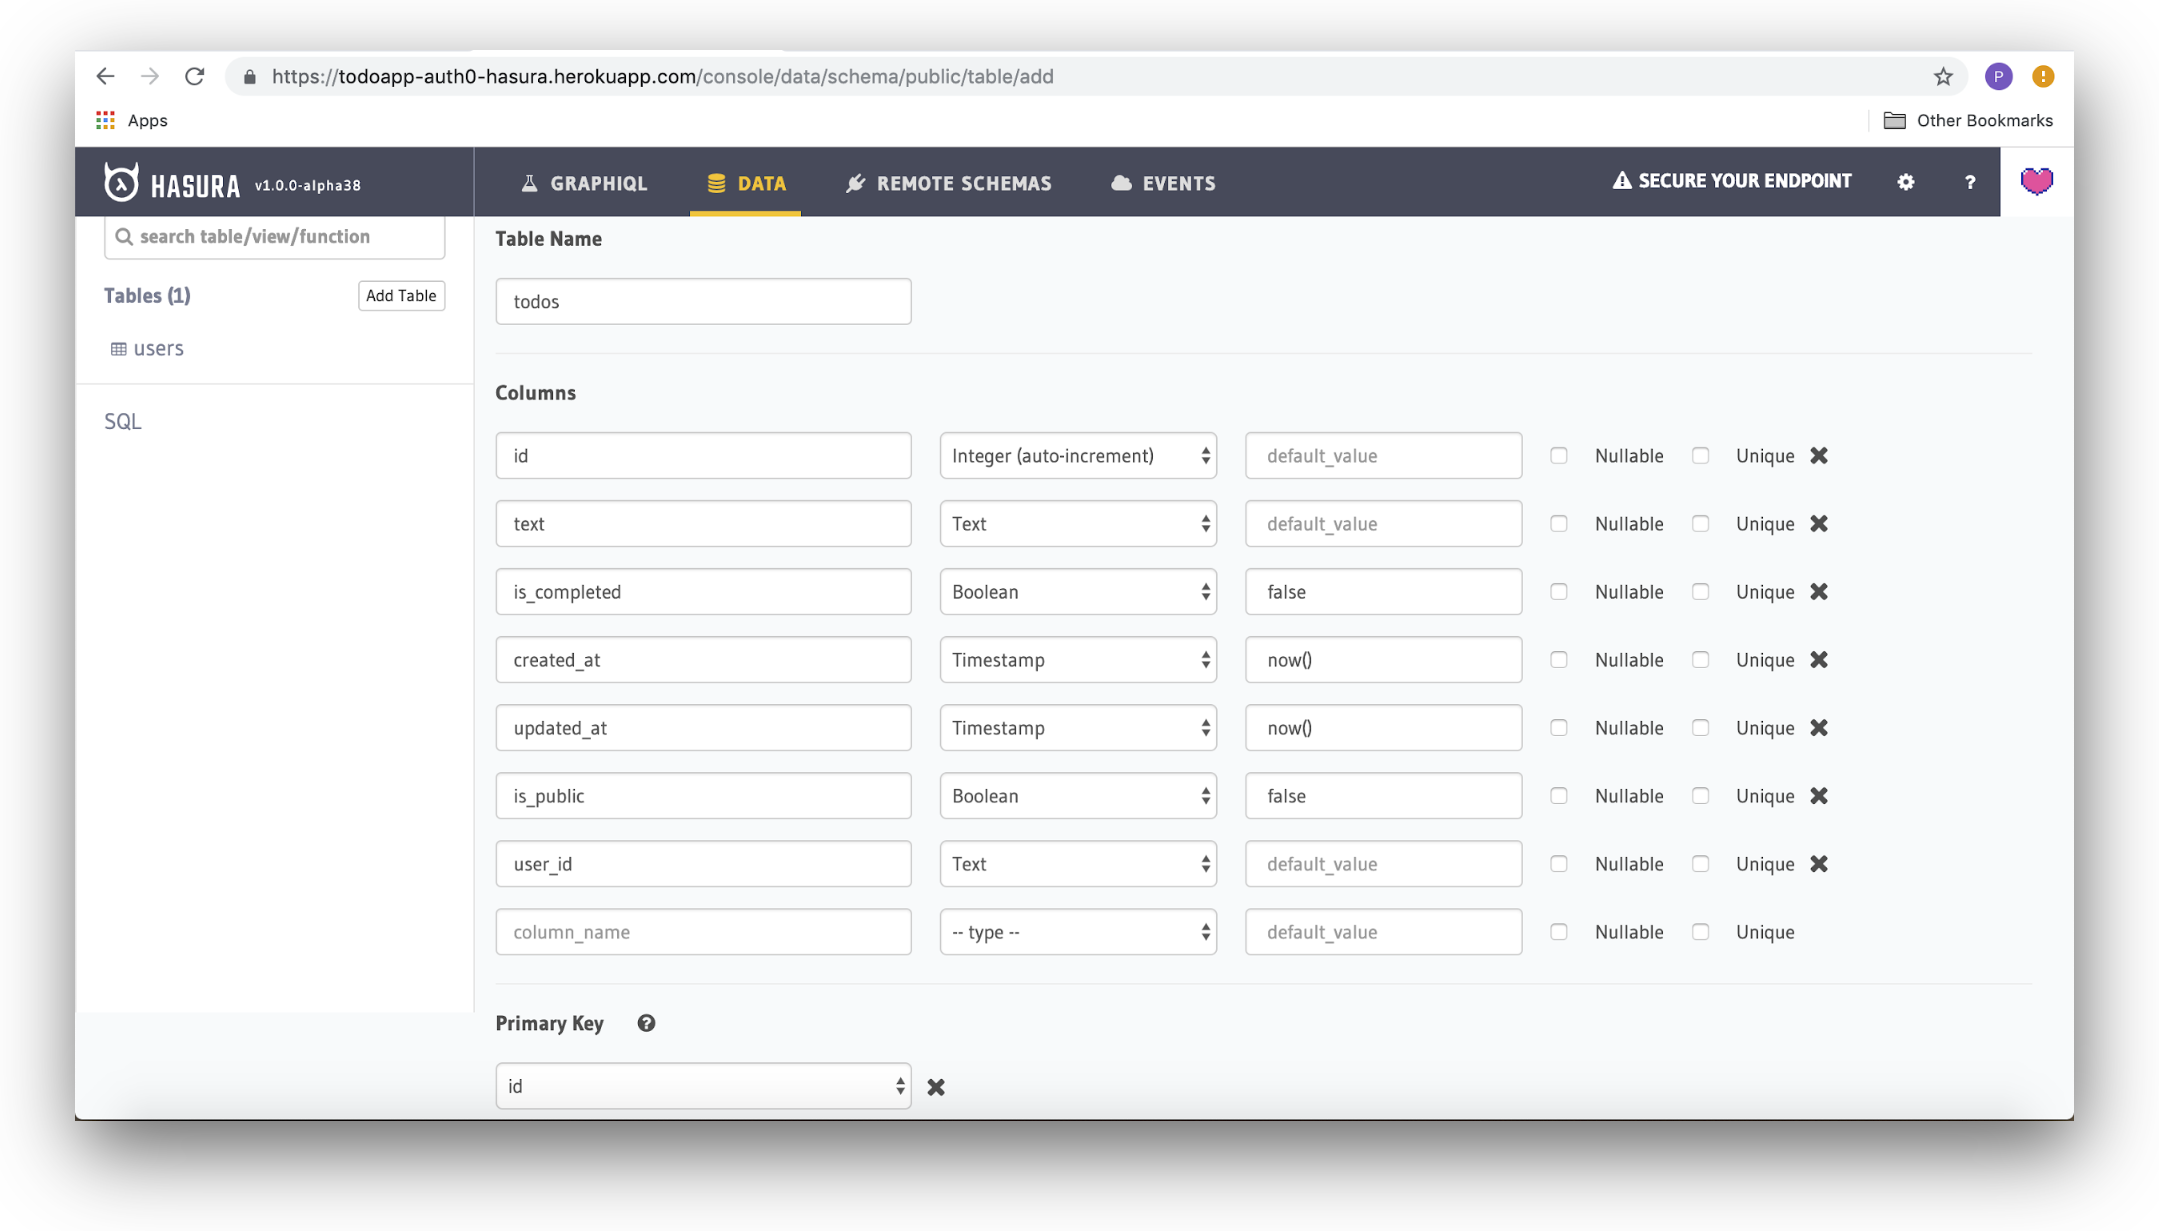
Finally, select the id field under Primary Key. When you are done, click the Create button at the bottom to add this table to the database.
Once the todos table has been created, we need to set up the foreign key for the user_id column to point to the users->auth0_id column. To do this, select the todos table from the left-hand side of the screen, then click the Modify tab, and finally click the add button underneath the Foreign Keys heading.
To add the foreign key, set the reference table to users, set the from column to user_id, the to column to auth0_id, and then click the Save button.
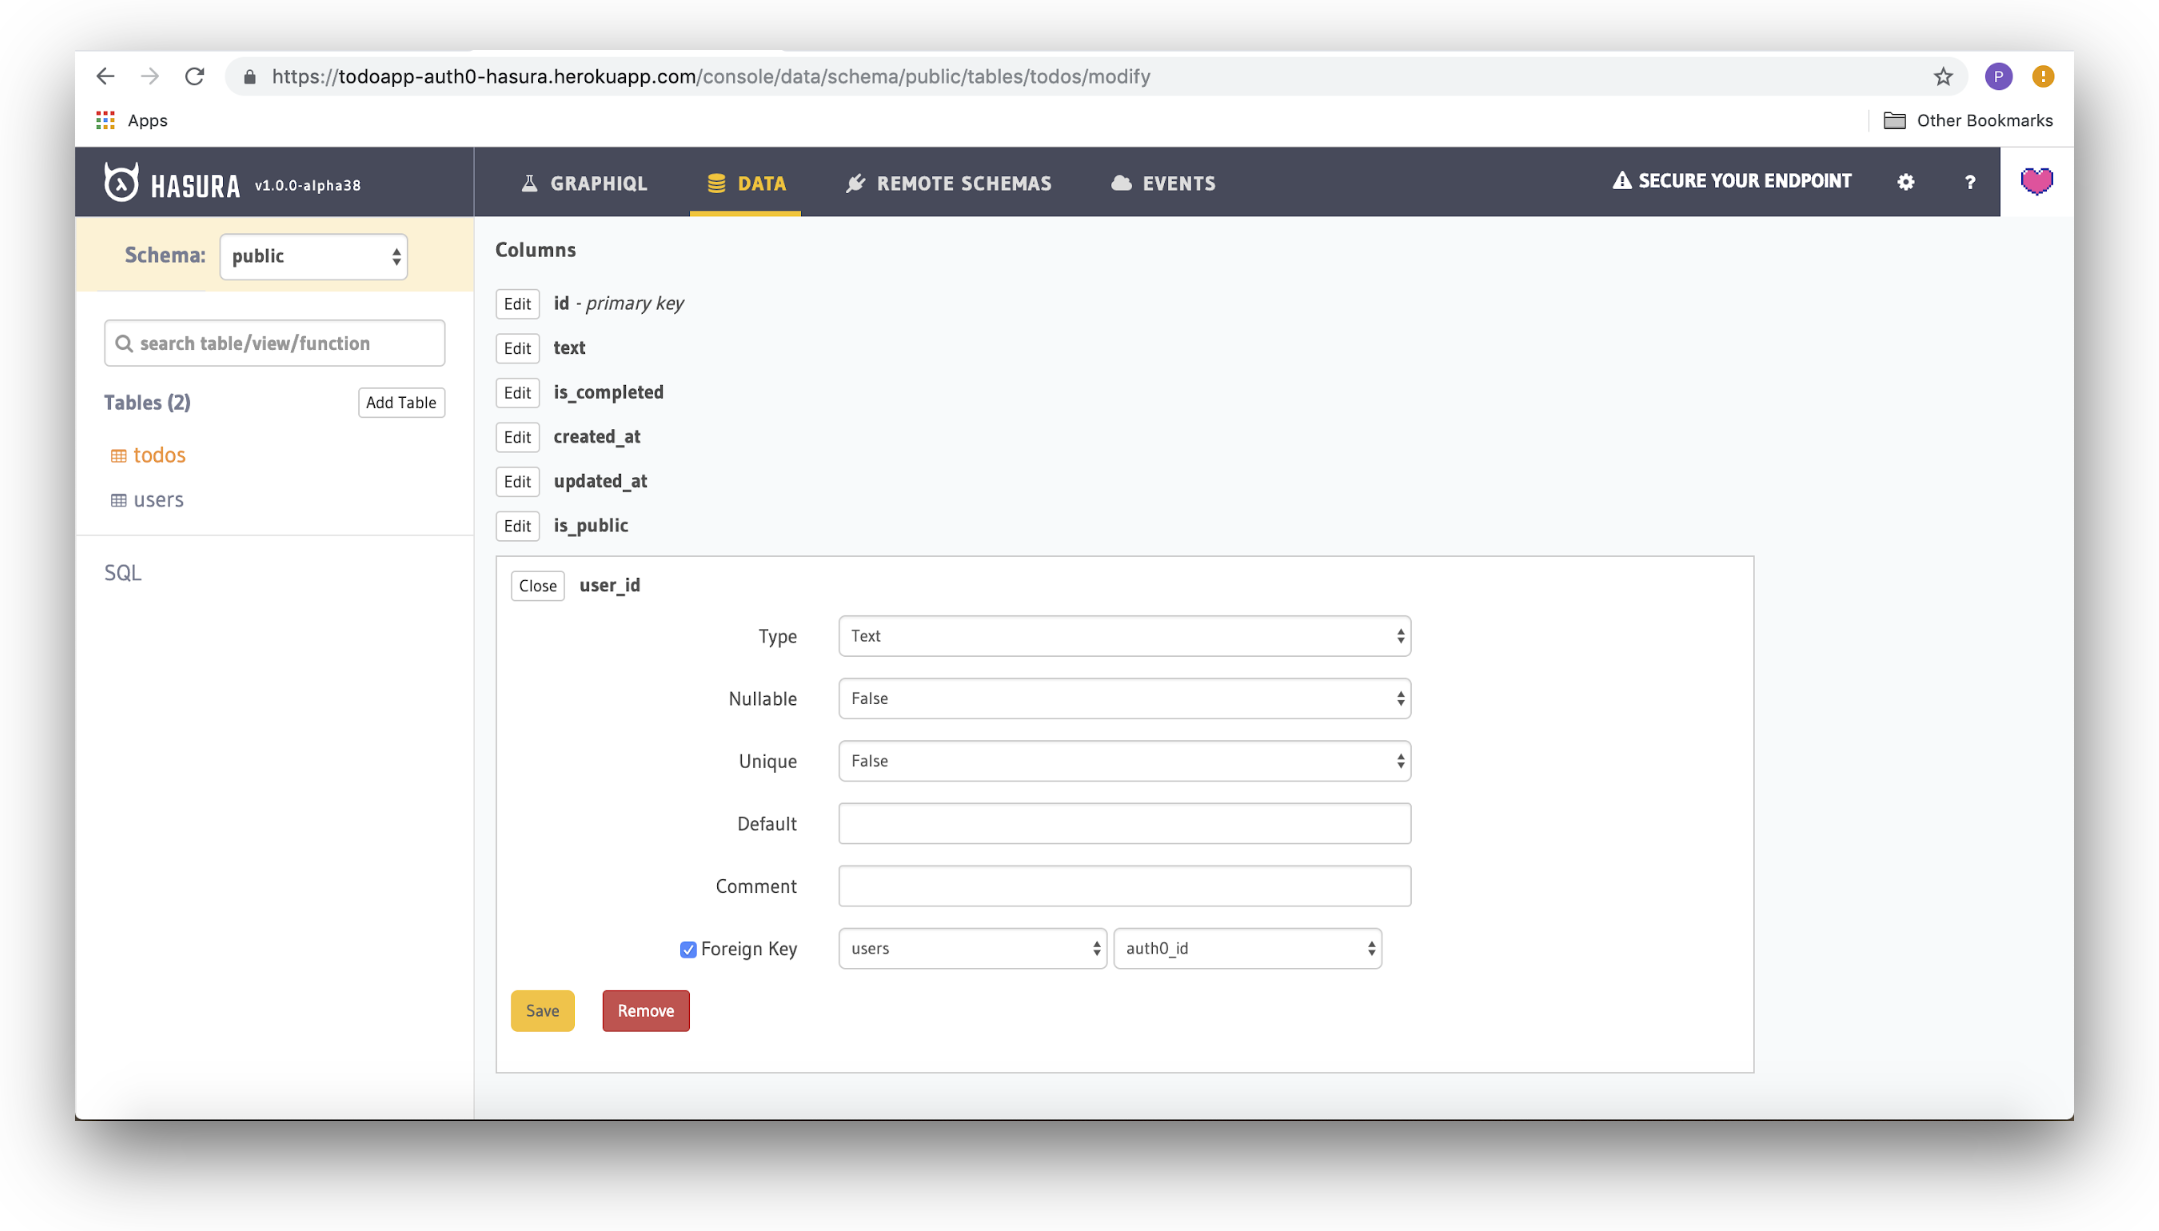
Once the foreign key is added, we need to add a relationship so that it can be queried using GraphQL APIs later.
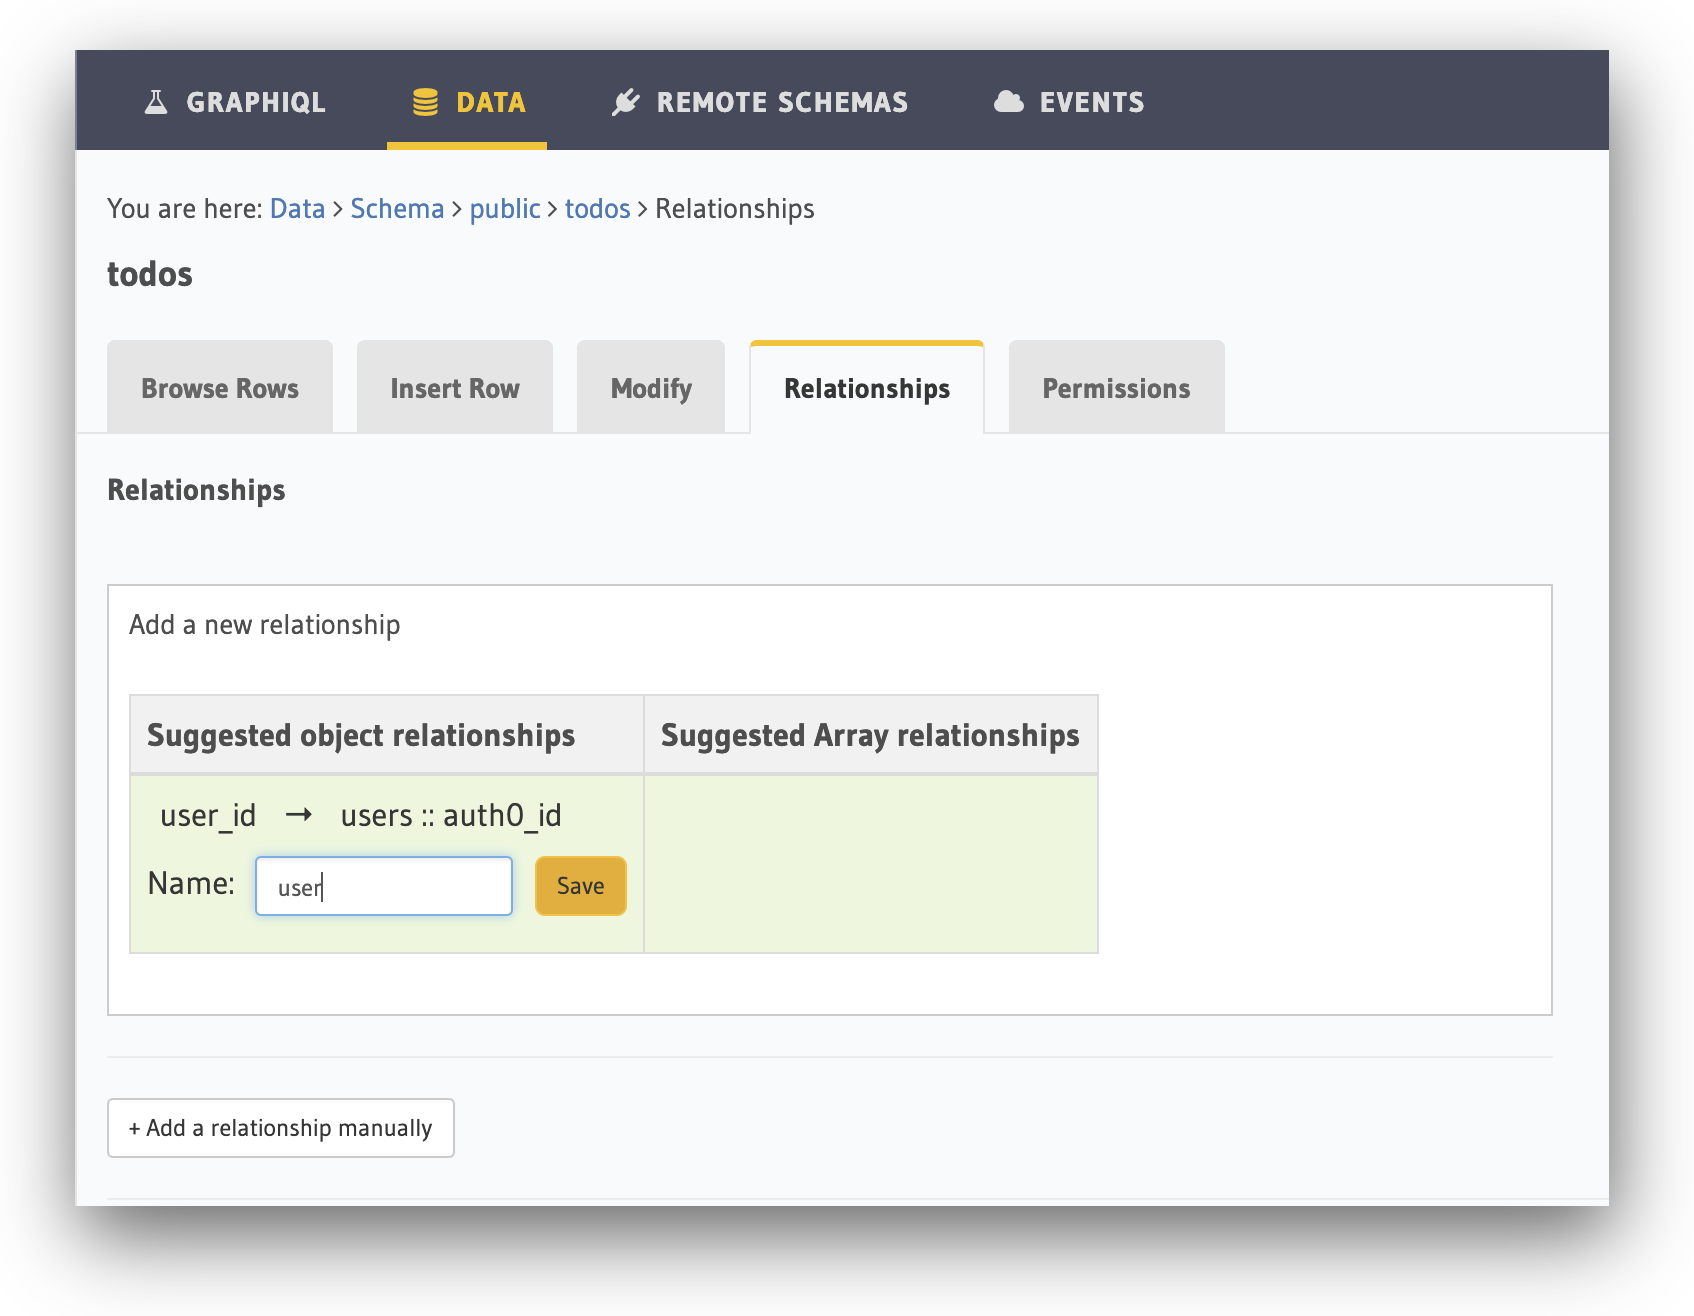
Create a user object relationship
We need to add a relationship between the todos table and the user who created the todo.
Whilst we're editing the todos table, click the Relationships tab and add the user object relationship for the user_id column of the todos table. We can do this by clicking on the Add button under the Suggested object relationships:

Enter the relationship name as user and click on the Save button.
Create the 'online_users' View
Finally, let's add a view to fetch the current list of online users. This view is required by the app to find the users who have logged in and are online. This is one of the real-time features of the app.
You can think of a view as being a pre-saved SQL query. An SQL statement can be specified that pulls data from a single table (or multiple tables) and can be easily recalled later. We're going to use this to create a view that gives us all the users that were 'seen' in the last 30 seconds. These will be considered the list of users who are currently online.
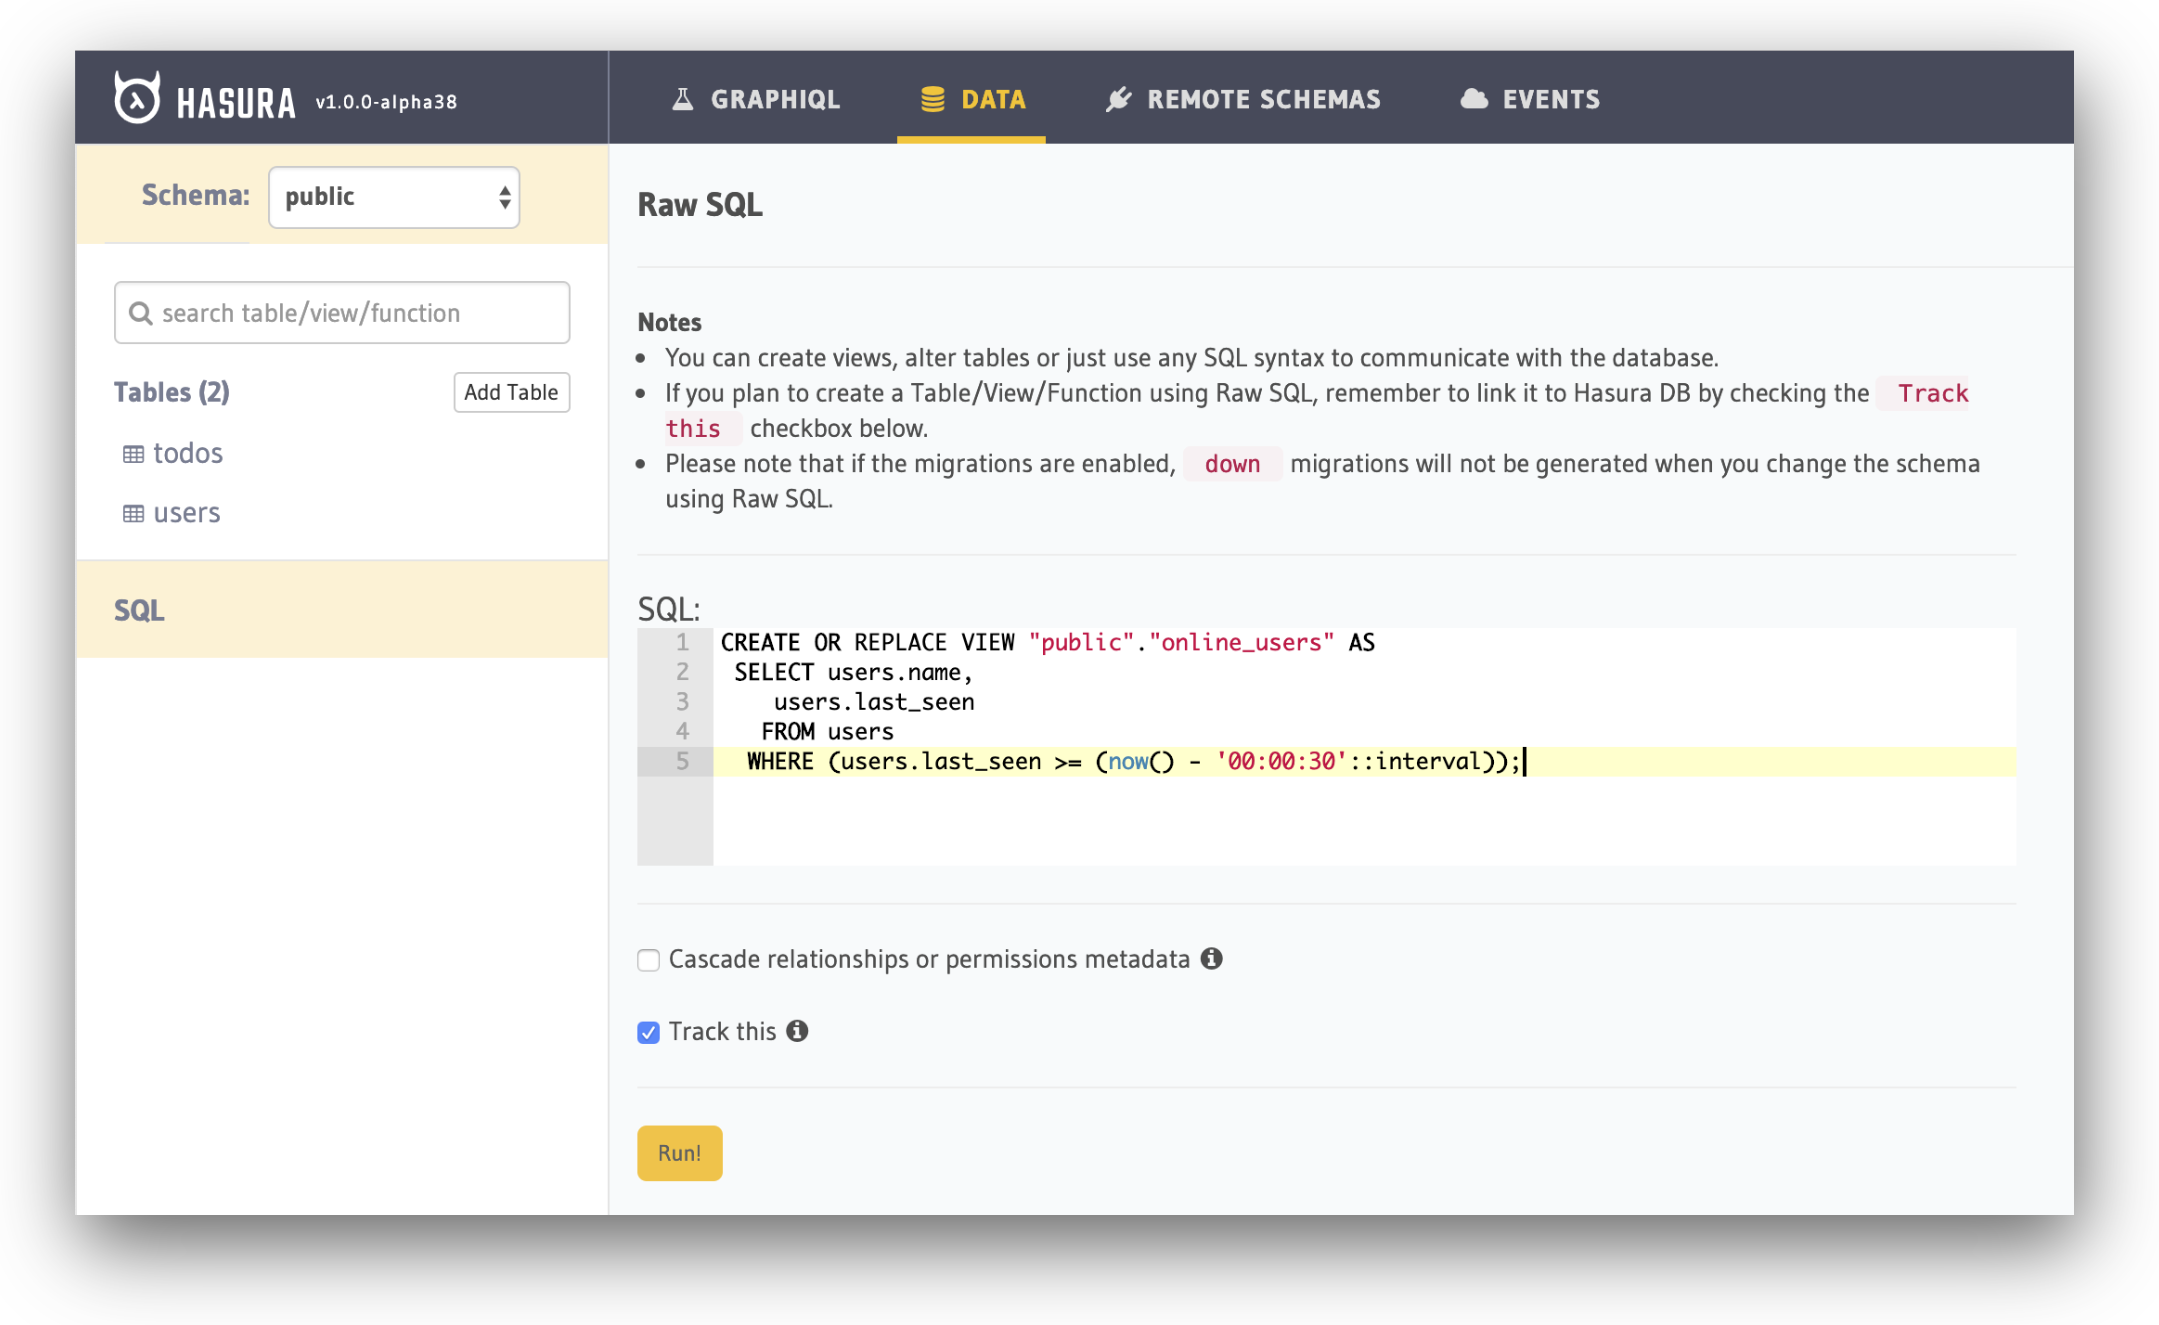
To create a PostgreSQL View, head over to the Data page and click on SQL on the left sidebar. The same page can also be reached using the URL path /console/data/sql.
Now add the following SQL command to create the required view:
CREATE OR REPLACE VIEW "public"."online_users" AS
  SELECT users.name, users.last_seen
  FROM users
  WHERE (users.last_seen >= (now() - '00:00:30'::interval));
Paste the above SQL into the SQL box, then press the Run button to create the view.
Great! We now have the basic schema ready. Let us add permissions for the tables to restrict row level access.
Configuring permissions
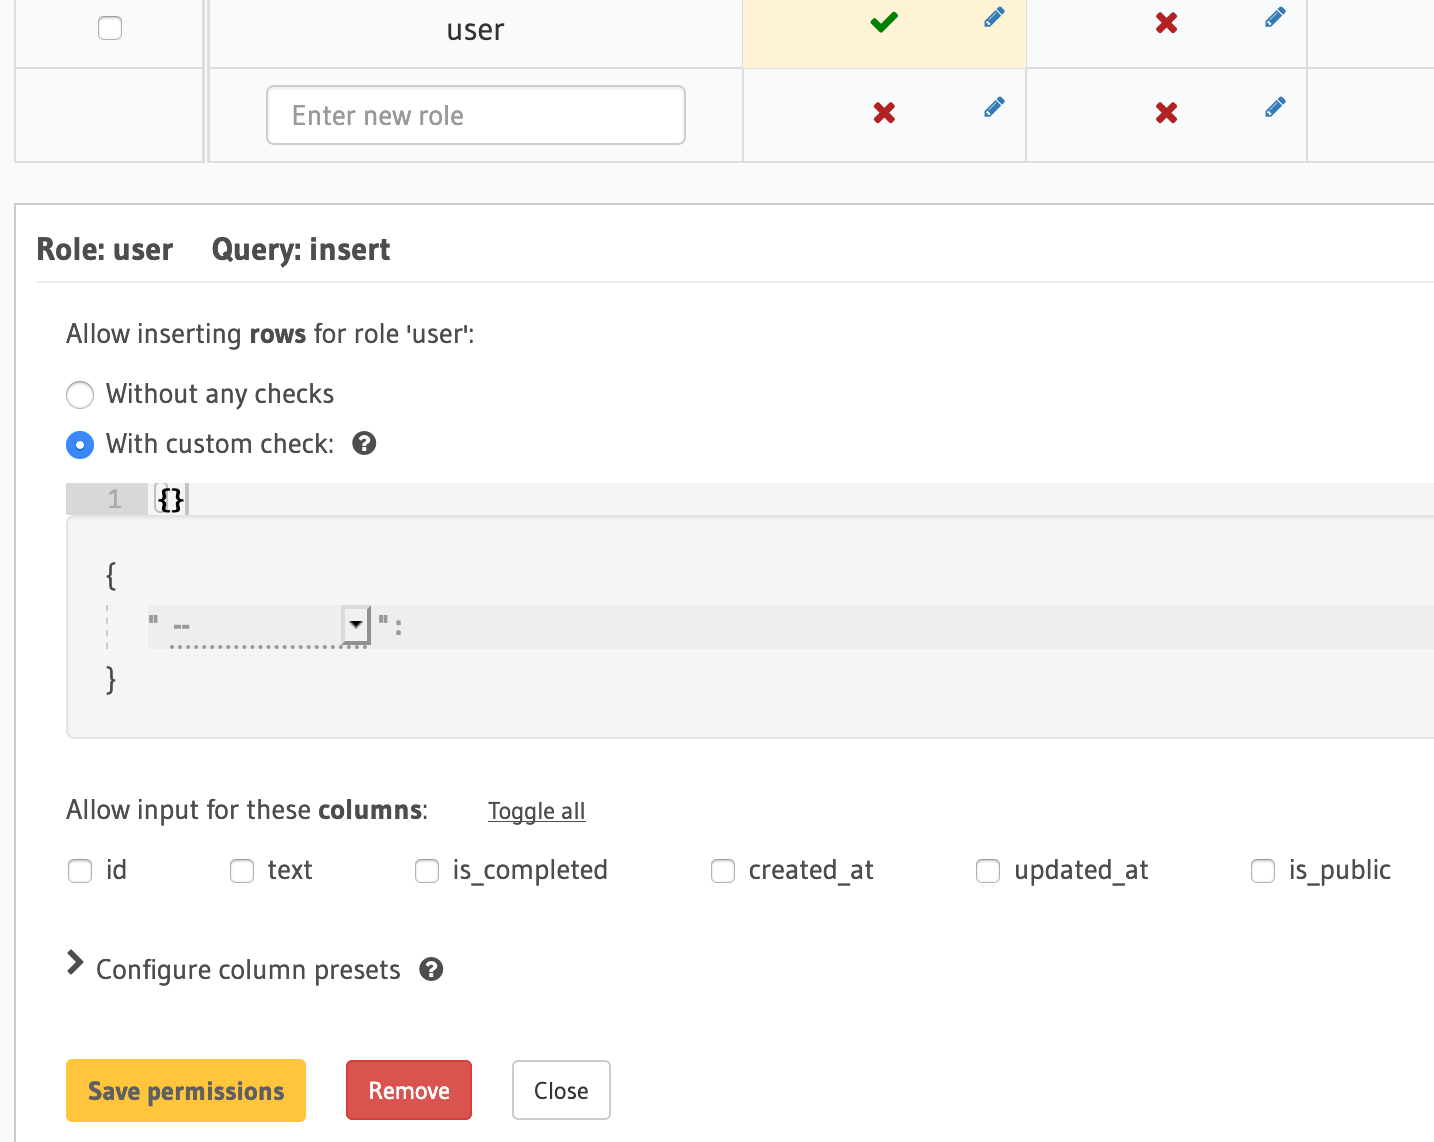
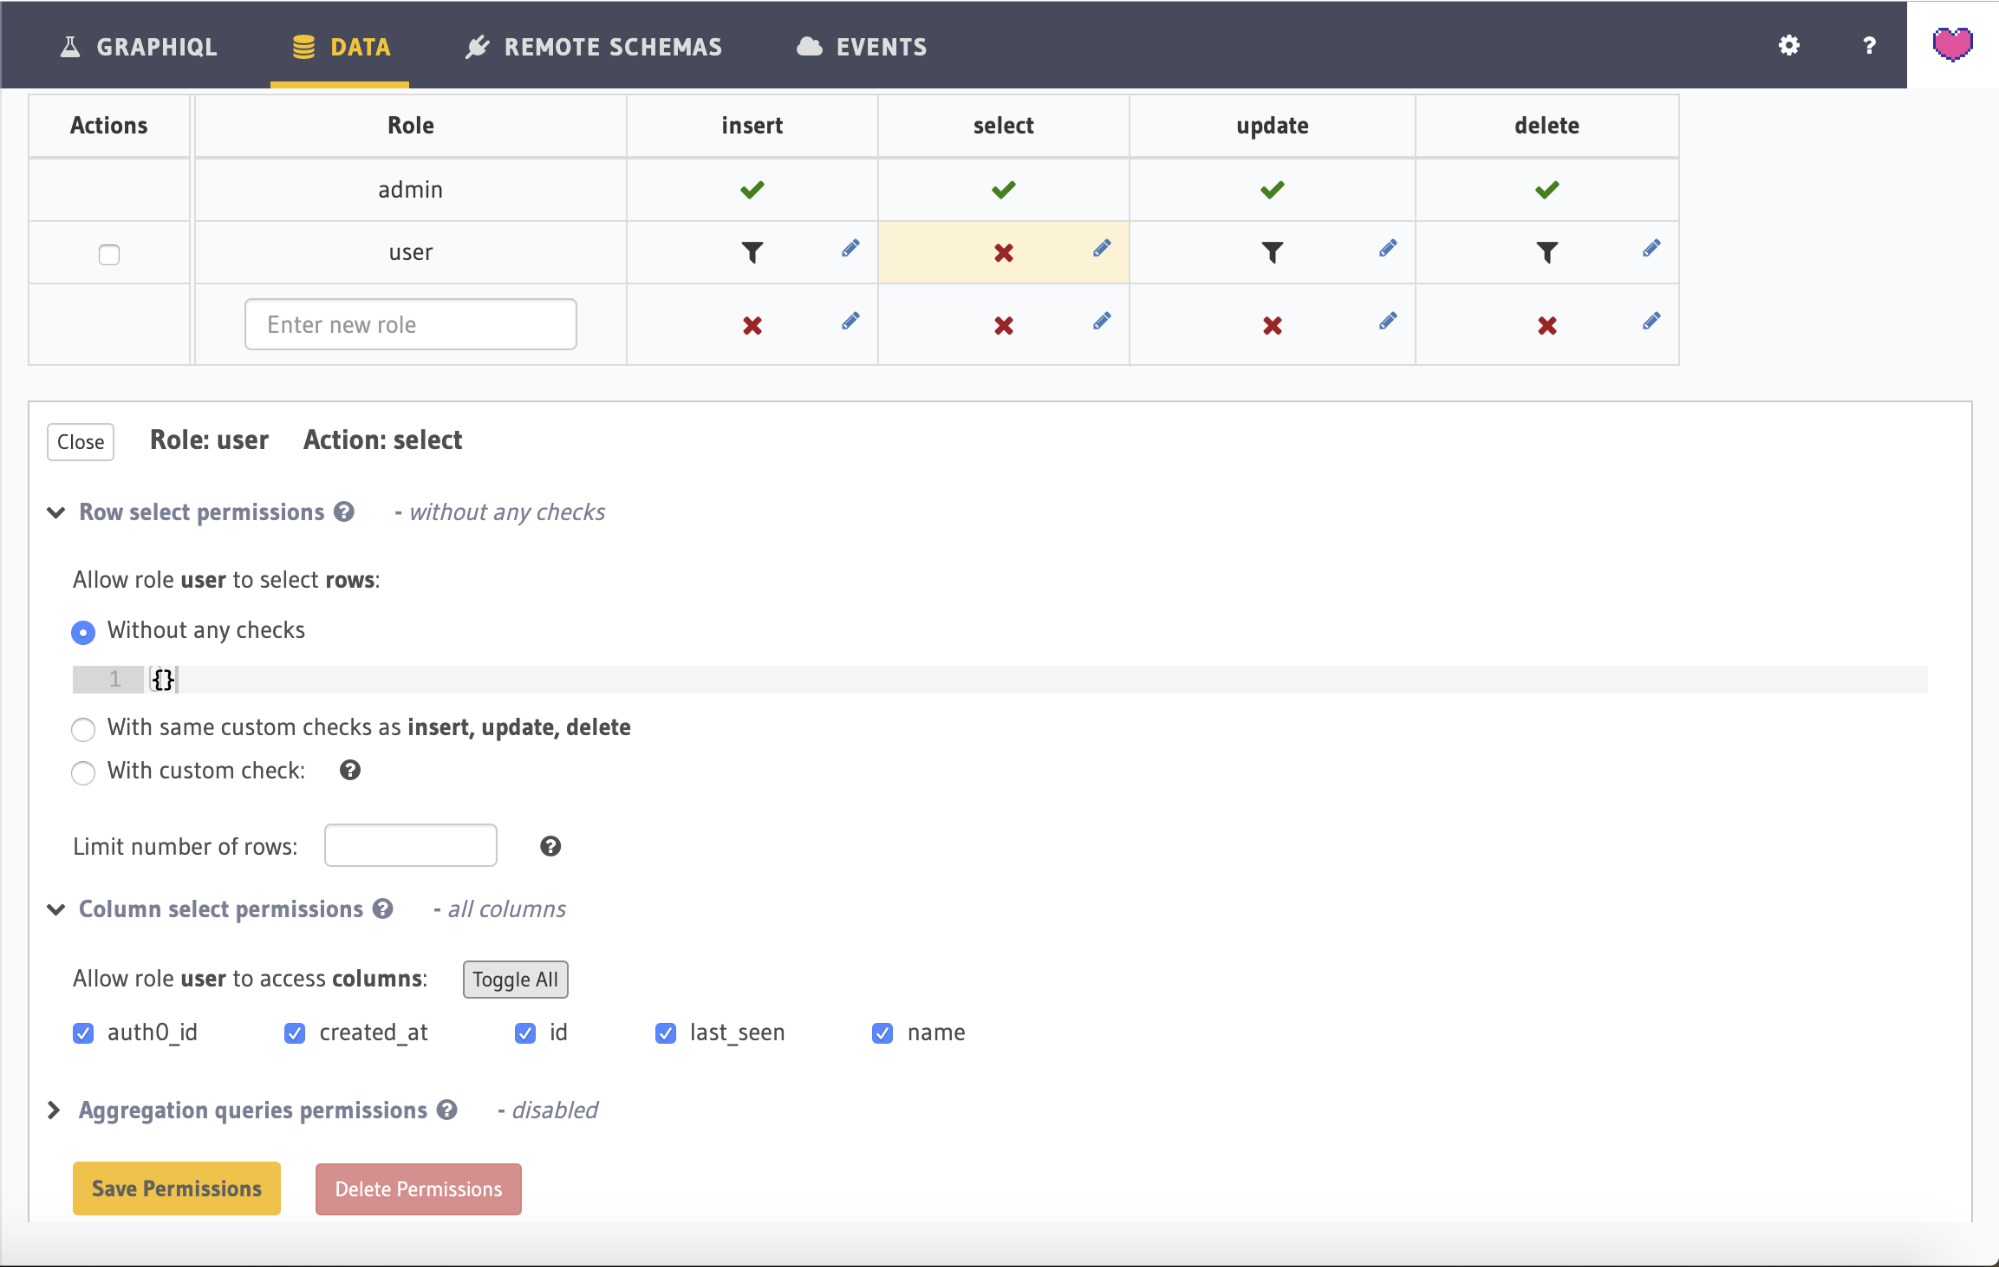
The aim of the app is to allow users to collaborate on their own todos and todos which are marked as public. Head over to the Permissions tab under todos table to add relevant permissions. Here you can see a permissions matrix, where permissions for inserting, selecting, updating, and deleting data can be specified against each role.
In the role textbox, type in "user" and click on the insert cell to the right of this textbox. This will open up a section below which lets you configure custom checks and which columns are visible to this role for the insert operation.
We're going to add a custom check that allows a to-do to be inserted into the database if either is_public is true or the request has a valid user ID. To do this, click the With custom check radio button to expose the check editor and begin to populate the fields.
When the editor first appears, it will look something like this:
Clicking on the drop-down box inside the editor will reveal all the fields on the todos table that have already been added, plus a couple of other items at the bottom. To begin with, select _or. This will reveal another drop-down box. This time, select the is_public field, then choose _eq in the drop-down box that appears immediately underneath. Finally, beside the _eq value, select true. You should end up with a check that looks like this:
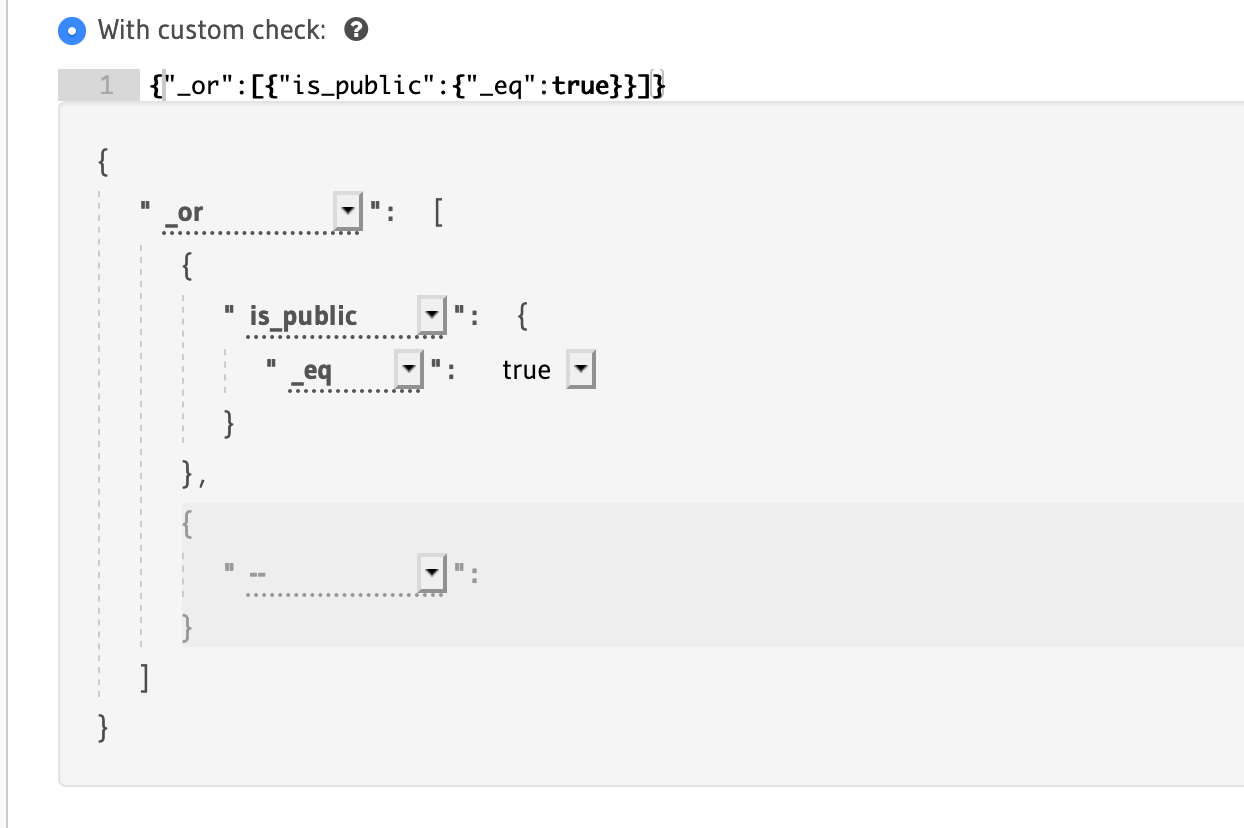
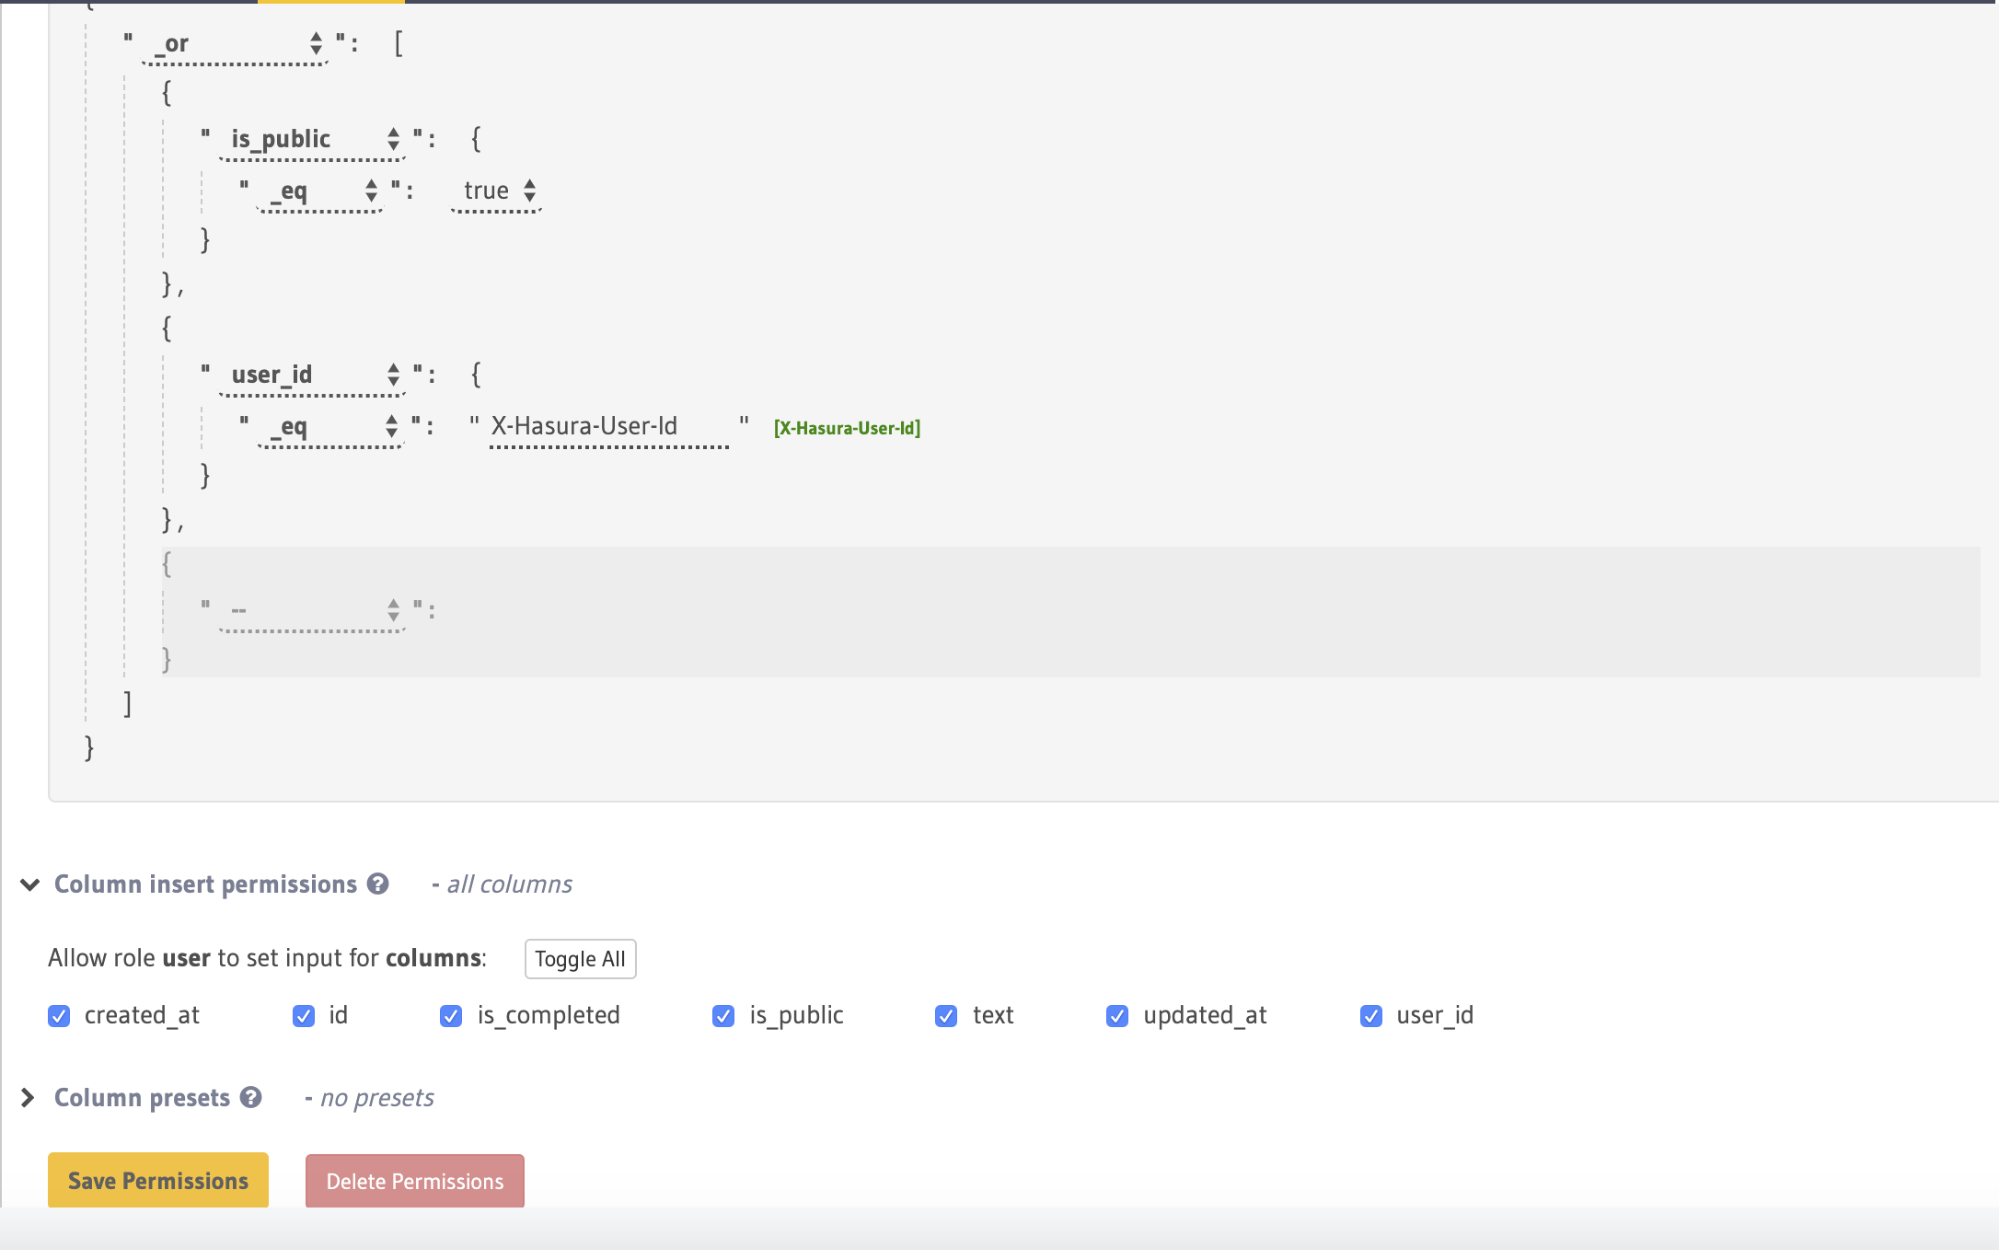
Seeing as we've added an "or" node, we'll need two fields to check on. Using the other unpopulated drop-down box inside the _or node, select the user_id field and then once again select _eq from the drop-down that appears. In the text editor that appears, you can enter the value "X-Hasura-User-Id" in here, or click the green link beside the field to add this value automatically. At the end, you should end up with something like this:
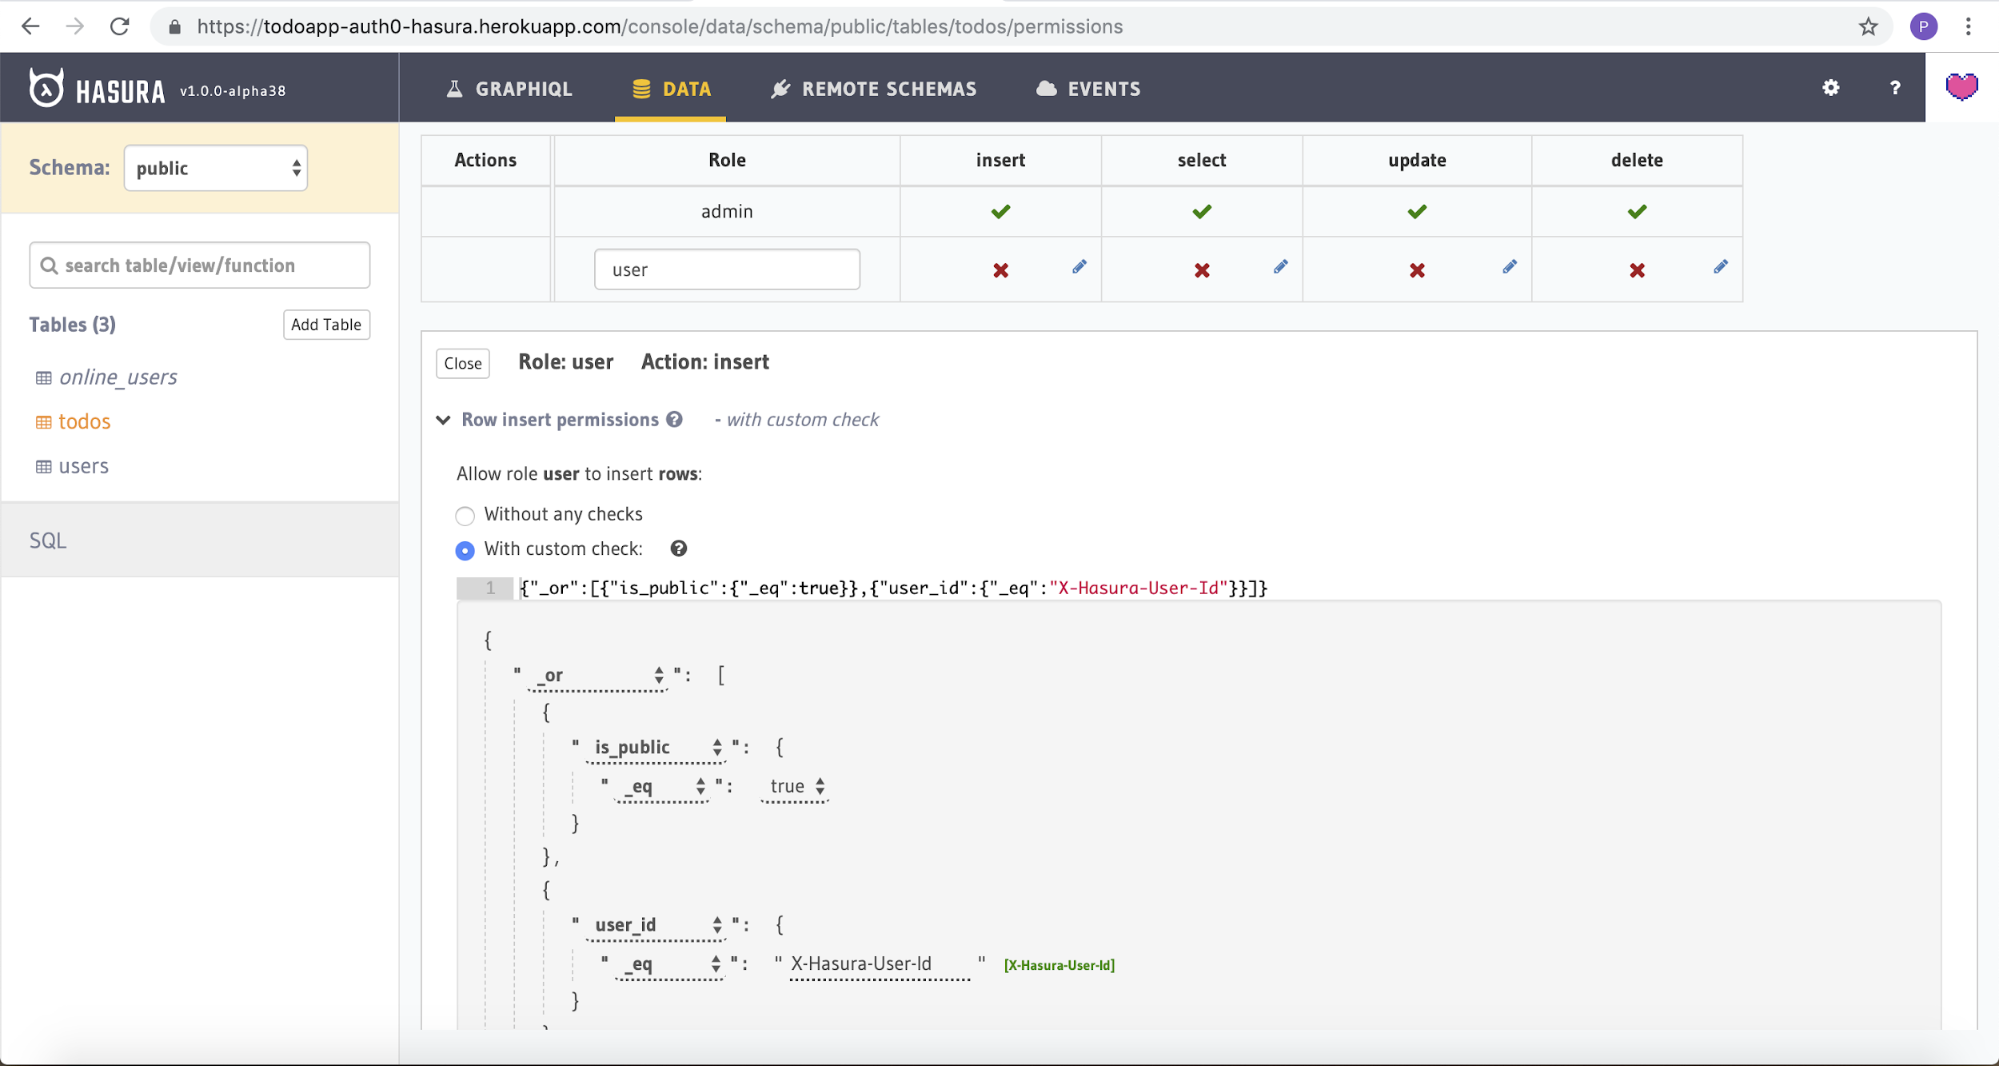
Finally, expand the Column insert permissions section and select all the columns under "Allow input for these columns" using the Toggle all link, and click the Save permissions button.
In the above permission, we are saying that either the todo -> is_public should be true or the to-do must have been created by the user who is making this request.
Copy permissions to other operations
The permissions that we just applied to the insert operation should also hold for the select, update, and delete operations. Luckily, we can copy the permissions for insert over to the other operations without having to go through the whole process again.
As an example of how to do this, edit the permissions for select by clicking on the select cell for the "user" role. This will open up the permission configuration for the select operation. Where you previously selected the With custom check radio button, there will be a new option entitled With same custom checks as insert. Selecting this option will cause the permissions for insert to also be applied to select.
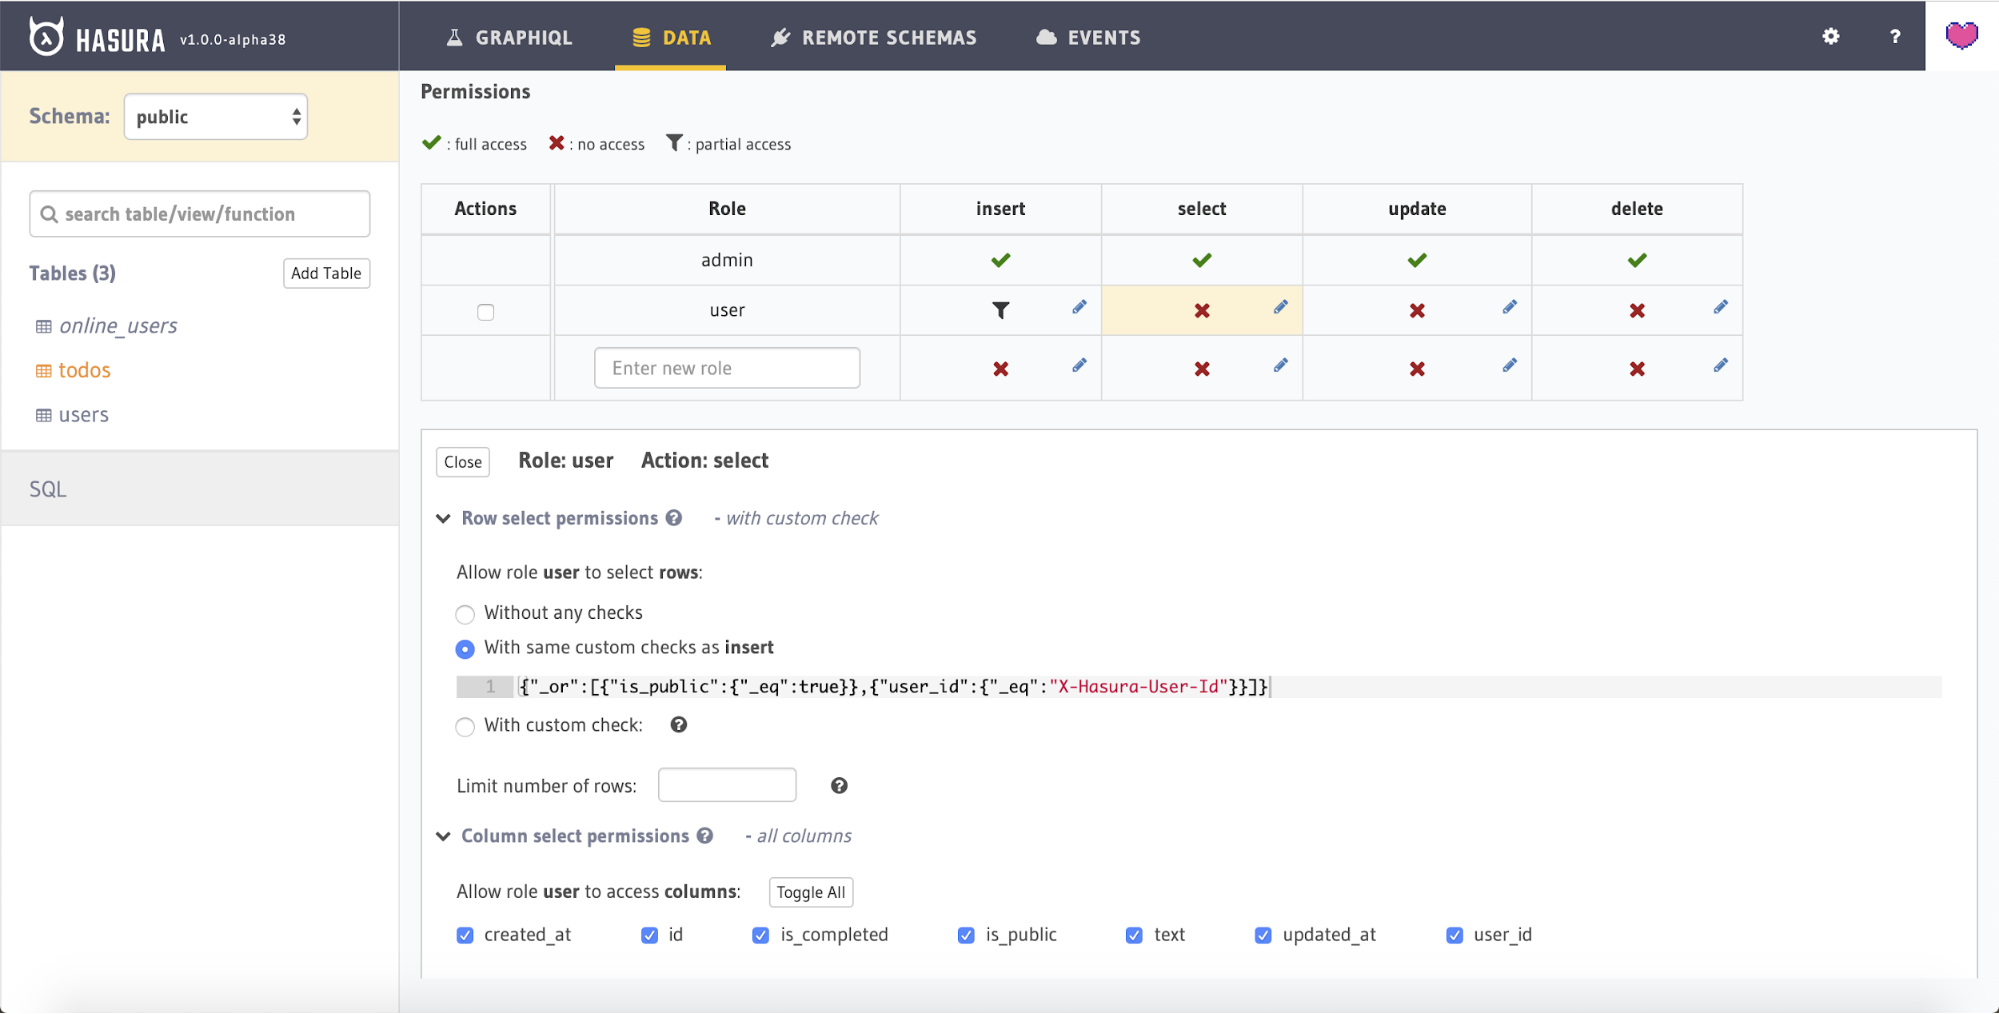
Select this option. Also make sure to click Toggle all next to Allow access to these columns (expanding the Column select permissions section), so that all the fields may be returned from the query. Finally, press the Save permissions button.
Perform the same steps for the update and delete operations, so that they both have the same permissions as insert and that all the fields can be returned from the query.
Note: The UI for selecting the available columns will not appear for the "delete" operation
Users table permissions
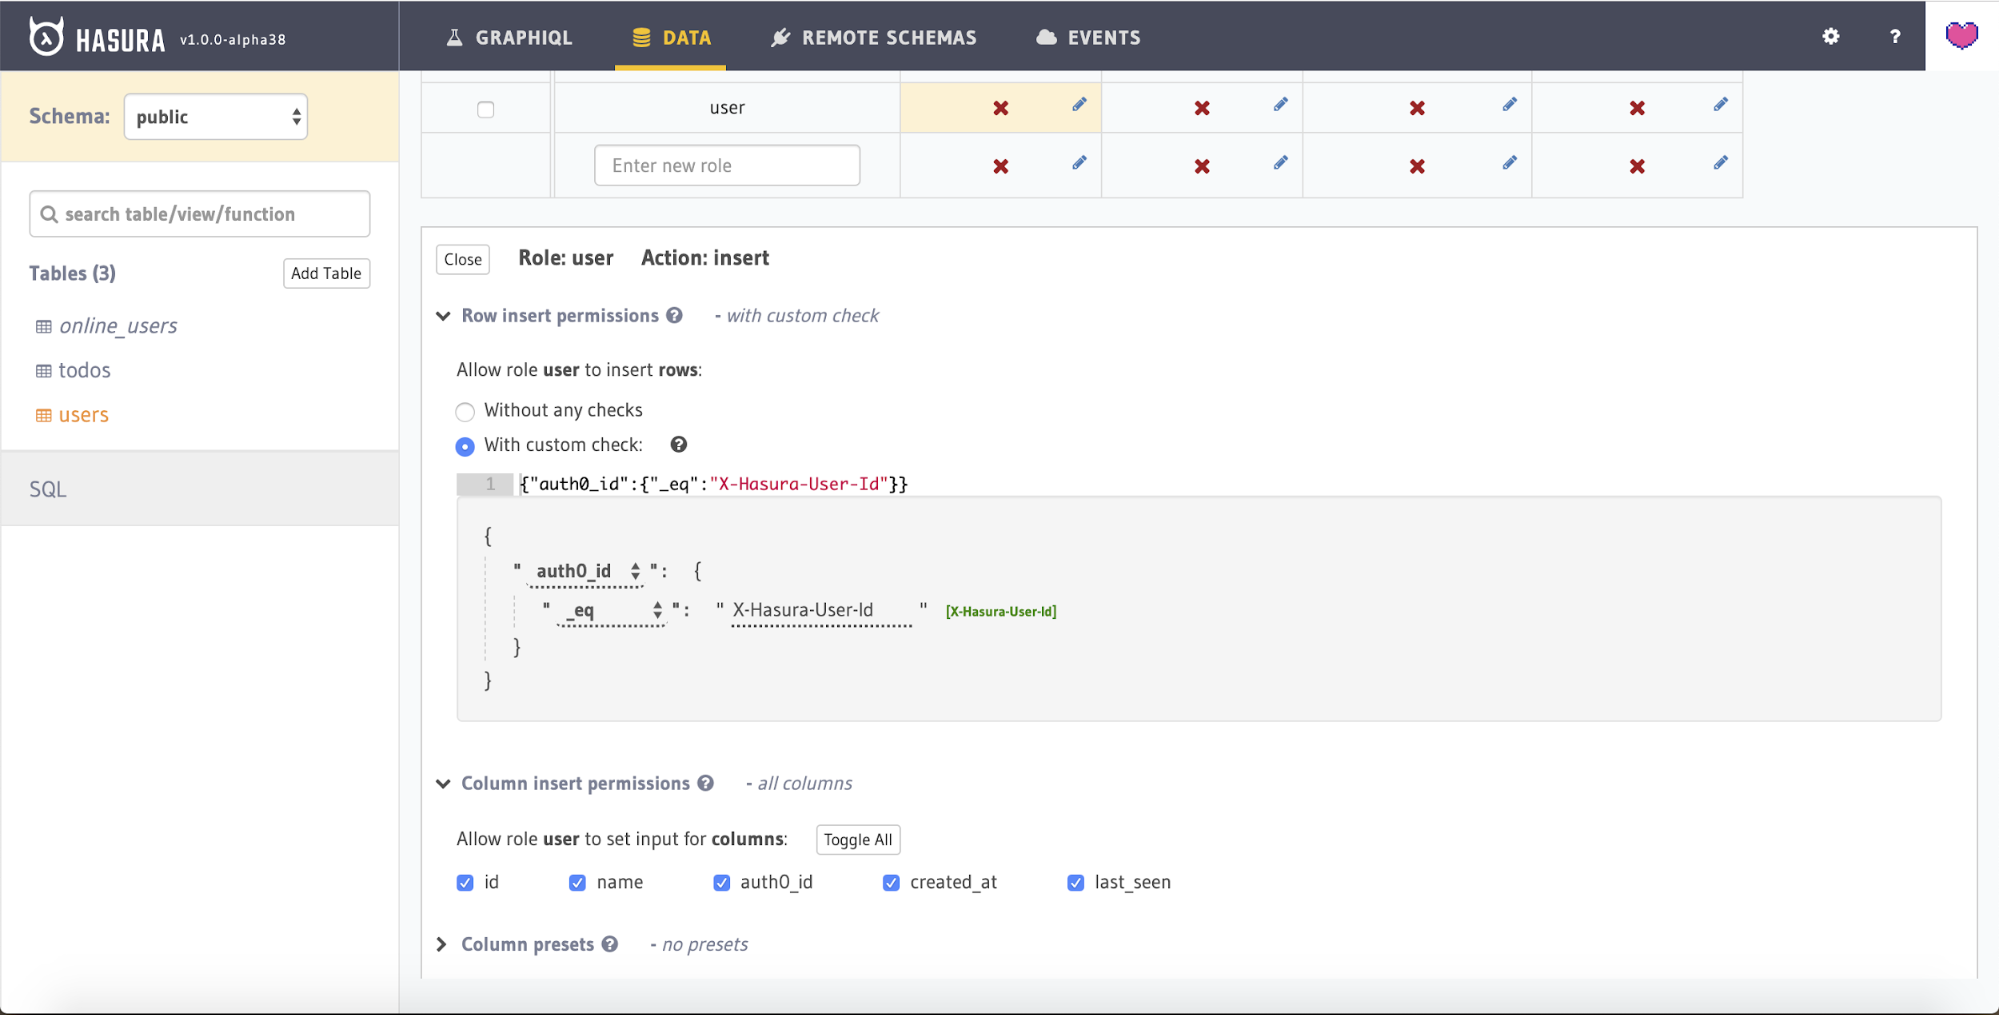
We also need to allow inserting into users table. The user who is logged in should be able to modify only their own record. So let’s set that permission now.
On the left sidebar, click on the users table to navigate to the table configuration, and switch to the Permissions tab.
Click on the Edit icon (pencil icon) to modify the insert permission for role user. This would open up a section below which lets you configure its permissions.
Click the With custom check radio button once again. Here we want to allow a record to be inserted only if auth0_id is equal to X-Hasura-User-Id.
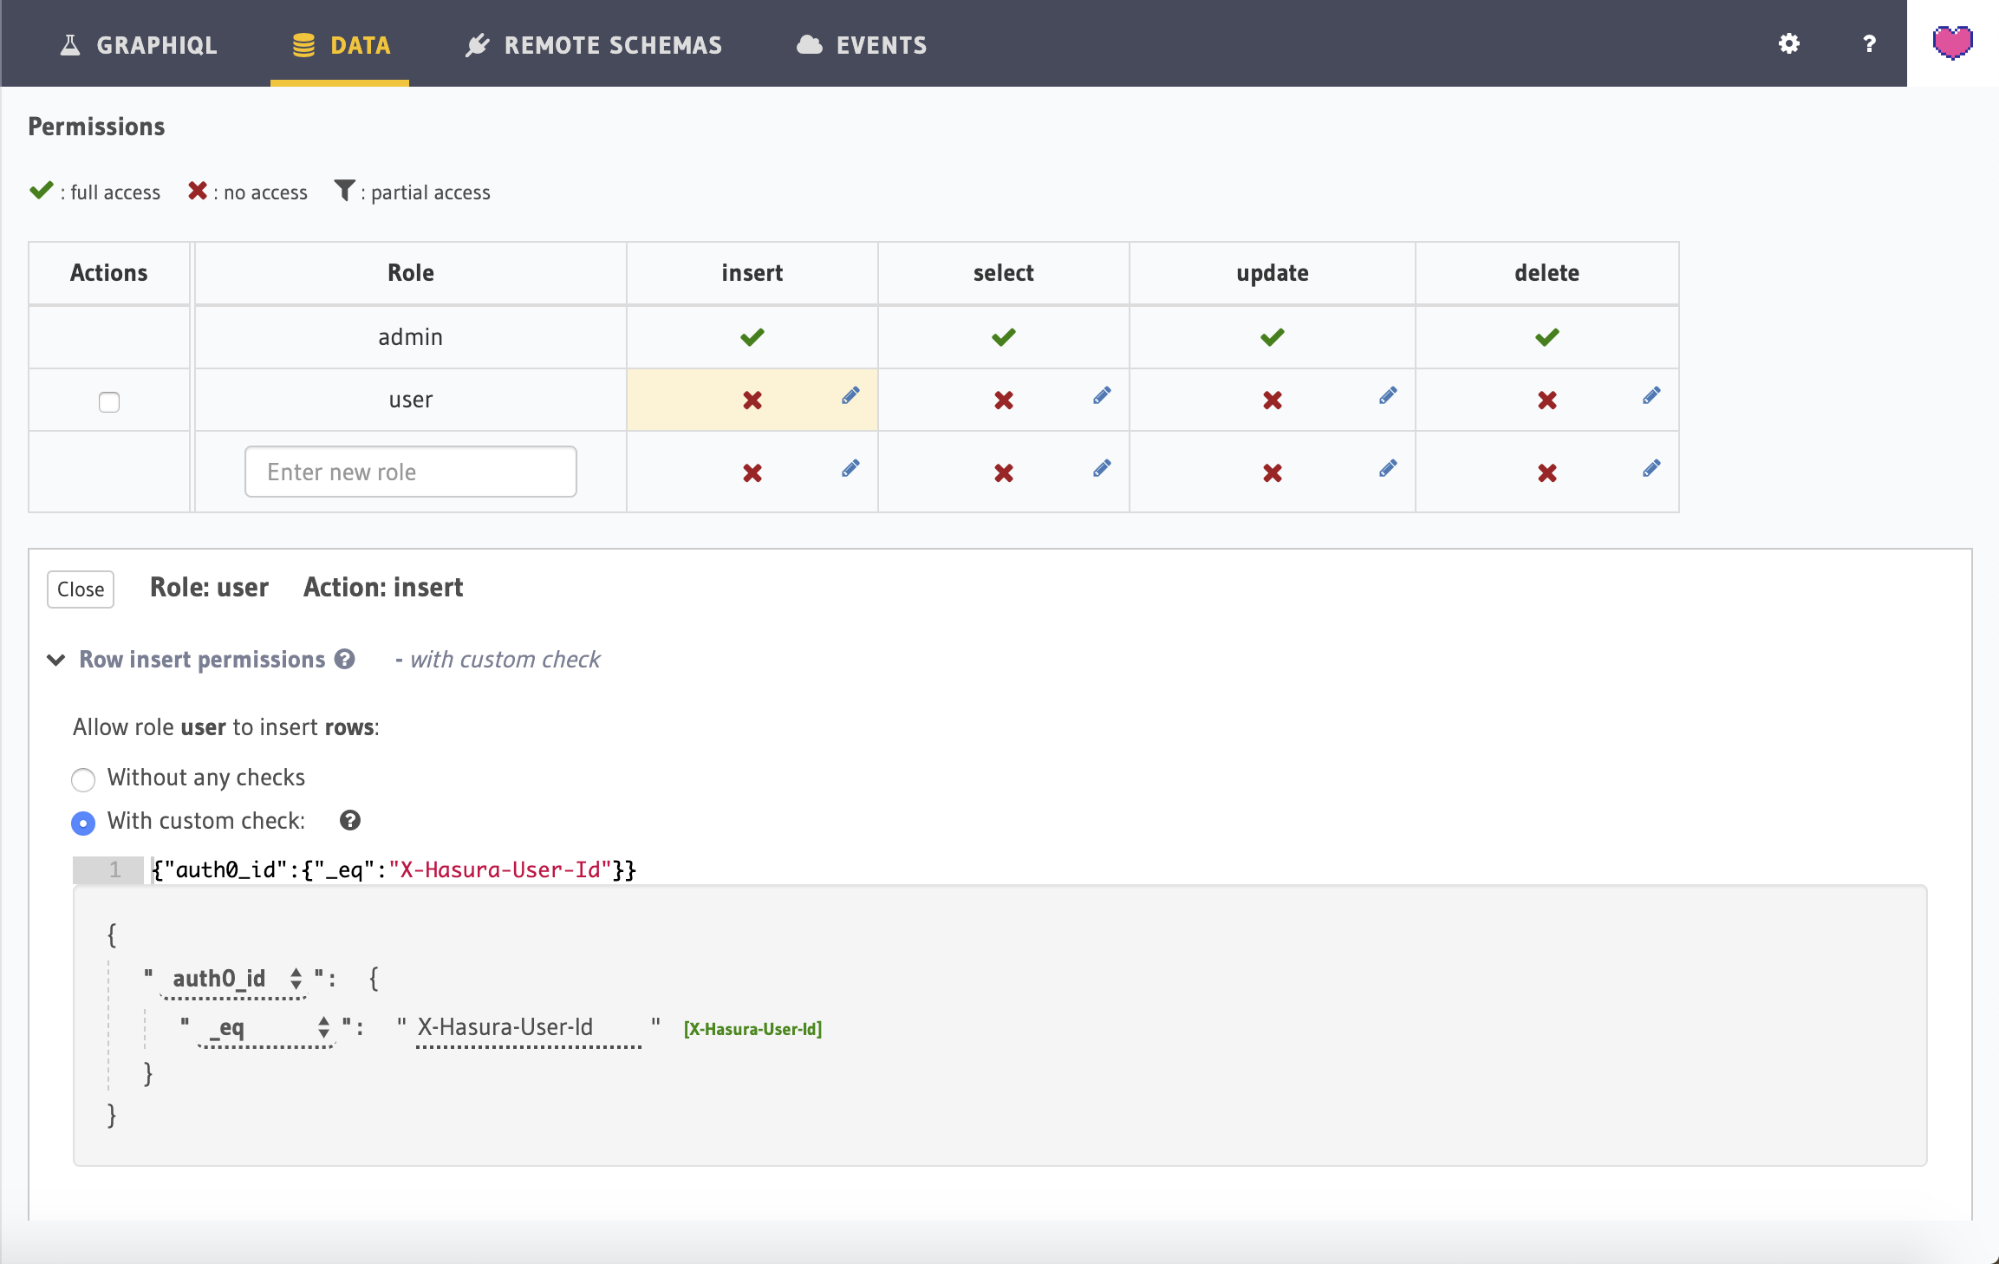
Select all the columns for the option Allow input for these columns as we would like to allow the user to input data for all columns. You can do this quickly by expanding the Column insert permissions section and hitting the Toggle all link.
Click the Save permissions button once you are done.
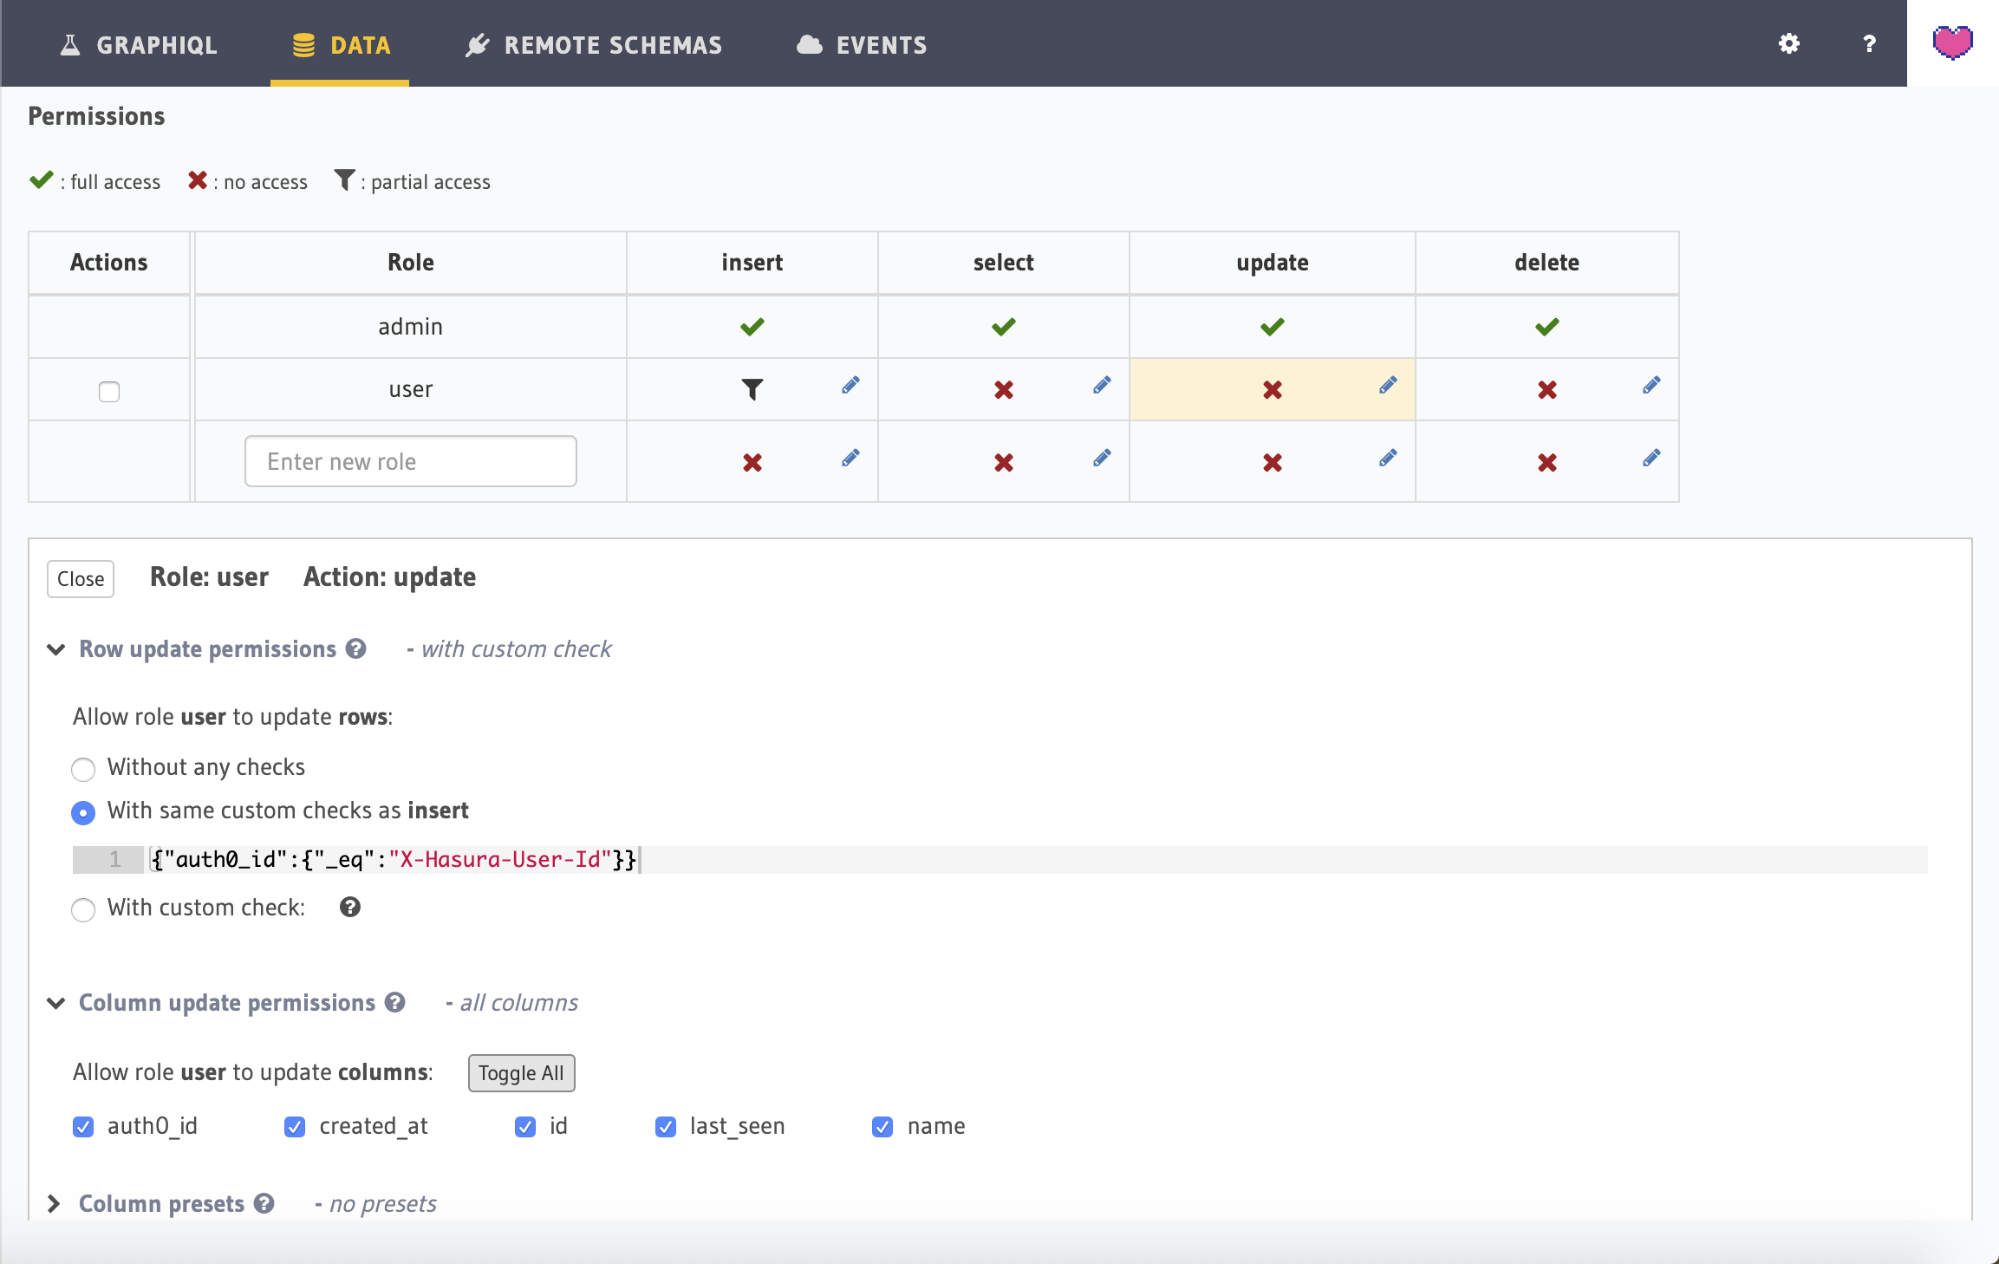
Apply the same permission configuration to the user role for the update and delete operations. To do this, click on the edit icon for update operation and select With same checks as insert option. Also be sure to select all the columns by expanding the Column update permissions section and clicking the Toggle all button:
Similarly apply the same permission for delete operation.
The select permission should allow the user to select any row without any checks. Open the permissions for the select operation and click Without any checks. Just like in the previous steps, make sure that all fields can be returned from the query:
Online Users view permissions
Finally, we need to setup select permissions for the online_users view that we created above for determining the current list of online users.
Head to the Permissions tab under online_users view and click on the Edit icon (pencil icon) under Select.
We want to allow all users to be able to fetch the list of online users without any check.
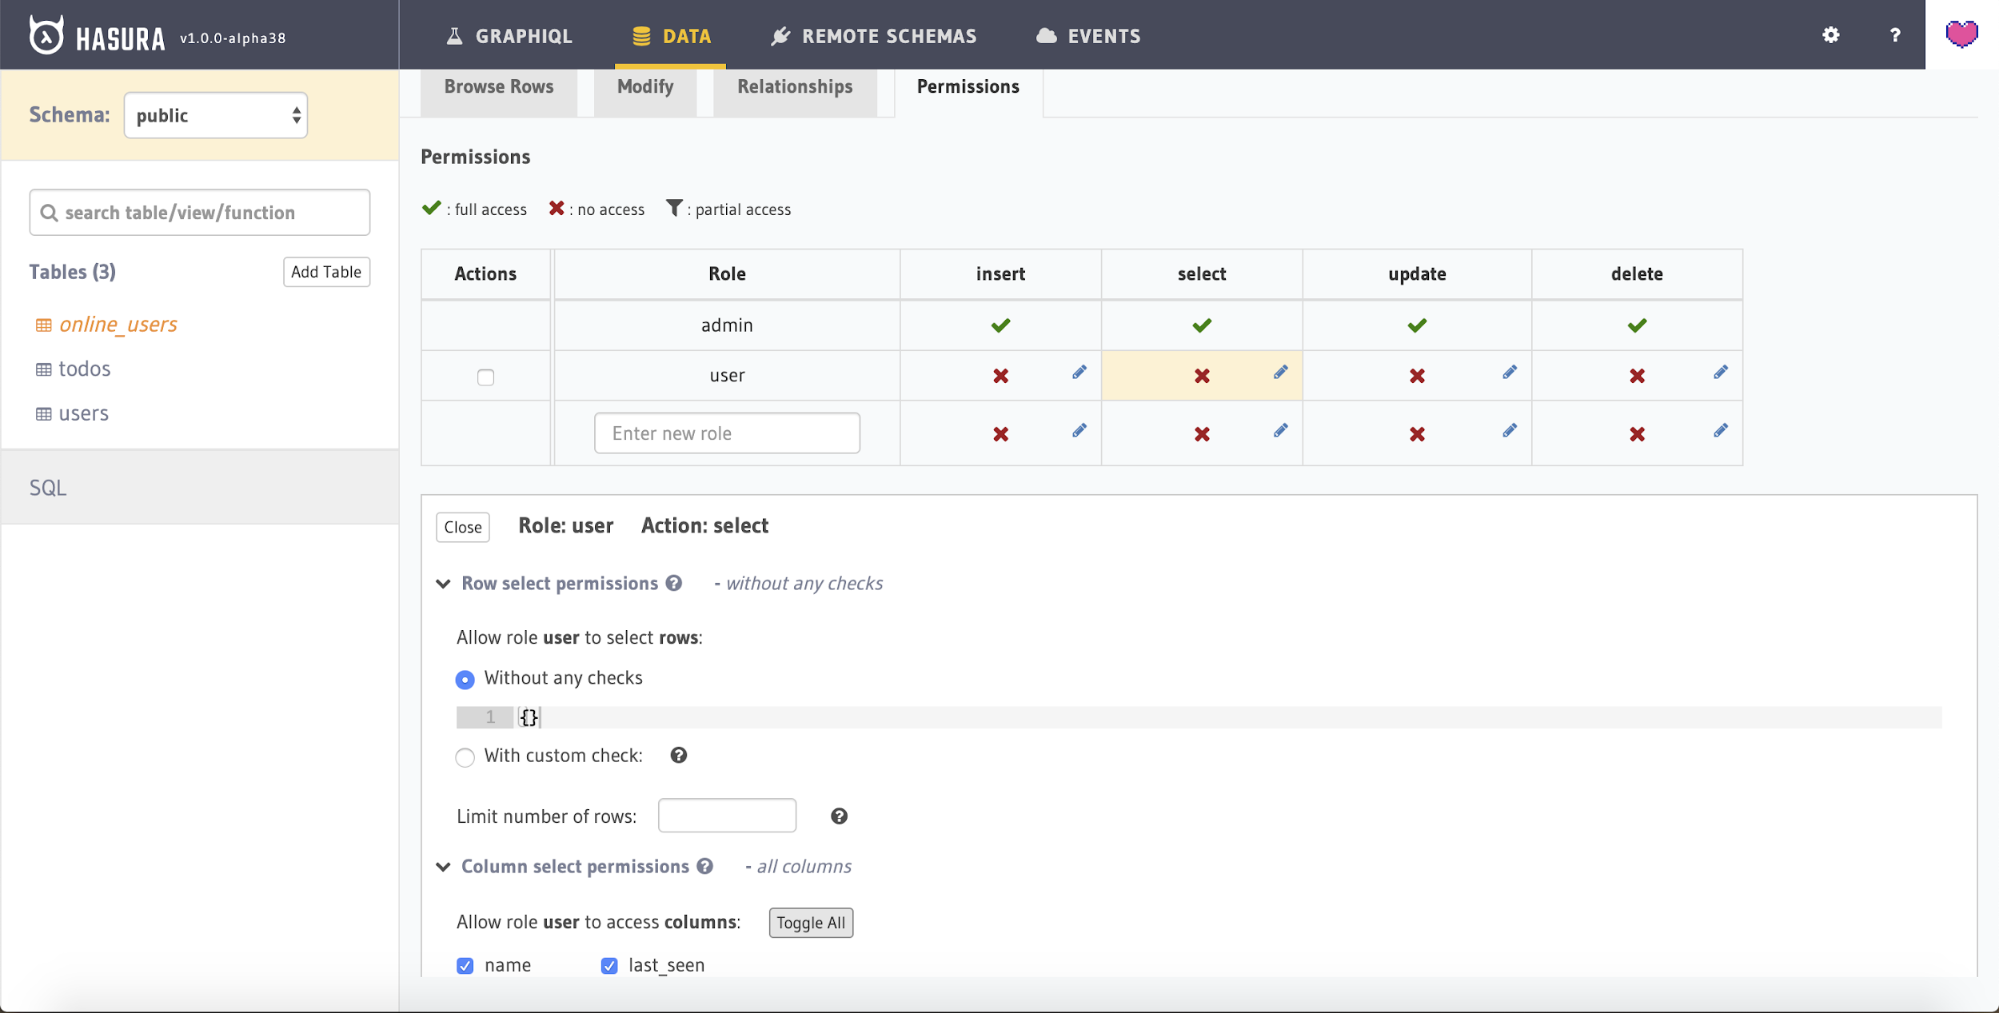
Expand the Column select permissions and click the Toggle all link beside Allow access to these columns to select all of the fields, then press the Save permissions button to finish.
We have now completed the backend setup for real-time GraphQL of the to-do app.
Authentication Using Auth0
You'll need an Auth0 account to manage authentication for your Hasura app. You can sign up for a free Auth0 account here.
Creating an Auth0 Application

- Navigate to the Auth0 Dashboard
- Click on the Applications menu option on the left and then click the + Create Application button
- In the Create Application window, set a name for your application and select Single Page Web Applications (since our demo app will be on React)
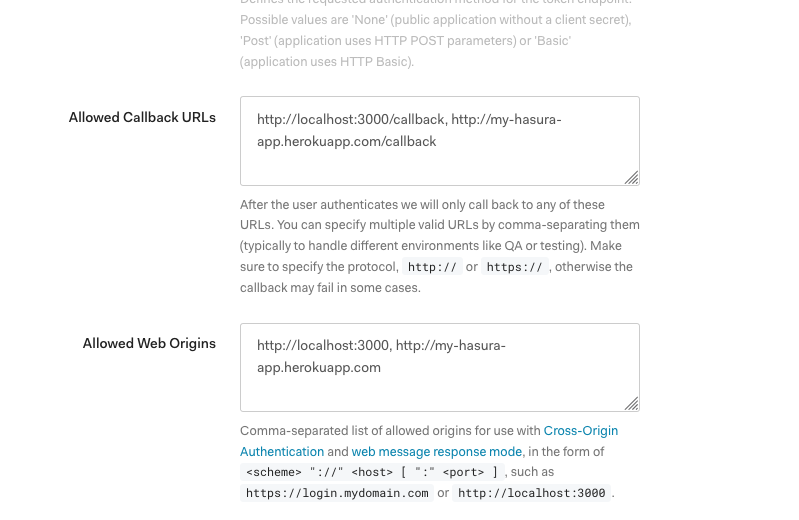
- In the settings of the application, set the Allowed Callback URLs field to
http://localhost:3000/callback - Still within the settings panel, set the Allowed Web Origins field to
http://localhost:3000 - Click the Save Changes button to complete this step
Note: The "Allowed Callback URLs" and "Allowed Web Origins" fields point to "localhost" so that the React app that you will download later can work. If you are integrating your own app hosted elsewhere, you will have to use those settings here instead.
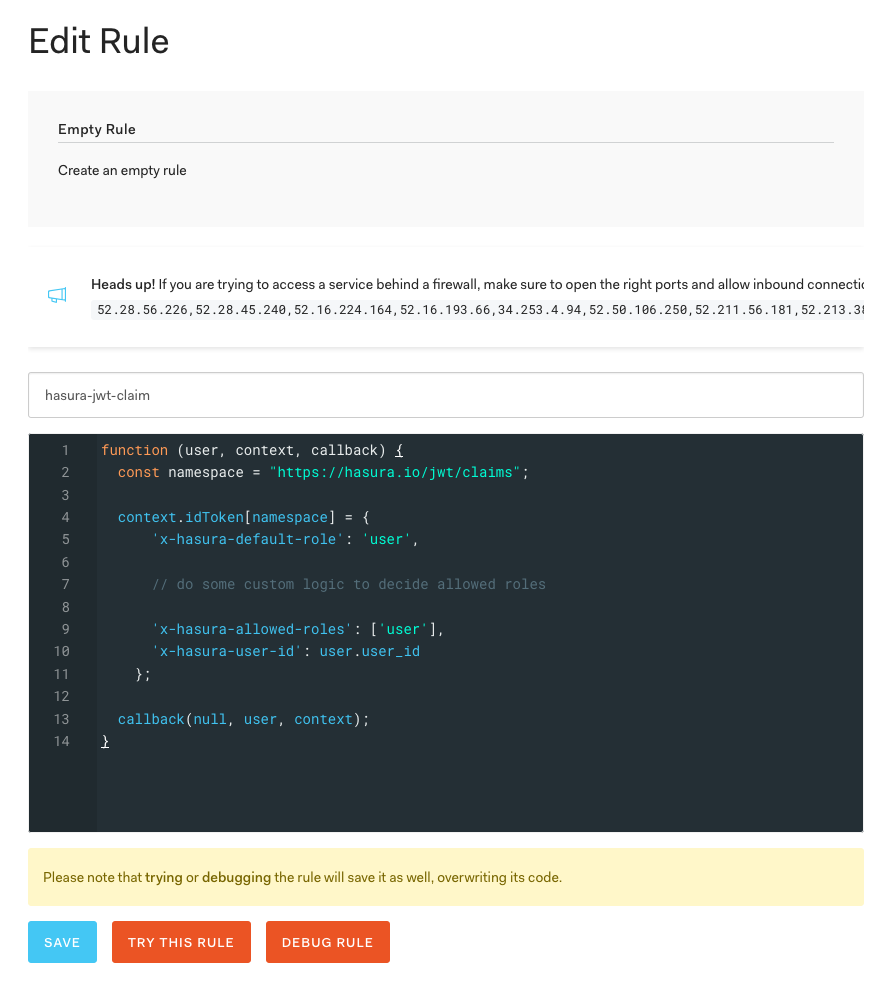
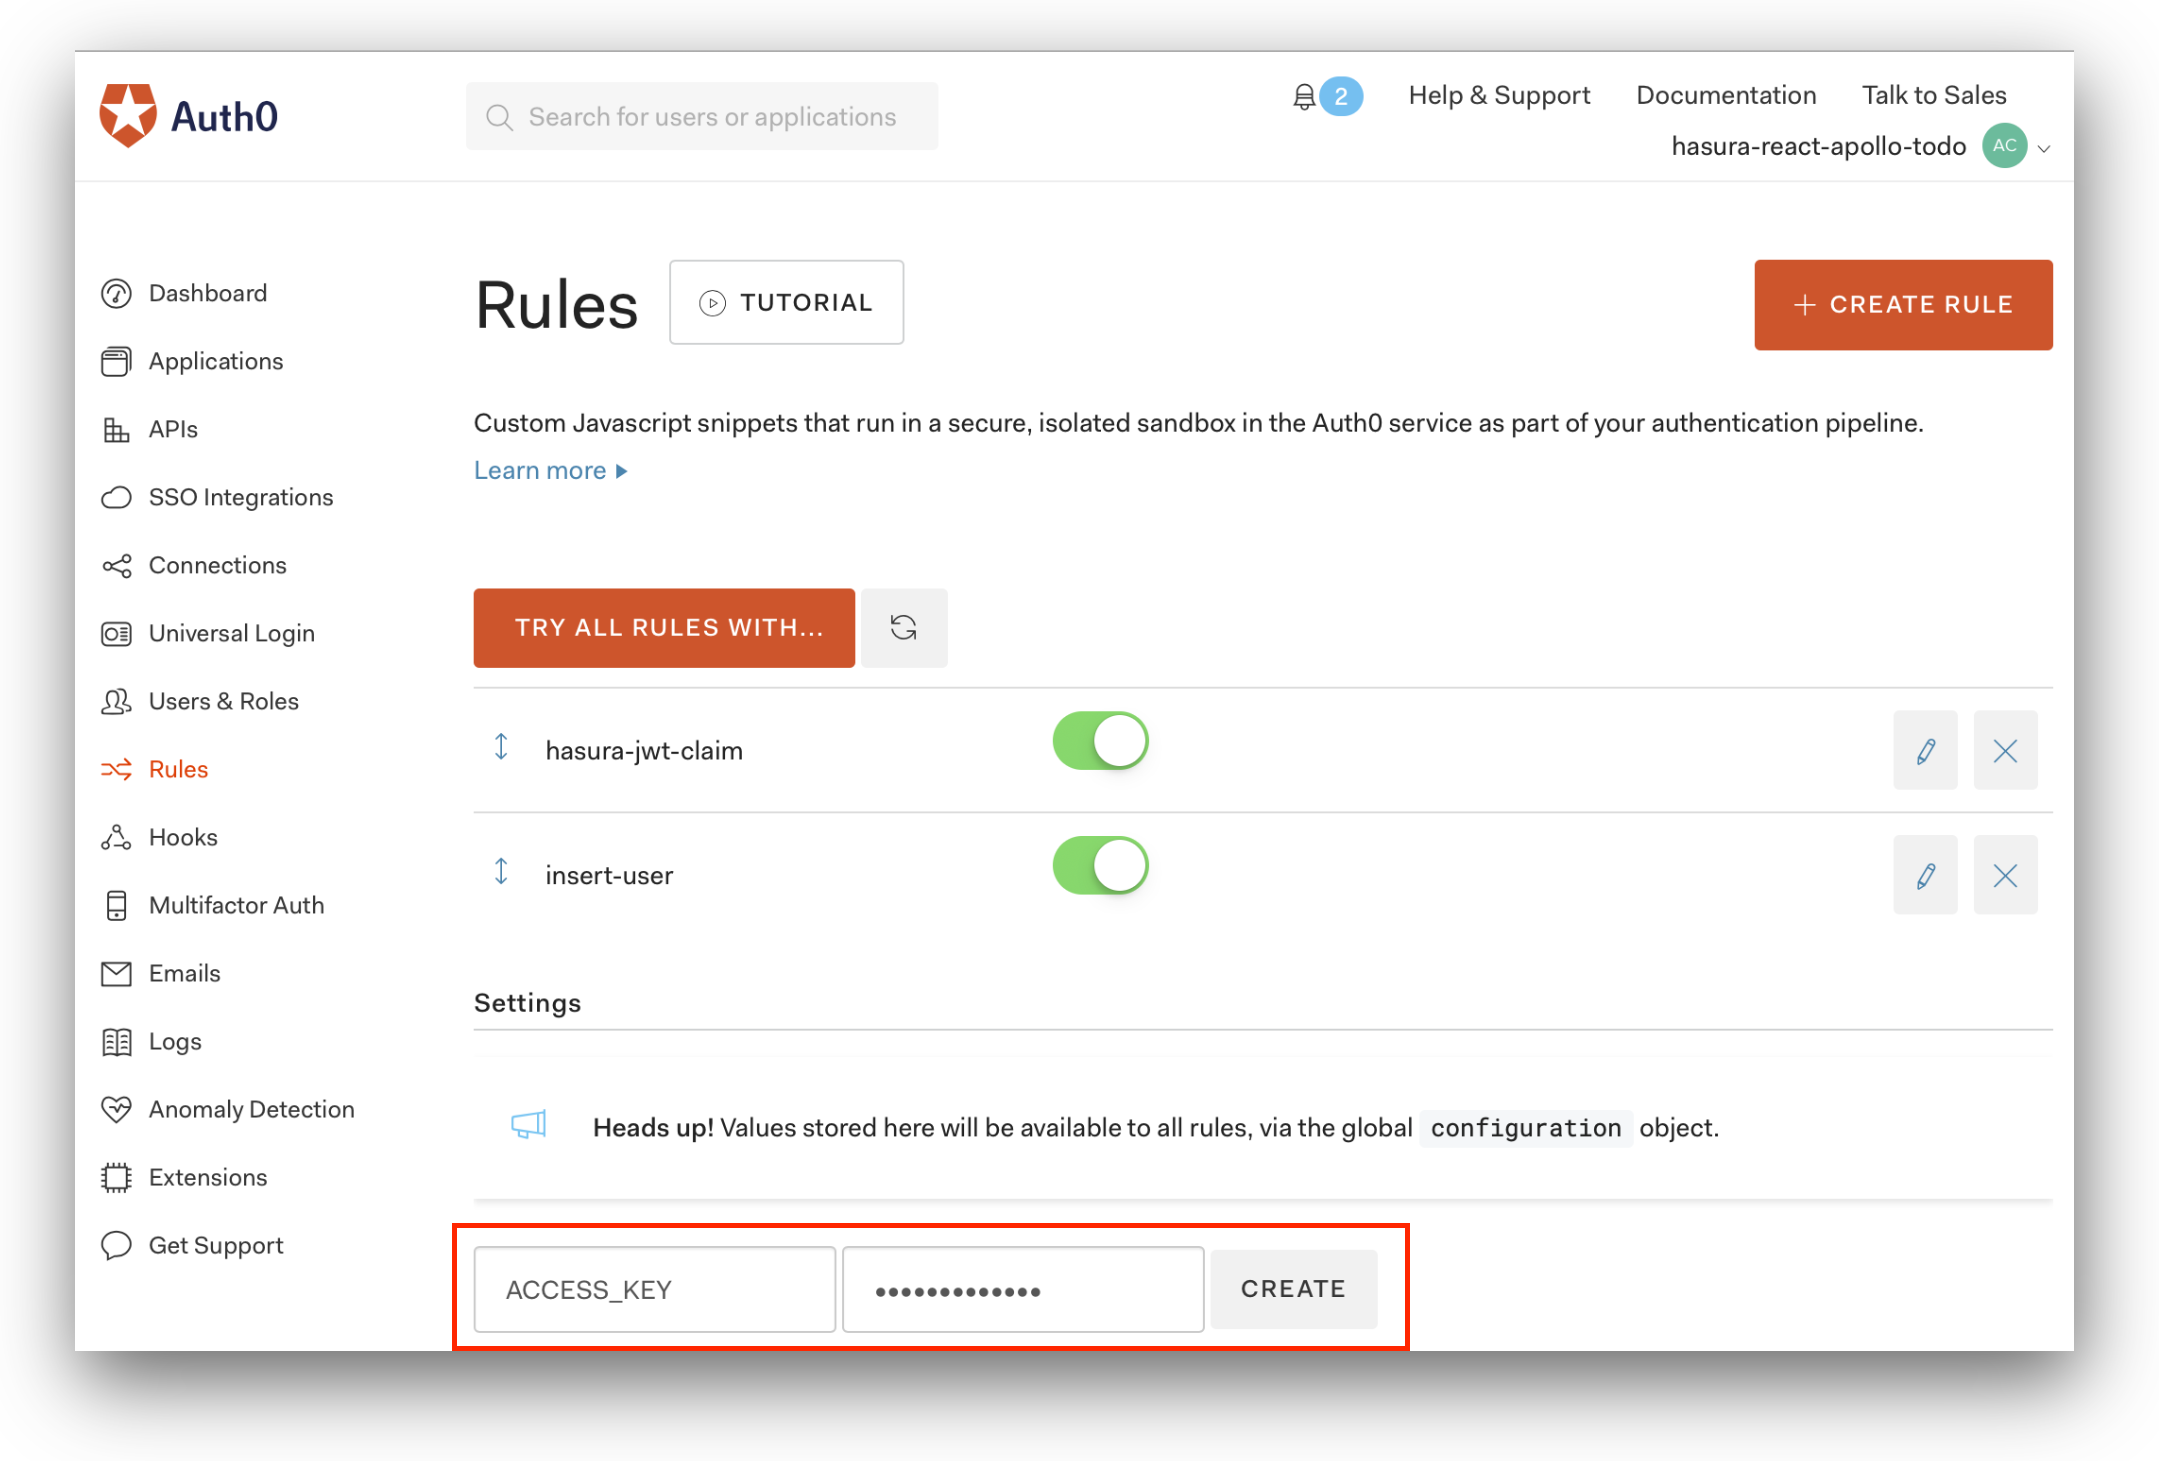
Adding rules for custom JWT claims
Custom claims inside the JWT are used to tell Hasura about the role of the caller, so that Hasura may enforce the necessary authorization rules to decide what the caller can and cannot do. Here we will add a new blank Rule to add these custom claims:
- In the Auth0 dashboard, navigate to "Rules"
- Click Create Rule
- Select empty rule
- Give it a name of
hasura-jwt-claim - Copy and paste the following code snippet into the editor, then press Save
function hasuraClaimsRule(user, context, callback) {
  const namespace = "https://hasura.io/jwt/claims";

  context.idToken[namespace] = {
    "x-hasura-default-role": "user",

    // do some custom logic to decide allowed roles

    "x-hasura-allowed-roles": ["user"],
    "x-hasura-user-id": user.user_id
  };

  callback(null, user, context);
}
Setting up Auth0 Rule for user sync
We need to set up a rule in Auth0 which allows the users of Auth0 to be in sync with the users in our database. The following code snippet allows us to do the same.
Again using the Rules feature, create a new empty rule, give it a name of hasura-user-sync, and paste in the following code snippet. This rule performs a mutation on the users table with the auth0_id and name values given to us from the user object inside the Rule:
function userSyncRule(user, context, callback) {
  const userId = user.user_id;
  const nickname = user.nickname;

  const mutation = `mutation($userId: String!, $nickname: String) {
    insert_users(objects: [{
        auth0_id: $userId,
        name: $nickname
      }],
      on_conflict: {
        constraint: users_pkey,
        update_columns: [last_seen, name]
      }) {
        affected_rows
      }
    }`;

  request.post(
    {
      headers: {
        "content-type": "application/json",
        "x-hasura-admin-secret": configuration.ACCESS_KEY
      },
      url: "https://<your-app-domain>/v1alpha1/graphql",
      body: JSON.stringify({ query: mutation, variables: { userId, nickname } })
    },
    function(error, response, body) {
      console.log(body);
      callback(error, user, context);
    }
  );
}
In the above rule, we have used configuration.ACCESS_KEY as the value for the x-hasura-admin-secret header (we will configure this in a moment). Also take care to replace your-app-domain inside the url property of the request with the Heroku app domain that you deployed above (e.g. my-hasura-app.herokuapp.com).
Now you should think of an admin secret key, which is to be used in the ACCESS_KEY setting. The admin secret will allow full API access to the Hasura GraphQL Engine. Imagine this as the password for your Hasura deployment. This will never be used from the client. Remember this key for later as you will need it to configure your Heroku instance.
To add ACCESS_KEY as a configuration setting, browse to the main Rules page in your Auth0 Dashboard. The setting can be added by specifying ACCESS_KEY in the key field and your Hasura admin secret in the value field, in the form underneath the Settings heading. Press the + Add button to save the new setting:
That's it! This rule will now be triggered on every successful signup or login, and when we insert or update the user data into our database using a Hasura GraphQL mutation.
Connecting Hasura and Auth0
Now that Auth0 application is set up and configured, we need to configure Hasura to use the Auth0 public keys. An easier way to generate the config for JWT is to use our JWT Configuration Tool:

- Select "Auth0" from the Select Provider list
- Type in your Auth0 tenant domain
- Click Generate Config
The generated configuration can be used as the environment variable HASURA_GRAPHQL_JWT_SECRET. Since we have deployed Hasura GraphQL Engine on Heroku, let's head to Heroku dashboard to configure the admin secret and JWT secret.
Open the "Settings" page for your Heroku app, click "Reveal Config Vars" to show the configuration UI, then add a new Config Var called HASURA_GRAPHQL_JWT_SECRET. Copy and paste the generated JWT configuration into the value box.
Next, create a new Config Var called HASURA_GRAPHQL_ADMIN_SECRET and paste in your Hasura admin secret key that you created in the previous section. You should end up with something like the following:
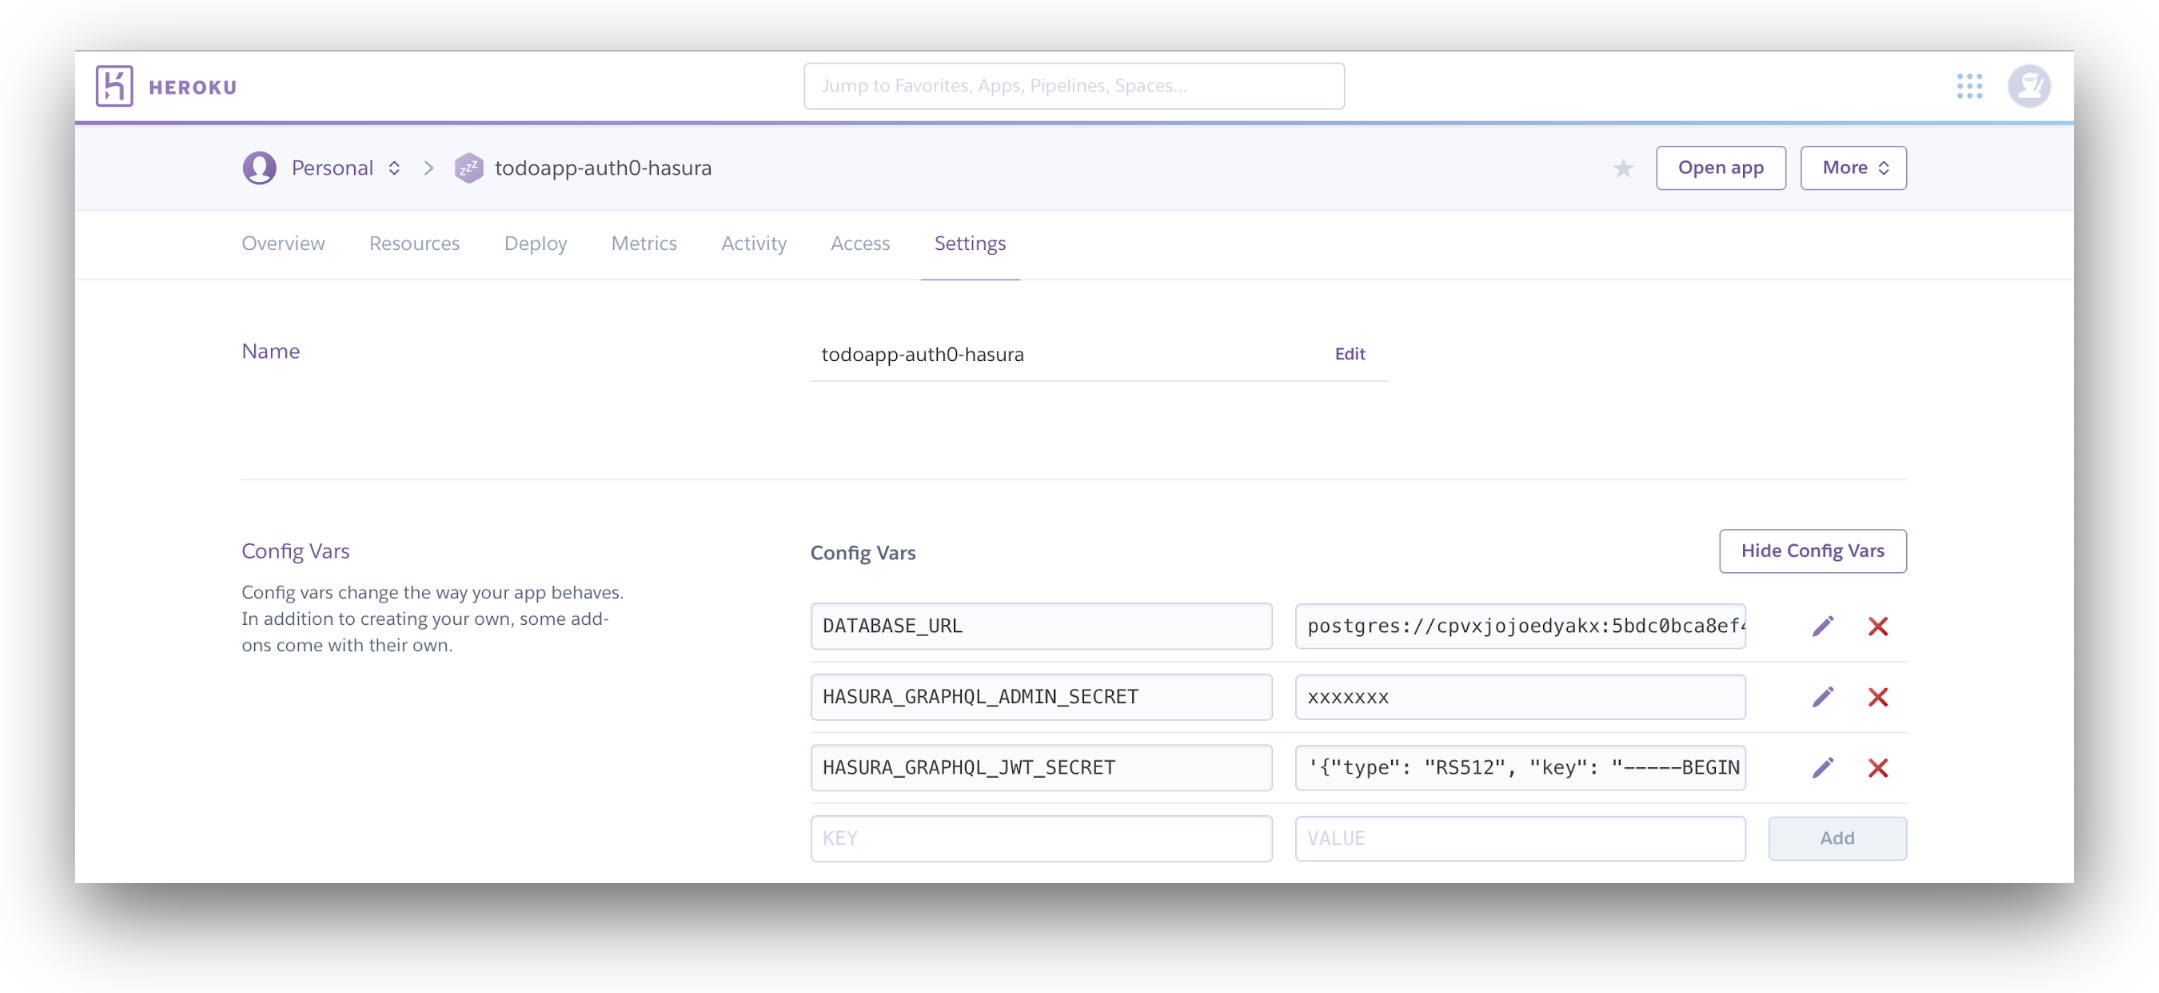
Great! Now your Hasura GraphQL Engine is secured using Auth0.
React App Configuration
Follow the steps below to clone the demo app and get it running locally on your machine:
Clone the repository
Find a location on your hard-drive and get the source code using git clone in the terminal:
git clone git@github.com:hasura/graphql-engine.git
This repository hosts many different sample applications. We want the react-apollo-todo sample, so use cd in the terminal to move into the sample directory:
cd graphql-engine/community/sample-apps/react-apollo-todo
This app wasn’t created specifically for this blog post. The app refers to a sample that Hasura has in a monorepo that is constantly evolving. As such, you need to check out a commit that reflects the state of the app at the time this blog post was written as follows:
git checkout f9fc0cc5e30644eaa73dc6507c52f0ebbb82af2e
Install Node modules
Next, install all of the dependencies required by this sample to run (this might take a few minutes):
// Install dependencies
npm install
Configure the environment
The configuration for the GraphQL endpoint and Auth0 domain values can be modified to make it work with your backend setup. Open the src/utils/constants.js file to begin editing the configuration for the app:
const HASURA_GRAPHQL_ENGINE_HOSTNAME = "<YOUR HASURA APP DOMAIN>";

const scheme = proto => {
  return window.location.protocol === "https:" ? `${proto}s` : proto;
};

export const GRAPHQL_URL = `${scheme(
  "http"
)}://${HASURA_GRAPHQL_ENGINE_HOSTNAME}/v1alpha1/graphql`;

export const REALTIME_GRAPHQL_URL = `${scheme(
  "ws"
)}://${HASURA_GRAPHQL_ENGINE_HOSTNAME}/v1alpha1/graphql`;

export const authClientId = "<YOUR AUTH0 CLIENT ID>";
export const authDomain = "<YOUR AUTH0 DOMAIN>";
export const callbackUrl = `http://localhost:3000/callback`; // modify `callbackUrl` to point to your localhost
In this file, modify the HASURA_GRAPHQL_ENGINE_HOSTNAME value to be the domain of the Hasura app that you deployed to Heroku earlier, e.g, myapp.herokuapp.com.
Next, update authClientId and authDomain constants to point to your Auth0 app’s respective values. The client ID for your Auth0 app can be found in the settings page of your Auth0 app configuration.
Finally, update the callbackUrl constant to http://localhost:3000/callback since you want Auth0 to redirect to your application running on localhost during development.
As an example of how the authorization step is made, inspect the configuration for Apollo Client in the src/apollo.js file. This shows how the authorization header is sent with the ID token, ensuring all requests are authorized using a JWT.
For example, in the makeApolloClient method, we are configuring getHeaders to include the token in the authorization header:
const getHeaders = () => {
  const headers = {};
  const token = auth.getIdToken();

  if (token) {
    headers.authorization = `Bearer ${token}`;
  }
  return headers;
};
Run the app
To start the application, run the following command from the terminal. This will start the application on localhost:3000 and open a browser window automatically:
npm start
You should see the following page if everything went smooth:
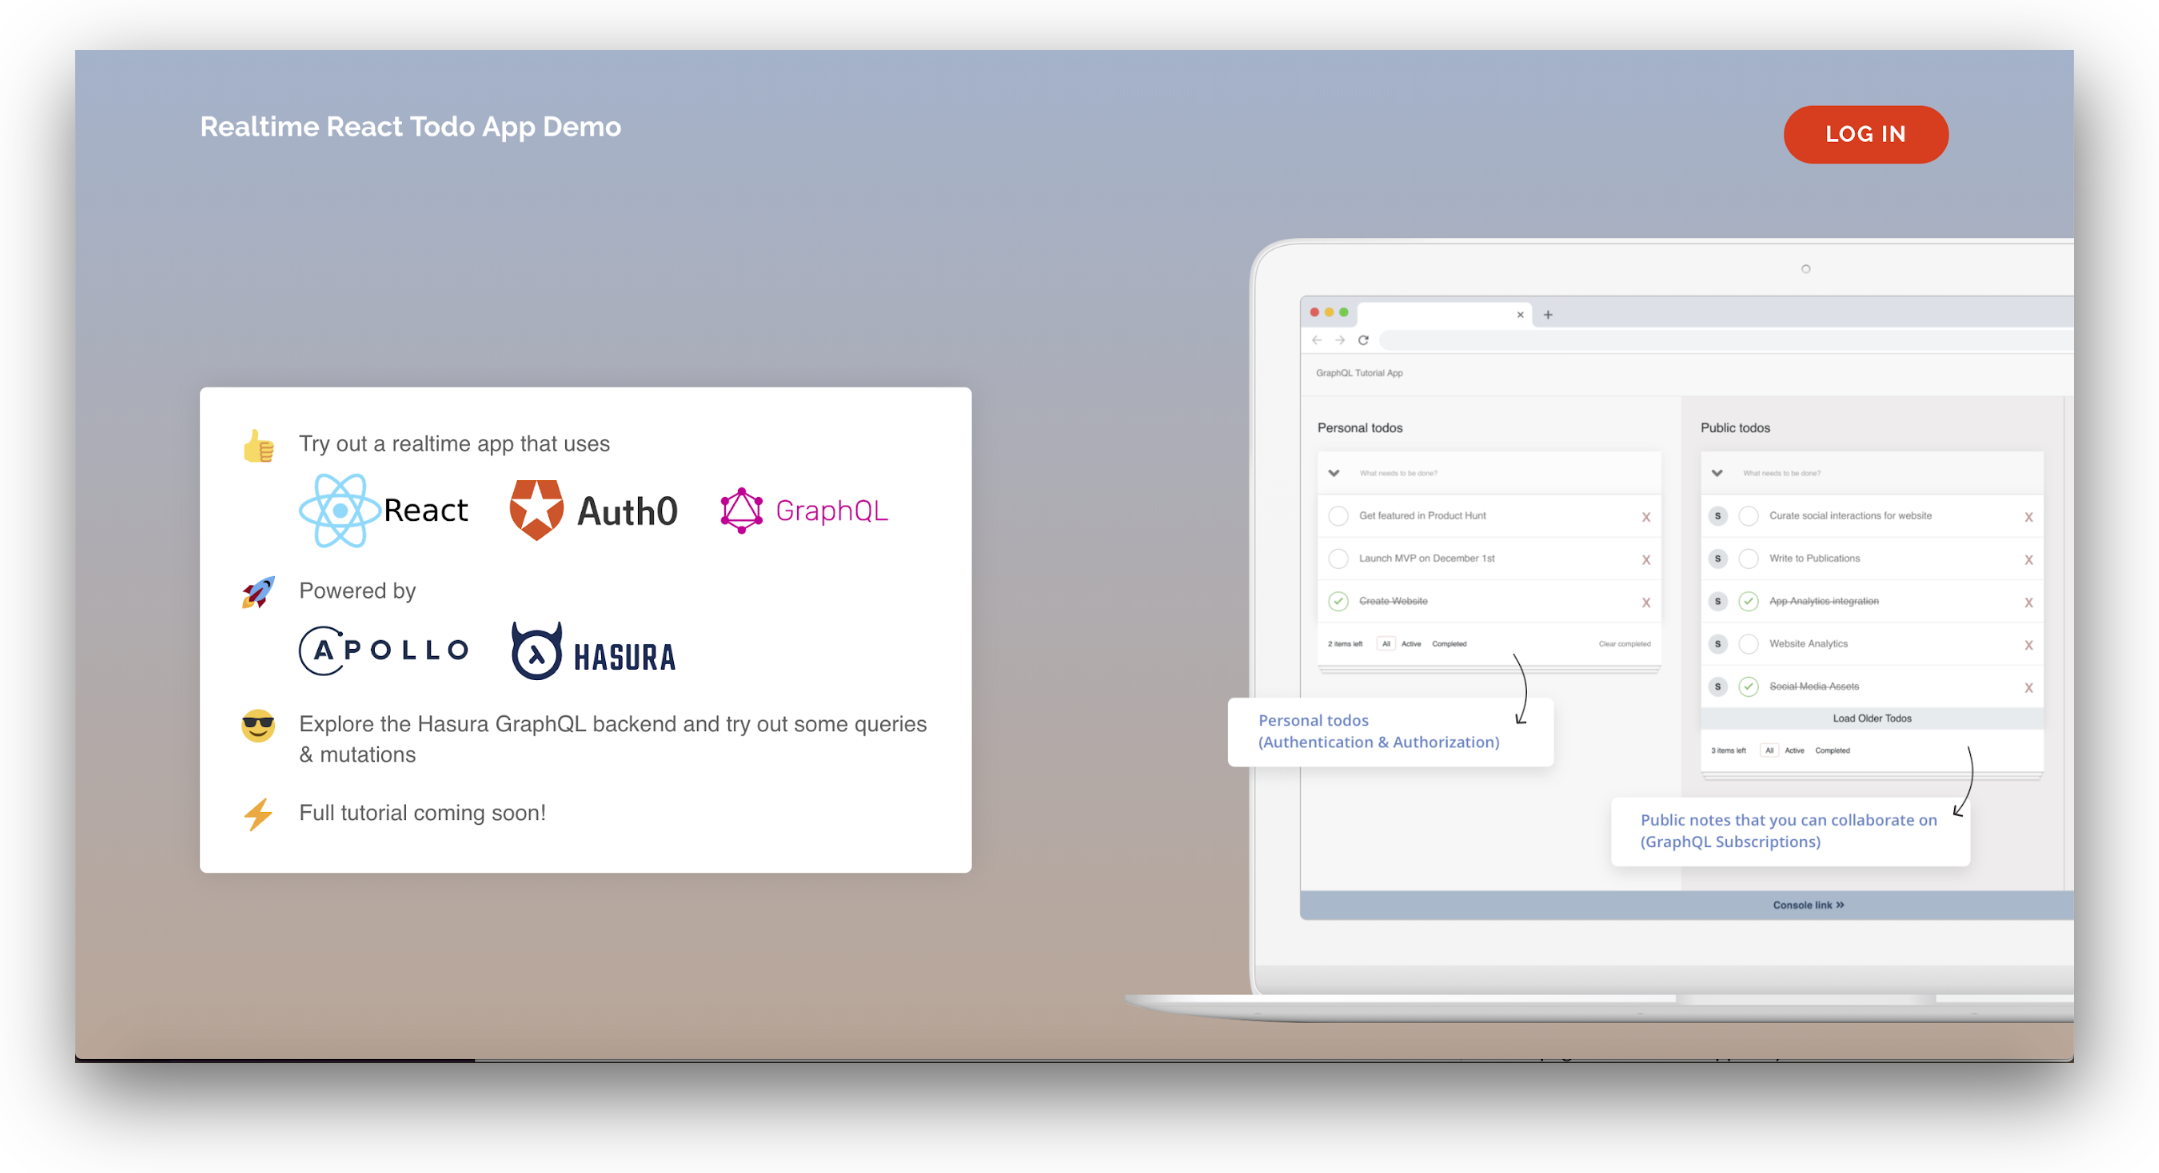
On this page, click on the LOG IN button to login via Auth0 and start exploring the app.
Explore GraphQL APIs for the App
Congrats! You have completed the set up of real-time GraphQL backend with authentication. Let's verify the configuration by making GraphQL queries. Before we begin, we need the JWT token to make authenticated queries. Using the configured React app above, fetch the Auth0 token for your login. One way to get the token is to inspect the requests being made in the app. You can do this by using the "Network Requests" feature of the debugging tools built into the browser:
For example in Chrome Dev Tools, under Network tab, click on the XHR requests being made to the server. The "authorization" header with the token is sent on every request and the same token can be copied.
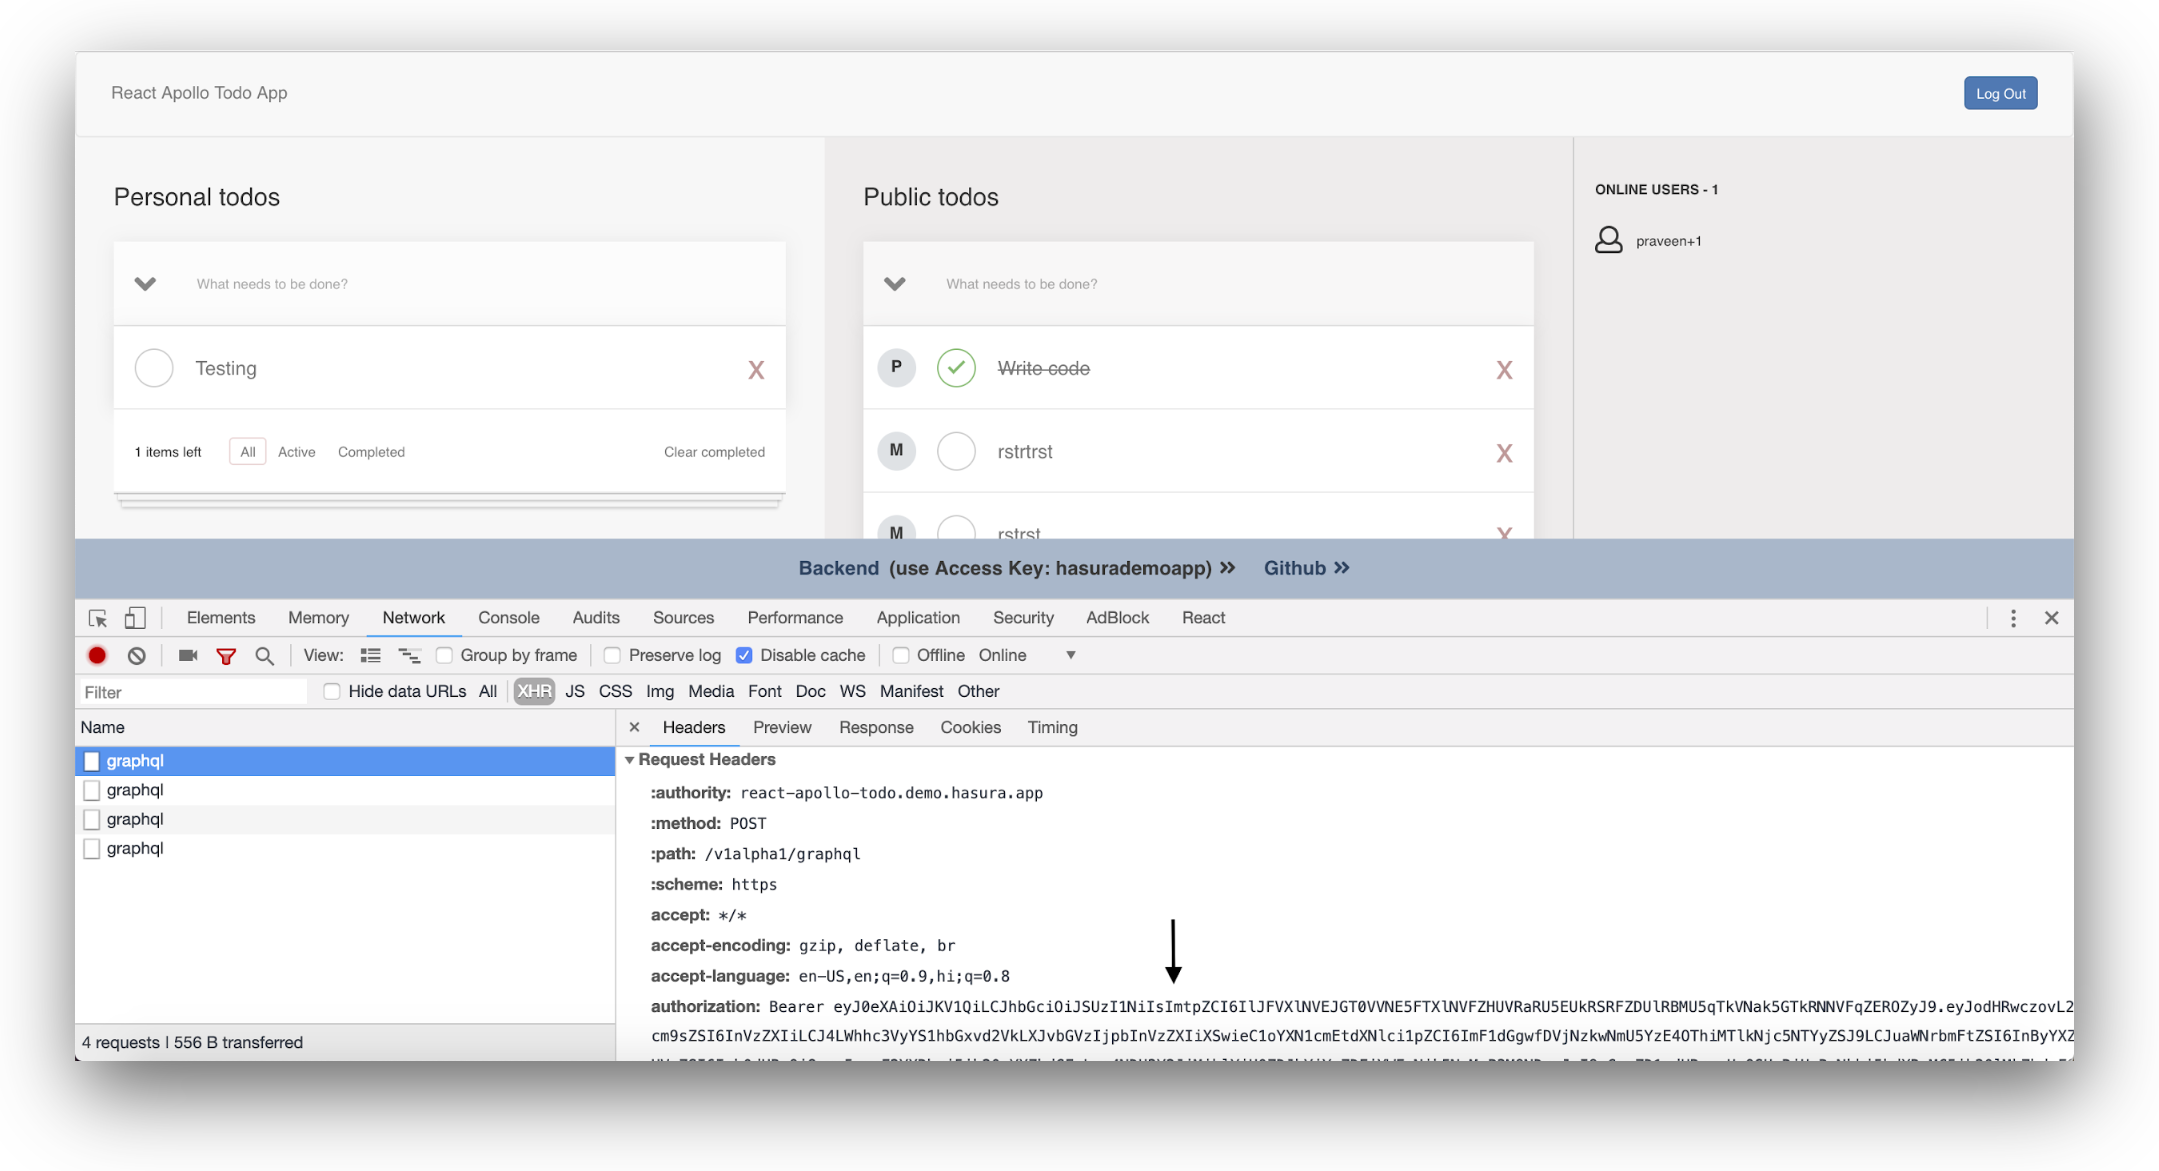
Head to Hasura console and use the API Explorer to start making queries to see if the permission system works as expected. Copy the auth token that you fetched above and add the headers Authorization: Bearer <token> to make the query as a user.
Check out this blog post for a deeper read into using the Hasura console to make queries against your GraphQL backend.
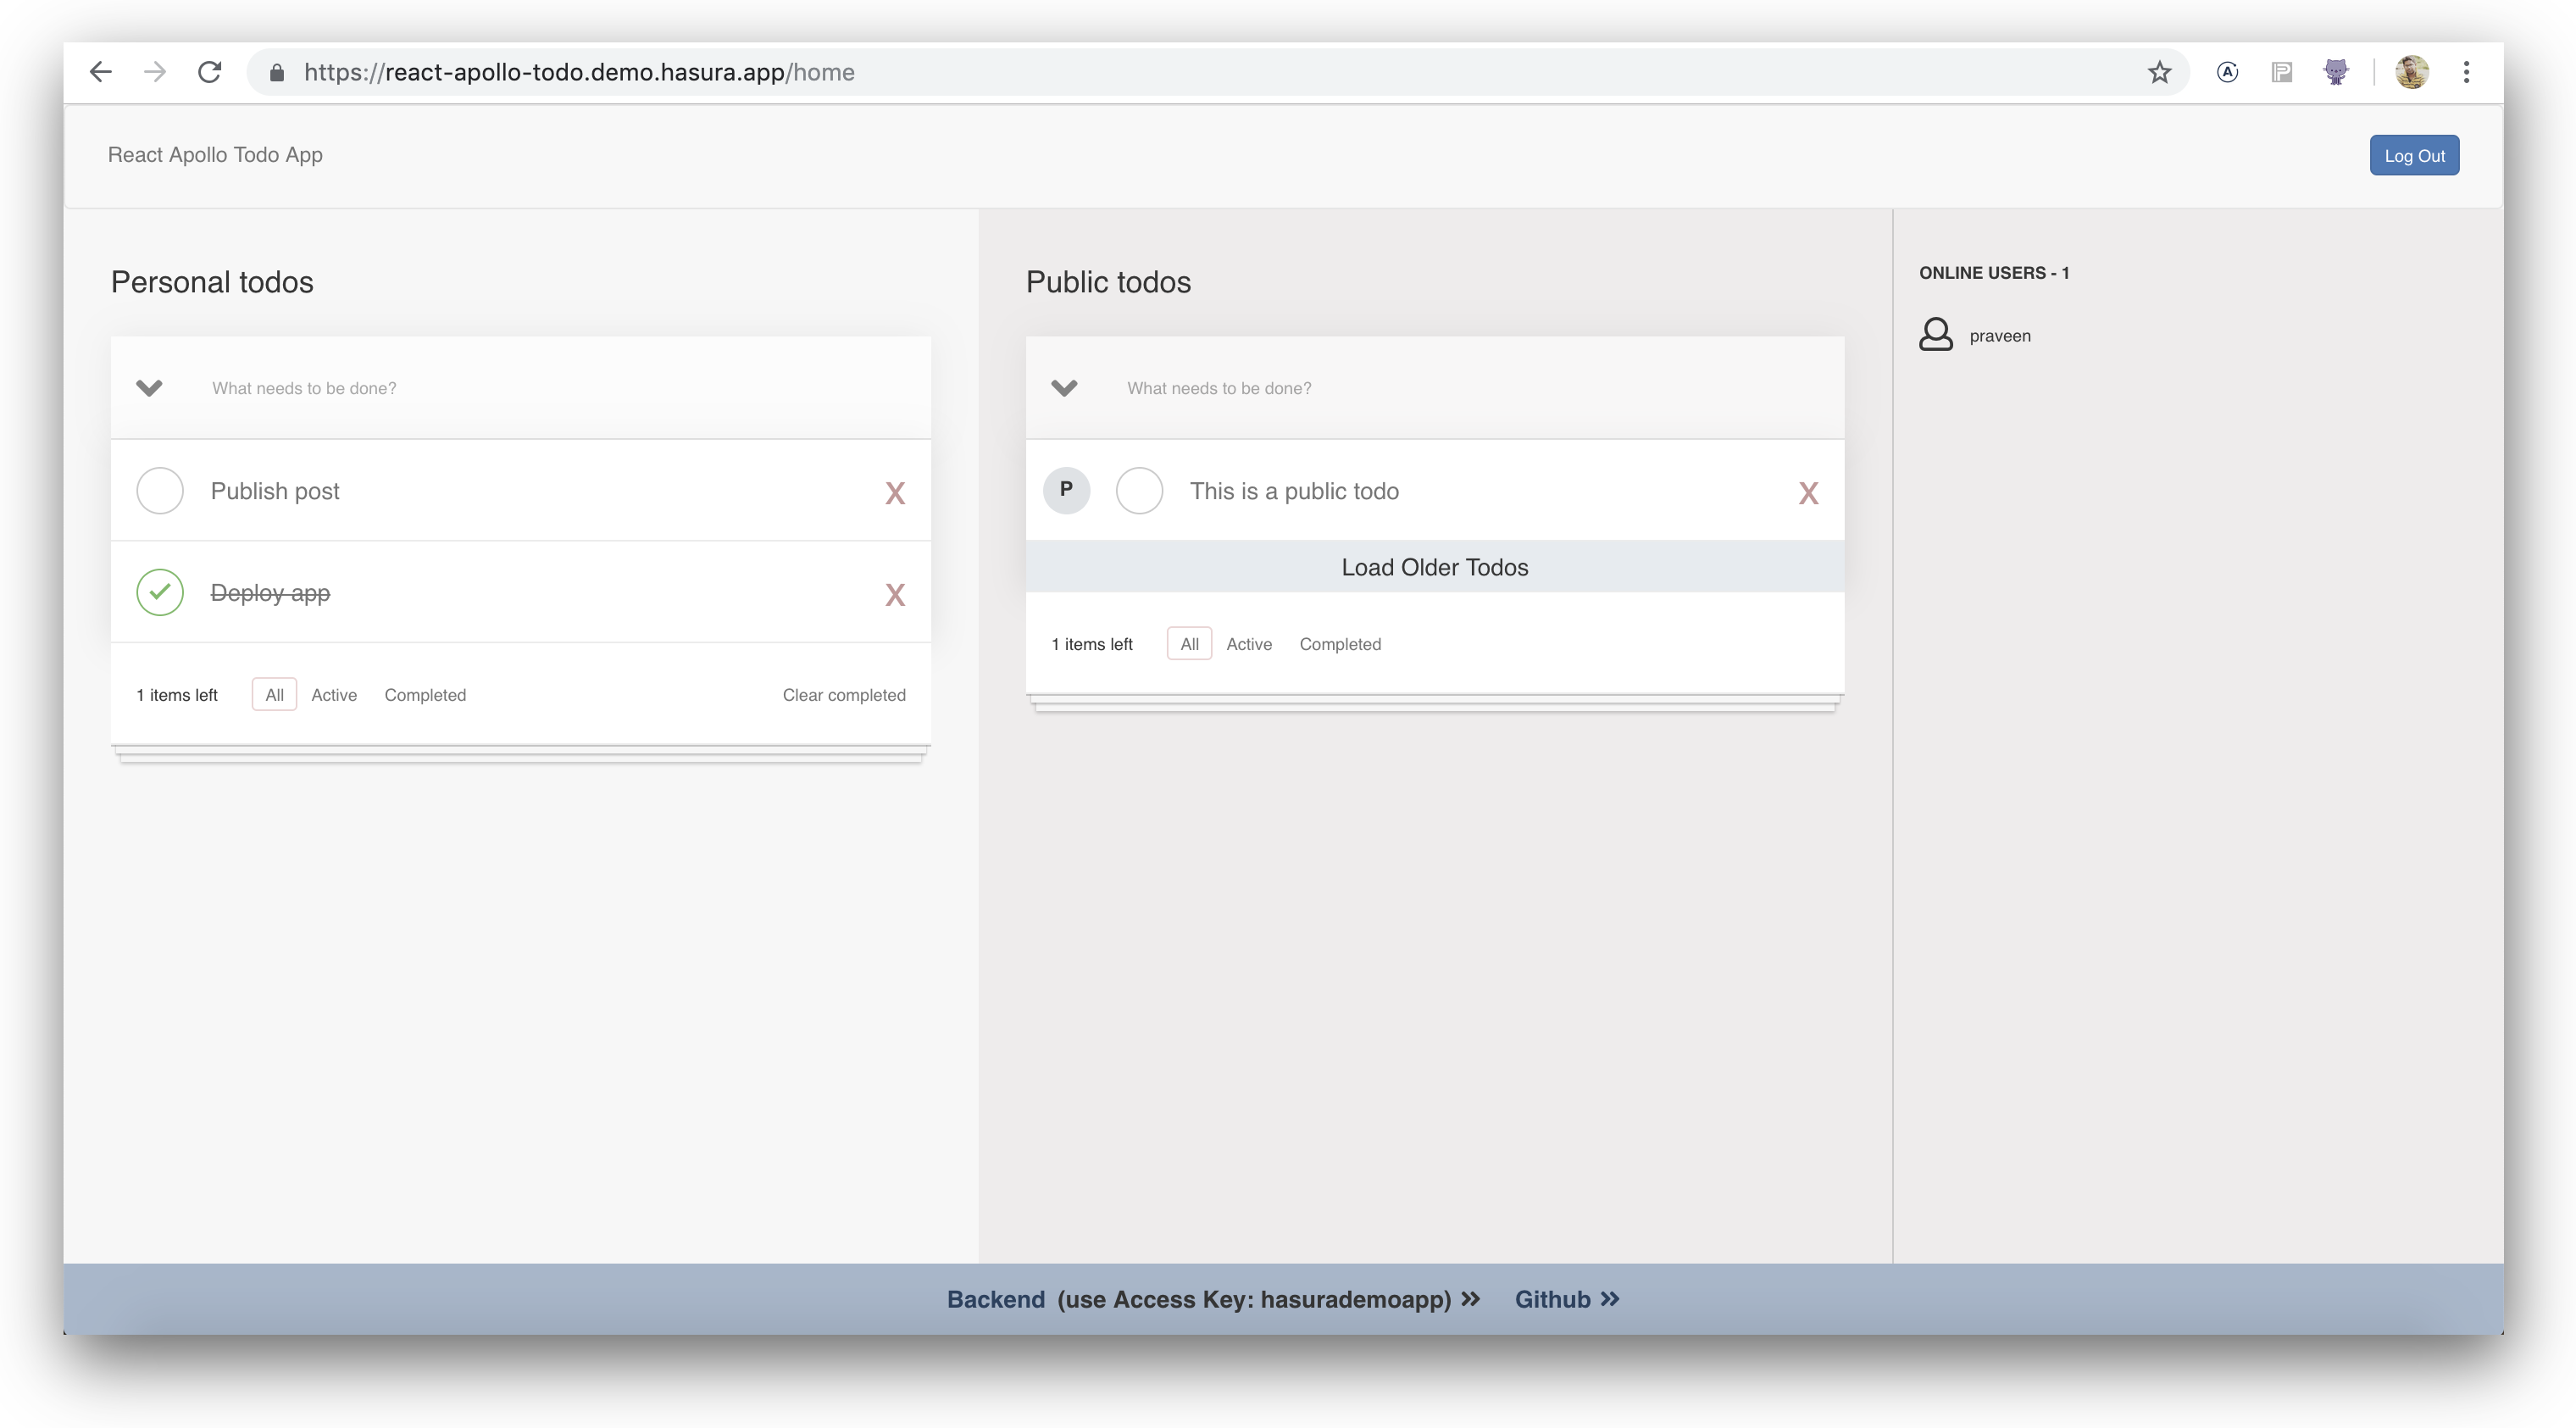
Collaborative To-do App Demo
We have a live demo of the collaborative real-time to-do app here. The app is protected by Auth0 and renders the to-do app upon successful login using Auth0.
You can play around by adding todos to your private list or modify the todos on the public list. Don't be surprised to see other users who are online at the same time!
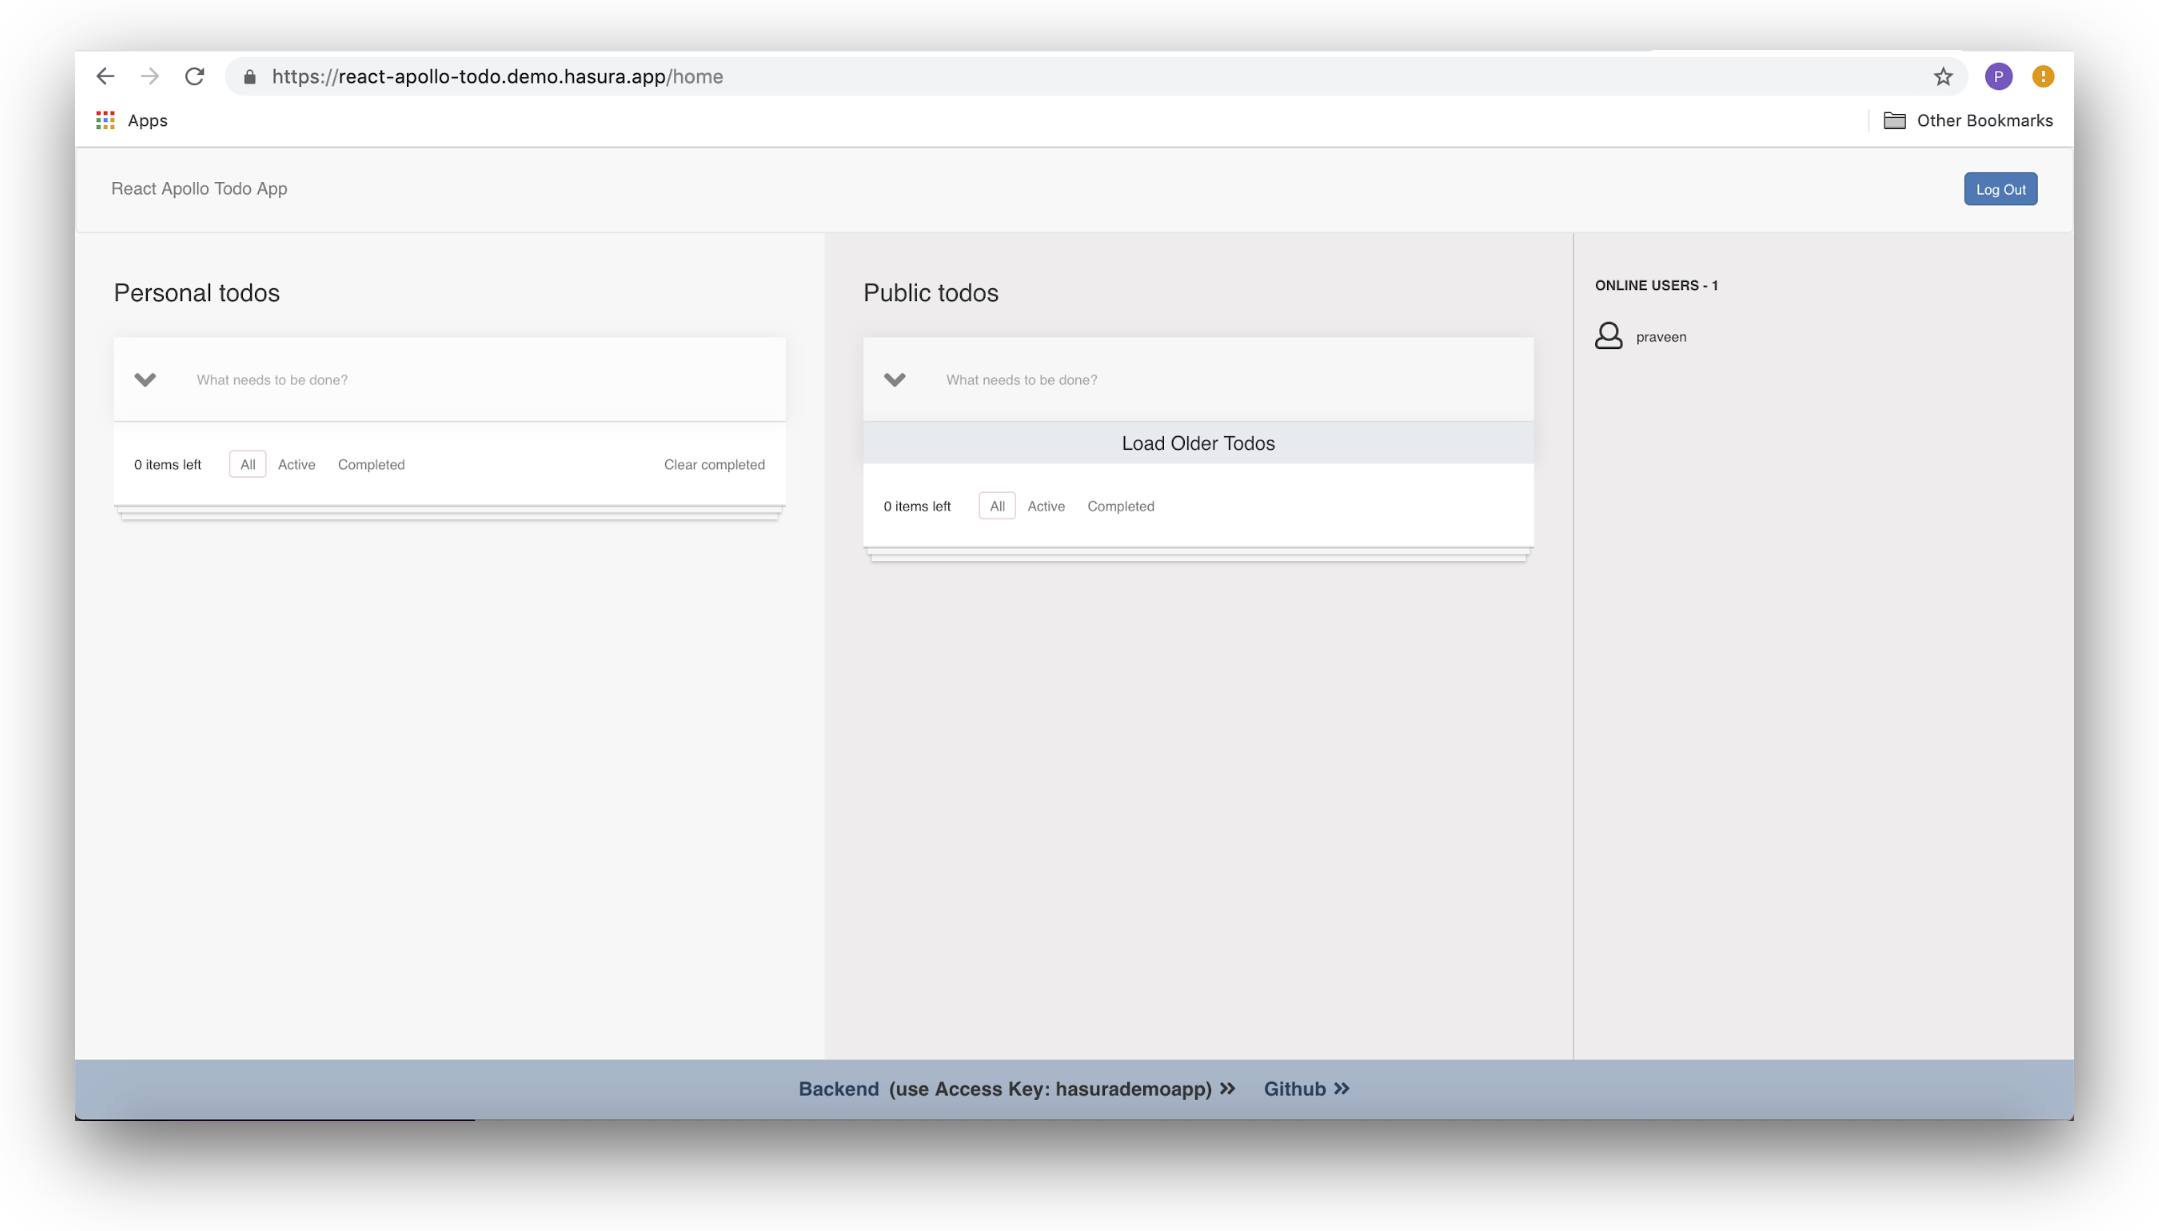
To add a to-do item, enter a task into the textbox labelled "What needs to be done?" under "Personal todos" and press enter. Doing this will send a mutation query to your GraphQL backend, and the task will appear in a list underneath that box. You can also mark tasks as done by clicking the large radio button beside each task, and remove a task completely by clicking the large cross to the right of an item.
Final Thoughts
In this article, we learned about using JWTs with Auth0 and how to leverage Auth0 Rules. We also discovered how to generate real-time GraphQL APIs using Hasura and deployment using a single-click deployment to Heroku.
Further reading: