

TL;DR: A well-designed architecture is important to keep a project maintainable in the long term. In this article, we'll compare MVVM and VIPER for iOS projects as an alternative to the traditional MVC.
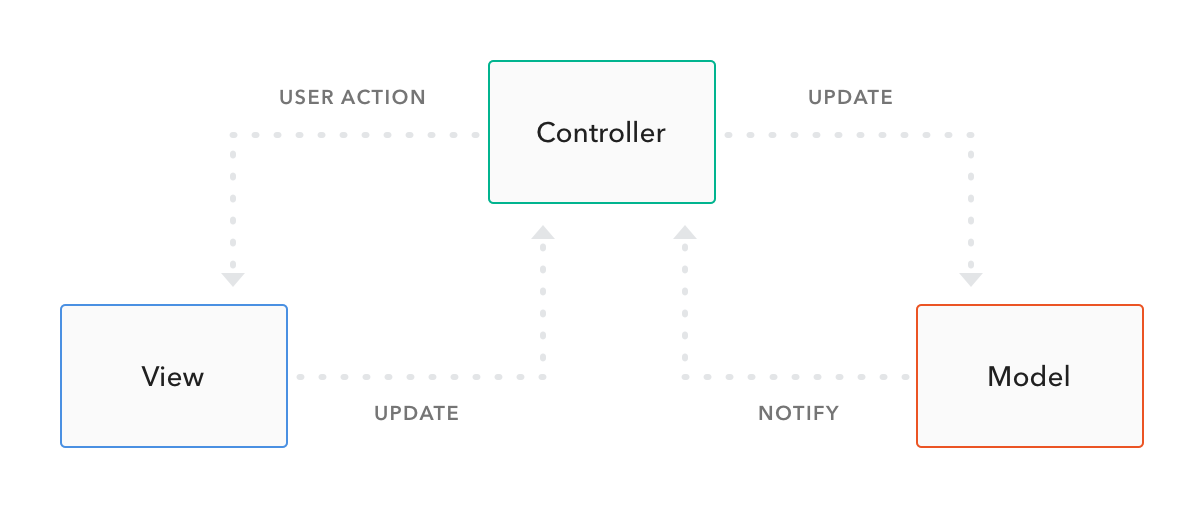
MVC is a well-known concept for those who have been developing software for a reasonable length of time. It's an acronym for Model View Controller, which is a pattern that divides a project into three parts: Model, representing the entities; View, representing the interface with which the user interacts; and Controller, responsible for connecting the other two pieces. That's how Apple recommends we organize our iOS projects.
However, you probably know that projects can be highly complex: handling network requests, parsing responses, accessing data models, formatting data for the interface, responding to interface events, and so on. You'll end up with enormous Controllers, responsible for all these different things and not reusable at all. In other words, MVC can be a nightmare for developers in charge of the maintenance of a project. But how can we accomplish a better separation of concerns and reusability for iOS projects?
We'll explore two popular alternatives to MVC: MVVM and VIPER. Both are gaining popularity in the iOS community, and have proved to be good ways to go instead of the traditional MVC (gently nicknamed as Massive View Controller). We'll talk about how the two are structured, build an example application and compare when it's the time to use one or the other.
Example
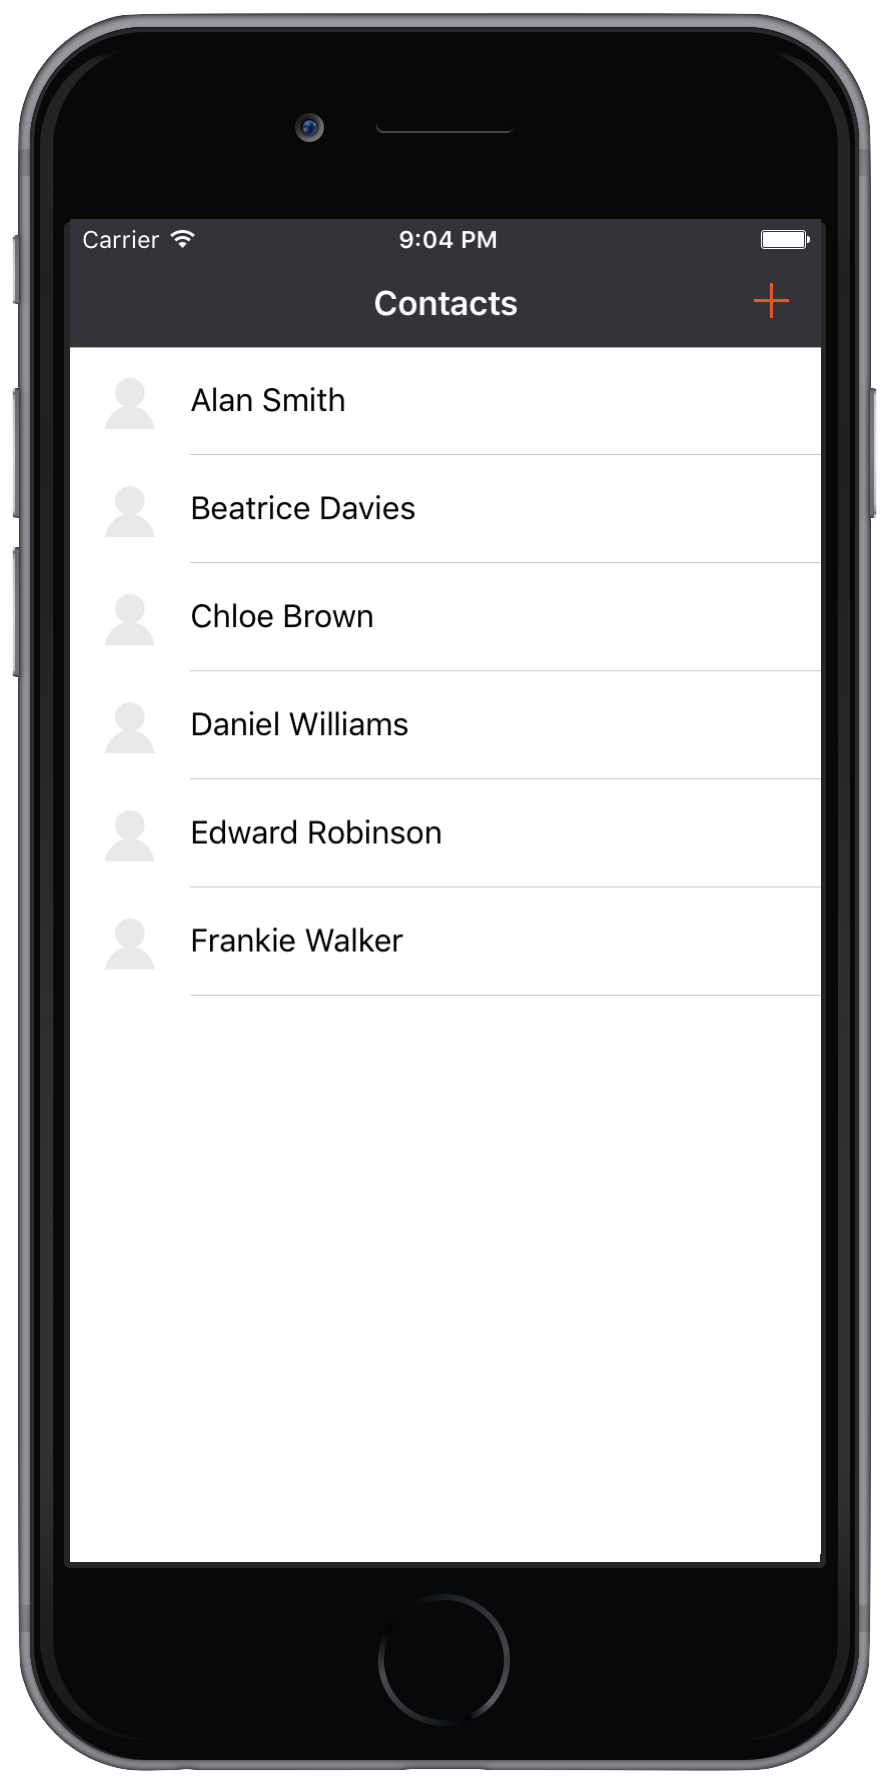
We'll build a Contacts app. You can follow the example in this repository. The starter folders for both MVVM and VIPER sections contain the initial setup and only need the code from the tutorial to work.
The app has two screens: the first is a list of contacts, displayed in table view with their full name and a placeholder profile image.
The second is an Add Contact screen, with first/last name text fields and cancel/done button items.

MVVM
How it works
MVVM stands for Model-View-ViewModel. It's a different way to arrange responsibilities, changing a few roles compared to MVC.
Model
- This is the layer that does not change if compared to MVC. It still represents the data-model layer of your application, and can hold business logic responsibilities as well. You may also want to create a manager class to manipulate the model objects and a network manager class to handle requests and data parsing.
View
- Here, things start to change. The view layer in MVVM englobes the interface (UIView subclasses, xib and storyboard files), the view logic (animations, drawing) and handling user input events (button clicks, transitions, etc). Those are responsibilities of the View and the Controller in the MVC. This means that your views will remain the same, while your view controller subclasses will only contain a small subset of the responsibilities they have in MVC - and will get reasonably smaller than usual
ViewModel
- That's the new home for most of your usual controller code. The view model layer will request the data from the model layer (it might be a local access to a database or a network request) and pass it back to the view, formatted in the way it will be displayed. But it's a two-way mechanism: user input, when necessary, will also get through the view model layer to update the model. Since the view model controls exactly what is being displayed, it's useful to use some data binding mechanism between the two layers.
Comparing to MVC, you change from a pattern that looks like this:
to something that looks like this:
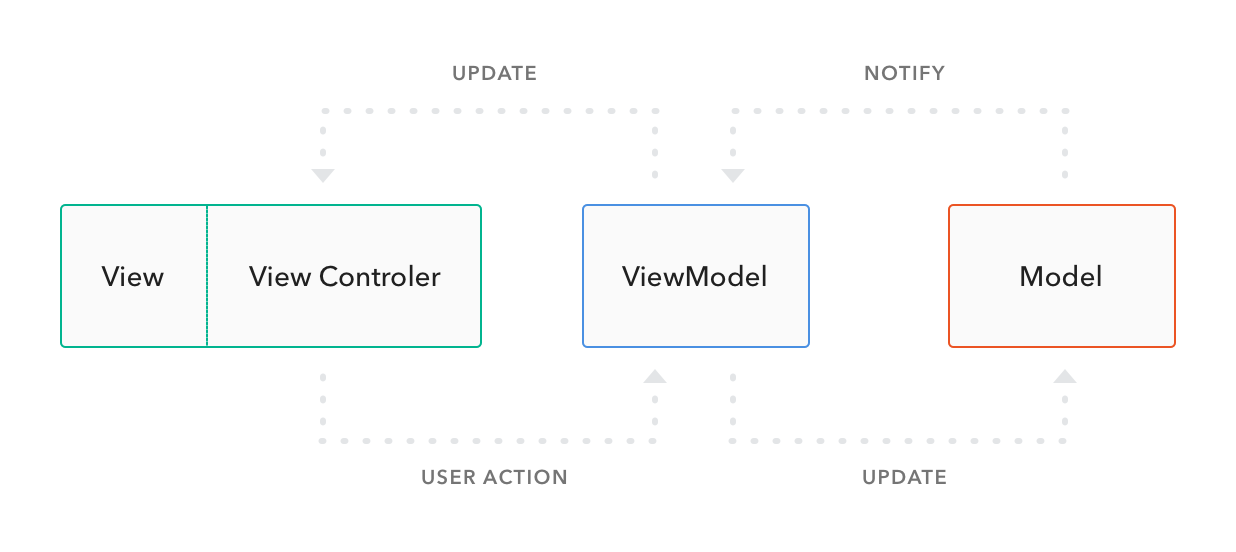
In which the view layer corresponds to UIView and UIViewController classes and subclasses.
Now it's time to get our hands dirty to grasp the new concepts. So let's build an example app structured using MVVM!
MVVM Contacts App
Model
The following code is a class to represent the contact and two operator overloading functions. Replace the content in Contact.swift file with the following code:
import CoreData

open class Contact: NSManagedObject {

    var fullName: String {
        get {
            var name = ""
            if let firstName = firstName {
                name += firstName
            }
            if let lastName = lastName {
                name += " (lastName)"
            }
            return name
        }
    }
}
A Contact has only these two fields, firstName and lastName. A computed property is responsible for returning the fullName, and the operators > and < have their implementation to be used when an instance is inserted in an ordered list.
View
There are three files responsible for the view layer: the Main storyboard, with views already laid out in the starter project; the ContactsViewController, which displays the contacts list in a table view; and the AddContactViewController, with two labels and fields for setting up the first and last name of a new contact. Let's start with the code for ContactsViewController. Replace the ContactsViewController.swift file with the following code:
import UIKit

class ContactsViewController: UIViewController {

    @IBOutlet var tableView: UITableView!
    let contactViewModelController = ContactViewModelController()

    override func viewDidLoad() {
        super.viewDidLoad()
        tableView.tableFooterView = UIView()
        contactViewModelController.retrieveContacts({ [unowned self] in
            self.tableView.reloadData()
        }, failure: nil)
    }

    override func prepare(for segue: UIStoryboardSegue, sender: Any?) {
        let addContactNavigationController = segue.destination as? UINavigationController
        let addContactVC = addContactNavigationController?.viewControllers[0] as? AddContactViewController

        addContactVC?.contactsViewModelController = contactViewModelController
        addContactVC?.didAddContact = { [unowned self] (contactViewModel, index) in
            let indexPath = IndexPath(row: index, section: 0)
            self.tableView.beginUpdates()
            self.tableView.insertRows(at: [indexPath], with: .left)
            self.tableView.endUpdates()
        }
    }

}

extension ContactsViewController: UITableViewDataSource {

    func tableView(_ tableView: UITableView, cellForRowAt indexPath: IndexPath) -> UITableViewCell {
        let cell = tableView.dequeueReusableCell(withIdentifier: "ContactCell") as? ContactsTableViewCell
        guard let contactsCell = cell else {
            return UITableViewCell()
        }

        contactsCell.cellModel = contactViewModelController.viewModel(at: (indexPath as NSIndexPath).row)
        return contactsCell
    }

    func tableView(_ tableView: UITableView, numberOfRowsInSection section: Int) -> Int {
        return contactViewModelController.contactsCount
    }

}
A quick look is enough to realize that this class has mostly interface responsibilities. It also has navigation flow dependency in prepareForSegue(::) - something that will change in VIPER with the Router layer.
Now take a closer look at the class extension that conforms to the UITableViewDataSource protocol. The implemented functions don't interact directly with the Contact class in the Model layer - instead, it gets the data (represented by the ContactViewModel struct) the way it's going to be displayed, already formatted by the ViewModelController.
Same thing happens with the closure that is called when a contact is created. Its only work is to insert a new row in the table view - that's only an interface update!
Now it's necessary to guarantee the data binding between the UITableViewCell subclass and the ViewModel. Replace the ContactsTableViewCell.swift file with the following code.
import UIKit

class ContactsTableViewCell: UITableViewCell {
    var cellModel: ContactViewModel? {
        didSet {
            bindViewModel()
        }
    }

    func bindViewModel() {
        textLabel?.text = cellModel?.fullName
    }
}
Now replace your AddContactViewController.swift file with the following code:
import UIKit

class AddContactViewController: UIViewController {

    @IBOutlet var firstNameTextField: UITextField!
    @IBOutlet var lastNameTextField: UITextField!
    var contactsViewModelController: ContactViewModelController?
    var didAddContact: ((ContactViewModel, Int) -> Void)?

    override func viewDidLoad() {
        super.viewDidLoad()
        firstNameTextField.becomeFirstResponder()
    }

    @IBAction func didClickOnDoneButton(_ sender: UIBarButtonItem) {
        guard let firstName = firstNameTextField.text,
            let lastName = lastNameTextField.text
            else {
                return
        }

        if firstName.isEmpty || lastName.isEmpty {
            showEmptyNameAlert()
            return
        }

        dismiss(animated: true) { [unowned self] in
            self.contactsViewModelController?.createContact(firstName: firstName, lastName: lastName,
                                                            success: self.didAddContact, failure: nil)
        }

    }

    @IBAction func didClickOnCancelButton(_ sender: UIBarButtonItem) {
        dismiss(animated: true, completion: nil)
    }

    fileprivate func showEmptyNameAlert() {
        showMessage(title: "Error", message: "A contact must have first and last names")
    }

    fileprivate func showMessage(title: String, message: String) {
        let alertView = UIAlertController(title: title,
                                          message: message,
                                          preferredStyle: .alert)
        alertView.addAction(UIAlertAction(title: "Ok", style: .destructive, handler: nil))
        present(alertView, animated: true, completion: nil)
    }

}
Again, mostly UI operations. Note that it delegates to the ViewModelController the responsibility of creating a new Contact instance on didClickOnDoneButton(:).
View Model
Time to talk about what's new: the View Model layer. First, insert the following code in the ContactViewModel.swift file.
public struct ContactViewModel {
    var fullName: String
}

public func <(lhs: ContactViewModel, rhs: ContactViewModel) -> Bool {
    return lhs.fullName.lowercased() < rhs.fullName.lowercased()
}

public func >(lhs: ContactViewModel, rhs: ContactViewModel) -> Bool {
    return lhs.fullName.lowercased() > rhs.fullName.lowercased()
}
And the following code in the ContactViewModelController file:
class ContactViewModelController {

    fileprivate var contactViewModelList: [ContactViewModel] = []
    fileprivate var dataManager = ContactLocalDataManager()

    var contactsCount: Int {
        return contactViewModelList.count
    }

    func retrieveContacts(_ success: (() -> Void)?, failure: (() -> Void)?) {
        do {
            let contacts = try dataManager.retrieveContactList()
            contactViewModelList = contacts.map() { ContactViewModel(fullName: $0.fullName) }
            success?()
        } catch {
            failure?()
        }
    }

    func viewModel(at index: Int) -> ContactViewModel {
        return contactViewModelList[index]
    }

    func createContact(firstName: String, lastName: String,
                                 success: ((ContactViewModel, Int) -> Void)?,
                                 failure: (() -> Void)?) {
        do {
            let contact = try dataManager.createContact(firstName: firstName, lastName: lastName)
            let contactViewModel = ContactViewModel(fullName: contact.fullName)
            let insertionIndex = contactViewModelList.insertionIndex(of: contactViewModel) { $0 < $1 }
            contactViewModelList.insert(contactViewModel, at: insertionIndex)
            success?(contactViewModel, insertionIndex)
        } catch {
            failure?()
        }
    }

}
Note: MVVM is not clear about how view models are created. For a more layered architecture, I prefer to create a ViewModelController, which is responsible for interacting with the Model layer and creating view model instances.
First thing to remember as a rule of thumb: the View Model layer is not responsible for user interface. A way to guarantee that you're not messing things up is to never import UIKit in a view model file.
The ContactViewModelController class retrieves contacts from the local storage and tries to not expose the model layer. It returns the data formatted in the way that the view asks, and notifies the view that there are changes in the data source when a new contact is added.
In a real-world scenario, this would involve performing a network request besides inserting in a local database. But none of them should be a view model role anyway - networking and database should have their own managers.
That's it for MVVM. You may find this approach more testable, maintainable and distributed than the usual MVC. So let's talk about VIPER and check how the two compare.
VIPER
How it works
VIPER is an application of the Clean Architecture to iOS projects. It stands for View, Interactor, Presenter, Entity, and Router. It's a really segmented way to divide responsibilities, fits very well with unit testing and makes your code more reusable.
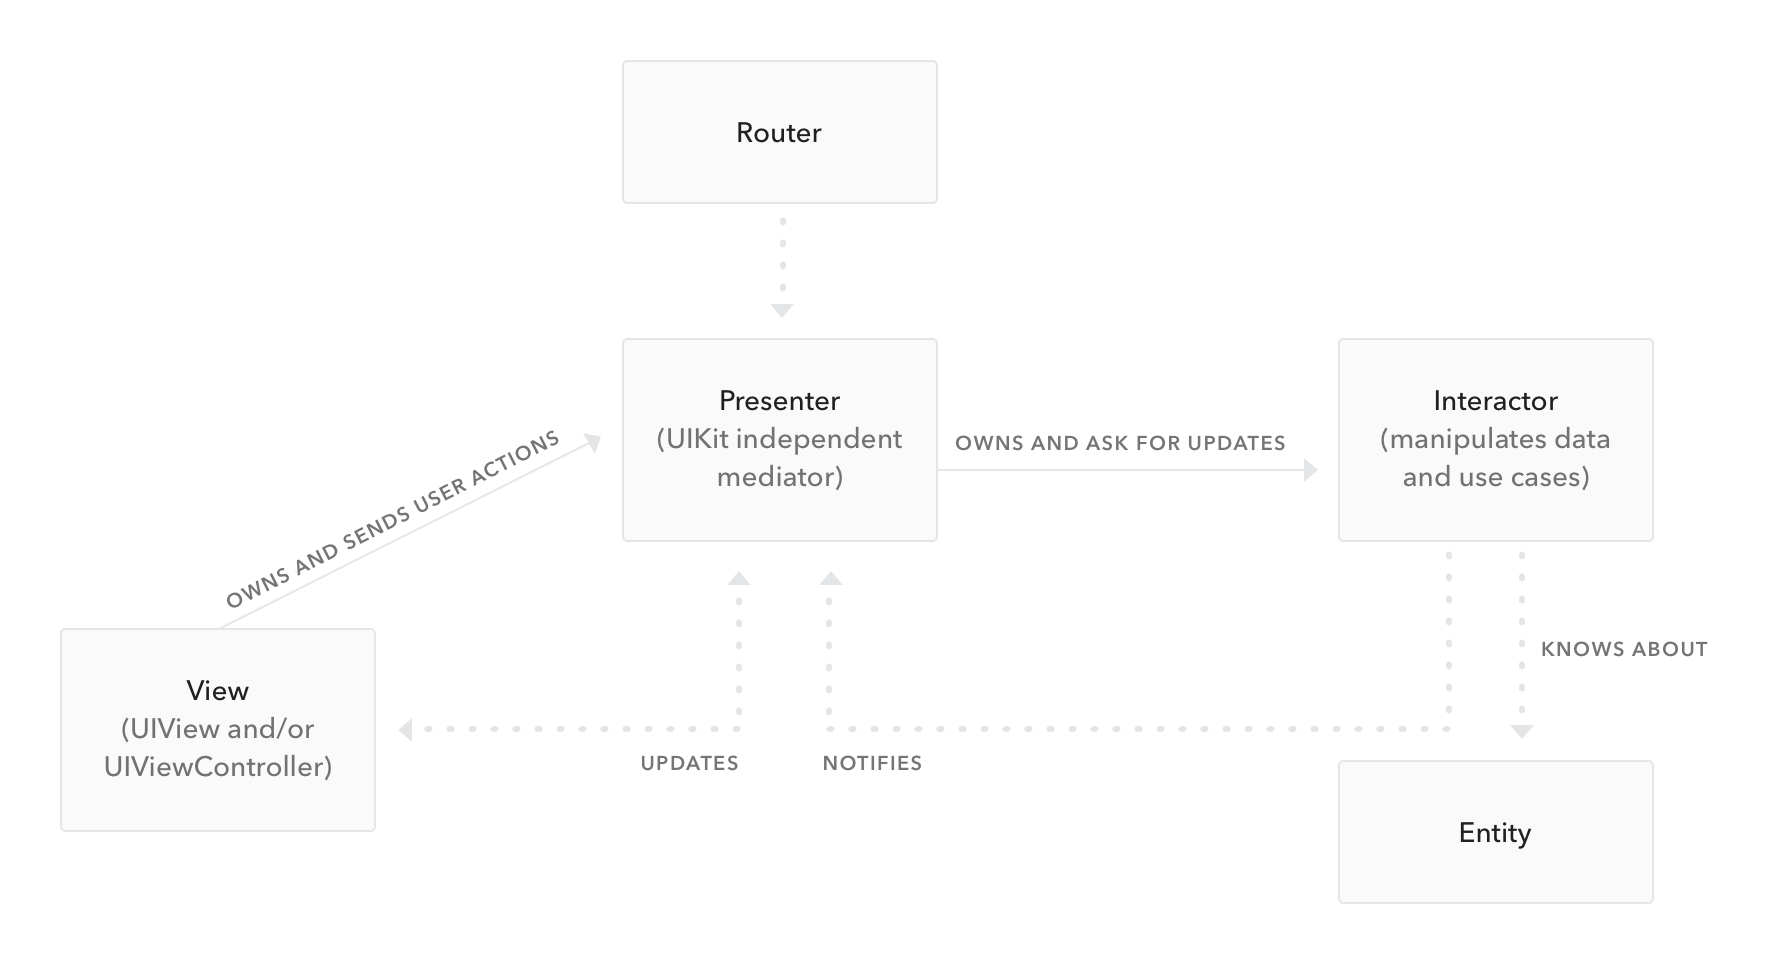
View
- It's the interface layer, which means UIKit files (including UIViewController). At this point, it's quite clear that UIViewController subclasses should belong to the view layer in a more decoupled architecture. In VIPER, things are basically the same of those in MVVM: views are responsible for displaying what the presenter asks them to, and to transmit user input back to the presenter.
Interactor
- Contains the business logic described by the use cases in the application. The interactor is responsible for fetching data from the model layer (using network or local database), and its implementation is totally independent of the user interface. It's important to remember that network and database managers are not part of VIPER, so they are treated as separated dependencies.
Presenter
- Contains view logic to format data to be displayed. In MVVM, this is part of the job done by the ViewModelController in our example. The presenter receives data from the interactor, creates a view model instance and carries it to the View. Also, it reacts to user inputs, asking for more data or sending it back to the interactor.
Entity
- Has part of the responsibilities of the model layer in the other architectures. Entities are plain data objects, with no business logic, managed by the interactor and by the data managers.
Router
- The navigation logic of the application. It might not seem an important layer, but if you have to reuse the same iPhone views in a iPad application, the only thing that might change is the way that the views are presented. This lets your other layers remain untouched, and the Router is responsible for the navigation flow in each situation.
Comparing to MVVM, Viper has a few key differences in the distribution of responsibilities:
- It introduces router, the layer responsible for the navigation flow, removing it from the View.
- Entities are plain data structures, transferring the access logic that usually belongs to model to the interactor.
- ViewModelController responsibilities are shared between interactor and presenter.
Again, it's time to get our hands dirty and explore the VIPER architecture with an example app. For the sake of simplicity, we will explore only the Contact List module. The code for the Add Contact module can be found in the starter project (VIPER Contacts Starter folder in this repository).
Note: If you consider making your application based in VIPER, please do not create all files manually - you can check a VIPER code generator like VIPER gen or Generamba.
Contacts App
View
The view is represented by the elements in the Main.storyboard file and the ContactListView class. It is passive; only passes interface events along to the presenter, and updates itself when notified by the presenter. Replace the content in ContactListView.swift with the following code:
import UIKit

class ContactListView: UIViewController {

    @IBOutlet var tableView: UITableView!
    var presenter: ContactListPresenterProtocol?
    var contactList: [ContactViewModel] = []

    override func viewDidLoad() {
        super.viewDidLoad()
        presenter?.viewDidLoad()

        tableView.tableFooterView = UIView()
    }

    @IBAction func didClickOnAddButton(_ sender: UIBarButtonItem) {
        presenter?.addNewContact(from: self)
    }

}

extension ContactListView: ContactListViewProtocol {

    func reloadInterface(with contacts: [ContactViewModel]) {
        contactList = contacts
        tableView.reloadData()
    }

    func didInsertContact(_ contact: ContactViewModel) {
        let insertionIndex = contactList.insertionIndex(of: contact) { $0 < $1 }
        contactList.insert(contact, at: insertionIndex)

        let indexPath = IndexPath(row: insertionIndex, section: 0)
        tableView.beginUpdates()
        tableView.insertRows(at: [indexPath], with: .right)
        tableView.endUpdates()
    }

}

extension ContactListView: UITableViewDataSource {

    func tableView(_ tableView: UITableView, cellForRowAt indexPath: IndexPath) -> UITableViewCell {
        guard let cell = tableView.dequeueReusableCell(withIdentifier: "ContactCell") else {
            return UITableViewCell()
        }
        cell.textLabel?.text = contactList[(indexPath as NSIndexPath).row].fullName
        return cell
    }

    func tableView(_ tableView: UITableView, numberOfRowsInSection section: Int) -> Int {
        return contactList.count
    }

}
The view sends viewDidLoad and didClickOnAddButton events to the presenter. In the former, the presenter will ask the interactor for data; in the latter, the presenter will ask the route layer to present the Add Contact module.
Methods from ContactListViewProtocol are called from the presenter, either when the contact list is retrieved or when a new contact is added. In both situations, the data in the view only contains the information needed for display.
Finally, there are the implementations of the UITableViewDataSource methods, updating the interface elements with the retrieved data.
Interactor
The interactor in our example is quite simple. It only asks the local data manager for data - it does not care if the local manager is using Core Data, Realm or any other data storage solution. The following code is part of the ContactListInteractor.swift file:
class ContactListInteractor: ContactListInteractorInputProtocol {
    weak var presenter: ContactListInteractorOutputProtocol?
    var localDatamanager: ContactListLocalDataManagerInputProtocol?

    func retrieveContacts() {
        do {
            if let contactList = try localDatamanager?.retrieveContactList() {
                presenter?.didRetrieveContacts(contactList)
            } else {
                presenter?.didRetrieveContacts([])
            }

        } catch {
            presenter?.didRetrieveContacts([])
        }
    }

}
After retrieving data, the interactor notifies the presenter and sends what was retrieved. As an alternative for this implementation, the interactor can also propagate the error to the presenter, which will then be responsible for formatting a error object to be displayed in the view.
Note: As you may have noticed, each layer in VIPER is implementing a protocol. This way, classes depend on abstractions instead of concretions, conforming to the Dependency Inversion principle.
Presenter
This is the central point in the VIPER architecture. The communication between view and the other layers (interactor and router) passes through the presenter. Let's see how things work by placing the following code in the ContactListPresenter.swift file.
class ContactListPresenter: ContactListPresenterProtocol {
    weak var view: ContactListViewProtocol?
    var interactor: ContactListInteractorInputProtocol?
    var wireFrame: ContactListWireFrameProtocol?

    func viewDidLoad() {
        interactor?.retrieveContacts()
    }

    func addNewContact(from view: ContactListViewProtocol) {
        wireFrame?.presentAddContactScreen(from: view)
    }

}

extension ContactListPresenter: ContactListInteractorOutputProtocol {

    func didRetrieveContacts(_ contacts: [Contact]) {
        view?.reloadInterface(with: contacts.map() {
            return ContactViewModel(fullName: $0.fullName)
        })
    }

}

extension ContactListPresenter: AddModuleDelegate {

    func didAddContact(_ contact: Contact) {
        let contactViewModel = ContactViewModel(fullName: contact.fullName)
        view?.didInsertContact(contactViewModel)
    }

    func didCancelAddContact() {}

}
When the view is loaded, it notifies the presenter, which asks the interactor for data. When the add button is clicked, it notifies the presenter, which asks the router layer to show the add contacts screen.
Also, when the contacts list is retrieved, the presenter formats the data and sends it back to the view. It is also responsible for implementing the Add Contact module delegate. This means that the presenter will be notified when a new contact is added, format it and send it to the view.
As you may have noticed, presenters might get large. When this happens, it is interesting to separate it into two pieces: the presenter, which will only receive data and format it back to the view; and event handler, which will respond to interface events.
Entity
This layer is similar to the Model layer in MVVM. In our contacts app, it is represented by the Contact class and its operator overloading functions. Replace the Contact.swift file with the following code:
import CoreData

open class Contact: NSManagedObject {

    var fullName: String {
        get {
            var name = ""
            if let firstName = firstName {
                name += firstName
            }
            if let lastName = lastName {
                name += " " + lastName
            }
            return name
        }
    }

}

public struct ContactViewModel {
    var fullName = ""
}

public func <(lhs: ContactViewModel, rhs: ContactViewModel) -> Bool {
    return lhs.fullName.lowercased() < rhs.fullName.lowercased()
}

public func >(lhs: ContactViewModel, rhs: ContactViewModel) -> Bool {
    return lhs.fullName.lowercased() > rhs.fullName.lowercased()
}
The view model contains the fields that the presenter formats and view needs to display. The Contact class is a subclass of NSManagedObject, containing the entity fields exactly as it is in the Core Data model.
Router
Last but not least, there is the router layer. The responsibility of navigating between modules is shared between the presenter and the wireframe. The presenter receives the user input and knows when to navigate, and the wireframe knows how to navigate. Replace the ContactListWireFrame.swift file with the following code.
import UIKit

class ContactListWireFrame: ContactListWireFrameProtocol {

    class func createContactListModule() -> UIViewController {
        let navController = mainStoryboard.instantiateViewController(withIdentifier: "ContactsNavigationController")
        if let view = navController.childViewControllers.first as? ContactListView {
            let presenter: ContactListPresenterProtocol & ContactListInteractorOutputProtocol = ContactListPresenter()
            let interactor: ContactListInteractorInputProtocol = ContactListInteractor()
            let localDataManager: ContactListLocalDataManagerInputProtocol = ContactListLocalDataManager()
            let wireFrame: ContactListWireFrameProtocol = ContactListWireFrame()

            view.presenter = presenter
            presenter.view = view
            presenter.wireFrame = wireFrame
            presenter.interactor = interactor
            interactor.presenter = presenter
            interactor.localDatamanager = localDataManager

            return navController
        }
        return UIViewController()
    }

    static var mainStoryboard: UIStoryboard {
        return UIStoryboard(name: "Main", bundle: Bundle.main)
    }

    func presentAddContactScreen(from view: ContactListViewProtocol) {

        guard let delegate = view.presenter as? AddModuleDelegate else {
            return
        }

        let addContactsView = AddContactWireFrame.createAddContactModule(with: delegate)
        if let sourceView = view as? UIViewController {
            sourceView.present(addContactsView, animated: true, completion: nil)
        }
    }

}
Since the wireframe is responsible for creating a module, it is convenient to set all the dependencies here. When presenting another module, the wireframe receives the object which will present it, and asks another wireframe for the presented module. It also passes the required data for the created module (in this case, only a delegate to receive the added contact).
The router layer provides a good opportunity to avoid using storyboards segues and deal with view controller transitions on code. Since storyboards don't offer a decent solution for passing data between view controllers, this doesn't always mean more code. All we get is more reusability.
Aside: Using Auth0.swift for iOS
Auth0 is an authentication broker that supports social identity providers (Facebook, Twitter, Github, etc.) as well as enterprise identity providers (Active Directory, LDAP, Google Apps and Salesforce). In other words, you can include single sign-on, quick authentication and simple user management using only a few lines of code.
It's quite easy to integrate Auth0.swift library into an iOS project, as we will see in the next few steps:
Step 0
If you don't already have an Auth0 account, sign up for one now to follow along with the other steps. Also, create a new client in the dashboard - it's pretty easy and straightforward.
Step 1
Auth0.swift is available on CocoaPods and Carthage. Create a new project with CocoaPods or use an existing one. Then add the following line to your Podfile:
pod 'Auth0', '~> 1.9'
Then use import Auth0 in every file where you need access to Auth0.swift.
Step 2
Create a new file named Auth0.plist and add the following string entries:
- ClientId: The client ID of your Auth0 application.
- Domain: Your Auth0 account domain.
These values can be found in the client dashboard.
Step 2
If you need to support iOS versions older than 11, set up your AppDelegate class with the following code:
func application(_ app: UIApplication, open url: URL, options: [UIApplicationOpenURLOptionsKey : Any]) -> Bool {
    return Auth0.resumeAuth(url, options: options)
}
Step 3
The Auth0.webAuth() call presents a Safari window that can be used for logging in. This window is configured according to your settings in the Auth0 dashboard and can include social logins, passwordless logins, traditional username/password databases and much more.
Auth0
    .webAuth()
    .audience("https://{YOUR_AUTH0_DOMAIN}/userinfo")
    .start { result in
        switch result {
        case .success(let credentials):
            print("Obtained credentials: (credentials)")
        case .failure(let error):
            print("Failed with (error)")
        }
    }
You can call this function from any the view controllers.
Then you'll see a beautiful and customizable login screen. And that's it - your integration is done in just a few minutes.
Important API Security Note: If you want to use Auth0 authentication to authorize API requests, note that you'll need to use a specific OAuth flow depending on your use case. Auth0 issues both accessTokens and idTokens, and the latter should only be used on the client-side. Access tokens should be used to authorize APIs. You can read more about making API calls with Auth0 here.
Conclusion
You can find all projects (VIPER and MVVM - Starter and Final) in this repository.
As you can see, MVVM and VIPER might be different, but are not necessarily exclusive. The MVVM pattern only says that, besides view and model, there should be a view model layer. But it doesn't say how this view model is created, nor how the data is retrieved - not all responsibilities are clearly defined. It's open and can be implemented in many different ways.
On the other hand, VIPER is a very specific software architecture. It contains layers with their own responsibilities and is less open to change. As we saw in this example, VIPER can also use view models, which are created by its presentation layer.
When it comes to choosing one or the other, there's no silver bullet - but certainly a few pieces of advice. If you are in a long-term project with well-defined requirements and intend to reuse components, then VIPER is definitely a better option. The clearer separation of concerns improves testability and reusability.
But if you are prototyping or in a shorter project with no need to reuse components, MVVM is a better fit. With VIPER, you might need to create a lot of classes and protocols for small responsibilities (think of an "About Us" screen). MVVM generally produces much less code due to its not-so-clear separation of concerns and can avoid some overhead created by VIPER. Your code will definitely be easier to write, and still be easy to test and maintain.