Your users' most trustworthy interaction with your business is when they type each letter on their keyboard to enter their username and password into your login box. After they hit enter and send this confidential information through the internet tubes, they trust that your application has done everything possible to keep their data safe from bad actors.
Even with proper protocols, expert attackers still find shortcuts and backdoors to access users' credentials and confidential information. The good news is you can add another layer of protection for your users by adding Multi-factor Authentication (MFA) to your Application. MFA lets you add another factor to verify so users can prove who they say they are. There are several types of MFA methods. Some of them are SMS-based, One-time passwords (OTP), Authenticator apps, and Biometrics, to name a few.
To learn more about MFA methods, check out this MFA Guide.
Today, you will add SMS-based MFA with Auth0 using Twilio as the SMS provider. Twilio is a popular customer engagement platform that you can easily integrate with Auth0.
If you prefer, you can also watch this video on the same topic:
What Will You Need?
- An Auth0 Account. If you don't have one, you can register for free
- A Twilio Account
- A mobile phone
Set Up and Configure Auth0 React Demo Application
If you already have a Single Page Application registered in your Auth0 dashboard, you can skip to Create Twilio Account and Get Credentials.
Clone the demo application
Start by cloning the Auth0 React SDK Sample Application from GitHub. This is a sample React app set up and connected with Auth0. Once you have the Application installed on your machine cd into auth0-react-samples then again into Sample-01, use npm to install the project's dependencies.
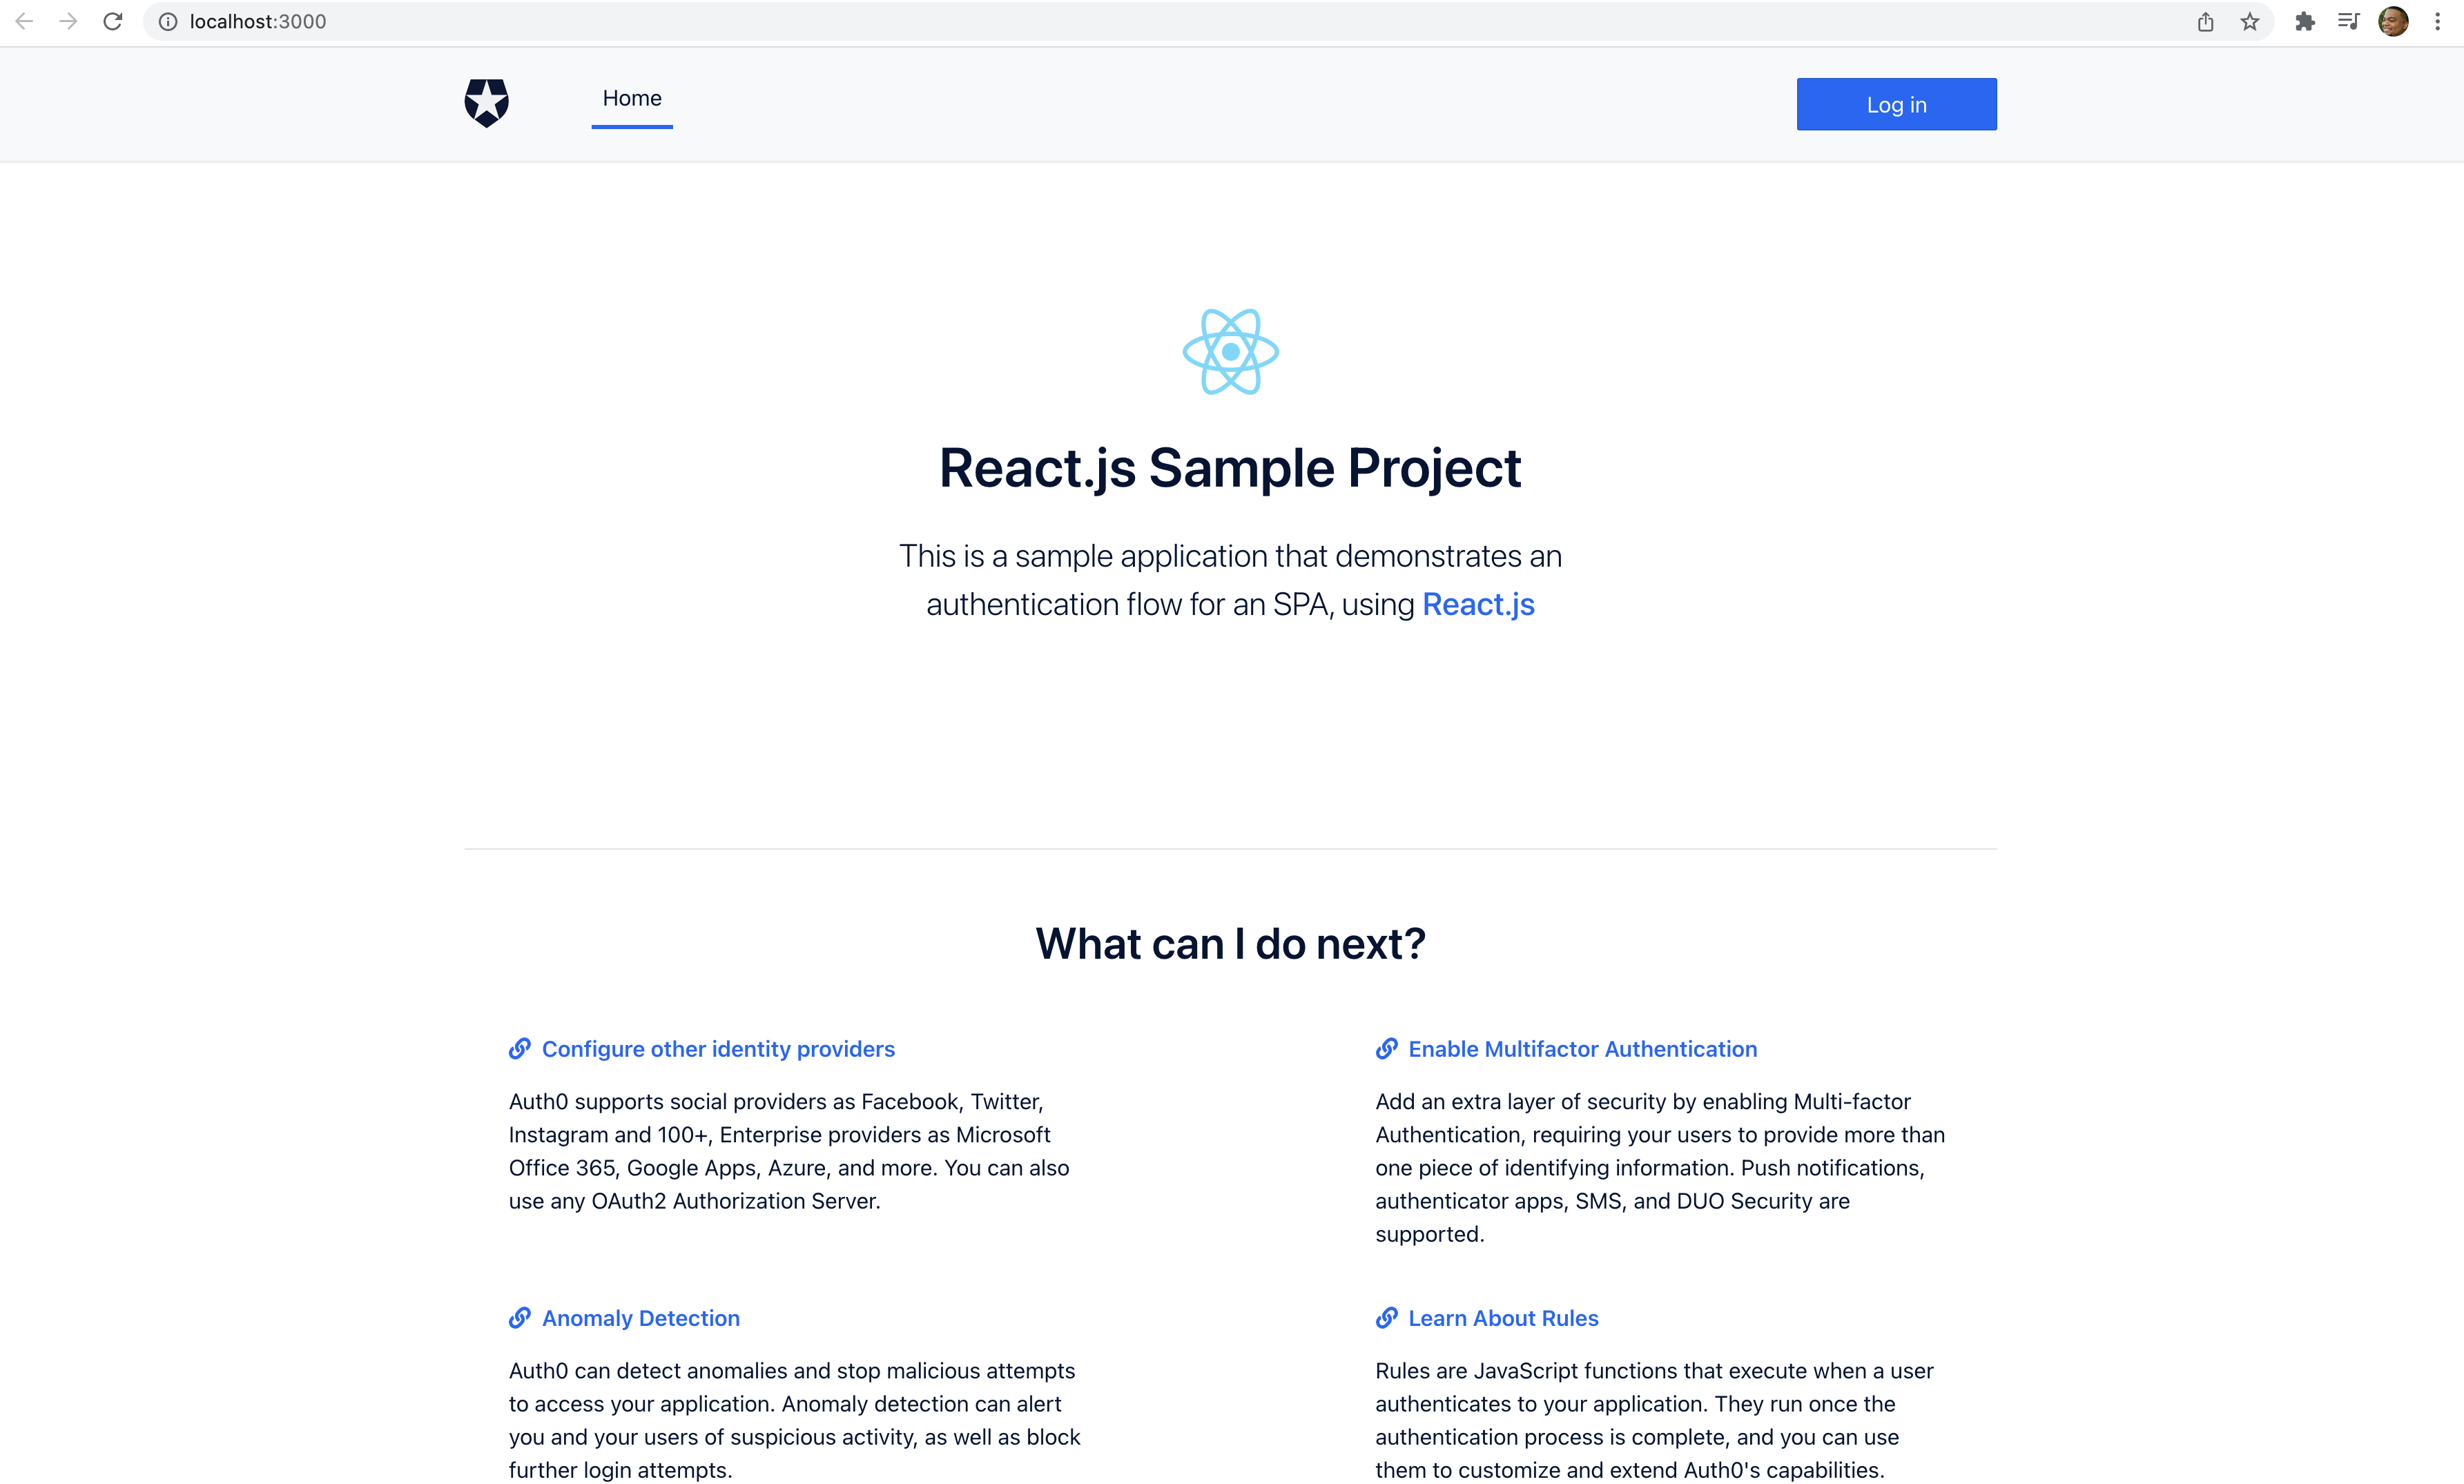
npm install
Once the dependencies are finished installing, run npm run dev in your terminal and in your browser visit http://localhost:3000, if it doesn't automatically start. Now you'll see the React sample project with a login button in the upper right corner of the screen.
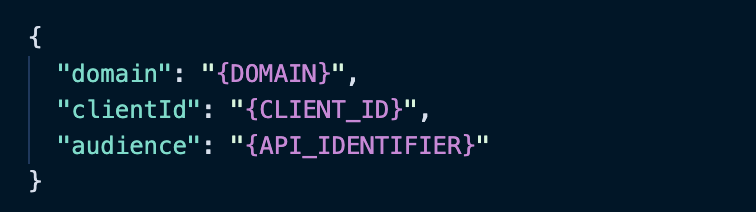
In the project's src folder, you'll find the auth_config.json.example file. There's a JSON object with placeholder values inside this file. Copy it, then create a new file in the same folder named auth_config.json. With this file created, you need to replace the placeholder values with your own credentials from the Auth0 dashboard.
Get Credentials from Auth0 Dashboard
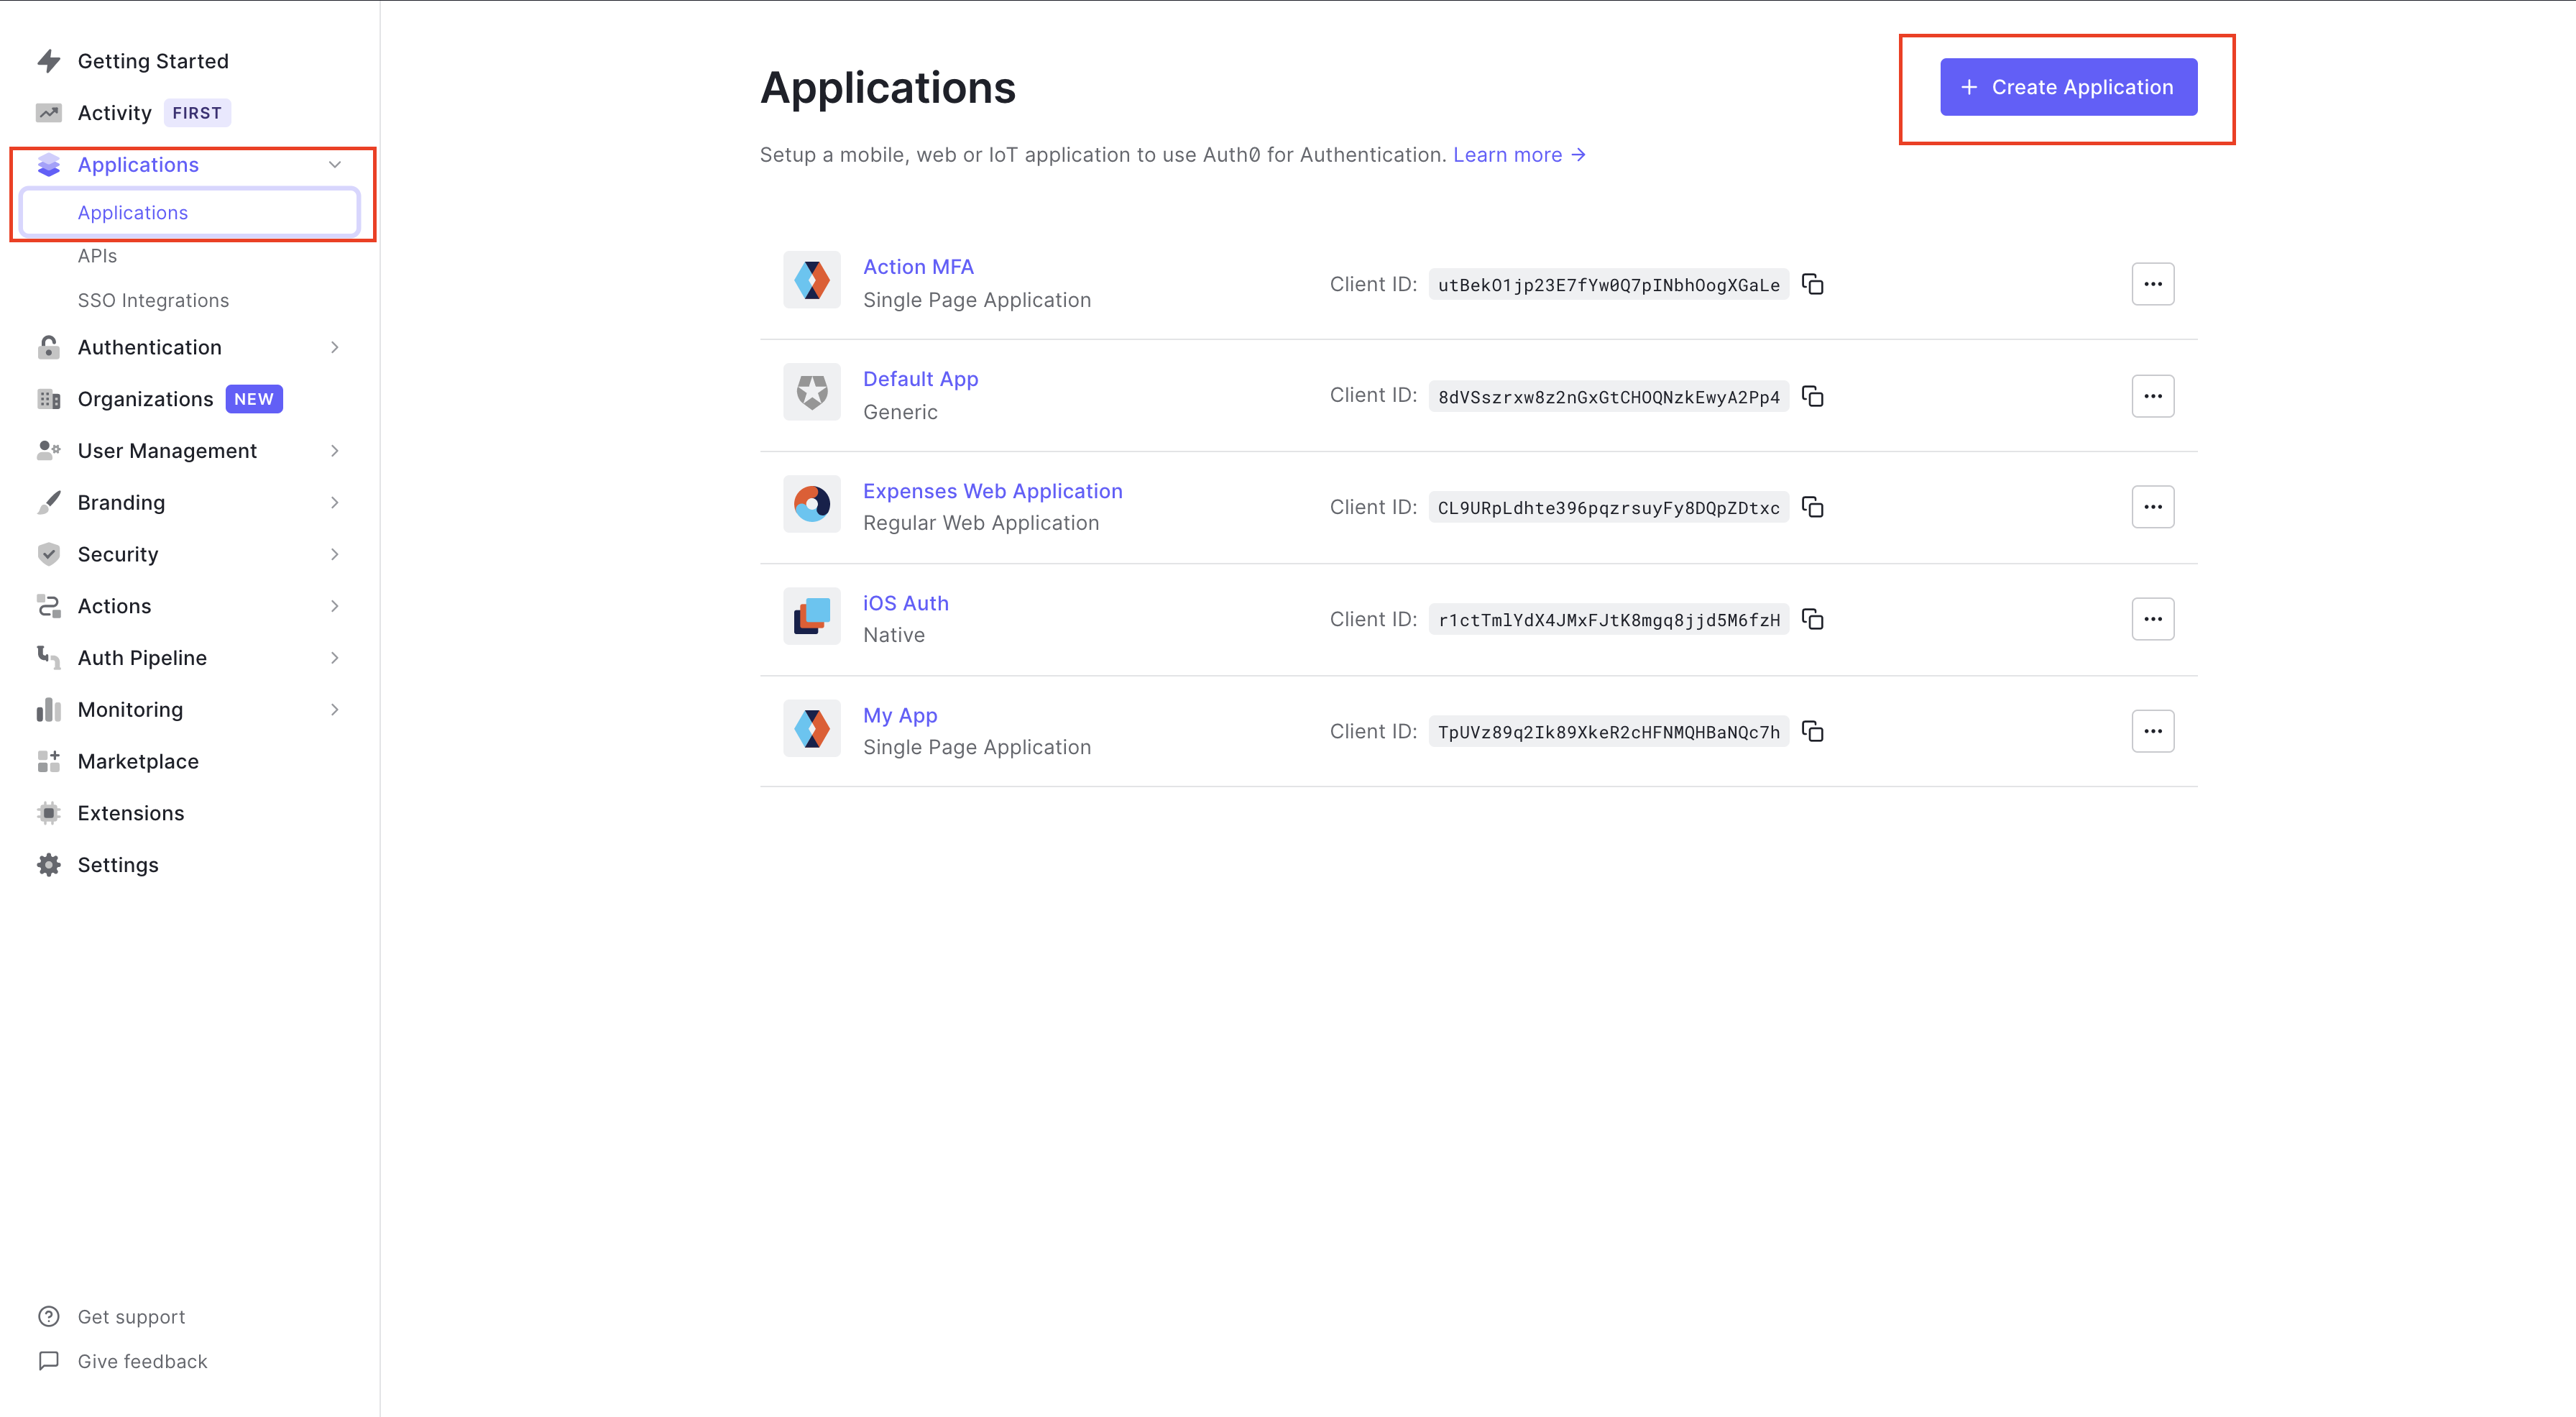
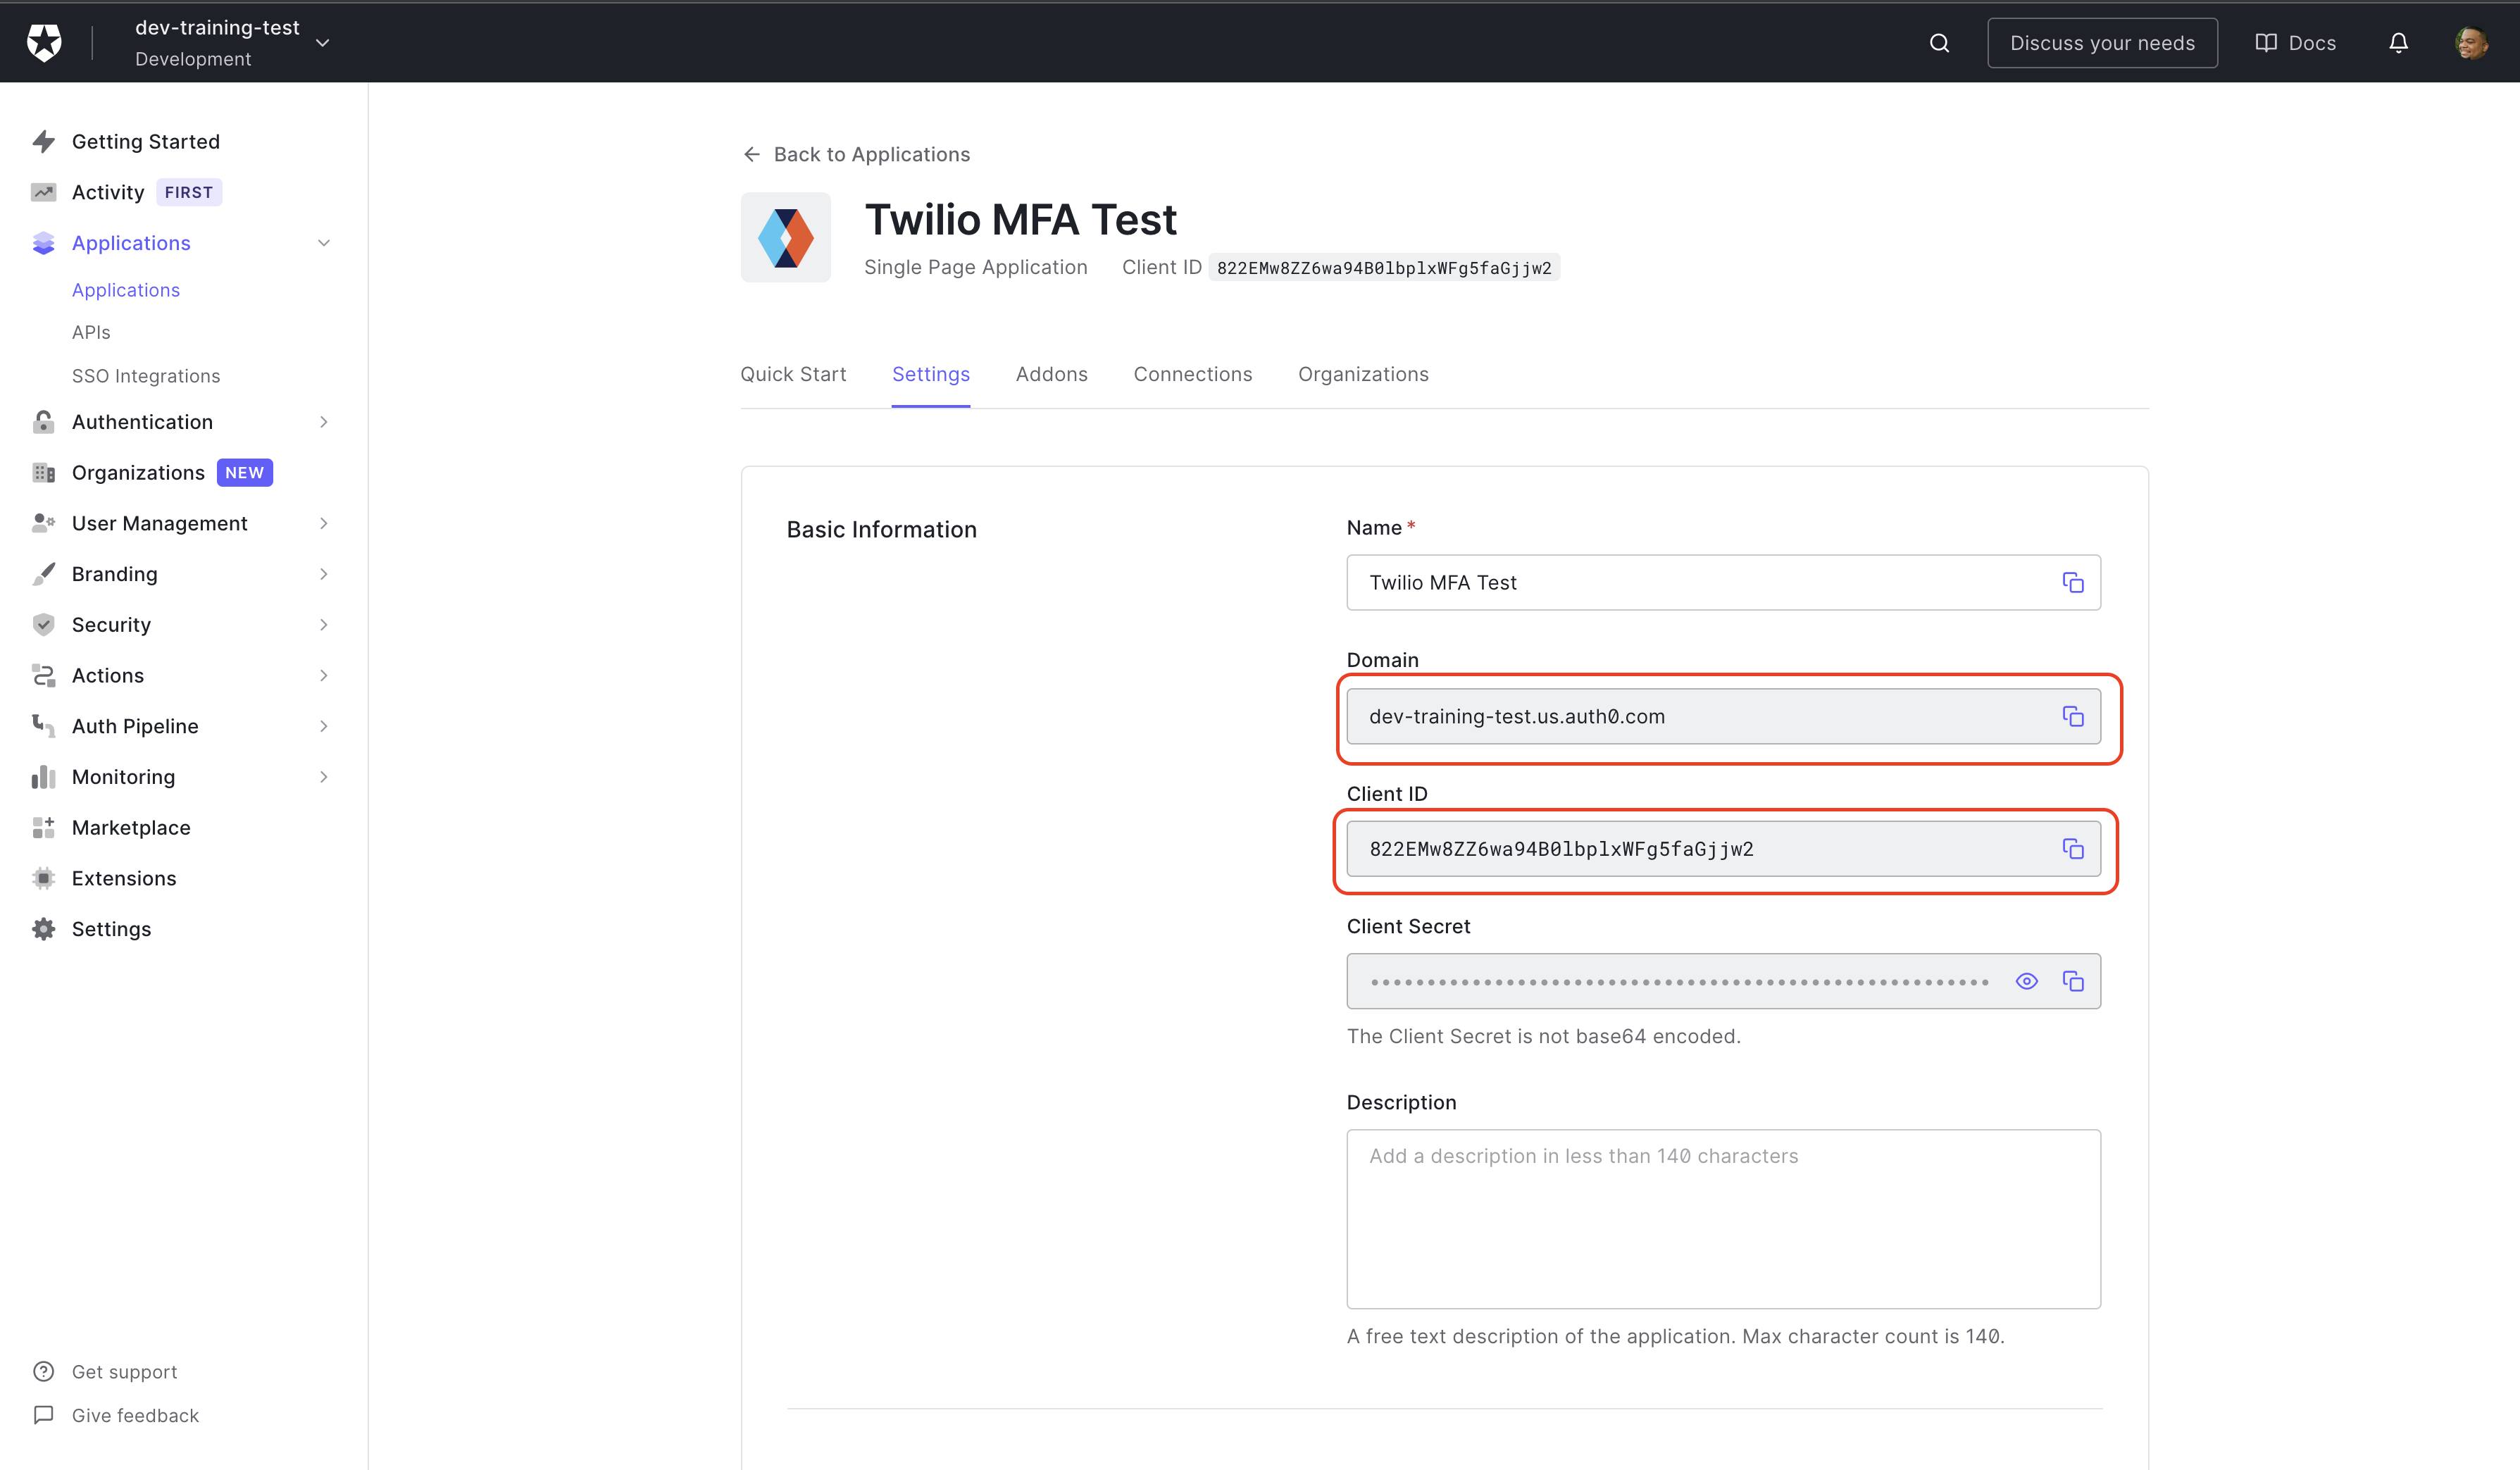
Now go to your Auth0 Dashboard; click Applications, then click Applications again when the options dropdown on the right-side panel. Click Create Application if you don't already have an application in your Auth0 account.
On the Create Application screen, you'll give your Application a name. You can use "Twilio MFA Test."
Next, you'll choose the application type; select Single Page Application since this is a React application. Then click Create.

Since you already have the sample application on your machine, skip Quick Start and click Settings. This is where you will find the Domain and Client ID, that you need to replace the placeholder values in the auth_config.json file. You can copy the values from the dashboard into your code editor.
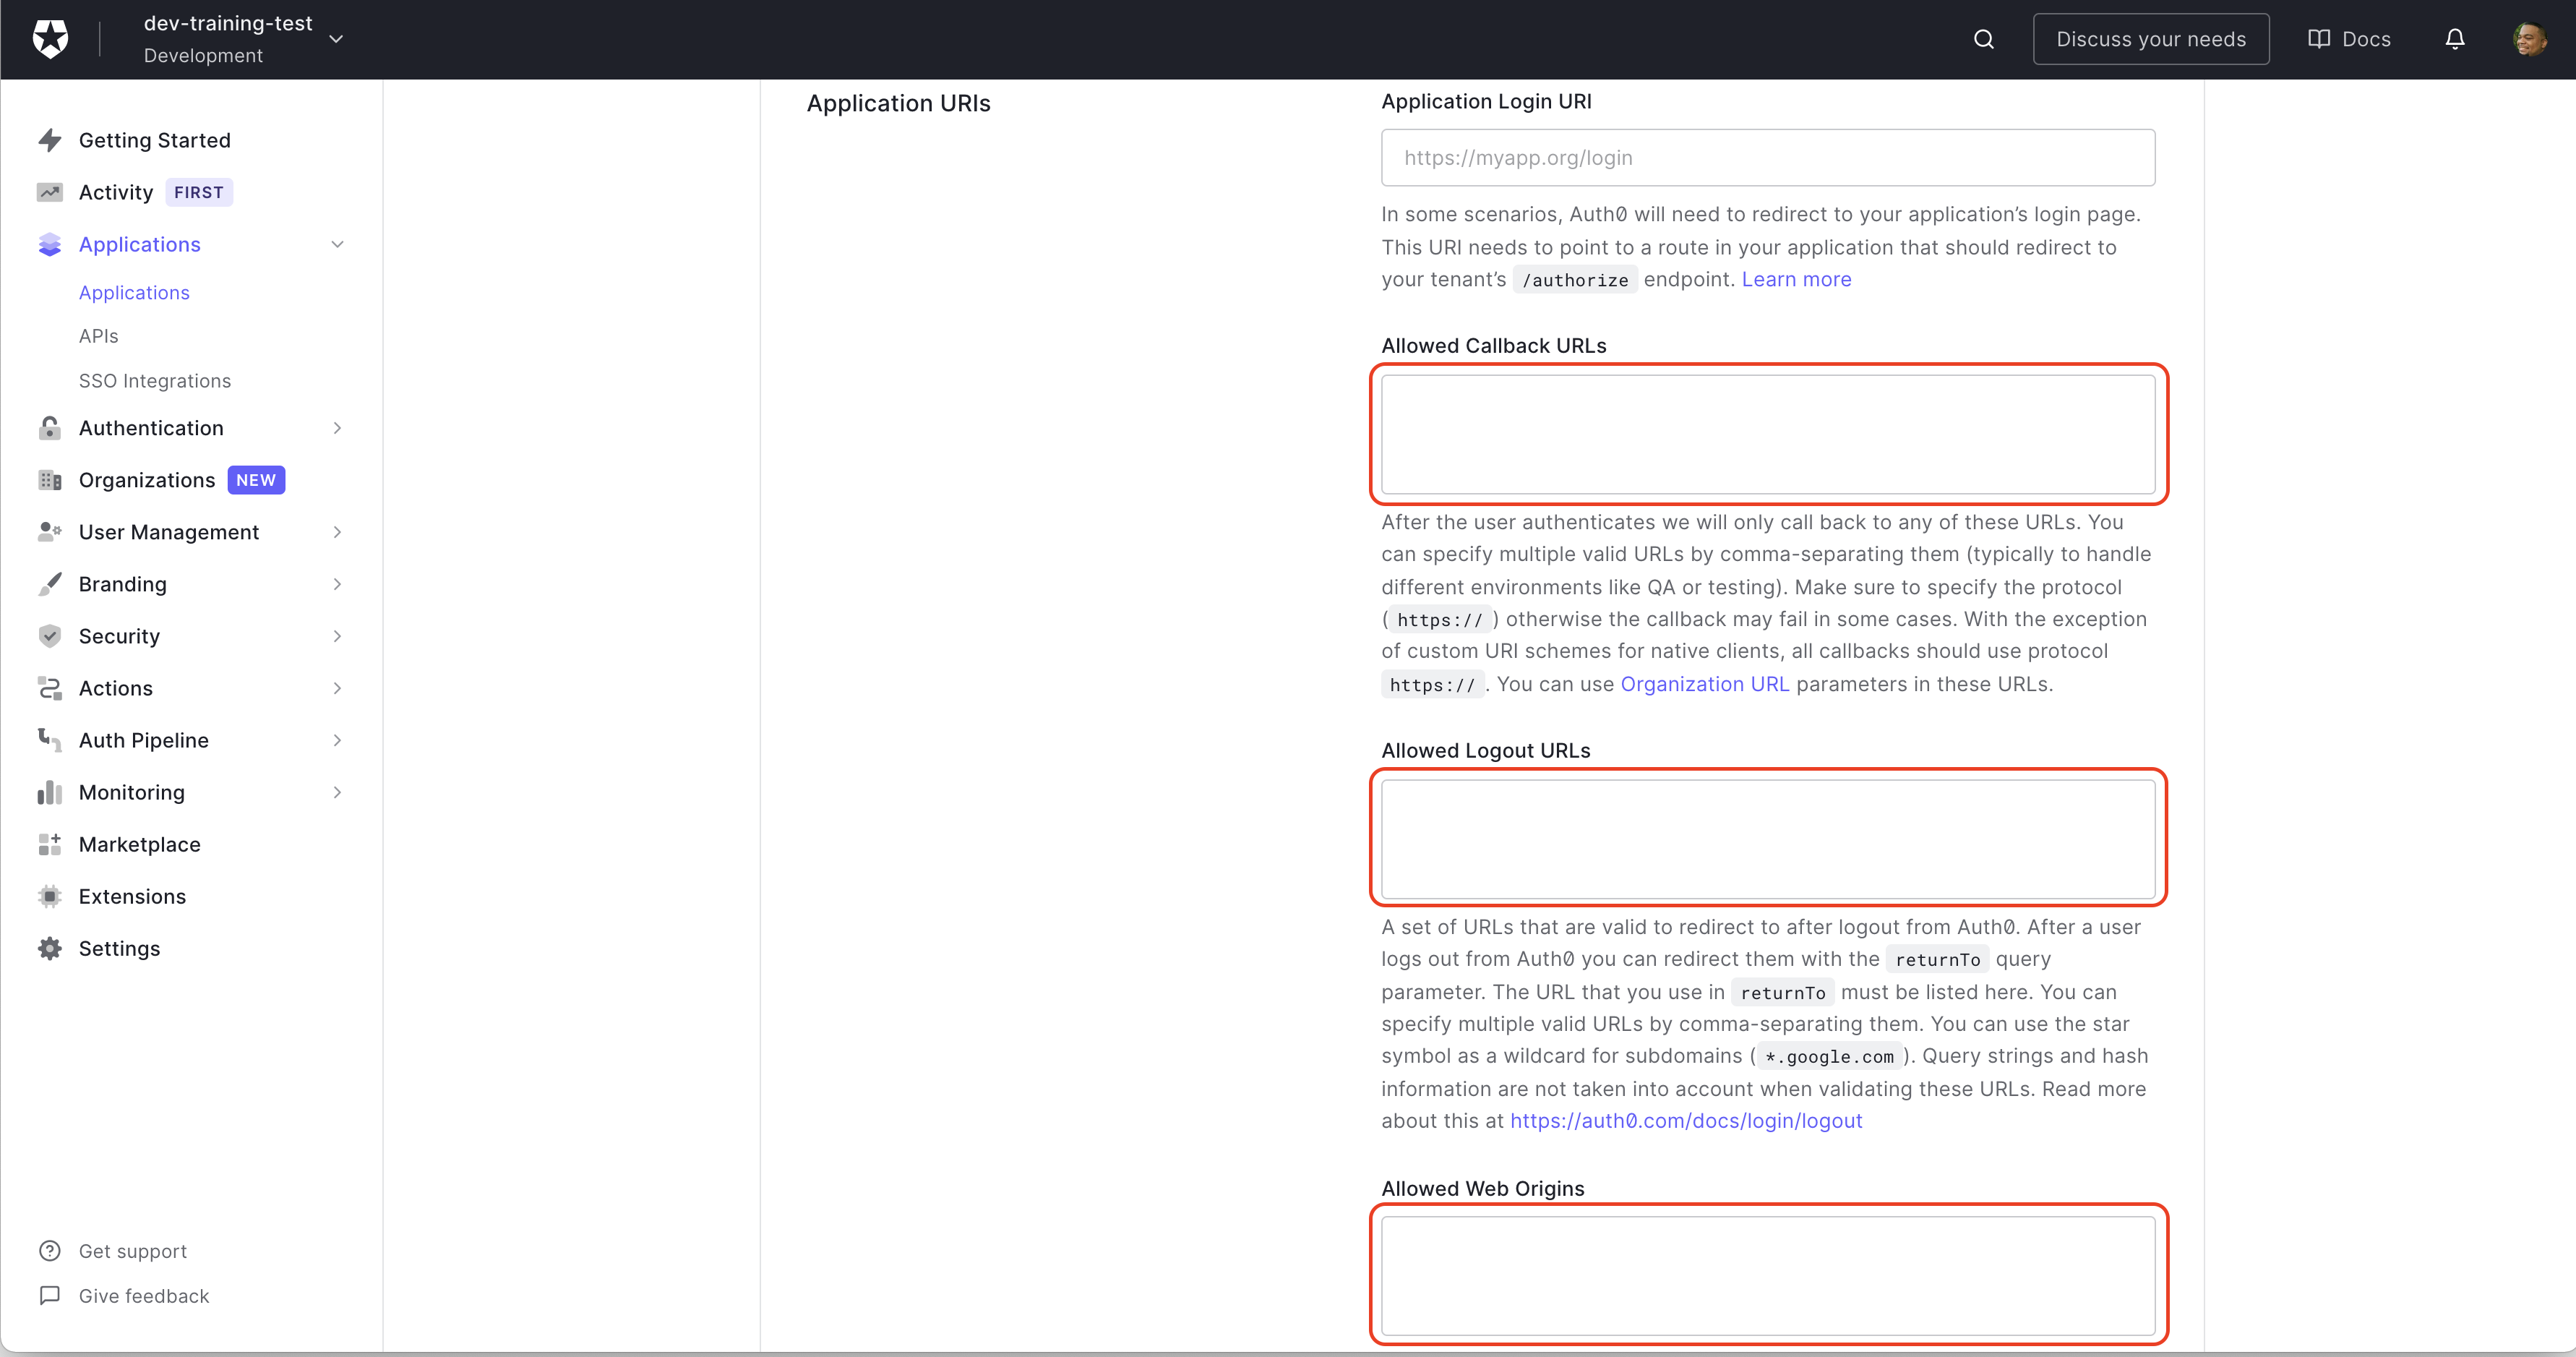
Next, scroll down to the Application URIs section to fill in Allowed Callback URLs, Allowed Logout URL, and Allowed Web Origins. This example is running locally, so enter http://localhost:3000 into each field. When you're finished, scroll to the bottom of the page and click Save Changes.
You can now run the Application locally again and click Login; enter a username and password, and the user will be successfully authenticated with Auth0. As you may have noticed the username and the password are the only factor being used to authenticate users. Make your application more secure by adding another factor for the user to verify. Twilio can add SMS-based authentication. You'll set that up next.
Create Twilio Account and Get Credentials
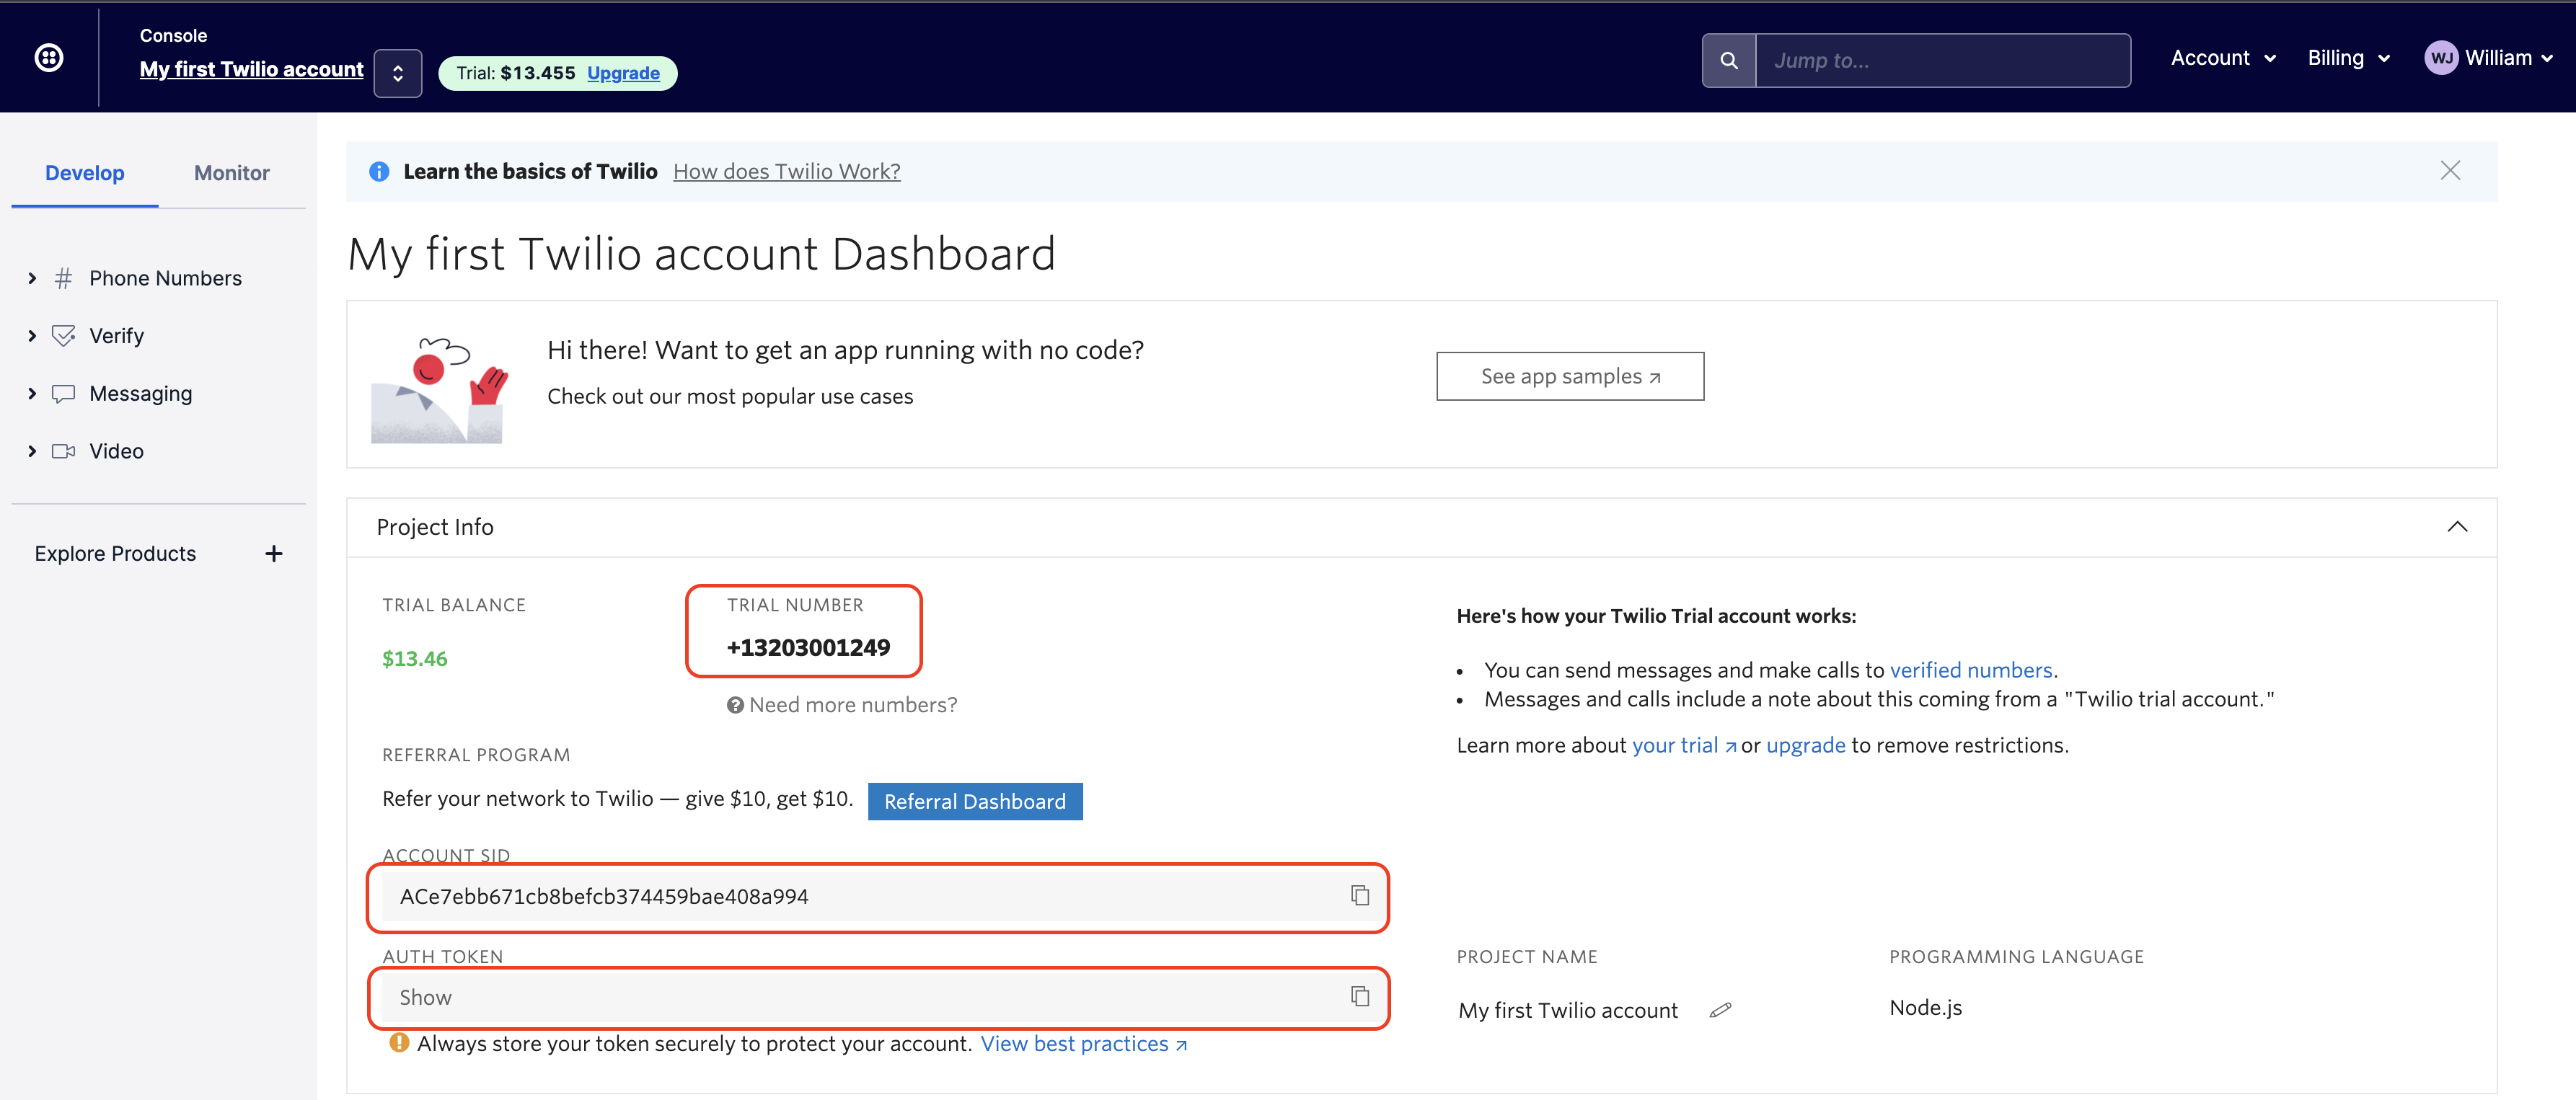
If you don't have a Twilio account already, you can create one here. Once you have created an account and logged in, you'll see the Twilio console. Here you'll see your Account SID and Auth Token, which you'll use later. The next step for a new Twilio account is getting a Twilio phone number. This will be the number that will send a one-time passcode to your user to verify and complete their authentication after they've logged in with their username and password.
Get a Twilio trial phone number
In the Twilio Console, click Get a trial phone number. You'll automatically get assigned a number click Choose this Number. This number will now show on the Project Info section under Phone Number.
Configure Auth0 to use Twilio for MFA
Back at your Auth0 dashboard, look at the ride side menu, click Security, then Multi-factor Auth. On this page, you'll be shown all the factor options that you can use with Auth0. For this Application, click on Phone Message.
The first thing you need to do on the Phone Message page is click the toggle button on the upper left side corner to enable Phone Message MFA. You'll see a pop-in notification confirming it has been enabled.
Next, you'll need to Choose a delivery provider; you'll see that Twilio is one of the listed options making it easy to connect Twilio to your Auth0 account. For Choose a delivery method, you have SMS, SMS, and Voice, or Voice to choose from. For simplicity, select SMS.
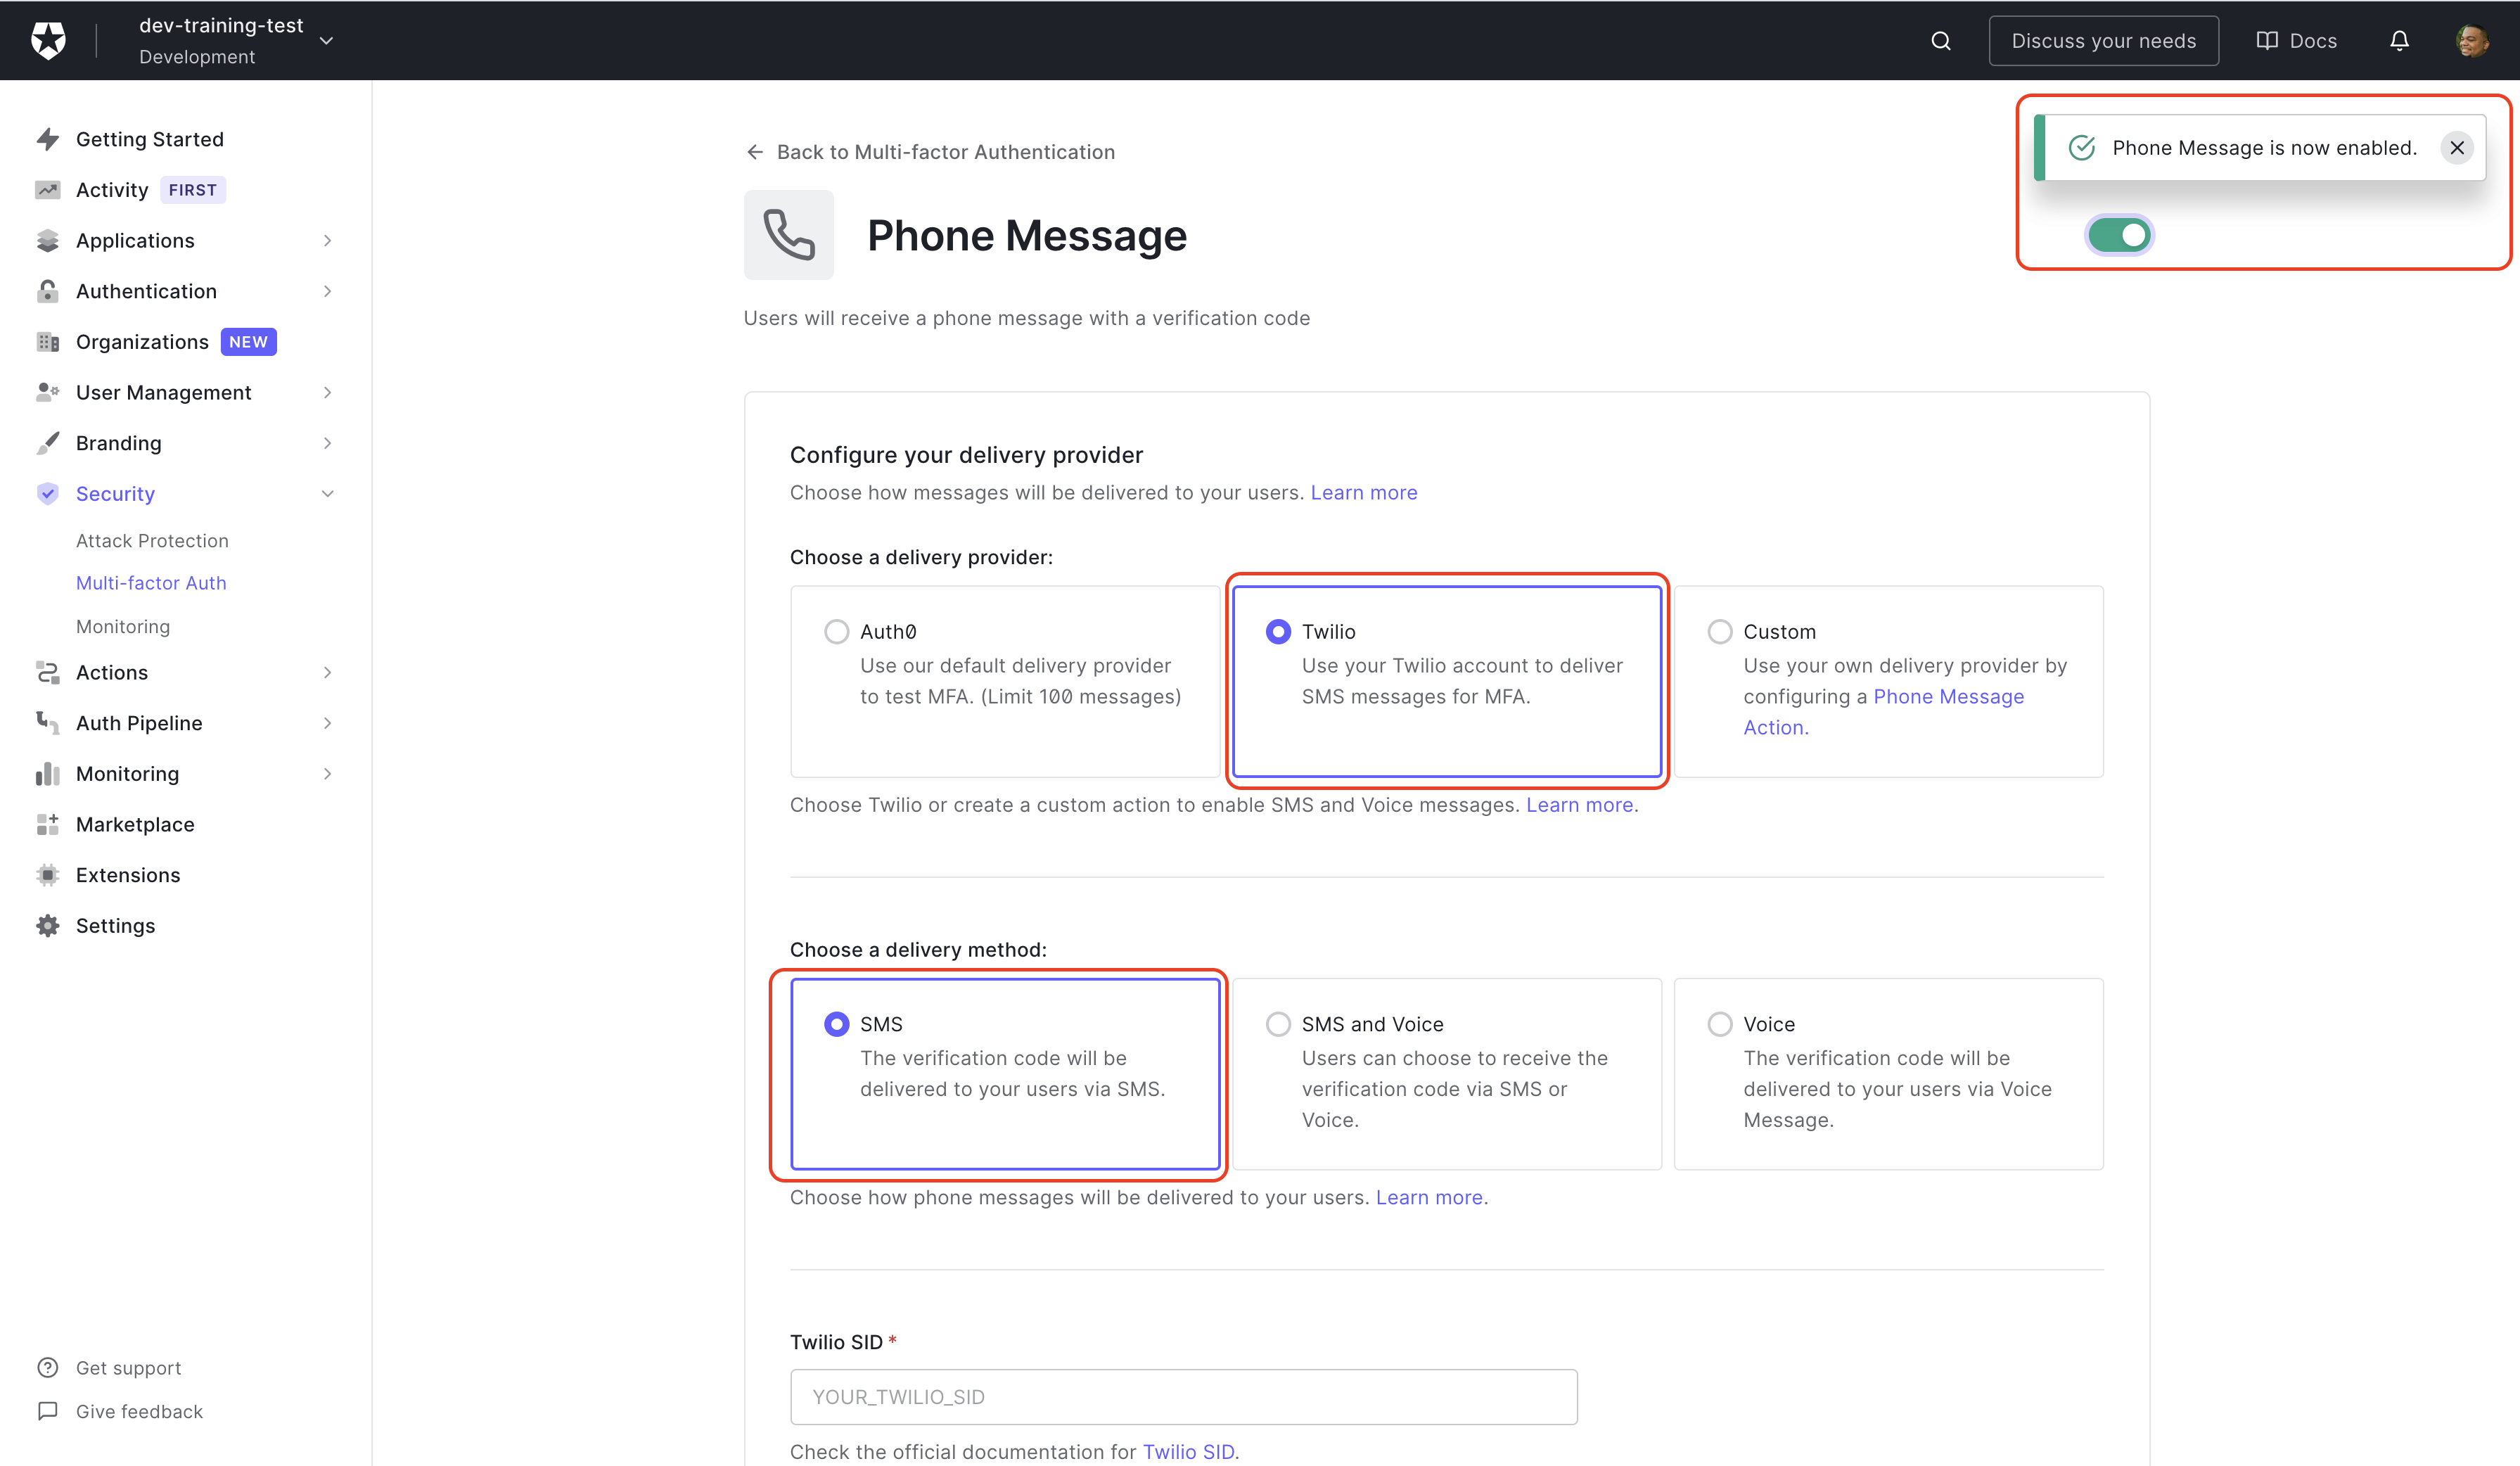
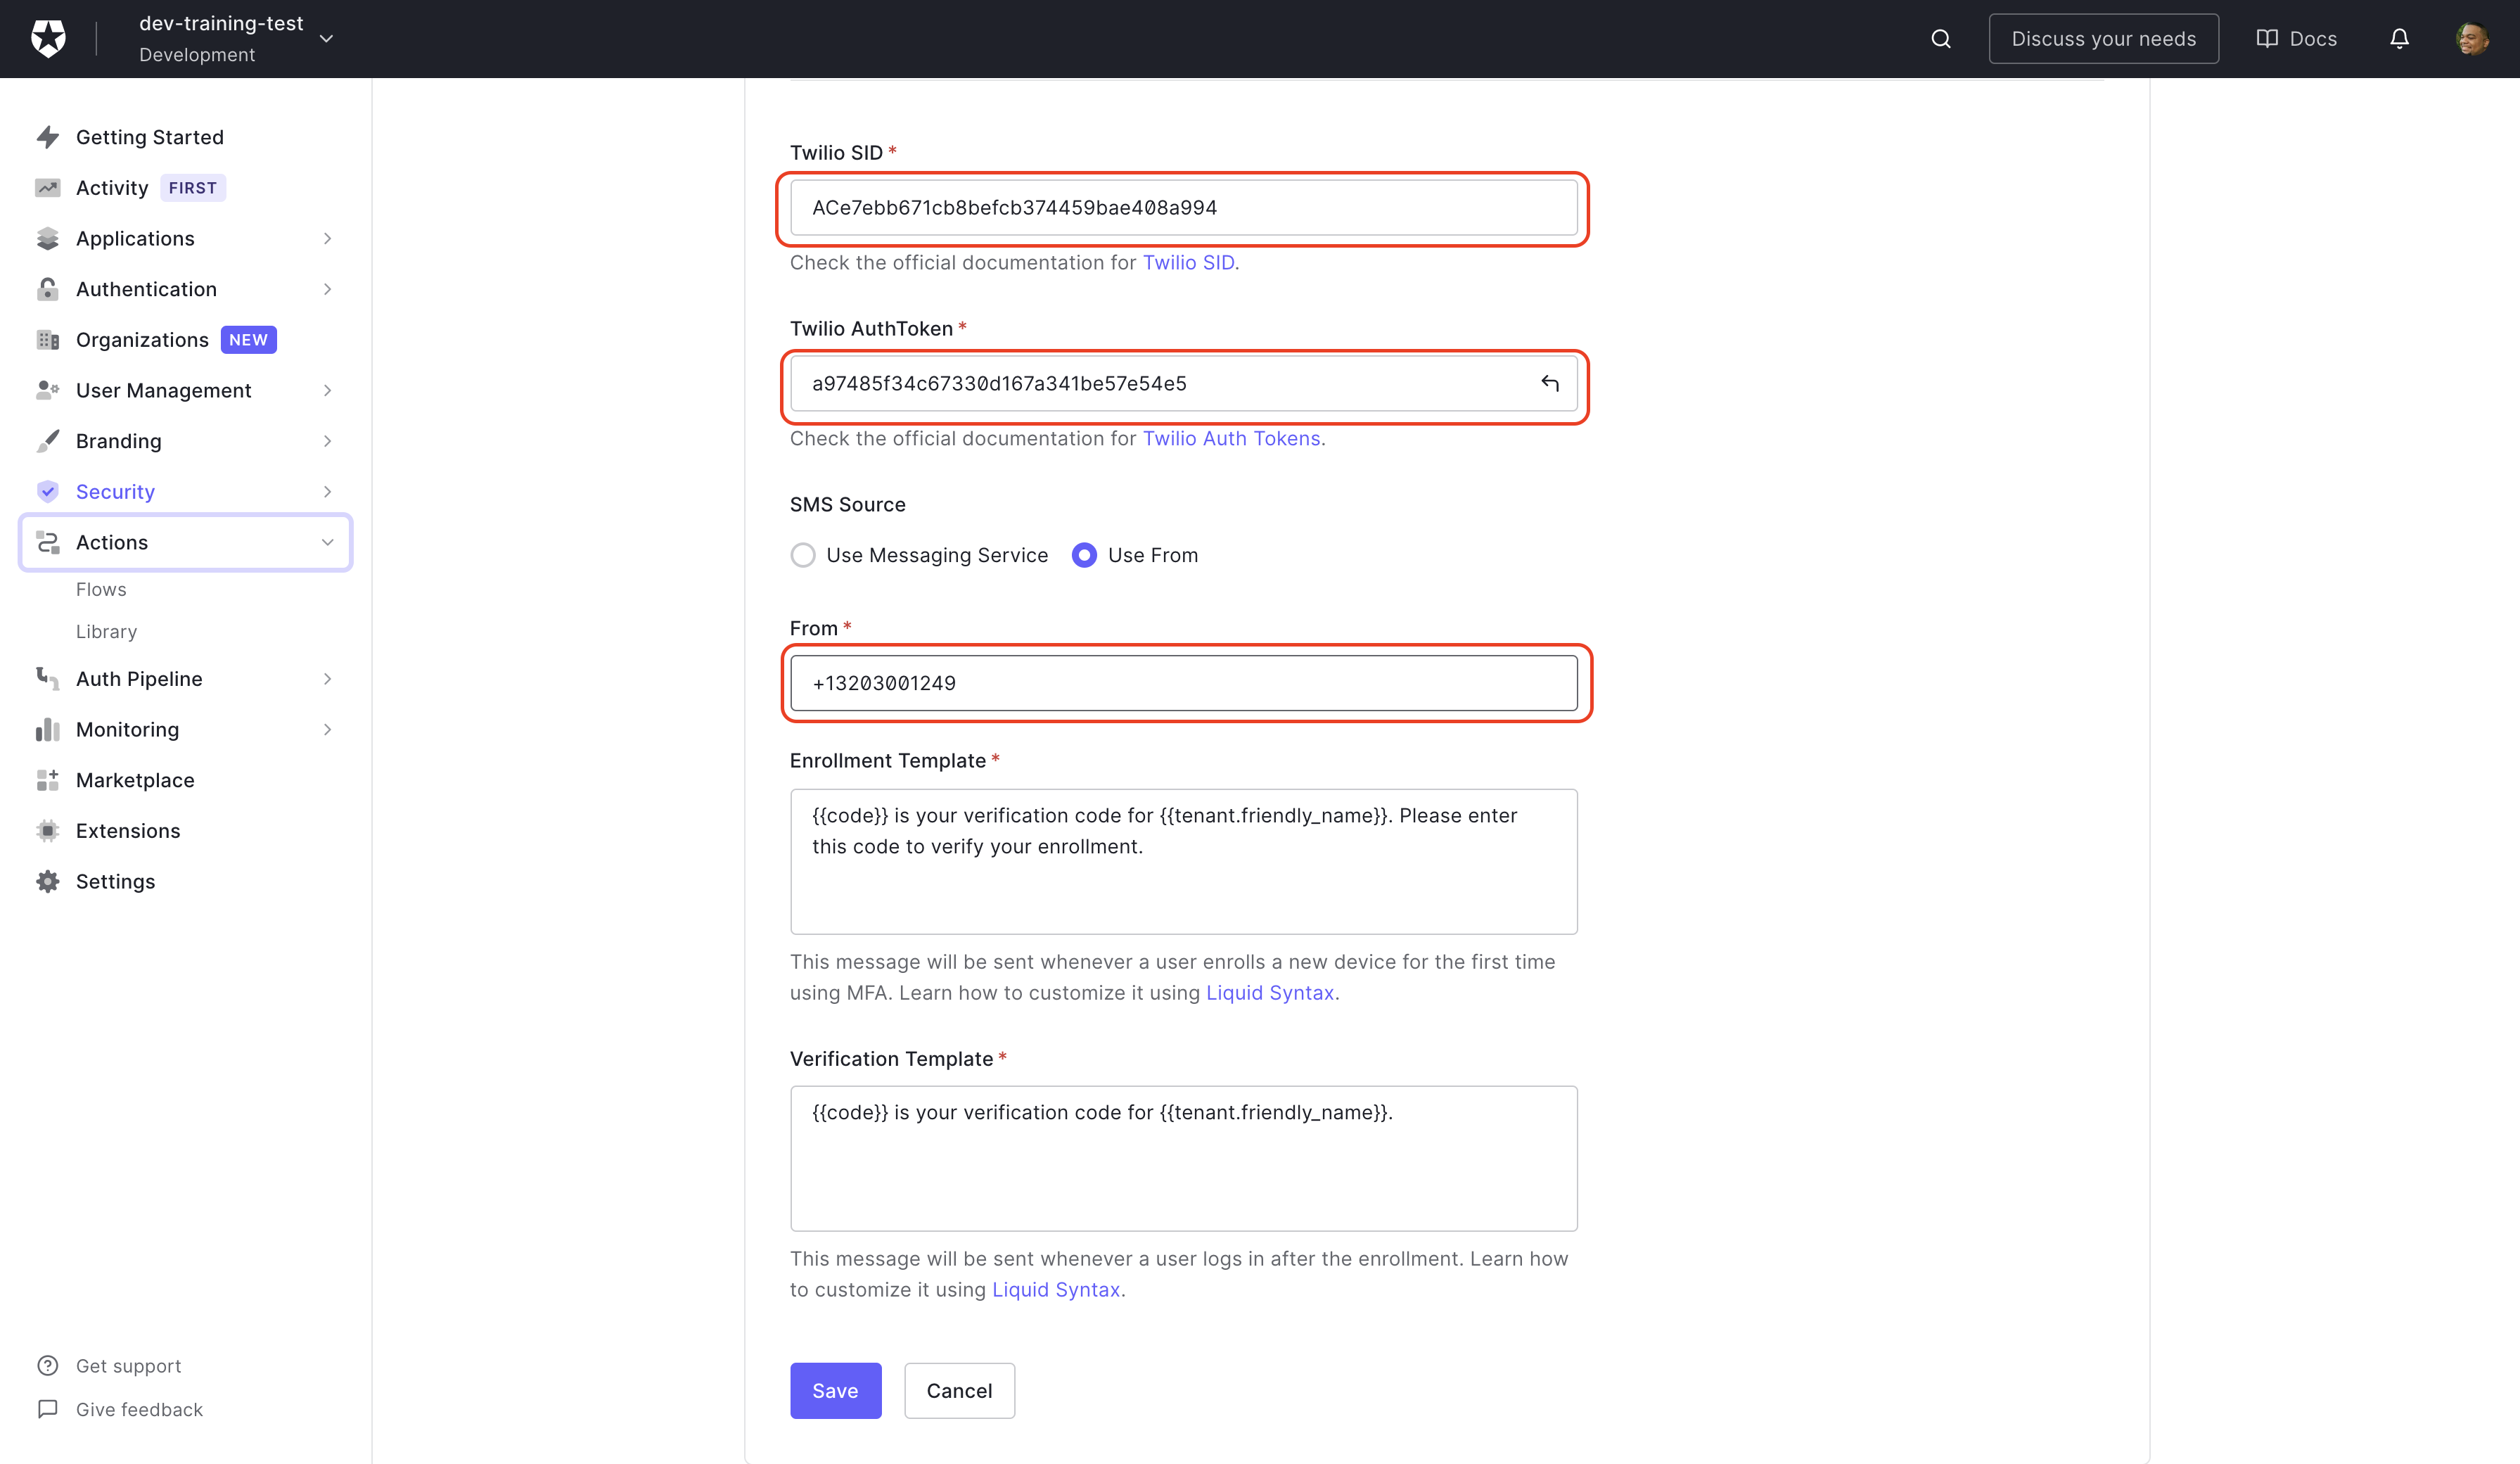
When you select Twilio as the delivery provider, you will have some new fields appear to enter the Twilio SID, Twilio AuthToken, and the From phone number. You'll see all of those values in the Twilio console.
Copy each value to the matching field in the Auth0 Dashboard. The two template fields can customize the message the user gets sent. You'll leave these as they are in this example. Now click Save.
Now you have everything configured to use Twilio as an SMS MFA provider, but there is still one more step left to actually make everything work!
Enable MFA in the Auth0 Dashboard
Back on the Multi-factor Authentication page, there are two sections Factors, which we just completed, and Define Policies. Define Policies will tell Auth0 when you want to prompt the user to use MFA. In the Require Multi-factor Auth section, the default is Never, which is the exact opposite of what you wish to do after doing all that work of configuring MFA.
The second option is an add-on called Adaptive MFA. This takes a look at the user's environment and determines if it's risky and requires another authentication factor. For this example, you'll choose Always, then click Save.
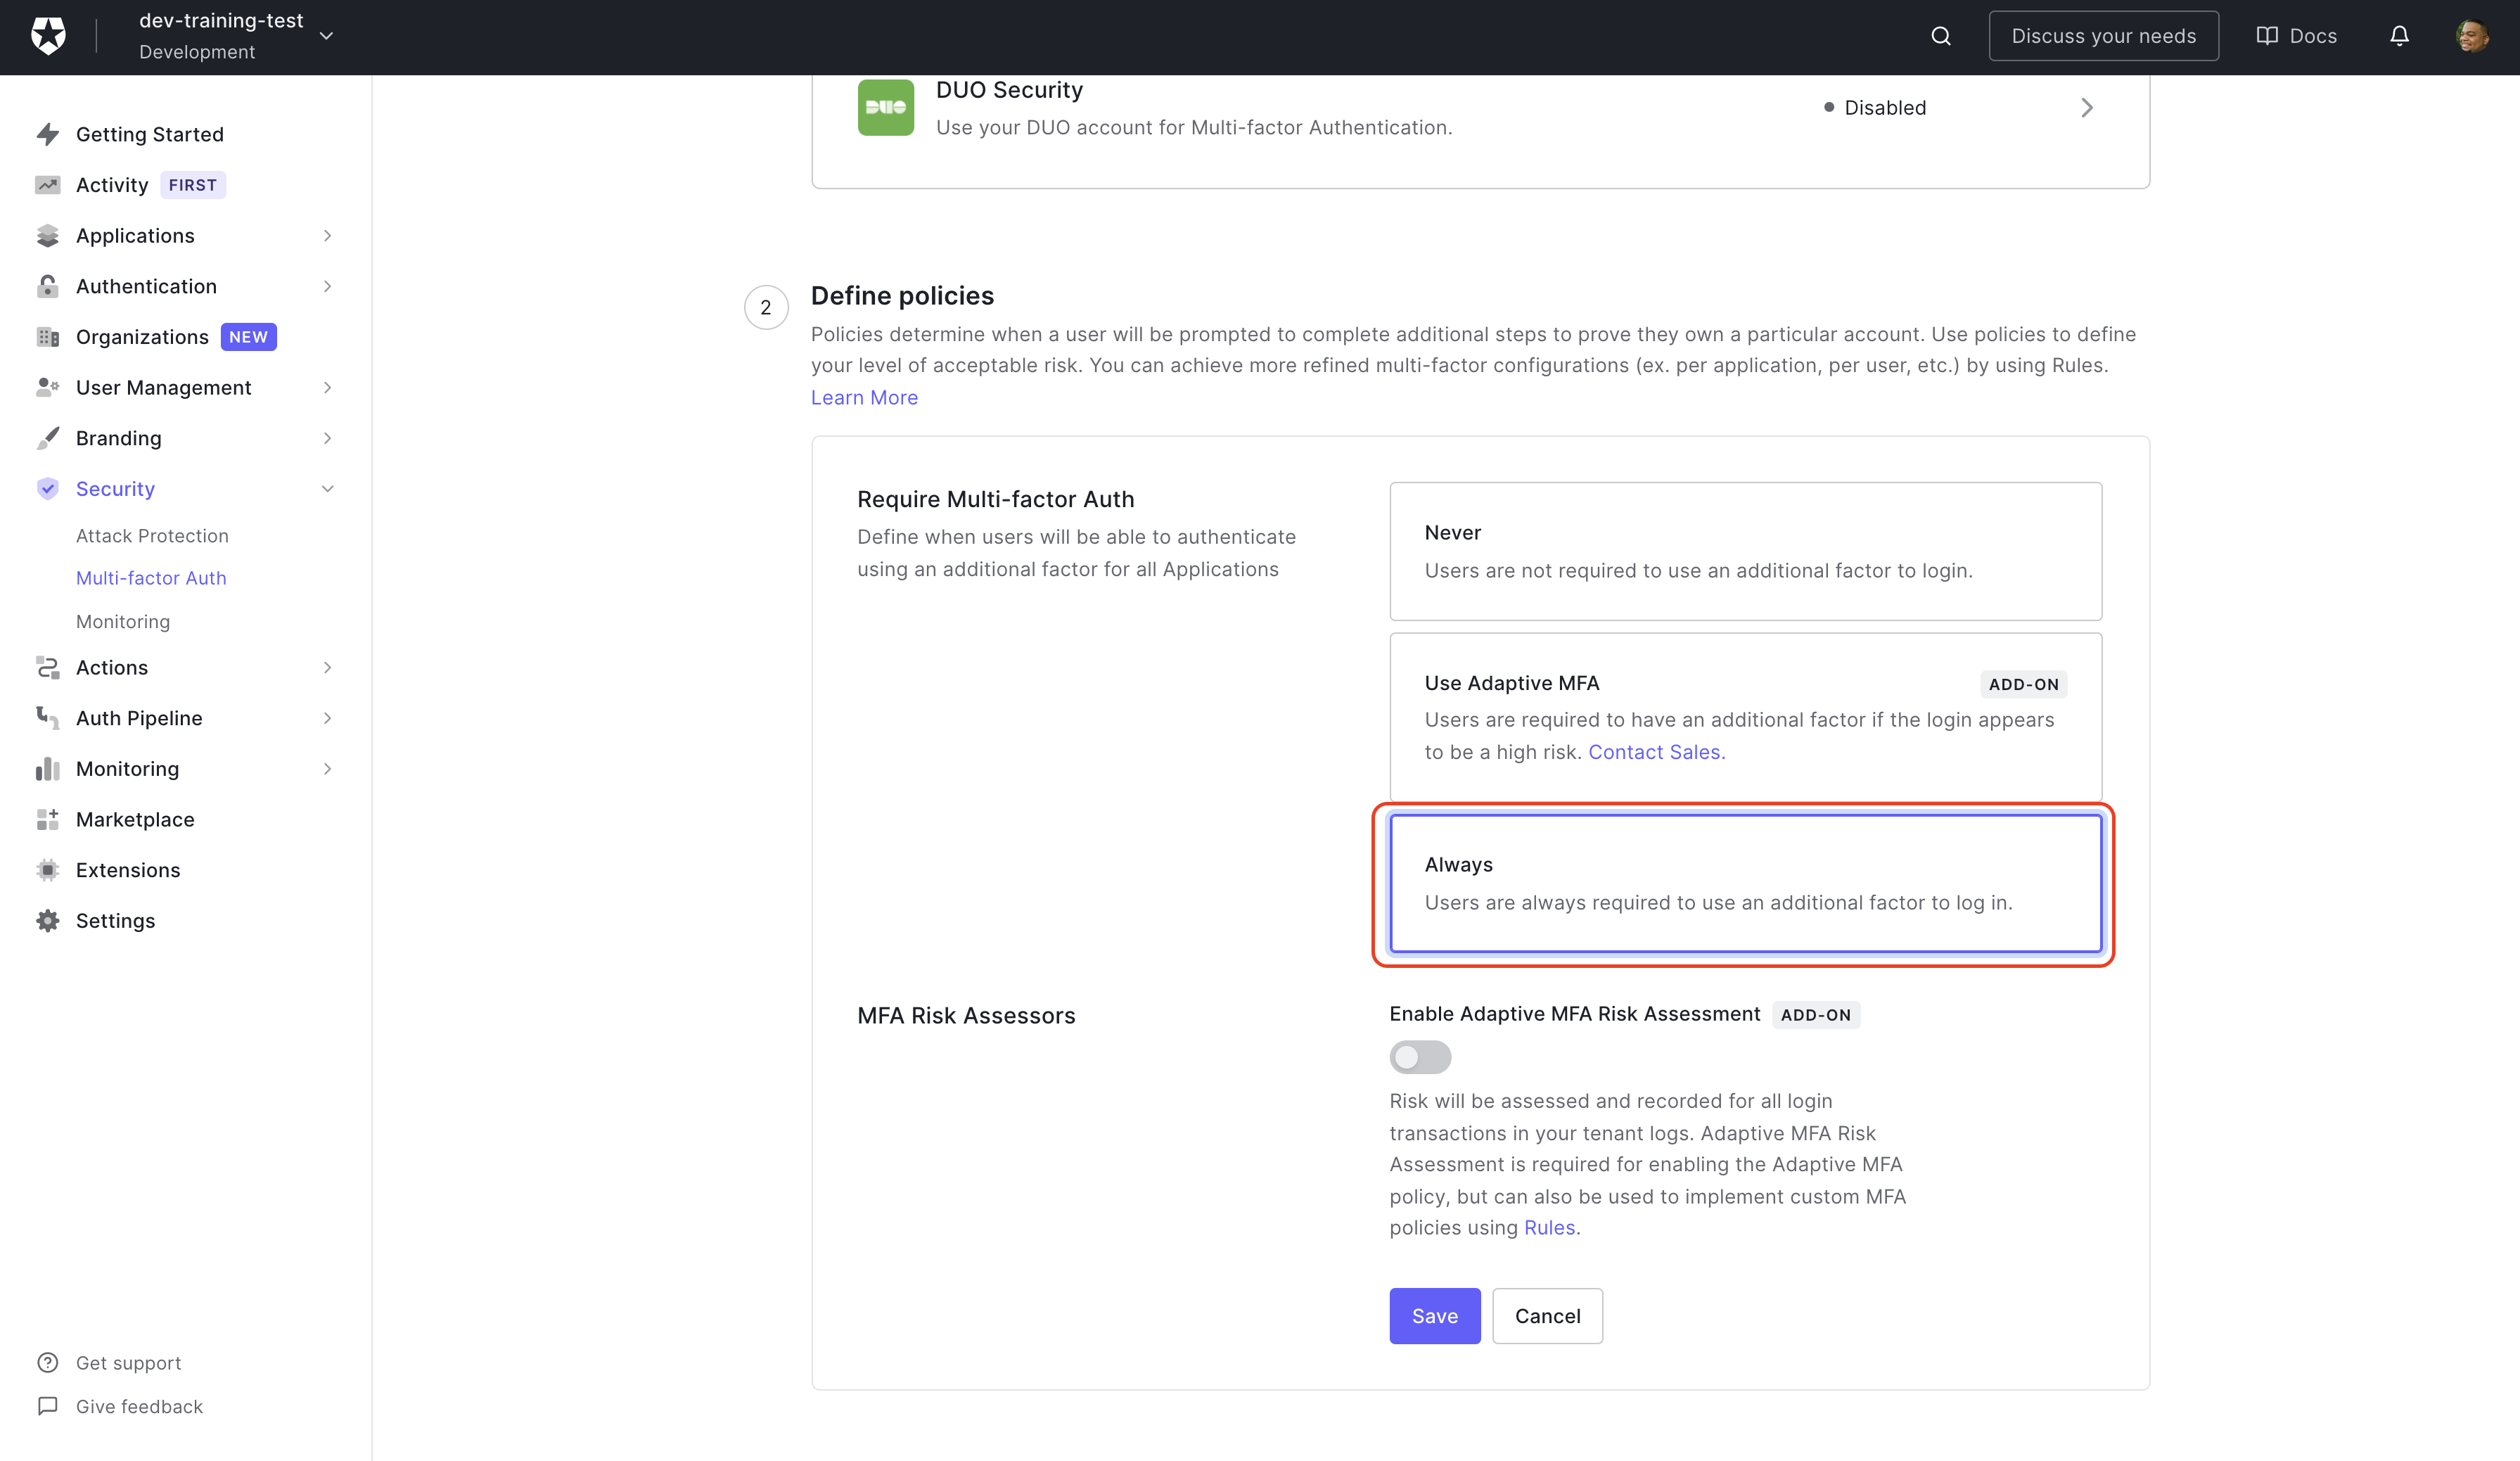
You'll get a prompt asking if you want to continue and let you know all new and existing users are now required to enroll in MFA click Continue. That will update your MFA policy, and now, when a user registers or logins, they will be met with a prompt to add their phone number to enroll in MFA.
Now that everything MFA is enabled in your Application, you want to test it out to ensure everything goes smoothly.
Test MFA on Login
With your sample application running, click Login and enter your email and password. Next, you'll be prompted to add a phone number to secure the account. This is what your users will see the next time they log in after you enable MFA.
You can select the code for your country on the first line, then type in your phone number and click Continue. You'll then have an SMS message come to your phone with a verification code. Enter that code into the input box on your application.
Now you're successfully logged in, and your users have another layer of protection from their data being compromised. All thanks to you, pat yourself on the back!
Summary
You just added Multi-factor authentication to your application using Twilio as the provider. You entered your Auth0 credentials to the auth_config.json in the project files of your application. Then, you enabled Phone Message MFA in the Auth0 Dashboard and added your Twilio credentials.
About the author

Will Johnson
Developer Advocate
Will Johnson is a Developer Advocate at Auth0. He loves teaching topics in a digestible way to empower more developers. He writes blog posts, records screencasts, and writes eBooks to help developers. He's also an instructor on egghead.io.
View profile