

TL;DR: In this article, you will learn about reactive programming, why it is important, and when to apply it to your projects. You will do so by learning about how reactive programming came to be and its implementation in Spring Boot via the Spring WebFlux API. To better understand these concepts you will build a reactive RESTful API using Spring WebFlux and secure it using OAuth 2.0. You can find the project built throughout this article in this GitHub repository.
Prerequisites
To follow this article along, you will need some previous experience with Java. Also, if you have some previous experience with Spring, that would be helpful.
Now, in relation to your development environment, you will need to have the following installed:
- JDK 8 or any version above (JDK 10 was used in this article).
- Any text editor or IDE of your choice (IntelliJ recommended).
Theoretical Foundation for Spring WebFlux
Problem Statement: Blocking I/O
Traditionally developers have always done I/O on the main thread of their applications. This raises a flag because it will block the execution of your program. To solve this problem, you can do I/O on a separate execution thread, but since threads take a lot of memory, this solution will not scale with many I/O operations. Additionally, this solution is still blocking.
Solution: Non-Blocking Asynchronous I/O
To solve this problem, you will need a single thread and an event loop just like Node.js. This will guarantee asynchronous and non-blocking I/O operations. Spring Boot implements this solution through Project Reactor and the reactive programming paradigm. Before you move into playing with Project Reactor, it will be good to understand its foundations.
What is Reactive Programming?
According to Jonas Bonér and Viktor Klang, reactive programming, not to be confused with functional reactive programming, is a subset of asynchronous programming and a paradigm where the availability of new information drives the logic forward rather than having control flow driven by a thread-of-execution. So it is a programming paradigm that allows systems to function based on the availability of new information or data. This definition of reactive programming leads us directly to asynchronous programming and non-blocking programming.
What is Asynchronous Programming?
Asynchronous programming is paradigm which allows developers to write code that can respond to future events or change in the state of your program. The best example of this kind of programming comes from JavaScript. As an example, the setTimeout function, waits for a given number of milliseconds (a second is a thousand milliseconds) and then calls a function.
setTimeout(() => console.log("Tick"), 500);
console.log("Hello");
If you run the following code, you will realize that "Tick" is printed after "Hello" because the first argument to setTimeout is a callback that will be called after 500 milliseconds. In other words, after "Hello" gets printed. Using this callback principle, you can access shared resources without blocking your program execution. To support asynchronous programming, the API of reactive libraries are either callback or declarative/functional (through functions like map, filter and reduce) based. Due to callback hell, many reactive libraries are declarative/functional based.
What is Non-Blocking Programming?
In order to understand non-blocking I/O, you need to understand what blocking I/O is. Traditionally, access to a database or operating system resources will block the main thread of execution and only continue execution once that operation is done. This is blocking I/O. Now with the support of reactive database drivers in MongoDB and relational stores via projects like the R2DBC project Java web application can now access these resources without blocking your thread of execution.
Benefits of Reactive programming
- Primarily, increase utilization of resource on multi-core and multi-CPU hardware.
- According to Jonas Bonér and Viktor Klang reactive programming increases developer productivity because unlike traditional programming paradigms, reactive programming provides ways for dealing with asynchronous non-blocking computation and I/O.
- Last but not the least, reactive programming shines well in the creation of components for a reactive system. There are systems that are responsive, resilient, elastic and message driven.
Reactive Programming with Reactive Streams
To support Reactive programming, the team behind Spring Boot created a library called Project Reactor which implements the specifications of the Reactive Streams initiative. This is an initiative to provide a standard for asynchronous stream processing with non-blocking back pressure. This standard is specified through the following interface:
Processor<T,R>- This class represents a processing stage, which is both aSubscriberand aPublisherand obeys the contracts of both.Publisher<T>- This is a provider of a potentially unbounded number of sequenced elements, publishing them according to the demand received from itsSubscribers.Subscriber<T>- Instances of this class will receive calls toSubscriber.onSubscribe(Subscription)once after passing an instance of Subscriber toPublisher.subscribe(Subscriber)Subscription- This class represents a one-to-one lifecycle of a Subscriber subscribing to a Publisher.
Reactive Streams Data Flow
While dealing with reactive streams, the data flow as follows:
- The
subscribemethod is called on aPublisherinstance. - Then a
Subscriptionobject is created and theonSubscribemethod of theSubscriberis executed with theSubscriptionobject. - After that, a
Subscriberwill call therequestmethod in theSubscriptionclass to specify the number of objects it can process (If this method is not called explicitly, an unbounded number of objects is requested). - Then the
Subscribercan receive objects via theonNextmethod. If the Subscriber receives all the objects it requested, it can request more object or cancel the Subscription by callingonComplete. If at some point there is an error thePublishercalls theonErrormethod on theSubscriber.
For more details about the Reactive Streams interface check out this resource.
Project Reactor's implementation of Reactive Streams
Project Reactor implements two data types for the Publisher interface: Flux and Mono. Flux is for a list of objects and Mono for zero or one object. These implementations support operators like map, filter, reduce, and flatMap which maps every entry in a Publisher to another Publisher. Last but not least, in order to get data from a publisher(Flux or Mono) you need to call the subscribe on it.
What is Spring WebFlux
To support reactive programming and the creation of reactive systems, the Spring Boot team created a whole new web stack called Spring WebFlux. This new web stack supports annotated controllers, functional endpoints, WebClient (analogous to RestTemplate in Spring Web MVC), WebSockets and a lot more.
Developing a RESTful API with Spring WebFlux
In this section, you will learn some key features of Spring WebFlux by creating a movie REST API with it. For starters, go to the Spring Initializr page and fill out the form like this:
- Generate a: At the top of the page, choose "Gradle Project".
- Group: You can leave this field as
com.example. - Artifact: You can type
movie-apiin this one.
Then, you will have to add the following dependencies (through the Search for dependencies field):
- Reactive Web
- Security
- Embedded MongoDB
- Reactive MongoDB
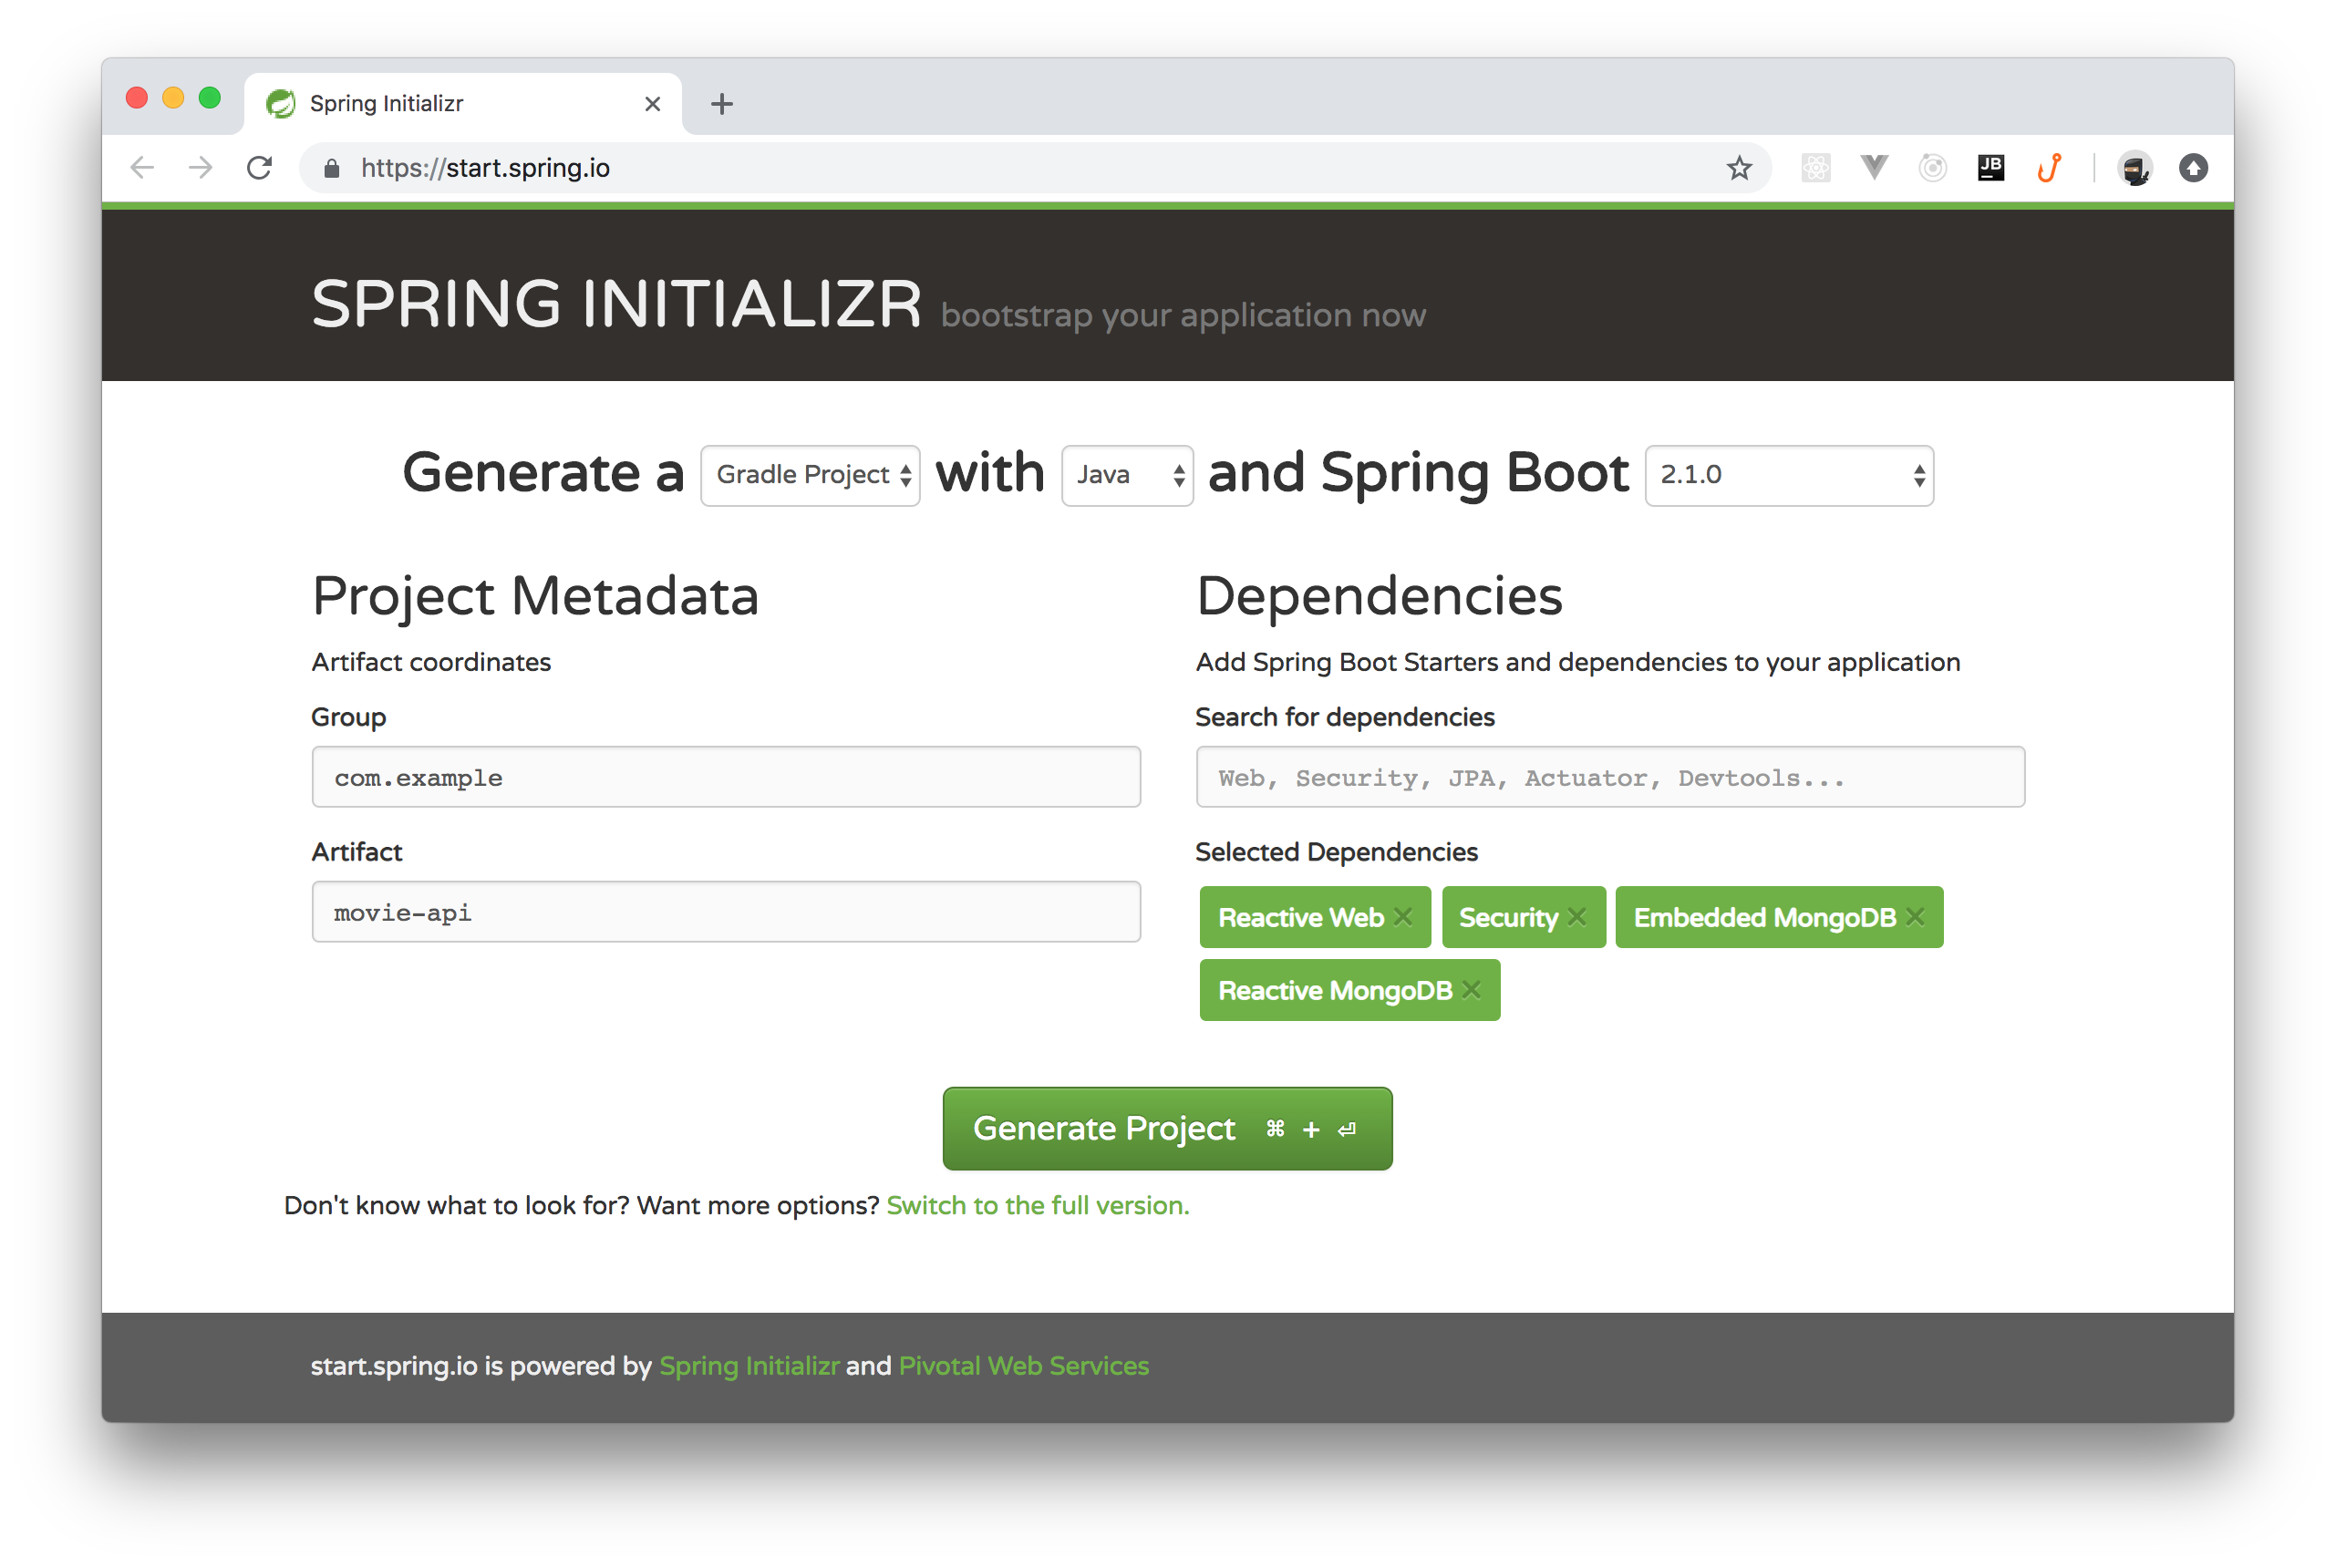
After filling out the form, click on the Generate Project button. This will download your project for you. Then, unzip the downloaded file and open your project in your favorite IDE. After that, navigate to your build.gradle file in the project's root directory.
Notice that your Embedded MongoDB dependency (de.flapdoodle.embed:de.flapdoodle.embed.mongo) has been added as a testImplementation dependency. Spring Boot added this dependency as a test dependency because it expects you to use this database in development and testing, and not production. For the sake of this tutorial, make this dependency an implementation dependency. After the change, your dependency section should look like the following:
//.... rest of file

dependencies {
    // ... don't remove the other two dependencies ...
    implementation('de.flapdoodle.embed:de.flapdoodle.embed.mongo')
}
Next, you need to define a Movie entity to represent movies in your database. To do that, start by creating a package called model inside the com.example.movieapi package. In that package, create a class called Movie and paste the following content in it:
package com.example.movieapi.model;

import org.springframework.data.annotation.Id;
import org.springframework.data.mongodb.core.mapping.Document;

import java.time.LocalDateTime;
import java.util.Objects;

@Document
public class Movie {

  @Id
  private String id;

  private String name;

  private String genre;

  private LocalDateTime releaseDate;

  public Movie() {
  }

  public Movie(String id, String name, String genre, LocalDateTime releaseDate) {
      this.id = id;
      this.name = name;
      this.genre = genre;
      this.releaseDate = releaseDate;
  }

  public String getId() {
      return id;
  }

  public void setId(String id) {
      this.id = id;
  }

  public String getName() {
      return name;
  }

  public void setName(String name) {
      this.name = name;
  }

  public String getGenre() {
      return genre;
  }

  public void setGenre(String genre) {
      this.genre = genre;
  }

  public LocalDateTime getReleaseDate() {
      return releaseDate;
  }

  public void setReleaseDate(LocalDateTime releaseDate) {
      this.releaseDate = releaseDate;
  }

  @Override
  public boolean equals(Object o) {
      if (this == o) return true;
      if (o == null || getClass() != o.getClass()) return false;
      Movie movie = (Movie) o;
      return Objects.equals(id, movie.id) &&
              Objects.equals(name, movie.name) &&
              Objects.equals(genre, movie.genre) &&
              Objects.equals(releaseDate, movie.releaseDate);
  }

  @Override
  public int hashCode() {
      return Objects.hash(id, name, genre, releaseDate);
  }

  @Override
  public String toString() {
      return "Movie{" +
              "id='" + id + ''' +
              ", name='" + name + ''' +
              ", genre='" + genre + ''' +
              ", releaseDate=" + releaseDate +
              '}';
  }
}
This class is annotated with @Document because MongoDB is a document database. At the time of this writing, Spring Boot does not support reactive database drivers for relational databases, which is why I decided to go with MongoDB. @Id is used to annotate the instance variable you will use as a key in your database.
Next, you need to create a repository for querying your MongoDB database in a reactive fashion. Luckily, Spring now supports reactive repositories. First, create a repository package inside the com.example.movieapi.model package. Then, create a MovieRepository interface in this package. Fill this class with the following content:
package com.example.movieapi.model.repository;

import com.example.movieapi.model.Movie;
import org.springframework.data.mongodb.repository.ReactiveMongoRepository;

public interface MovieRepository extends ReactiveMongoRepository<Movie, String> {
}
Notice that this repository extends the ReactiveMongoRepository instead of the traditional MongoRepository. As usual, this repository interface provides out of the box implementation for methods like findById, findAll, save, and many more methods.
With that covered, you can now query your database and get results. Next, you need to expose these database queries via RESTful endpoints. For starters, create a controller package in your com.example.movieapi package. In this package, create a file called MovieController and add the following code to it:
package com.example.movieapi.controller;

import com.example.movieapi.model.Movie;
import com.example.movieapi.model.repository.MovieRepository;
import org.springframework.http.HttpStatus;
import org.springframework.http.ResponseEntity;
import org.springframework.web.bind.annotation.*;
import reactor.core.publisher.Flux;
import reactor.core.publisher.Mono;

@RestController
@RequestMapping("/movies")
public class MovieController {

    private MovieRepository movieRepository;

    public MovieController(MovieRepository movieRepository){
        this.movieRepository = movieRepository;
    }

    @GetMapping
    public Flux<Movie> getMovies(){
        return movieRepository.findAll();
    }

    @GetMapping("{id}")
    public Mono<ResponseEntity<Movie>> getMovie(@PathVariable String id){
        return movieRepository.findById(id)
                .map(ResponseEntity::ok)
                .defaultIfEmpty(ResponseEntity.notFound().build());
    }


    @PostMapping
    @ResponseStatus(HttpStatus.CREATED)
    public Mono<Movie> saveMovie(@RequestBody Movie movie){
        return movieRepository.save(movie);
    }

    @PutMapping("{id}")
    public Mono<ResponseEntity<Movie>> updateMovie(@PathVariable(value = "id") String id, @RequestBody Movie movie){
        return movieRepository.findById(id)
                .flatMap(existingMovie -> {
                    existingMovie.setName(movie.getName());
                    existingMovie.setGenre(movie.getGenre());
                    existingMovie.setReleaseDate(movie.getReleaseDate());
                    return movieRepository.save(existingMovie);
                })
                .map(ResponseEntity::ok)
                .defaultIfEmpty(ResponseEntity.notFound().build());
    }

    @DeleteMapping("{id}")
    public Mono<ResponseEntity<Void>> deleteMovie(@PathVariable(value = "id") String id){
        return movieRepository.findById(id)
                .flatMap(existingMovie ->
                    movieRepository.delete(existingMovie)
                            .then(Mono.just(ResponseEntity.ok().<Void>build()))
                )
                .defaultIfEmpty(ResponseEntity.notFound().build());
    }

    @DeleteMapping
    public Mono<Void> deleteAllMovies(){
        return movieRepository.deleteAll();
    }
}
You need to examine these methods carefully. Notice how they do not return void or a Movie type but instead Void or Movie either wrapped by Flux or Mono which are publishers from Project Reactor added in the spring-boot-starter-webflux dependency. To help you better understand Project Reactor's operators, I will give a detailed explanation of each method in this controller:
- The
getMoviesmethod callsfindAllon your repository and returns aFluxof movies. Notice that thesubscribemethod has not been called on theFluxto get the values. Spring Boot will call this method automatically when this endpoint is accessed. - The
getMoviemethod callsfindByIdon your repository which returns aMonoof a movie. Then themapoperator is called on this movie to wrap it in aResponseEntityobject with status code 200 OK, and finally there is a call todefaultIfEmptyto build an emptyResponseEntitywith status 404 NOT FOUND if the movie was not found. - The
saveMoviemethod calls thesavemethod on your repository to save a new movie object in the database. - The
updateMoviemethod takes in the id of the movie you want to update with an object that represents the values of the updated movie and then callsfindByIdto get the movie you want to update, then callsflatMapwith this movie to update its entries using its setters and the values from the movie passed as argument. Then it saves them to the database and wraps this updated movie in aResponseEntitywith status code 200 OK in case of success or 404 NOT FOUND in case of failure. deleteMoviethis method follows the same flow asupdateMovies. First, you search the movie you want to delete. Next, you delete and return 200 OK to show your delete was successful or you return 404 NOT FOUND to say the movie was not found.deleteAllMoviesthis method calls thedeleteAllmethod on your movie repository which empties our database.
With this controller in place, you now have all the functionality to access your data but you do not have data in your database. To solve that, go ahead and add data to your database by updating the MovieApiApplication class as follows:
//... leave all other library imports untouched
import com.example.movieapi.model.Movie;
import com.example.movieapi.model.repository.MovieRepository;
import org.springframework.boot.CommandLineRunner;
import org.springframework.context.annotation.Bean;
import org.springframework.data.mongodb.core.ReactiveMongoOperations;
import reactor.core.publisher.Flux;

import java.time.LocalDateTime;

@SpringBootApplication
public class MovieApiApplication {

    // ... static void main ...

    @Bean
    CommandLineRunner init(ReactiveMongoOperations operations, MovieRepository movieRepository) {
        return args -> {
            Flux<Movie> productFlux = Flux.just(
                    new Movie(null, "Avenger: Infinity Wars", "Action", LocalDateTime.now()),
                    new Movie(null, "Gladiator", "Drama/Action", LocalDateTime.now()),
                    new Movie(null, "Black Panther", "Action", LocalDateTime.now()))
                    .flatMap(movieRepository::save);

            productFlux
                    .thenMany(movieRepository.findAll())
                    .subscribe(System.out::println);
        };
    }
}
This code creates a Flux of three sample Movie objects, saves them to the database. Then, queries all the movies from the database and print them to the console.
Now, you can run your RESTful API by either issuing the command ./gradlew bootRun from the command line or by building and running the project in your favorite IDE. If everything works as expected, your RESTful Spring Boot API will be up and running. To test it, you can use a tool like Postman or curl to issue requests to the available endpoints. But before you start testing, comment out the spring-boot-starter-security in your build.gradle file, this will remove the default security on your endpoints.
Run the following commands to test your API:
# issue a GET request to see the list of movies
curl http://localhost:8080/movies

# issue a GET request to see a particular movie, get an {id}
# from one of the movies printed in the command line
curl http://localhost:8080/movies/{movie-id}

# issue a POST request to create a new movie
curl -H "Content-Type: application/json" -X POST -d '{"name":"Hercules","genre":"Drama/Action","releaseDate":"2018-11-22T14:15:18.512"}' http://localhost:8080/movies


# issue a PUT request to update the genre of the Gladiator movie. Get {movie-id} from the command line.
curl -H "Content-Type: application/json" -X PUT -d '{"id":"{movie-id}","name":"Gladiator","genre":"{new-genre}","releaseDate":"{movie-release-date}"}' http://localhost:8080/movies/{movie-id}

# issue a DELETE request for a movie
curl -X DELETE http://localhost:8080/movies/{movie-id}

# issue a DELETE request to delete all movies
curl -X DELETE http://localhost:8080/movies
Securing your Spring WebFlux API with Auth0
In this section, you are going to secure your API with Auth0's OAuth 2.0 implementation. You'll need to sign up for a free Auth0 account here. After signing up for your Auth0 account, you will need to create an API on Auth0 to represent your Spring Boot API and to be able to configure it to authenticate requests. To do this, head to the APIs section on your Auth0 dashboard and click on the Create API button. After that, the dashboard will show you a form where you will have to enter:
- a name for your API (this can be something like "Movies API");
- an identifier (in this case, it can be
https://localhost:8080/moviesor anything that resembles a valid URL); - and the signing algorithm (for this field, make sure you choose
RS256).
Then, you can create your Auth0 API by clicking on the Create button. Now, that you have created your Auth0 API, you need to add security configuration to your Spring Boot project. For this, create a class called SecurityConfig in your com.example.movieapi package. Add the following code to this file:
package com.example.movieapi.security;

import org.springframework.beans.factory.annotation.Value;
import org.springframework.context.annotation.Bean;
import org.springframework.http.HttpMethod;
import org.springframework.security.config.annotation.web.reactive.EnableWebFluxSecurity;
import org.springframework.security.config.web.server.ServerHttpSecurity;
import org.springframework.security.oauth2.jwt.ReactiveJwtDecoder;
import org.springframework.security.oauth2.jwt.ReactiveJwtDecoders;
import org.springframework.security.web.server.SecurityWebFilterChain;

@EnableWebFluxSecurity
public class SecurityConfig {

    @Value("${spring.security.oauth2.resourceserver.jwk.issuer-uri}")
    private String issuerUri;

    @Bean
    public SecurityWebFilterChain securityWebFilterChain(ServerHttpSecurity http){
        http
                .authorizeExchange()
                .pathMatchers(HttpMethod.GET,"/movies/**").permitAll()
                .anyExchange().authenticated()
                .and()
                .oauth2ResourceServer()
                .jwt();
        return http.build();
    }

    @Bean
    public ReactiveJwtDecoder jwtDecoder() {
        return ReactiveJwtDecoders.fromOidcIssuerLocation(issuerUri);
    }
}
Note: You will have to uncomment the security dependency (
spring-boot-starter-security) on yourbuild.gradlefile to be able to import the dependencies above.
- The
jwtDecodermethod in the above class is used by your API to decode JWT access token and verify them. - The
securityWebFilterChainmethod is used to restrict unauthenticated users of your API to GET operations and request authentication for any other operation.
To support OAuth authentication you need to add the following dependencies to your build.gradle file.
//.... rest of file

dependencies {
    // ... don't remove the other two dependencies ...
  compile('org.springframework.security:spring-security-oauth2-jose')
  compile('org.springframework.security:spring-security-oauth2-resource-server')
}
Finally, you have to add Auth0 configuration to your Spring Boot project so that it knows where to verify your JWT access tokens. To do this, go to the resources folder of your project and rename your application.properties file to application.yml and add the following configurations to it:
spring:
  security:
    oauth2:
      resourceserver:
        id: http://localhost:8080/movies
        jwk:
          jwk-set-uri: https://YOUR_AUTH0_DOMAIN/.well-known/jwks.json
          issuer-uri: https://YOUR_AUTH0_DOMAIN/
Make sure you replace both YOUR_AUTH0_DOMAIN placeholders with your own Auth0 domain (e.g., blog-samples.auth0.com). Also, if you have chosen another identifier for your Auth0 API (rather than http://localhost:8080/movies), make sure you update the id property accordingly in the file above.
Testing Your API
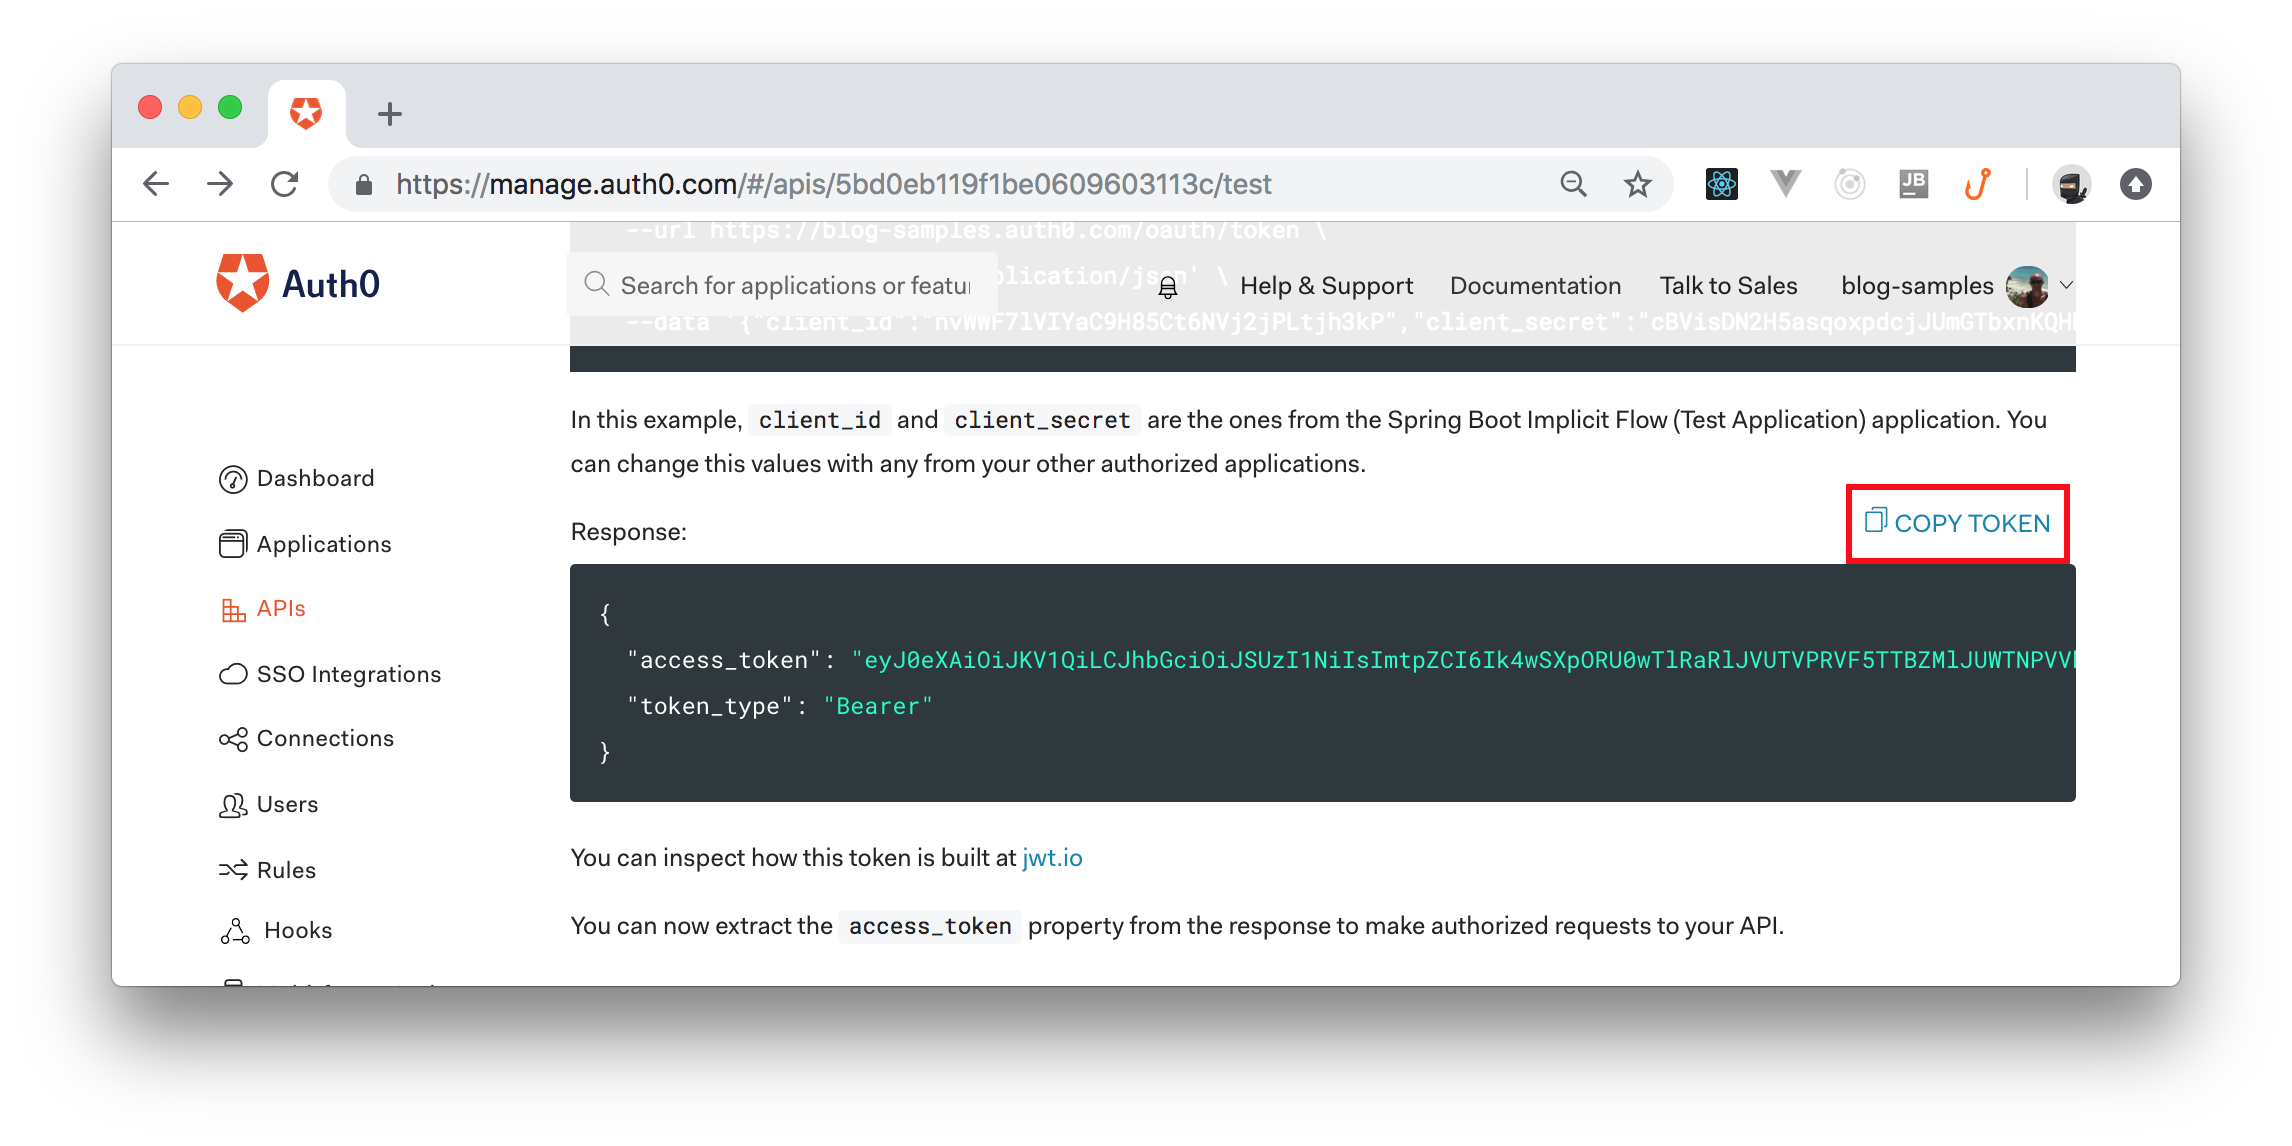
With that in place, your API is now secured. You will still be able to read from your API but not carry out write operations. To interact with your endpoints you need an access token. The strategy to get one usually used for this depends on the type of client application you are developing. You can read more about which authentication flow strategy to use at Auth0. For this simple test, you can get an access token from your API dashboard. To do so, go to the APIs section in your Auth0 dashboard, click on the API you created before, and then click on the Test section of this API. There, you will find a button called Copy Token. Click on this button to copy an access token to your clipboard
After copying the token, open your terminal and run your application: ./gradlew bootRun. Then, open another terminal and run the following commands (make sure to replace <YOUR-ACCESS-TOKEN-HERE> placeholder with your access token):
# set your access token variable
ACCESS_TOKEN=<YOUR-ACCESS-TOKEN-HERE>

# issue a POST request to create a new movie
curl -H "Content-Type: application/json" -H "Authorization: Bearer "$ACCESS_TOKEN -X POST -d '{"name":"Hercules","genre":"Drama/Action","releaseDate":"2018-11-22T14:15:18.512"}' http://localhost:8080/movies

# issue a PUT request to update the genre of the Gladiator movie
curl -H "Content-Type: application/json" -H "Authorization: Bearer "$ACCESS_TOKEN -X PUT -d '{"id":"{movie-id}","name":"Gladiator","genre":"{new-genre}","releaseDate":"{movie-release-date}"}' http://localhost:8080/movies/{movie-id}

# issue a DELETE request for a movie
curl -H "Authorization: Bearer "$ACCESS_TOKEN -X DELETE http://localhost:8080/movies/{movie-id}

# issue a DELETE request to delete all movies
curl -H "Authorization: Bearer "$ACCESS_TOKEN -X DELETE http://localhost:8080/movies
Finally go back and run the curl commands you ran before securing your API. This time make sure you pass a -i flag to the command after curl. As you will see, GET requests will succeed as before but other requests will return an unauthorized request error.
Conclusion
In this article, you learned about the motivation behind reactive programming and how it is implemented in Spring WebFlux with Project Reactor. You also learned how to use the Spring WebFlux API by developing a RESTful API and securing it with Auth0. Developing with Spring WebFlux is not hard, it just requires a change in mindset since you are developing with a different paradigm from Spring Web MVC. It also has a lot in common with Spring Web MVC, so transitioning will not be very difficult.
Although you used annotated controllers to develop your API, you can also develop it in a functional and declarative style using functional endpoints.
In this article, you just scratched the surface of Spring WebFlux. However, this framework supports many other amazing features like WebSockets, WebClient, and functional endpoints. To learn more on the topic visit the official documentation.