
In this blog post, we are going to discuss how the Auth0 Site Reliability team, led by Hernán Meydac Jean, used a progressive approach to build a mature service architecture characterized by high availability and reliability.
At Auth0, we manage different features for our clients. We use feature flags to enable features into codebases without breaking anything or having to change the code. As defined by Pete Hodgson, feature flags, or feature toggles, are a flexible and powerful technique that allow developers to modify the behavior of a system without changing its code. A feature flag lets a development team turn features on and off in the system even after it is live in production.
Motivation for a Feature Flags Router Service
To help us manage feature flags, our SRE team created a feature flags router service. As defined by Martin Fowler, a feature flags router can be used to dynamically control which code path to a feature is live. The router lets us centralize all the feature flags logic in a single place allowing different services and products to retrieve the same information at any time to turn on and off feature flags across different functions.

Our vision for this feature flags router service is to make it a generic service that can be used by multiple products and services within and outside our organization. Because of the extensive number of clients that this generic service will support and the massive amount of requests these clients will generate, we needed to design this service with an architecture that makes it easy to scale and promotes high availability.
Engineering an SDK for Feature Parity
With this in mind, the SRE team came up with a feature flags SDK designed to act as an abstract client so that we can use any kind of provider or database with it. The goal of the SDK is to have the same language and the same syntax across services. Therefore, in order to retrieve a feature flag value, we don't need to access a database directly or make a direct request to a server; instead, we simply use the SDK which offers the same code everywhere. If we make changes to the logic behind the SDK, we just need to bump up version of the SDK to apply the updates.
“Learn how the @auth0 SRE team created a standardized library to help them manage feature flags and promote feature parity.”
Tweet This
The final design of this client was the result of a progressive service architecture that provides us with fallbacks, self-healing, high availability, and high scalability. We started with a basic topology that gave the client direct access to the database and ended with a sophisticated topology that integrates a self-healing strategy for the feature flags router service.
Let's explore the system topology of each stage of this process as it was explained by Hernán during one of our internal engineering talks. These topologies can be abstracted to use any kind of provider and different databases.
Would you like to tackle reliability and scalability challenges? We are currently looking for new teammates to join our SRE team!
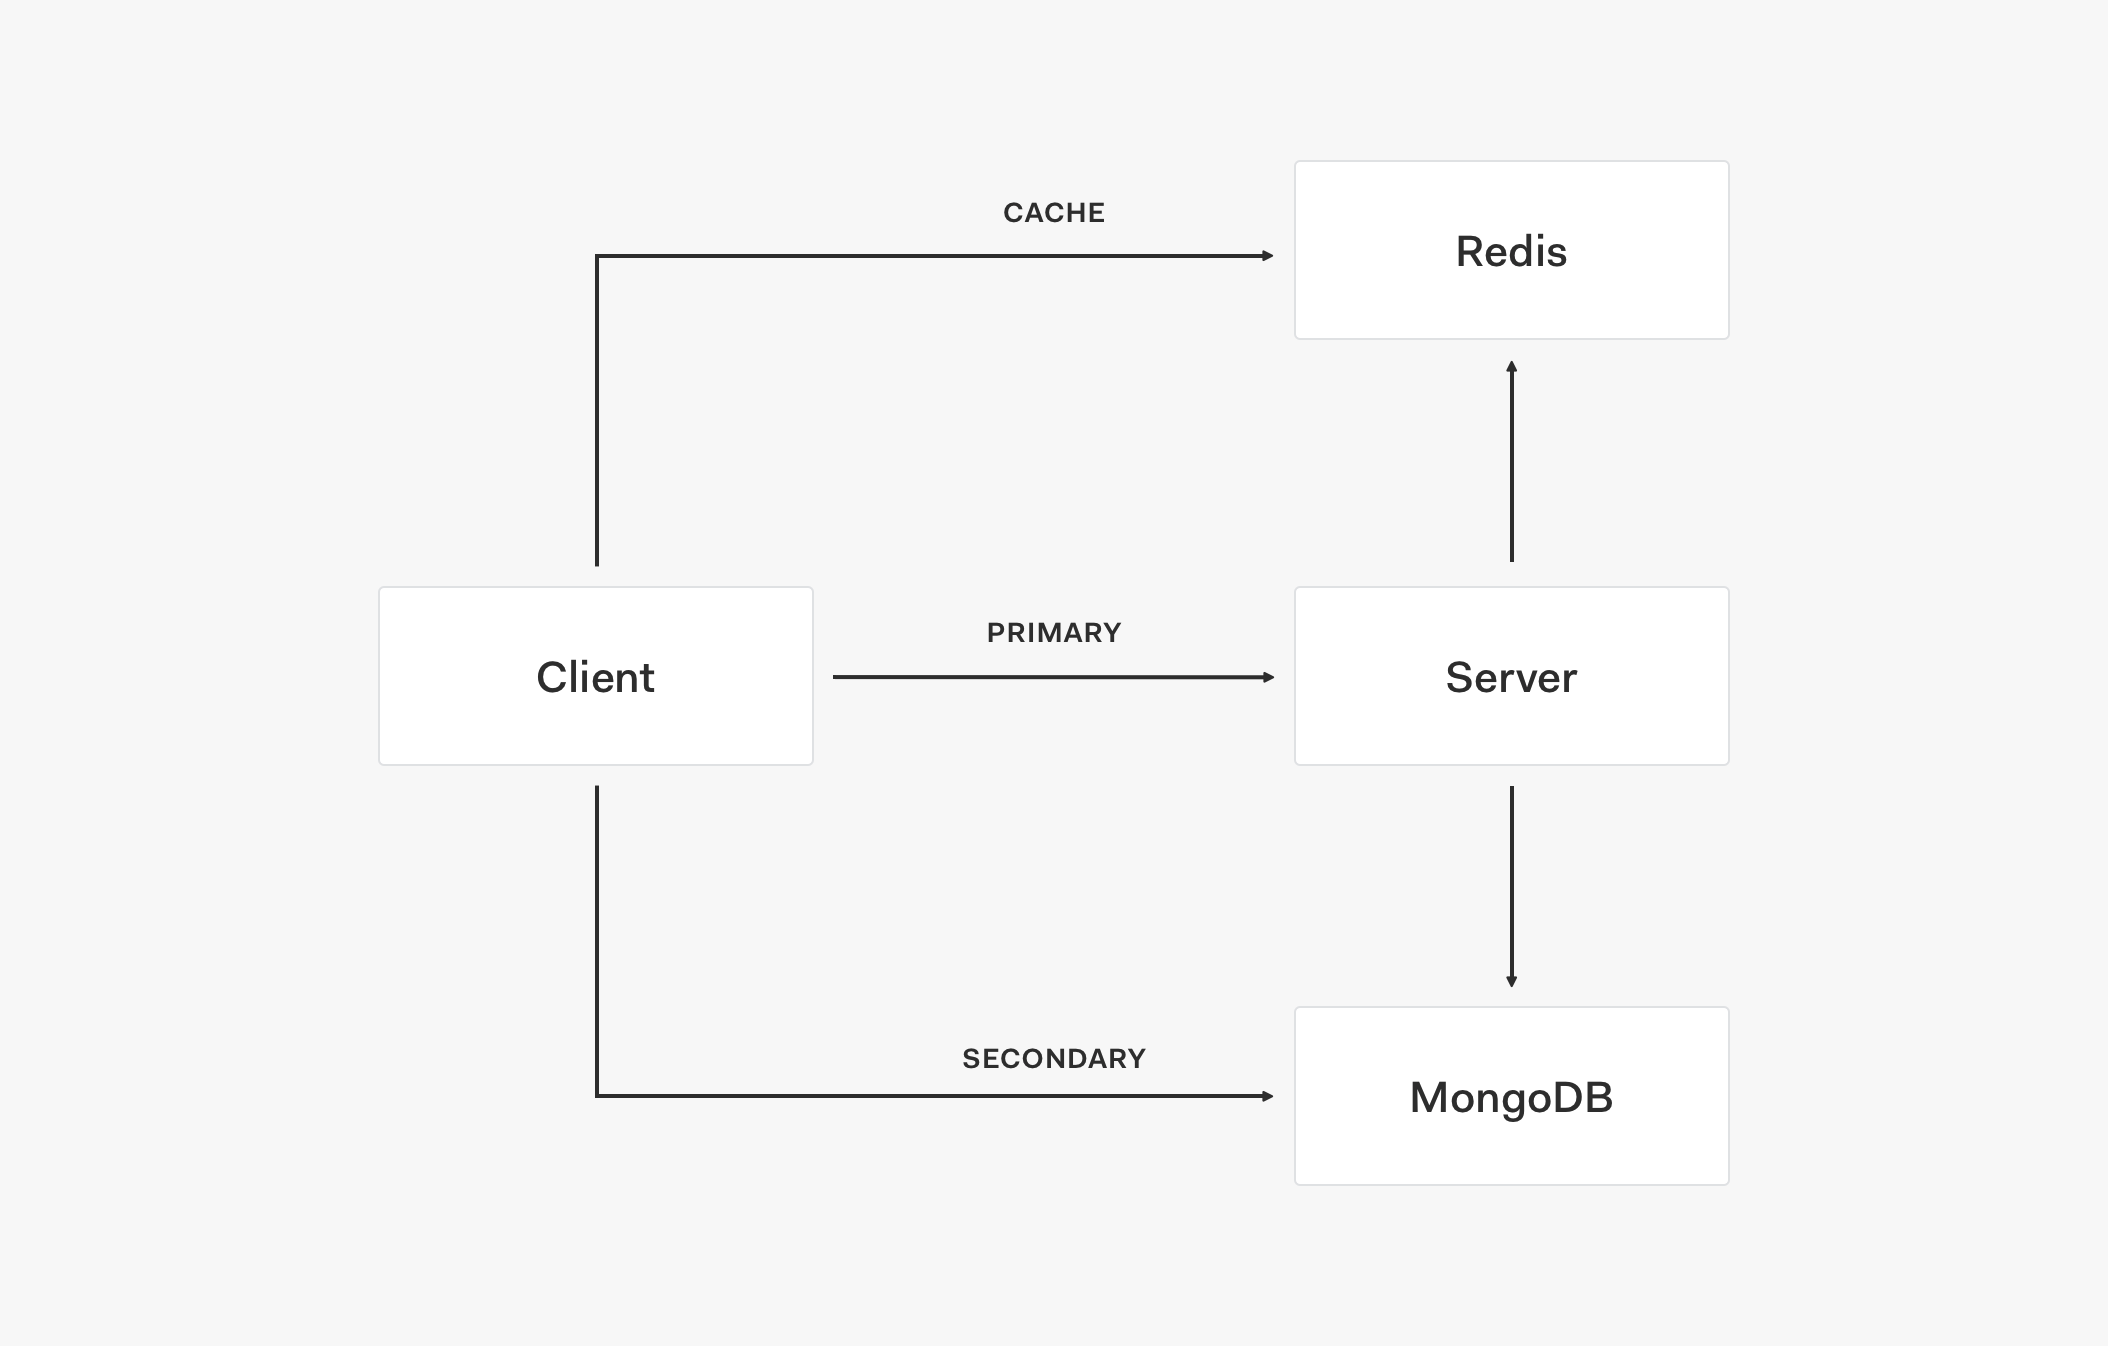
Connecting Directly to the Database
This is the scenario where the client connects directly to a database such as MongoDB. In essence, this is the most basic configuration to have for the service. We simply connect the client to any database of our choice and retrieve data — in this case, feature flags. The client could be limited to have read-only permissions to the database but write operations could be added if necessary.
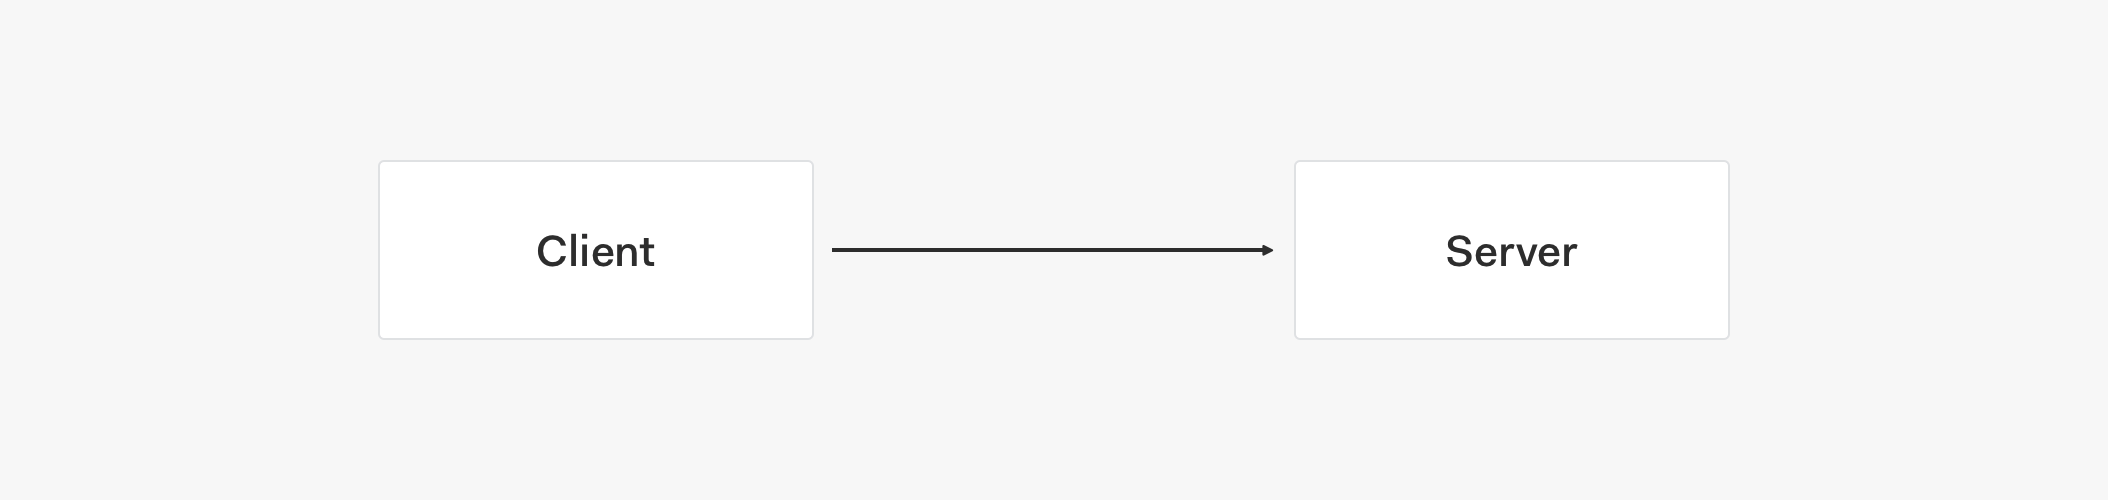
Our current client for our feature flags service is read-only.
Let's look at some of the pros and cons of this architecture.
Pros
- Easy to set up.
- Doesn't require additional infrastructure.
- Configurable for Auth0 appliances.
- An Auth0 appliance is an Auth0 deployment that exists in a dedicated area of Auth0's cloud, your cloud, or your own data center.
- For example, a self-hosted Auth0 instance doesn't need to connect to the Auth0 server that manages the service; instead, it can connect to the database directly.
Cons
- No failover.
- If the database is down, the service is also down.
- Database stress occurs if the client application doesn't enforce limits.
- Higher security complexity.
- You have to grant database access to a service.
- It requires you to open permissions, create security groups, etc. to control access levels to the database by services.
Although this basic approach is straightforward, we thought of a better approach: integrate the concept of a store in the service architecture.
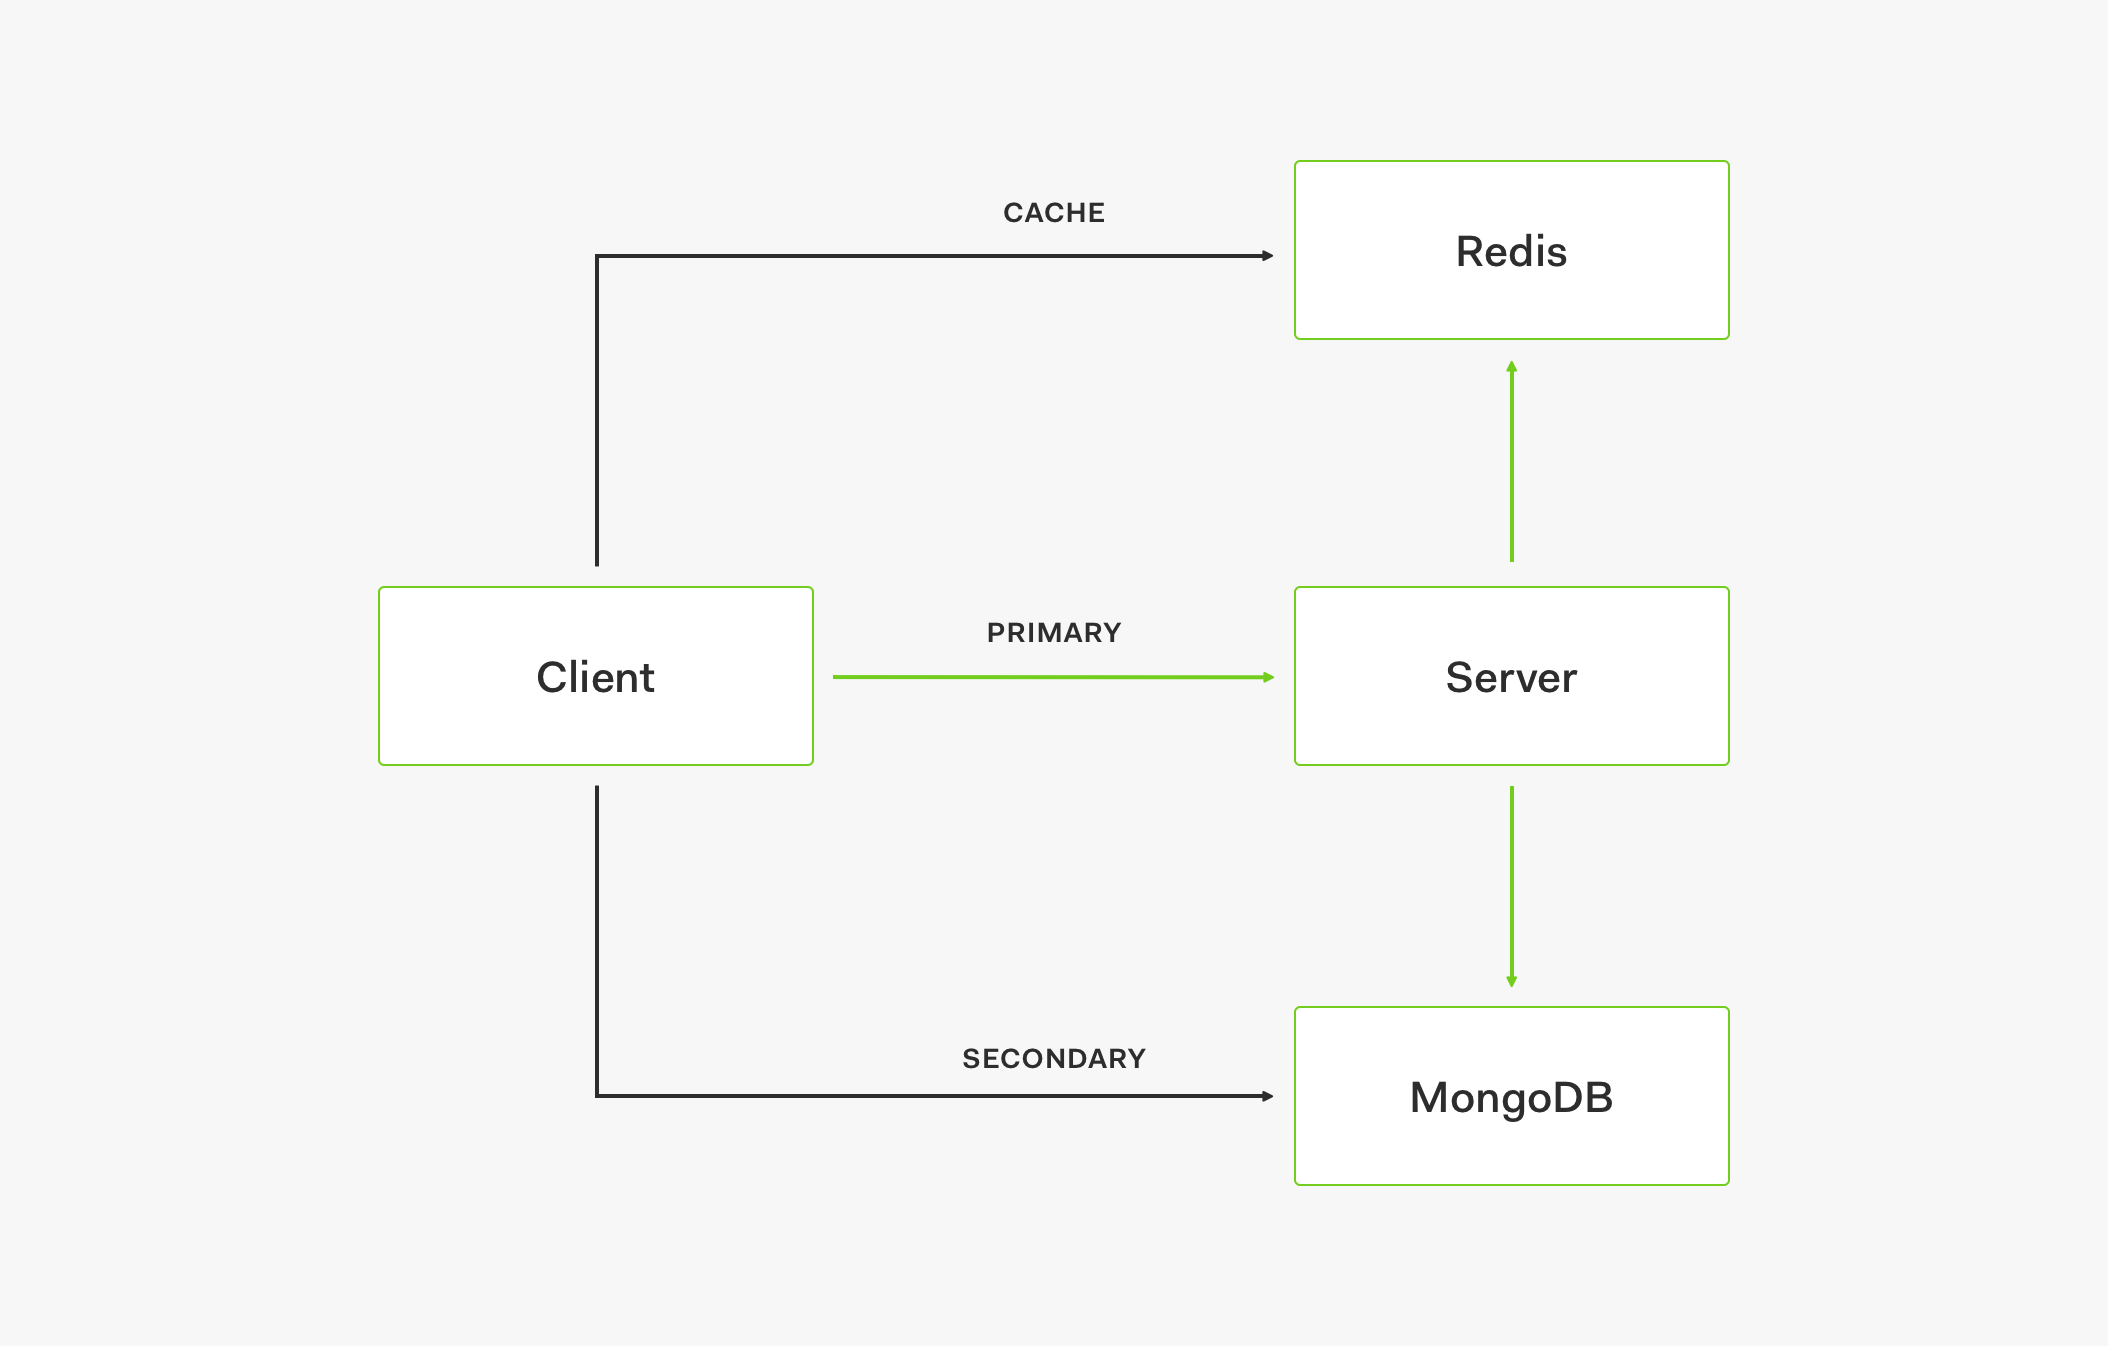
Using a Data Store
To augment the previously discussed architecture, we added the concept of a store. A store is basically a service provider. It can be a primary or a secondary provider that we can connect to different services. In turn, a service can be an API or a direct database connection. The core principle here is that we can use the stores to design a fallback strategy and optimize service availability. For example, the secondary store serves as a fallback for any kind of incident that we could have with the primary store to guarantee data access for the service.
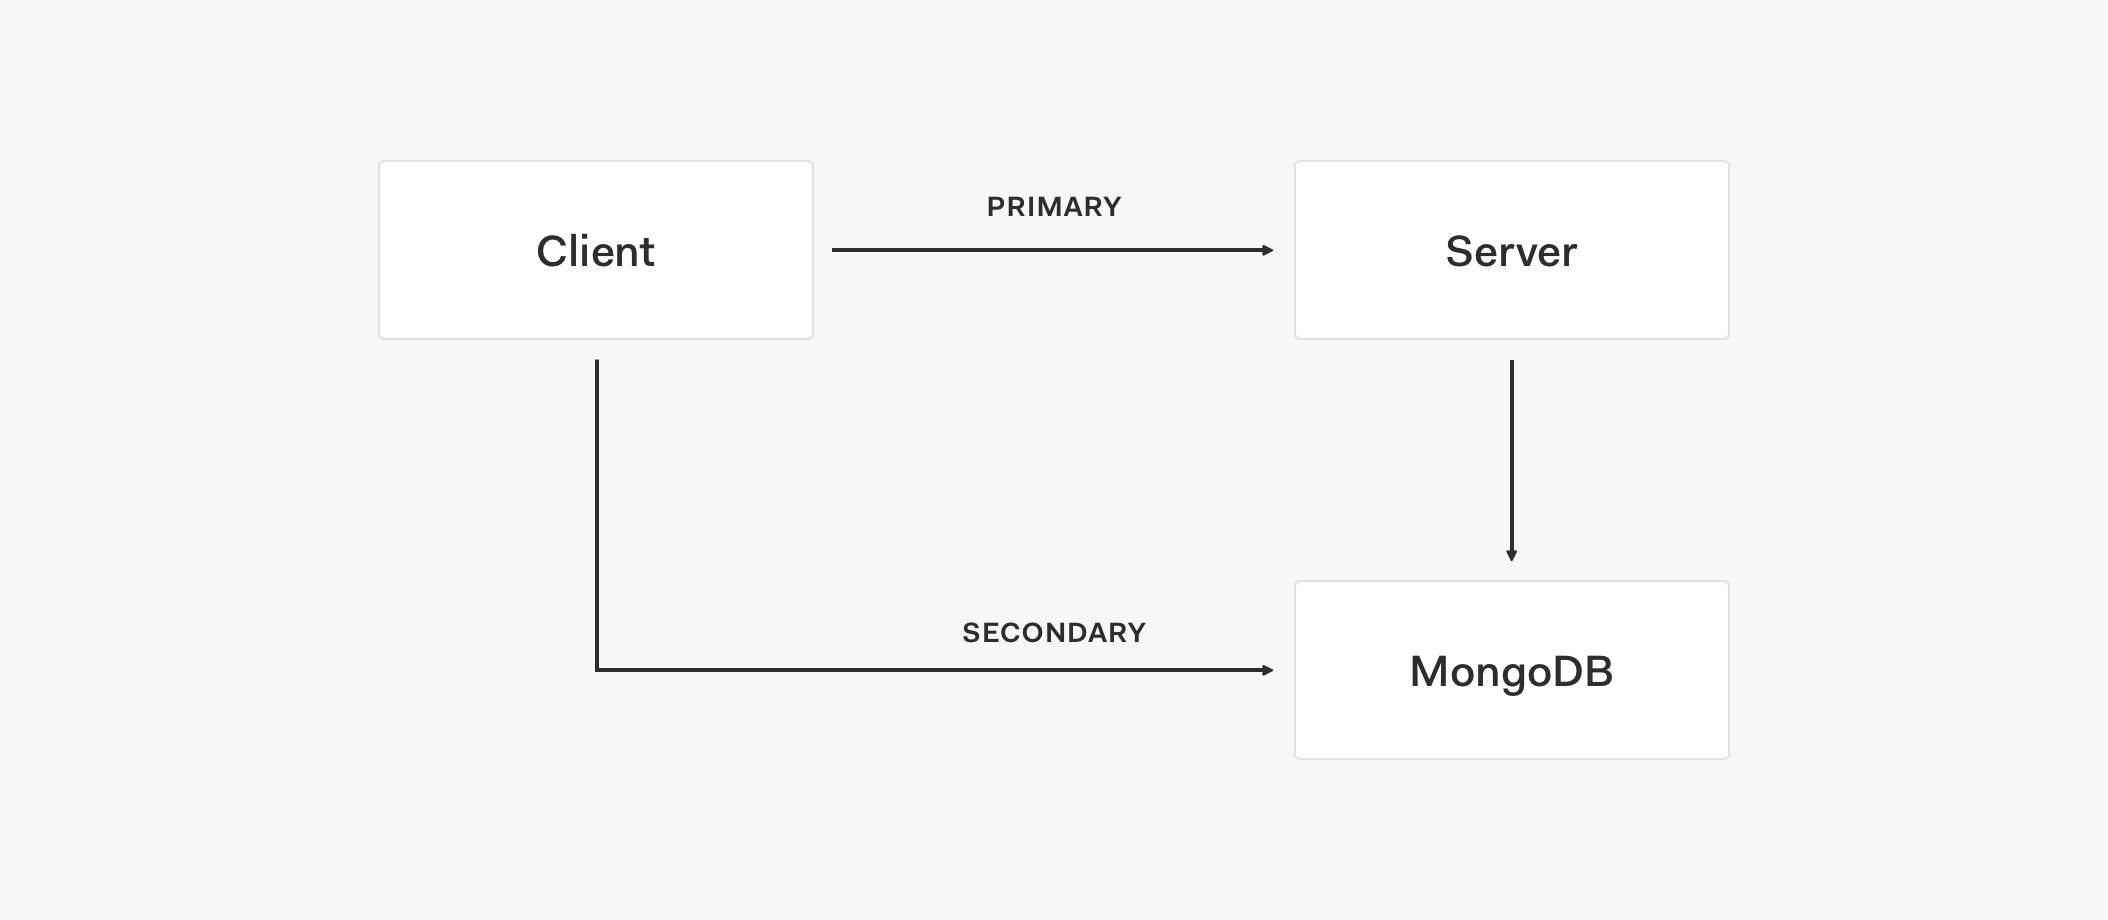
Let's look at the architecture flow of this topology:
- The client tries to connect to the primary store to use an API to retrieve data.
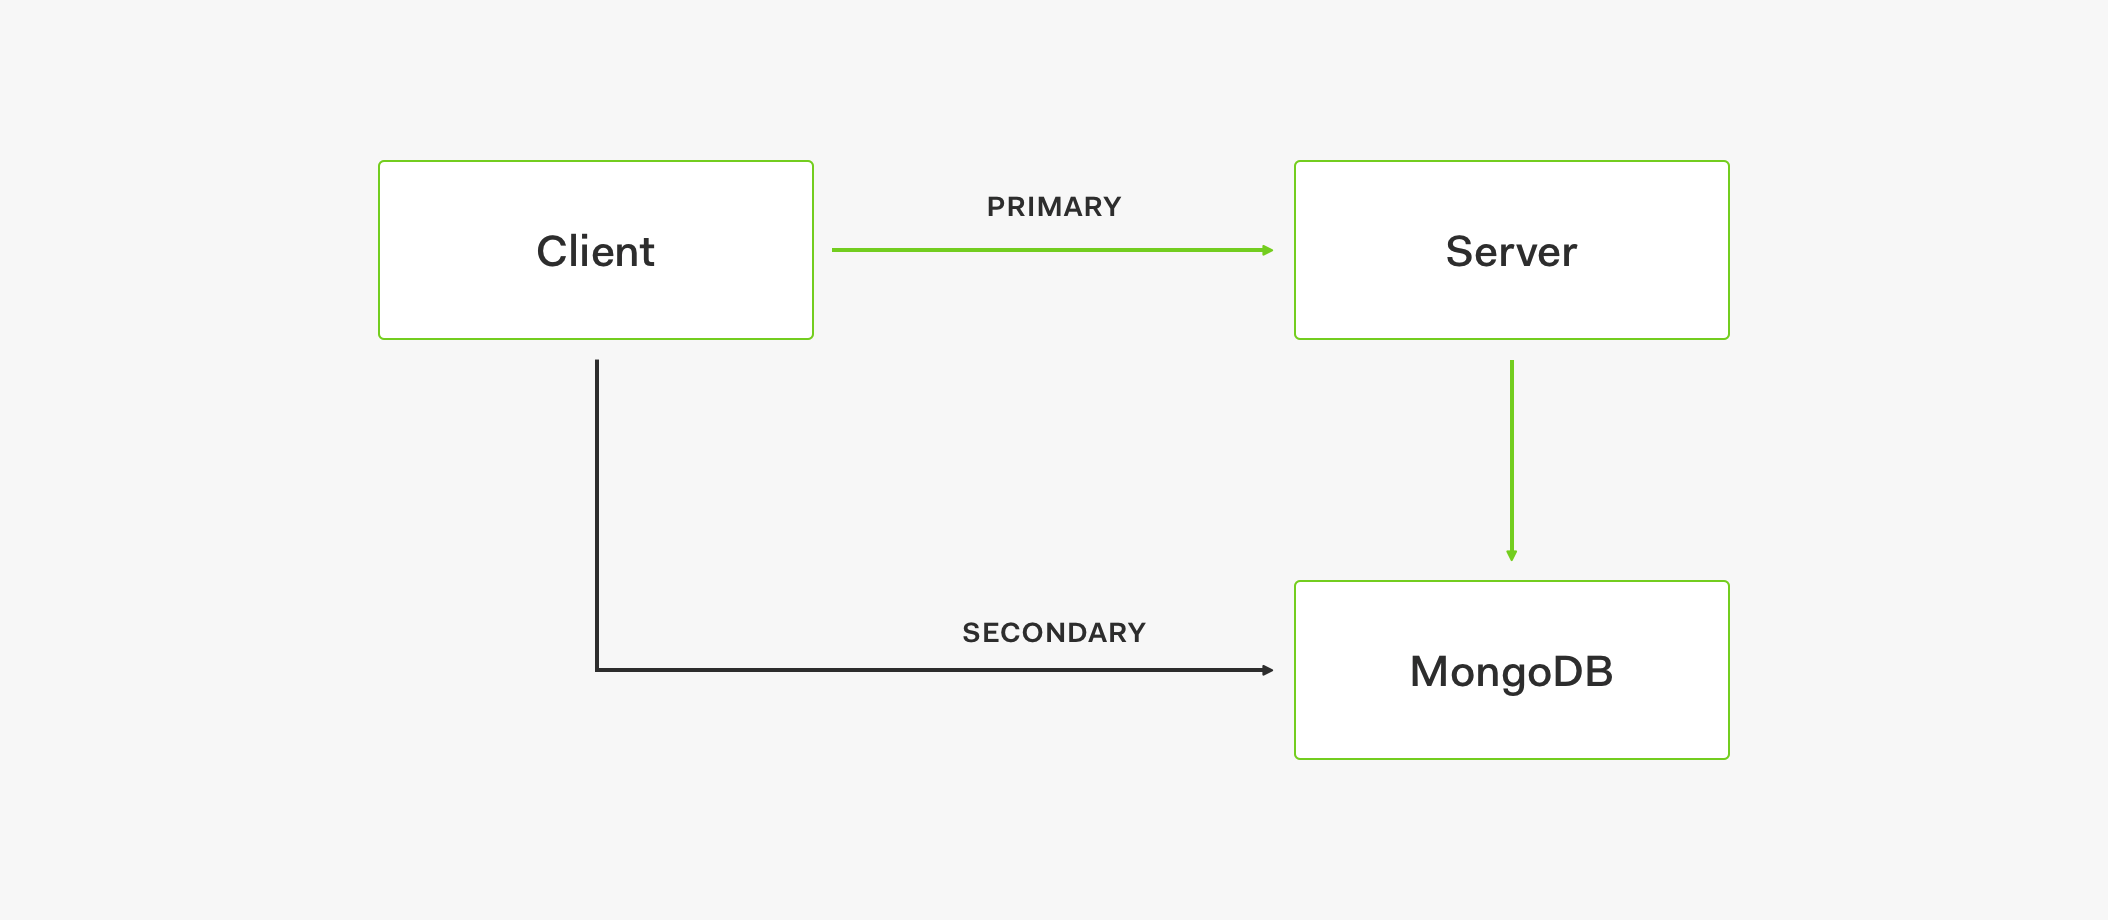
- If API is down for whatever reason, after 5 attempts, a logic circuit is opened.
- The open circuit takes the client request to the secondary store.
- The data is then retrieved from the secondary store.
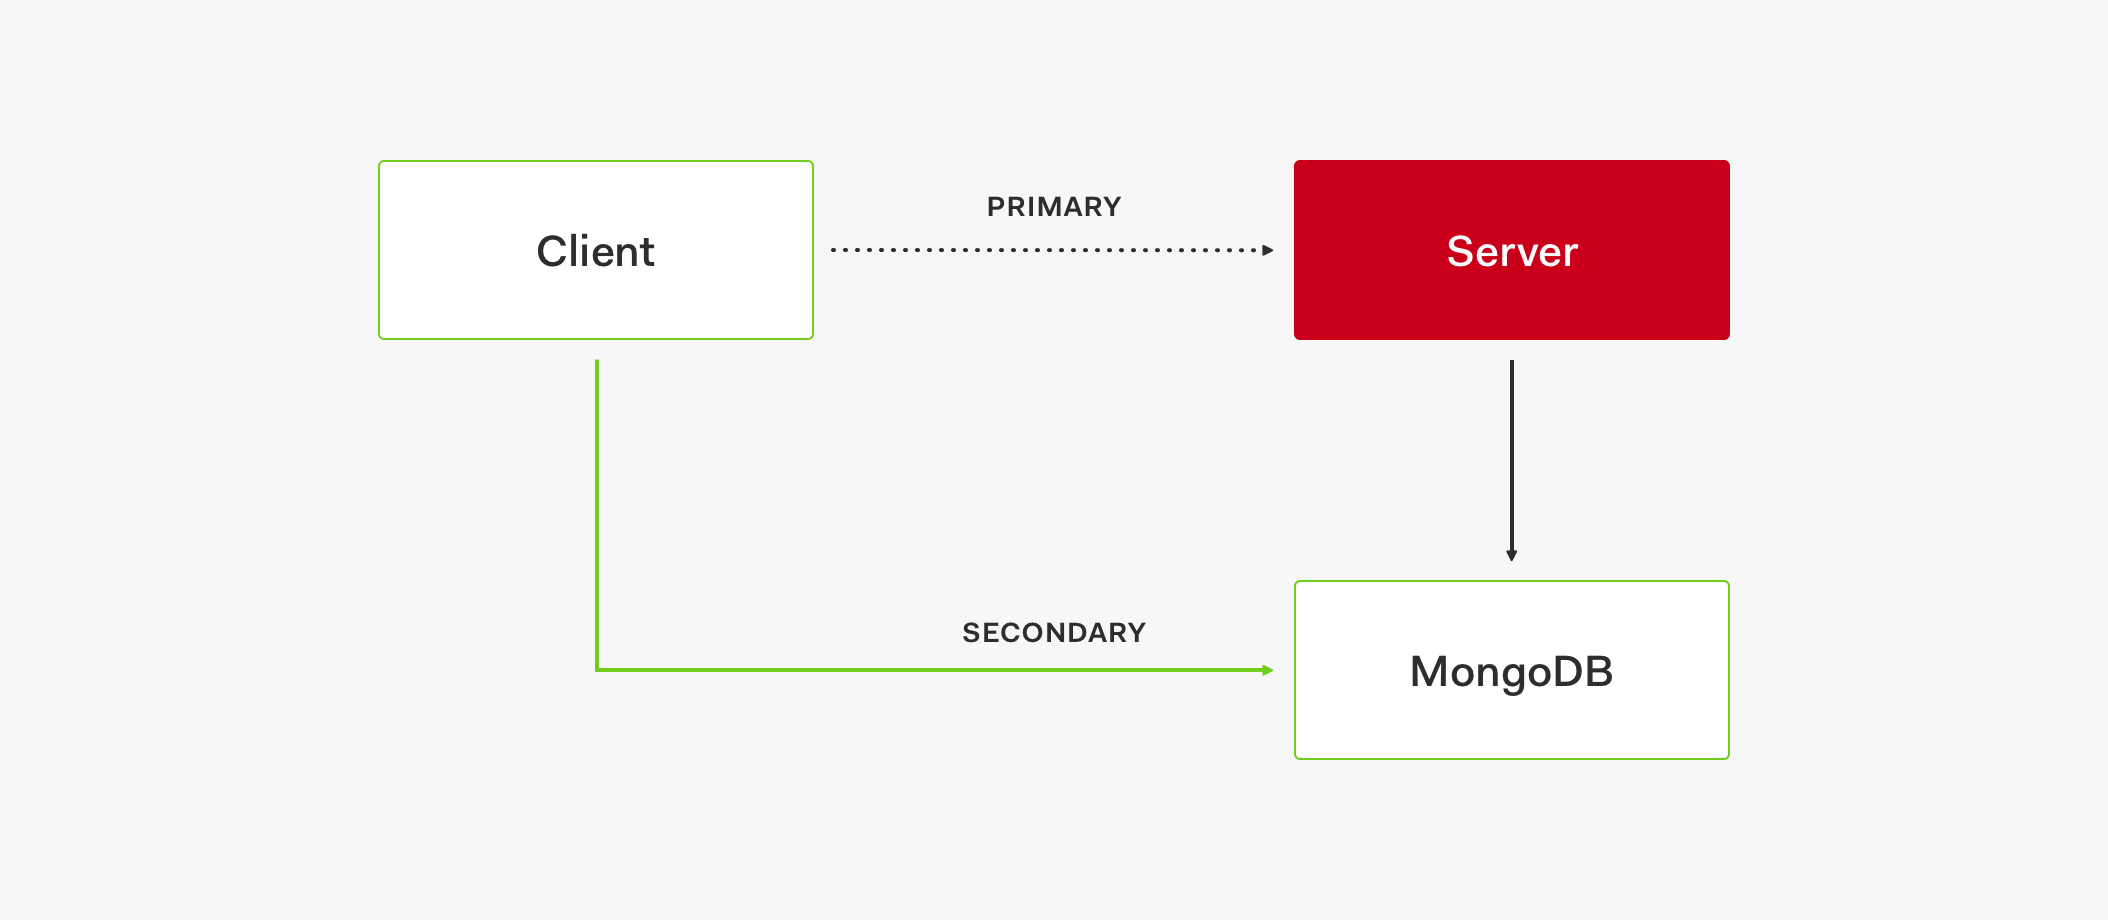
This flow may incur performance degradation or other problems but at least the service is operational. Additionally, the stores have the ability to self-heal. Once the primary store is up and running again, the circuit is closed and we go back to using the primary store.
Pros
- Circuit-breaking to handle failures.
- Automatic fallback and restoration.
- Scalable with company growth by abstracting underlying providers.
- Services with different access can query data.
Cons
- Additional infrastructure and maintenance required.
- Additional cost.
- Difficult to perform a capacity plan for both stores.
- When the primary store is down, all the requests go to the secondary one.
- You must understand the capacity of the secondary store and the traffic on its region; otherwise, this store will have a huge performance impact on the system.
- Capacity planning is not easy.
- Depends on traffic, use cases, client applications.
- Must account for applications having an internal cache or not.
- Must strategize how services are scaled.
- Need to balance stores to avoid major outage when the circuit is open.
- Avoid stampedes while the circuit is open.
- Requests are going to flood the secondary store and may crash it.
To solve the problems present in this topology, we needed to add another layer: the cache. Let's explore that next.
Adding Caching to the Stores
In this stage, we now have three layers: cache, primary store, and secondary store.
Let's understand how these layers interact with each other by analyzing the architectural flow of this topology:
- The client first retrieves data from the cache, such as Redis.

- If data is not in the cache, the request goes to the primary store.
- When the primary store provides the data response, it also updates the cache.
- Subsequent requests will then retrieve that data from the cache.
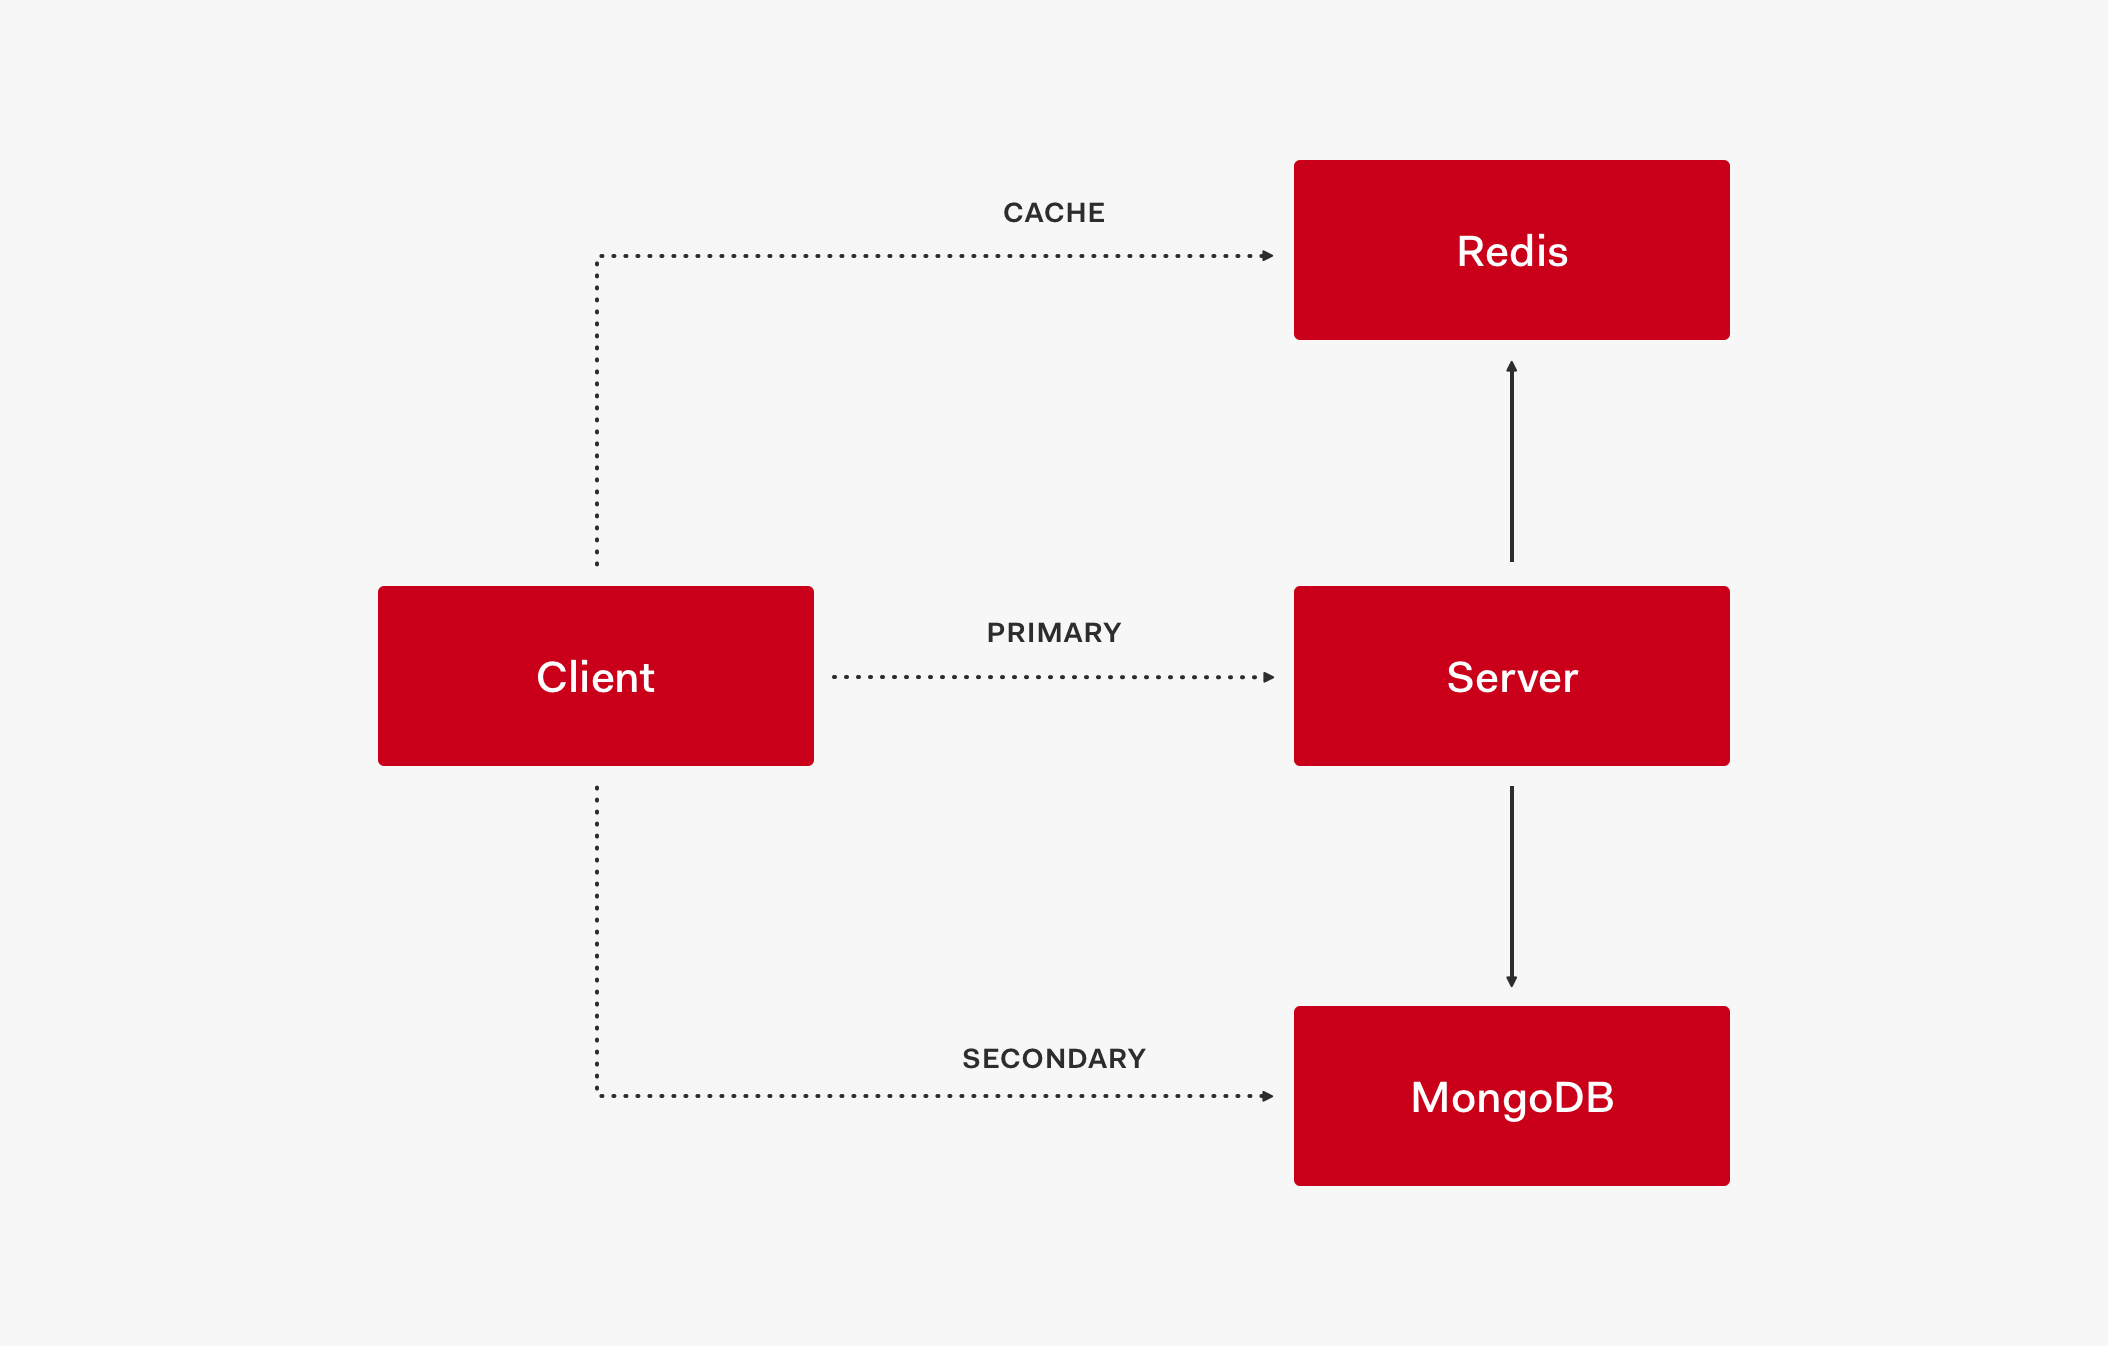
If the cache is up but doesn't have the needed value (the cache is outdated) and the primary store is down, the request is served by the secondary store which acts as a fallback.
If both the cache and the primary store are down, the request is also served by the secondary store.
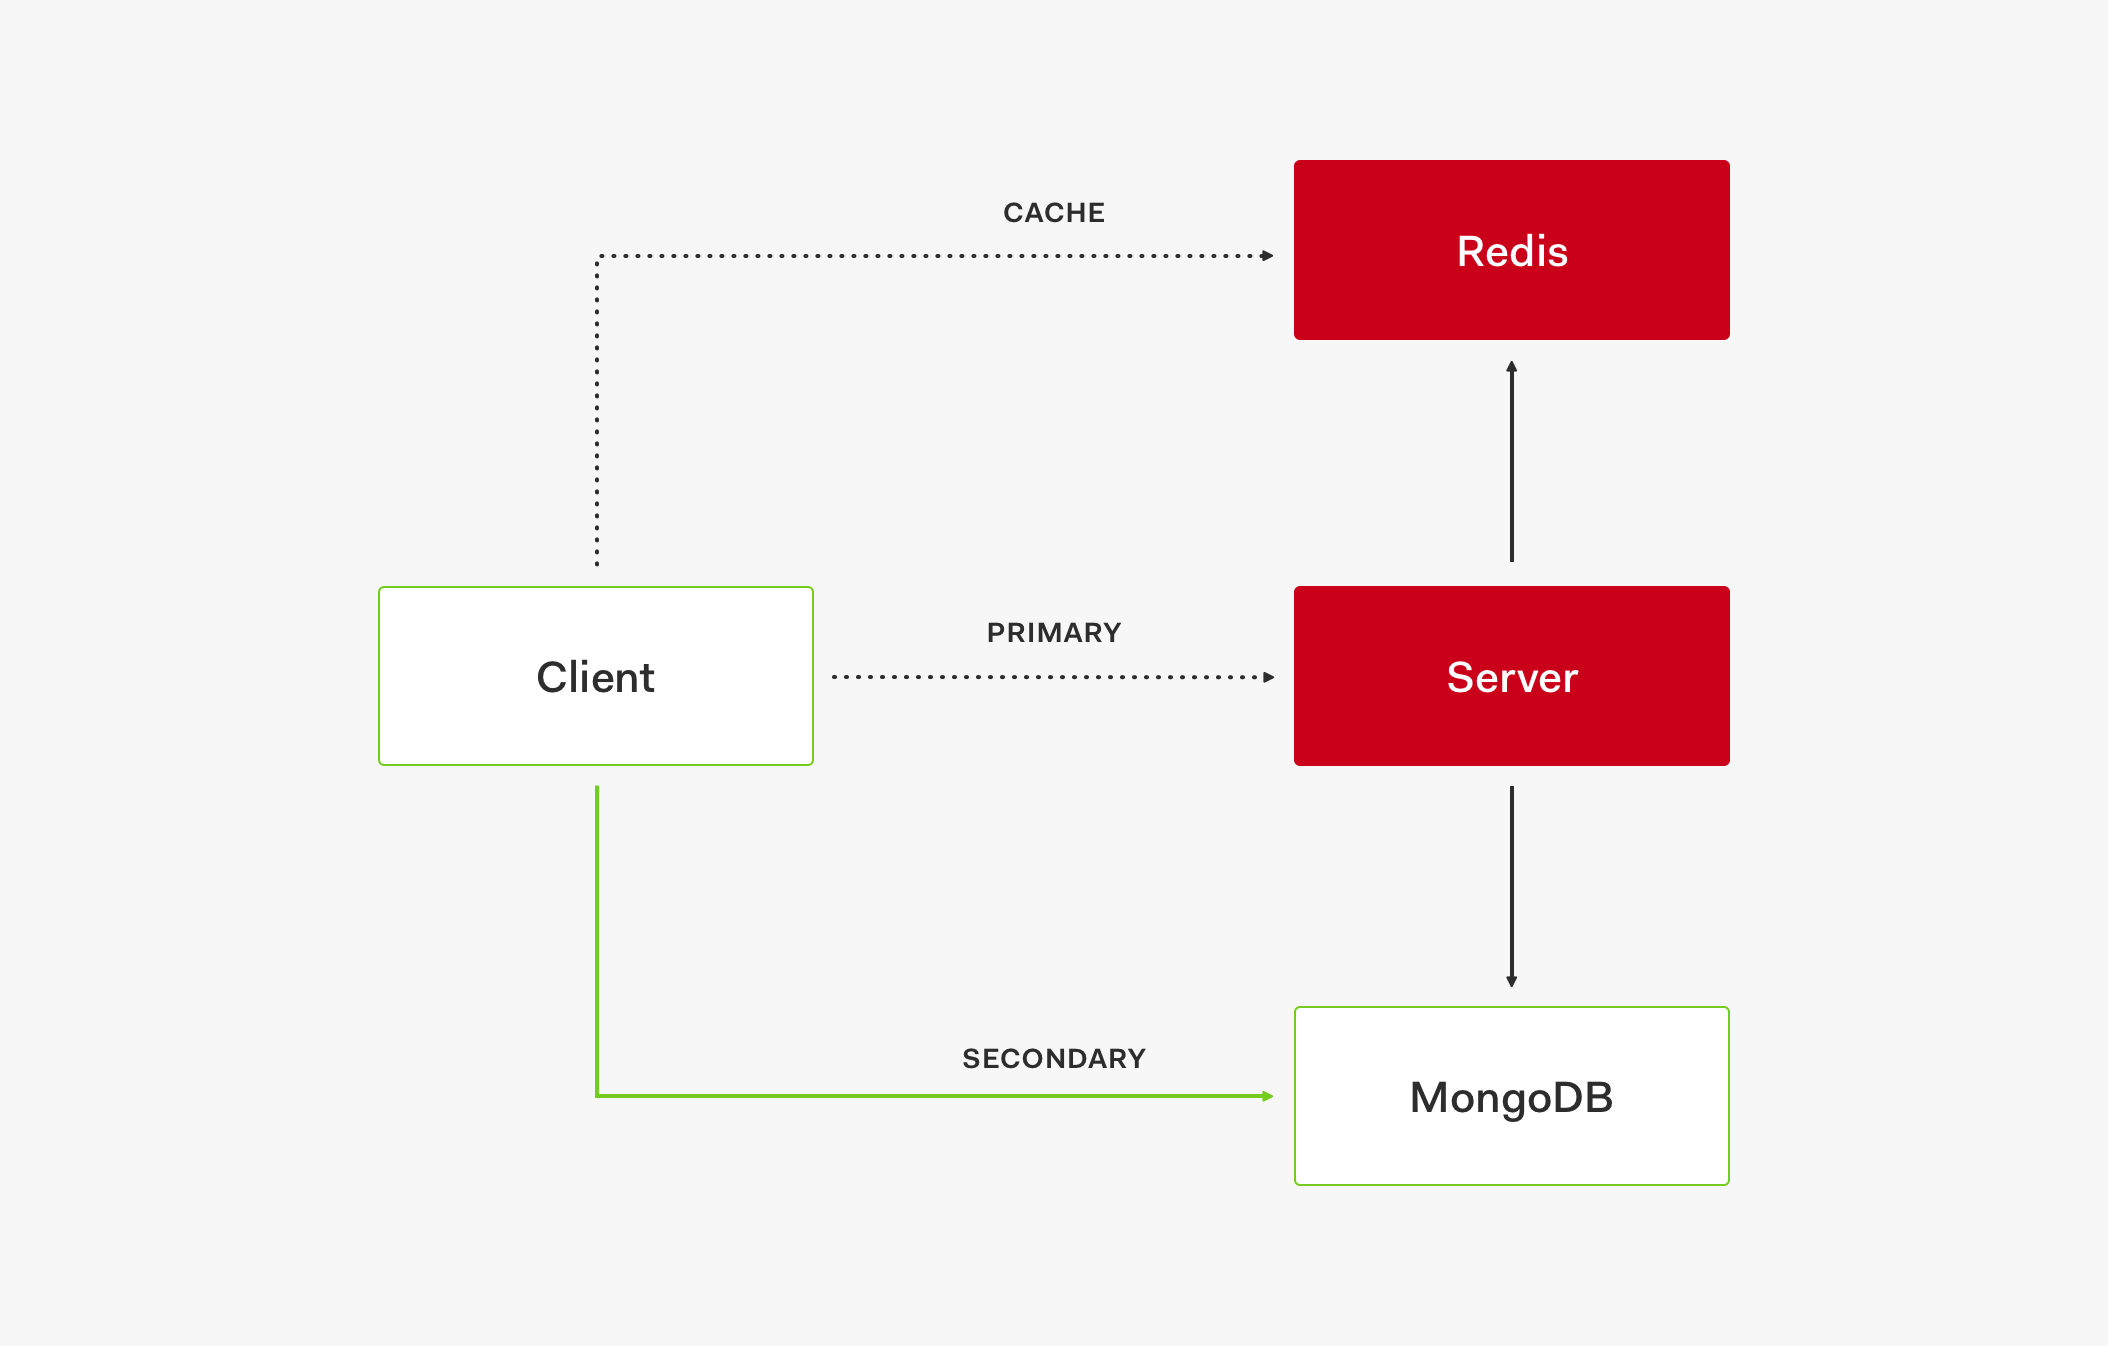
- To create a service outage, all three layers need to be down: cache, primary store, and secondary store.
This three-layer system model creates a high availability setup to keep the service up and running.
We highly benefit from this architecture at Auth0, since we can keep some of our services operational in a similar way to our authentication server.
Pros
- Faster response times.
- Ideal for data that doesn't change much, such as feature flags in our case.
- Great benefit to have flags cached.
- Reduction of stress on stores.
- Same benefits as stores (circuit-breaking, fallback, restoration).
Cons
- Yet more infrastructure to add and maintain with additional cost.
- You now need a distributed cache.
- Another point of failure to consider.
- Caching requires additional balance (proper time to live (TTL) values, cache invalidation)
- Same problems as stores in relation to capacity planning.
This is the most mature progression of the service architecture for our feature flags service. Part of its success is counting with a performant circuit-breaking mechanism that allows us to switch between the different layers of the model as needed. Let's explore more in-depth our current circuit-breaking strategy.
Circuit-Breaking
Circuit breaking is a design pattern implemented in software architecture and popularized by Michael Nygard in his book, Release It!. This pattern is used to detect system failures and prevent the system from attempting to execute operations that will fail during events such as maintenance or outages.
At Auth0, we implement the circuit-breaking pattern using a custom library created by our Head of Engineering, José Romaniello, called disyuntor.
Our engineers use this library to easily configure different paths for exceptions and problems:
const disyuntor = require('disyuntor');

const dnsSafeLookup = disyuntor.wrapCallbackApi({
  //This is used in error messages.
  name: 'dns.lookup',

  //Timeout for the protected function.
  // timeout: '2s',

  //The number of consecutive failures before switching to open mode
  //and stop calling the underlying service.
  // maxFailures: 5,

  //The minimum time the circuit remains open before doing another attempt.
  // cooldown: '15s',

  //The maximum amount of time the circuit remains open before doing a new attempt.
  // maxCooldown: '60s',

  //optionally log errors
  onTrip: (err, failures, cooldown) => {
    console.log(`dns.lookup triped because it failed ${failures} times.
Last error was ${err.message}! There will be no more attempts for ${cooldown}ms.`);
  },

  onClose: (cooldown) => {
    console.log(`dns.lookup circuit closed after ${cooldown}ms.`;
  }

  // //optional callback to prevent some errors to trigger the disyuntor logic
  // //in this case ENOTFOUND is passed to the callback and will
  // //not trigger the breaker eg:
  // trigger: (err) => err.code !== 'ENOTFOUND'
}, dns.lookup);

//then use as you will normally use dns.lookup
dnsSafeLookup('google.com', (err, ip) => {
  if (err) { return console.error(err.message); }
  console.log(ip);
})
For example, if we have a problem after 4 failures, we open the circuit and we go on a different path. For this path, you can have a recovery, a fallback, or any kind of preferred alternative in your code. Whenever the service trips the wire, using the onTrip method, we log an exception:
// Configure protected functions with circuit-breaker
const disyuntorOptions = {
  name: "client",
  maxFailures: 4,
  cooldown: "15s",
  timeout: options.api && options.api.type === "rest" ? "5s" : "1s",
  trigger: err => {
    // increment the number of attempts only for transient errors
    return this._isTransientError(err);
  },
  onTrip: (err, failures) =>
    agent.logger.error(
      { err },
      `An error occurred while reading from primary  store after ${failures} attempts.`
    )
};
This is the basic configuration we have for our feature flags service. At every 4 failures, we open the circuit, go to the secondary store, and we have a cooldown of 15 seconds before we try to use the primary store again.
Our service has a RESTful implementation using HapiJS and another one using gRPC. In the circuit-breaking configuration, we also specify a timeout whose length depends on the type of API request. For HapiJS, if servicing the request takes longer than 5 seconds, we automatically time out. For gRPC, the timeout is 1 second:
const disyuntorOptions = {
  //...
  timeout: options.api && options.api.type === "rest" ? "5s" : "1s"
  //...
};
Additionally, the timeout depends on the trigger:
const disyuntorOptions = {
  //...
  trigger: err => {
    // increment the number of attempts only for transient errors
    return this._isTransientError(err);
  }
  //...
};
We have to detect if we are experiencing a transient error or not. There are errors that warrant opening the circuit and others that don't. For example, in our feature flags service, an invalid flag is not an error that calls for opening the circuit. Instead, it is just a bad request from the client application.
Using disyuntor, this is how it looks to open the circuit:
_getFlagsFromStore(entityId, flagsIds) {
  const self = this;
  return self.protectedGetFlags(entityId, flagsIds)
    .then(flags => { return flags; })
    .catch(err => {
      if (!self.stores.secondary || !self._isTransientError(err)) {
        // don't use fallback for non transient errors
        throw err;
      }
      agent.logger.error(err.error || err, 'getFlags.fromPrimaryStore.error');
      return self.stores.secondary.Entities.getFlags(entityId, flagsIds)
        .then(flag => { return flag; })
        .catch(err => {
          throw err;
        });
    });
}
disyuntor creates a Promise to get the feature flags. If the Promise resolves, it returns the flags; otherwise, it goes into the catch block. Once there, we verify that we have configured a secondary store and that we are not experiencing a transient error and then retrieve the flags from the secondary store. Translating this into our final service architecture goes like this:
First, we go to the cache:
_getFlagsFromStore(entityId, flagsIds) {
  // ...
}
If the cache doesn't have the value, we go to the primary store, for example, our gRPC API:
_getFlagsFromStore(entityId, flagsIds) {
  // ...
  return self.protectedGetFlags(entityId, flagsIds)
    .then(flags => { return flags; })
    .catch(err => {
      // ...
    });
}
If after 4 attempts the primary store fails to service the request, we go to the secondary store, which is MongoDB, to retrieve the flag:
_getFlagsFromStore(entityId, flagsIds) {
  // ...
  return self.protectedGetFlags(entityId, flagsIds)
    .then(flags => { return flags; })
    .catch(err => {
      if (!self.stores.secondary || !self._isTransientError(err)) {
        // don't use fallback for non transient errors
        throw err;
      }
      agent.logger.error(err.error || err, 'getFlags.fromPrimaryStore.error');
      return self.stores.secondary.Entities.getFlags(entityId, flagsIds)
        .then(flag => { return flag; })
        .catch(err => {
          throw err;
        });
    });
}
Going to the secondary store is our last resource when we are having issues with our cache and primary store. It allows us to continue serving flags to all other services.
Finally, let's look into our caching strategy a bit closer.
“Learn more about circuit breaking: a design pattern to detect system failures and prevent the system from attempting to execute operations that will fail during events such as maintenance or outages.”
Tweet This
Cache
For caching, we simply add Redis as cache and create cache strategies without any complex configuration:
"use strict";
const _ = require("lodash");
module.exports = class CacheConfigurator {
  constructor(strategies) {
    this.Strategies = _.extend(
      {
        redis: require("./redis-cache"),
        memory: require("./memory-cache")
      },
      strategies
    );
  }
  build(options) {
    if (!options) {
      return;
    }
    const strategy = this.Strategies[options.type];
    if (!strategy) {
      throw new Error("Unknown cache strategy " + options.type);
    }
    return new strategy(options);
  }
};
We use a CacheConfiguration class that allows us to pick different caching strategies: a distributed cache, such as Redis, or an in-memory cache. Essentially, we initialize the SDK and specify which cache we want. The initialization strategy determines how the SDK will retrieve flag information from the cache:
_getFlagFromCache(entityId, flagId) {
  return this.cache ? this.cache.getEntityFlag(entityId, flagId) : Promise.resolve();
}
If the cache is configured, we retrieve the flag from the provider; otherwise, return a Promise. If the cache misses, the request is handled by the primary store; otherwise, we return the value retrieved from the cache.
We have the freedom to extend our caching strategies. We could replace Redis with MongoDB as a distributed cache, for example. We can do the same for the primary and secondary stores. We could use PostgreSQL as a primary store, for example, or any other provider that meets our present and future requirements.
Managing Disaster Scenarios
Our self-healing service architecture is simple and it allows us to implement disaster management solutions easily as we have seen:
🛑 Cache times out.
✅ Connect to primary store.
🛑 Cache is down.
✅ Connect to primary store.
🛑 Primary store times out.
✅ After a certain number of attempts, open the circuit to secondary store.
🛑 Primary store is down.
✅ After a certain number of attempts, open the circuit to secondary store.
🛑 Secondary store is down.
🙏 Pray… light a candle… everything is down!
Ideally, the data that supports the service feature should be moved into its own database. In our case, this would mean moving our feature flags data into its own separate MongoDB instance with separate backups and monitoring.
Next Steps For Our Architecture
We are planning to perform the following infrastructure and system upgrades to further optimize our service architecture:
- Improve caching strategies further.
- Augment the size of our caching instances to have even better reliability in each region.
- Introduce circuit-breaking at the cache layer.
- In case Redis fails, we can then talk to a memory cache.
- Memoize incoming requests for faster performance.
- We could cache promises and return their resolution.
Conclusion
Why did we build our own feature flags service anyway? We wanted a hosted version to use different providers and for any Auth0 appliance. By building our own service we gained provider flexibility that we can tailor to our specific needs. We considered offerings such as LaunchDarkly but it did not meet our service requirements. What we like best about our feature flags service is that we can define the complexity level of the service layer by layer. In the future, we may consider open sourcing this project.
About Auth0
Auth0 by Okta takes a modern approach to customer identity and enables organizations to provide secure access to any application, for any user. Auth0 is a highly customizable platform that is as simple as development teams want, and as flexible as they need. Safeguarding billions of login transactions each month, Auth0 delivers convenience, privacy, and security so customers can focus on innovation. For more information, visit https://auth0.com.
About the author

Dan Arias
Software Engineer (Auth0 Alumni)