
The Auth0 Dashboard offers a wide range of tools for managing your application's authentication and authorization. You can create and delete users, assign roles, ban IPs, and much more. Although it's convenient to manage users directly from the dashboard, there may be scenarios where you need control from within your application.
Say, for example, that you want to store UI preferences such as dark/light mode settings or the user’s preferred theme directly on the user’s profile so that, independently from which device they connect to your application, they will have their favorite settings ready.
In scenarios like this, where your application directly processes and manages users' information, you can use the Auth0 Management API, which allows you to work with users' data and programmatically access most features available in the Auth0 Dashboard.
In this article, we’ll explore how to use the Auth0 Management API from Python applications using the Auth0 Python SDK to read and store information about users, and at the end, we’ll build a lottery system to pull a random lucky user from the system.
Accessing the Auth0 Management API
The Auth0 Management API allows you to programmatically create, access, update, and delete resources from your Auth0 tenant. It is an API built for back-end servers or trusted parties to perform administrative tasks such as user management or DevOps.
You can access the Auth0 Management API via HTTP requests directly or use one of the SDKs we provide for such a purpose. In any scenario, you’ll need a few things before starting the management API.
- Auth0 account. If you don’t have one already, you can sign up for a free Auth0 account.
- A machine-to-machine application
- A short-lived token for production access to the API
Set up your Auth0 account
Once you have an Auth0 account you can navigate the the Auth0 Dashboard and access your applications list.
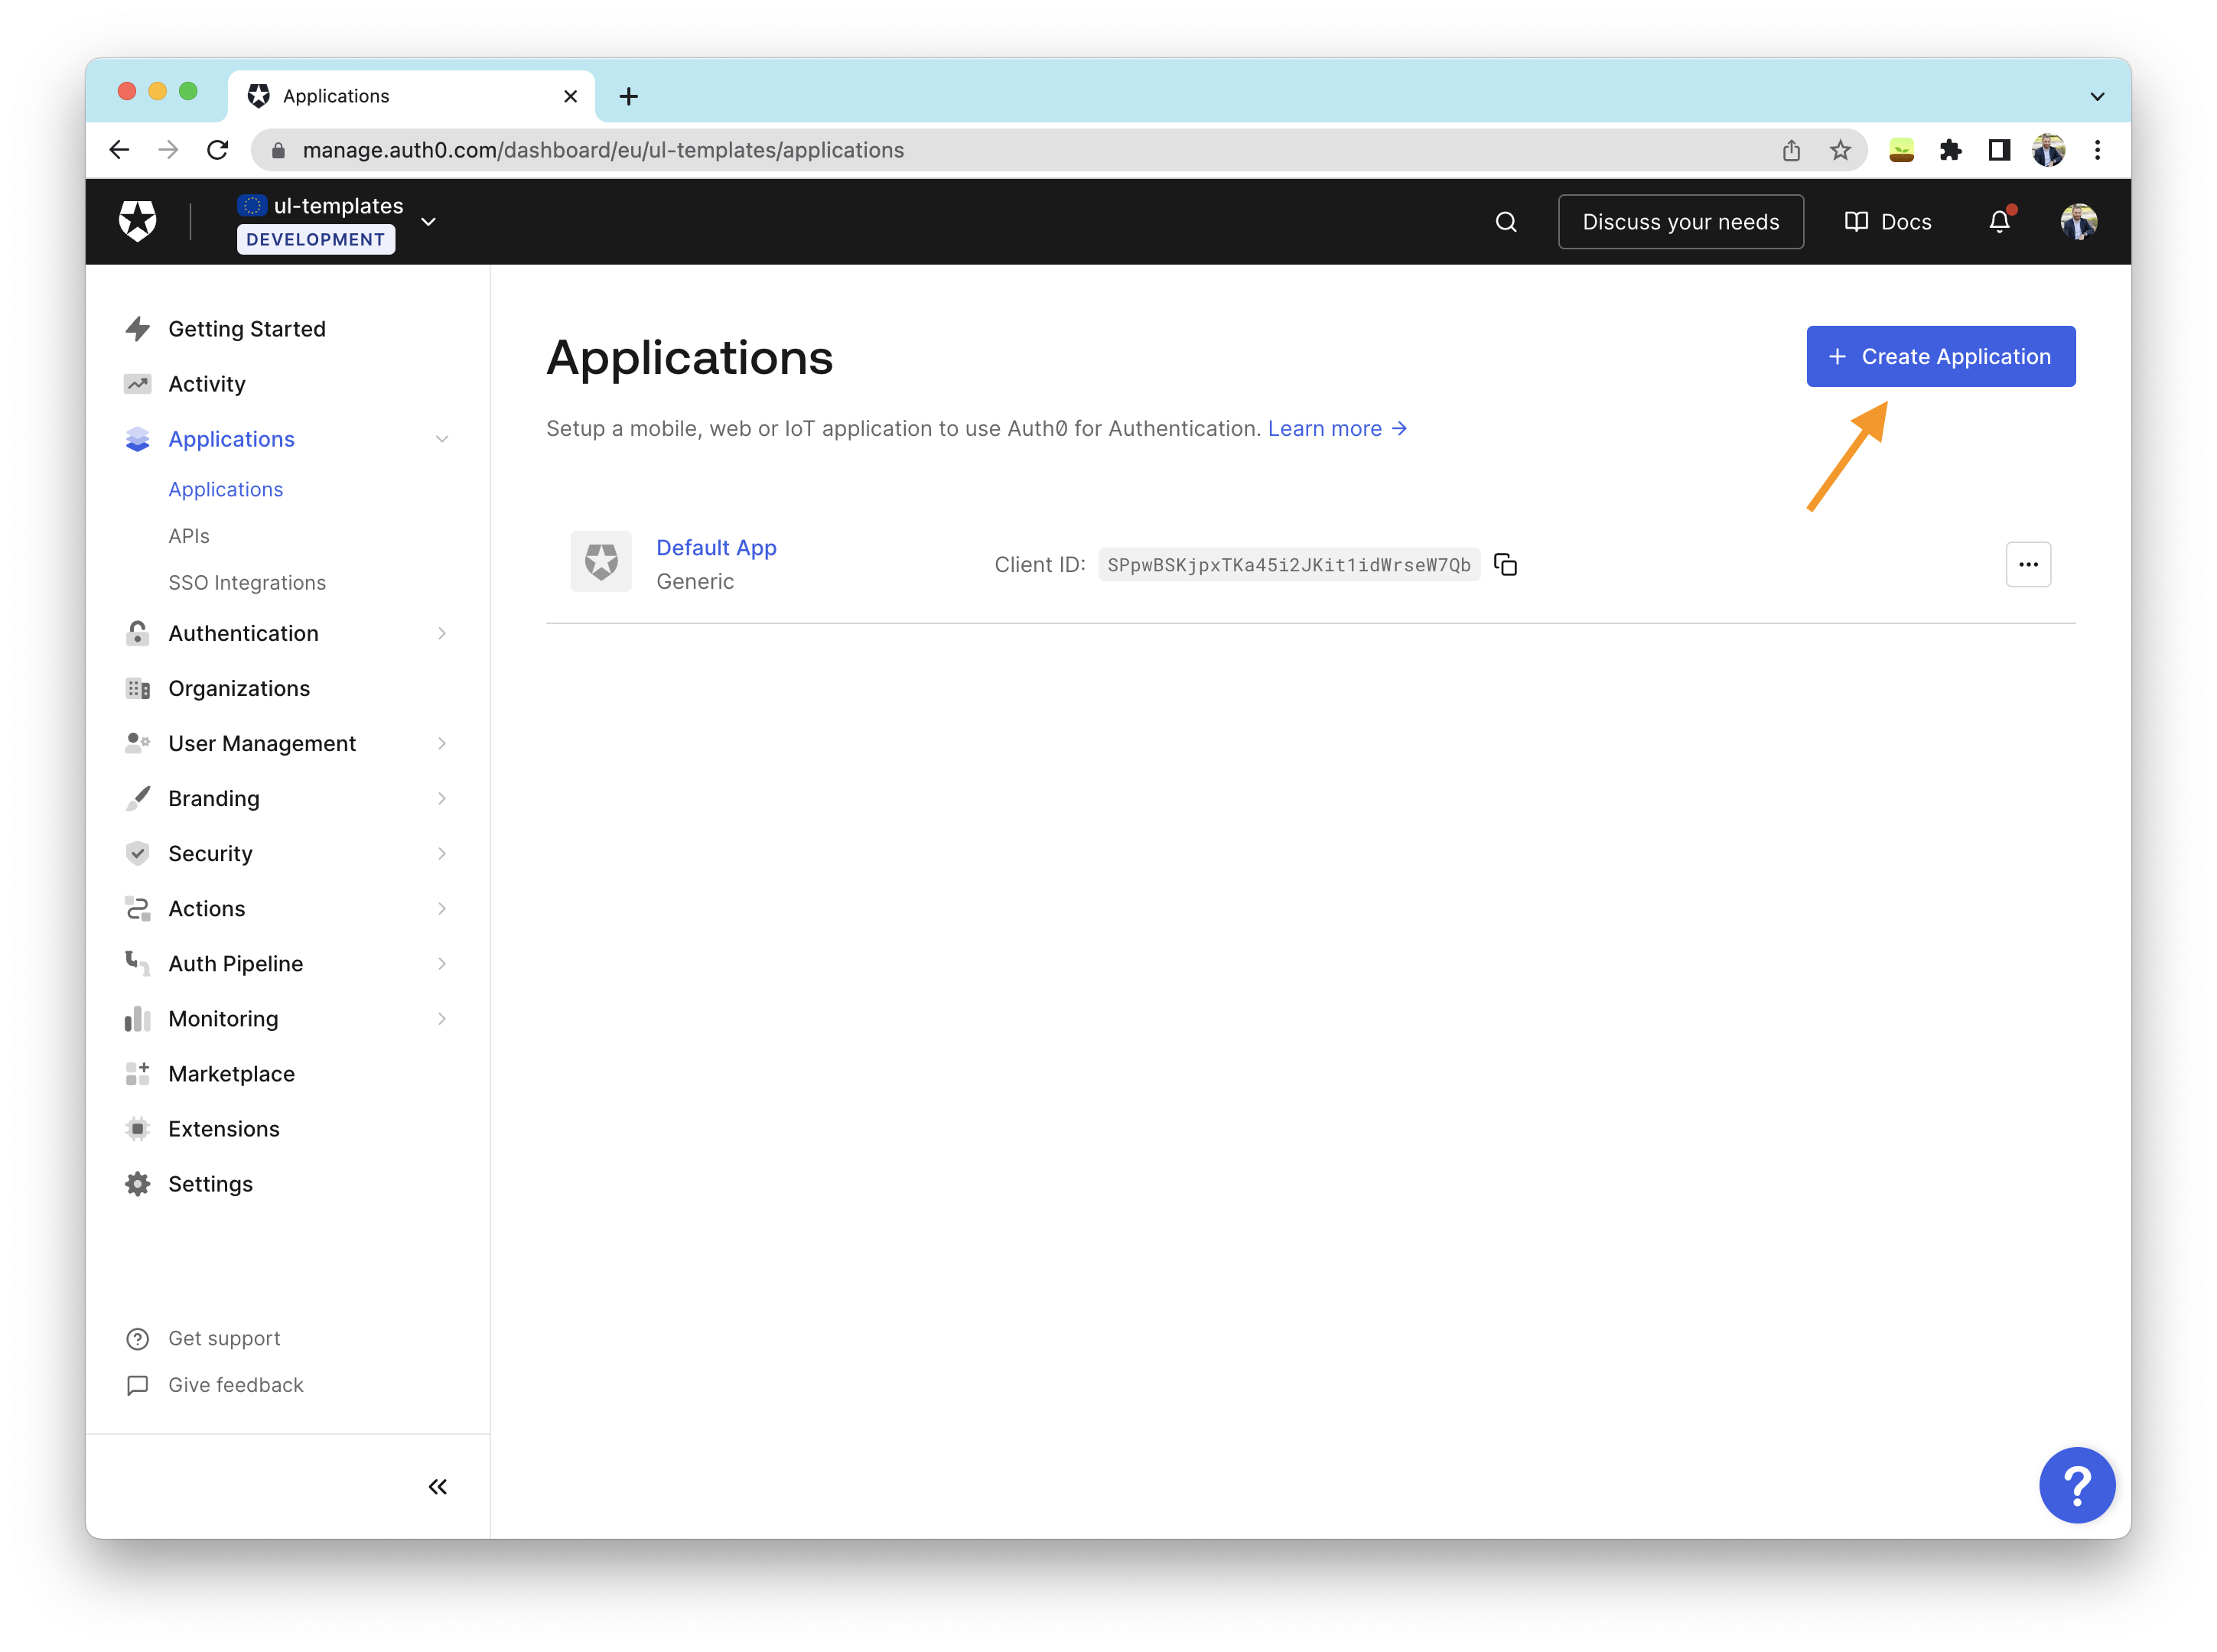
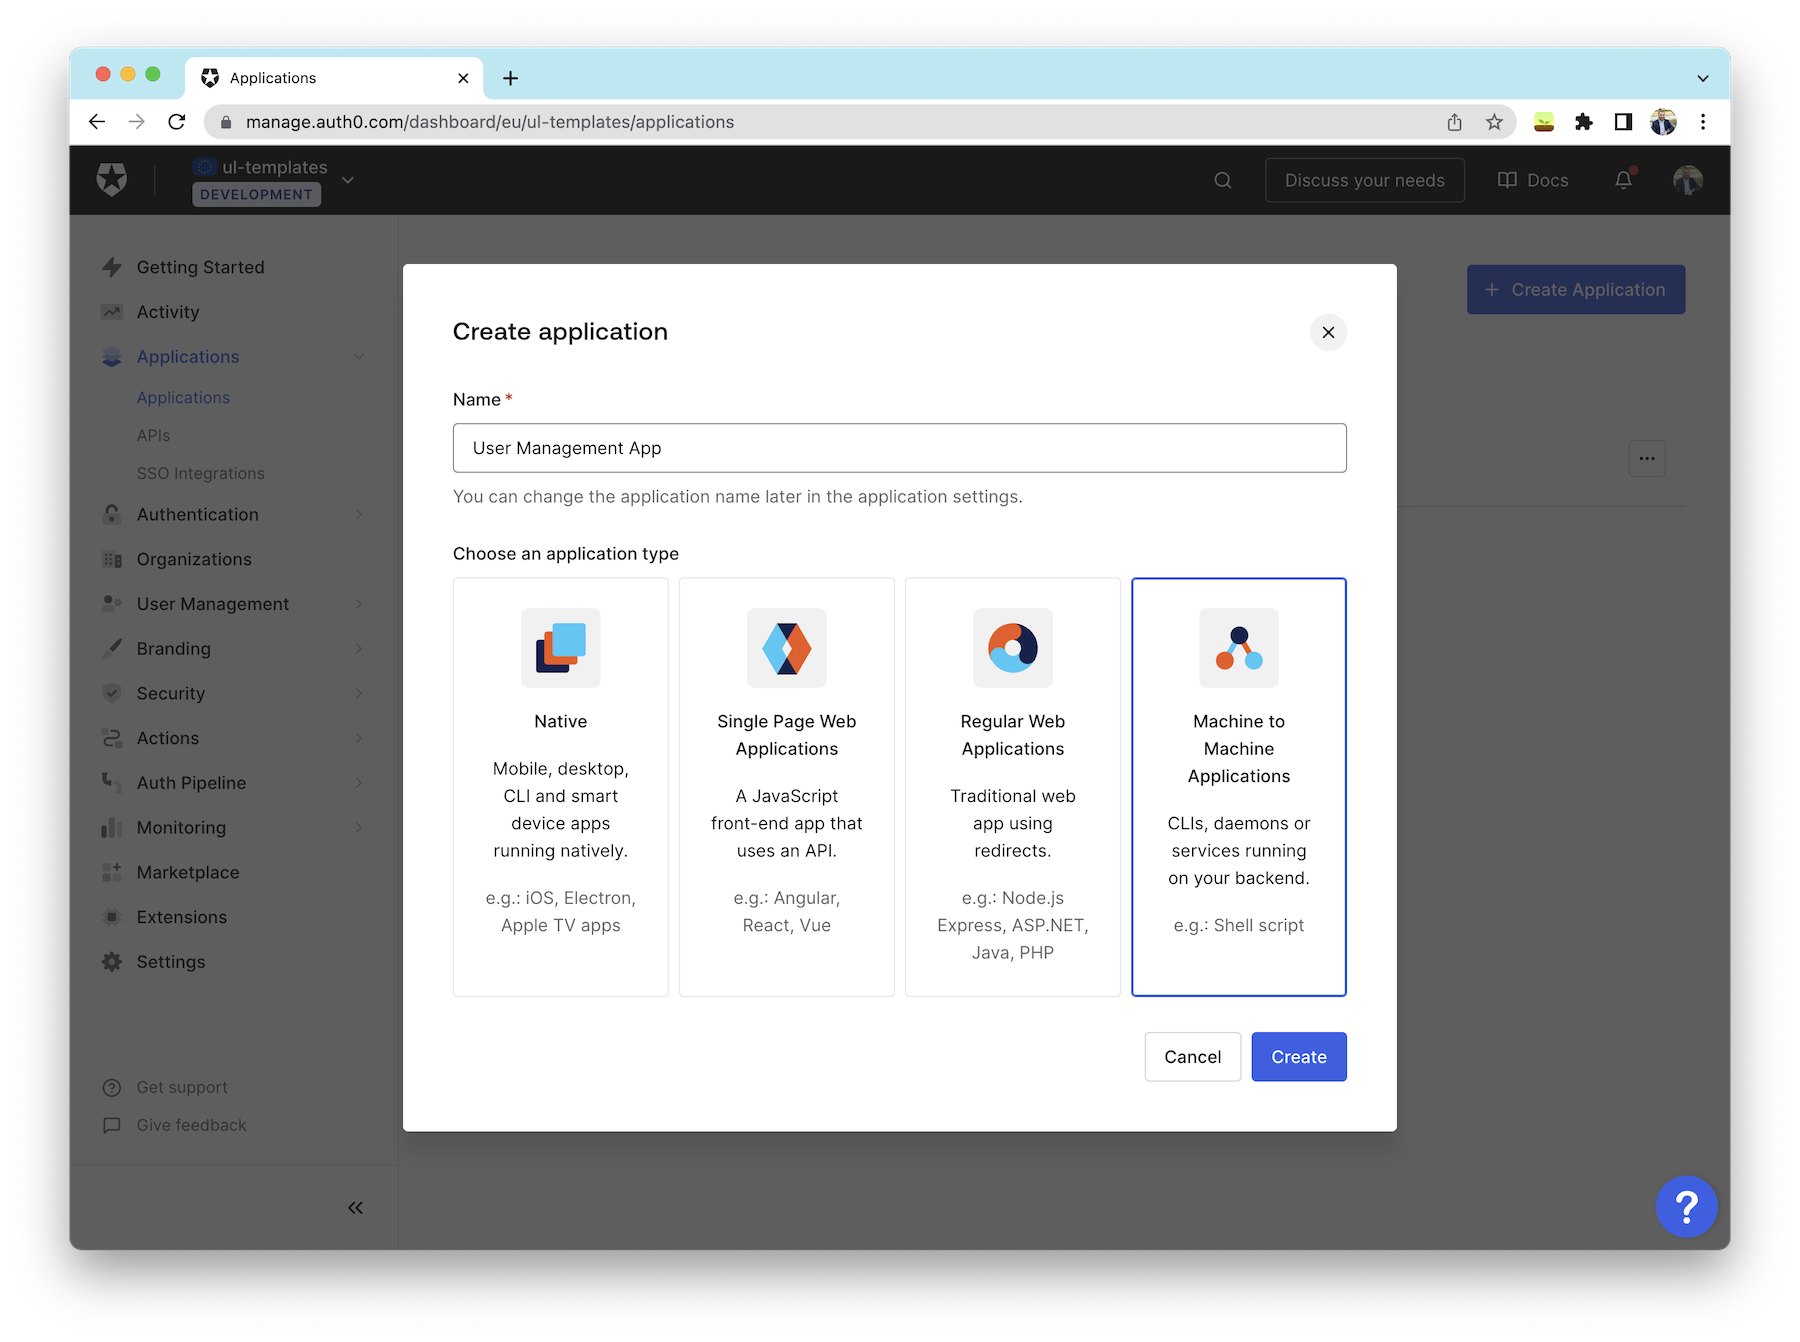
Once on the page, click on the “Create Application” button on the top right and enter the following information:
- Name: A descriptive name for your application, e.g., User Management App
- Application Type: Because we’ll be connecting to this Auth0 application from another system, e.g., your Python application, you need to select “Machine to Machine Applications.”
Then click on “Create”.
In the following dialog, you’ll select which API you’ll authorize this application to access. In our case, you’ll choose the Auth0 Management API already available in your tenant. Before authorizing the API, Auth0 will list all the permissions associated with it. There are many available. For our use case, you'll authorize the following: read:users, update:users, read:users_app_metadata, and update:users_app_metadata. Finally, click on “Authorize”.
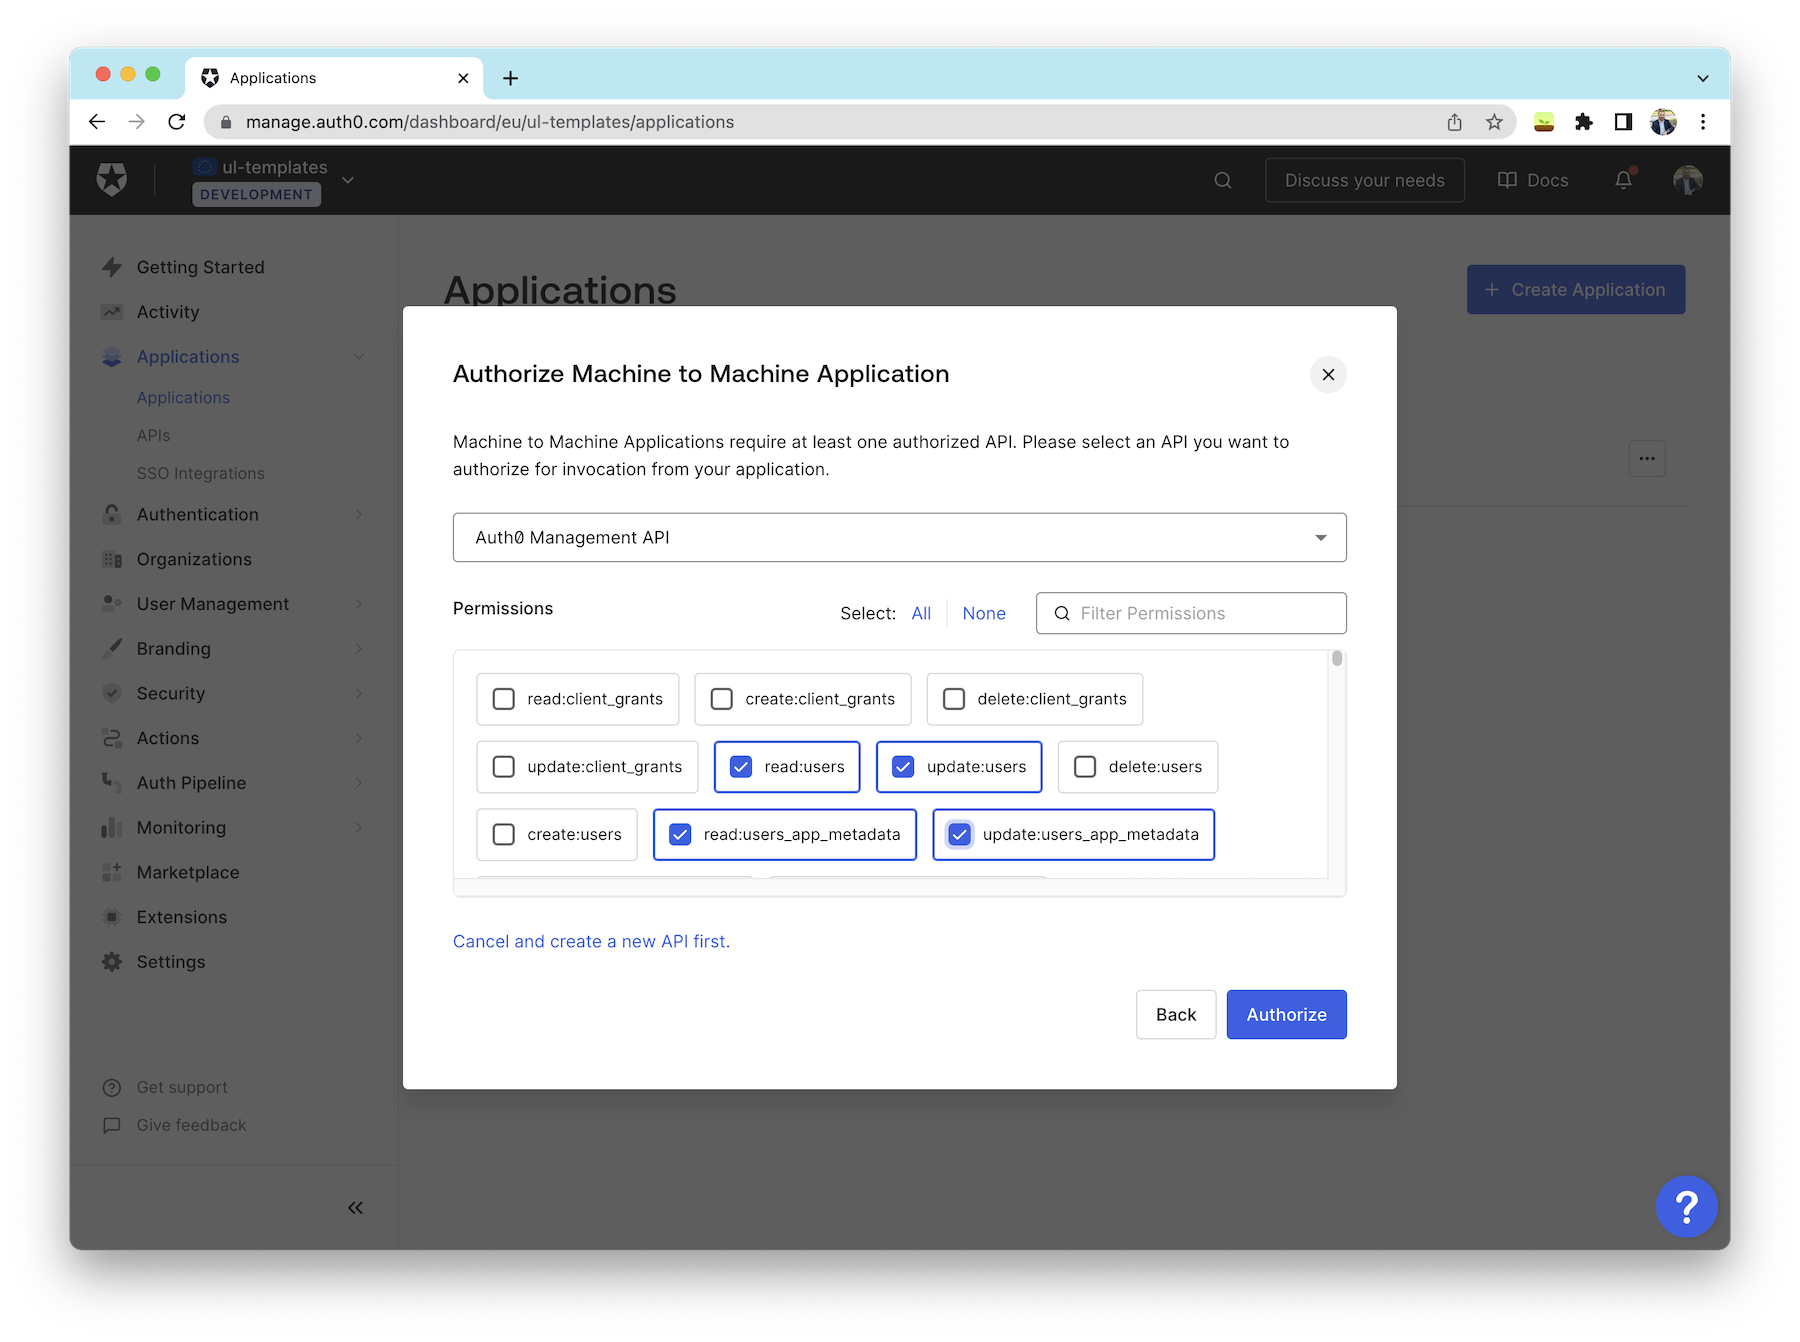
You can update your application’s permissions at any point from the Auth0 dashboard.
Get a Test Token from the Auth0 Dashboard
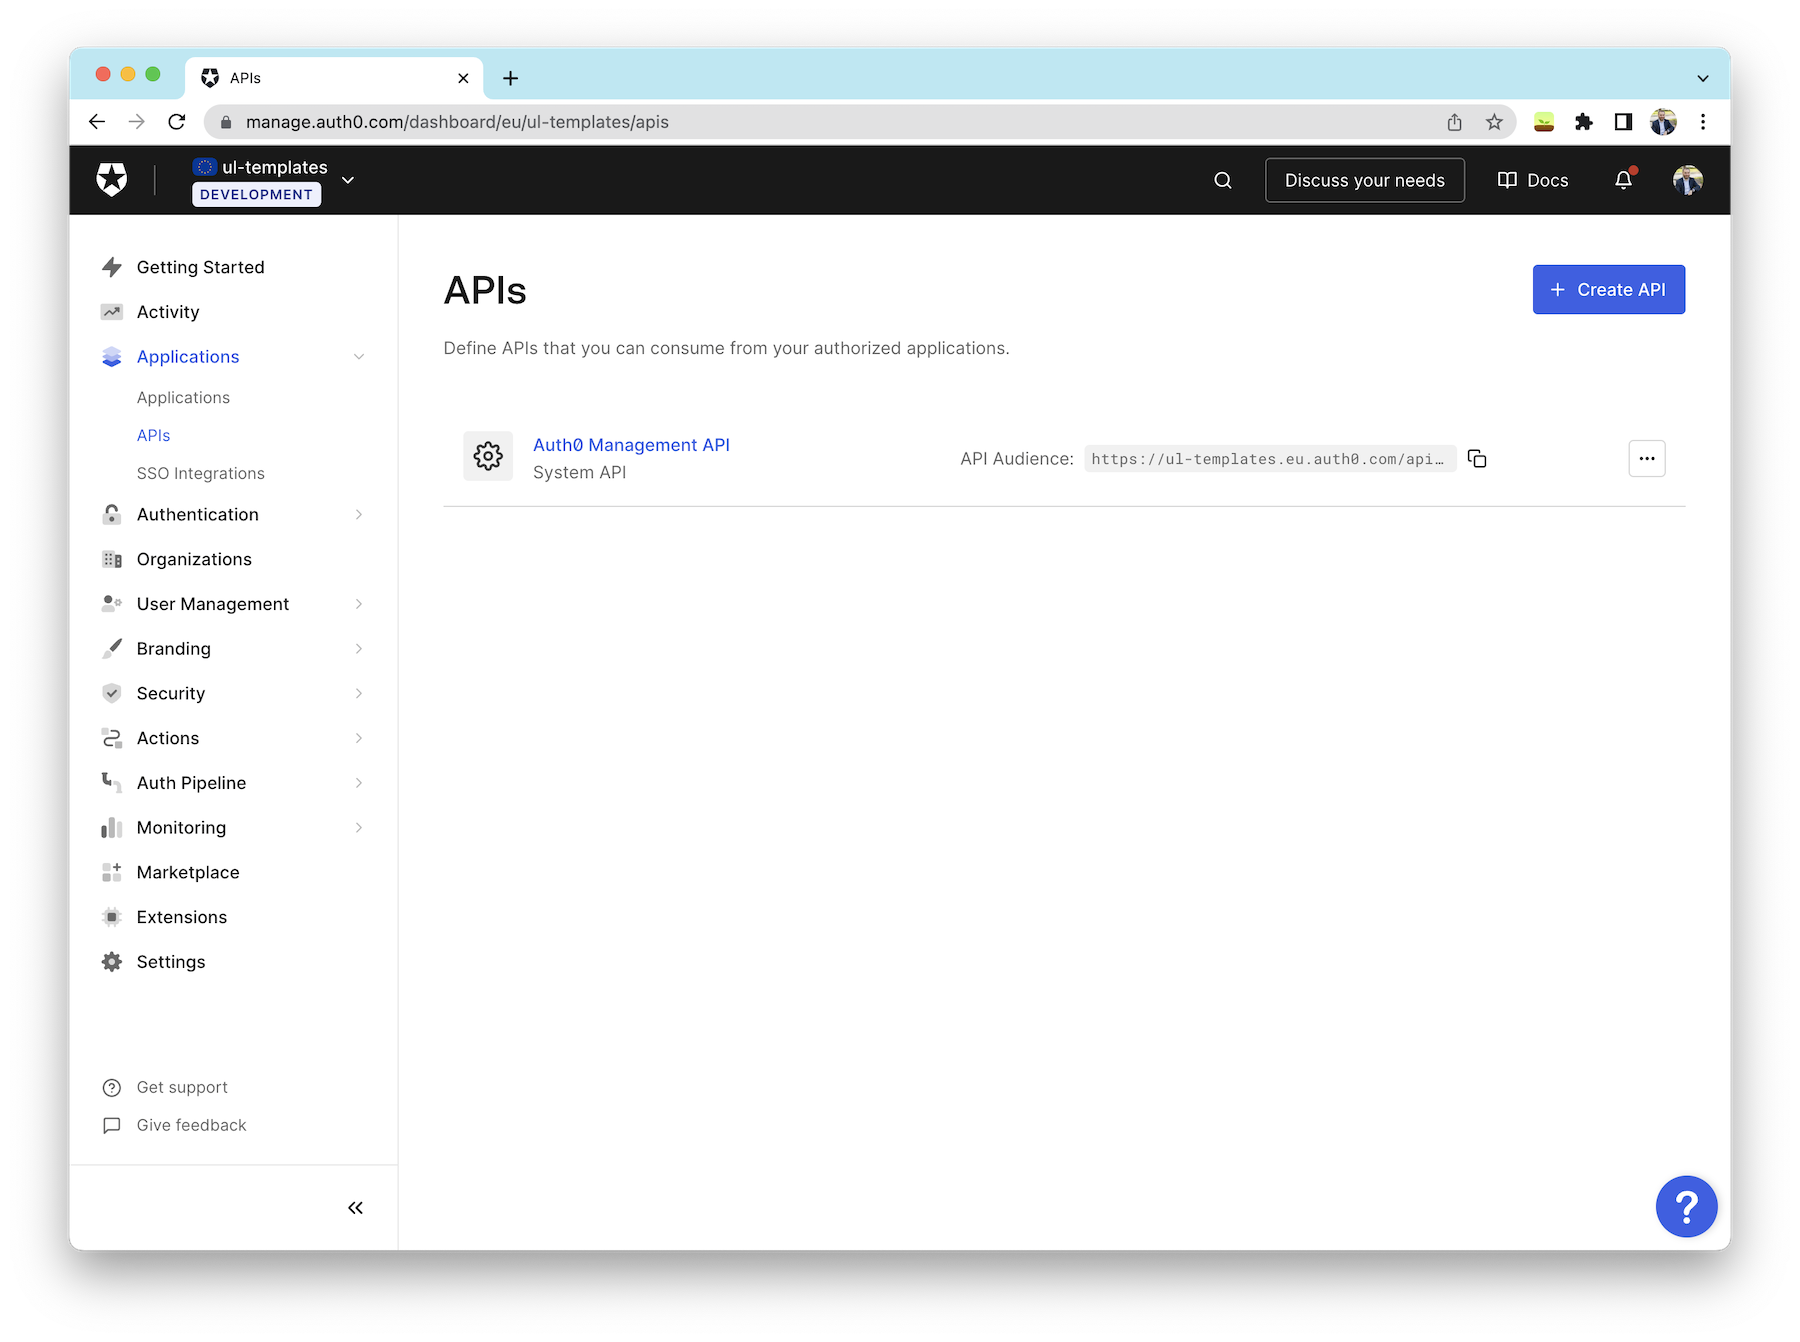
Now you are ready to test your Auth0 Management API. Visit the API entry on the Auth0 Dashboard.
Once there, click on the Auth0 Management API and head on to the “Test” tab. After a few seconds, you’ll see a screen like the following:
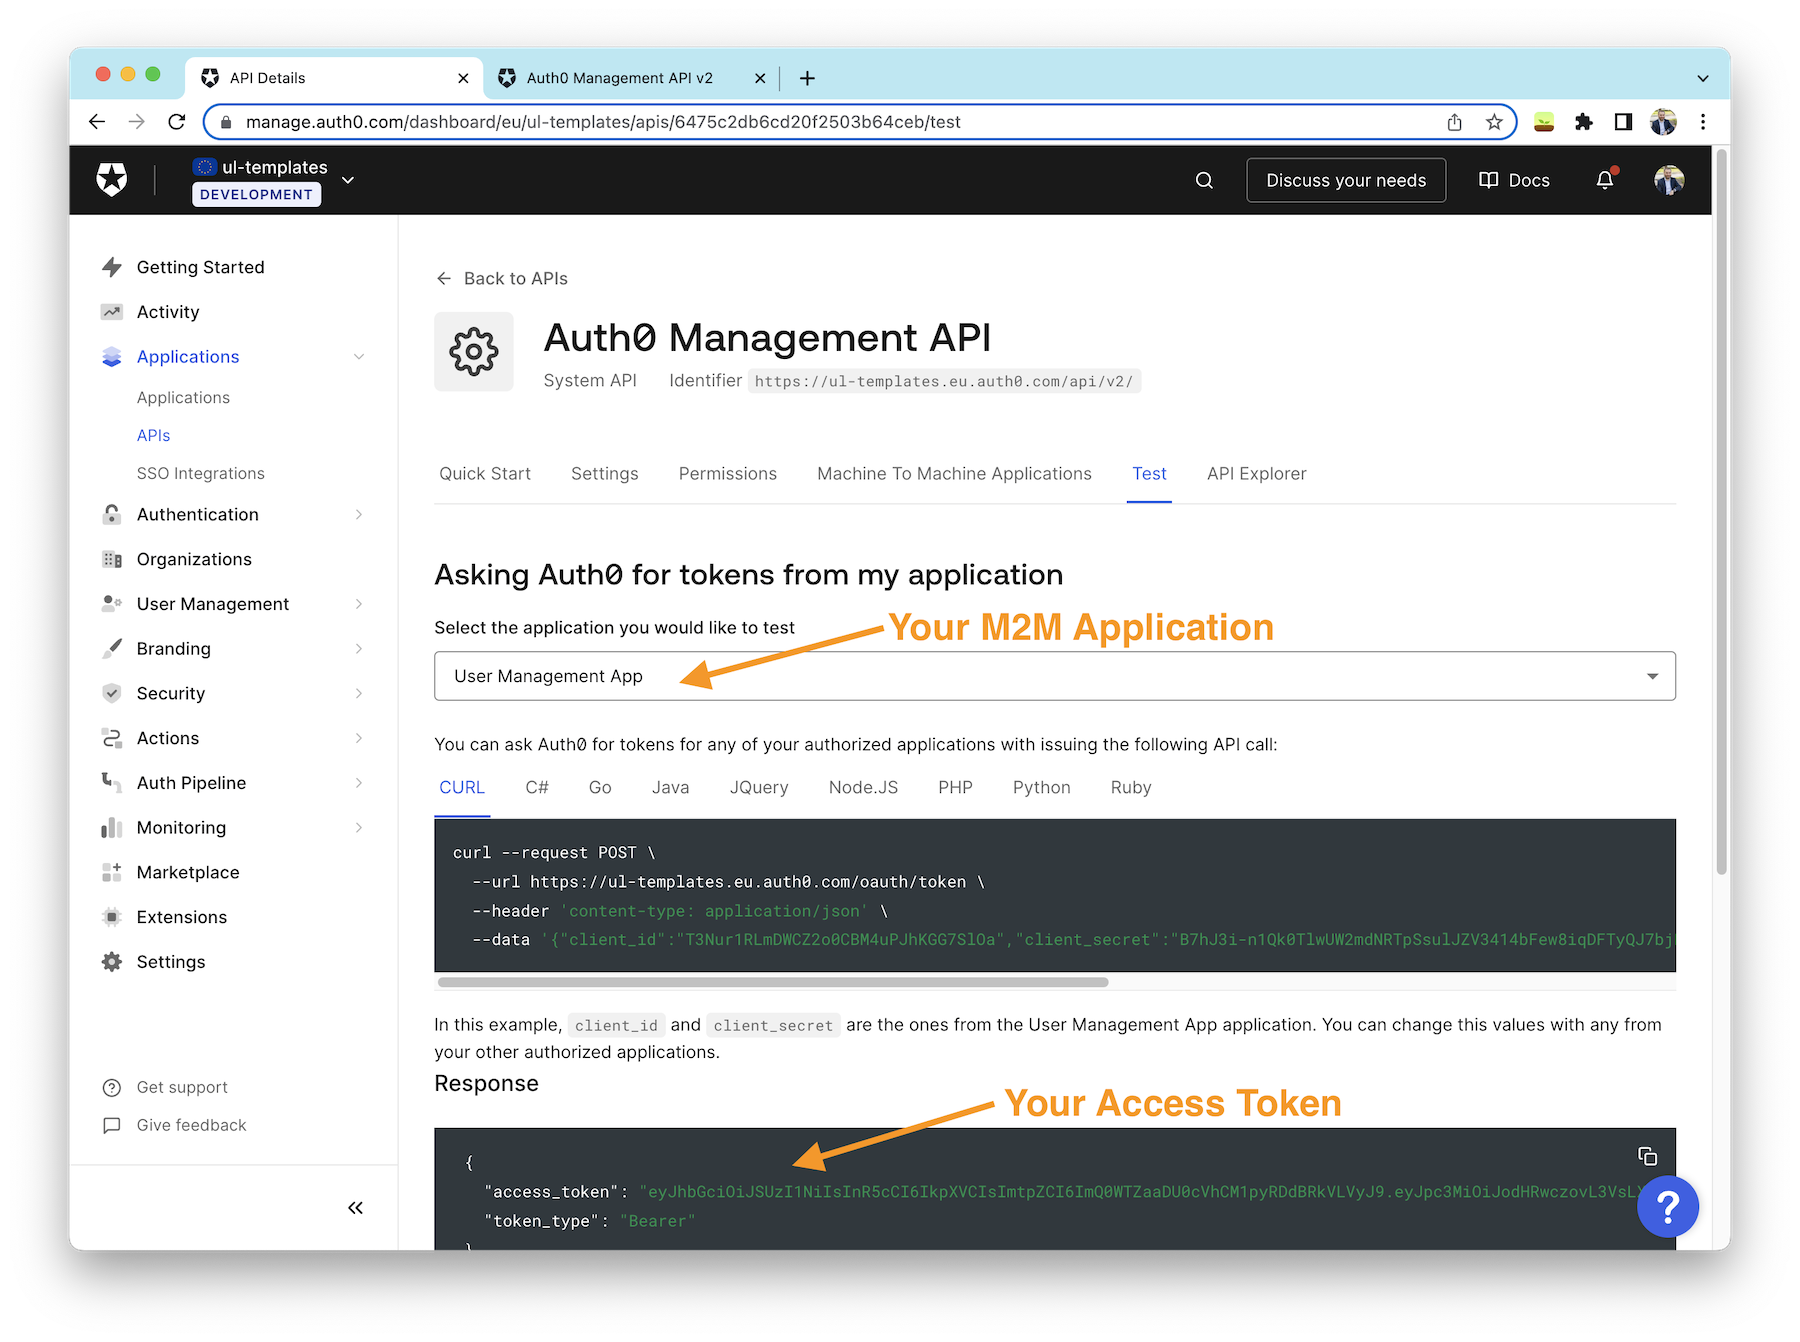
Before continuing, ensure you have the correct application selected on the drop-down; next, you can copy your access_token from the UI. Make sure to copy just the value without the quotes. You’ll need this token next.
You can test your API directly on the API documentation page. You can explore and test all the API endpoints there, though we’ll focus on the list user’s endpoint for now.
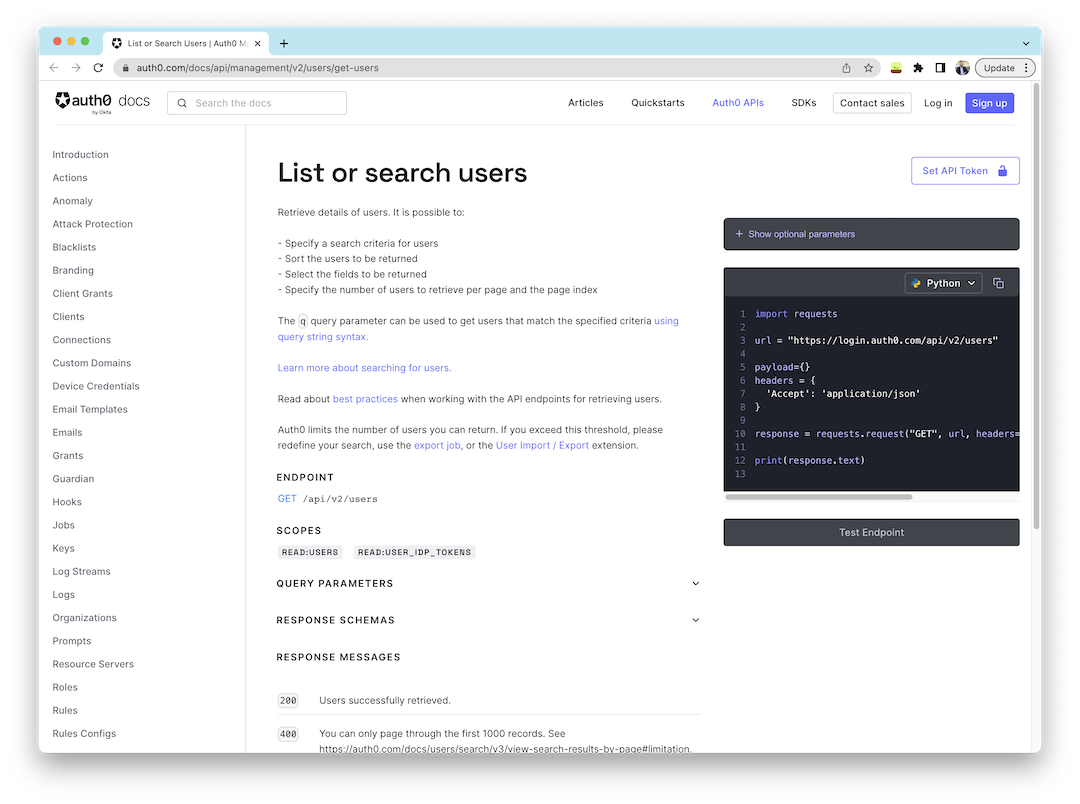
On the “List or Search Users” section, you’ll find the different parameters you can use to query users. For now, we’ll leave them all to the default values, and if you look to the right of the screen, you’ll find a button, “Test Endpoint”, at the end of the section.
The button is currently disabled as the documentation page is not authorized to make calls to the management API yet. To test endpoints on the documentation page, you'll need to provide an API Token using the "Set API Token" on the top right of the screen.
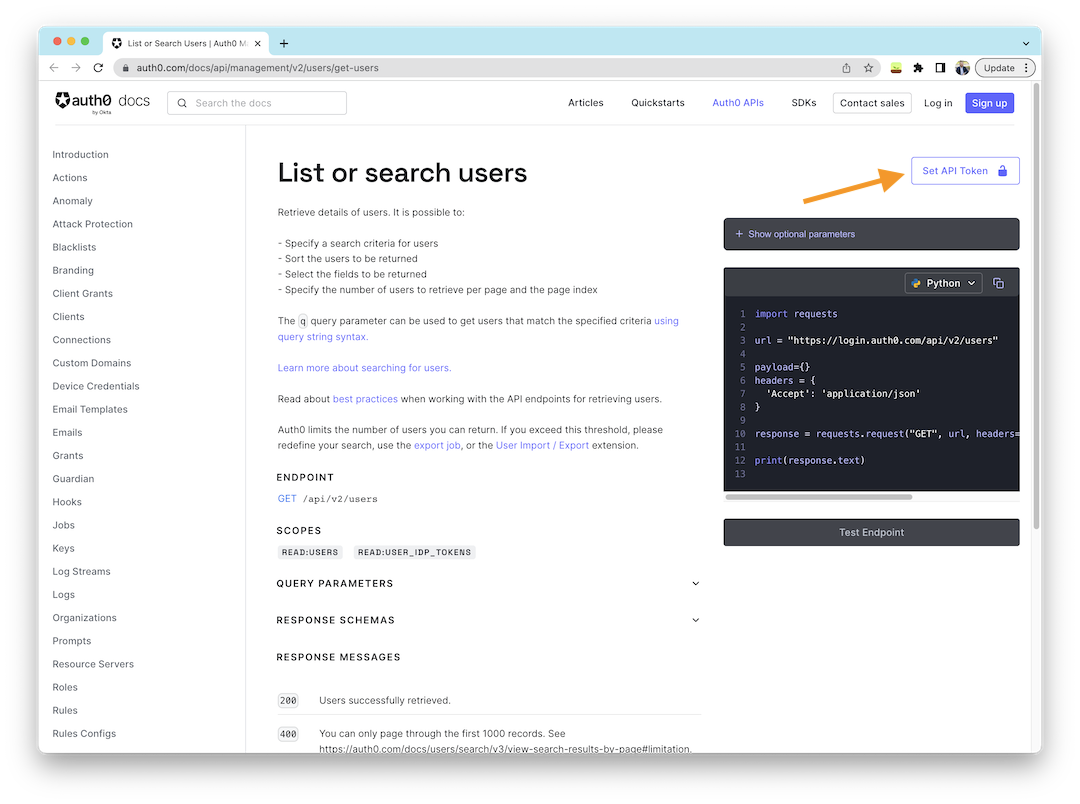
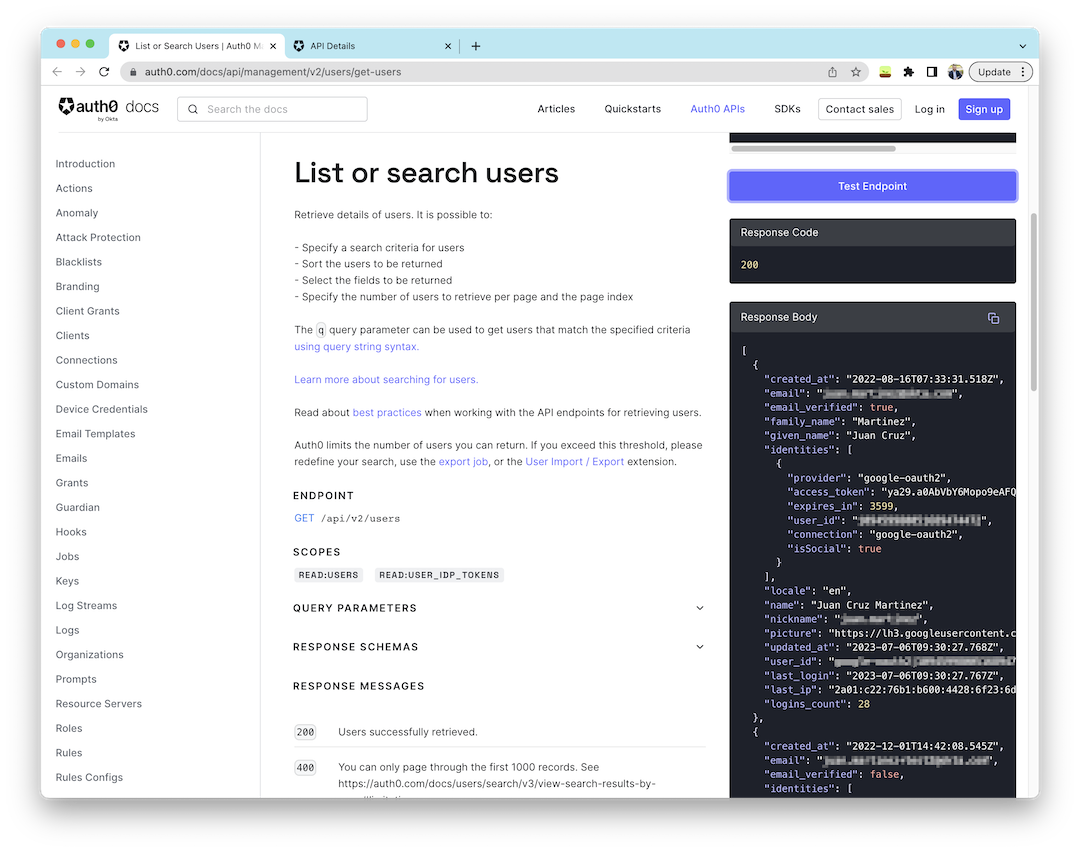
Next, paste your access token from the Auth0 dashboard into the modal window and click “Set Token”. If you copied the token value correctly and tried the endpoint again, you should now see your list of users.
How to Consume the Auth0 Management API with Python
To make your life easier when working with the Auth0 Management API, Auth0 offers a set of tools in multiple programming languages. In the case of Python, we have the Auth0 Python SDK that allows for easy and convenient access to all the features in the management API.
To consume the Auth0 Management API with Python, we will use the Auth0 Python SDK. To install it, run the following command:
pip install auth0-python
After installing the library, you must get a short-lived access token and initialize it programmatically. You’ll need information about your Auth0 tenant domain and the machine-to-machine application you created before. You’ll need the “Client Id” and the “Client Secret”, which can be found on the Auth0 Dashboard under your application’s settings.
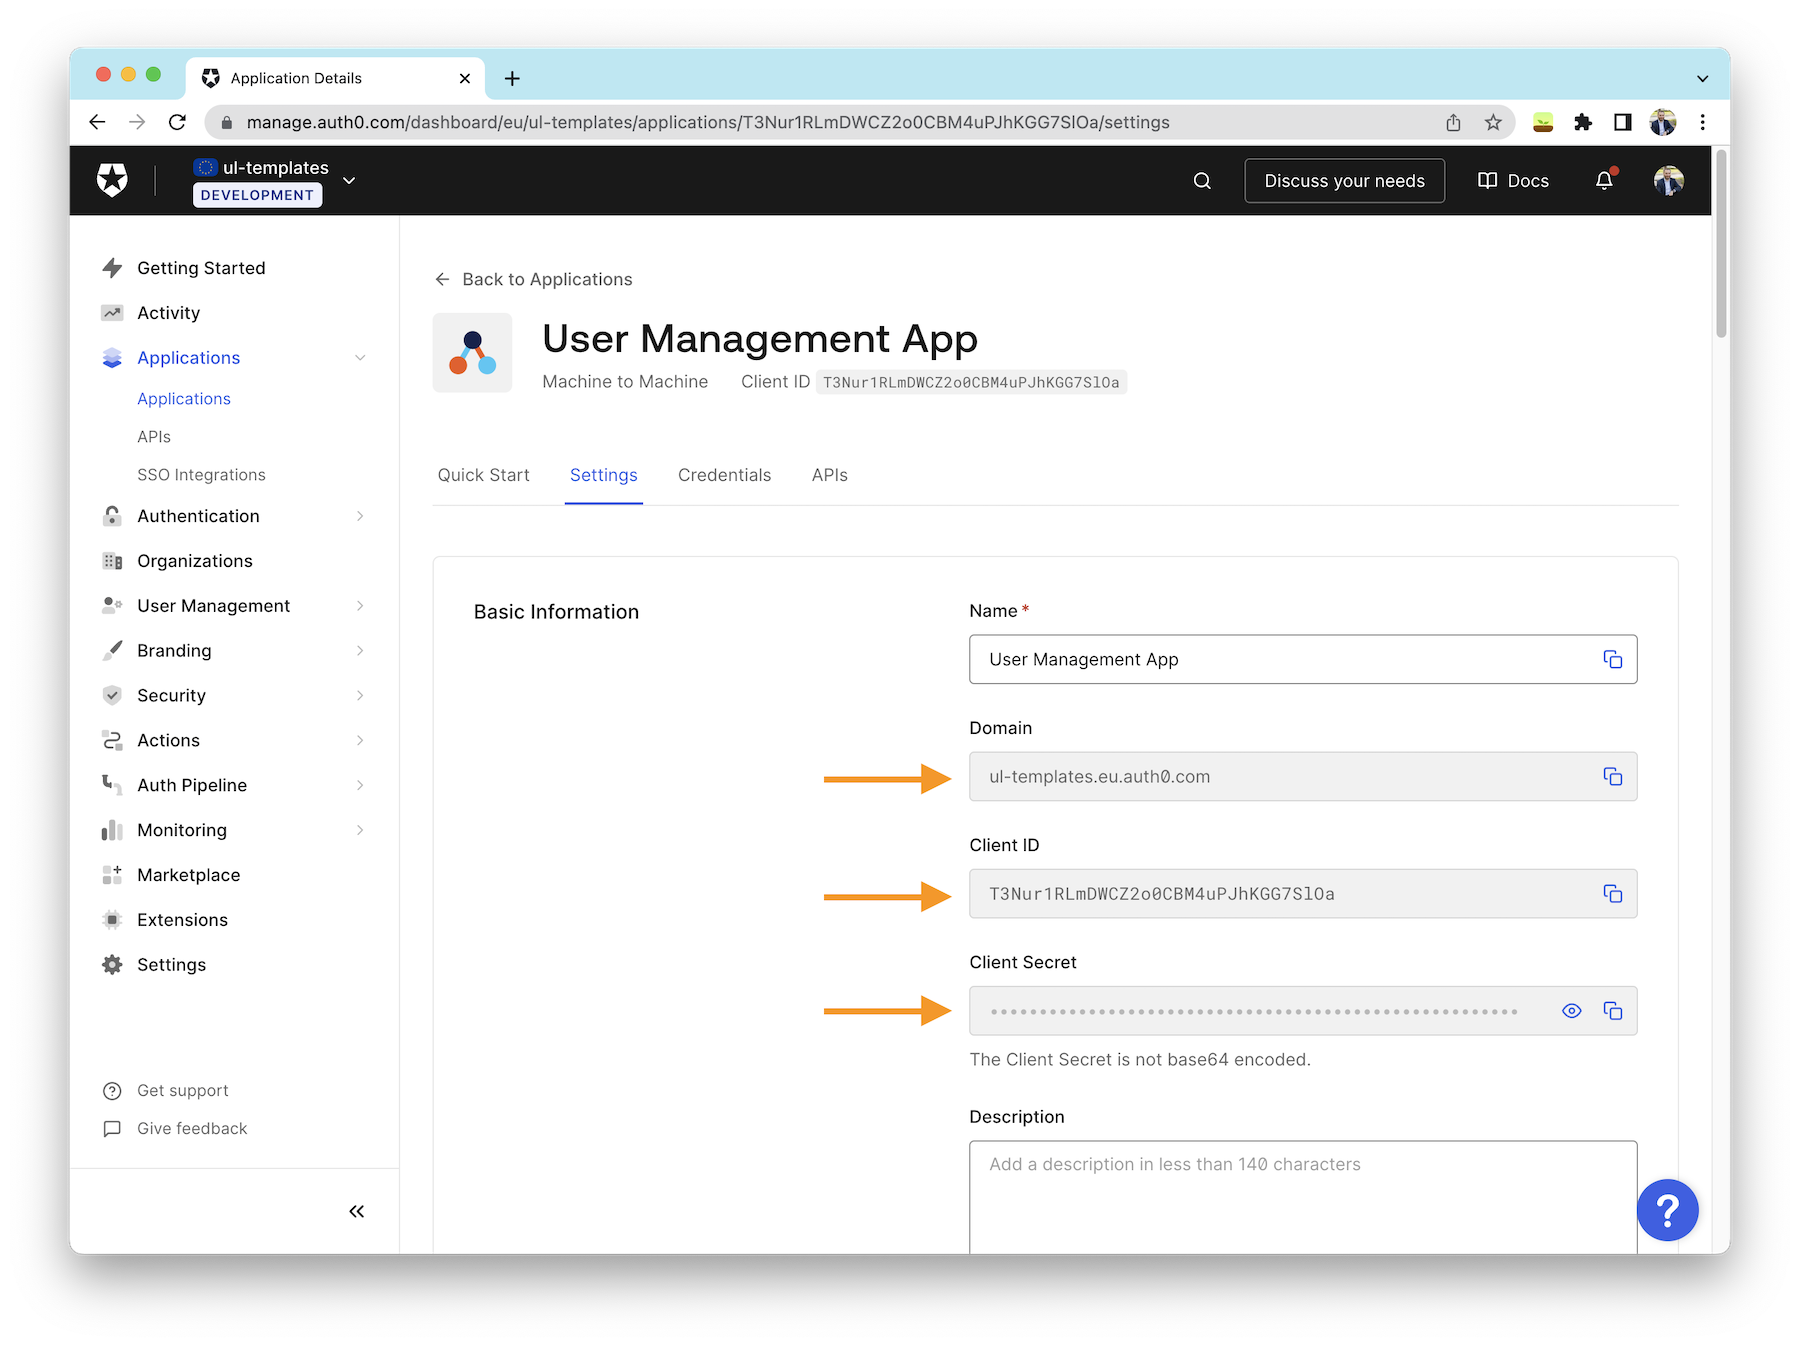
Once you can access these values, you set the Auth0 SDK with the following code:
from auth0.authentication import GetToken
from auth0.management import Auth0

domain = 'mydomain.auth0.com'
client_id = 'myclientid'
client_secret = 'myclientsecret'

get_token = GetToken(domain, client_id, client_secret=client_secret)
token = get_token.client_credentials('https://{}/api/v2/'.format(domain))
mgmt_api_token = token['access_token']
auth0 = Auth0(domain, token['access_token'])

auth0 = Auth0(domain, mgmt_api_token)
And finally, if you, for example, want to list your users, you can run:
users = auth0.users.list()
print(users)

# Example Output
{
    "start": 0,
    "limit": 25,
    "length": 25,
    "users": [
        {
            "created_at": "2023-07-14T11: 01: 09.493Z",
            "email": "###.#####@###.com",
            "email_verified": False,
            "identities": [
                {
                    "connection": "Username-Password-Authentication",
                    "provider": "auth0",
                    "user_id": "64b12af5c157759fdf791d4d",
                    "isSocial": False
                }
            ],
            "name": "###.#####@###.com",
            "nickname": "###.#####",
            "picture": "https: //s.gravatar.com/avatar/.........png",
            "updated_at": "2023-07-14T11:01:09.493Z",
            "user_id": "auth0|64b12af5c157759fdf791d4d",
            "last_login": "2023-07-14T11:01:09.491Z",
            "last_ip": "2a01:c23:c480:7900:6c:a31c:9c46:f435",
            "logins_count": 1
        },
        ...
    ],
    "total": 40
}
Updating Users’ Profile Information
Auth0's user profiles store basic information about each user, including a unique identifier, name, contact details, and identifying information such as their profile picture. This information is helpful during the authentication process, but you may also require additional information as the user logs in, such as:
- User preferences, such as the application’s theme or color scheme, etc.
- Flags that the user opt-in in the application, such as notification preferences, getting started tutorial completion, etc.
- Others, such as the last read announcement, subscription status, and more.
Auth0's user profiles can store such information as metadata, which your app can access once the user logs in successfully. Although your app could store this information in its own storage system, utilizing Auth0's user profile metadata offers the advantage of immediate availability during and after the login process.
A significant benefit of using metadata is that it is associated with the user's account rather than tied to a specific device. This ensures that if a user switches between the mobile and web versions of your app, their settings and preferences based on metadata will remain consistent across both versions.
Auth0 supports two types of users’ metadata:
- User metadata: refers to information the user can see and update, such as user preferences and settings
- App metadata: refers to information about the user that is only accessible by the application, for example, feature flags, last read announcement, and more.
Let’s now write a Python script to update the user’s name and metadata to store their preferred theme and an application flag enabling extra features on the user’s account.
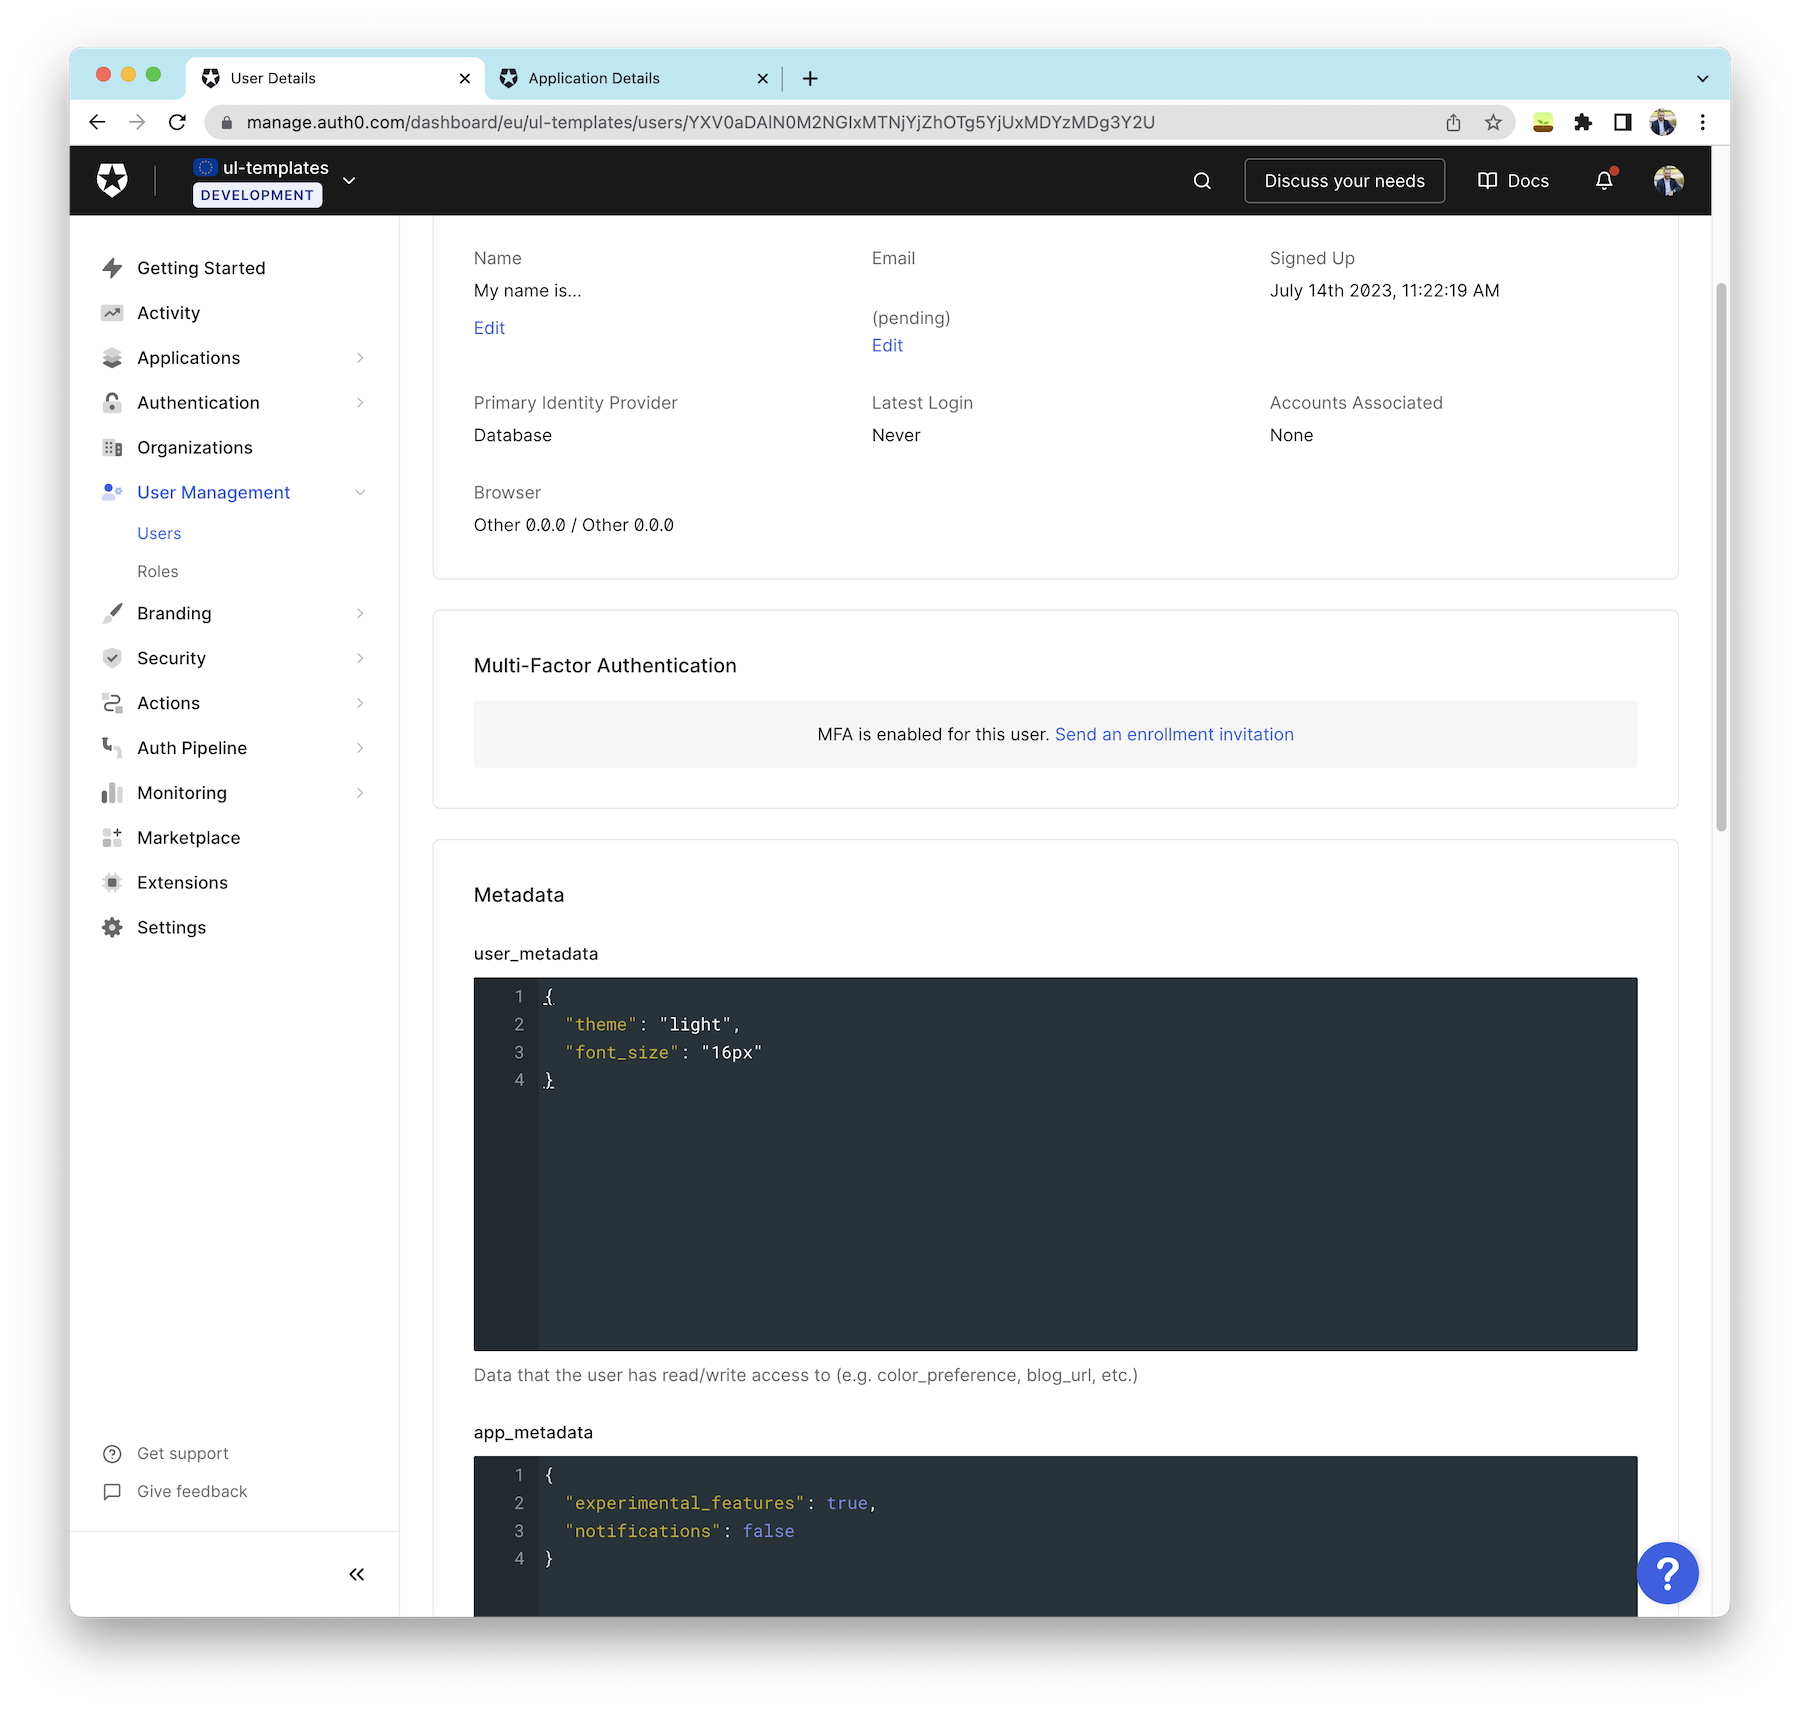
# As we did before, we need to get an instance of the Auth0 client
from auth0.authentication import GetToken
from auth0.management import Auth0

domain = 'mydomain.auth0.com'
client_id = 'myclientid'
client_secret = 'myclientsecret'

get_token = GetToken(domain, client_id, client_secret=client_secret)
token = get_token.client_credentials('https://{}/api/v2/'.format(domain))
mgmt_api_token = token['access_token']
auth0 = Auth0(domain, token['access_token'])

auth0 = Auth0(domain, mgmt_api_token)

# Next, we can proceed to update the user's name using the user's id
user_id = '{YOUR_USER_ID}'
auth0.users.update(user_id, {
    'name': 'My name is...'
})

# We can also update the user's metadata
auth0.users.update(user_id, {
    'user_metadata': {
    'theme': 'light'
  },
  'app_metadata': {
    'experimental_features': True
  }
})

# Let's add some more information to see what the end result is
auth0.users.update(user_id, {
    'user_metadata': {
    'font_size': '16px'
  },
  'app_metadata': {
    'notifications': False
  }
})

# Query the user information
user_info = auth0.users.get(user_id)
print(user_info)

# Output
{
    "created_at": "2023-07-14T09:22:19.151Z",
    "email": "###.#####@###.com",
    "email_verified": False,
    "identities": [
        {
            "connection": "Username-Password-Authentication",
            "user_id": "64b113cb6a989b51063087ce",
            "provider": "auth0",
            "isSocial": False
        }
    ],
    "name": "My name is...",
    "nickname": "###.#####",
    "picture": "https://s.gravatar.com/avatar/...",
    "updated_at": "2023-07-14T11:29:53.139Z",
    "user_id": "auth0|64b113cb6a989b51063087ce",
    "user_metadata": {
        "theme": "light",
        "font_size": "16px"
    },
    "app_metadata": {
        "experimental_features": True,
        "notifications": False
    }
}
Note that when calling the update method, we don’t need to send all the information about the user, but only those fields we would like to change. This makes working with data really simple, as we don’t need to worry about overriding critical fields. Even on the user_metadata and app_metadata fields, we don’t need to send the full JSON we want to store but rather the individual key-value pairs, Auth0 will automatically merge the existing values with the new ones.
We can also access the user information from the user’s entry in the Auth0 Dashboard.
Query Users
Whether you are building a user dashboard, gathering some statistics, or needing your users’ information to process in your application, the Auth0 Management API and the Auth0 Python SDK allow you to access the information you need and how you need it.
Previously we used the method users.list to retrieve a list of all users in the Auth0 database, which may be all that you need. However, that method offers advanced query functions worth knowing and exploring.
First, let’s start with paginating results. By default, paging is disabled. However, you can quickly specify the page and the number of items per page you want to retrieve with these two parameters:
- page: Page index of the results to return. The first page is 0.
- per_page: Number of results per page.
Here is an example querying the second page of users, up to ten users per page
users = auth0.users.list(page=1, per_page=10)
Another common parameter in usage is sorting operations. For this purpose, the SDK exposes the sort parameter to specify the field and direction. For example:
users = auth0.users.list(sort="name:1")
Use field:order where the order is 1 for ascending and -1 for descending.
Lastly, one of the most powerful functions is the ability to perform complex queries, for example, getting all the users whose names start with J or even filtering by custom metadata, listing all the users that prefer the dark mode theme. Auth0 uses Lucene query string syntax for those complex queries, though there are some limitations, as some query types cannot be used on metadata fields, for details see Searchable Fields.
Example 1: List all users whose name starts with J
users = auth0.users.list(search_engine='v3', q='name:j*')
Example 2: List all users that prefer dark mode
users = auth0.users.list(search_engine='v3', q='user_metadata.theme:dark')
You can also mix multiple search criteria, for example:
users = auth0.users.list(search_engine='v3', q='name=j* AND user_metadata.theme:dark')
To learn more about how to form queries, check the Lucene query string syntax.
Selecting a Random User
For the events we attended this year, we created a fun game using Python, Flask, and Auth0 to give some fabulous prizes away to lucky contestants. The game was pretty simple. It consisted of people signing up for our application at events like PyCon. During the day, users registered to the game using the Auth0 Universal Login page. Then, when it was time to give prizes away, we would use the same Flask application to withdraw a lucky winner. The winner would then get a special award from Auth0.
To select the lucky winner, we built a special page using the users.list method. There was a caveat: the same user couldn’t win twice. The way we solved it was by using app_metadata to store information about the users who had already won and then using Lucene syntax to filter them out when pulling for a new winner.
Though not critical for our situation, we wanted the script to be efficient and thus not pull the whole user’s database, as it could be quite extensive, so instead, we first pulled the API to know how many users were in total with a minimum query, and then we accessed a random user from the pull and extracted only that user’s information.
import random

# List only 1 user just to retrieve the total number of users that match the given query
user_count = auth0.users.list(per_page=1, include_fields=False, search_engine='v3', q='NOT app_metadata.winner:true')["total"]

# Then, use the same trick of listing one user per page to get a random page between 0 and the total number of users
# That resulting user is our lucky winner
winner_user = auth0.users.list(page=random.randint(0, user_count - 1), per_page=1, include_fields=False, search_engine='v3', q='NOT app_metadata.winner:true')['users'][0]

# Before we do anything else with the results, update the user's metadata to reflect them as winner
auth0.users.update(winner_user.get('user_id'), {
    "app_metadata": {
        "winner": True
    }
})
Summary
Today you learned about the Auth0 Management API and how to work with it from the documentation as well as from any Python application. You also learned how to work with user information, user, and app metadata, and how to query users from the Auth0 database using simple and more complex queries.
Thanks for reading!
About the author

Juan Cruz Martinez
Staff Developer Advocate