
Introduction
WebAuthn (Web Authentication) is an API specification by W3C that facilitates a secure way for users to log in to online services and websites using various authentication methods, such as biometrics (e.g., fingerprint or facial recognition) and hardware-based authenticators (e.g., USB or NFC tokens).
Key Features of WebAuthn
Phishing resistant
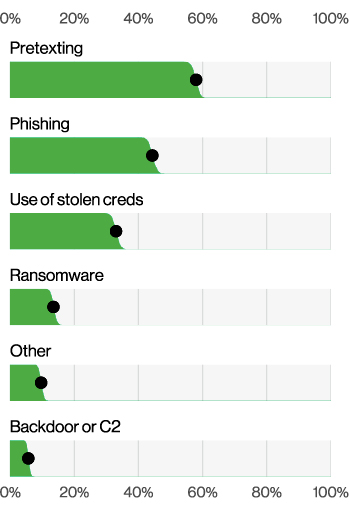
WebAuthn uses public key cryptography; the user's private key never leaves their device. Since WebAuthn relies on cryptographic keys, it is resistant to phishing attacks. Assuming that a bad actor tricks the user into entering their credentials on a phishing site, the attacker cannot use those credentials because they are scoped to a specific domain. In short, a credential created for webauthn.me cannot be used by a fake website, webauth.me. According to Verizon DBIR 2023, Phishing is one of the major attacks on a web-based application, as shown in the following image. Using WebAuthn, the web applications could have easily averted these attacks.
Action varieties in Social Engineering incidents
High-Security standards
WebAuthn leverages industry-standard cryptographic algorithms and protocols to ensure the highest level of security. It utilizes the authenticators to confirm the user's identity and create highly secure public-private key credentials. There are two types of authenticators: roaming authenticators, like hardware security keys, and platform authenticators, like your laptop or device, that support biometrics, such as fingerprint recognition, facial recognition, and voice recognition, depending on the capabilities of the user's device.
Seamless user experience
With WebAuthn, users can authenticate with a single gesture or action, providing a convenient and frictionless login experience. While delivering a seamless and convenient authentication experience for users, it also enhances security.
WebAuthn Roles
Relying Party - This is the website or online service the user wants to access. The relying party initiates the WebAuthn authentication process and verifies the user's identity.
WebAuthn Client Device - The user's device (e.g., smartphone, computer) that supports WebAuthn and communicates with the relying party. It is capable of hosting the private keypair in secret storage that a user can access through biometrics or PIN.
User - The individual attempting to access a relying party's website or services.
Authenticator - There are two types of authenticators, i.e., Platform Authenticators and Roaming Authenticators.
Platform Authenticators refer to a specific type of authenticator built into the user's device or platform, such as a smartphone, laptop, or desktop computer. For example, a smartphone's fingerprint sensor or a laptop's built-in biometric recognition system can act as a platform authenticator.
Roaming Authenticators are authenticators not tied to any particular platform but can be used to authenticate across multiple devices. They are also sometimes referred to as cross-platform or external authenticators. e.g., hardware security keys like the YubiKey.
Want to learn more about WebAuthn?
Visit → webauthn.meHow WebAuthn Works
WebAuthn's mode of authentication consists of a Registration Flow and an Authentication Flow. With WebAuthn, there are no longer shared credentials between the user and the relying party. A public-private key pair is generated with the help of the authenticators and is used instead of the password. Let us look into the user journey of the registration and authentication flows.
Registration flow
A User visits a website
The process begins when a user visits a website or a web application that supports WebAuthn for authentication and requests the website to create a new account.
Initiating registration
The website, often called the relying party, begins the registration process. It generates a unique and cryptographically random challenge and communicates to the user's browser that it wants to register a new public-private key pair for the user.
The User chooses an authenticator to generate a public-private key pair
The user selects their preferred authenticator, a platform authenticator (built into their device, e.g., fingerprint sensor), or an external authenticator (e.g., a hardware security key). The chosen authenticator generates a new public-private key pair for the user and signs the challenge generated by the relying party with those keys.
The Authenticator sends back the user credentials
The private key is securely stored within the authenticator, while the public key is sent back to the website along with the signed challenge and an optional private key ID.
The Website stores the user credential
The website stores the user's public key and the private key ID (if sent) and associates it with the user's account for future authentication;
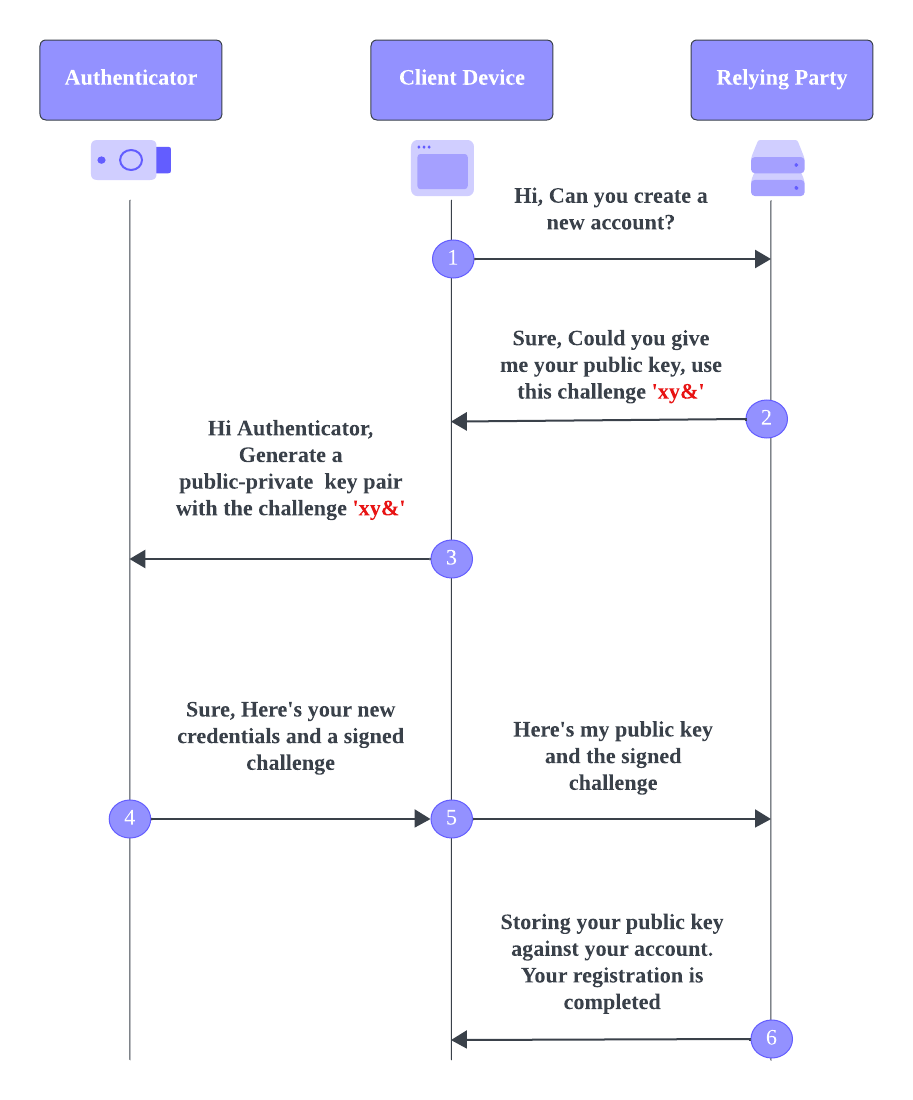
The registration process is completed, and no more shared secrets are exchanged over the network between the user and the server, eventually reducing the risk of stolen credentials.
Authentication flow
Once the user's registration is complete, the returning user can verify the credentials and log in to the application. Following are the steps that take place in the authentication flow for the user.
User returns to the website
When users return to the website to access the protected resources, the web application prompts the user to authenticate. The user provides the username to the server.
Website generates an authentication challenge
The website generates a new challenge and sends it to the user's browser.
User requests authenticator to sign the challenge
The user selects the authenticator they used during registration, or the authenticator may be automatically detected and requested to sign the challenge.
Authenticator signs the challenge
The authenticator signs the challenge using the private key stored during the registration flow. The authenticator sends the signed response and the public key back to the website.
User verification
The website receives the signed response and the user's public key. It verifies the response by checking the signature against the stored public key. If the verification is successful, the website grants the user access to the requested resources.
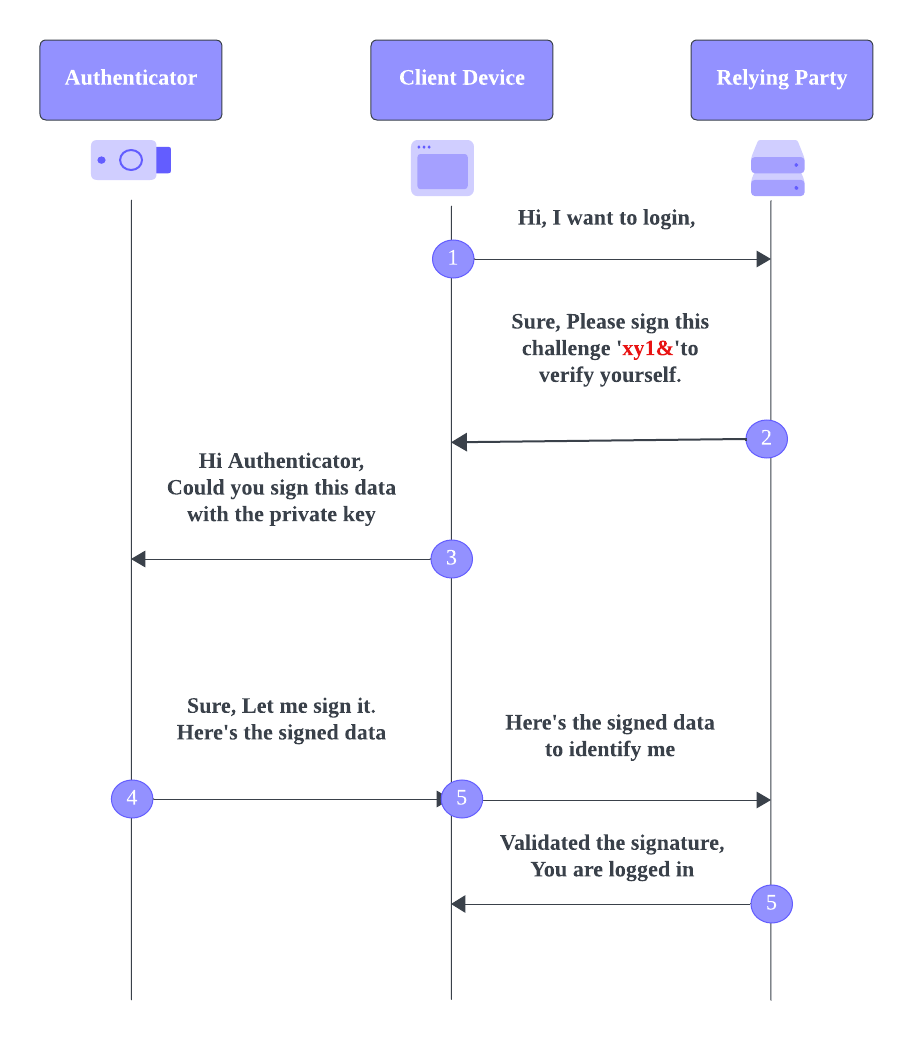
The user is authenticated securely without a password and with less friction to the user.
How to Implement the WebAuthn API
Two methods in the WebAuthn API mediate between the user and the server to create the public-private key pair.
navigator.credentials.createnavigator.credentials.get
Using the "navigator.credentials.create" method
The navigator.credentials.create method is used to initiate registering a new credential for a user. This method allows users to create a new credential, such as a public-private key pair, which can be used for secure authentication in the future. Here's how you can use navigator.credentials.create.
Prepare credential creation options
You need to define the options for the credential creation request. These options specify various credential creation parameters, such as the relying party ID (your website's domain), user information, and allowed authenticator types (e.g., platform authenticator or external security key).
Here's an example of how to create credential creation options:
const publicKey = {
  challenge: new Uint8Array(/* Generate a random challenge */),
  rp: {
    name: 'Webauthn Me', // Relying party name
    id: 'webauthn.me',     // Relying on party ID
  },
  user: {
    id: new Uint8Array(/* Generate a unique user ID */),
    name: 'jane.doe@example.com',
    displayName: 'Jane Doe',
  },
  pubKeyCredParams: [
    { type: 'public-key', alg: -7 }, // ES256 algorithm
  ],
  timeout: 60000, // 1-minute timeout
  attestation: 'direct', // Attestation type
};
The following section describes each variable in detail.
challenge: A challenge is a random value generated by the server and included in the registration request that helps to prevent replay attacks. The challenge serves as a nonce (number used once), ensuring that each registration request is fresh and not subject to replay. It prevents attackers from intercepting and reusing a valid registration message to gain unauthorized access. The server should validate the response promptly and reject it if the challenge has expired or does not match.rp: The relying party is the entity that relies on WebAuthn for authentication. For example, it is the domain of the website that implements WebAuthn to enable secure user authentication. Validating the relying party information helps prevent phishing attacks.user: Information about the user who wants to register.pubKeyCredParams: It is an array that specifies the acceptable public key algorithms and parameters for the generated credential. The array consists of two properties,type: A string indicating the cryptographic algorithm to be used. Common values include "public-key" for ECDSA (Elliptic Curve Digital Signature Algorithm) or "rsa" for RSA (Rivest–Shamir–Adleman)alg: An integer representing the specific algorithm within the given type. For example,-7representing ES256 for ECDSA with SHA-256.
timeout: The time limit for the credential creation process.attestation: The attestation parameter specifies how the authenticator (e.g., security key, biometric device) should attest to the authenticity of the public key credential it generates during the registration process. The attestation parameter can take different values, each representing a different attestation type. Common values include:none: No attestation is requested. The authenticator generates a credential without any assertion of its authenticity. This is suitable for scenarios where the relying party already has a secure means of verifying the authenticator.direct: The authenticator provides an attestation statement, but the format and content depend on the authenticator type. This is also known as "self-attestation."indirect: The authenticator forwards an attestation statement obtained from a third-party service, typically the manufacturer or a trusted party.
Call "navigator.credentials.create"
Use the navigator.credentials.create method to initiate the credential creation process.
navigator.credentials.create({ publicKey })
  .then((credential) => {
    // Handle the successful credential creation
    // Send the credential information to your server for storage
  })
  .catch((error) => {
    // Handle any errors that occurred during credential creation
  });
publicKey: It is the variable defined in the previous step.
Handle the Credential Creation Response
If the user successfully creates a credential, the navigator.credentials.create promise will resolve with a credential object. You should send this credential object to your server for storage and associate it with the user's account.
// Handle the successful credential creation
// Send the credential information to your server for storage
navigator.credentials.create({ publicKey })
  .then((credential) => {
    // Response object has information about the authenticator data,
    // public key, transport mechanisms, and more.
    const response = credential.response;

    // Access attestationObject ArrayBuffer
    const attestationObj = response.attestationObject;

    // Access client JSON
    const clientJSON = response.clientDataJSON;

    // Return authenticator data ArrayBuffer
    const authenticatorData = response.getAuthenticatorData();

    // Return public key ArrayBuffer
    const pk = response.getPublicKey();

    // Return public key algorithm identifier
    const pkAlgo = response.getPublicKeyAlgorithm();

    // Return permissible transports array
    const transports = response.getTransports();

    // Send the credential information to the server for storage
    return credential;
  })
  .catch((error) => {
    // Handle any errors that occurred during credential creation
    console.log('FAIL', error)
  });
If the credential creation fails or if there are errors, the promise will be rejected, and you can handle the errors accordingly.
Remember that the server-side storage and management of user credentials are essential for the WebAuthn authentication process. The server should securely store the user's public key and other relevant information to enable future authentication.
Using the "navigator.credentials.get" method
The navigator.credentials.get method is part of the WebAuthn API and is used to initiate the process of authenticating a user based on the credentials they have previously registered. This method is typically used in conjunction with the navigator.credentials.create method for credential registration. Here's how you can use this method.
Prepare authentication options
You need to define the options for the authentication request. These options specify the criteria for the user's credentials for authentication. You can include the relying party ID (e.g., your website's domain) and specify the allowed authentication methods.
Here's an example of how to create authentication options:
const publicKey = {
  challenge: new Uint8Array(/* Generate a random challenge */),
  rpId: 'webauthn.me', // Relying party ID
  allowCredentials: [
    {
      type: 'public-key',
      id: /* The credential ID of the user's registered credential */,
    },
  ],
  userVerification: 'preferred', // or 'required'
};
The following section describes each variable in detail.
userVerification:It specifies the preferred user verification method that the relying party wishes to be performed during the WebAuthn authentication process. The userVerification parameter can take different values, each representing a different user verification method. Common values includerequired,preferred, anddiscouraged.allowCredentials:It is an array that contains one or more "PublicKeyCredential" objects representing the credentials that the relying party is willing to accept during the authentication process. Each element in the allowCredentials array is an object with the following properties:type: A string specifying the type of the credential. Commonly, this is set to "public-key".id: A byte array representing the credential ID. This corresponds to a credential that was previously created during the registration process.
challengeandrpIdare the same parameters used for thenavigator.credentials.createmethod.
Call "navigator.credentials.get"
Use the navigator.credentials.get method to initiate the authentication process:
navigator.credentials.get({ publicKey })
  .then((assertion) => {
    // Handle the successful authentication assertion
  })
  .catch((error) => {
    // Handle any errors that occurred during authentication
  });
publicKey: It is the variable defined in the previous step.
Handle the authentication response
If the user successfully authenticates, the navigator.credentials.get promise will resolve with an authentication assertion containing information about the user's successful authentication. You can then send this assertion to your server for verification.
// Handle the successful authentication assertion
// Send the assertion to your server for verification
navigator.credentials.get({ publicKey })
  .then((assertion) => {
    // Handle the successful authentication assertion
    // The assertion response has information about the authenticator data,
    // signature, and user handle
     const response = assertion.response;

    // Access authenticator data ArrayBuffer
    const authenticatorData = response.authenticatorData;

    // Access client JSON
    const clientJSON = response.clientDataJSON;

    // Access signature ArrayBuffer
    const signature = response.signature;

    // Access userHandle ArrayBuffer
    const userHandle = response.userHandle;

    return assertion;
  }).catch((error) => {
    // Handle any errors that occurred during authentication
    console.log('FAIL', error)
  });
If the authentication fails or if there are errors, the promise will be rejected, and you can handle the errors accordingly.
Remember that the server-side verification of the authentication assertion is an essential part of the process. The server should validate the assertion's signature and ensure that it matches a previously registered credential for the user.
These steps provide a high-level overview of how to use navigator.credentials.create and navigator.credentials.get in the WebAuthn API for user authentication. The actual implementation will vary based on your specific use case and server-side verification requirements.
Conclusion
WebAuthn offers a passwordless and highly secure alternative to traditional authentication methods. Leveraging public key cryptography, user verification methods like biometrics, and a challenge-response model, WebAuthn effectively mitigates the risks associated with phishing attacks and enhances online security. It's important to note that while WebAuthn is phishing-resistant, it is not immune to all types of attacks. Therefore, proper implementation and security best practices on both the client and server sides are crucial to harness the security benefits of WebAuthn fully. Auth0 supports WebAuthn and adheres to industry best practices and security standards, removing the heavy lifting of implementing on your own. It is a simple toggle switch in the configuration to show up in your login box, and all the background processing is taken care of by Auth0.
Try out WebAuthn with Auth0?
Get started →About the author

Pradheepa Pullanieswaran
Staff Developer Advocate (Auth0 Alumni)