You can use Auth0 as the in configurations with SAML 2.0.Documentation Index
Fetch the complete documentation index at: https://auth0.com/llms.txt
Use this file to discover all available pages before exploring further.
SSO integrations with built-in Auth0 support
- Go to Dashboard > Applications > SSO Integrations and select Create SSO Integration.
- Choose an SSO identity provider integration. On the next screen, click Continue.
- Enter the required details for your selected provider and click Save.
Manually configure SSO integrations
You can manually configure a SAML integration with the SAML2 Web App addon in the . You can configure the SAML addon using the instructions on the screen along with the information available on the service provider’s settings.Obtain the Application Callback URL from the service provider
Obtain the URL to which the SAML Authentication Assertion should be sent from the service provider. This may be called Assertion Consumer Service URL, Post-back URL, or Callback URL.Configure SAML SSO in Auth0
- Go to Dashboard > Applications > Applications and either create a new application or click the name of an application to configure.
- Scroll to the bottom of the Settings page and click Advanced Settings.
-
Select the Certificates tab and click Download Certificates and choose
PEMformat. The certificate will be downloaded to a file called{yourTenant}.pem. Save this file; you will need to upload it when you configure the service provider.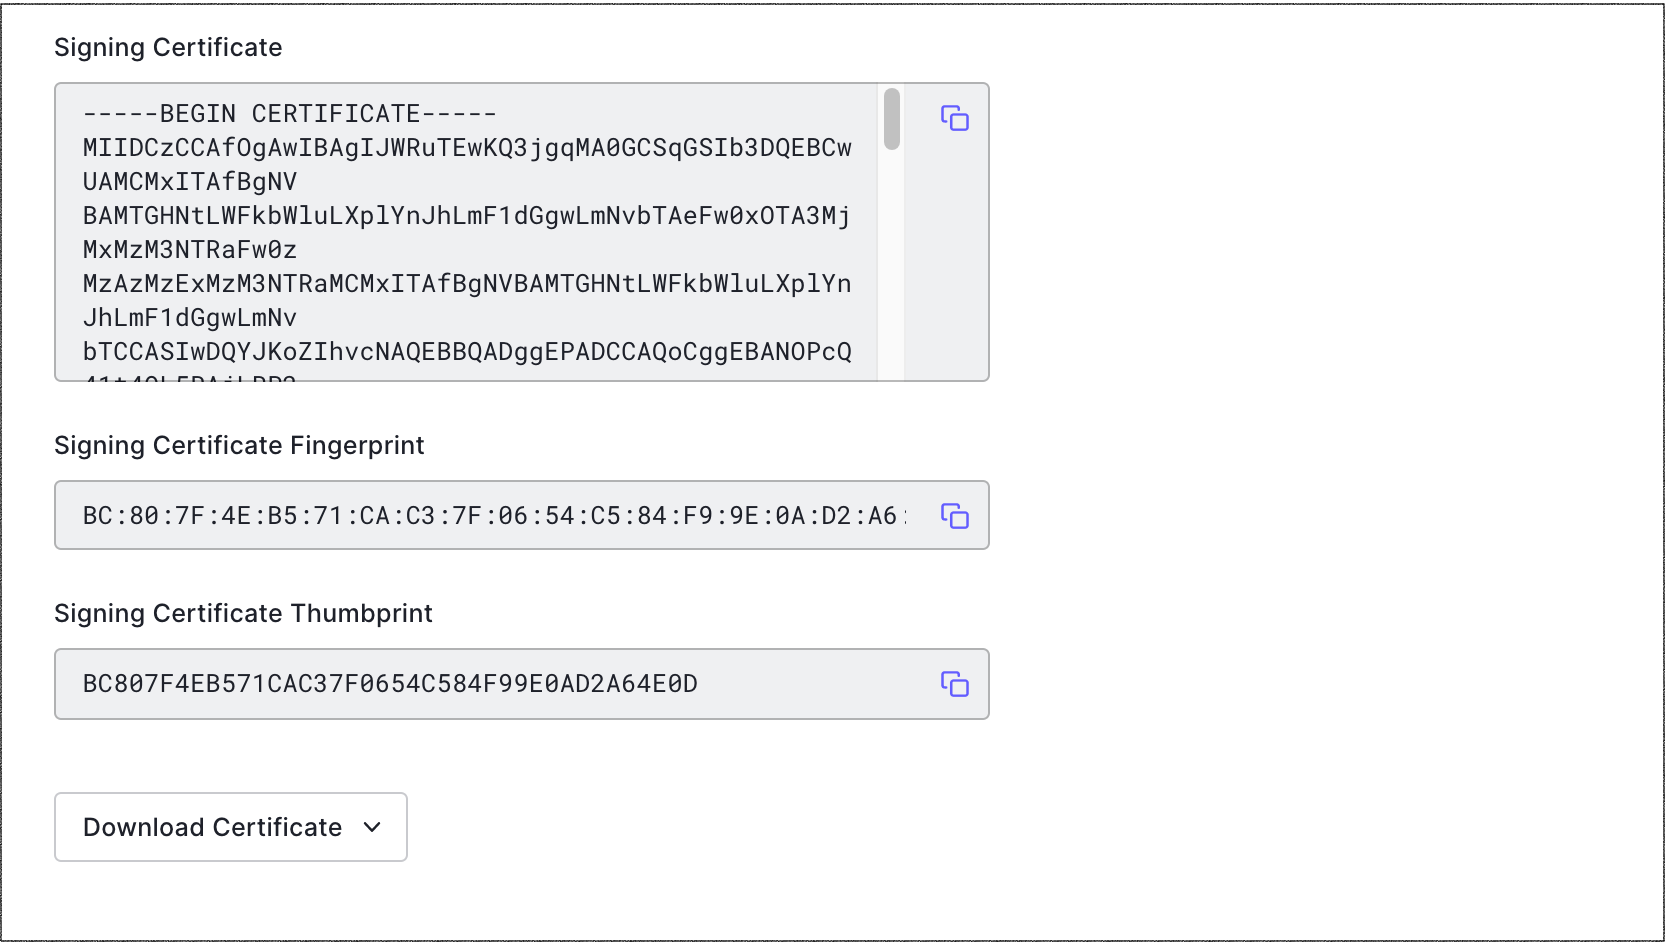
- Select the Endpoints tab and locate SAML Protocol URL. Copy and save it. You will need to provide it to the service provider.
- Scroll to the top and select the Addons tab.
-
Enable the SAML2 Web App toggle.
Enabling both SAML and WS-Fed addons for a single client is not supported and may lead to inconsistent behavior. Use a separate client for each addon.
-
On the Settings tab, enter the Application Callback URL from the service provider (or application) to which the SAML assertions should be sent after Auth0 has authenticated the user. This is the Assertion Consumer Service (ACS) URL.
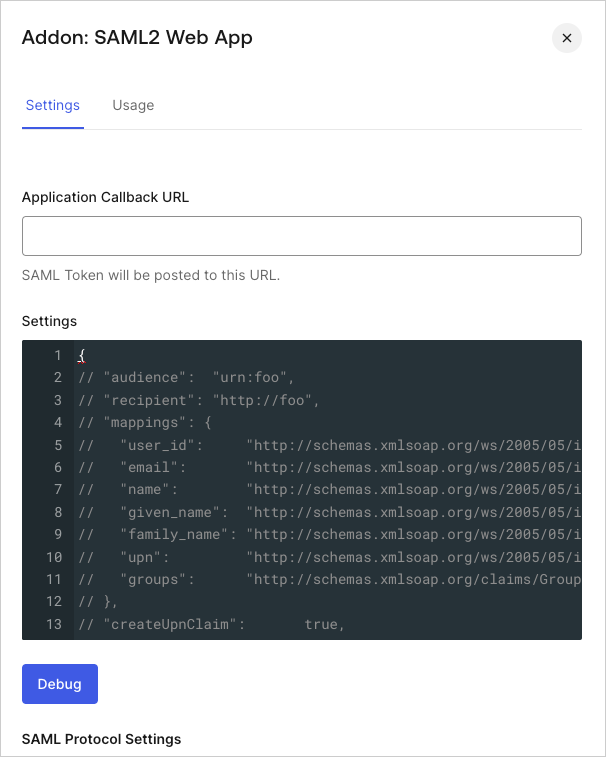
- Scroll to the bottom of the tab and click Enable.
- If your service provider sends multiple ACS URLs in the SAML request, you will need to add them to the allow list by navigating to your application’s Settings tab, locating Allowed Callback URLs, and adding them.
Configure SAML SSO on the service provider
-
Go to the SAML Addon Usage tab to view the information that you need to configure the service provider application.
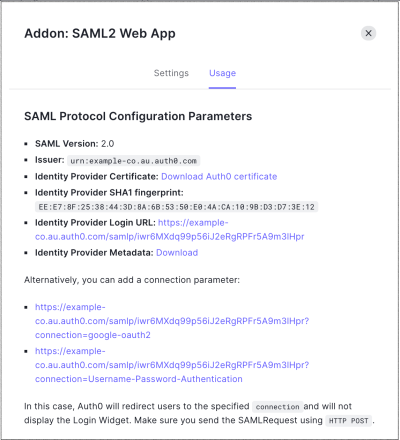
- Locate Identity Provider Metadata, and click Download to download the metadata file. Add information to the service provider, so it knows how to send SAML-based authentication requests to Auth0. The instructions provided here are generic. You will need to find the appropriate screens and fields on the service provider.
- If the service provider supports uploading a metadata file, provide the metadata URL obtained on the SAML2 Web Addon Usage tab.
-
If the service provider does not support uploading a metadata file, configure settings manually, using the information from the SAML Addon’s Usage view.
- For a Login URL, use the Identity Provider Login URL, which is the URL to which the service provider should send its SAML Authentication Requests.
- If you have a custom domain, use the custom-domain-based URL rather than your Auth0 domain. Instead of using a URL in this format:
https://{yourTenant}.auth0.com/samlp/CLIENTID?connection=Username-Password-AuthenticationYou will want to use one in this format:https://{yourCustomDomain}/samlp/CLIENTID?connection=Username-Password-Authentication. - If you are using Organizations, you can direct users to a specific organization’s login prompt by providing an organization ID in the query string as the
organizationparameter. Optionally, you can also specify the connection by including theconnectionparameter. Example:https://{yourTenant}.auth0.com/samlp/CLIENTID?connection=Acme-Saml-Connection&organization=org_123456789 - If the service provider also has a field for a Logout URL, enter the Identity Provider Login URL again; both login and logout are handled by the same URL.
- Download the certificate from the SAML Addon’s Usage view and provide it to the service provider. This certificate will be used to validate the signature of the SAML Authentication Assertions sent from Auth0 to the service provider. If the service provider asks for an Issuer, this can also be obtained from the SAML Addon’s Usage view.
Test configuration
Once you have completed the above configuration, test the login.- If your application doesn’t work the first time, clear your browser history and (ideally) cookies each time before you test. Otherwise, the browser may not pick up the latest version of your HTML page, or it may have stale cookies that impact execution.
-
To help troubleshoot SSO, capture an HTTP trace of the interaction. Many tools will capture the HTTP traffic from your browser for analysis.
- Search the internet for “HTTP Trace” to find and install a tool.
- Capture the login sequence from start to finish and analyze the trace. Track the sequence of GETs to see how far in the expected sequence you get. You should see a redirect from your original site to the SP and then to the IdP, a post of credentials if you had to log in, then a redirect back to the callback URL or the SP, and then a redirect to the callback URL specified in your application.
- Make sure that cookies and JavaScript are enabled for your browser.
- Use the http://samltool.io tool to decode a SAML assertion.