
TL;DR: The new component router in Angular 2 comes with a lot of features and a slightly different approach to setting up routing. In this article we take a look at the router's features by implementing them in a simple Github user explorer application. Follow along here or take a look at the repo to get started with the code.
If you'd like to see our other Angular 2 content, we've also covered pipes, dependency injection, HTTP, and authentication.
Angular 2 comes with a brand new component router that is packed with features. At the Beta 1 release, the documentation on Angular 2's router is in pretty good shape, and there is even an extensive guide on setting it up. There are, howevever, some features and use cases that have yet to be documented.
Those coming from Angular 1.x will likely be familiar with UI Router, a third party routing system contributed by the community. Some aspects of the new component router in Angular 2 will look familiar to those who have used UI Router, but there are definitely some new features and concepts that haven't been seen before. For example, child routes in Angular 2 are designed to work best by requiring separate routing and view components.
In this article we'll get a feel for the new router by implementing it in a simple Github user explorer application. In the app, we'll be able to search for Github accounts based on username, and we'll set up a way to explore further detail about the users. To do this, we'll set up child routes and work with route parameters.

Getting Started with the New Angular 2 Router
It's best to get started with a seed project. If you'd like to use Webpack, the Angular 2 Webpack Starter from AngularClass is an excellent option.
The router in Angular 2 provides both a HashLocationStrategy and a PathLocationStrategry, one of which is used when we bootstrap the app. As you might guess, HashLocationStrategy uses hashes in the URL, which is what we're used to as the default from Angular 1.x. Many prefer not to use hashes, in which case PathLocationStrategy can be applied.
HashLocationStrategy http://example.com/#/users PathLocationStrategy http://example.com/users
// main.ts

...

import {LocationStrategy, PathLocationStrategry} from 'angular2/router';

...

bootstrap(App, [
  ...

  provide(LocationStrategy, { useClass: PathLocationStrategy })
])
Creating the Root Component
Our app.ts file will serve as the root component for our app and will eventually have some routing configuration that points to other components. For now, let's just set it up so that we can query Github users and have them displayed in a list.
// src/app.ts

import {Component} from 'angular2/core';
import {ROUTER_DIRECTIVES, RouteConfig, Router} from 'angular2/router';
import {FORM_PROVIDERS, FORM_DIRECTIVES, Control} from 'angular2/common';
import {Http} from 'angular2/http';

@Component({
  selector: 'app',
  providers: [ FORM_PROVIDERS ],
  directives: [ ROUTER_DIRECTIVES, FORM_DIRECTIVES ],
  pipes: [],
  template: `
    <div id="sidebar" class="col-sm-3">
      <div class="search">
        <input [ngFormControl]="searchTerm" class="form-control" placeholder='Seach for users' />
        <button class="btn btn-primary" (click)="getUsers()">Get Users</button>
      </div>
      <div class="list-group">
        <p class="no-users" *ngIf="users.total_count == 0">No users found</p>
        <a
          class="users list-group-item"
          *ngFor="#user of users.items"
        >
          <img class="img-circle" src="{{ "{{user.avatar_url" }}}}"  />
          <strong>{{ "{{user.login" }}}}</strong>
        </a>
      </div>
    </div>
    <div id="main" class="col-sm-9">
      <router-outlet></router-outlet>
    </div>
  `,
  styles: [`
      #main { margin: 10px 0 }
      #main button { margin-bottom: 5px }
      .search * { margin: 10px 0; }
      .no-users { color: red; }
      .container { width: 100% }
      img { max-width: 50px; }
  `]
})

export class App {
  users: Array<Object> = [];
  searchTerm: Control = new Control();

  constructor(public http: Http) {}

  getUsers() {
    this.http.get(`https://api.github.com/search/users?q=${this.searchTerm.value}`)
    .map(response => response.json())
    .subscribe(
      data => this.users = data,
      error => console.log(error)
    );
  }
}
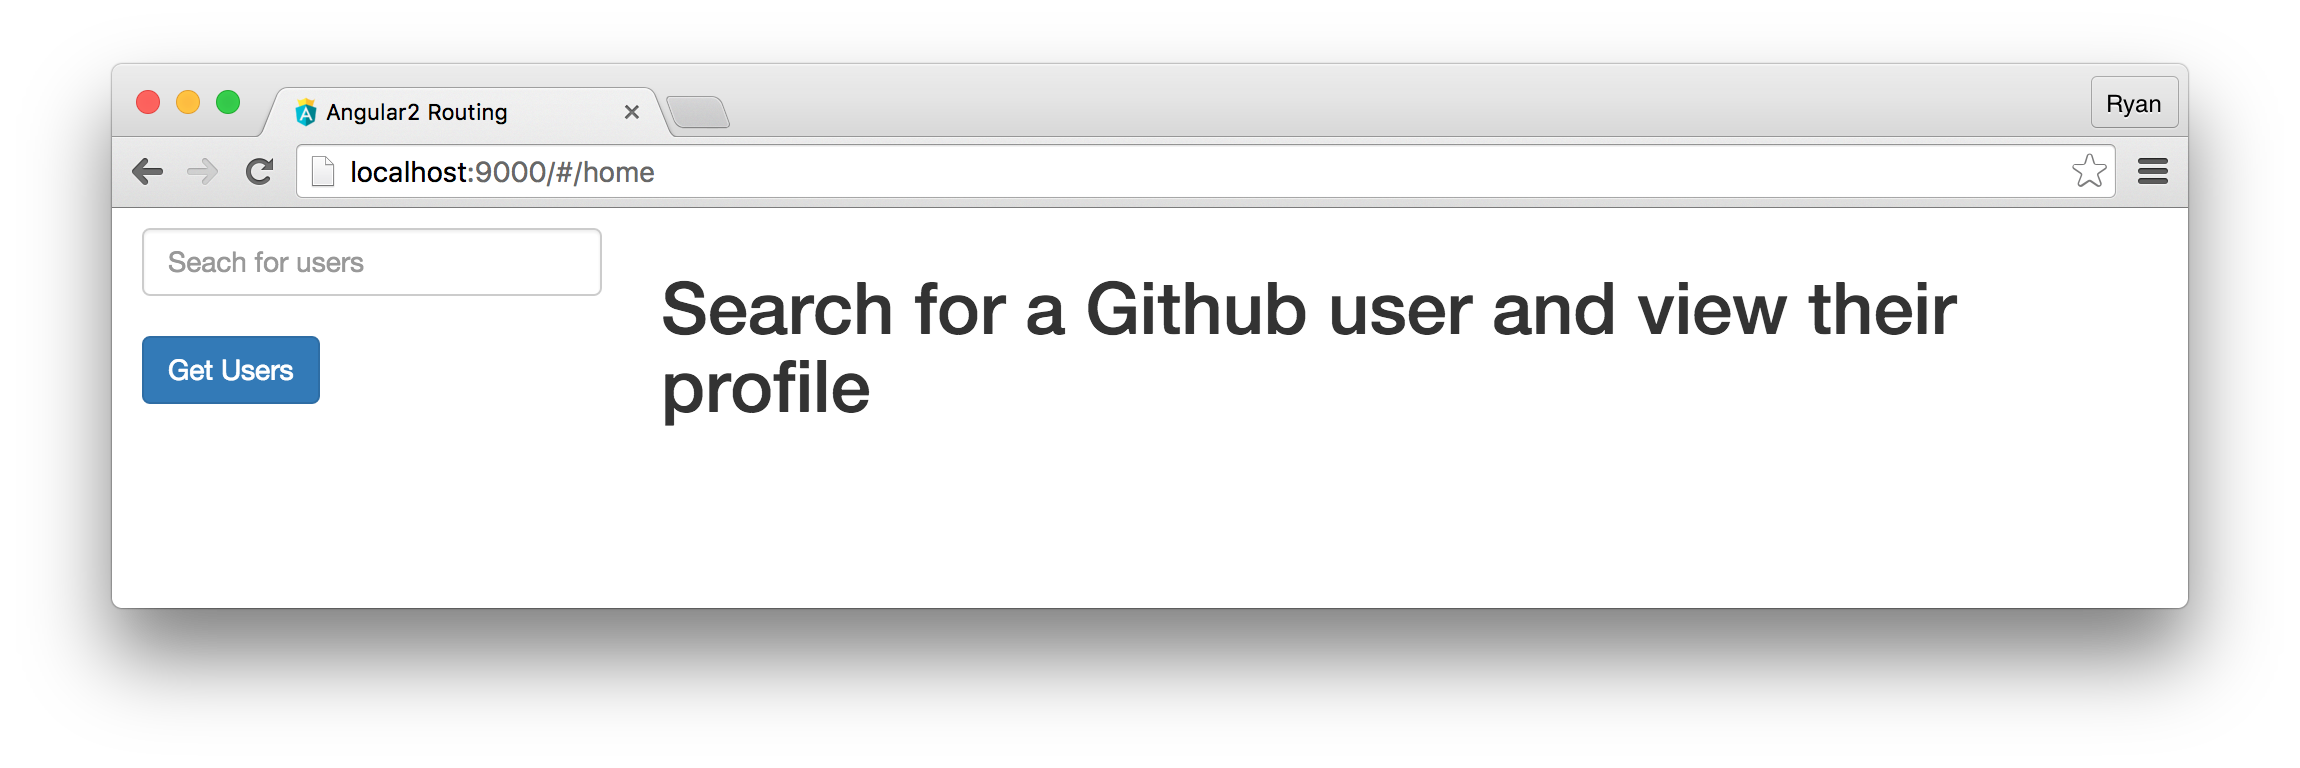
Now when we enter a search term and click "Get Users", we get a list of 30 users. We won't bother setting up any kind of ordering by relevence or pagination in this example because we want to keep the focus on routing. However, Github's API returns useful information such as a score which indicates search relevence, so things like ordering can be done easily if you like.
Notice that towards the end of the template, we have a router-outlet tag. This tag will be replaced by content from our other routes and is the spot where other content is "let out", hence router-outlet. Let's give it a route to render.

Setting Up the Home Route
Let's start with a Home route that will just have a simple welcome message. This will go in a file called Home.ts.
// src/Home.ts

import {Component} from 'angular2/core';

@Component({
  template: `<h1>Search for a Github user and view their profile</h1>`
})

export class Home {}
Now we need to set up our initial routing configuration. This is done with the @RouteConfig decorator, which takes an array of objects called RouteDefinitions that describe our app's various routing paths and their respective components. We'll use @RouteConfig as a decorator on the App class here to set up the base routing, but we'll also use it in our other components later on. We already imported RouteConfig, so let's now set it up to just have the App class definition.
// src/app.ts

import {Home} from './Home';

...

@RouteConfig([
  { path: '/home', component: Home, name: 'Home' },
  { path: '/**', redirectTo: ['Home'] }
])

...
So far we only have one real route set up, and that is the /home route. We are also instructing the app to redirect any request to unrecognized routes to the Home component. Each RouteDefinition requires a path, a name, and either a component, loader, or redirectTo. Here we see the component and redirectTo case, and later we'll see how loader can be used to lazily load components.
Setting Up the User Detail Component and Route
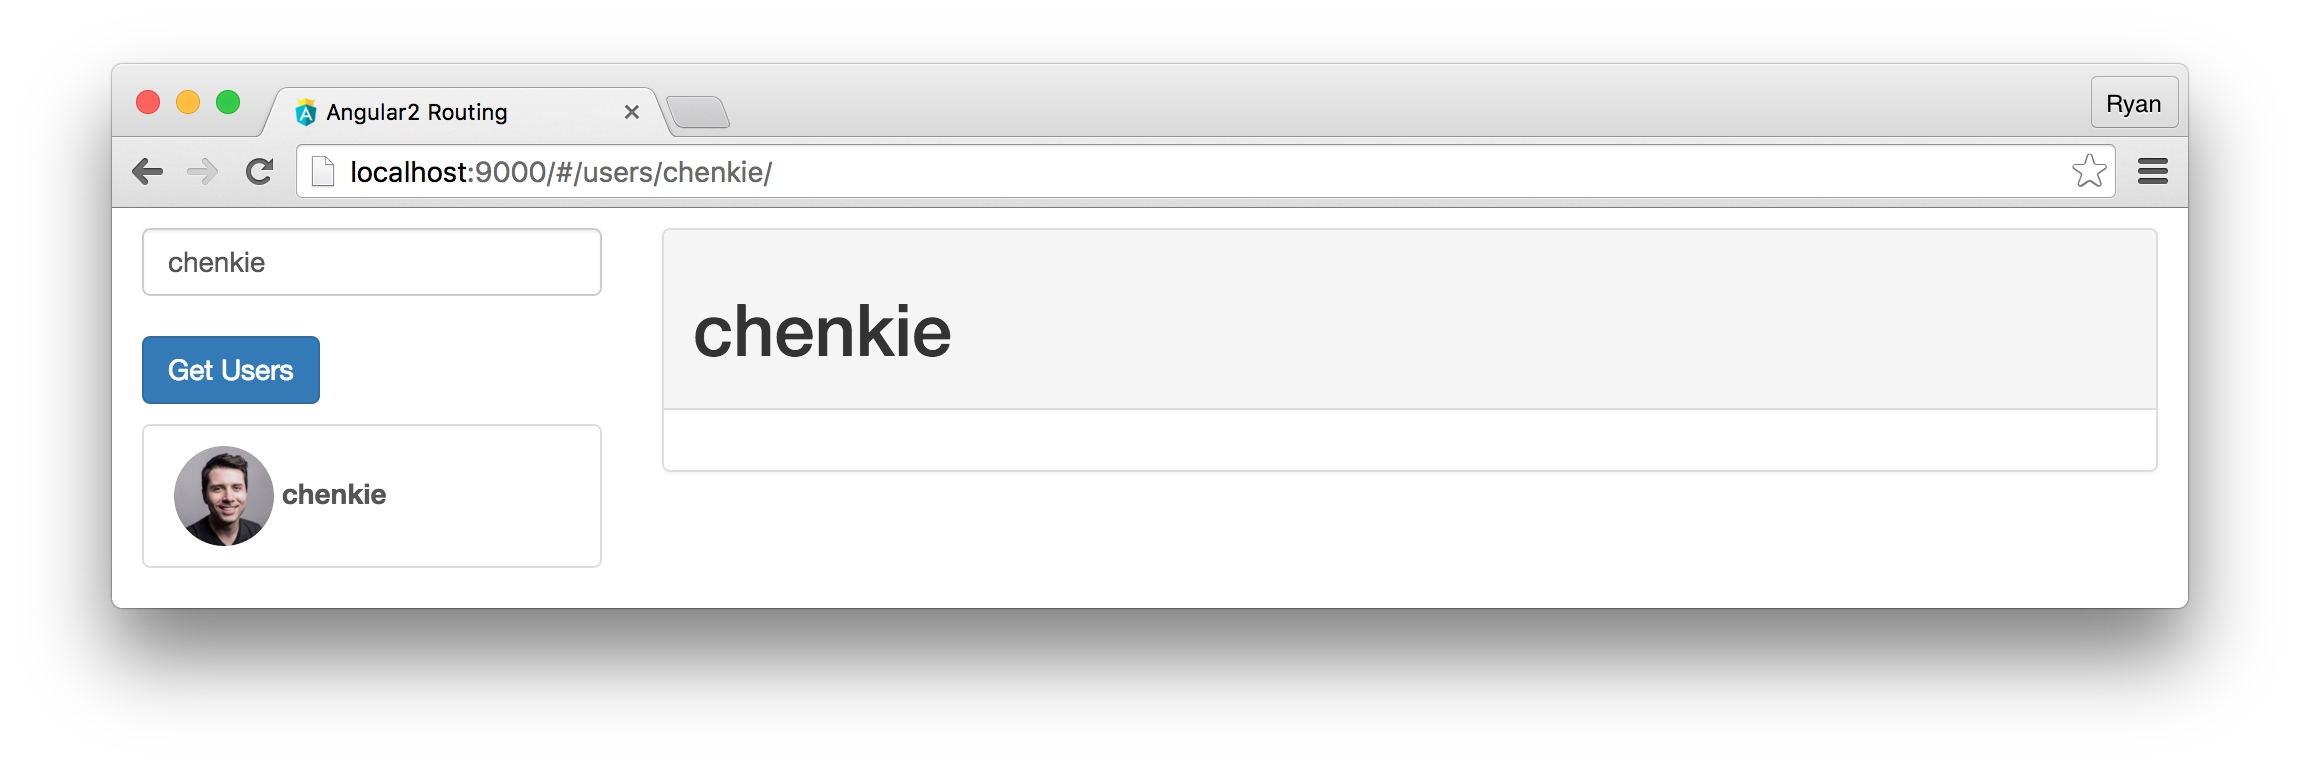
The router-outlet in the main App component can only show the Home route right now, but of course want to show others routes as well. We should put in some routing so that when we click the list item for a user in the returned results, we get a route like /users/<username>. For that, let's create another component called Users.
// src/Users.ts

import {Component} from 'angular2/core';
import {Http} from 'angular2/http';
import {ROUTER_DIRECTIVES, RouteParams, RouteConfig} from 'angular2/router';

@Component({
  template: `
    <div class="panel panel-default">
      <div class="panel-heading">
        <h1>{{userLogin}}</h1>
      </div>
      <div class="panel-body">
        <router-outlet></router-outlet>
      <div>
    </div>
  `,
  directives: [ROUTER_DIRECTIVES]
})

export class Users {
  userLogin: Object;

  constructor(params: RouteParams) {
    this.userLogin = params.get('userLogin');
  }
}
This is a simple component that so far just displays the user's login name. The router-outlet in the template will be the place where the content from our child components will show up, which we'll cover next. You'll notice that we are retrieving the user's login name using params.get which is a method given by RouteParams, a class that gives us a map of parameters for the route. To pass this parameter on to the Users component, we need to send it from the App component. An easy way to do this is to add it in as an object when we attach a routerLink to an element.
// src/app.js

...

import {Home} from './Home';
import {Users} from './Users';

...

template: `
  ...
  <a
    class="users list-group-item"
    *ngFor="#user of users.items"
    [routerLink]="['Users', { userLogin: user.login }]"
  >
  ...
 `
...

@RouteConfig([
  { path: '/home', component: Home, name: 'Home', useAsDefault: true },
  { path: '/users/:userLogin/', component: Users, name: 'Users' },
  { path: '/**', redirectTo: ['Home'] }
])

...
We've also set up an additional RouteDefinition that points to our Users component and has a path that contains the userLogin parameter. This parameter is a variable one, indicated by the colon. When we click the list item for a returned user, userLogin will be set to their login name, and will be displayed as a segment on the URL.
Moving to Child Components
Child routes in Angular 2 work somewhat differently than what we may have become accustomed to in UI Router. In fact, child routes have caused quite a bit of confusion and are considered to be flawed by some. The issue (which some argue is not an issue) seems to stem from how Angular 2's router handles terminal and non-terminal routes. A terminal route is basically one that has a defined end point, whereas a non-terminal route is one that can facilitate further routing. That sounds a bit confusing, so let's see how it looks in practice.
The first thing we need to do is tell the router that our /users/:userLogin path should be able to handle children. We do that by appending ellipses to the end of the path.
// src/app.ts

...

@RouteConfig([
  { path: '/home', component: Home, name: 'Home', useAsDefault: true },
  { path: '/users/:userLogin/...', component: Users, name: 'Users' },
  { path: '/**', redirectTo: ['Home'] }
])

...
Depending on how we want our app set up, we might like to have a /detail path that indicates we're looking at a detailed profile area for the user. This can be a child of our Users route. Let's set up a new component that will fetch and display the user's details. First, we need to set up another @RouteConfig in User.ts.
// src/User.ts

...

@RouteConfig([
  { path: '/detail', component: UserDetail, name: 'UserDetail' }
])

...
User has now become a routing component instead of stictly a view component because it is facilitating further routing. In fact, this is by design in Angular 2's router, but can be undesirable because it causes the need for additional files. The router's design means that the ideal routing setup should look like this:

Let's now create the UserDetail view component.
// src/UserDetail.ts

import {Component, Injector} from 'angular2/core';
import {Http} from 'angular2/http';
import {ROUTER_DIRECTIVES, Router, RouteParams, RouteConfig} from 'angular2/router';

@Component({
  directives: [ROUTER_DIRECTIVES],
  template: `
    <div class="col-sm-3">
      <img class="img-circle" src="{{userData.avatar_url}}" />
      <p *ngIf="userData.name">
        <i class="glyphicon glyphicon-user"></i>
        {{userData.name}}
      </p>
      <p *ngIf="userData.company">
        <i class="glyphicon glyphicon-briefcase"></i>
        {{userData.company}}
      </p>
      <p *ngIf="userData.location">
        <i class="glyphicon glyphicon-globe"></i>
        {{userData.location}}
      </p>
    </div>
    <div class="col-sm-9">

    </div>
  `,
  styles: [`
    img { width: 100px; margin-bottom: 10px; }
  `]
})

export class UserDetail {
  params: RouteParams;
  userLogin: string;
  userData: Object = {};

  constructor(public http: Http, params: RouteParams, injector: Injector, private _router: Router) {
    // We use injector to get a hold of the parent's params
    this.params = injector.parent.parent.get(RouteParams);
    this.userLogin = this.params.get('userLogin');
  }

  ngOnInit() {
    this.http.get(`http://api.github.com/users/${this.userLogin}`)
      .map(response => response.json())
      .subscribe(
        data => this.userData = data,
        err => console.log(err)
      );
  }

}
You'll notice that the way we're getting the userLogin param is quite different in this case. We can't get at the params of the parent route by simply using params.get like we previously did, and instead we need to use the Injector to reference the RouteParams of the parent. For nesting that doesn't go too deep this isn't a big deal, but as we'll see later, it can get cumbersome when we nest further. This method of getting the params from the parent is a bit of a workaround, and will hopefully be improved in later releases of the router.
There's a problem with the route configuration above, and we can take this opportunity to demonstrate the non-terminal route error. If we run it and try to select a user, we can see the error in the console.
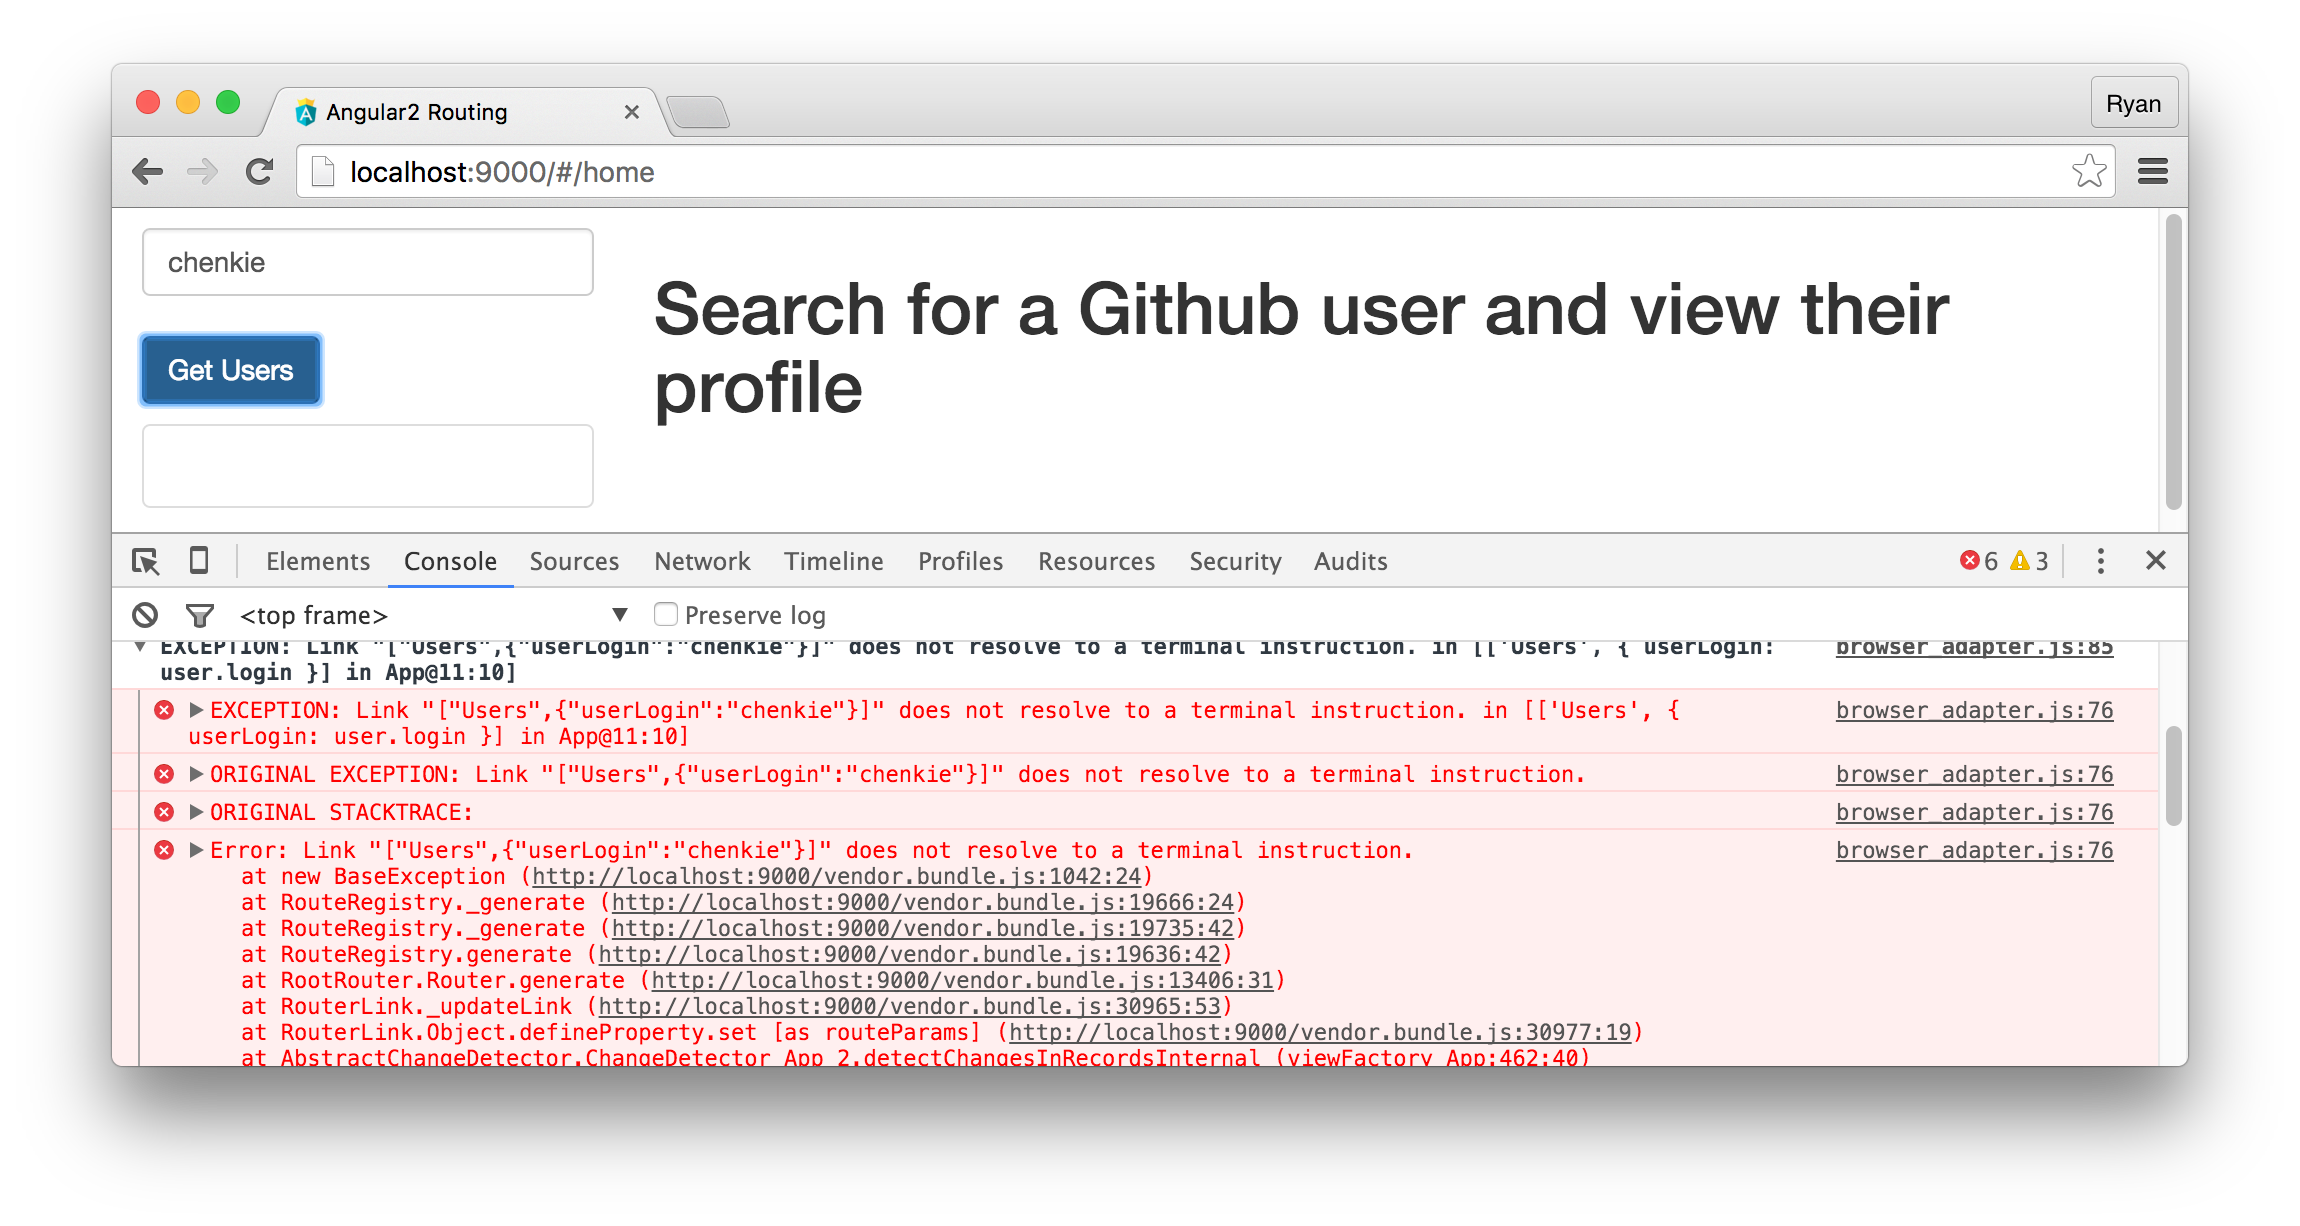
The issue here is that an explicit instruction for which route should be the terminal one is required. We do this by setting setAsDefault to true on the /details route.
// app/User.ts

...

@RouteConfig([
  { path: '/detail', component: UserDetail, name: 'UserDetail', useAsDefault: true }
])

...
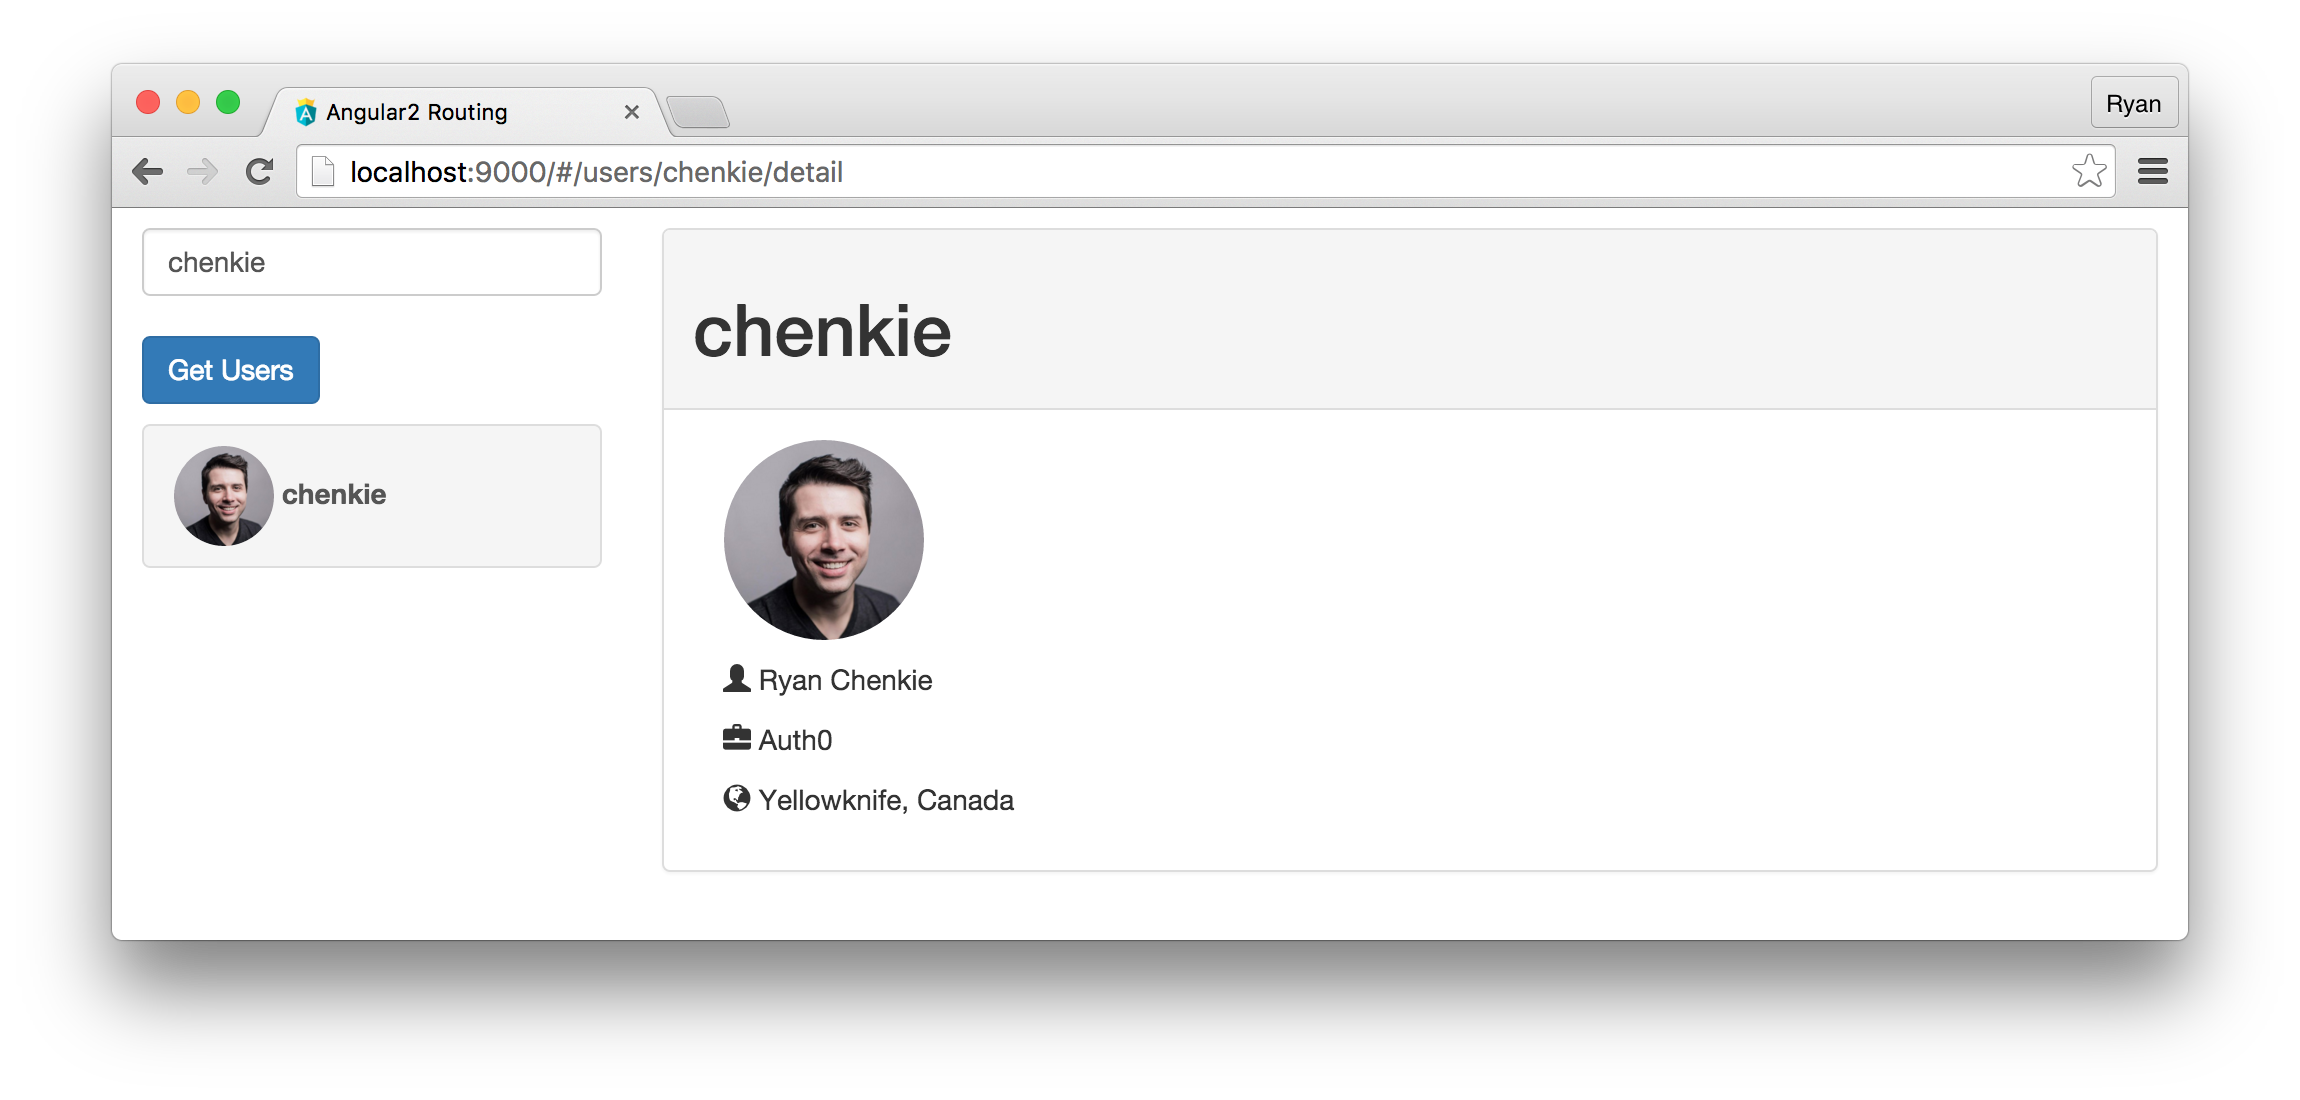
Now we can get the user detail.
Another Child Route and OnActivate
As was mentioned above, the new router is designed such that we should be creating distinct routing and view components, but this can get cumbersome for deep routing. We can provide a terminal route directly to a parent if we like. Let's see this by creating a component to list out a user's followers.
// src/UserFollowers.ts

import {Component, Injector} from 'angular2/core';
import {Http} from 'angular2/http';
import {RouteParams, OnActivate, ComponentInstruction} from 'angular2/router';

@Component({
  template: `
    <ul class="list-group">
      <h3>Followers</h3>
      <li class="list-group-item" *ngFor="#follower of followers">{{follower.login}}</li>
    </ul>
  `
})

export class UserFollowers implements OnActivate {
  userLogin: string;
  followers: Array<Object> = [];

  constructor(public http: Http, injector: Injector, params: RouteParams) {
    // This is one way to get params but is ugly
    // this.params = injector.parent.parent.parent.parent.get(RouteParams);
    this.userLogin = params.get('userLogin');
  }

  routerOnActivate(to: ComponentInstruction, from: ComponentInstruction) {
    return new Promise((resolve) => {
      this.http.get(`https://api.github.com/users/${this.userLogin}/followers`)
        .map(response => response.json())
        .subscribe(
          data => {
            this.followers = data;
            resolve(true);
          },
          error => console.log(error)
        );
    });
  }
}
This route also gives us the chance to introduce another class from the new router: OnActivate. If we implement this class for our component, we're able to use the routerOnActivate method which does two things for us.
- We're able to get information about the current and previous routes by use of their
ComponentInstructions - We can wait until a promise resolves for the route to be navigated to
In the UserFollowers component we are seeing how to hold off on completing navigation until we get a result back from the request to Github's API for the user's followers.
Getting the userLogin from the params in this component can be done like we did last time, but now we're getting to a point where we need to keep calling parent over and over. Obviously this isn't too scalable. Instead, we can pass the param down from the parent if we use router.navigate to explicitly go to this route.
// src/User.ts

...

template: `
  ...

  <div class="col-sm-9">
    <button class="btn btn-primary" (click)="getFollowers()">Load Followers</button>
    <router-outlet></router-outlet>
  </div>

  ...
 `,

...

@RouteConfig([
  { path: '/followers', component: UserFollowers, name: 'UserFollowers' }
]

...

  constructor(public http: Http, params: RouteParams, injector: Injector, private _router: Router) {
    this.params = injector.parent.parent.get(RouteParams);
    this.userLogin = this.params.get('userLogin');
  }

  getFollowers() {
    this._router.navigate(['UserFollowers', { userLogin: this.userLogin }]);
  }

...
You'll notice that the userLogin param shows up explicitly as the last segment and is separated from the rest with a semicolon. This is called matrix URI notation and is a bit different than what we're used to.
What Else Can the Router Do?
We've got some basic child routing set up, but there are some other features that we haven't explored yet.
Restricting Routes
The router provides a hook called @CanActivate that allows us to restrict routes based on a condition. With it we get the same ComponentInstructions that we saw earlier, which allow us to get information about the to and from routes. If the funtion in the hook resolves to false, the router won't allow navigation to that route.
We can apply the decorator directly in our components. A good example is using the tokenNotExpired function from angular2-jwt to determine if the user is authenticated or not.
...

@CanActivate(() => tokenNotExpired())

export class MyComponent {
  ...
}
Passing Data in Routes
Much like UI Router, we can pass an arbitrary data object with routes if we like. This is done in the @RouteConfig.
 ...

 @RouteConfig([
  { path: '/myroute', component: MyComponent, name: 'MyRoute', data: { isAdmin: true } }
])

...
We can then read this data with the RouteData class in whichever component is being navigated to.
...

import {RouteData} from 'angular2/router';

export class MyComponent {
  isAdmin: boolean;

  constructor(data: RouteData) {
    this.isAdmin = data.get('isAdmin');
  }
}
Lazy Component Loading
As our apps get larger, it might become desireable to hold off on loading components until they are needed. For this, we lazily load components by using an AsyncRoute in the @RouteConfig.
...

import {RouteConfig, AsyncRoute} from 'angular2/router';

...

@RouteConfig([
   new AsyncRoute({path: '/async', loader: () => System.import('app/Async').then(m => m.About), name: 'Async'})
])

...
This will now load the route's component only when it is needed, meaning the initial download of our app can be smaller.
Custom Router Outlet
We might like to define our own custom router-outlet so that we can have better control over its behavior. For this, we can extend RouterOutlet in our own directive.
import {Directive} from 'angular2/core';
import {Router, RouterOutlet, ComponentInstruction} from 'angular2/router';

@Directive({
  selector: 'router-outlet'
})

export class MyOwnRouterOutlet extends RouterOutlet {
  ...

  activate() {
    console.log('Hello from the new router outlet!');
  }
}
For a full example of extending RouterOutlet, see this repo.
Aside: Easy Authentication with Auth0
You can easily add authentication to your Angular 2 app with Auth0, and with it you can have features like social login, single sign-on and passwordless authentication at the flip of a switch.
Let's go through the simple steps of adding Auth0 to your app.
Sign Up
If you haven't already done so, sign up for your free Auth0 account.
Install angular2-jwt for Authenticated HTTP Requests
npm install angular2-jwt
Add the Auth0Lock Script
  <!-- Auth0 Lock script -->
  <script src="https://cdn.auth0.com/js/lock/10.0/lock.min.js"></script>


  <!-- Setting the right viewport -->
  <meta name="viewport" content="width=device-width, initial-scale=1.0, maximum-scale=1.0, user-scalable=no" />
Instantiate Lock and Add Login/Logut Controls
// app.ts

...

@Component({
  selector: 'app',
  template: `
    <h1>Welcome to Angular2 with Auth0</h1>
    <button *ngIf="!loggedIn()" (click)="login()">Login</button>
    <button *ngIf="loggedIn()" (click)="logout()">Logout</button>
  `
})

export class AuthApp {

  lock = new Auth0Lock('AUTH0_CLIENT_ID', 'AUTH0_DOMAIN');

  constructor() {
    // Add callback for lock `authenticated` event
    var self = this;
    this.lock.on("authenticated", authResult => {
      self.lock.getProfile(authResult.idToken, (error, profile) => {

        if (error) {
          // handle error
          return;
        }

        localStorage.setItem('profile', JSON.stringify(profile));
        localStorage.setItem('id_token', authResult.idToken);

      });
    });
  }

  login() {
    this.lock.show();
  }

  logout() {
    localStorage.removeItem('profile');
    localStorage.removeItem('id_token');
  }
}
Make Authenticated Requests
// app.ts

import {AuthHttp} from 'angular2-jwt';

constructor(public authHttp: AuthHttp) {}

getSecretThing() {
  this.authHttp.get('http://example.com/api/secretthing')
    .subscribe(
      data => console.log(data.json()),
      err => console.log(err),
      () => console.log('Complete')
    );
  );
}
Protect Routes
If the user has an expired token, they shouldn't be allowed to navigate to a protected route. Use the CanActivate hook for this.
import {tokenNotExpired} from 'angular2-jwt';

...

@CanActivate(() => tokenNotExpired())

export class MyComponent {}
Done!
For full details, including configuration, check out the Auth0 Angular 2 docs or download a seed project for Webpack and SystemJS.
Wrapping Up
The new router in Angular 2 has some powerful features and is, for the most part, fairly intuitive. The main point of confusion for developers right now is the distinction between terminal and non-terminal routes, and the need for separate routing and view components. If issues which point this out as a flaw like this one keep popping up, it's possible that we might see some changes to the router API in the future.
“The main point of confusion for developers right now is the distinction between terminal and non-terminal routes”
Tweet This
About the author

Ryan Chenkie
Developer
Ryan is a Google Developer Expert, the host of the Entrepreneurial Coder Podcast, the author of Securing Angular Applications, and an all-around fanatic about application security.View profile