
As a Blazor developer, you can reuse your Razor components and your skills to create UIs for desktop and mobile applications through .NET MAUI. While you may know how to add authentication to a Blazor application, things are slightly different when it comes to a Blazor MAUI app, i.e., a Blazor app running within a MAUI app. Let's explore how to add Auth0 authentication to your Blazor MAUI applications.
Blazor Hybrid and MAUI
The ambitious goal of Blazor Hybrid is to provide developers with a framework to create a cross-platform user interface. Web developers who know the Blazor framework and the Razor syntax can easily reuse their UI components and their knowledge to build UIs that run on web servers (web applications), browsers (SPAs), and even on desktop and mobile apps.
While Blazor components of web applications are rendered in a browser, they run natively on desktop and mobile applications by leveraging a special WebView control: the BlazorWebView. The .NET platform provides BlazorWebView controls for the specific native UI framework you use in your application. So, you have a BlazorWebView for .NET MAUI, one for WPF, and one for Windows Forms.
You might think that Razor components are compiled into WebAssembly since they are included in a WebView. Actually, the components are optimized to run natively on each specific platform.
In this article, we will focus on Blazor Hybrid in the .NET MAUI framework context.
Prerequisites and Warnings
This article assumes that you have a basic knowledge of Blazor and .NET MAUI. Although you will build and secure a Blazor MAUI app from scratch, knowing how authentication and authorization work for Blazor and MAUI applications may help. You can take a look at this article to learn how to add authentication to a MAUI app and this one to learn how to secure a Blazor web app.
To build and run the sample application used in this article, you need the .NET 8.0 SDK installed on your machine. Depending on your development and target platforms, you may need additional components.
Please, refer to this document to learn more and set up your development environment.
⚠️ Please, consider that at the time of writing, there are still some issues that prevent proper and easy integration of OIDC into some platforms. Consider this article as a general outline of how OIDC integration should occur in a Blazor MAUI application, but keep in mind that, at the current state, the framework may not be ready for your target platform.
⚠️ The sample application built in this article has been tested on macOS Sonoma 14.5 with Xcode 15.4.
The Sample Application
The sample application you will build is based on the MAUI Blazor template. Open a terminal window and run the following command to create it:
dotnet new maui-blazor -o MauiBlazorAuth0App
This article uses the .NET CLI to create and build the project to offer a consistent cross-platform experience, but feel free to use the IDE and tool that you prefer. For example, in Visual Studio 2022, you will select the .NET MAUI Blazor App template, as shown in the following screenshot:

Once you create your project, go to the MauiBlazorAuth0App folder. Here you will find all the assets for your Blazor MAUI application. As a Blazor developer, you may notice the well-known wwwroot folder, which contains the web-based assets. The Components folder contains the Razor components for the application, while the Platforms and Resources folders are MAUI-specific folders.
If you are curious to learn how a Blazor app runs in a MAUI app, open the MainPage.xaml file and look at its content. You should see the following code:
<!-- MainPage.xaml -->

<?xml version="1.0" encoding="utf-8" ?>
<ContentPage xmlns="http://schemas.microsoft.com/dotnet/2021/maui"
             xmlns:x="http://schemas.microsoft.com/winfx/2009/xaml"
             xmlns:local="clr-namespace:MauiBlazorAuth0App"
             x:Class="MauiBlazorAuth0App.MainPage"
             BackgroundColor="{DynamicResource PageBackgroundColor}">

    <BlazorWebView x:Name="blazorWebView" HostPage="wwwroot/index.html">
        <BlazorWebView.RootComponents>
            <RootComponent Selector="#app" ComponentType="{x:Type local:Components.Routes}" />
        </BlazorWebView.RootComponents>
    </BlazorWebView>

</ContentPage>
Notice the BlazorWebView element. This is the control that allows your Blazor UI to render natively on your MAUI application.
Now, run your newly created application to make sure that everything works as expected.
If you are using Visual Studio 2022, select your target platform and click the run button in the toolbar. If you prefer the .NET CLI, run one of the following commands according to your target platform:
# macOS target platform
dotnet build -t:Run -f net8.0-maccatalyst

# Android target platform
dotnet build -t:Run -f net8.0-android

# iOS target platform
dotnet build -t:Run -f net8.0-ios

# Windows target platform (⚠️ see the note below ⚠️)
dotnet build -t:Run -f net8.0-windows10.0.19041.0 -p:WindowsPackageType=None
⚠️ Unfortunately, at the time of writing, the command for the Windows platform target is not working as expected. You can build a .NET MAUI Windows app by running
dotnet build -f net8.0-windows10.0.19041.0 -p:WindowsPackageType=None, but you can't launch it through the CLI on Windows. This is a known issue reported by several developers.
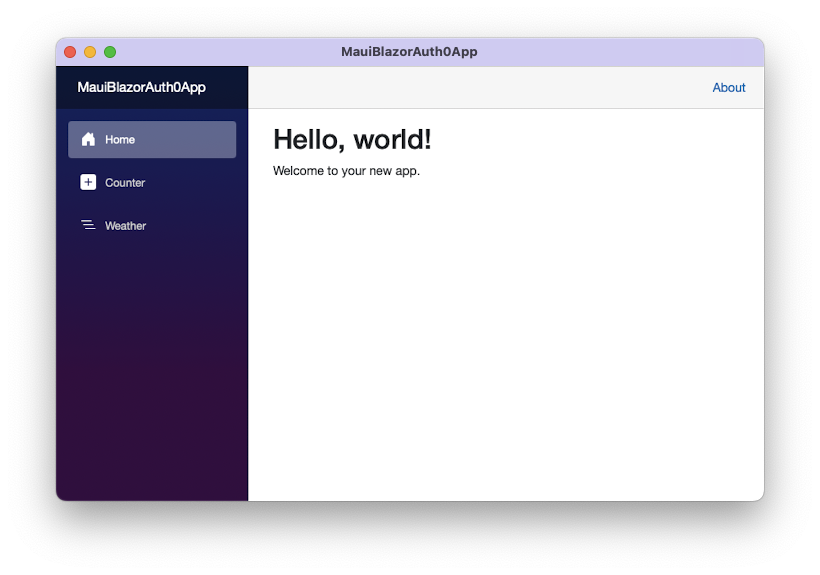
In both cases, you should see the standard application coming with the Blazor templates, whose main screen is as follows:
Register with Auth0
Once you verify that your app is running properly, let's start to add Auth0 authentication to it.
As the first step, you need to let Auth0 know about your application by registering it. Use your Auth0 account to access your dashboard. If you don't yet have one, you can sign up for free. Once in the dashboard, move to the Applications section and follow these steps:
- Click on Create Application.
- Provide a friendly name for your application (for example, Blazor MAUI App) and choose Native as the application type.
- Finally, click the Create button.
These steps make Auth0 aware of your MAUI application. After creating the application, select the Settings tab and take note of your Auth0 domain and client id. Soon, you'll put them to use.
Then, in the same form, scroll down to the Application URIs section and assign the value myapp://callback to both the Allowed Callback URLs and the Allowed Logout URLs fields.
The first value instructs Auth0 to call a specific URL back once the user has authenticated. The second value tells Auth0 to redirect the user to that URL when they log out. Even if you are not building a web application, your MAUI application will be able to catch this URI through some platform-specific settings.
Click the Save Changes button to apply them.
⚠️ At this point, it's very important that you apply some changes to the code in the Platforms folder according to your target platform, as explained here.
Add the Authentication Infrastructure
As mentioned earlier, a Blazor MAUI app merges the two .NET frameworks, MAUI and Blazor, to leverage the best of both. To manage authentication and authorization, you will mix the approaches used for both frameworks as well.
To learn more about the specific approaches to add authentication to MAUI and Blazor apps, you can read the following articles:
To give you a high-level view of what you are going to do, you will leverage MAUI to perform user authentication and Blazor to secure the user interface. The glue between the two frameworks will be a custom authentication state provider that will allow Blazor to learn when a user is authenticated or not.
In this section, you will focus on building the underlying authentication infrastructure that enables the authentication step.
Let's start by adding the required packages. Back in your MAUI project, add the Auth0 .NET OIDC Client for MAUI SDK and ASP.NET Core Authorization Components packages by running the following commands:
dotnet add package Auth0.OidcClient.MAUI
dotnet add package Microsoft.AspNetCore.Components.Authorization
Now you need to write the code that integrates your application with Auth0. You will do it in a few steps:
- Add a custom authentication state provider.
- Configure your MAUI app to use Auth0.
- Create an access control component that allows the user to log in and log out.
Let's go through each step.
Add a custom authentication state provider
Let's start creating the custom authentication state provider. As mentioned before, this component is the intermediary between MAUI and Blazor regarding user authentication.
First, let's make the authorization components available throughout the Blazor app running within the BlazorWebView control. Open the _Imports.razor file in the Components folder and add the two lines shown in the following code snippet:
@* Components/_Imports.razor *@

@using System.Net.Http
@using System.Net.Http.Json
@using Microsoft.AspNetCore.Components.Forms
@using Microsoft.AspNetCore.Components.Routing
@using Microsoft.AspNetCore.Components.Web
@using Microsoft.AspNetCore.Components.Web.Virtualization
@using Microsoft.JSInterop
@using MauiBlazorAuth0App
@using MauiBlazorAuth0App.Components
@using Microsoft.AspNetCore.Components.Authorization  //👈 new addition
@using Microsoft.AspNetCore.Authorization             //👈 new addition
Now create a new file in the project's root folder and name it Auth0AuthenticationStateProvider.cs. Then add the following code to it:
// Auth0AuthenticationStateProvider.cs

using System.Security.Claims;
using System.Threading.Tasks;
using Microsoft.AspNetCore.Components.Authorization;
using Auth0.OidcClient;

public class Auth0AuthenticationStateProvider : AuthenticationStateProvider
{
    private ClaimsPrincipal currentUser = new ClaimsPrincipal(new ClaimsIdentity());
    private readonly Auth0Client auth0Client;

    public Auth0AuthenticationStateProvider(Auth0Client client) {
        auth0Client = client;
    }

    public override Task<AuthenticationState> GetAuthenticationStateAsync() =>
        Task.FromResult(new AuthenticationState(currentUser));

    public Task LogInAsync()
    {
        var loginTask = LogInAsyncCore();
        NotifyAuthenticationStateChanged(loginTask);

        return loginTask;

        async Task<AuthenticationState> LogInAsyncCore()
        {
            var user = await LoginWithAuth0Async();
            currentUser = user;

            return new AuthenticationState(currentUser);
        }
    }

    private async Task<ClaimsPrincipal> LoginWithAuth0Async()
    {
        var authenticatedUser = new ClaimsPrincipal(new ClaimsIdentity());
        var loginResult = await auth0Client.LoginAsync();

        if (!loginResult.IsError) {
          authenticatedUser = loginResult.User;
        }
        return authenticatedUser;
    }

    public async void LogOut()
    {
        await auth0Client.LogoutAsync();
        currentUser = new ClaimsPrincipal(new ClaimsIdentity());
        NotifyAuthenticationStateChanged(
            Task.FromResult(new AuthenticationState(currentUser)));
    }
}
This code defines the class Auth0AuthenticationStateProvider, which inherits from AuthenticationStateProvider. Its constructor gets an instance of the Auth0Client class and assigns it to the private variable auth0Client. Then you override the GetAuthenticationStateAsync() method and define three methods:
LogInAsync(). This public method starts the login process and notifies the user authentication state as soon as it changes throughNotifyAuthenticationStateChanged(). The login process is performed via theLogInAsyncCore(), which calls the private methodLoginWithAuth0Async(),LoginWithAuth0Async(). This private method actually uses theauth0Clientobject to authenticate the user with Auth0 and returns the authenticated user as aClaimsPrincipalobject.LogOut(). This public method logs the user out of Auth0, removes all the user info, and notifies the new user authentication state.
The authentication state provider implemented here is just one of the possible approaches to creating it. Check out the official documentation to learn more about the different approaches to implementing an authentication state provider for Blazor Hybrid.
Configure authentication in your MAUI app
Once we set up the infrastructure to interact with Auth0, let's configure the application. Open the MauiProgram.cs file and apply the changes shown below:
// MauiProgram.cs

using Microsoft.Extensions.Logging;
using Microsoft.AspNetCore.Components.Authorization; // 👈 new code
using Auth0.OidcClient;  // 👈 new code

namespace MauiBlazorAuth0App;

public static class MauiProgram
{
    public static MauiApp CreateMauiApp()
    {

    //...existing code...

        // 👇 new code
        builder.Services.AddSingleton(new Auth0Client(new()
    {
      Domain = "<YOUR_AUTH0_DOMAIN>",
      ClientId = "<YOUR_CLIENT_ID>",
      Scope = "openid profile",
      RedirectUri = "myapp://callback/"
    }));
        builder.Services.AddAuthorizationCore();
        builder.Services.AddScoped<AuthenticationStateProvider, Auth0AuthenticationStateProvider>();
        // 👆 new code

        return builder.Build();
    }
}
You added the references to the needed namespaces and added a singleton service to inject the Auth0Client instance with the required options. Replace the <YOUR_AUTH0_DOMAIN> and <YOUR_CLIENT_ID> placeholders with the respective values for your Auth0 domain and client ID taken from the Auth0 dashboard.
Create the login component
To complete the authentication infrastructure building step, let's create a Razor component that allows the user to log in and log out. Create a new file named LoginButton.razor in the Components folder and insert the following content:
@* Components/LoginButton.razor *@

@inject AuthenticationStateProvider AuthenticationStateProvider

<AuthorizeView>
    <Authorized>
        Hello, @context.User.Identity.Name!
        <a href="#" @onclick="Logout">Log out</a>
    </Authorized>
    <NotAuthorized>
        <a href="#" @onclick="Login">Log in</a>
    </NotAuthorized>
</AuthorizeView>

@code{
    public async Task Login()
    {
        await ((Auth0AuthenticationStateProvider)AuthenticationStateProvider)
            .LogInAsync();
    }

    public void Logout()
    {
        ((Auth0AuthenticationStateProvider)AuthenticationStateProvider)
            .LogOut();
    }
}
This component uses AuthorizeView to show different content according to the user's authentication state. Basically, it shows the Log in link when the user is not authenticated. It shows the user's name and the Log out link when the user is authenticated.
Each link points to the respective methods Login() and Logout(), which are just wrappers around the corresponding authentication state provider's methods.
Now, make this component accessible to the user. Open the MainLayout.razor file in the Components/Layout folder and add the <LoginButton /> element as shown in the following:
@* Components/Layout/MainLayout.razor *@

@inherits LayoutComponentBase

<div class="page">
    <div class="sidebar">
        <NavMenu />
    </div>

    <main>
        <div class="top-row px-4">
            <LoginButton />    //👈 new code
            <a href="https://docs.microsoft.com/aspnet/" target="_blank">About</a>
        </div>

        <article class="content px-4">
            @Body
        </article>
    </main>
</div>
This will show the Log in and Log out links close to the About link.
Great! You are almost done! 💪
Leverage Auth0's authentication and authorization services in your .NET applications.
DOWNLOAD THE FREE EBOOK
Protect the UI
The code and the configuration you have set up so far enable your application to deal with user authentication. However, you need a way to prevent unauthorized users from accessing sensitive parts of its UI. Blazor provides a few components for this purpose, such as the AuthorizeView component, the Authorize attribute, and others.
Let's start by replacing the content of the Routes.razor file in the Components folder with the following:
<!-- Components/Routes.razor -->

<Router AppAssembly="@typeof(MauiProgram).Assembly">
    <Found Context="routeData">
        <AuthorizeRouteView RouteData="@routeData" DefaultLayout="@typeof(Layout.MainLayout)">
            <NotAuthorized>
                <p>You're not authorized to reach this page. You need to log in.</p>
            </NotAuthorized>
        </AuthorizeRouteView>
        <FocusOnNavigate RouteData="@routeData" Selector="h1" />
    </Found>
</Router>
You have replaced the <RouteView> component with the <AuthorizeRouteView> component, which allows your app to display protected components only to authorized users. Also, you added the message to display when an unauthenticated user access a protected component by using the NotAuthorized component.
Finally, let's protect the pages of the Blazor application. Open the Counter.razor file in the Components/Pages folder and add the @attribute [Authorize] directive as shown below:
@* Components/Pages/Counter.razor *@

@page "/counter"
@attribute [Authorize]     //👈 new code

<h1>Counter</h1>

// ... exisiting code ...
Apply this change also to the Home.razor and Weather.razor files in the Components/Pages folder.
Now you are ready to run your protected Blazor MAUI application. This time, the main screen of the application looks like the following:
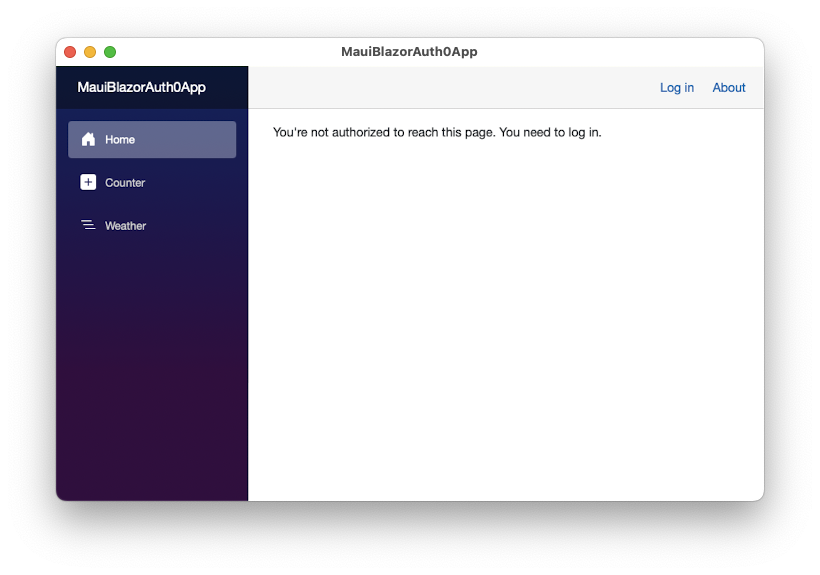
You will keep getting the same message when you click the Counter and Weather links on the sidebar.
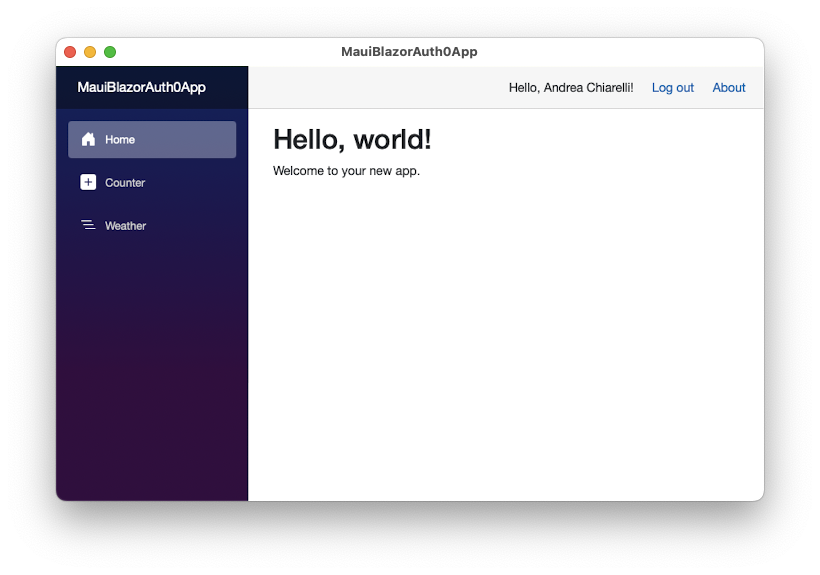
To access the application's functionality, you must authenticate by clicking the Log in link on the upper right corner of the window. This starts the Auth0 authentication process as it happens in a MAUI application:
- A browser instance opens, showing the Auth0 Universal Login page
- The user authenticates
- The application's pages become available.
Check out here to learn about the authentication user experience in a MAUI application.
Notice that after the authentication, the top bar shows the name of the user and the Log out link, as you can see in the following picture:
Show the User Profile
Currently, your application shows the user's name in the top bar. You may want to access other user profile data, such as their picture. Your application already has this data since the Auth0 client has been configured with the appropriate OpenID Connect scopes. To access and show the user's picture, you need to make some changes to the Home.razor page, as shown by the following code:
@* Components/Pages/Home.razor *@

@page "/"
@attribute [Authorize]

@* 👇 new code *@
@inject AuthenticationStateProvider AuthenticationStateProvider

<h1>Hello, @Username!</h1>  @* 👈 changed code *@

<p>Welcome to your new app.</p>

@* 👇 new code *@
<img src="@Picture">

@code {
  private string Username = "Anonymous User";
  private string Picture = "";

  protected override async Task OnInitializedAsync()
  {
    var state = await AuthenticationStateProvider.GetAuthenticationStateAsync();

    Username = state.User.Identity.Name?? string.Empty;

    Picture = state.User.Claims
                .Where(c => c.Type.Equals("picture"))
                .Select(c => c.Value)
                .FirstOrDefault() ?? string.Empty;

    await base.OnInitializedAsync();
  }
}
@* 👆 new code *@
You injected the AuthenticationStateProvider, which provides you with information about the current authentication state. You get the actual authentication state in the code block by using its GetAuthenticationStateAsync() method. Thanks to the authentication state, you can extract the name and the picture of the current user ad assign them to the Username and Picture variables. These are the variables you use in the component's markup to customize this view.
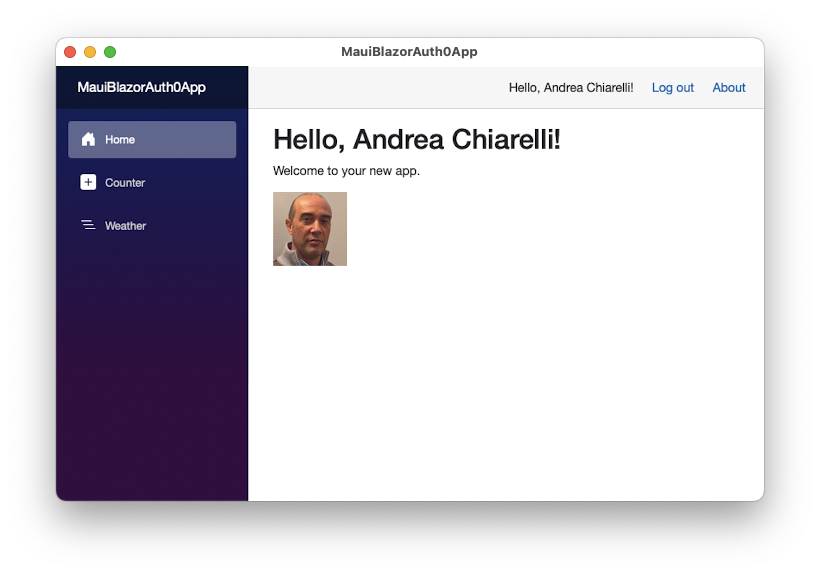
Now, you can run your application, log in, and get a main screen like the following:
Summary
Let's quickly recap what you learned throughout this article.
First, you learned that in a Blazor MAUI application, the user authentication takes place within the MAUI framework and user authorization to access the UI occurs on the Blazor side.
To enable user authentication, you set up the needed infrastructure by adding the required libraries, a custom authentication state provider, and a button component to allow the user to log in and log out your application. You made everything available to your application by opportunely configuring the Auth0 client.
Then, you protected your application's UI by using the standard authorization Blazor components. Your Blazor app knows if the current user has authenticated or not, thanks to the custom authentication state provider you built, which also provides the user profile information. That's roughly the approach to add Auth0 authentication to your Blazor MAUI application.
You can download the full source code of the project described in this article from this GitHub repository. While the sample project works in a macOS machine, be aware that many issues are still pending on the MAUI framework that may prevent you from actually running it in other operating systems.
About the author

Andrea Chiarelli
Principal Developer Advocate
I have over 20 years of experience as a software engineer and technical author. Throughout my career, I've used several programming languages and technologies for the projects I was involved in, ranging from C# to JavaScript, ASP.NET to Node.js, Angular to React, SOAP to REST APIs, etc.
In the last few years, I've been focusing on simplifying the developer experience with Identity and related topics, especially in the .NET ecosystem.