
TL;DR: Today, Auth0 announces the release of express-openid-connect, a new Node.js SDK that makes it super easy to add OpenID Connect authentication to your Express apps. You can install it using npm today.
Since Auth0 relies on open protocols to expose its features, you can use its services from any platform and app type, without requiring any proprietary SDK. Whenever a platform or a dev stack has a good, well-designed SDK, the Auth0 Quickstarts simply use that — no need to reinvent the wheel!
When the targeted platform does not have a great experience available, we will often step in and create one. Historically, that’s what we have done for Node.js — a very special platform for us at Auth0, powering our very own authorization server, our extensibility model, and many of our samples.
About eight years ago, we provided an Auth0 strategy for Passport.js, which has been downloaded more than 2M times and is still going strong. Despite its obvious success, however, our Passport strategy is starting to show its age. For example:
- It requires more code to initialize and use authentication features than is strictly necessary.
- It brings significant dependencies into your app, a burden that many developers might want to avoid.
- It is Auth0 specific, whereas Auth0’s web sign-on function can be easily achieved with pure OpenID Connect.
That’s why we decided to create a new Node.js SDK that is ultra-easy to use, nimble, and standard-based, providing a great experience to Node.js developers, not just when using Auth0, but with any provider that uses OpenID Connect.
Adding Web Sign-On to a Node.js App Really Fast
Before we get into the library’s architecture, let me just give you a quick taste of what it feels like to use express-openid-connect to add web sign on to a Node.js web app.
Adding express-openid-connect to your project is straightforward:
$ npm init -f
$ npm install auth0/express-openid-connect express dotenv
You can initialize the SDK in code or via environment variables. For the latter, the minimal .env file would look like the following:
ISSUER_BASE_URL=https://<YOURTENANT>.auth0.com
CLIENT_ID=<YOURCLIENTID>
BASE_URL=https://localhost
SECRET=<LONGRANDOMSTRING>
All the <> values need to be updated with the details of your tenant app, that you’ll find in the Auth0 Dashboard. In this example, we assume that your Allowed Callbacks URLs include https://localhost/callback (note, the SECRET is not your client secret — any long random string will do).
A diminutive server.js could look like the following:
const express = require('express');
const { auth } = require('express-openid-connect');
require('dotenv').config();
const app = express();
app.use(auth());
app.get('/', (req, res) => {
  res.send(`hello ${req.oidc.user.name}`);
});
app.set('trust proxy', true);
app.listen(3000, () => console.log('listening at http://localhost:3000'))
Note, this isn’t the absolute smallest app with web sign-in that you can write (I tweeted a much smaller one), but it still gives an idea of how concise express-openid-connect code can be, while remaining perfectly readable. In a nutshell:
- Lines 1-3 pull in dependencies and load
.env. - Lines 4-5 initialize
expressand addexpress-openid-connectmiddleware in the pipeline. That will have the effect to protect every app route with OpenID Connect. - Lines 6-8 define the behavior of the root route — showing the name of the authenticated user.
- Lines 9-10 start the app, enabling the use of a proxy.
I could have easily skipped the proxy part, but given that the SameSite changes make HTTPS mandatory for SameSite=none cookies, it’s a good habit to start using HTTPS at development time anyway. See the "HTTPS in Development" document for more detailed instructions.
For our purposes, all you need to do is to install a reverse proxy like Caddy 2* ($ brew install Caddy or https://caddyserver.com/docs/download) and launch it:
$ caddy reverse-proxy --from localhost:443 --to localhost:3000
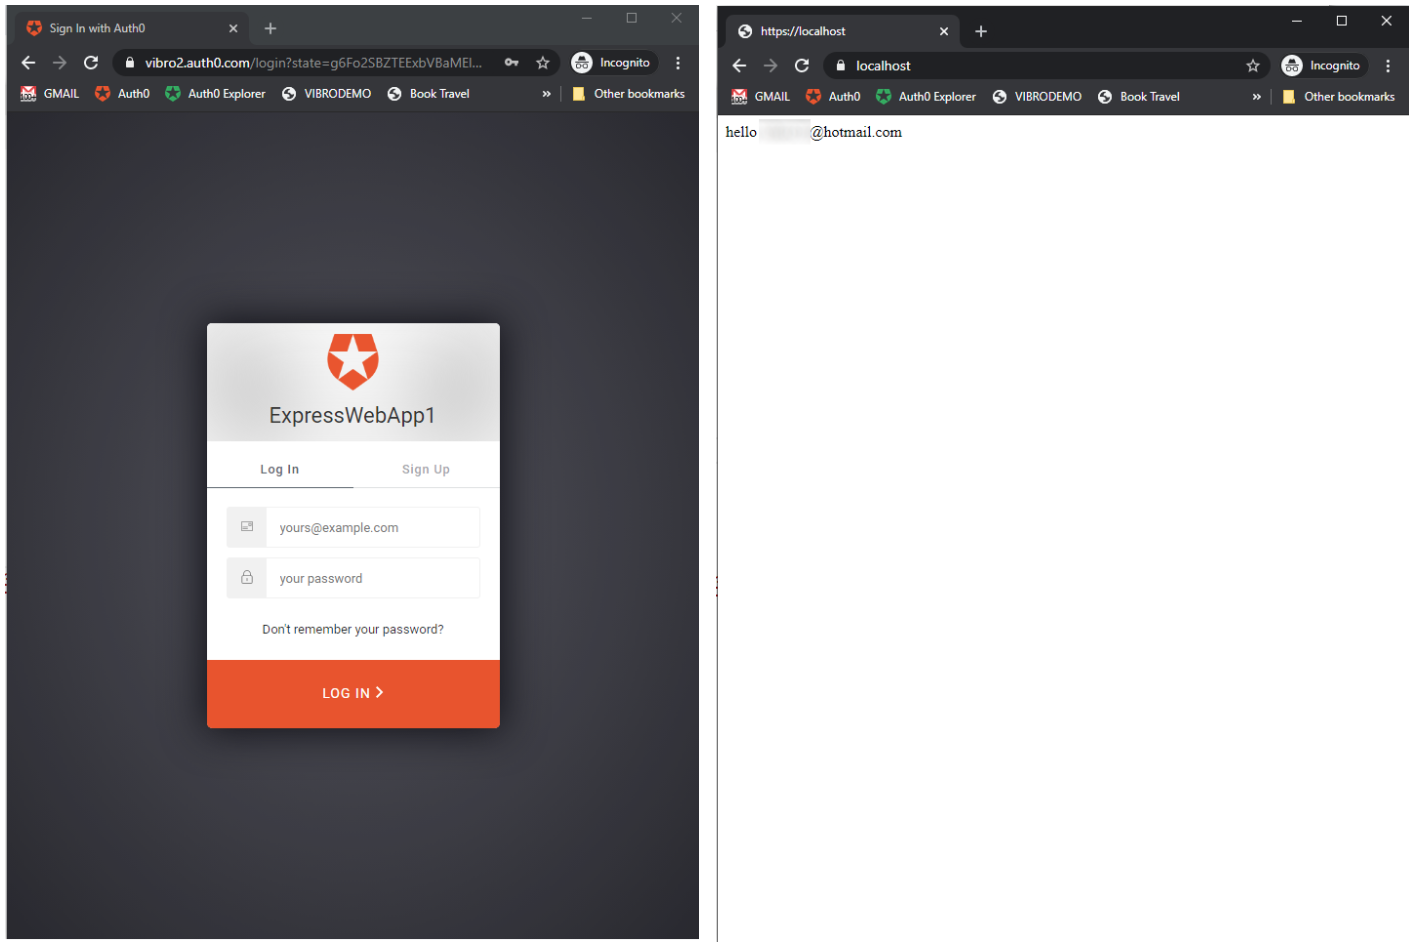
All you need to do now is to launch your app with node server.js and navigate to https://localhost. You’ll see the familiar prompt and, once authenticated, the user greeting:
That’s it! In barely one Word page, I gave you the complete instructions to build an authenticated web app from scratch, including explanations of what the code does and how to run it on HTTPS in localhost. Here’s a comparison with the code required by the Auth0 Passport.js strategy to achieve the same functionality:

Looks great, but what’s really going on here? Let’s take a deeper look.
The Architecture of express-openid-connect
In a nutshell: express-openid-connect is an application-level Express middleware, which implements the OpenID Connect protocol with the purpose of adding and managing authentication for your web application.
The middleware effectively wraps node-openid-client, an OpenID Connect certified client for Node.js maintained by our very own Filip Skokan, which handles all the protocol concerns. As mentioned, you can use express-openid-connect with any OpenID Connect provider, not just Auth0. You’re welcome!
As a middleware, express-openid-connect is meant to implement a sign-in for a web application. That means that no matter what protocol flow is selected, the SDK will always want to end up with an id_token to validate and ultimately create a session for your web app.
Here’s a diagram describing what happens under the hood when an unauthenticated user attempts to access a protected app route, /profile, using the default settings demonstrated in the preceding section.
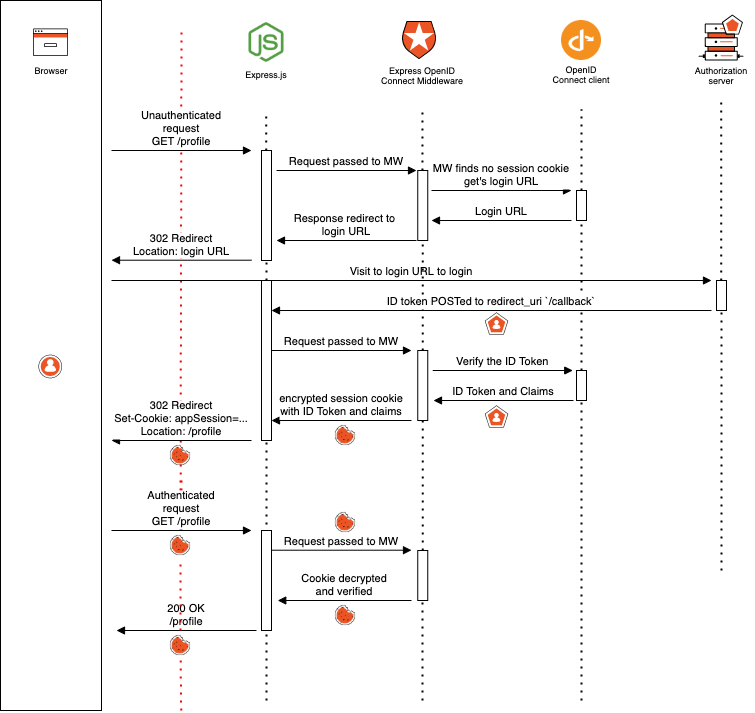
As we’ve seen, you don’t need to grok all the fine details of that diagram to successfully use the SDK: but it’s a handy reference if you want to know how the standards are used and how the various components of the solution collaborate to achieve route protection and sign on. You can find this and other diagrams in the "Architecture" section of the express-openid-connect documentation.
The default OpenID Connect flow used by express-openid-connect is implicit + form_post, requesting response_type=id_token and response_mode=form_post. That’s the absolute simplest sign inflow to set up, as it doesn’t require client secrets (the secret you configured was for protecting the session cookie, no backend traffic, or registration required for it).
If, in addition to the id_token, you also want to obtain an access token to invoke protected API endpoints, the SDK allows you to choose the code or hybrid flow. All you need to do is to use the SDK config options to override the defaults.
If you want to go beyond the basics, express-openid-connect offers a very comprehensive collection of configuration settings that allow you to control every aspect of how authentication occurs, including:
Fine control over the session behavior (rolling, absolute, transient, or persistent, etc.),
Fine control over authorization request characteristics (grants, whether to request access tokens for an external API together with the initial request, what scopes to request, etc.).
Customization of the default routes used by the SDK for triggering authentication, sign out, etc
...and a lot more
As you’ve seen, the most common use case is super easy to implement. You initialize the middleware with the essential parameters, add it in the pipeline, and by default, everything is protected. That is to say, any attempt to access a route by an unauthenticated user will trigger the authentication dance.
If you don’t want blanket protection, you can elect to secure individual routes by setting authRequired to false and applying the requiresAuth middleware to individual routes.
Alternatively, you can initiate an authentication operation programmatically from anywhere via the SDK method login. If your authorization requirements are more complex, you can easily set up more sophisticated route protection logic. For example, you can configure a given route to be accessible only by users possessing specific claim types and values by using claimEquals, claimInclude, or, for completely custom criteria, claimCheck.
The SDK comes with an essential Express Quickstart, accompanied by a sample that shows how to accomplish more advanced tasks, such as obtaining access tokens for API or using and refreshing them when necessary.
What’s Going to Happen to passport-auth0?
The answer is... nothing. Unless someone finds a security bug, that is. passport-auth0 is used and loved by many Auth0 customers — and remains fully supported. There’s no need to rush updates to your existing apps. We will keep fixing bugs and patch them. We plan to stop adding new features to passport-auth0, and the bar for the bugs we fix will be tuned accordingly. If you are about to start a new project, we recommend considering using express-openid-connect, as it will be our target for all innovation for web sign-in on the Node.js platform for the foreseeable future.
What’s Next
There are many features we really want to add to express-openid-connect (hello, custom session persistence) that didn’t make it in time for this release. We’re already hard at work on those: if you have feedback, wish lists, pet peeves, now it’s the time to hit us up via the Issues list.
We are also planning to produce a similar SDK for Express APIs, giving Node.js API developers a way to enjoy the same ease of use and lightweight integration we achieved with express-openid-connect.
Happy coding!
About the author

Vittorio Bertocci
Principal Architect