
Web workers enable developers to benefit from parallel programming in JavaScript. Parallel programming allows applications to run different computations at the same time. An example of how humans benefit from doing tasks in parallel is helpful to understand the value of web workers.
For example, when writing a tech tutorial, you are responsible for:
- Making a demo app
- Writing the content
- Creating assets for the post (like diagrams or images)
It will be easier for you to write the content based on your experience making the app. However, creating assets is something that you could delegate to someone else, like a professional graphic designer.
You could send a text message to a graphic designer with a description of an illustration you want. The designer would work on creating the illustration and text it back to you when done. While the designer works on the illustration, you are free to focus on coding and writing. When you receive the illustration from the designer, you just have to integrate it with your content, which takes much less time than creating the asset yourself.
Delegating the asset creation to a designer gives you a big productivity boost. Before, you were blocked from coding and writing whenever you had to create assets. Within a fixed amount of time, your content output will be larger when delegating tasks to a designer than when working by yourself.
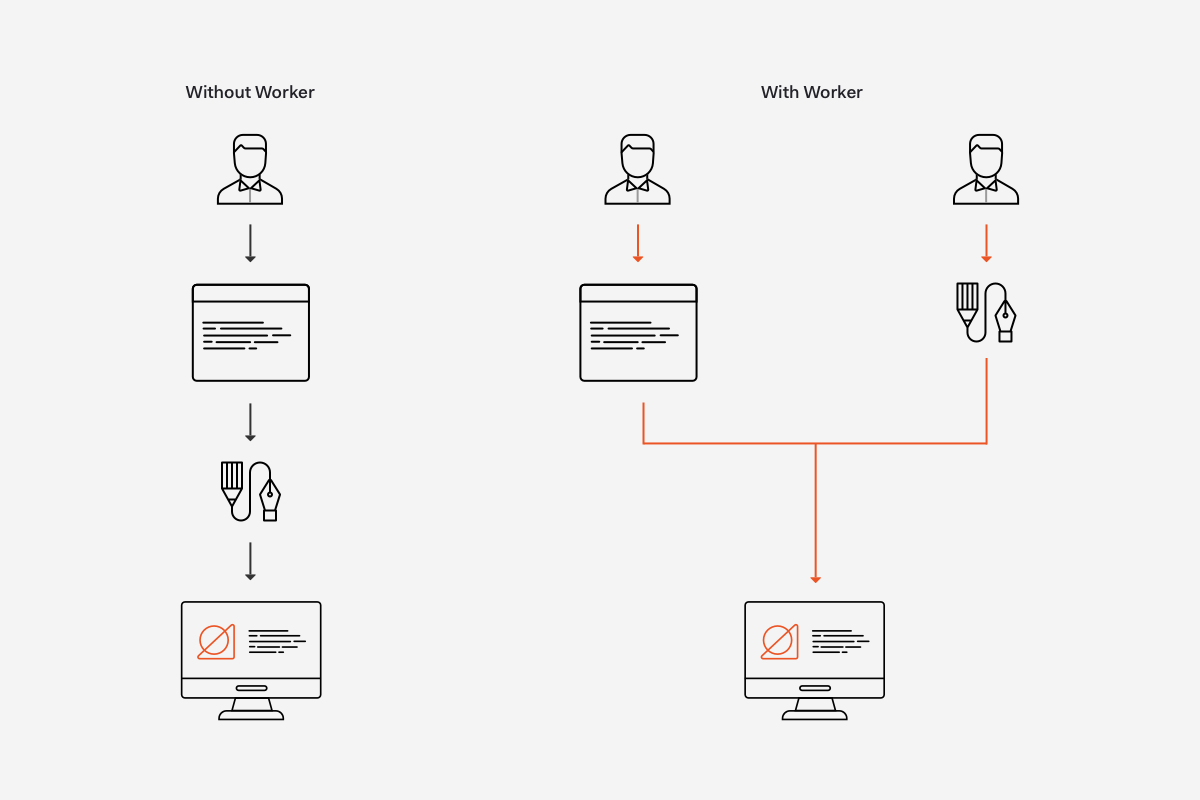
The designer handles the task of creating an illustration asynchronously on a separate pipeline, acting exactly how a web worker does in JavaScript applications. JavaScript is a single-threaded language. As such, running expensive logic in the main thread can block it and make JavaScript applications seem slow or unresponsive. Using web workers, you can create a separate thread to run expensive computational logic without interrupting the main thread.
“Web workers in JavaScript allows us to create parallel programming to perform multiple operations simultaneously rather than interleaving them.”
Tweet This
Interleaving means "to arrange (an operation) so that two or more programs, sets of instructions, etc., are performed in an alternating fashion."
In this blog post, you'll learn how to use web workers in JavaScript and what benefits it brings to a web application.
HEY
USE WEB WORKERS
— Jason Miller 🦊⚛ (@developit) <a href="https://twitter.com/developit/status/995162140016177152?ref_src=twsrc%5Etfw">May 12, 2018</a>
To free up the already-congested main thread so it can spend all of it's time on layout and paint 😃
— Jason Miller 🦊⚛ (@developit) <a href="https://twitter.com/developit/status/995792286947643392?ref_src=twsrc%5Etfw">May 13, 2018</a>
Why Use JavaScript Web Workers?
In JavaScript, you can utilize parallel programming to perform multiple operations simultaneously using web workers. Web workers let you create background threads that are separate from the main execution thread, where you usually run the user interface logic. The core advantage of this workload separation is that you can run expensive operations within an isolated thread and without interrupting or affecting the responsiveness and usability of the main thread. When the background thread completes its task it seamlessly notifies the main thread about the results through an event that is managed through regular JavaScript event handling.
“Web workers are JavaScript objects that can be treated just like any other object: you can pass them around as function arguments, assign them to class properties, and since they have a common interface, even extend them!”
Tweet This
Web workers effectively enable a form of multi-threading in JavaScript with some restrictions such as not being able to access the DOM and not having access to the web worker's parent page (the page that created it). With that in mind, you can start learning how to create web workers.

Setting Up a Development Environment
Getting hands-on with web workers will help you understand them better. For the purpose of this blog post, we'll create a simple web page that instantiates a web worker through the main thread.
To start, create a project directory anywhere on your system:
mkdir web-workers-basics
Windows users will be provided with PowerShell commands when the UNIX commands are not applicable.
Move into the directory you just created by using the cd command:
cd web-workers-basics
Within this directory, create the entry point of the web page:
touch index.html
- Windows PowerShell:
ni index.html
To keep files tidy, create an src subdirectory to hold your JavaScript files:
mkdir src
Finally, create the files main.js and worker.js under the src folder:
touch src/main.js src/worker.js
- Windows PowerShell:
ni src\main.js, src\worker.js
This is the complete file structure needed for the web page; however, to run it, you need a web server. For this use case, the best tool to use is Browsersync as it serves your files and reloads the browser automatically on file changes.
Browsersync is a module available for Node.js, a JavaScript runtime used to create fast network applications. If you don't have Node.js installed, use any of the convenient installers for MacOS, Windows and Linux.
With Node.js, you get npm, a JavaScript development tool to install and run Node.js packages. In this case, you only need an easy way to run Browsersync that doesn't involve installing packages locally on your machine, which can be done through an NPM script.
Follow these steps to create a Node.js project within your web-workers-basic directory and create an NPM script:
- Run the following command to create a
package.jsonfile:
npm init -y
package.jsonis a special file used by NPM to list project dependencies.
- Open
package.jsonand replace its content with the following:
{
  "name": "web-workers-basic",
  "version": "1.0.0",
  "description": "",
  "main": "index.js",
  "scripts": {
    "dev": "browser-sync start --server --files 'index.html', 'src/*.js'"
  },
  "author": "",
  "license": "ISC",
  "devDependencies": {
    "browser-sync": "^2.26.5"
  }
}
- Run the following command to install the project dependencies defined on
package.json:
npm install
Once that's done, you'll notice a node_modules folder under your project directory. Notice the dev entry under the scripts property of package.json:
"dev": "browser-sync start --server --files 'index.html', 'src/*.js'"
This NPM script uses Browsersync to create a server on http://localhost:3000 (the default port) and to refresh the web browser when you change the content of your index.html file or any JavaScript file inside the src subdirectory.
To run the dev NPM script, execute the following command:
npm run dev
Browsersync will open your browser with the index.html page shown automatically. In the console, you'll see this output:
[Browsersync] Access URLs:
 ----------------------------------
       Local: http://localhost:3000
    External: http://<IP-ADDRESS>:3000
 ----------------------------------
          UI: http://localhost:3001
 UI External: http://localhost:3001
 ----------------------------------
[Browsersync] Serving files from: ./
[Browsersync] Watching files...
[Browsersync] Reloading Browsers...
This output tells you that you can access the web page locally on your machine using http://localhost:3000 or on any device connected to your network on http://<IP-ADDRESS>:3000, where IP-ADDRESS is the IP address of your network.
With the project now set up and running, you can start building it up.
Creating a Web Worker
From your project directory, open index.html and populate it with the following content:
<html lang="en">
  <head>
    <title>Web Workers Demo</title>
    <meta charset="UTF-8" />
  </head>

  <body>
    <div id="app"></div>
    <h1>Web Workers Demo: The Basics</h1>

    <script src="src/main.js"></script>
  </body>
</html>
Since
index.htmlwas empty when Browsersync started running, you may need to refresh the page this time to help it kick in.
To create a web worker, you'll use the Worker() constructor from the Web Workers API. The Worker() constructor has the following signature:
Worker(aURL, options);
aURL is a string that represents the URL of the script that we want the worker to execute.
options is an object to customize the Worker instance. The allowed options are type, credentials, and name. You don't need to configure them for the scope of this post.
In practice, you instantiate a web worker in the main thread. The main thread could be represented by a JavaScript file, for example, main.js, that is the entry point to the application. The web worker thread could be represented by another file, for example, worker.js. main.js then creates a new Worker using the worker.js file.
To see this in action, open src/main.js and populate it with the following code:
// src/main.js

const worker = new Worker("../src/worker.js");
In the code above, worker becomes a Worker instance that will execute the script on worker.js.
That's it for the creation of a web worker! You effectively now have two threads available in your application: main and worker. Next, you'll learn how to communicate between threads.
Sending Messages to and from a Web Worker
Referencing the scenario from the introduction, when writing code and content for your tutorial, you represent the main thread and the designer creating illustrations for you represents the worker thread. How would the main thread ping the worker thread and vice versa? That's done through the postMessage() method and the onmessage event handler from the Web Workers API.
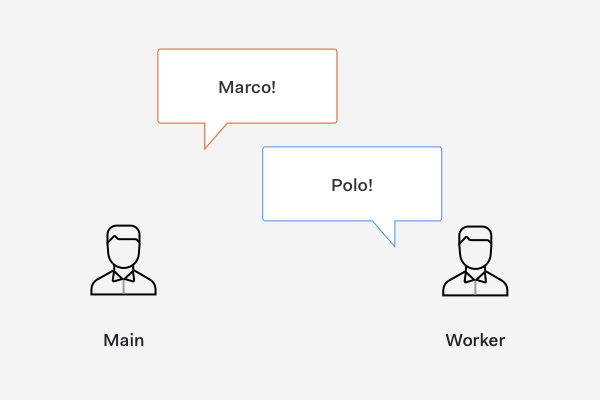
You'll use the classic Marco Polo game to see this communication in action. In this game, one player shouts "Marco!" and the other player must reply "Polo!". Within this context you want to do the following:
main.jsandworker.jsare on standby listening for any message between each other.main.jssends a message toworker.js:"Marco!".worker.jsgets the message frommain.jsand replies:"Polo!".Step 2 and Step 3 are repeated infinitely.
Step 1: Listening for messages
The Worker.onmessage event handler lets you listen for messages between the threads. The signature of this Worker event handler property is as follows:
myWorker.onmessage = e => {
  // Event handler logic
};
The function assigned to onmessage is called when a message event occurs.
To set this up in main.js, use the Worker instance you created:
// src/main.js

const worker = new Worker("../src/worker.js");

worker.onmessage = e => {};
To set this up in the web worker thread represented by worker.js, use the onmessage property directly:
// src/worker.js

onmessage = e => {};
How do you access the message data that is being sent? The message payload can be accessed from the data property of the message event. Update src/main.js as follows:
// src/main.js

const worker = new Worker("../src/worker.js");

worker.onmessage = e => {
  const message = e.data;
  console.log(`[From Worker]: ${message}`);
};
Then, update src/worker.js as well:
// src/worker.js

onmessage = e => {
  const message = e.data;
  console.log(`[From Main]: ${message}`);
};
Save your work for each file.
You got your threads listening for messages between each other. Next, learn how to send messages between them.
Step 2: Sending a message from main thread to worker thread
To send messages, you'll rely on the Worker.postMessage() method:
worker.postMessage(message);
The postMessage() takes a single parameter representing the data that you want to send. This data may be any value or JavaScript object handled by the structured clone algorithm. As noted by MDN, the structured clone algorithm is an algorithm defined by the HTML5 specification for copying complex JavaScript objects. Why do you need to rely on this algorithm? Data transferred through web workers is passed as a copy, not as a reference.
With an understanding of how the postMessage() method works, use this method to send a message from the main thread to the worker thread. Update main.js with this code:
// src/main.js

const worker = new Worker("../src/worker.js");

worker.onmessage = e => {
  const message = e.data;
  console.log(`[From Worker]: ${message}`);
};

worker.postMessage("Marco!");
Save your work. In the browser, open the developer console and refresh the page. You should see the following output:
// [From Main]: Marco!
This output in the console confirms that your web worker is listening and reacting to the message event sent from main.js. Now, you need to reverse the communication. You need to send a message reply from worker.js to main.js.
Step 3: Sending a message from worker thread to main thread
This will be quick. You need to use the postMessage() method in the onmessage event handler in worker.js:
// src/worker.js

onmessage = e => {
  const message = e.data;
  console.log(`[From Main]: ${message}`);

  postMessage("Polo!");
};
Once again, save your work. In the browser console, you should now see the following output:
// [From Main]: Marco!
// [From Worker]: Polo!
You have achieved bi-directional communication between threads, but the communication is short-lived. Next, you'll make this multi-threaded Marco Polo game run infinitely.
Step 4: Sending messages between main and worker threads infinitely
You are going to keep the communication between threads going endlessly. To better pace the back and forth, you are going to rely on the setTimeout() method to delay messaging by 3 seconds.
To start, when main.js gets a message from worker.js, it replies back after 3 seconds:
// src/main.js

const worker = new Worker("../src/worker.js");

worker.onmessage = e => {
  const message = e.data;
  console.log(`[From Worker]: ${message}`);

  const reply = setTimeout(() => worker.postMessage("Marco!"), 3000);
};

worker.postMessage("Marco!");
Next, when worker.js gets a message from main.js it also replies back after 3 seconds:
// src/worker.js

onmessage = e => {
  const message = e.data;
  console.log(`[From Main]: ${message}`);

  const reply = setTimeout(() => postMessage("Polo!"), 3000);
};
The three-second delay creates an eye-friendly pause to be able to see the communication calmly in the developer console. What makes this work infinitely is that every handled message event executes a postMessage() response. Before, the worker.onmessage in main.js did not have a reply within its body.
Save your work. Head back to the browser console and notice the paced output stream:
// [From Main]: Marco!
// [From Worker]: Polo!
// [From Main]: Marco!
// [From Worker]: Polo!
This will go on forever until you close the browser tab running the preview of your web page. But, you could also terminate the web worker manually.
Terminating a Web Worker
You can terminate web workers from the main thread immediately or from the worker thread.
From the main thread, you can terminate a web worker by calling the terminate() method of the Web Workers API:
worker.terminate();
After terminate() is issued, the web worker is destroyed immediately without any chance of completing any ongoing or pending operations. The web worker is also given no time to clean up. Thus, terminating a web worker abruptly may lead to memory leaks.
You can also terminate a web worker from the worker thread using its own close method:
close();
Upon calling close(), any queued tasks present in the event loop are discarded and the web worker scope is closed.
Checking the documentation for close() may be confusing at first because there is a version of the close() method that has been deprecated. The deprecated version belongs to the WorkerGlobalScope interface. In reality, there are two types of web workers that you can create: dedicated and shared web workers. Each web worker type has its own interface, DedicatedWorkerGlobalScope and SharedWorkerGlobalScope respectively. For the scope of this introduction, you've used a dedicated web worker under the hood.

Recap
You've learned the basics of how to create a web worker. You also learned how to effectively send messages between two threads and how to react to those messages. You briefly touched on the subject of terminating web workers. This last task is to be handled with care as badly terminated web workers may lead to memory leaks in a web page.
What's left to learn? A lot! Web workers have been around for a long time and they are great at executing expensive logic. This logic will be much more complex than what you've done in this blog post.
Please let me know in the comments how you liked this introduction to web workers and what else you'd like to learn about this handy technology that lets developers perform parallel programming in JavaScript.
About Auth0
Auth0 by Okta takes a modern approach to customer identity and enables organizations to provide secure access to any application, for any user. Auth0 is a highly customizable platform that is as simple as development teams want, and as flexible as they need. Safeguarding billions of login transactions each month, Auth0 delivers convenience, privacy, and security so customers can focus on innovation. For more information, visit https://auth0.com.
About the author

Dan Arias
Software Engineer (Auth0 Alumni)