
When your users log in, it is crucial that you verify they are who they say they are by adding a second factor for authentication. This can help reduce fraudulent logins from a password compromised through phishing or in a past breach.
We often see SMS as a second factor for authentication and it may get a lot of criticism, but it is still an important security tool for large user bases. There are many other ways to implement two-factor authentication but they seem to add too much friction to the user experience.
Luckily, it doesn’t have to be cumbersome. With the help of VoiceIt, a face and voice biometrics API, and Auth0 rules, we can easily add 2fa to our authentication while providing users with a great experience.
What is VoiceIt?
VoiceIt provides a cloud-based, pay as you go, face and voice biometrics platform that empowers you to rapidly build and deploy security solutions. Whatever your integration needs, VoiceIt removes traditional obstacles to entry by providing a secure platform at a reasonable cost.
About Auth0
Auth0 by Okta takes a modern approach to customer identity and enables organizations to provide secure access to any application, for any user. Auth0 is a highly customizable platform that is as simple as development teams want, and as flexible as they need. Safeguarding billions of login transactions each month, Auth0 delivers convenience, privacy, and security so customers can focus on innovation. For more information, visit https://auth0.com.
Try Out the Demo
You can try out a deployed version of the demo application before building your own. On this application, you will see two main buttons. The first one accesses a public endpoint to fetch a random clickbait headline. The second one will generate a new headline using your name (assuming you used your Google account to sign in). The second one will only work once you are authenticated.
If you click on the Login button in the upper right corner, you will be redirected to Auth0 to sign in. The first time you sign in, you will be redirected to the VoiceIt enrollment screen. Once you are enrolled, you will be redirected back to the application. Here, you will see the tokens that were generated by Auth0. You should now also be able to use the “Awesome Headline” button in the application.
You can now try to log out and log back in. This time, you will be redirected back to the VoiceIt screen for verification. If you are verified, you will be brought back to the application.
Implementing VoiceIt and Auth0
Now that you've seen how VoiceIt and Auth0 can work together, you can build out this application yourself.
Clone the Starter Application
The first step is to clone the skeleton application:
git clone https://github.com/joellord/auth0-voiceit.git
Then, change into the newly created directory:
cd auth0-voiceit
From here, you have all the working demo code. This repo has a few tags representing various steps throughout this tutorial. For now, you can go to the start using:
git checkout begin
Then, install all the required dependencies. First, install the dependencies in the root of the project:
npm install
Then, navigate into the voiceit2 folder and install those dependencies:
cd voiceit2
npm install
To start the application, you can run the following command from the root of the application (be sure to run cd .. first if you were in the voiceit2 folder):
node .
This Node server acts as a server for your static files in the client folder as well as an API for the public and private routes. It also handles the two VoiceIt endpoints that we will need later on.
Now that your server is ready, you can point your browser to http://localhost:5000 to test the application. For now, there is not much working but you should still see the main screen.
The starter application already has all the required files to make Auth0 and VoiceIt work. Should you want to learn more about how to start a project with VoiceIt, you can look at the VoiceItApi2WebSDK documentation.
Create Your VoiceIt account
To create your free VoiceIt account, you can go to VoiceIt and click on the “Sign Up” button on the top right of the page. You'll need to verify using SMS in addition to choosing a login and password. You'll also need to verify your email address. After you are logged in, go to the console, click "Settings" on the left, and scroll to the bottom.
In there, you will find both an API 2.0 token and an API 2.0 key. Now open up the config.js file at the root of the application and paste those in:
// ./config.js
module.exports = {
 VOICEIT_API_KEY: "key_XXXXXX", // your key goes here
 VOICEIT_API_TOKEN: "tok_XXXXXX", // your token goes here
 AUTH0_DOMAIN: "https://TENANT_NAME.auth0.com/",
 AUTH0_AUDIENCE: "AUDIENCE (API IDENTIFIER)"
};
Create Your Auth0 account and Application
Auth0 can also provide you with a free account for up to 7000 users. You can sign up for a free Auth0 account here. Once you have created your account, you can create your first API. From the dashboard, go to the “APIs” section and click "Create API" in the upper right corner.
Give it a name (like "VoiceIt Demo") and an identifier (like "https://voice-it-demo) and then click on "Create". You'll need the identifier in a sec, so jot it down somewhere.
Once it’s created, go back to your config.js file and add your Auth0 domain (the name of your tenant followed by .auth0.com) and your API audience (the identifier you just created).
// ./config.js
module.exports = {
 VOICEIT_API_KEY: "key_XXXXXX",
 VOICEIT_API_TOKEN: "tok_XXXXXX",
 AUTH0_DOMAIN: "TENANT.auth0.com", //your tenant
 AUTH0_AUDIENCE: "identifier-for-my-api" //your identifier
};
Those are used by your server. You will also need to configure your client to use Auth0 in the /client/config.js file:
// ./client/config.js
const AUTH0_CONFIG = {
 domain: "TENANT.auth0.com", // your tenant
 clientID: "CLIENT_ID", // your application client id
 audience: "identifier-for-my-api", // your identifier
 responseType: "token id_token",
 scope: "openid profile",
 redirectUri: window.location.origin
};
The domain and audience will be the same as those used in the root config.js file (your tenant and your identifier). When you created your API, Auth0 also automatically created an Application for you. If you go to the Applications section of the dashboard, you will see it with the same name as your API. Click on the application to go to its settings. First, copy the Client ID from here to add to your configuration file. Second, scroll down and add http://localhost:5000 to both “Allowed Callback URLs” and "Allowed Logout URLs." Finally, paste your Client ID into the clientID field of /client/config.js.
Use Auth0 rules for 2FA
At this point, your application should be working with Auth0’s universal login screen. Stop and restart the server, then navigate to http://localhost:5000 and click the "Login" button. You will be able to create a new user and authorize this application. Once you're logged in, you will be able to click the "Awesome headline" button.
Our next step is to implement two-factor authentication (2FA). In order to do so, you will need to use Auth0 rules to redirect the user to your VoiceIt authentication page (/client/2fa.html) and then redirect the users back to Auth0 to complete the authentication process.
This can be done by going to the Auth0 Rules section and clicking on “Create Rule”. Choose "empty rule" from the list and paste the following code in:
// Auth0 rule
function (user, context, callback) {
  let redirectUrl = "http://localhost:5000/2fa.html";
  context.redirect = {
    url: redirectUrl
  };
  callback(null, user, context);
}
Click save and return to the application. You'll see that you are redirected back to the 2fa.html page as soon as you log in. Right now, there is no content on it aside from a title. Note that the URL has a “state” query parameter. This will be used by the application when you want to redirect the users back to Auth0 to identify the session that is currently being used.
In the 2fa.html page, you can get that state query parameter and redirect the user back to Auth0 by adding the following code inside of the script tags:
// ./client/2fa.html
// inside script tags
const queryParams = new URLSearchParams(window.location.search);

let url = `https://${AUTH0_CONFIG.domain}/continue?state=${queryParams.get("state")}`;

location.href = url;
The application will now redirect home after a user logs in.
Now, go back to the Auth0 rule you created. You'll need to check if the user comes back after a redirection. Change the rule code to do a check on the context of the request by replacing the existing code with the following:
// replace in the Auth0 rule
function (user, context, callback) {
  if (context.protocol !== "redirect-callback") {
    let redirectUrl = "http://localhost:5000/2fa.html";
    context.redirect = {
      url: redirectUrl
    };
    callback(null, user, context);
  } else {
    callback(null, user, context);
  }
}
If you now test the application, you should be able to log in. You'll see that Auth0 redirects the user to the 2fa.html page and is then automatically redirected to Auth0 to complete the authentication process. The next step will be to connect VoiceIt in this process instead of blindly redirecting users.
Enroll a User
Before you redirect users to the VoiceIt validation page, you will need to check if the user has already completed the enrollment step. The enrollment is what will enable us to validate the users next time they log in.
The enrollment step will register the user biometrics and store them in the VoiceIt database. Once the application has enrolled a user, VoiceIt will return a userId from their system. This userId should be stored as part of the Auth0 user metadata to know who you are validating next time this user logs in. If you find a VoiceIt userId in the user metadata, you will add a parameter to the redirect page in the Auth0 rule. If you do not add a user id, your 2fa page will assume that this is an enrollment.
In the Auth0 rule, change the code to the following:
// Auth0 rule
function (user, context, callback) {
  if (context.protocol !== "redirect-callback") {
    let redirectUrl = "http://localhost:5000/2fa.html";

    // If the user is already enrolled, he should have a VoiceIt ID
    const voiceitId = (user.user_metadata && user.user_metadata.voiceitId) ? user.user_metadata.voiceitId : null;
    const params = voiceitId ? `userId=${voiceitId}` : "enroll=true";
    redirectUrl += `?${params}`;

    context.redirect = {
      url: redirectUrl
    };

    callback(null, user, context);
  } else {
    callback(null, user, context);
  }
}
Now, in your application, you will create a helper class to deal with the VoiceIt integrations. The first thing you will do is to go to voiceit.js and create that object.
This helper can be defined as follows, it will take some options as a parameter when you instantiate it. For now, you will check if this is an enrollment or a verification based on the presence (or absence) of a user id.
// ./client/voiceit.js
let VoiceItHelper = function(options) {
 this.options = options;
 this.enroll = this.options.userId ? false : true;
};
You also need to add two constants which will identify the two routes that you need to run VoiceIt as well as initialize the VoiceIt library. You will also create the holders for two methods: the first one to get a token and a second one for the enrollment/verification step. Finally, you will have one single method that you can call from the 2fa.html page that will take care of running everything.
// ./client/voiceit.js
let VoiceItHelper = function(options) {
 this.options = options;
 this.enroll = this.options.userId ? false : true;

 this.ENDPOINT_URL = "http://localhost:5000/voiceit_endpoint";
 this.TOKEN_URL = "http://localhost:5000/voiceit_token";

 this.voiceItInstance = new VoiceIt2.initialize(this.ENDPOINT_URL, "./vendor/face_detector.wasm");

 this.getToken = function() {

 };

 this.verify = function() {

 };

 this.start2FAProcess = function() {

 };
};
I have already hinted that you will need two new routes on our Express server. Open the index.js file to add those two routes.
The first route will access the VoiceIt server to generate an authentication token to be used in the enrollment/verification step. In the index.js file, just before the app.listen() line, add the following Express route:
// ./index.js
app.get("/voiceit_token", (req, res) => {
 // Initialize module
 const myVoiceIt = new VoiceIt2(config.VOICEIT_API_KEY, config.VOICEIT_API_TOKEN);

 myVoiceIt.createUser(user => {
   let userId = user.userId;
   const createdToken = myVoiceIt.generateTokenForUser(userId);
   res.json({
     "ResponseCode": "SUCC",
     "Message" : "Successfully created new user",
     "Token" : createdToken,
     "userId": userId
   });
 });
});
You will use the createUser method to create a new user in the VoiceIt database and then send back a token to the front end with the user id that you just created. Every time you make a change to your Node server, be sure to restart the server to actually see those changes.
The second endpoint will be used by the VoiceIt SDK to perform operations on the backend. In order to do so, you will need to initialize the backend in this route and the VoiceIt SDK will take care of doing all the magic for us.
Right after the previous route you’ve just created, add the following code:
// ./index.js
app.post("/voiceit_endpoint", multer.any(), (req, res) => {
 const myVoiceIt = new VoiceIt2(config.VOICEIT_API_KEY, config.VOICEIT_API_TOKEN);
 myVoiceIt.initBackend(req, res, function(jsonObj){
   const userId = jsonObj.userId;

   if(jsonObj.jsonResponse.responseCode === "SUCC"){
     console.log(`User ${jsonObj.userId} Authenticated/Enrolled`);
   } else {
     console.error("Error!", jsonObj);
   }
 });
});
Now that your server is ready, you can restart it and head back to your /client/voiceit.js file to finish up your helper and add some code to the getToken method.
// ./client/voiceit.js
this.getToken = function() {
 let url = `${this.TOKEN_URL}`;
 let self = this;

 return fetch(url).then(resp => resp.json()).then(data => {
   self.voiceItInstance.setSecureToken(data.Token);
   self.options.userId = data.userId;
 });
};
This method will now try to fetch a token from the Express route you’ve just written. Once it gets back the token and the new user id, it adds those to the options object for later use. Because you now return the fetch object, the getToken method now returns a promise that will let you chain the next step.
Your next step will be the verify method in your helper. This will be used for both enrollment and verification. For now, you can focus on the enrollment part.
// ./client/voiceit.js
this.verify = function() {
 let self = this;
 let nextStep = "encapsulatedFaceEnrollment";

 let voiceItOptions = {
   completionCallback: (success, response) => {
     let url = `https://${AUTH0_CONFIG.domain}/continue?state=${self.options.auth0State}&enrolled=${self.options.userId}`;
     location.replace(url);
   }
 };

 this.voiceItInstance[nextStep](voiceItOptions);
};
Here, the encapsulatedFaceEnrollment method of the VoiceIt SDK is used. This will do face detection only for the sake of simplicity. Later on, you will see how to add face and voice biometrics as well as liveness checks for better security. For this reason, the next step is named in a variable. It will make it easier when you come back to it later.
In the options that you are passing to the SDK, you declare a callback to be used once the user is enrolled. In this case, you redirect the user back to Auth0 with the current state that you got from the original URL. You also add the userId of the newly created VoiceIt user so that you can later add this to the Auth0 user metadata.
Now that the two steps are completed, you can chain them into the start2FAProcess method.
// ./client/voiceit.js
this.start2FAProcess = function() {
 let self = this;
 return self.getToken().then(_ => self.verify());
};
You can now instantiate your helper in the 2fa.html file and run by replacing the existing code with:
// ./client/2fa.html
const queryParams = new URLSearchParams(window.location.search);

let myVoiceIt = new VoiceItHelper({
 userId: queryParams.get("userId"),
 auth0State: queryParams.get("state")
});

myVoiceIt.start2FAProcess();
The last thing you will need to do now is to edit your Auth0 rule so that when you enroll your user in the VoiceIt SDK, you also store the VoiceIt user id in the Auth0 user metadata. To do so, you will verify if there is an enrolled property in the request and store this in Auth0. Your rule should now look like this:
// Auth0 rule
function (user, context, callback) {
  if (context.protocol !== "redirect-callback") {
    let redirectUrl = "http://localhost:5000/2fa.html";

    // If the user is already enrolled, he should have a VoiceIt ID
    const voiceitId = (user.user_metadata && user.user_metadata.voiceitId) ? user.user_metadata.voiceitId : null;
    const params = voiceitId ? `userId=${voiceitId}` : "";
    redirectUrl += `?${params}`;

    context.redirect = {
      url: redirectUrl
    };

    callback(null, user, context);
  } else {
    if (context.request.query.enrolled) {
      user.user_metadata = user.user_metadata || {};
      user.user_metadata.voiceitId = context.request.query.enrolled;
      auth0.users.updateUserMetadata(user.user_id, user.user_metadata).then(function() {
        callback(null, user, context);
      });
    } else {
     callback(null, user, context);
    }
  }
}
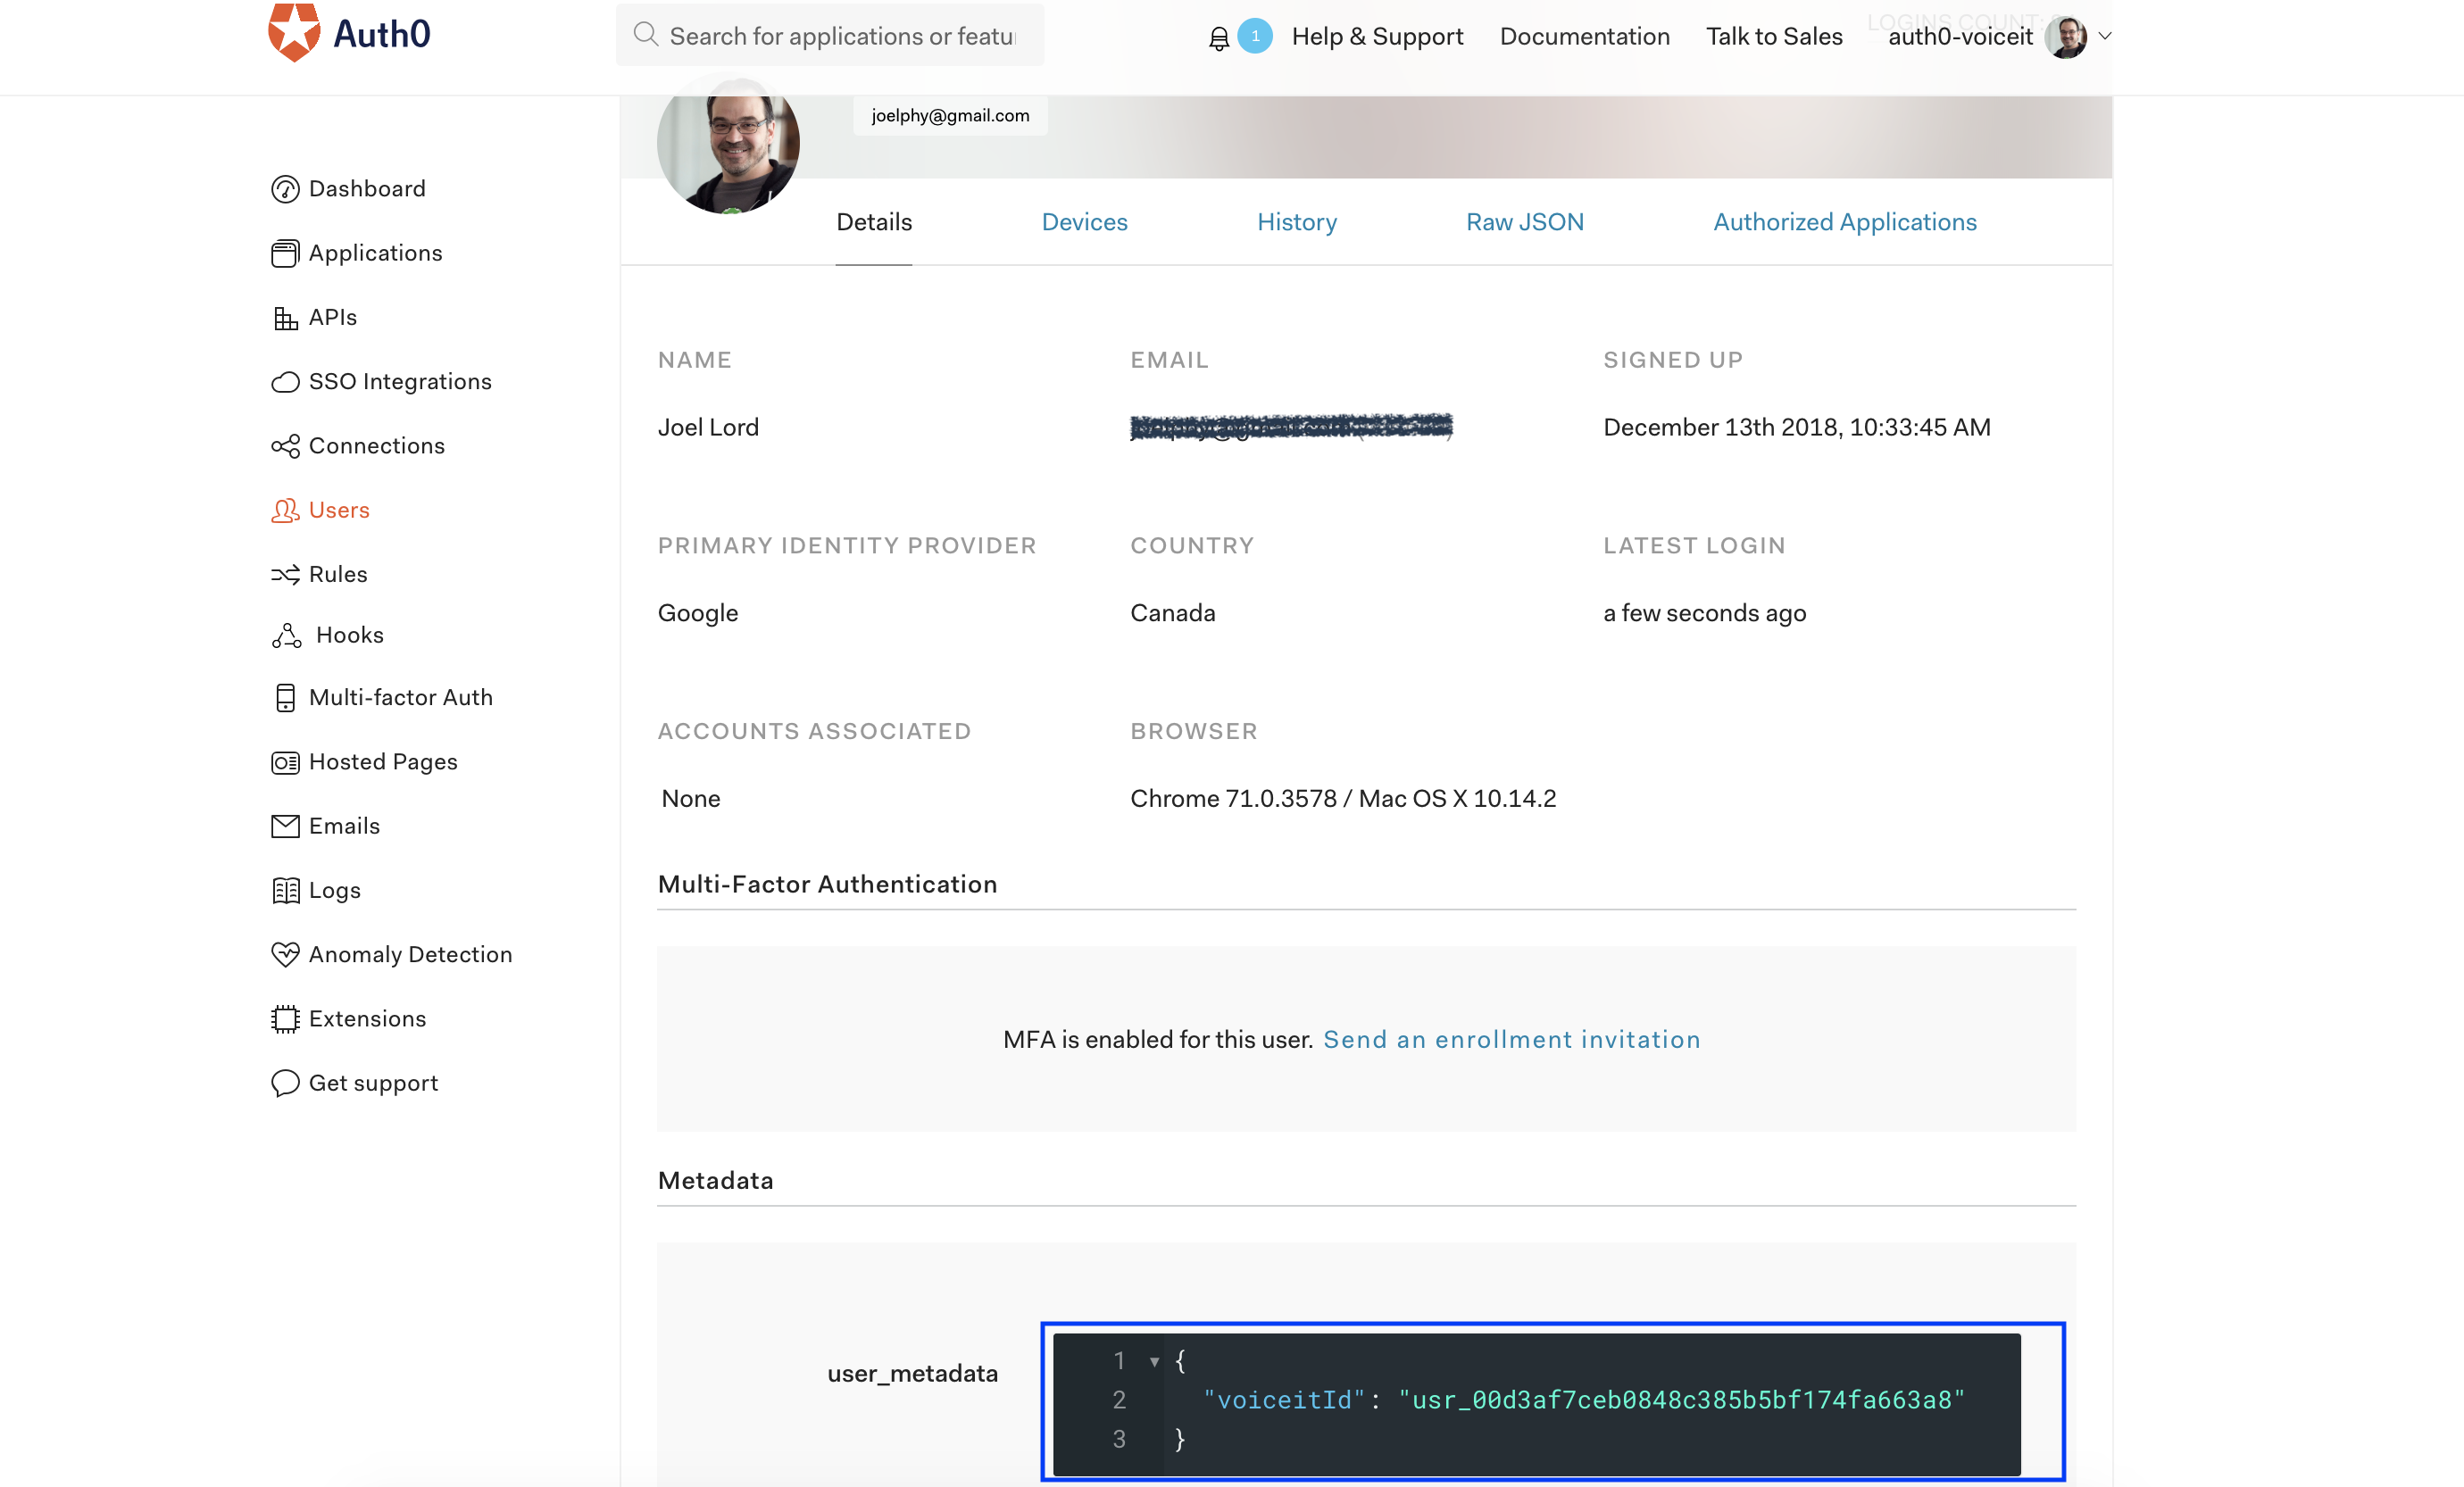
It’s now time to test all of this code. Point your browser to http://localhost:5000. If everything goes well, you should still be able to log in. Once you are logged in to Auth0, it will take you to the 2fa.html page. From here, you will see a screen asking you if you want to proceed with the enrollment. Go ahead and follow the steps on the screen. Once you are successfully enrolled, you are redirected back to Auth0 to finish the authentication process. Finally, the browser sends you back to the application with a pair of access and id tokens. With those, you should now be able to see both the regular and awesome headlines. If you want to be sure that the user was successfully enrolled, you can head to the Auth0 dashboard, look at your recently created user and you should see a voiceitId as part of the user_metadata.
If everything works, you are now ready to move on to the verification step. Should you have missed something, you can do a git checkout to the tag enroll-complete:
git checkout enroll-complete
Validate a User
Now that you can enroll new users, you will need to actually do a verification the next time they log in. You are already sending the user id as part of the query parameters when you redirect the user to the 2fa page. So, from here, you will need to change your helper to perform an actual verification.
The first step will be to fetch a token with the userId instead of creating a new user each time. To do so, you will need to start by editing the getToken() method in /client/voiceit.js.
// ./client/voiceit.js
this.getToken = function() {
 let url = `${this.TOKEN_URL}`;
 let self = this;
 url += this.enroll ? "" : `?userId=${this.options.userId}`;

 return fetch(url).then(resp => resp.json()).then(data => {
   self.voiceItInstance.setSecureToken(data.Token);
   if (this.enroll) {
     self.options.userId = data.userId;
   }
 });
};
You will also need to change your server so that it creates a new token for a given user whenever a user id was passed. In your index.js file, you can change the voiceit_token route to this:
// ./index.js
app.get("/voiceit_token", (req, res) => {
 // Upon a successful login, lookup the associated VoiceIt userId
 const VOICEIT_USERID = req.query.userId;
 // Initialize module
 const myVoiceIt = new VoiceIt2(config.VOICEIT_API_KEY, config.VOICEIT_API_TOKEN);

 // If a userId is provided, do a verification.  If not, assume this is an
 // enrollment and create a new userId to be associated with the Auth0 user
 if (VOICEIT_USERID) {
   // Generate a new token for the userId
   const createdToken = myVoiceIt.generateTokenForUser(VOICEIT_USERID);

   // Then return this token to the front end, for example as part of a jsonResponse
   res.json({
     "ResponseCode": "SUCC",
     "Message" : "Successfully authenticated user",
     "Token" : createdToken
   });
 } else {
   myVoiceIt.createUser(user => {
     let userId = user.userId;
     const createdToken = myVoiceIt.generateTokenForUser(userId);
     res.json({
       "ResponseCode": "SUCC",
       "Message" : "Successfully created new user",
       "Token" : createdToken,
       "userId": userId
     });
   });
 }
});
Now that those two are changed, you will also need to add some logic to do a verification instead of an enrollment in the verify method of /client/voiceit.js when needed. Also, once the verification is done, you will only send the enrolled parameter once the user is actually enrolled.
// ./client/voiceit.js
this.verify = function() {
 let self = this;
 let nextStep = this.enroll ? "encapsulatedFaceEnrollment" : "encapsulatedFaceVerification";

 let voiceItOptions = {
   completionCallback: (success, response) => {
     let url = `https://${AUTH0_CONFIG.domain}/continue?state=${self.options.auth0State}&`;
     url += (self.enroll) ? `enrolled=${self.options.userId}` : "";
     location.replace(url);
   }
 };

 this.voiceItInstance[nextStep](voiceItOptions);
};
Now back to your application. Point your browser to http://localhost:5000 and click "Login" again (make sure that you click “Logout” before if needed). You will now be redirected to the VoiceIt verification screen. It will ask you to look at the screen and you should see a message saying that “You’ve been successfully verified.” Then, your browser will be redirected back to the application where you will receive your access and id tokens, just like before in the enrollment step. You now have a basic 2fa with VoiceIt completed.
If you need to jump to this place in the code, you can use:
git checkout verification-complete
Secure the Data Coming from VoiceIt with JWT
Now while everything seems to work, it is easy to trick the system into telling it that you were successfully verified with VoiceIt. This is why you need another way to validate that the user was authenticated with VoiceIt.
To do so, you will need to send back a JSON Web Token with your VoiceIt response in the voiceit_endpoint Express route. This token will contain the response received from the VoiceIt backend and will be signed with a secret key that is only shared between the Node server and the Auth0 rule engine.
The Auth0 rule will then check for the existence and validity of this token and then complete a successful authentication if the face verification step worked. It will throw an error if the user was not authenticated.
First, we’ll create a new environment variable to store the secret key jwt needs for signing.
export JWTSIGNINGKEY=auth0-voiceit-shared
We will then be able to use this variable in our code. Next, we will generate a JWT in the voiceit_endpoint of the Express server.
// ./index.js
app.post("/voiceit_endpoint", multer.any(), (req, res) => {
 const myVoiceIt = new VoiceIt2(config.VOICEIT_API_KEY, config.VOICEIT_API_TOKEN);
 myVoiceIt.initBackend(req, res, function(jsonObj){
   const callType = jsonObj.callType.toLowerCase();
   const userId = jsonObj.userId;

   // Build a JWT proving the user was authenticated or not
   let token = jwt.sign({
     userId: userId,
     userAuthenticated: (jsonObj.jsonResponse.responseCode === "SUCC")
   }, process.env.JWTSIGNINGKEY);

   // Add the JWT to the JSON response
   jsonObj.jsonResponse.token = token;

   if(jsonObj.jsonResponse.responseCode === "SUCC"){
     console.log(`User ${jsonObj.userId} Authenticated/Enrolled`);
   } else {
     console.error("Error!", jsonObj);
   }
 });
});
Here, you generate a JWT and it only has the userAuthenticated claim in its payload. This is true if the response code from the VoiceIt server was “SUCC”. This token is then signed with a secret key, “auth0-voiceit-shared” in this case. Make sure that you add your own private key here.
Now that you are sending a token to the users, you will need to handle this in the verify method of /client/voiceit.js and send it as part of the URL.
// ./client/voiceit.js
this.verify = function() {
 let self = this;
 let nextStep = this.enroll ? "encapsulatedFaceEnrollment" : "encapsulatedFaceVerification";

 let voiceItOptions = {
   completionCallback: (success, response) => {
     let url = `https://${AUTH0_CONFIG.domain}/continue?state=${self.options.auth0State}&`;
     url += (self.enroll) ? `enrolled=${self.options.userId}` : `token=${response.token}`;
     location.replace(url);
   }
 };

 this.voiceItInstance[nextStep](voiceItOptions);
};
The last step will be to modify your Auth0 rule so that it now checks for this token and uses the userAuthenticated claim to either let the user in or not.
// Auth0 rule
function (user, context, callback) {
  if (context.protocol !== "redirect-callback") {
    let redirectUrl = "http://localhost:5000/2fa.html";

    // If the user is already enrolled, he should have a VoiceIt ID
    const voiceitId = (user.user_metadata && user.user_metadata.voiceitId) ? user.user_metadata.voiceitId : null;
    const params = voiceitId ? `userId=${voiceitId}` : "";
    redirectUrl += `?${params}`;

    context.redirect = {
      url: redirectUrl
    };

    callback(null, user, context);
  } else {
    if (context.request.query.enrolled) {
      user.user_metadata = user.user_metadata || {};
      user.user_metadata.voiceitId = context.request.query.enrolled;
      auth0.users.updateUserMetadata(user.user_id, user.user_metadata).then(function() {
        callback(null, user, context);
      });
    } else {
      let err = null;
      // Decode JWT
      let payload = jwt.verify(context.request.query.token, configuration.JWTSIGNINGKEY);

      if (!payload.userAuthenticated) {
        // 2FA failed
        err = new UnauthorizedError("MFA with VoiceIt failed");
      }
      callback(err, user, context);
    }
  }
}
You will also need to change the configuration object of your Rule. To do so, go to the list of Rules then scroll down to the "Settings" section. In here, enter "JWTSIGNINGKEY" in the Key field and the value that you picked earlier in your server.
Now you can go and test your application once again. This time, get someone else to stand before your camera. If the user is not verified, he won’t be able to get into the application. Neat, isn’t it?
Once again, if you need to reach this point, you can use checkout this git tag:
git checkout with-jwt
Change from Face to Video Biometrics
While face biometrics are neat, they can still easily be tricked by using a picture of someone. VoiceIt does have some built-in protections against this but in order to add more security, you should use “Video Verification” by VoiceIt. This will ask your users to authenticate using not only the camera feed but also by saying a magic phrase.
Finally, you can also add a random liveness check which will make it much harder for anyone to forge the identity.
Most of this will be done in the verify method in /client/voiceit.js. Instead of using the encapsulatedFaceVerification that you had previously defined, you will use the video verification here. You will also need to add doLivenessCheck, phrase, and contentLanguage to the options.
// ./client/voiceit.js
this.verify = function() {
 let self = this;
 let nextStep = this.enroll ? "encapsulatedVideoEnrollment" : "encapsulatedVideoVerification";

 let voiceItOptions = {
   doLiveness: true,
   phrase: "never forget tomorrow is a new day",
   contentLanguage: "en-US",
   completionCallback: (success, response) => {
     let url = `https://${AUTH0_CONFIG.domain}/continue?state=${self.options.auth0State}&`;
     url += (self.enroll) ? `enrolled=${self.options.userId}` : `token=${response.token}`;
     location.replace(url);co
   }
 };

 this.voiceItInstance[nextStep](voiceItOptions);
};
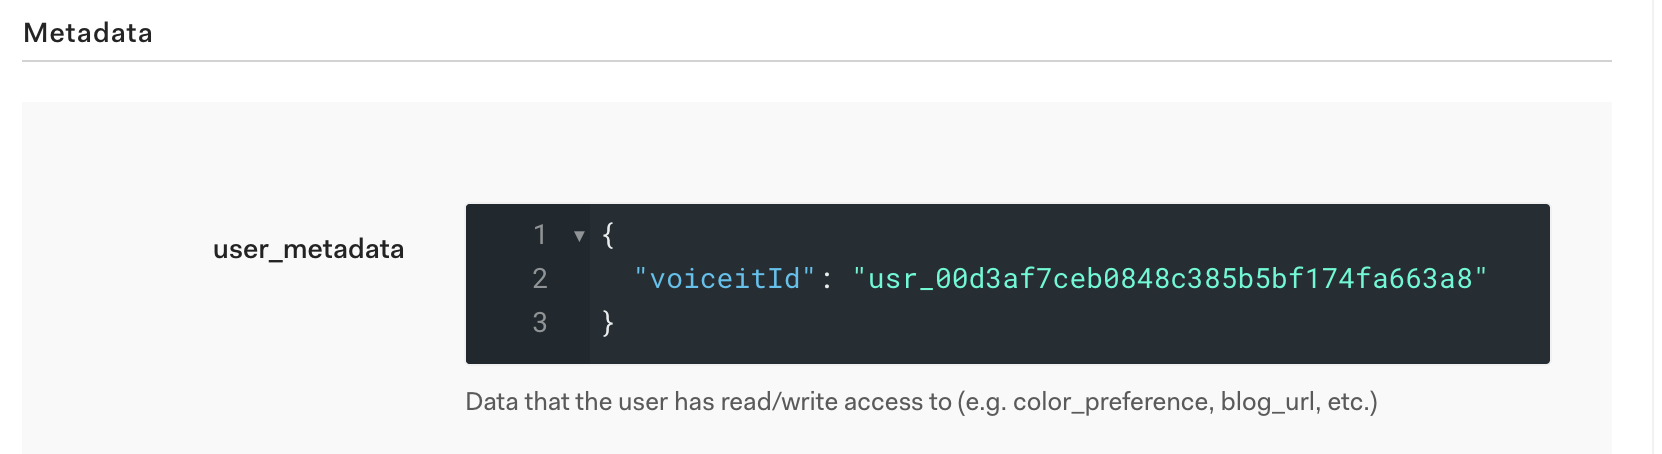
Now that you did those changes, go to your Auth0 dashboard to remove any existing metadata.
Navigate to the “Users” section using the left navigation bar. You will see a list of all the users that have logged in to your application. Find the user you used to test the application and click on it. If you scroll down to the Metadata section, you will see the user_metadata with a VoiceIt user id in there. Go ahead and delete it.
Because you will now switch to another type of biometrics, you will need to create a new user in the VoiceIt database. This will be done the first time the user logs in during the “enrollment” step of the process.
You can now point your browser to http://localhost:5000 one last time and follow the instructions on the screen to enroll. Then, log out and try to do a verification. You should now have a full working 2fa that uses face and voice biometrics to use in your applications.
Note: Voice recognition effectiveness depends on my factors like the quality of your microphone and the surrounding sound. During the enrollment step, make sure that you speak clearly and slowly for better results.
To see the full code, you can checkout the final git tag:
git checkout final
Summary
That’s it! You now have working two-factor authentication in your application that uses face and voice biometrics. As you can see, Auth0 and VoiceIt can be made to easily work hand in hand to accomplish this. Using the power of VoiceIt’s face and voice biometrics with the simplicity of Auth0, you can make your applications much more secure with a 2fa that will bring a much better experience to your users.
About the author

Joel Lord
Technical Evangelist (Auth0 Alumni)