The Model Context Protocol (MCP) is gaining traction as a mechanism to connect Large Language Models (LLMs), like GPT, Gemini, or Claude, to external tools and APIs in a standardized, secure, and reusable way.
What is MCP?
Think of MCP as a universal translation layer that offers APIs to LLMs in the form of tools/functions. Although LLMs excel at language, they don't natively understand the specific APIs required to interact with services like GitHub, databases, or even local file systems. MCP provides a standard protocol for providing LLMs access to these services, without needing to be intimately familiar with the underlying API of each individual tool.
To better understand how MCP works, let’s understand its components and how they interact with each other:
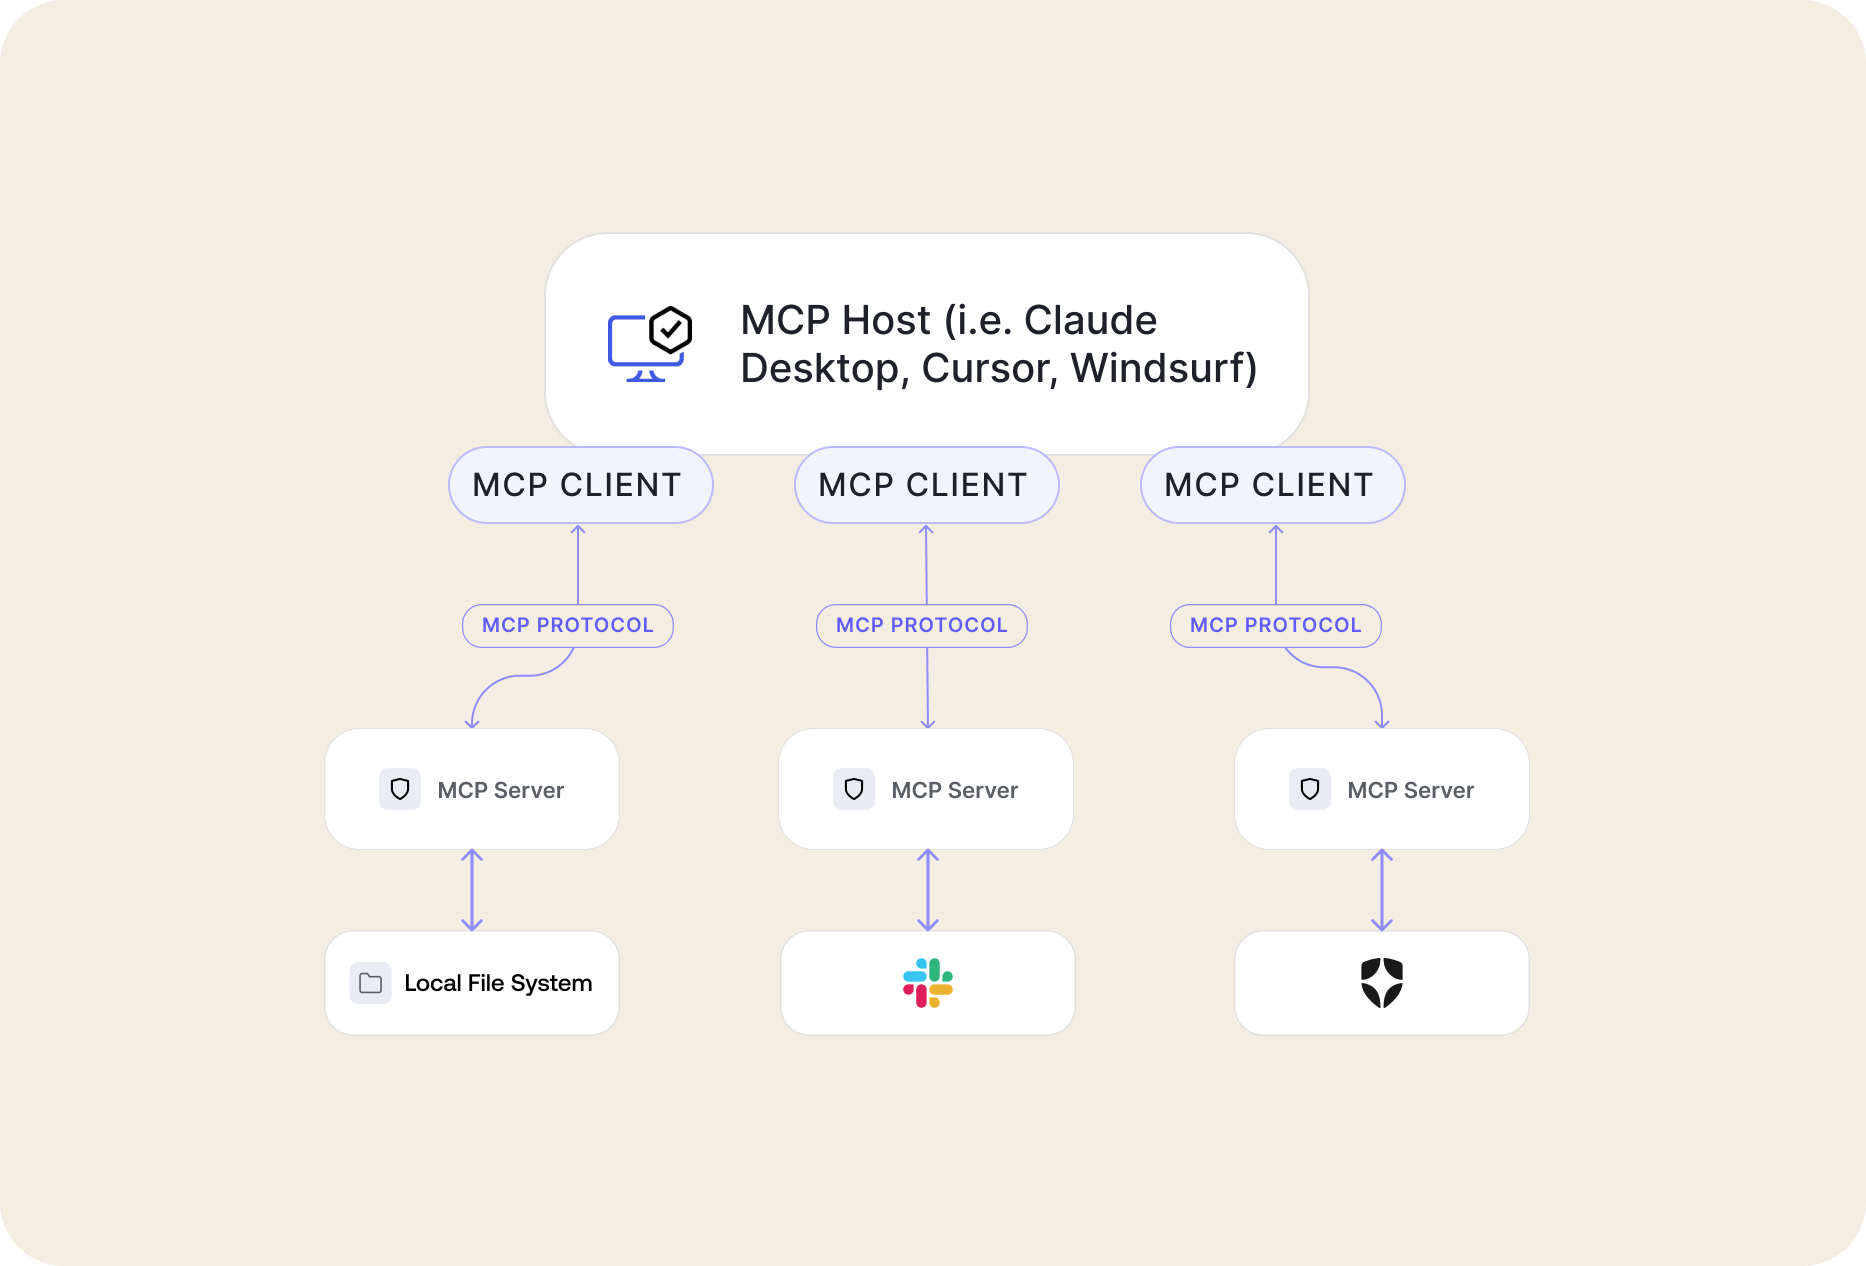
- MCP Host: These are programs like Claude Desktop, Cursor IDE, or any other AI tool that requires access to data through MCP.
- MCP Client: Your MCP host will run one or multiple MCP clients. Each client will maintain a 1:1 relationship with an MCP server. For example, When Cursor starts, it will connect to each MCP server you’ve provided.
- MCP Servers: This is the server that’s going to be running the tools your host wants to call. These servers can either run locally or hosted on a remote server.
- Local Data Sources: The MCP server, if running locally, can access local resources in the host computer, such as files, databases, and locally running services and applications.
- Remote Services: External systems available through the internet, e.g., Auth0 APIs, Google Calendar APIs, GitHub APIs, etc.
How Does MCP Work?
Now that we understand the basic idea of MCP and its components, let’s look at how MCP works, going from the host, to the underlying services, and back.
MCP hosts and clients
The MCP host is the program that initiates it all. It starts by importing the definition for an MCP server. This definition is specified in JSON format and will vary from server to server.
Here’s an example of what that configuration may look like:
{
  "mcpServers": {
    "filesystem": {
      "command": "npx",
      "args": [
        "-y",
        "@modelcontextprotocol/server-filesystem",
        "/Users/username/Desktop",
        "/Users/username/Downloads"
      ]
    }
  }
}
With this setup, the host will initialize a client that will give the host access to the user’s Desktop and Downloads folder through the server-filesystem MCP server. It’s common for MCP servers to provide details about their setup and multiple configurations through their documentation.
The client will communicate with the MCP server through transports, which we will review in the next section.
Transport
Transports in MCP provide a way for communication between client and server. The transport handles all the communication mechanisms and is responsible for sending and receiving messages between the parties.
When developing MCP servers, the developer will opt for a specific transport type depending on the MCP requirements.
The specification currently allows for three different transport types:
1. Stdio (standard input/output): This transport enables communication through the input and output streams. It’s useful for local integrations and command-line tools.
const server = new Server({
  name: "my-mcp-server",
  version: "1.0.0"
});

const transport = new StdioServerTransport();
await server.connect(transport);
2. SSE (server-sent events): This transport enables communication through HTTP POST streaming requests.
const app = express();

const server = new Server({
  name: "my-mcp-server",
  version: "1.0.0"
});

let transport: SSEServerTransport | null = null;

app.get("/sse", (req, res) => {
  transport = new SSEServerTransport("/messages", res);
  server.connect(transport);
});

app.post("/messages", (req, res) => {
  if (transport) {
    transport.handlePostMessage(req, res);
  }
});

app.listen(3000);
3. Custom Transports: MCP allows developers to easily define new custom transports for their unique requirements, whether you need to support a specific network protocol, or integrate with existing systems, you can create a custom transport by implementing a simple interface.
interface Transport {
  // Start processing messages
  start(): Promise<void>;

  // Send a JSON-RPC message
  send(message: JSONRPCMessage): Promise<void>;

  // Close the connection
  close(): Promise<void>;

  // Callbacks
  onclose?: () => void;
  onerror?: (error: Error) => void;
  onmessage?: (message: JSONRPCMessage) => void;
}
MCP server
Finally, we define the MCP server, which will receive and process the messages sent by the client on behalf of the LLM’s requests, and will stream/output the results.
The MCP server can serve the host with three capabilities:
- Resources: Allow for MCP servers to expose data and content that can be read by the clients and be used as context for the LLM interactions. Resources can be any kind of data, like file contents, database records, API responses, etc.
- Prompts: Allow for MCP servers to define reusable prompt templates and workflows that clients can use to guide users or LLMs.
- Tools: Perhaps what MCP are most famous for, tools allow for servers to expose executable functionality to clients. Thanks to tools, LLMs can directly interact with external systems, perform computations and access the real world.
Your first MCP server
Now that we know what MCP servers are and how they work let’s build our first server.
The first thing we need to think about is, what type of transport do we want to use? We will get started with an SSE server. Our MCP server will allow clients to retrieve random dog images, so let’s give it a proper name.
import { McpServer } from "@modelcontextprotocol/sdk/server/mcp";
import { SSEServerTransport } from "@modelcontextprotocol/sdk/server/sse";
import express from "express";

const server = new McpServer({
  name: "MCP for Dog Lovers",
  version: "1.0.0",
});
const app = express();
let transport: SSEServerTransport | null = null;

app.get("/sse", async (_req, res) => {
  transport = new SSEServerTransport("/messages", res);
  server.connect(transport);
});

app.post("/messages", async (req, res) => {
  if (transport) {
    transport.handlePostMessage(req, res);
  }
});

app.listen(3000);
Next, we are going to define a tool that will retrieve a dog image from a third-party service and return it back to the client:
server.tool("getRandomDogImage", {}, async () => {
  const response = await fetch(`https://dog.ceo/api/breeds/image/random`);
  const data = await response.json();
  return {
    content: [
      { type: "text", text: `Your dog image is here: ${data.message}` },
    ],
  };
});
Our tool is very simple, and doesn’t really take any arguments. So let’s improve that, where we might wish to provide the name of our favorite dog breeds:
server.tool("getRandomDogImage", { breed: z.string() }, async ({ breed }) => {
  const response = await fetch(
    `https://dog.ceo/api/breed/${breed}/images/random`,
  );
  const data = await response.json();
  return {
    content: [
      { type: "text", text: `Your dog image is here: ${data.message}` },
    ],
  };
});
In the same way, we can specify arguments for tool calling for LLMs, we can specify arguments for MCP tools. Pretty cool, right? Let’s see the complete code sample, and this server in action:
import { McpServer } from "@modelcontextprotocol/sdk/server/mcp";
import { SSEServerTransport } from "@modelcontextprotocol/sdk/server/sse";
import express from "express";
import { z } from "zod";

const server = new McpServer({
  name: "My Super Cool Thursday MCP Demo Server",
  version: "1.0.0",
});

server.tool("getRandomDogImage", { breed: z.string() }, async ({ breed }) => {
  const response = await fetch(
    `https://dog.ceo/api/breed/${breed}/images/random`,
  );
  const data = await response.json();
  return {
    content: [
      { type: "text", text: `Your dog image is here: ${data.message}` },
    ],
  };
});

const app = express();
let transport: SSEServerTransport | null = null;

app.get("/sse", (req, res) => {
  transport = new SSEServerTransport("/messages", res);
  server.connect(transport);
});

app.post("/messages", (req, res) => {
  if (transport) {
    transport.handlePostMessage(req, res);
  }
});

app.listen(3000);
console.log("Server is running on http://localhost:3000/sse");
Steps to run the server:
- Create a new directory to save the project and run
npm init - Save all the code in a
main.tsfile. - Install the project dependencies:
npm i @modelcontextprotocol/sdk express zod - Run the server with
npx tsx main.ts - Finally, set up the MCP in a client of your choice, using the following URL for the server:
http://localhost:3000/sse
Let’s see it in action:

The MCP Lifecycle
We now understand how MCP works, we even built a MCP server ourselves, but in all the magic, there’s a sequence of steps from prompt to response.
The lifecycle is divided into two different flows.
Connection lifecycle
- The MCP host, in our case, Cursor, reads the MCP configuration file, determines the MCP servers it needs to connect to, and sends an
initializerequest with protocol version and capabilities to the MCP server. - The MCP server responds with its own protocol version and capabilities (e.g., available tools).
- The client sends
initializednotification as acknowledgment. - The connection is ready for use.
Messaging lifecycle
- When the user sends a prompt through the MCP Host, the host will run an LLM model, which will determine if it’s interested in requesting a tool call. In our case, when we prompt “Generate a random image of a labrador”, the LLM detects we are talking about a dog, that there’s a tool available for that task (that happens to be through our MCP server), and then it chooses to invoke that tool.
- In this process, the MCP client sends a message to the MCP server indicating the tool's execution and parameters.
- The MCP server receives the request, calls the Dog API, and returns the image URL to the client.
- The MCP Host merges the response from the tool with the LLM context, processes a new response, and displays that back to the user.
Authorization in the World of MCPs
So far, the MCP server knows nothing about who’s requesting information, or calling tools. This situation may work for MCP servers accessing public services that require no form of authorization or for getting access to local resources the MCP server has access to.
But what if we need to access remote services that require authorization?
Let’s explore that next.
Authorization with API keys and secrets
One popular way developers use to access external services is by using API Keys. These are simple string tokens that authenticate and authorize requests to APIs or services.
You can use environment variables or local resources to store your API keys and retrieve them in the MCP server during runtime. This is normally done when spawning the MCP client, for example:
{
  "mcpServers": {
    "github": {
      "command": "npx",
      "args": ["-y", "@modelcontextprotocol/server-github"],
      "env": {
        "GITHUB_PERSONAL_ACCESS_TOKEN": "<YOUR_TOKEN>"
      }
    }
  }
}
This method is only recommended for MCP servers using the stdio transport.
Alternatively, since these are servers running locally, like a CLI application, the server could make use of device flow to authenticate the user, and retrieve an access token. The necessary client credentials needed for device flow, would be stored as disclaimed before, as environment variables or secrets.
OAuth 2.1
In March 2025, the MCP specification took a major leap forward with the release of a new specification that standardizes Authorization using OAuth 2.1.
The new specification enables MCP clients and servers to make use of OAuth 2.1, to delegate authorization. MCP servers implementing the new spec can authorize users to perform specific tasks and actions on existing services built on top of OAuth such as Auth0, Google APIs, GitHub, etc.
Here are some of the features that the new spec enables:
Built-in Security Baseline (PKCE): Mandating PKCE for all clients significantly raises the bar for security, protecting against common attacks right out of the box.
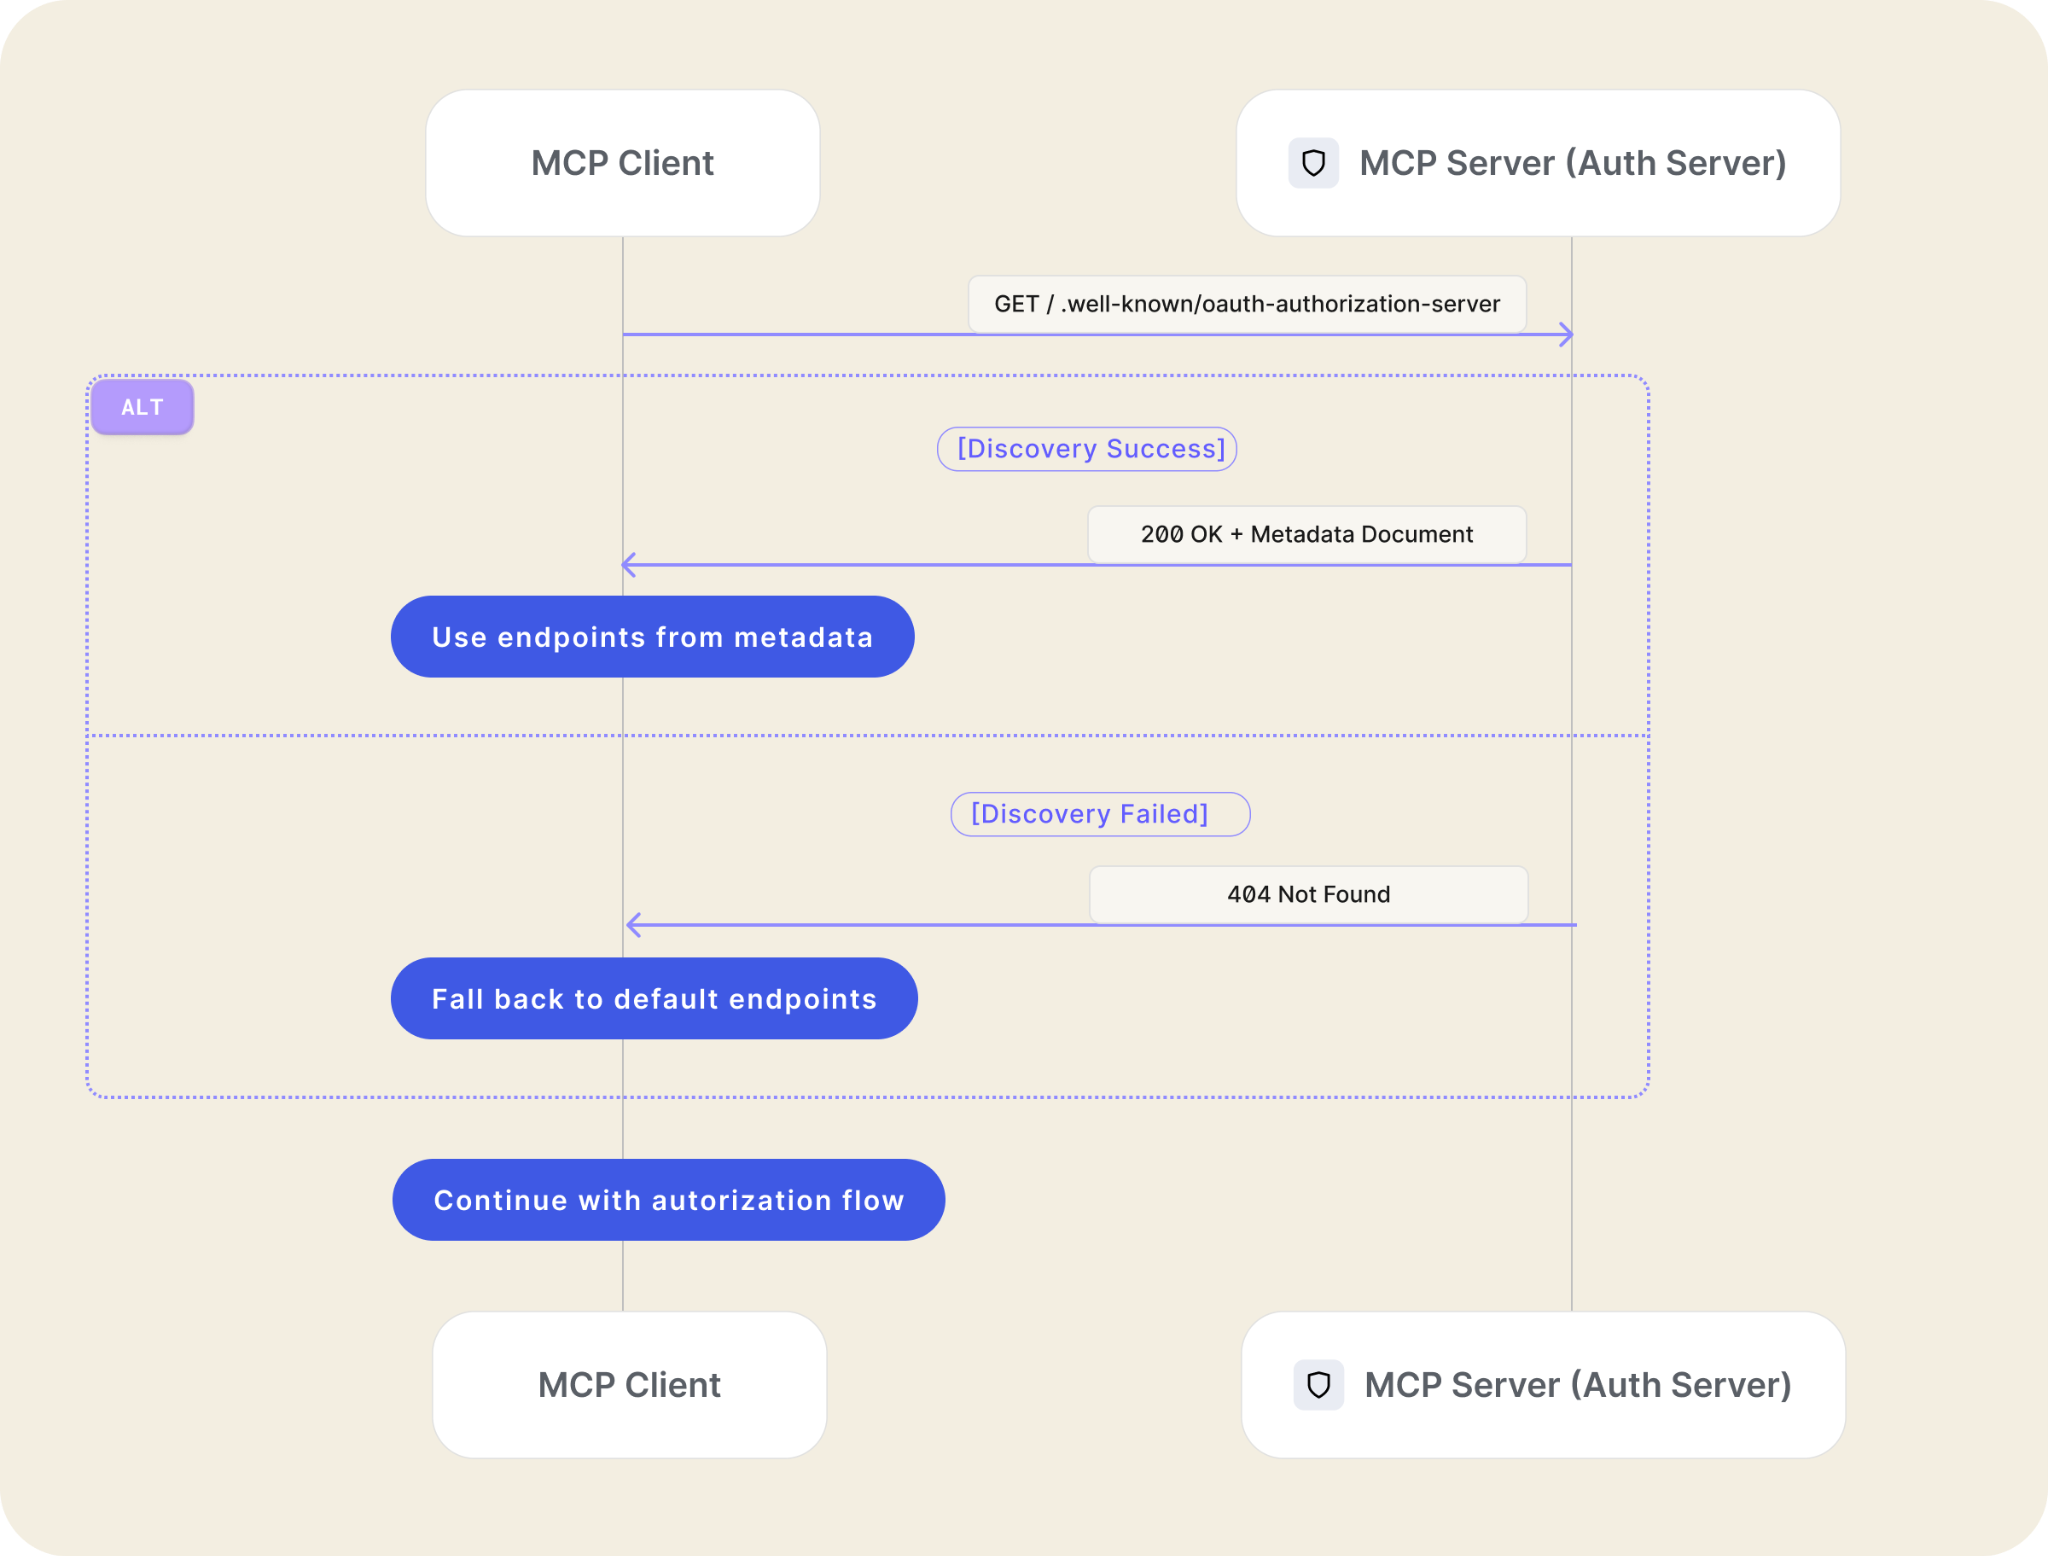
Simplified Connections (Metadata Discovery): How does your tool know where to send you to log in for a specific MCP server? The spec encourages Metadata Discovery, allowing servers to advertise their OAuth endpoints automatically. This means less manual configuration and fewer errors.
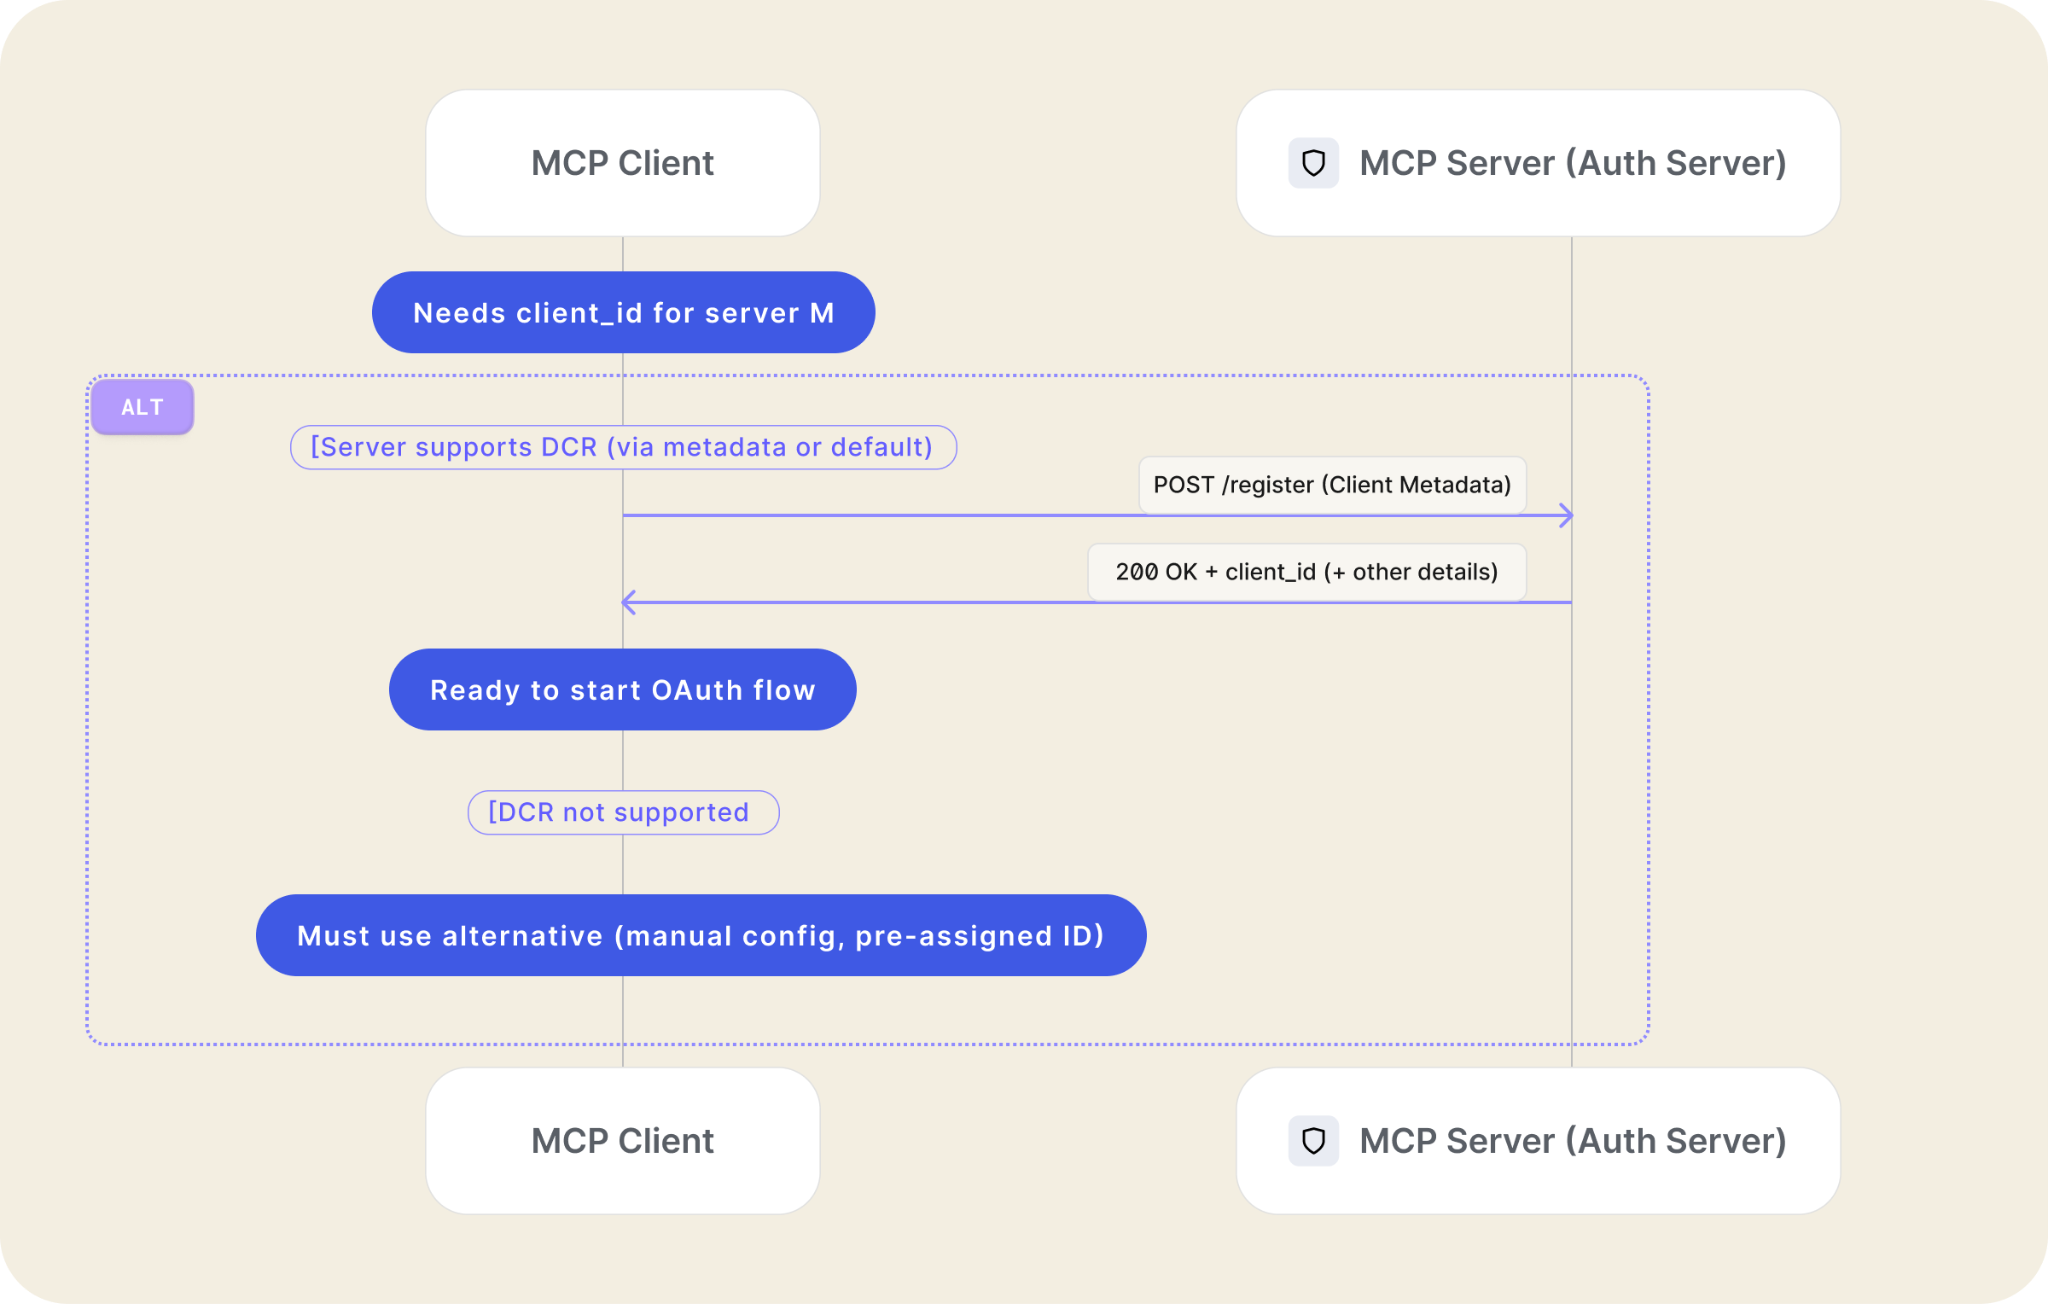
Seamless Onboarding (Dynamic Client Registration - DCR): Perhaps one of the most impactful features for usability. DCR allows MCP clients (like a generic AI workbench) to programmatically register themselves with a new MCP server they've never seen before. This avoids forcing users through tedious manual setup processes for every new connection, which is critical in a potentially vast landscape of model servers.
Leveraging Your Existing Identity Infrastructure (Third-Party Auth): The specification explicitly supports flows where the MCP server delegates the actual user login process to a trusted Third-Party Identity Provider – like Auth0.
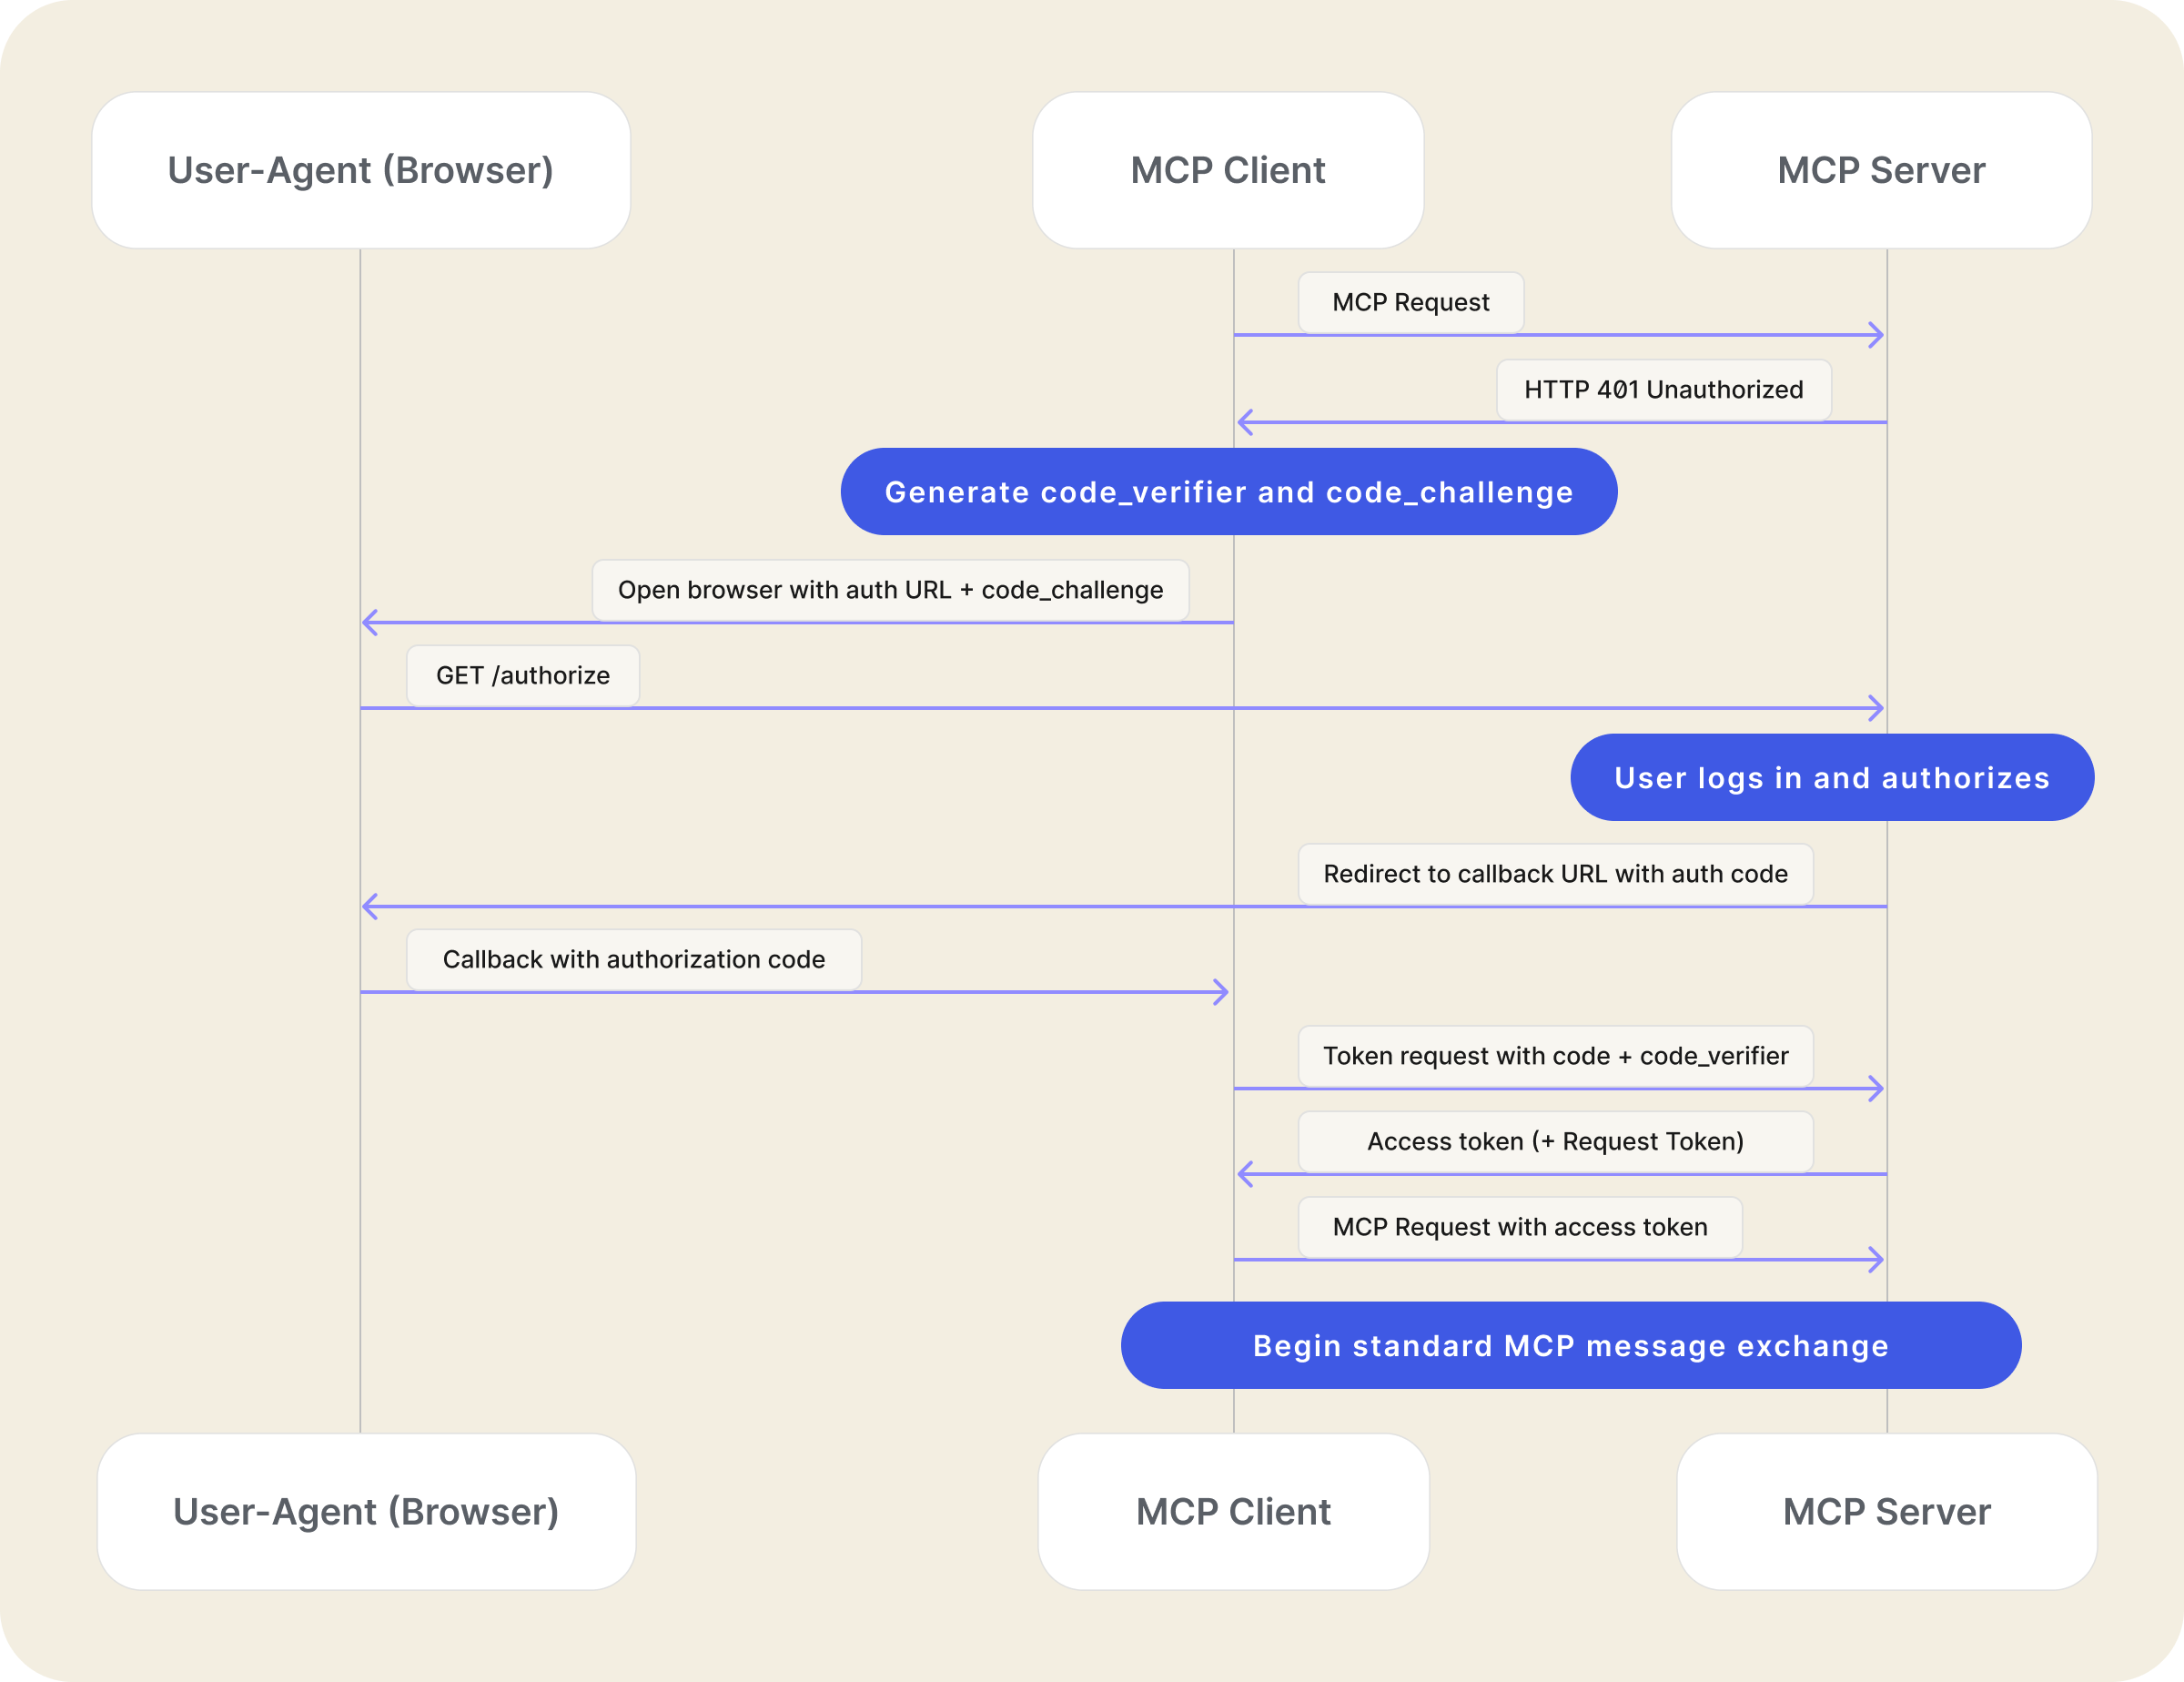
Here’s what the authorization flow looks like:
- MCP client initiates standard OAuth flow with MCP server
- The MCP server redirects the user to a third-party authorization server
- User authorizes with the third-party server
- The third-party server redirects back to the MCP server with the authorization code
- MCP server exchanges code for the third-party access token
- MCP server generates its own access token bound to the third-party session
- MCP server completes original OAuth flow with MCP client

The Road Ahead
While the new spec introduces OAuth 2.1 support to the MCP standard, the specification as it currently stands defines the MCP server as both a resource server and an authorization server. This design, though a step forward, also introduces some challenges for developers of MCP servers, as they would have to be responsible for implementing discovery, registration, and token endpoints rather than leveraging existing identity providers.
But the limitations are beyond just lines of code, as incorrect implementations can lead to security vulnerabilities and scaling challenges.
Of course, not all is lost, and there are already conversations about the future of authorization in the world of MCPs, and identity experts are sharing their views, and knowledge to find a solution to some of these limitations.
But before going any further, let’s see what the current state is.
Current limitations
As defined in the specification, an MCP server that supports OAuth 2.1 would follow these requirements:
- MCP auth implementations MUST implement OAuth 2.1 with appropriate security measures for both confidential and public clients.
- MCP auth implementations SHOULD support the OAuth 2.0 Dynamic Client Registration Protocol (RFC7591).
- MCP servers SHOULD, and MCP clients MUST implement OAuth 2.0 Authorization Server Metadata (RFC8414). Servers that do not support Authorization Server Metadata MUST follow the default URI schema.
In that chapter, the MCP Server specification states that the MCP server SHOULD support OAuth 2 Authorization Server Metadata. This exposes to the client, among other things, the following:
- issuer
- authorization_endpoint
- token_endpoint
- registration_endpoint
- userinfo_endpoint
For example, you can query your Auth0 tenant metadata by using the following URL:
https://<your-tenant>.auth0.com/.well-known/openid-configuration
Here’s what that may look like:
{
  "issuer": "https://<your-tenant>.auth0.com/",
  "authorization_endpoint": "https://<your-tenant>.auth0.com/authorize",
  "token_endpoint": "https://<your-tenant>.auth0.com/oauth/token",
  "device_authorization_endpoint": "https://<your-tenant>.auth0.com/oauth/device/code",
  "userinfo_endpoint": "https://<your-tenant>.auth0.com/userinfo",
  "mfa_challenge_endpoint": "https://<your-tenant>.auth0.com/mfa/challenge",
  "jwks_uri": "https://<your-tenant>.auth0.com/.well-known/jwks.json",
  "registration_endpoint": "https://<your-tenant>.auth0.com/oidc/register",
  "revocation_endpoint": "https://<your-tenant>.auth0.com/oauth/revoke",
  ...
}
As you can see, the metadata information contains information about your Auth0 tenant (or identity provider). But if we are to implement that on the MCP server, then do we also need to implement each of those endpoints?
This is not a great practice, and it introduces a lot of burden and limitations on the MCP server. For example:
- The MCP server would require storage for token handling.
- The MCP server would be a part of critical infrastructure and will have to comply with all the corresponding security requirements, audits, logging, and certifications.
- The MCP server would be responsible for validating the third-party token, and that’s unnecessary and not a recommended practice.
Alternatively, we could “proxy” the metadata endpoint to that of our identity provider; that way, the MCP server would, in a way, delegate the authorization to the authorization server.
But, according to the MCP spec, that raises new issues. In section 2.9.2, the spec states that the MCP server authorizes with the third-party authorization server, and then it generates its own access token bound to the third-party session.
The issue here is that if we delegate authorization, as explained before, we would not be able to comply with this part of the spec.
So, what’s the alternative?
With identity experts weighing in the spec, we have to consider the possibility of releasing a new specification that addresses the issues above, and provides the MCP standard with a best-in-class take on OAuth2.
Conclusion
As MCPs continue to grow, it’s important that we, as industry leaders and conscious developers, lead the way in establishing stronger, more secure standards that empower developers to build safer, more reliable products. This is just the beginning of this MCP journey. If you like this post, or you have comments or ideas about security, identity, and MCP, please join the conversation in the comments section below. Let’s improve MCP for everyone!
At Auth0, we’re deeply committed to secure AI, and as part of our commitment, we are working on Auth0 for AI Agents, a new generation of tools and SDKs to help you build secure AI applications and services.
Thanks for reading!
About the author

Juan Cruz Martinez
Staff Developer Advocate