

TL;DR: In this blog post we'll see how easy it is to authenticate a user with any OAuth2 service using the new generic OAuth middleware in ASP.NET Core. Check out the repo to get the code.
In previous versions of ASP.NET you could allow users of your application to sign in using their social media accounts by using the external authentication providers. The support for these external authentication providers were however limited to the most popular ones such as Facebook, Twitter, Google and Microsoft. Open Source projects tried to address the gap, but this meant that a custom provider had to be written from the ground up for every single one of these external authentication services.
Most of these services are however based on OAuth2, so in ASP.NET Core, Microsoft has supplied a generic OAuth2 provider which allows you to add authentication for any OAuth2-based services with a minimal amount of code.
To be able to use any of these services, you will need to have the following information:
- A Client ID and Client Secret which is typically obtained by registering your application with the service's Developer Portal or similar service.
- The URL for the service's OAuth2 Authorization endpoint
- The URL for the service's OAuth2 Token endpoint
- Optionally a URL which will allow you to retrieve the user information for the authenticated user from the service
In this blog post I will show you how you can allow a user of your application to sign in with their LinkedIn account, by making use of the generic OAuth2 middleware which is available in ASP.NET Core.
This blog post is based on Release Candidate 2, and assumes that you have the correct tooling installed. I am using the Visual Studio tooling, but you can use the ASP.NET Yeoman generator and Visual Studio Code as well if you prefer.
Creating a new ASP.NET Core Application
In Visual Studio, create a new project (File > New > Project), and select ASP.NET Core Web Application (.NET Core).
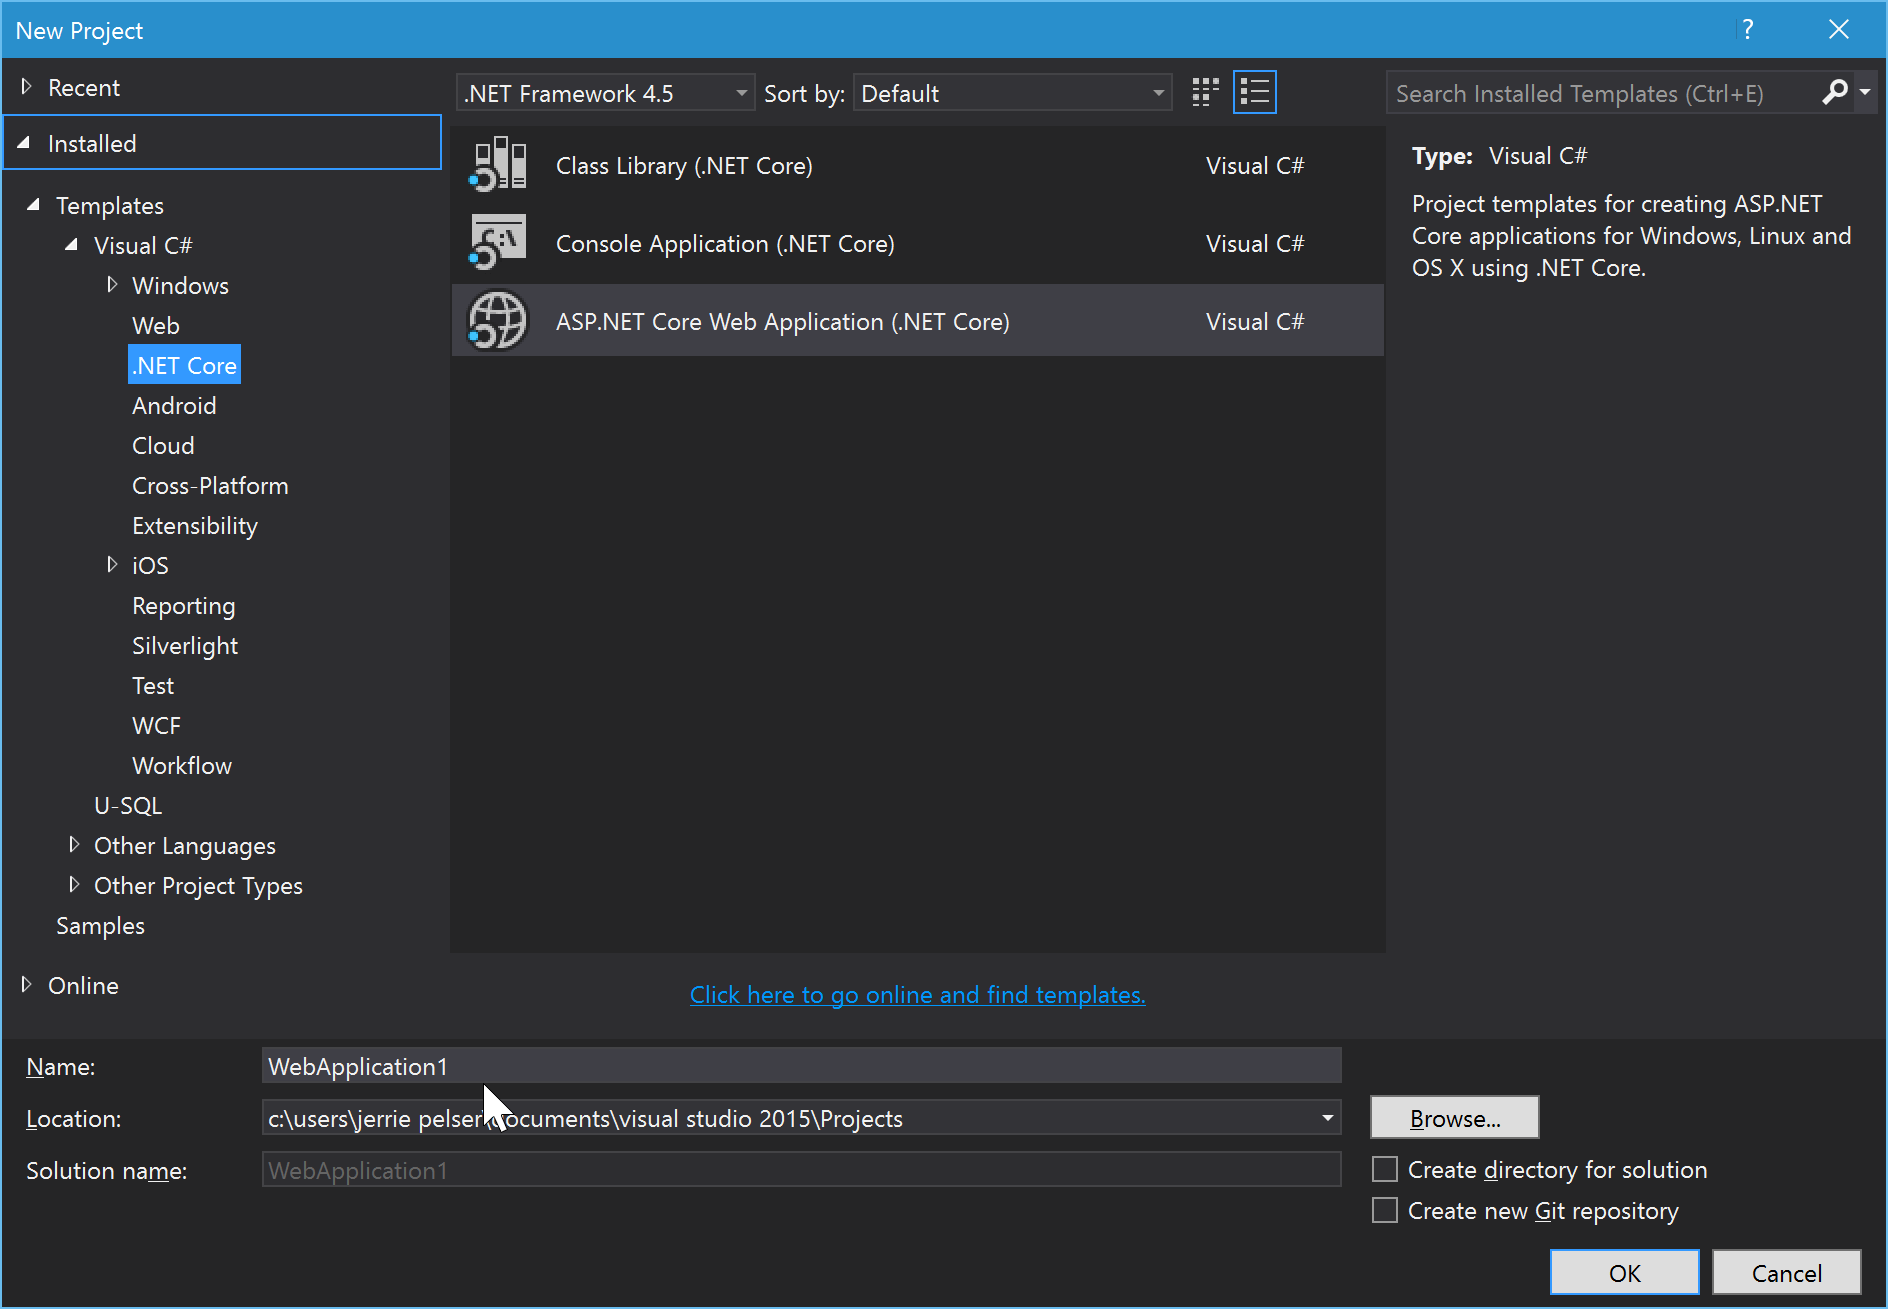
Enter a name of the application and click OK.
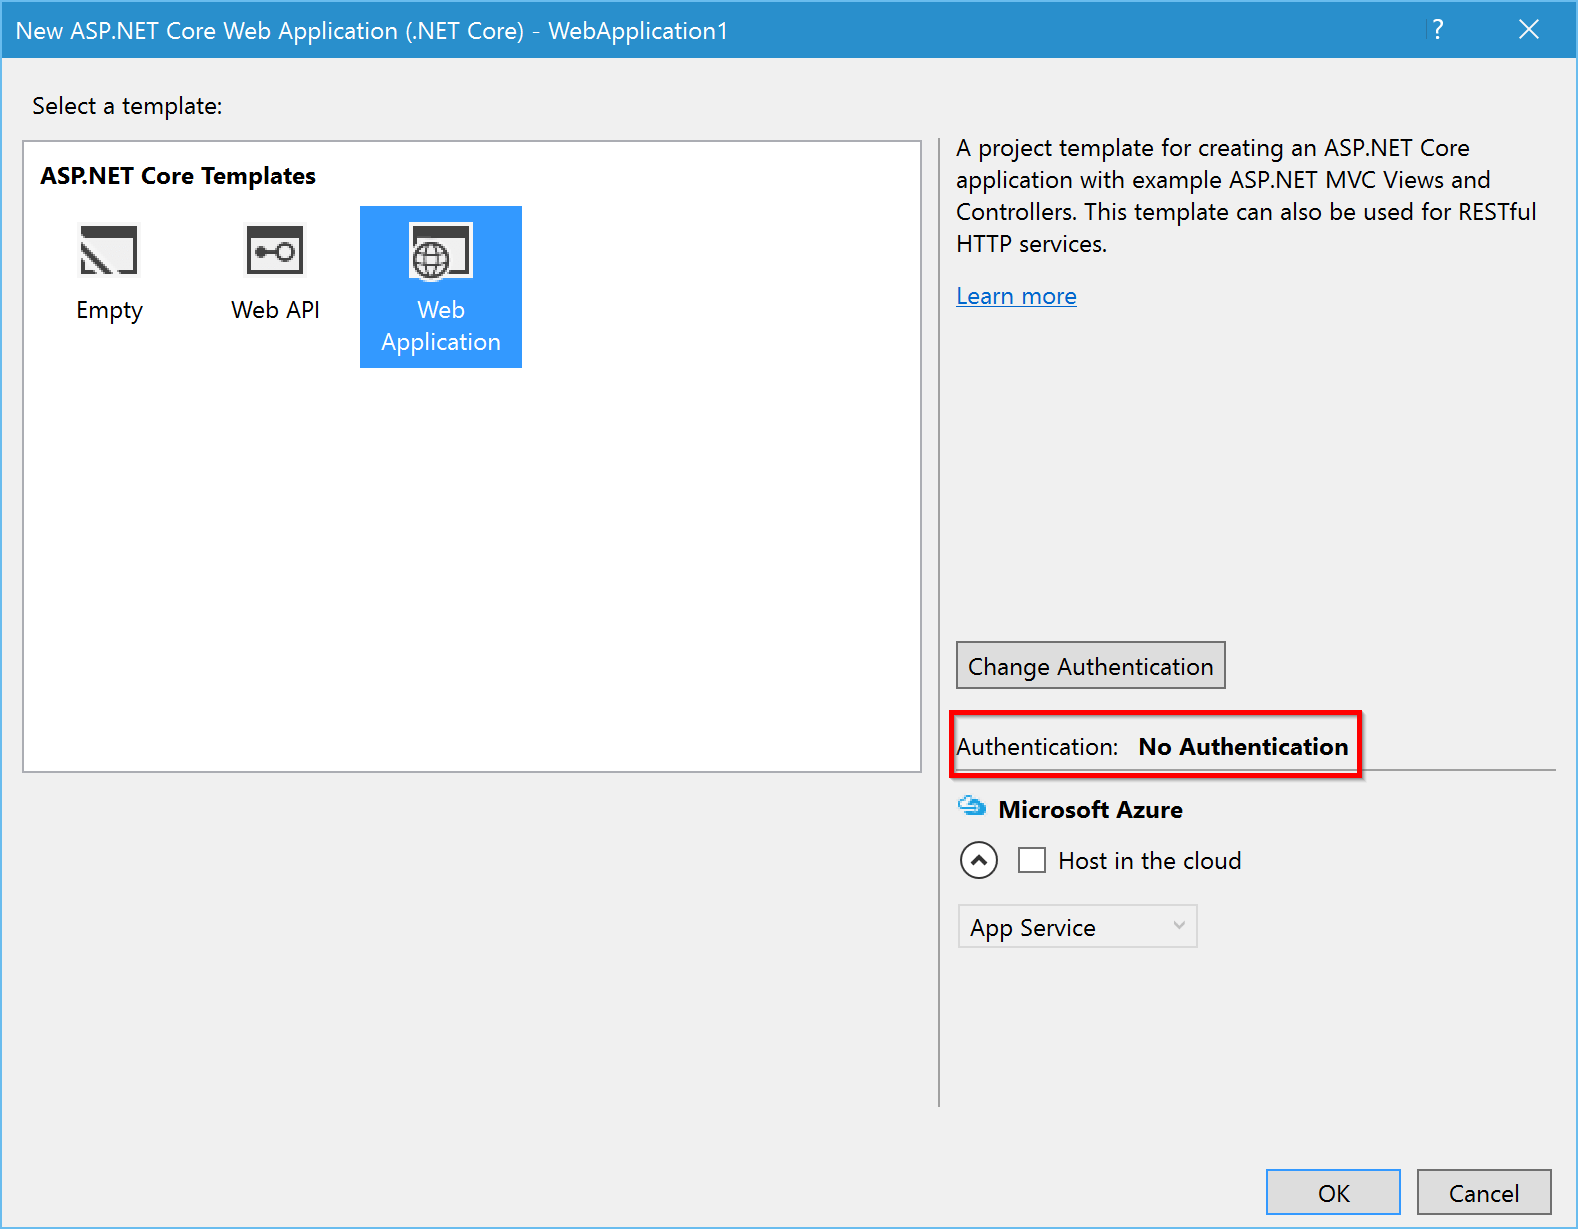
Next, select Web Application and ensure that you have set the Authentication to No Authentication
Register your application in the LinkedIn Developer Portal
Next up you will need to register your application in LinkedIn and obtain a Client ID and Client Secret.
Go to the LinkedIn Developer Portal and select My Apps from the top menu. Click on the Create Application button. You will need to complete all the information for your application, and once you are done click on the Submit button.
You will be taken to a page which displays the detail about your new application, including the Client ID and Client Secret:
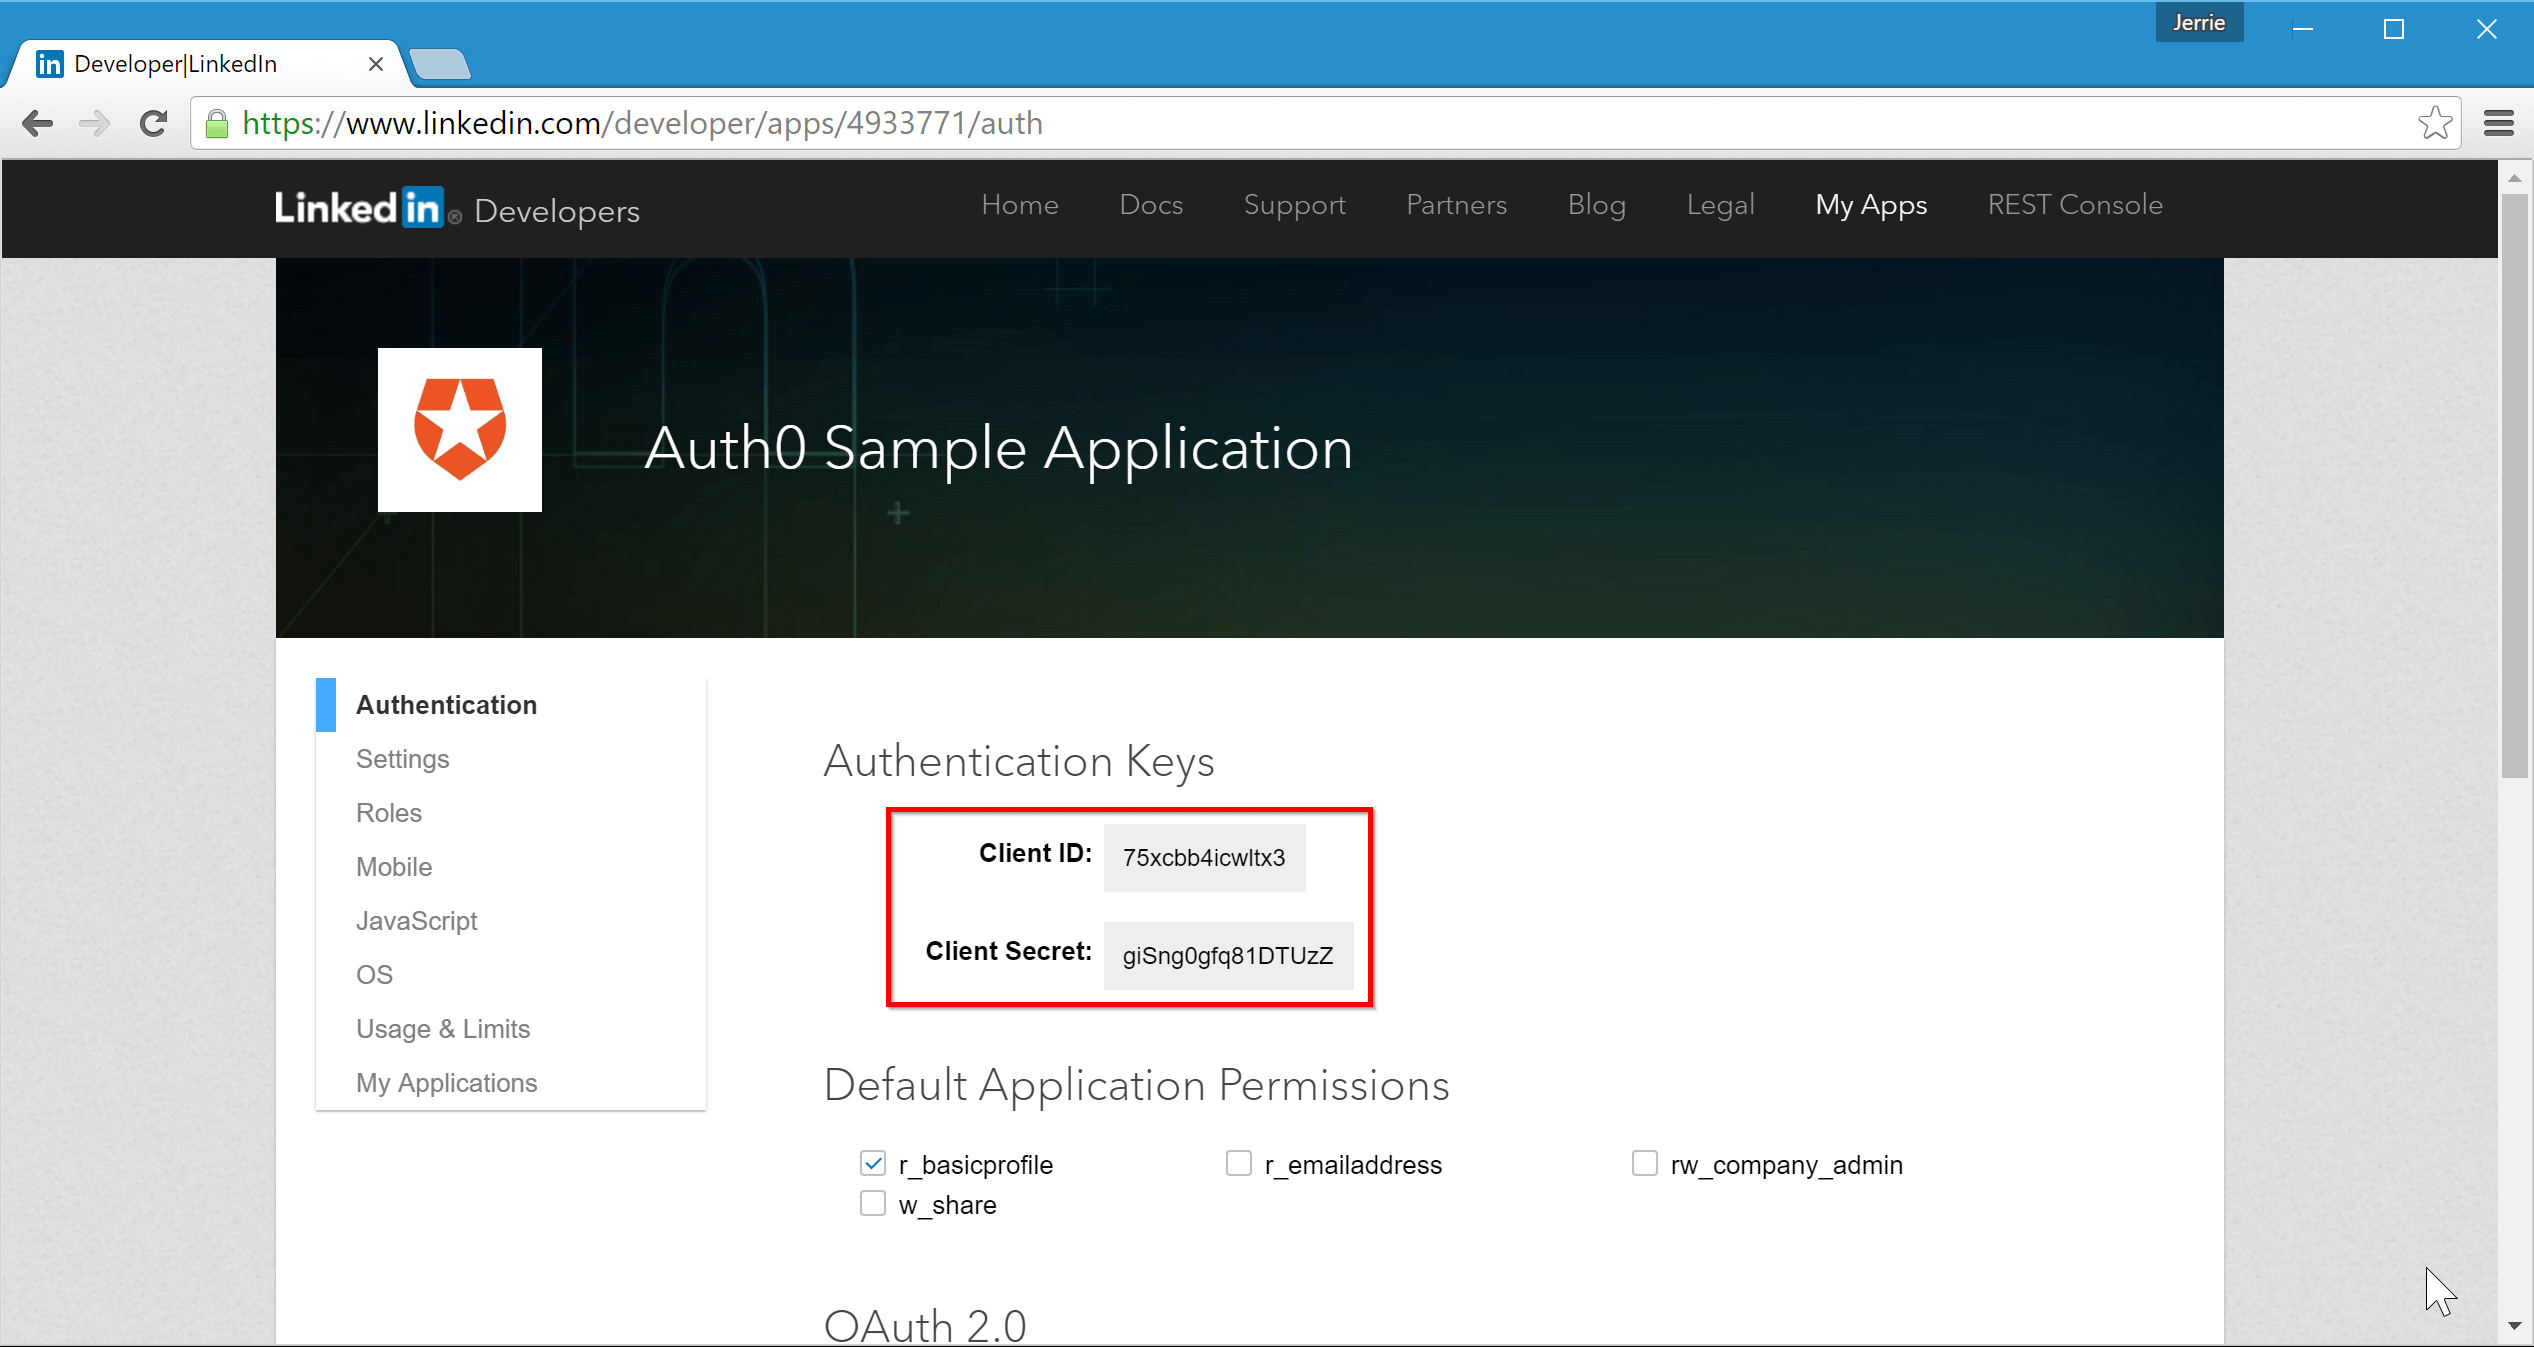
We will be storing these values in the configuration file so we can retrieve them later on when registering the OAuth2 middleware. So head over to your appsettings.json and add the values:
{
  "Logging": {
    "IncludeScopes": false,
    "LogLevel": {
      "Default": "Debug",
      "System": "Information",
      "Microsoft": "Information"
    }
  },
  "linkedin": {
    "clientid": "75xcbb4icwltx3",
    "clientSecret": "giSng0gfq81DTUzZ"
  }
}
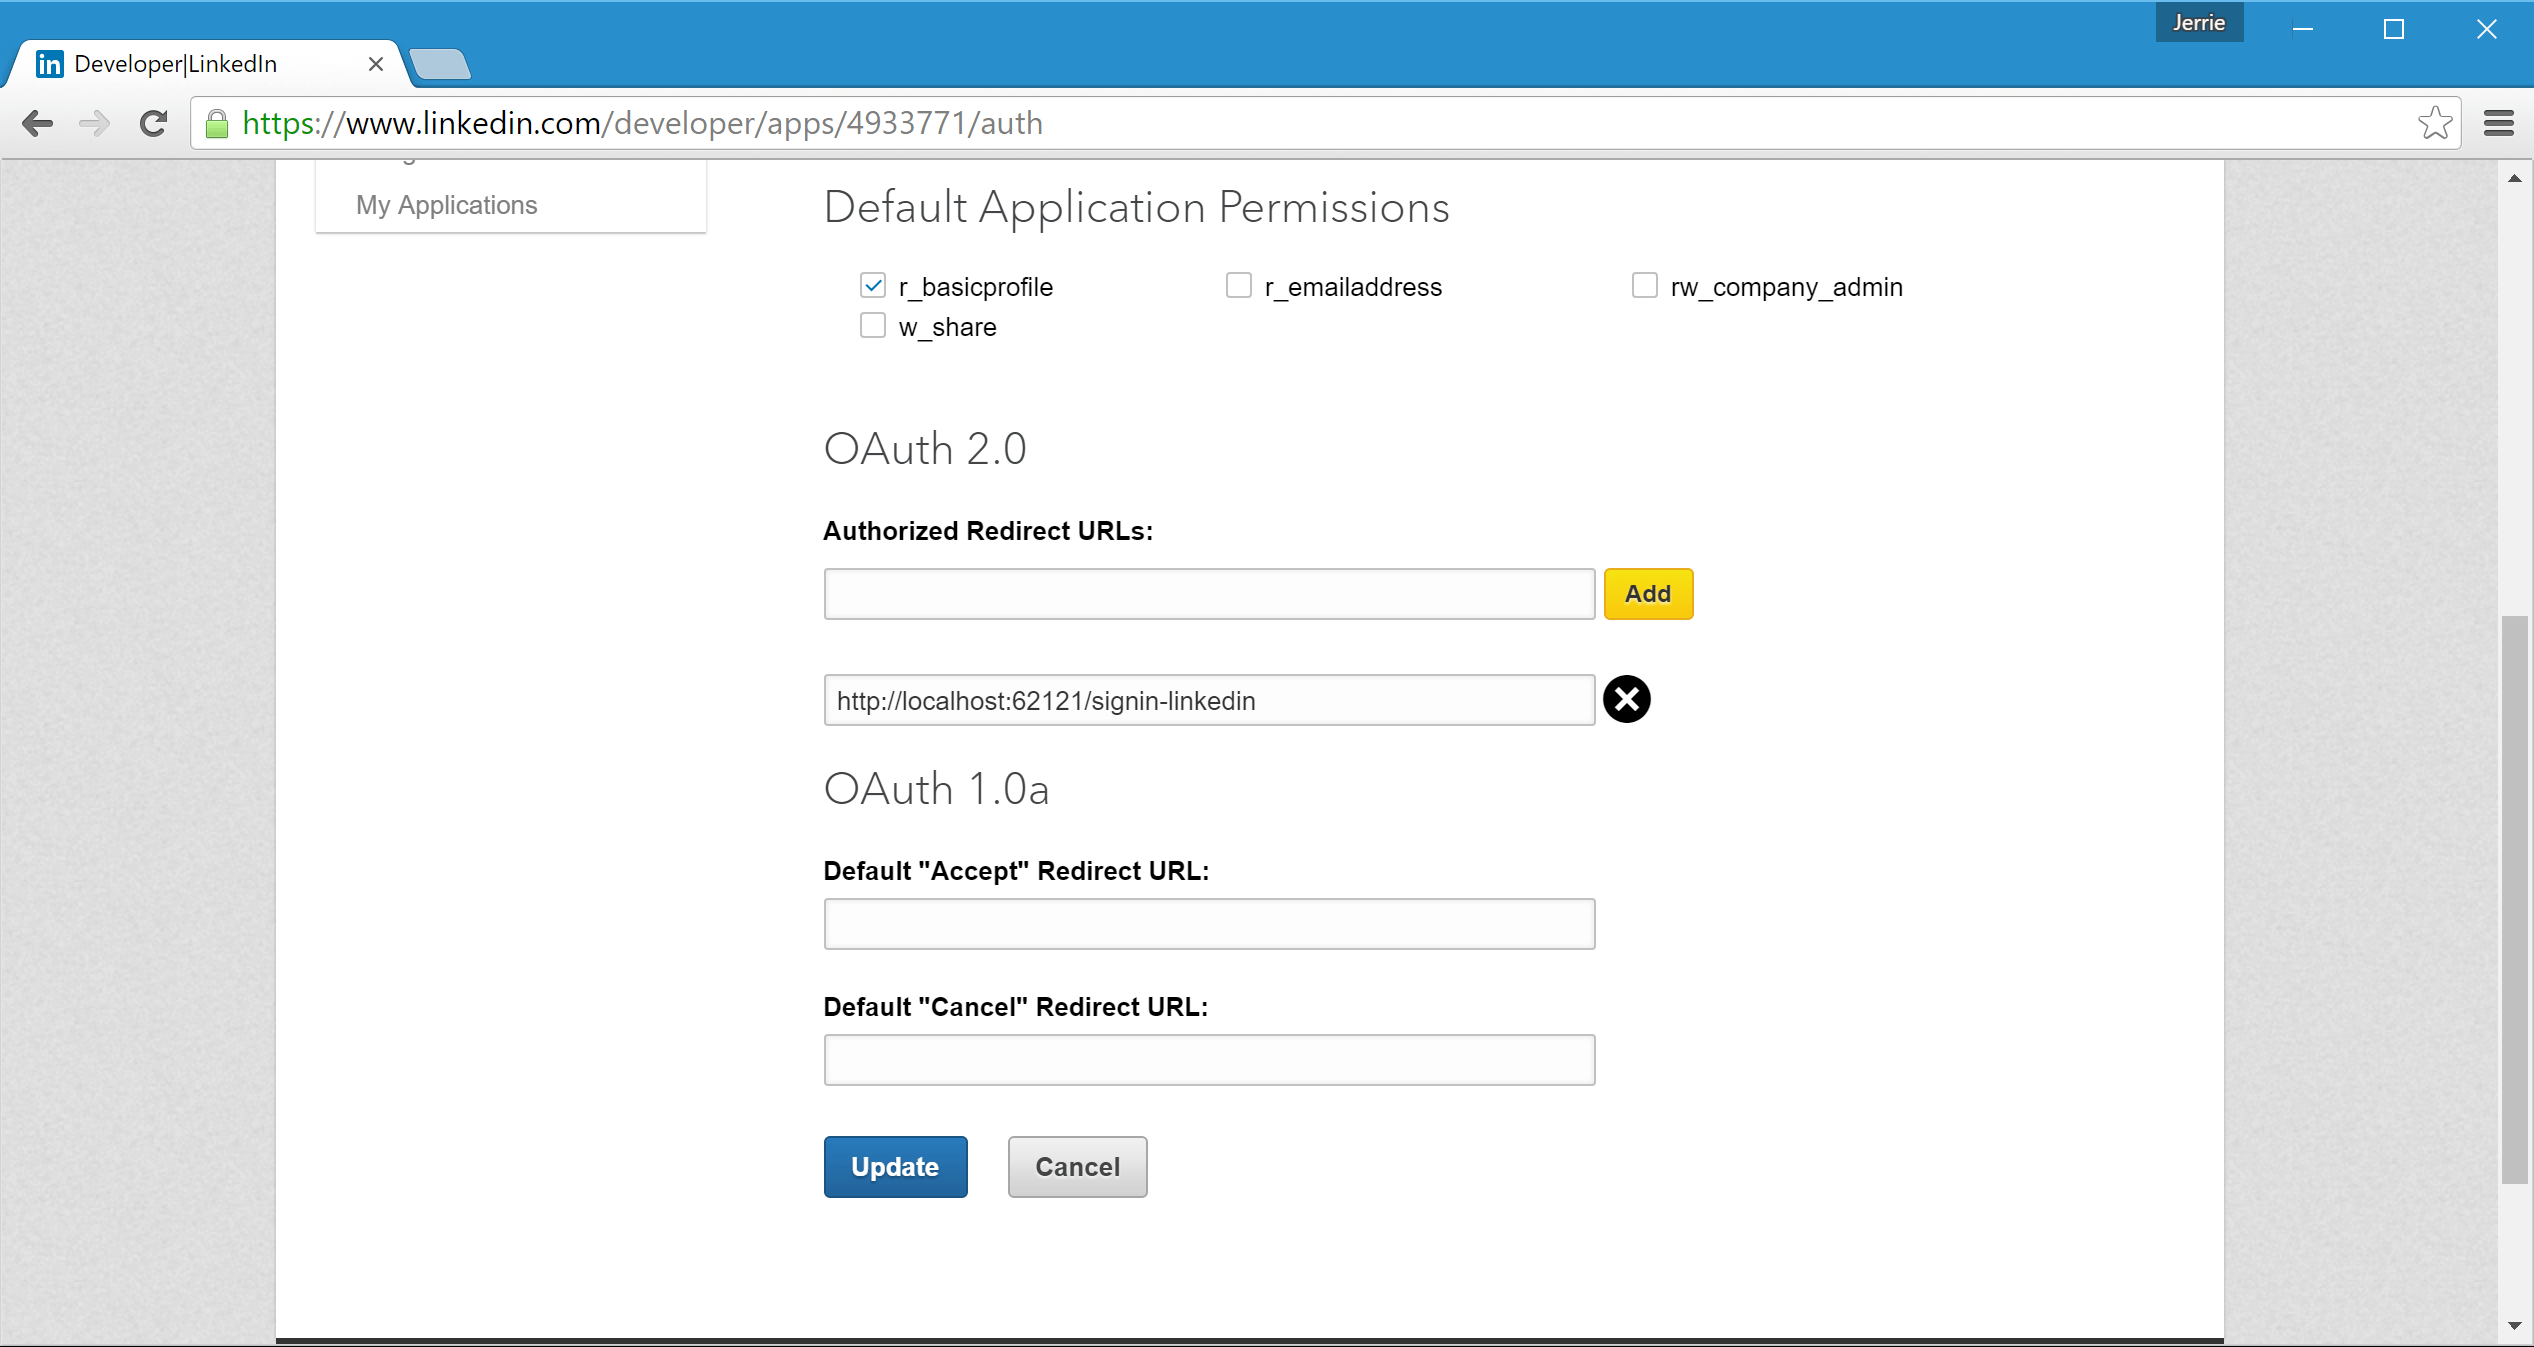
The final thing you need to do on the LinkedIn side is to register the Redirect URL for our application. For this you will need your application's URL, so head over to Visual Studio again, open your application's Properties and go to the Debug tab. Copy the value for the App URL:

Now head over to LinkedIn again and under Authorized Redirect URLs add the URL for your application with the path /signin-linkedin appended to it, and then make sure to click on the Update button to save the settings:
Register the authentication middleware
In your ASP.NET application you will need to register the authentication middleware. First though, you need to add the correct NuGet packages, so open your project.json file and add the following dependencies:
- Microsoft.AspNetCore.Authentication.Cookies
- Microsoft.AspNetCore.Authentication.OAuth
Your project.json file should not look something like this:
{
  "dependencies": {
    "Microsoft.NETCore.App": {
      "version": "1.0.0-rc2-3002702",
      "type": "platform"
    },
    "Microsoft.AspNetCore.Diagnostics": "1.0.0-rc2-final",
    "Microsoft.AspNetCore.Mvc": "1.0.0-rc2-final",
    "Microsoft.AspNetCore.Razor.Tools": {
      "version": "1.0.0-preview1-final",
      "type": "build"
    },
    "Microsoft.AspNetCore.Server.IISIntegration": "1.0.0-rc2-final",
    "Microsoft.AspNetCore.Server.Kestrel": "1.0.0-rc2-final",
    "Microsoft.AspNetCore.StaticFiles": "1.0.0-rc2-final",
    "Microsoft.Extensions.Configuration.EnvironmentVariables": "1.0.0-rc2-final",
    "Microsoft.Extensions.Configuration.Json": "1.0.0-rc2-final",
    "Microsoft.Extensions.Logging": "1.0.0-rc2-final",
    "Microsoft.Extensions.Logging.Console": "1.0.0-rc2-final",
    "Microsoft.Extensions.Logging.Debug": "1.0.0-rc2-final",
    "Microsoft.VisualStudio.Web.BrowserLink.Loader": "14.0.0-rc2-final",
    "Microsoft.AspNetCore.Authentication.Cookies": "1.0.0-rc2-final",
    "Microsoft.AspNetCore.Authentication.OAuth": "1.0.0-rc2-final"
  },

  // Rest of file omitted for brevity
}
If you are using Visual Studio, the packages will automatically be restored when you save the
project.jsonfile, but if you are not using Visual Studio then remember to rundotnet restoreat this point.
You will need to register the authentication services with the Dependency Injection, so in the ConfigureServices method of your Startup class, add the call to the AddAuthentication extension method:
public void ConfigureServices(IServiceCollection services)
{
    // Add authentication services
    services.AddAuthentication(
        options => options.SignInScheme = CookieAuthenticationDefaults.AuthenticationScheme);

    // Add framework services.
    services.AddMvc();
}
You will also need to register the Cookie and OAuth middleware, so in the Configure method of your Startup class add the following code:
// Add the cookie middleware
app.UseCookieAuthentication(new CookieAuthenticationOptions
{
    AutomaticAuthenticate = true,
    AutomaticChallenge = true,
    LoginPath = new PathString("/login"),
    LogoutPath = new PathString("/logout")
});

// Add the OAuth2 middleware
app.UseOAuthAuthentication(new OAuthOptions
{
    AuthenticationScheme = "LinkedIn",

    ClientId = Configuration["linkedin:clientId"],
    ClientSecret = Configuration["linkedin:clientSecret"],

    CallbackPath = new PathString("/signin-linkedin"),

    AuthorizationEndpoint = "https://www.linkedin.com/oauth/v2/authorization",
    TokenEndpoint = "https://www.linkedin.com/oauth/v2/accessToken",
    UserInformationEndpoint = "https://api.linkedin.com/v1/people/~:(id,formatted-name,email-address,picture-url)",

    Scope = { "r_basicprofile", "r_emailaddress" },
});
For the OAuth middleware options, we set the AuthenticationScheme to LinkedIn. The ClientId and ClientSecret is obtained from the Configuration. The CallbackPath is set to /signin-linkedin and this correlates with the value we registered in LinkedIn as an Authorized Redirect URL.
The correct values for AuthorizationEndpoint and TokenEndpoint was obtained from the LinkedIn OAuth documentation. To obtain the user's profile information we configure the UserInformationEndpoint property to point to the /v1/people/~ endpoint which will return the details for the authenticated user. We also limit the fields we will return from LinkedIn to the ID, Formatted Name, Email Address and Picture URL. For more information on the available fields you can refer to the Basic Profile Fields documentation on LinkedIn.
Lastly we configure the Scope to request access to the user's basic profile information and email address.
Adding the Login and Logout routes
At this point we have configured the OAuth middleware, but we have nothing which is going to invoke it. In order to invoke it we will need to Challenge the OAuth middleware. Once again, in the Configure of your Startup class, after the registration of the Cookie and OAuth middleware, add middleware which will listen for the /login and /logout routes:
// Listen for requests on the /login path, and issue a challenge to log in with the LinkedIn middleware
app.Map("/login", builder =>
{
    builder.Run(async context =>
    {
        // Return a challenge to invoke the LinkedIn authentication scheme
        await context.Authentication.ChallengeAsync("LinkedIn", properties: new AuthenticationProperties() { RedirectUri = "/" });
    });
});

// Listen for requests on the /logout path, and sign the user out
app.Map("/logout", builder =>
{
    builder.Run(async context =>
    {
        // Sign the user out of the authentication middleware (i.e. it will clear the Auth cookie)
        await context.Authentication.SignOutAsync(CookieAuthenticationDefaults.AuthenticationScheme);

        // Redirect the user to the home page after signing out
        context.Response.Redirect("/");
    });
});
When a request is made to the /login route, the LinkedIn authentication scheme will be challenged, which will invoke the OAuth2 middleware and redirect the user to the LinkedIn website to authenticate themselves.
For the /logout route we simply sign the user out of the Cookie middleware, which effectively signs them out of the application.
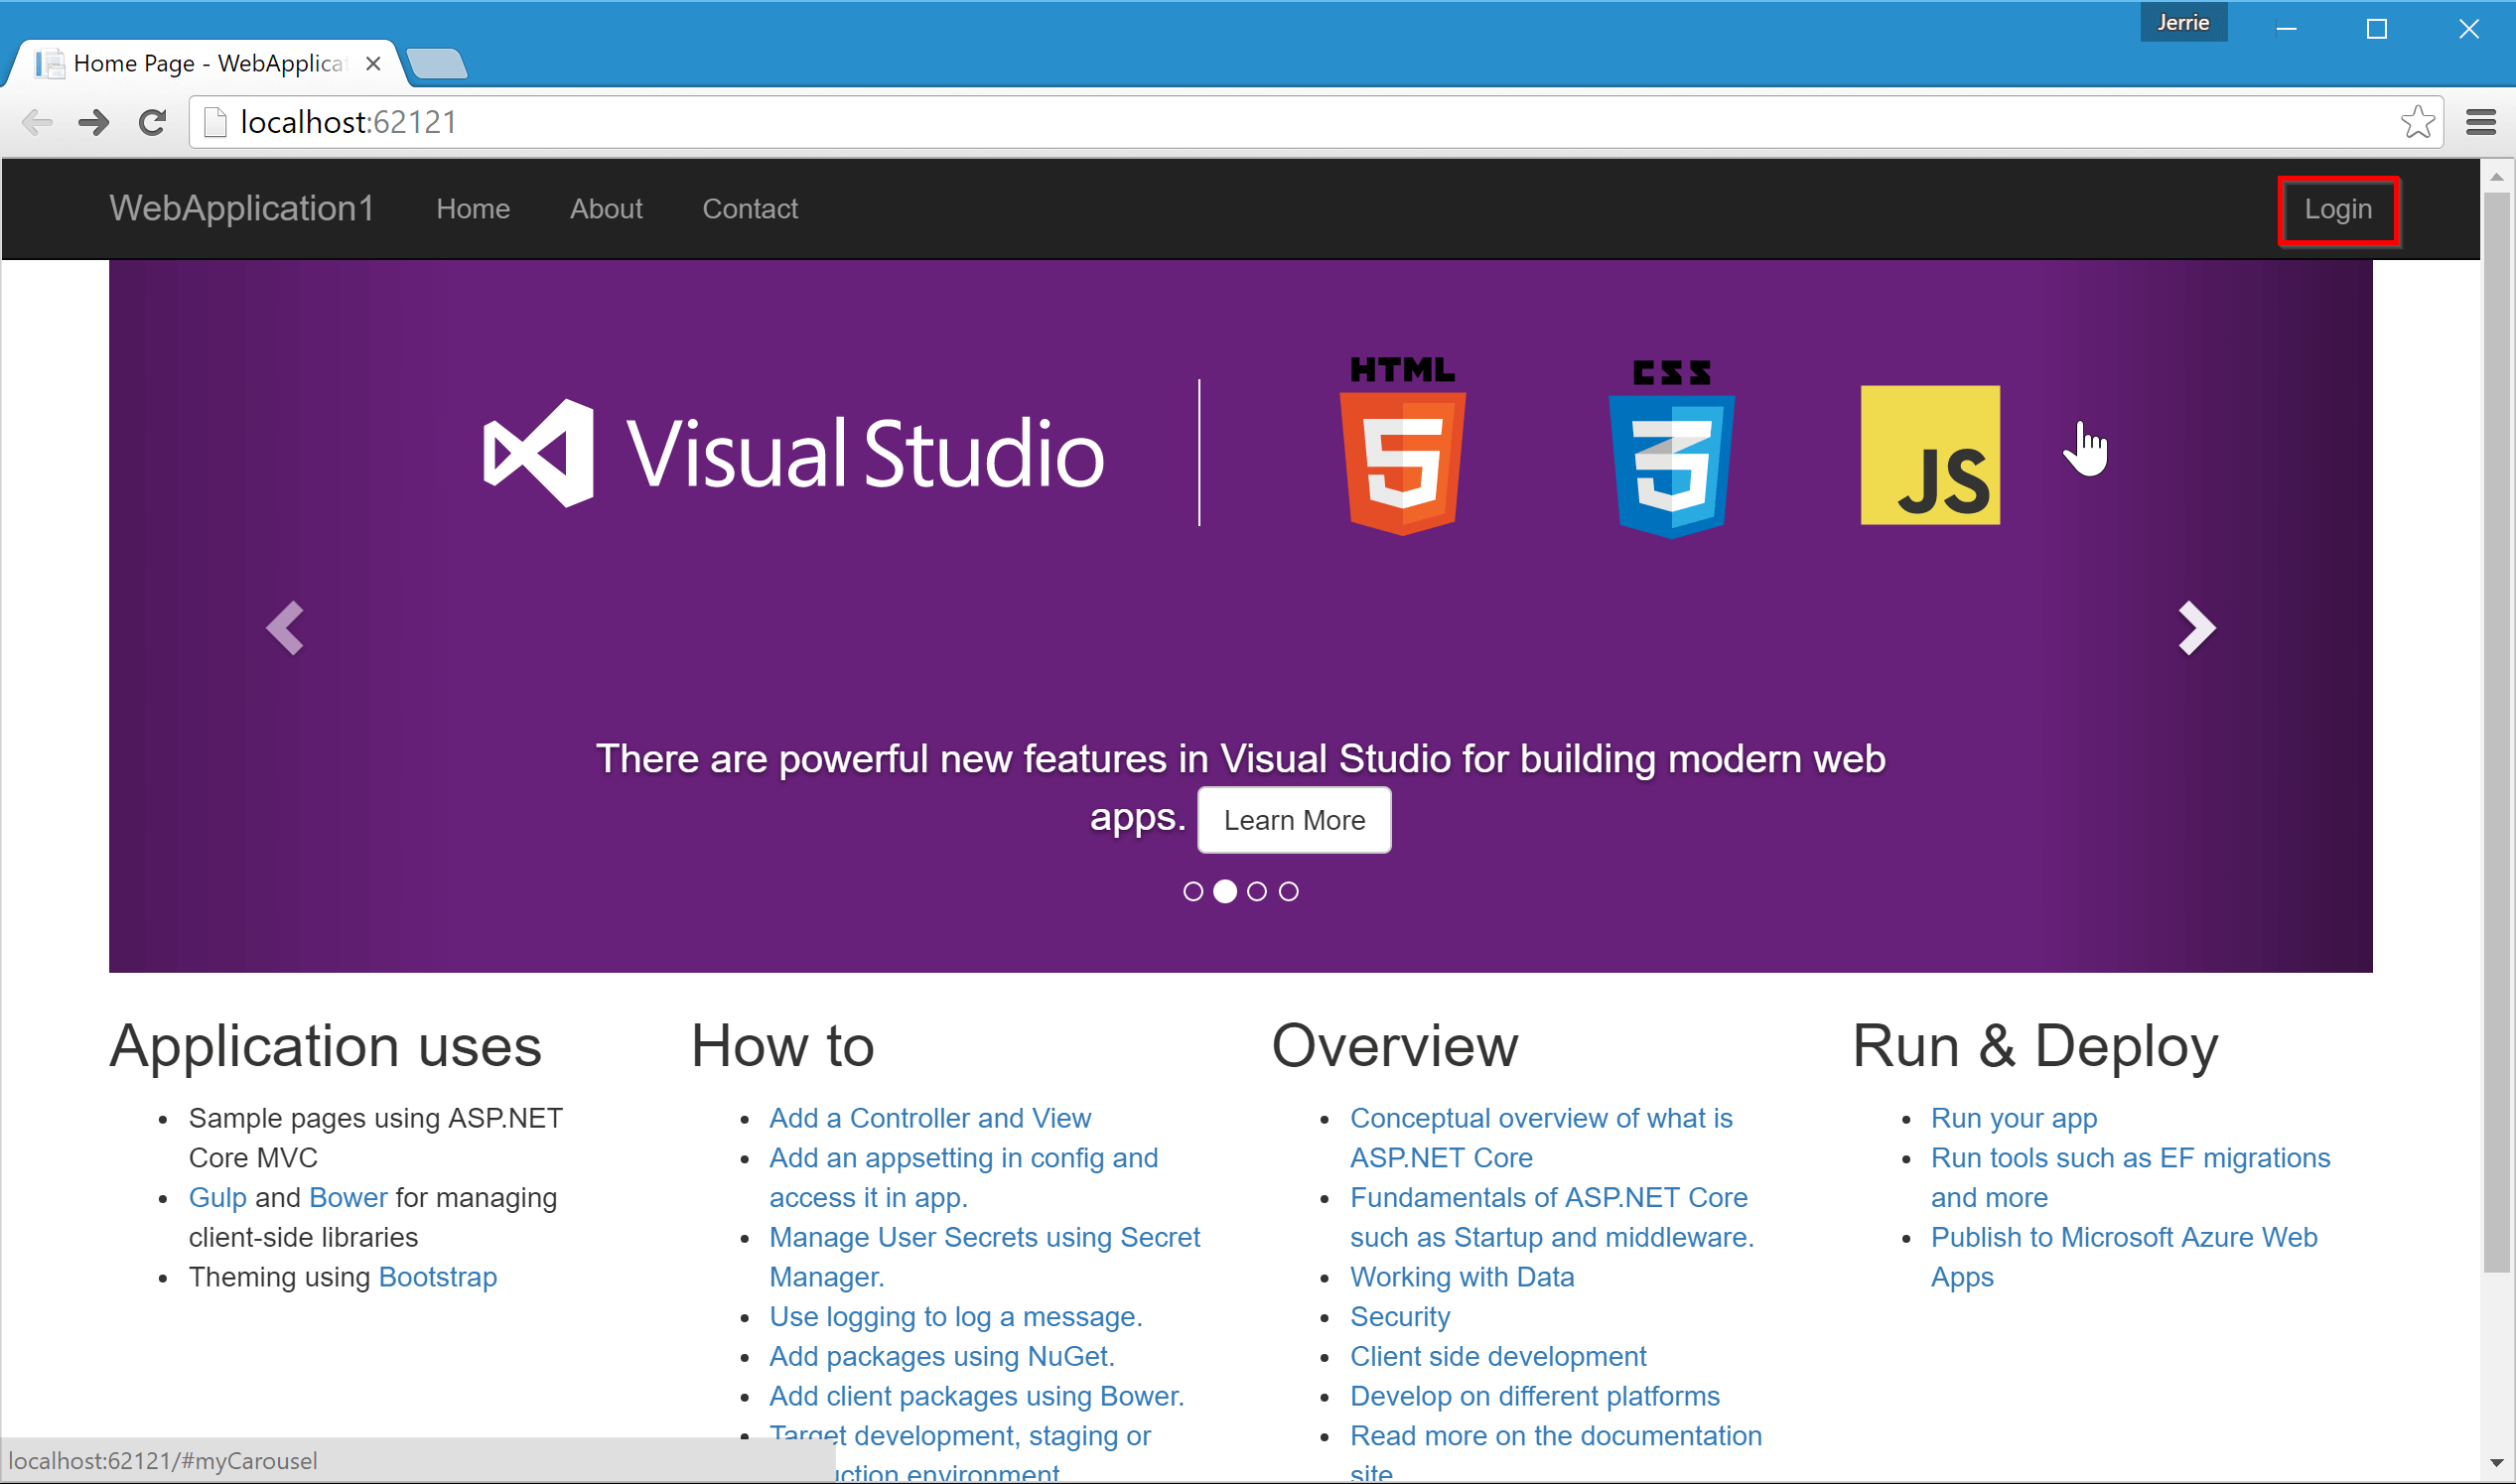
One final thing we want to do is to add a Login button on the website, so open the /Views/Shared/_Layout.cshtml file and in the nav bar section add some logic which check if the user is authenticated and then send them either to the /logout or the /login route.
Also, if the user is actually authenticated we will display a greeting that will display the string "Hello [user name]". Clicking on this link will take the user to a profile page which we will develop later in this blog post.
<div class="navbar-collapse collapse">
    <ul class="nav navbar-nav">
        <li><a asp-controller="Home" asp-action="Index">Home</a></li>
        <li><a asp-controller="Home" asp-action="About">About</a></li>
        <li><a asp-controller="Home" asp-action="Contact">Contact</a></li>
    </ul>
    <ul class="nav navbar-nav navbar-right">
        @if (User.Identity.IsAuthenticated)
        {
            <li><a asp-controller="Home" asp-action="UserProfile">Hello @User.Identity.Name!</a></li>
            <li><a href="~/logout">Logout</a></li>
        }
        else
        {
            <li><a href="~/login">Login</a></li>
        }
    </ul>
</div>
Running the application
We can now run the application. After the application starts up, click on the Login link in the top right:
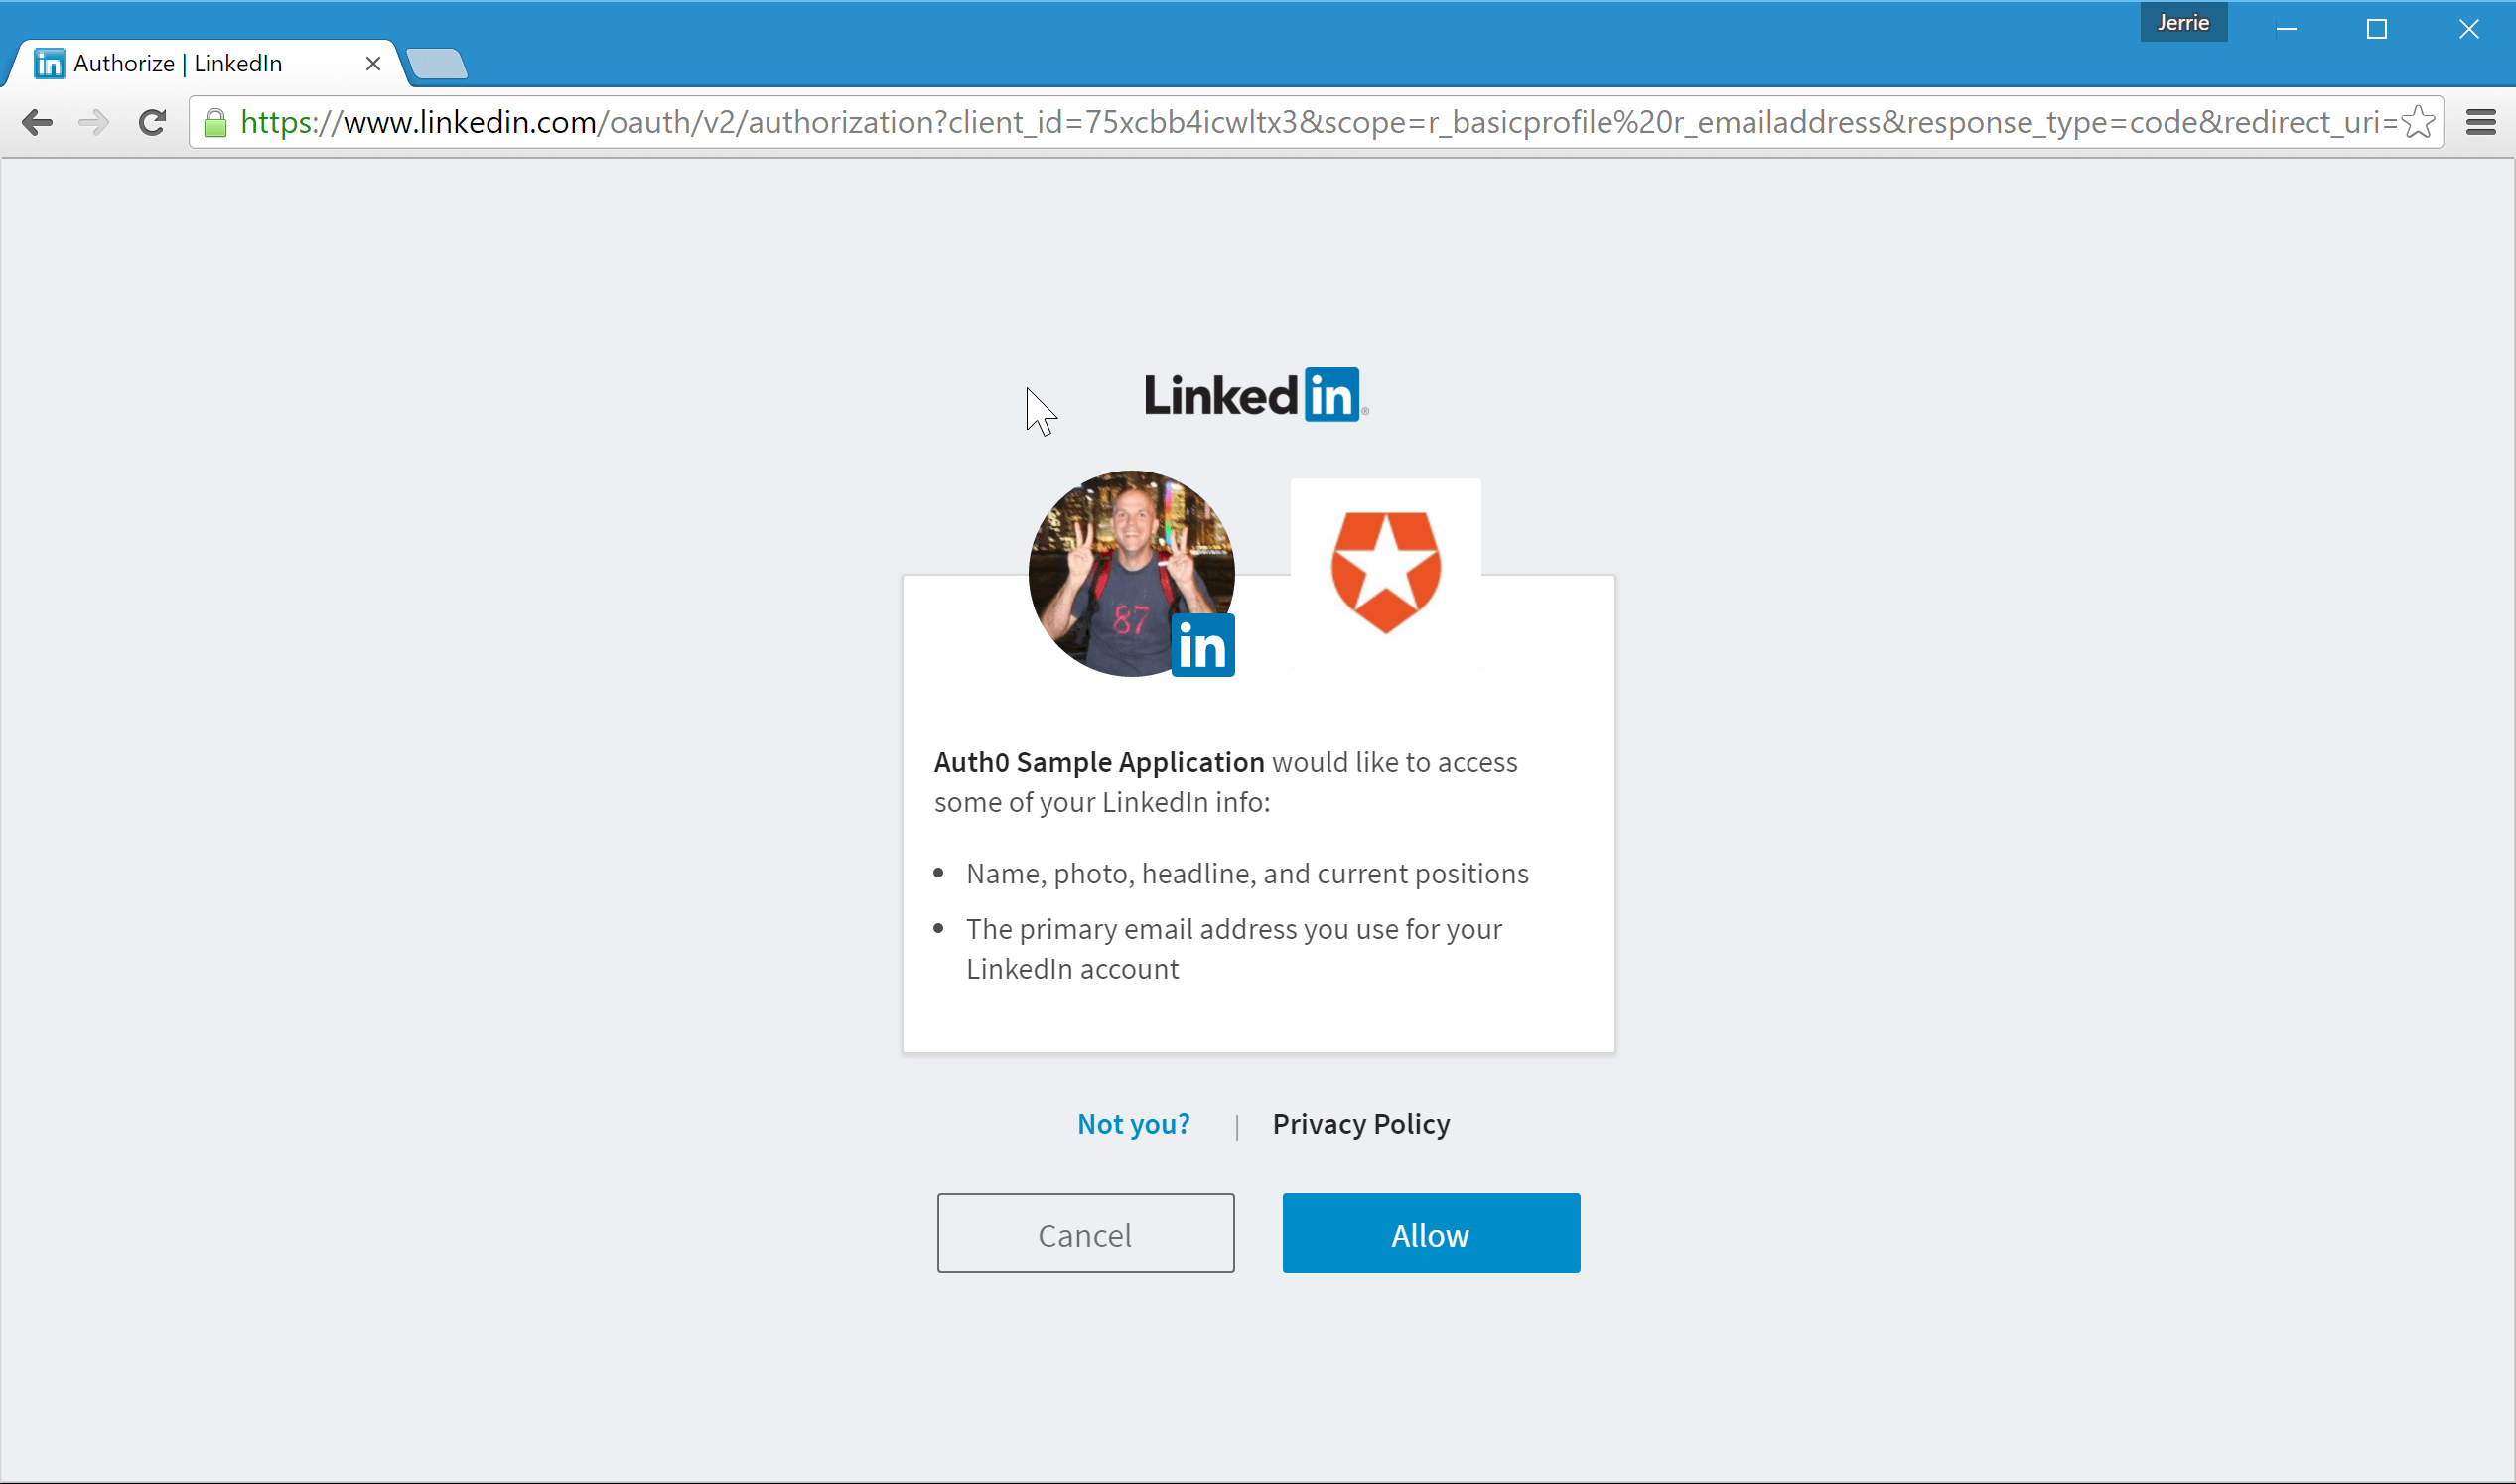
This will take you to the LinkedIn website where you will be prompted to sign in if you are not already signed in to LinkedIn, and then give the application access to your basic information and email address. Click on the Allow button:
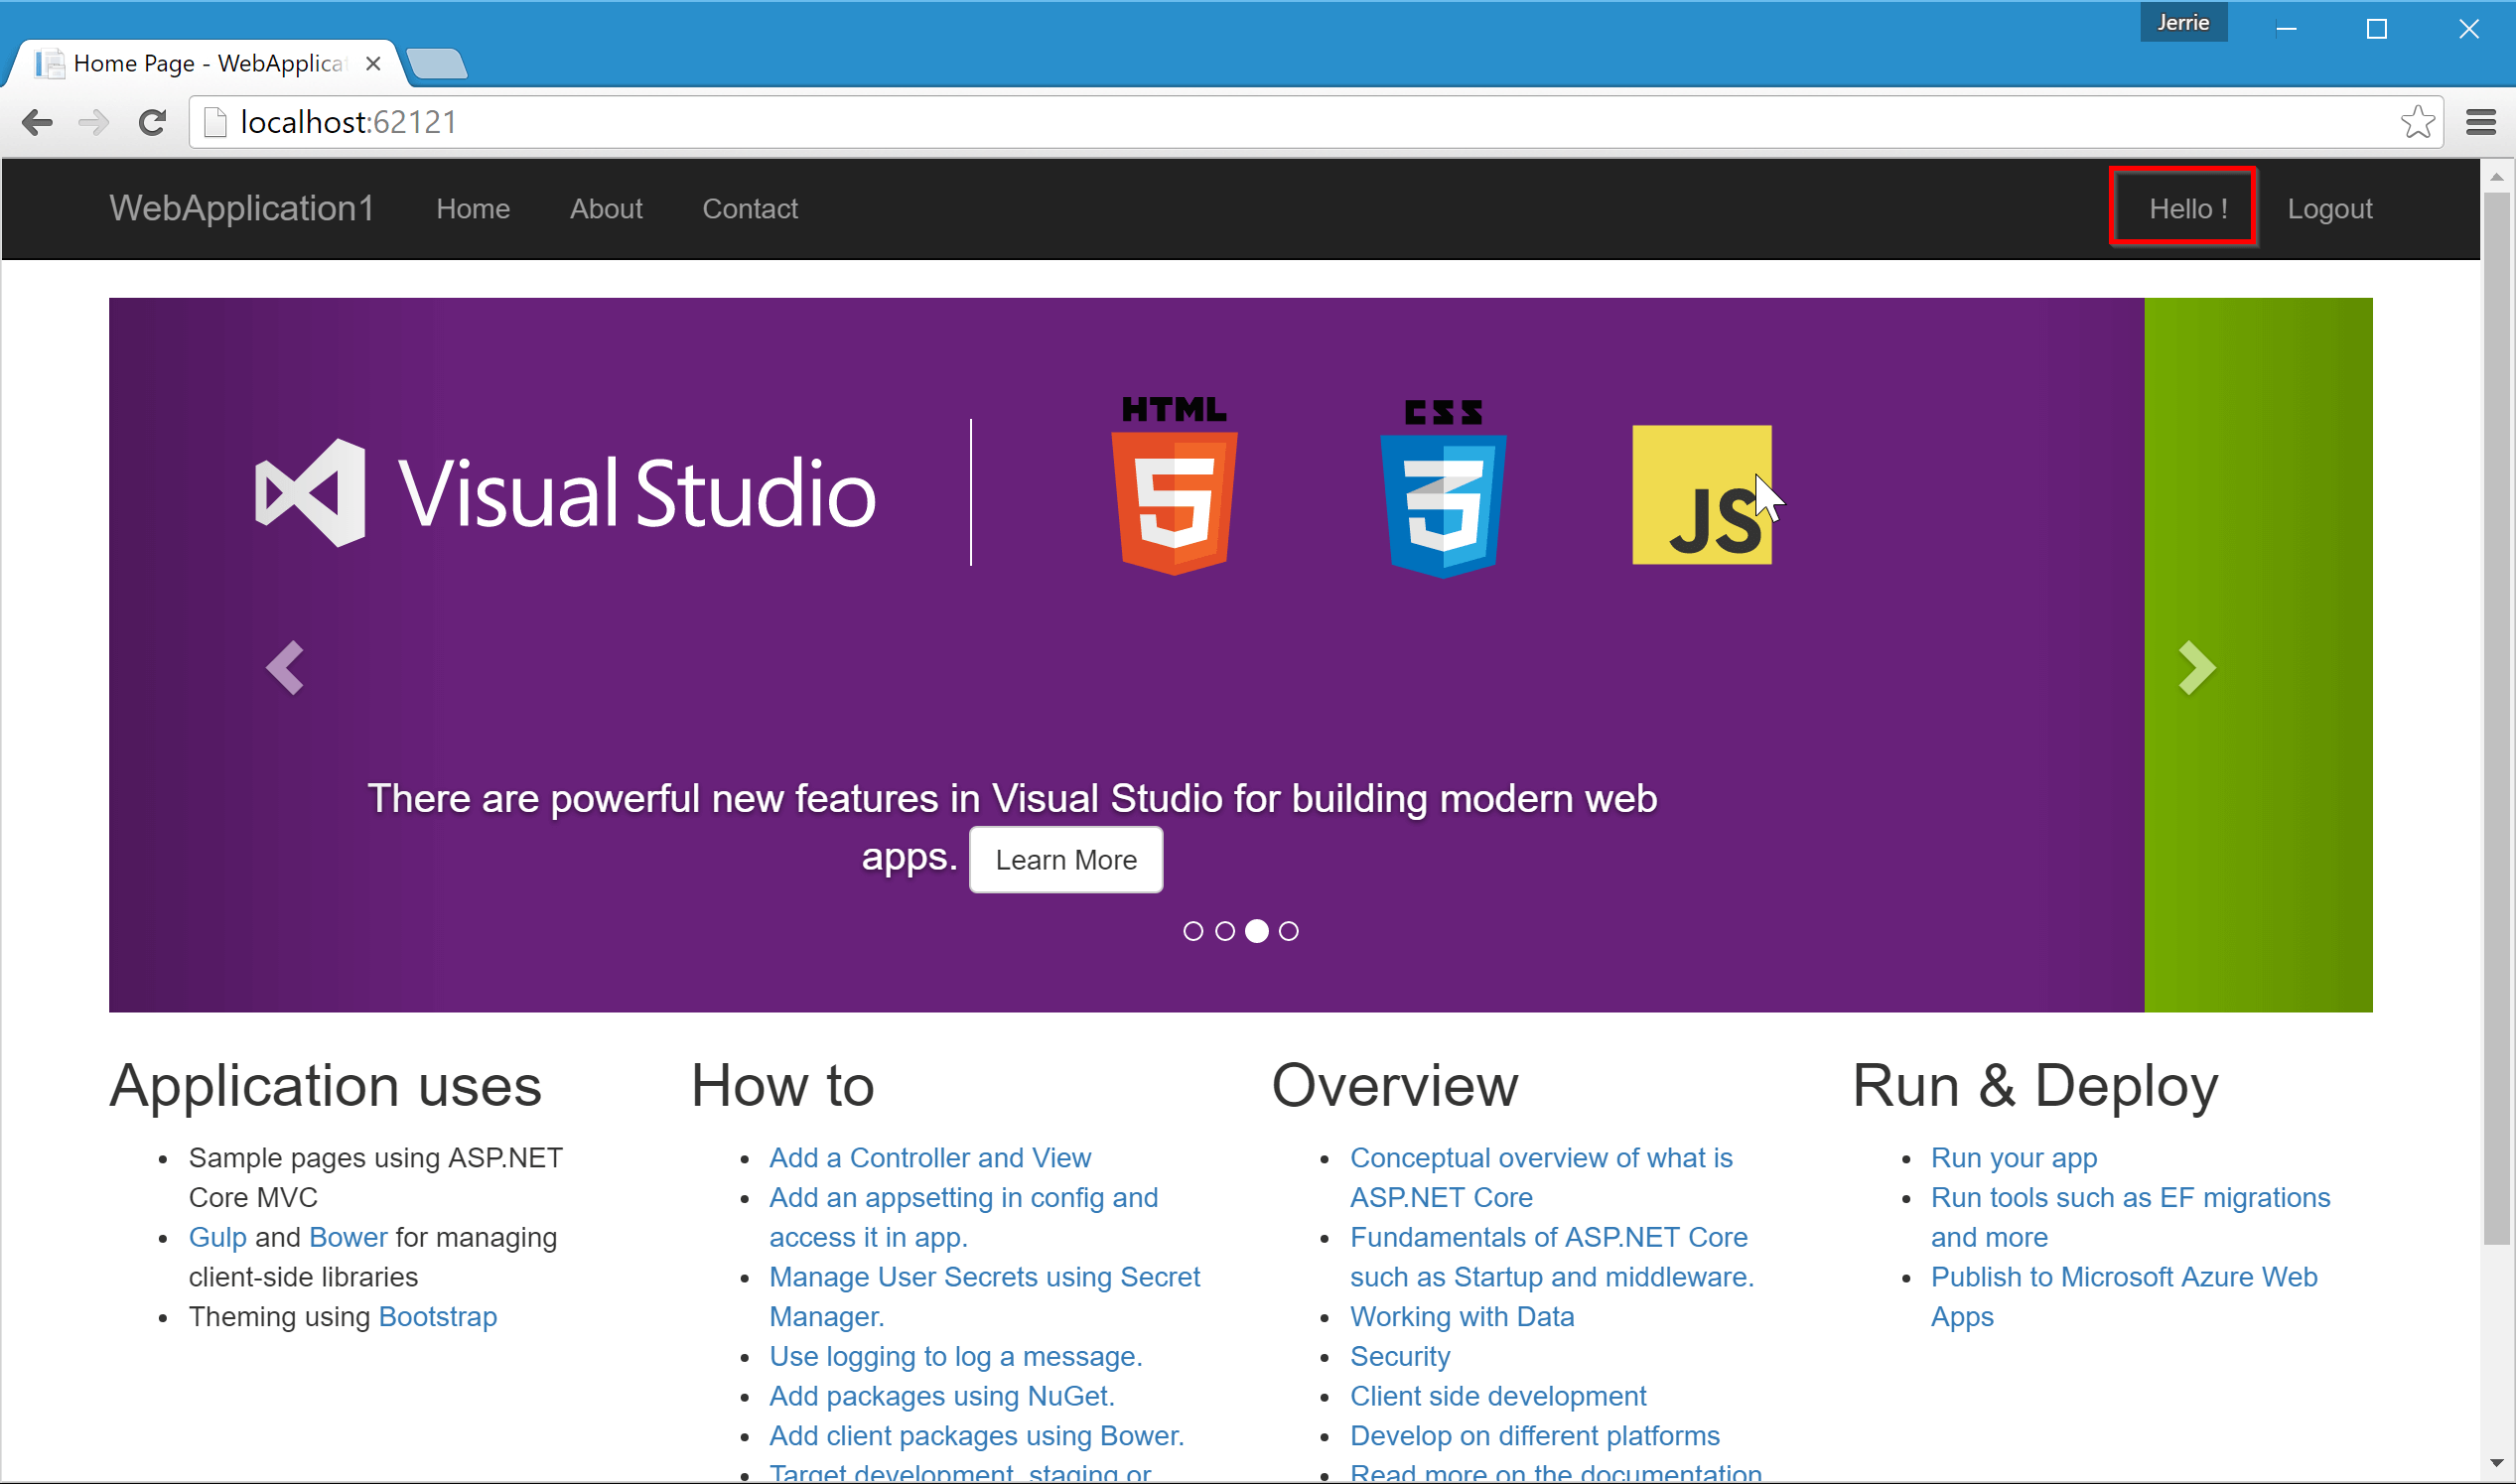
You will be redirected back to your ASP.NET application where you will see that you are signed in:
Retrieving the User Information
Notice however that the website does not display your actual name. The reason for this is that the OAuth middleware does not actually retrieve the user's information from the UserInformationEndpoint. Because each service returns a unique payload for the user information endpoint, there is no way in which a generic mechanism could be developed for this, so you will have to write the code to retrieve the user's information and set the correct claims.
The OAuthOptions class contains an Events property which will allow us to subscribe to certain events during the OAuth authentication process. The specific event we are interested in is the OnCreatingTicket event which will be raised as the middleware is creating the authentication ticket. At this point we need to make the call to the UserInformationEndpoint and set the relevant claims.
So head back to your Startup class and change the OAuth middleware registration code as follows:
// Add the OAuth2 middleware
app.UseOAuthAuthentication(new OAuthOptions
{
    // We need to specify an Authentication Scheme
    AuthenticationScheme = "LinkedIn",

    // Configure the LinkedIn Client ID and Client Secret
    ClientId = Configuration["linkedin:clientId"],
    ClientSecret = Configuration["linkedin:clientSecret"],

    // Set the callback path, so LinkedIn will call back to http://APP_URL/signin-linkedin
    // Also ensure that you have added the URL as an Authorized Redirect URL in your LinkedIn application
    CallbackPath = new PathString("/signin-linkedin"),

    // Configure the LinkedIn endpoints
    AuthorizationEndpoint = "https://www.linkedin.com/oauth/v2/authorization",
    TokenEndpoint = "https://www.linkedin.com/oauth/v2/accessToken",
    UserInformationEndpoint = "https://api.linkedin.com/v1/people/~:(id,formatted-name,email-address,picture-url)",

    Scope = { "r_basicprofile", "r_emailaddress" },

    Events = new OAuthEvents
    {
        // The OnCreatingTicket event is called after the user has been authenticated and the OAuth middleware has
        // created an auth ticket. We need to manually call the UserInformationEndpoint to retrieve the user's information,
        // parse the resulting JSON to extract the relevant information, and add the correct claims.
        OnCreatingTicket = async context =>
        {
            // Retrieve user info
            var request = new HttpRequestMessage(HttpMethod.Get, context.Options.UserInformationEndpoint);
            request.Headers.Authorization = new AuthenticationHeaderValue("Bearer", context.AccessToken);
            request.Headers.Add("x-li-format", "json"); // Tell LinkedIn we want the result in JSON, otherwise it will return XML

            var response = await context.Backchannel.SendAsync(request, context.HttpContext.RequestAborted);
            response.EnsureSuccessStatusCode();

            // Extract the user info object
            var user = JObject.Parse(await response.Content.ReadAsStringAsync());

            // Add the Name Identifier claim
            var userId = user.Value<string>("id");
            if (!string.IsNullOrEmpty(userId))
            {
                context.Identity.AddClaim(new Claim(ClaimTypes.NameIdentifier, userId, ClaimValueTypes.String, context.Options.ClaimsIssuer));
            }

            // Add the Name claim
            var formattedName = user.Value<string>("formattedName");
            if (!string.IsNullOrEmpty(formattedName))
            {
                context.Identity.AddClaim(new Claim(ClaimTypes.Name, formattedName, ClaimValueTypes.String, context.Options.ClaimsIssuer));
            }

            // Add the email address claim
            var email = user.Value<string>("emailAddress");
            if (!string.IsNullOrEmpty(email))
            {
                context.Identity.AddClaim(new Claim(ClaimTypes.Email, email, ClaimValueTypes.String,
                    context.Options.ClaimsIssuer));
            }

            // Add the Profile Picture claim
            var pictureUrl = user.Value<string>("pictureUrl");
            if (!string.IsNullOrEmpty(email))
            {
                context.Identity.AddClaim(new Claim("profile-picture", pictureUrl, ClaimValueTypes.String,
                    context.Options.ClaimsIssuer));
            }
        }
    }
});
The code above will set some of the standard claims, such as the ClaimTypes.NameIdentifier and the ClaimTypes.Name claims. The latter is the one which is used to display the user's name when you make a call to User.Identity.Name.
Create the User Profile page
The final thing we need to do is to create a User Profile page. All this page will do is to display the claims which is set for the user. In your application you can use this to display a nice profile page based on the user's personal information.
First we will add a UserProfile action to the HomeController:
public class HomeController : Controller
{
    public IActionResult Index()
    {
        return View();
    }

    public IActionResult UserProfile()
    {
        return View();
    }
}
And also add a view called UserProfile.cshtml to the \Views\Home folder:
@{
    ViewData["Title"] = "User Profile";
    int rowNo = 1;
}
<div class="row">
    <div class="col-md-12">
        <h2>@ViewData["Title"].</h2>
        <p>Welcome <strong>@User.Identity.Name</strong>. Here are the claims associated with your account:</p>
        <table class="table">
            <thead>
                <tr>
                    <th colspan="2">
                        Claim
                    </th>
                    <th>
                        Value
                    </th>
                </tr>
            </thead>
            <tbody>
                @foreach (var claim in User.Claims)
                {
                    <tr>
                        <th>@rowNo</th>
                        <td>@claim.Type</td>
                        <td>@claim.Value</td>
                    </tr>
                    rowNo++;
                }
            </tbody>
        </table>
    </div>
</div>
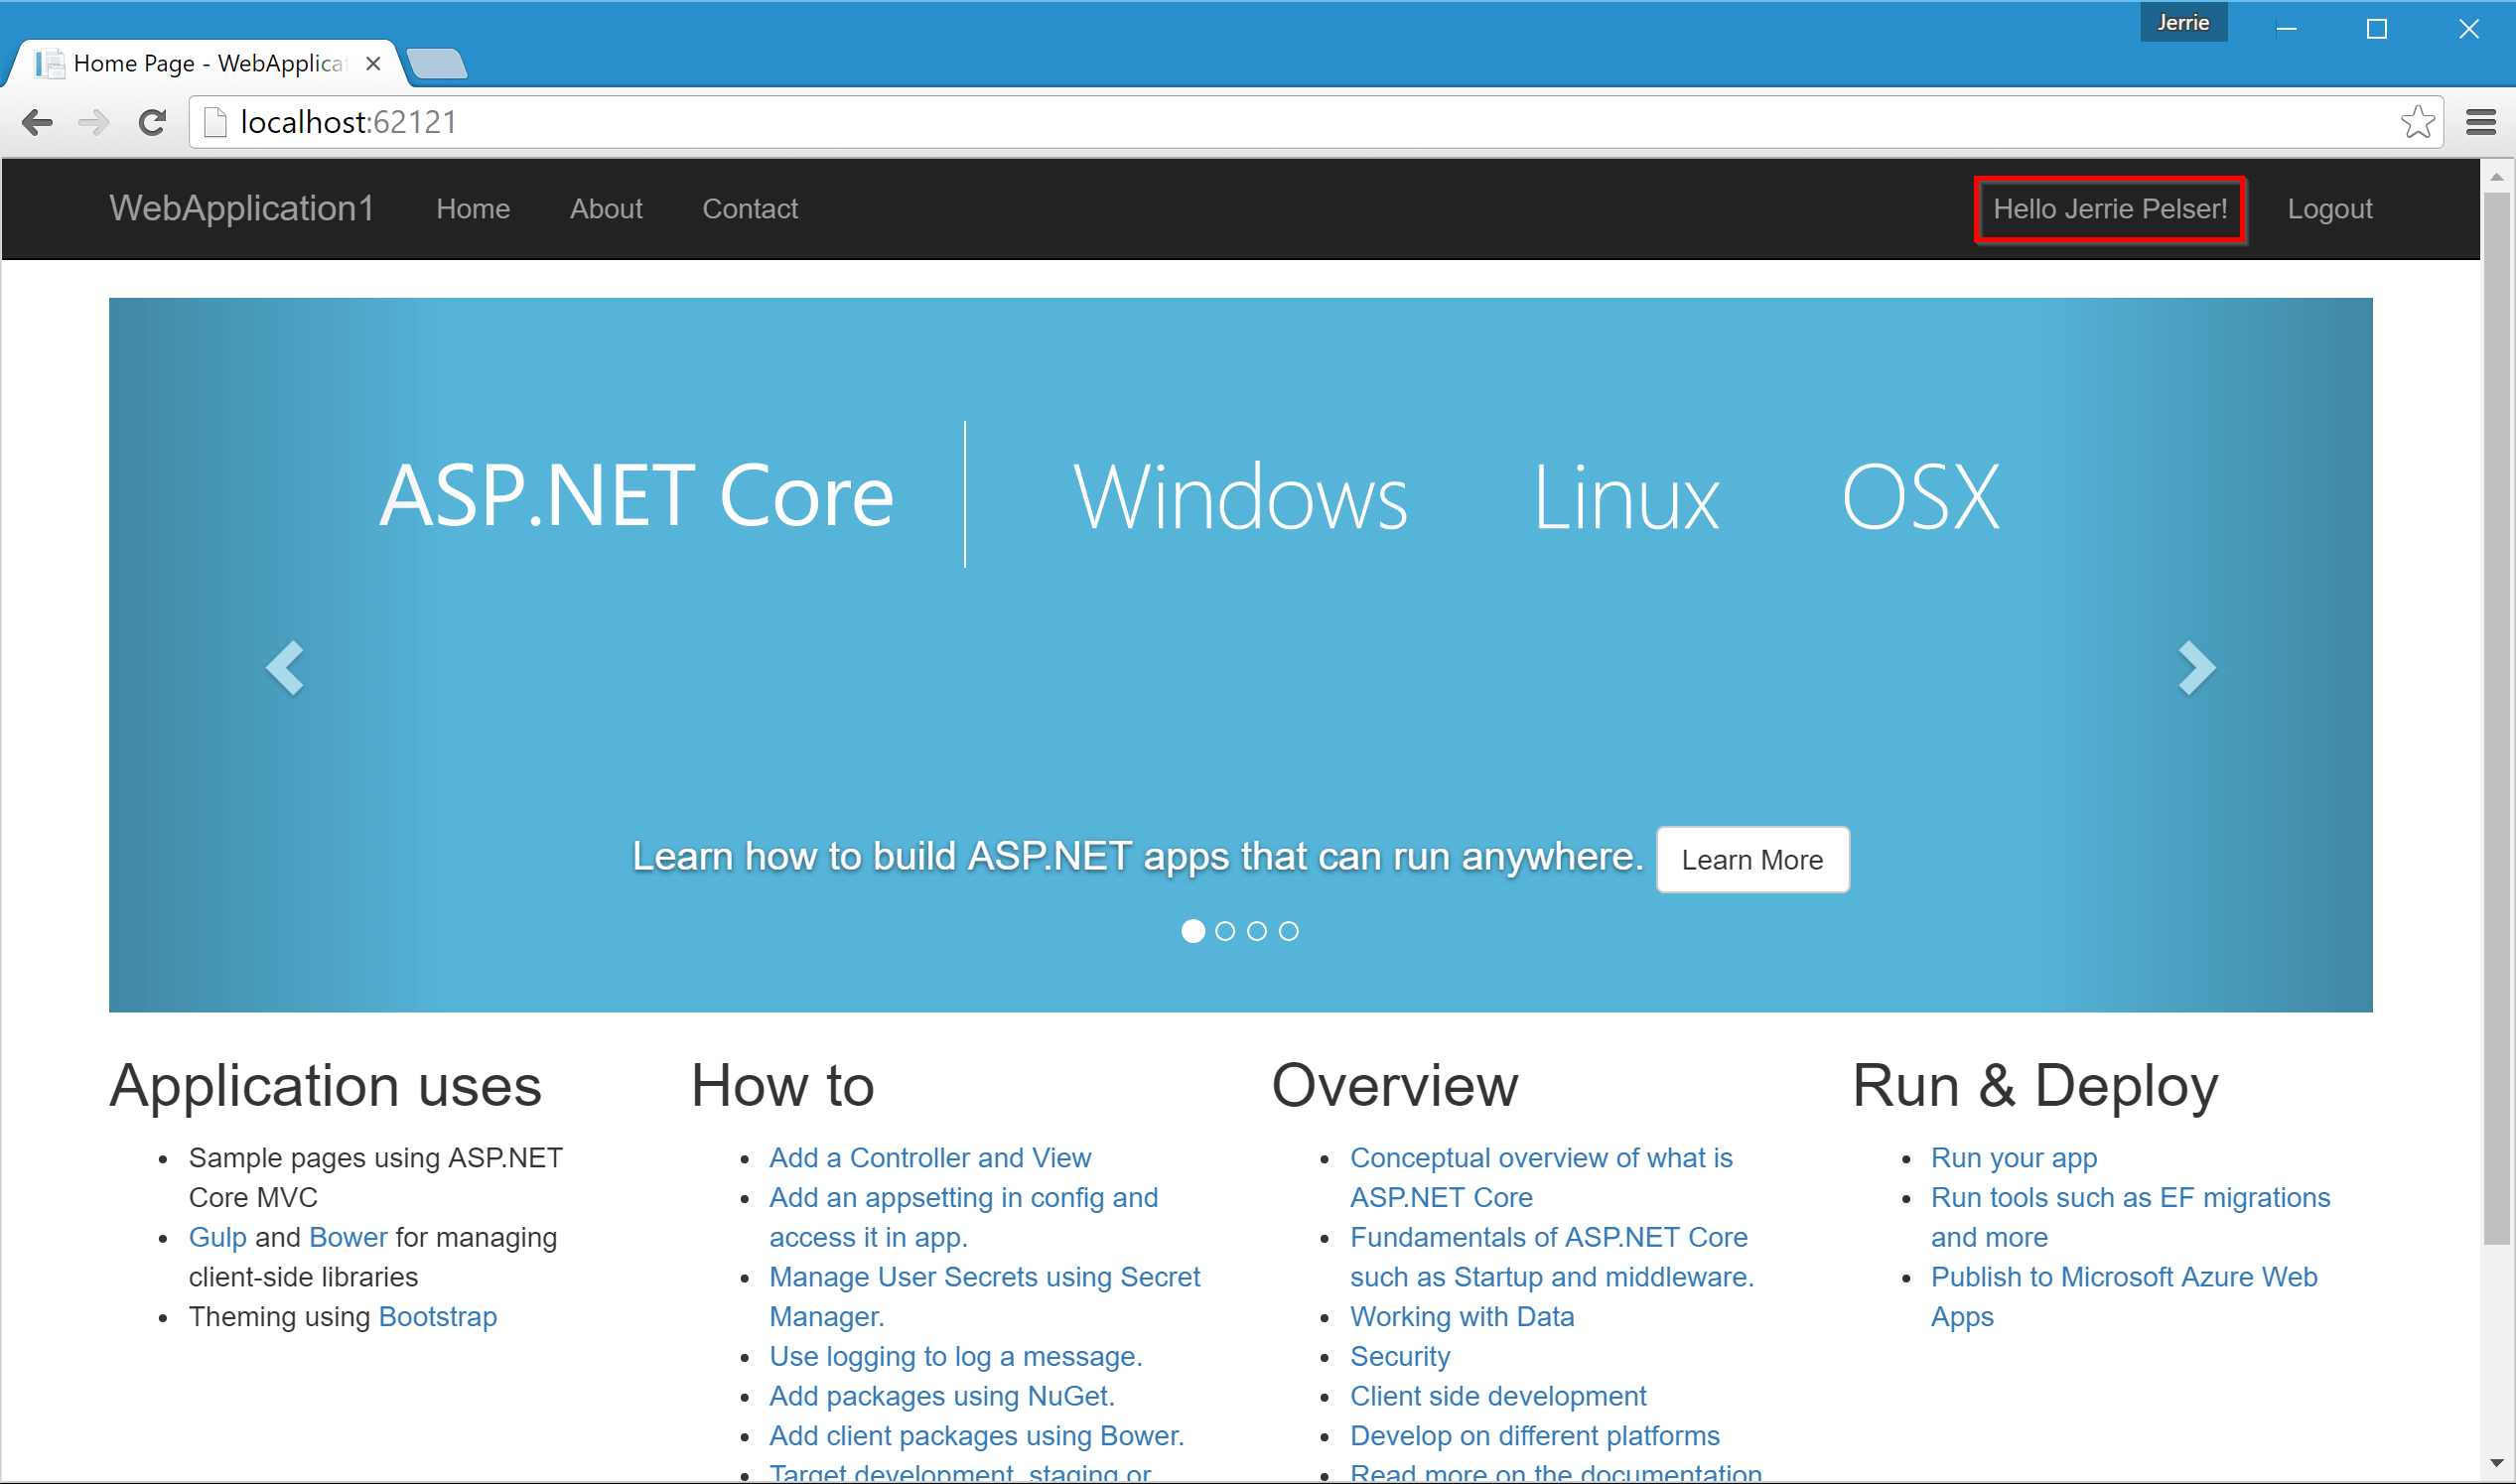
Now when you run the application and you sign in, you will see the user's name displayed correctly:
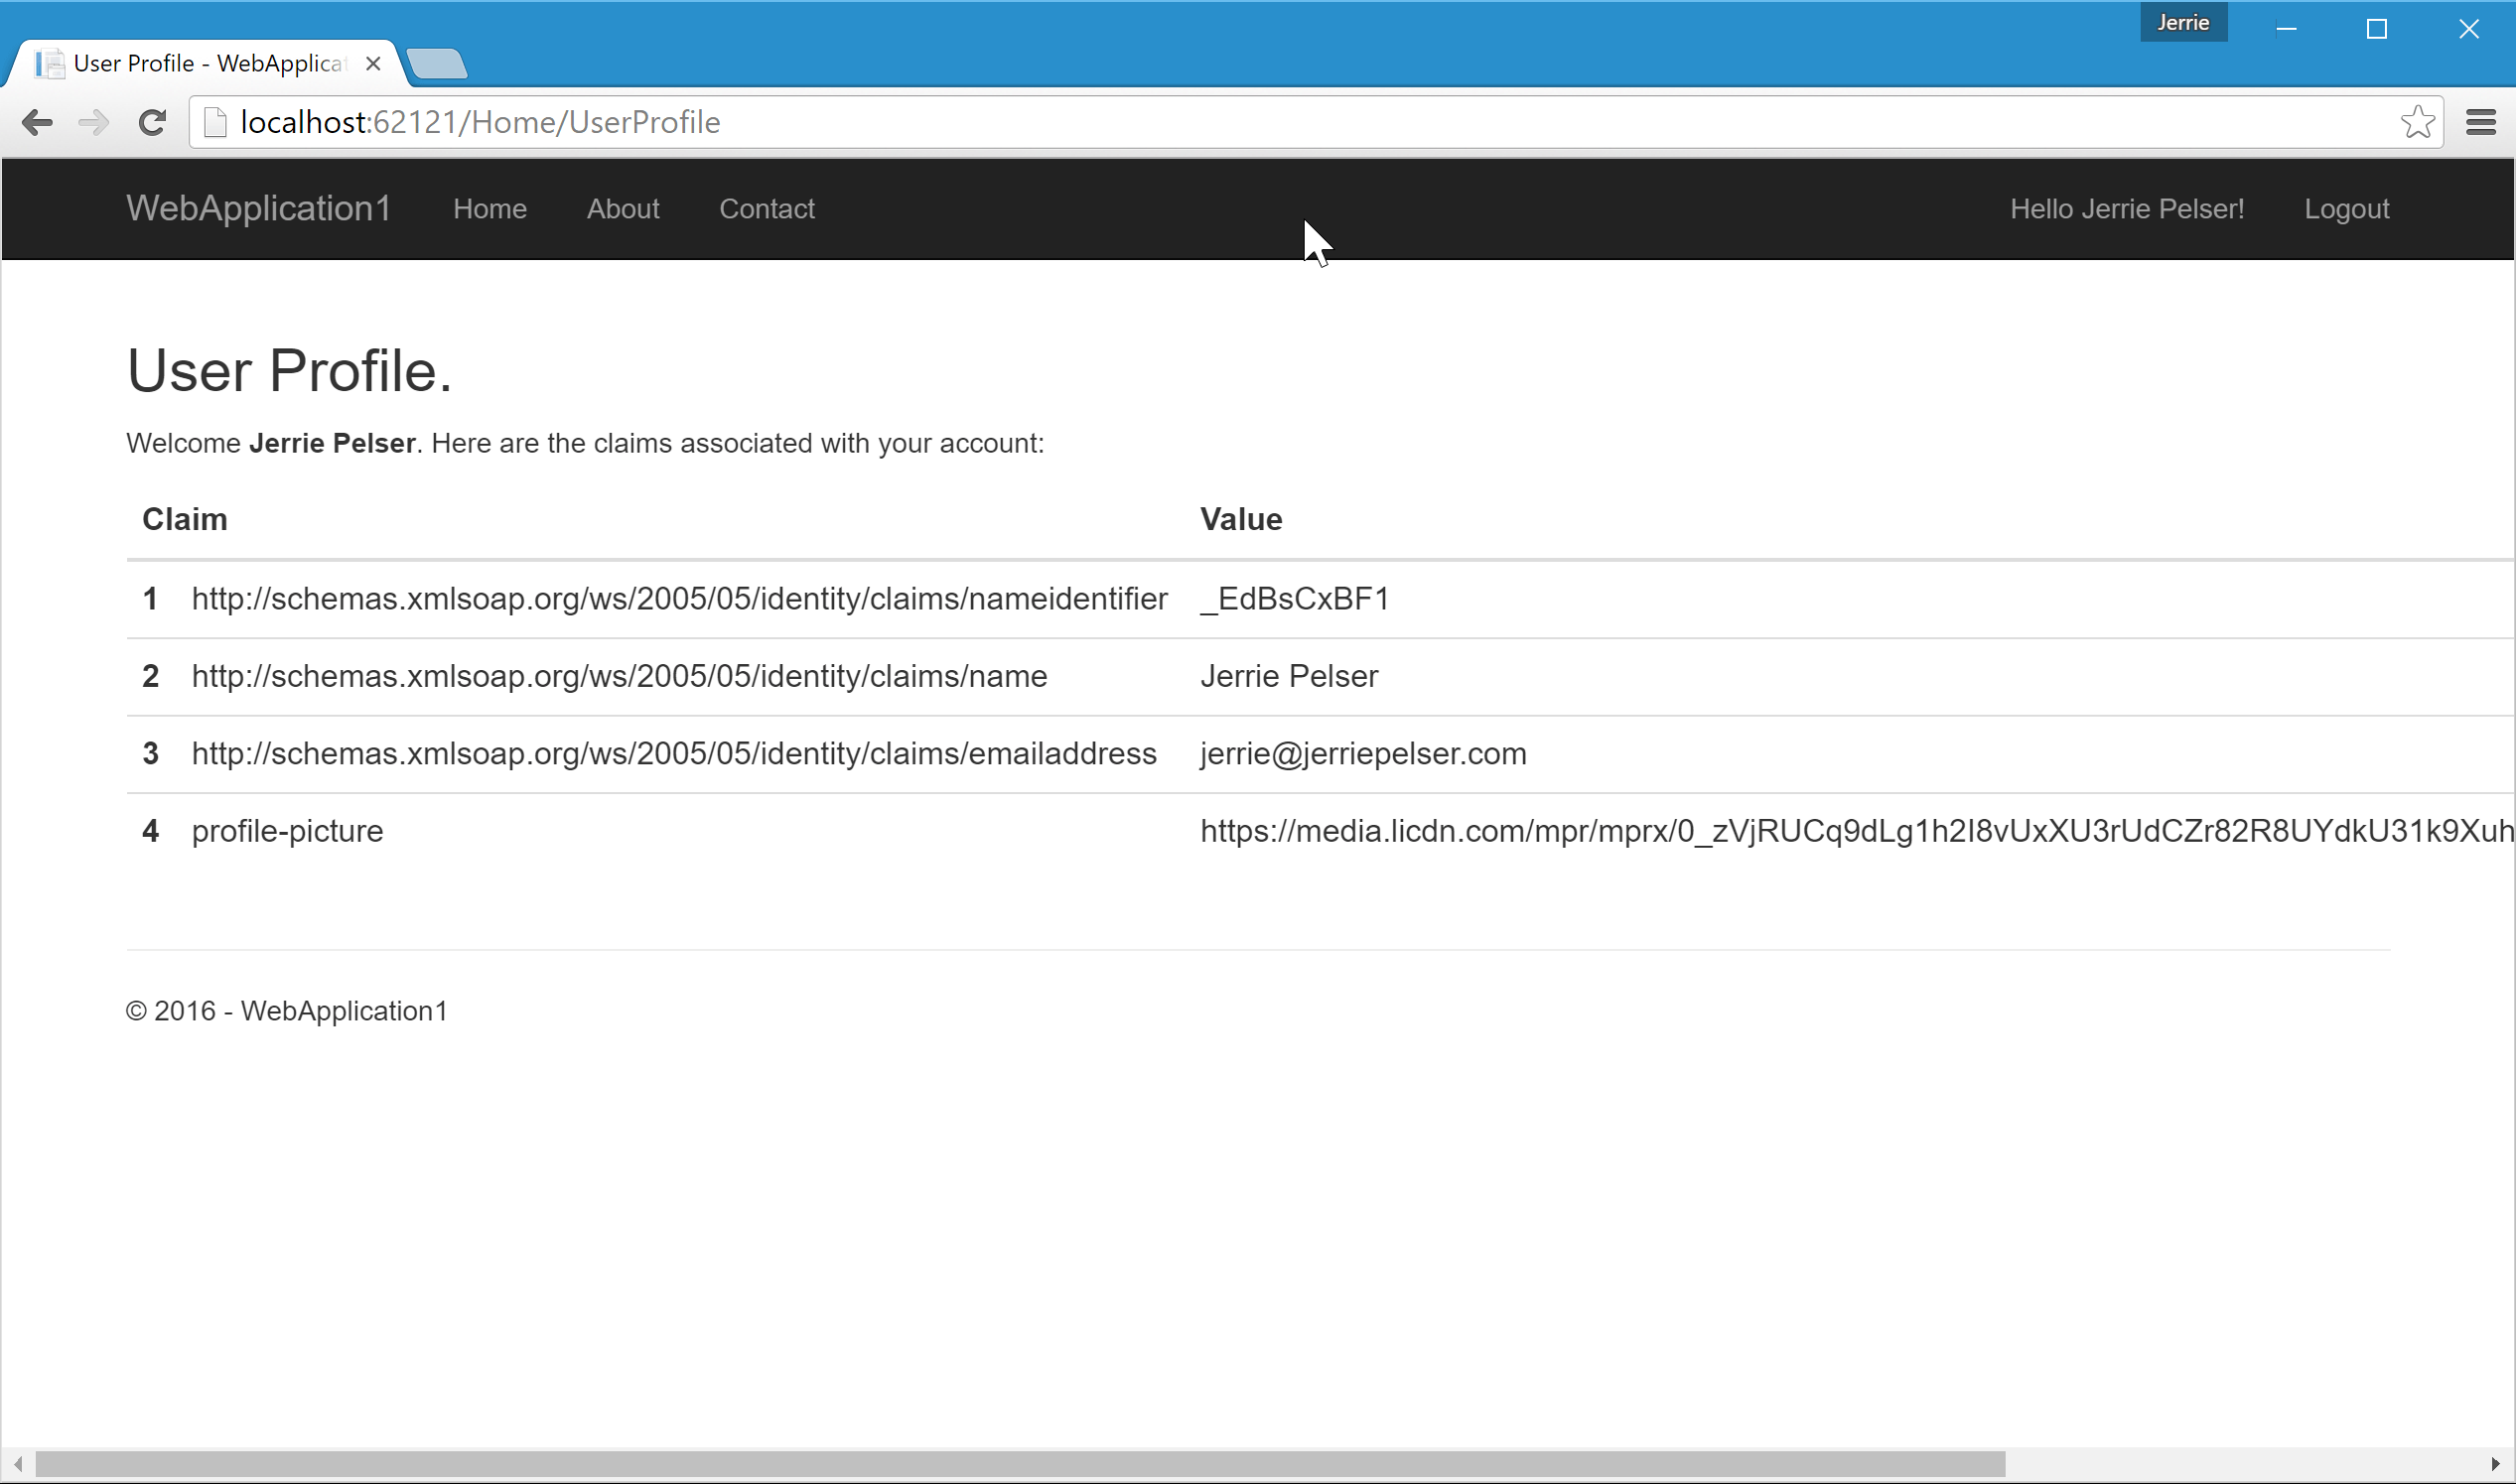
Clicking on the user's name will take you to the new User Profile page where you can see all the claims for the user listed:
Aside: Authenticating using LinkedIn in Auth0
Auth0 also supports allowing users to sign in with their LinkedIn accounts, along with 30+ other Social providers.
“Auth0 also supports allowing users to sign in with their LinkedIn accounts, along with other Social providers.”
Tweet This
If you are using ASP.NET Core you will be pleased to know that because we use industry standards such as OAuth2, OpenID Connect and JWT, you can implement Auth0 in your ASP.NET Core applications using the standard ASP.NET Core libraries.
For more information on how to use Auth0 to allow users to sign in to your MVC applications, please look at our ASP.NET Core quickstart. If you want to secure your Web API using Auth0 issued JWTs, then have a look at our ASP.NET Core Web API Quickstart.
Conclusion
The new generic OAuth middleware in ASP.NET Core makes it really simple to authenticate your users using any OAuth2 service. All you need have is a Client ID and Client Secret for the relevant service, as well as know the service's OAuth2 Authorization and Token endpoints.
With that information, and a little but of custom code, you can enable logging in using the relevant service in a couple of minutes.