

This is a guest post by Taiseer Joudeh. He has more than 8 years of experience spent in developing and managing different software solutions for finance, transportation, logistics, and e-commerce sectors. He is a frequent blogger on http://bitoftech.net, and you can follow him on twitter @tjoudeh
Two weeks ago I've blogged about using tokens to authenticate users in single page applications. I've used ASP.NET Web API, Owin middleware and ASP.NET Identity to store local accounts in database. I didn't tap into social identity logins (such as Google, Microsoft Accounts, Facebook, etc.) because each provider does not supply the same information (profile schema) about the logged in user and there might be properties missing or with different names, so handling this manually and storing those different schemes will not be a straight forward process.
I was introduced to Auth0 by Matias Woloski. Basically Auth0 is a feature rich identity management system which supports local database accounts, integration with more than 30 social identity providers and enterprise identity providers (such as AD, Office 365, Google Apps, etc.). You can check the full list here.
In this post I'll implement the same set of features I've implemented previously but using Auth0 management system as well as integrating authentication with multiple social identity providers using less code in the back-end API and in the front-end application. The front end will be built using AngularJS. So let's jump to the implementation.
I'll split this post into two sections, the first section will be for creating the back-end API and configuring Auth0 application, and the second section will cover creating the SPA and Auth0 widget.
The demo application we'll build in this post can be accessed from (http://auth0web.azurewebsites.net). The source code is available on my GitHub Repo.Section 1: Building the Back-end API
Step 1.1: Create new Application in Auth0
After you register with Auth0 you need to create an application. Auth0 comes with a set of applications with easy to integrate SDKs. In our case, we'll select "ASP.NET (OWIN)" application as the image below:

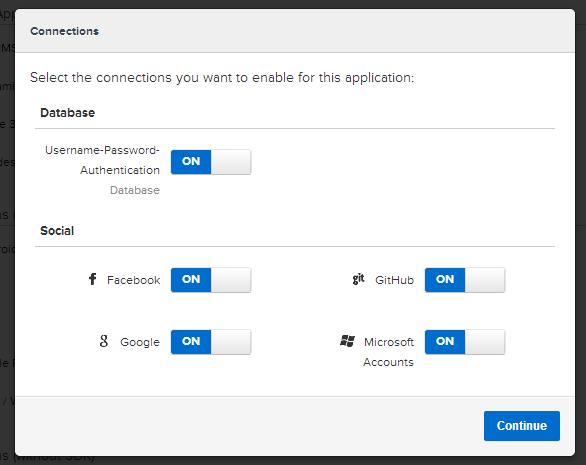
After you give the application a friendly name (In my case I named it "ASP.NET (OWIN)") a popup window will show up asking which connections you want to enable for this application. Connection in Auth0 means identity providers you want to allow in the application. In my case, I'll allow Database local accounts, Facebook, Google, GitHub, and Microsoft Accounts as the image below shows. Usually, the social accounts will be disabled for all applications. In order to enable them navigate to Connections tab, choose Social then activate the social providers you'd like to enable for your application.
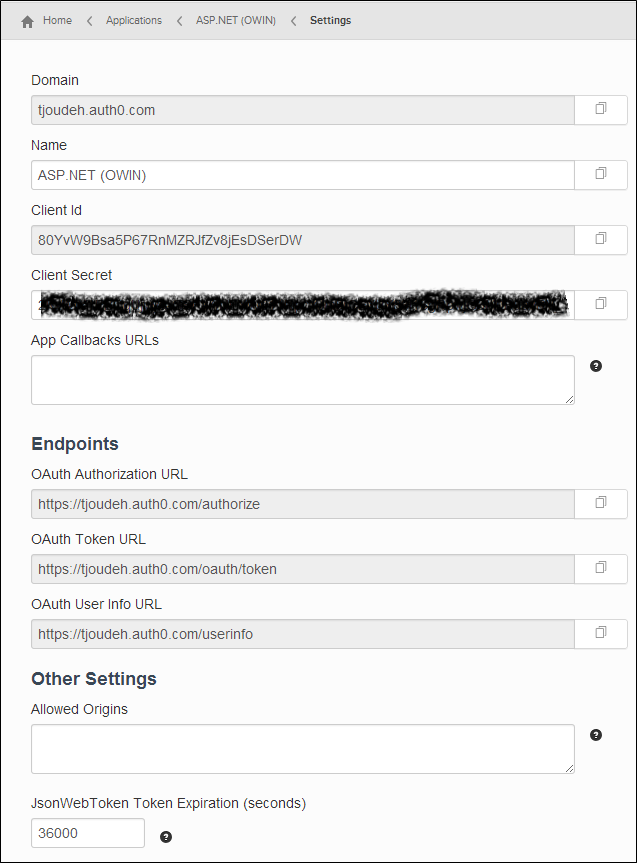
Once the application is created, you can navigate to application settings link where you will find all the needed information (Domain, Client Id, Client Secret, Callback URLs, etc.) to configure the Web API we'll build in the next step.
Step 1.2: Create the Web API
In this tutorial I’m using Visual Studio 2013 and .Net framework 4.5. You can follow along using Visual Studio 2012 but you need to install Web Tools 2013.1 for VS 2012 by visiting this link.
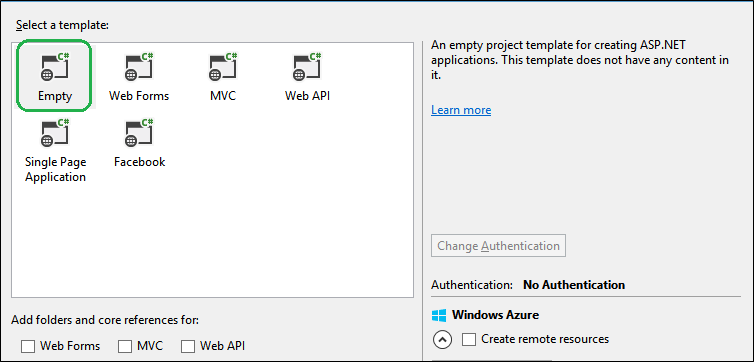
Now, create an empty solution and name it AuthZero then add a new ASP.NET Web application named AuthZero.API. The selected template for the project will be the Empty one with no core dependencies. Check the image below:
Step 1.3: Install the needed NuGet Packages
This project is empty so we need to install the NuGet packages needed to setup our Owin server and configure ASP.NET Web API to be hosted within an Owin server. In order to do that, open the NuGet Package Manager Console and install the below packages:
Install-Package Microsoft.AspNet.WebApi -Version 5.1.2
Install-Package Microsoft.AspNet.WebApi.Owin -Version 5.1.2
Install-Package Microsoft.Owin.Host.SystemWeb -Version 2.1.0
Install-Package Microsoft.Owin.Security.Jwt -Version 2.1.0
Install-Package Microsoft.Owin.Cors -Version 2.1.0
Update-Package System.IdentityModel.Tokens.Jwt
The first package, Microsoft.AspNet.WebApi, contains everything we need to host our API on IIS. The second package, Microsoft.AspNet.WebApi.Owin, will allow us to host Web API within an Owin server.
The third package, Microsoft.Owin.Host.SystemWeb, will be used to enable our Owin server to run our API on IIS using ASP.NET request pipeline. Eventually, we’ll host this API on Microsoft Azure Websites which uses IIS so we're going to need this.
The forth package, Microsoft.Owin.Security.Jwt, will enable Owin server Middleware to protect and validate JSON Web Tokens (JWT).
The last package, Microsoft.Owin.Cors, will be responsible for allowing CORS for our Web API so that it will accept requests coming from any origin.
The package System.IdentityModel.Tokens.Jwt that gets installed by default is old (version 1.0.0) so we need to update it to the latest version (version 3.0.2).
Step 1.4: Add Auth0 settings to Web.config
We need to read the settings for the Auth0 application we created earlier to configure our API, so open the Web.Config file and add the below keys. Do not forget to replace the values of those keys with the correct ones that you obtain once you create an application on Auth0.
 <add key="auth0:ClientId" value="YOUR_CLIENT_ID" />
 <add key="auth0:ClientSecret" value="YOUR_CLIENT_SECRET" />
 <add key="auth0:Domain" value="YOUR_DOMAIN" />
</appSettings></pre>
Step 1.5: Add Owin "Startup" Class
Now, we want to add a new class named Startup. It will contain the code below:
[assembly: OwinStartup(typeof(AuthZero.API.Startup))]
namespace AuthZero.API
{
    public class Startup
    {
        public void Configuration(IAppBuilder app)
        {
            HttpConfiguration config = new HttpConfiguration();

            ConfigureAuthZero(app);

            WebApiConfig.Register(config);
            app.UseCors(Microsoft.Owin.Cors.CorsOptions.AllowAll);
            app.UseWebApi(config);

        }
    }
}
What we've implemented above is simple. This class will be fired once our server starts. Notice the assembly attribute which states which class to fire on start-up. The Configuration method accepts a parameter of type IAppBuilder. This parameter will be supplied by the host at run-time. This app parameter is an interface which will be used to compose the application for our Owin server.
The implementation of the ConfigureAuthZero method will be covered in the next step. This method will be responsible for configuring our Web API to generate JWT using Auth0's application secret.
The HttpConfiguration object is used to configure the API routes, so we’ll pass this object to the Register method in WebApiConfig class.
Lastly, we’ll pass the config object to the UseWebApi extension method which will be responsible to wire up ASP.NET Web API to our Owin server pipeline.
The implementation of WebApiConfig is simple. All you need to do is add this class under the App_Start folder and then paste the code below:
public static class WebApiConfig
    {
        public static void Register(HttpConfiguration config)
        {
            // Web API routes
            config.MapHttpAttributeRoutes();

            config.Routes.MapHttpRoute(
                name: "DefaultApi",
                routeTemplate: "api/{controller}/{id}",
                defaults: new { id = RouteParameter.Optional }
            );

            var jsonFormatter = config.Formatters.OfType<JsonMediaTypeFormatter>().First();
            jsonFormatter.SerializerSettings.ContractResolver = new CamelCasePropertyNamesContractResolver();
        }
    }
Step 1.6: Configure generating JWT using Auth0
Now we want to configure our Web API to use the Auth0 application we created earlier. We will do so to generate JSON Web Tokens, which will be used to allow authenticated users to access the secured methods in our Web API. To implement this, open the Startup class and add the code below:
//Rest of Startup class implementation is here

private void ConfigureAuthZero(IAppBuilder app)
        {
            var issuer = "https://" + ConfigurationManager.AppSettings["auth0:Domain"] + "/";
            var audience = ConfigurationManager.AppSettings["auth0:ClientId"];
            var secret = TextEncodings.Base64.Encode(TextEncodings.Base64Url.Decode(ConfigurationManager.AppSettings["auth0:ClientSecret"]));

            // Api controllers with an [Authorize] attribute will be validated with JWT
            app.UseJwtBearerAuthentication(
                new JwtBearerAuthenticationOptions
                {
                    AuthenticationMode = Microsoft.Owin.Security.AuthenticationMode.Active,
                    AllowedAudiences = new[] { audience },
                    IssuerSecurityTokenProviders = new IIssuerSecurityTokenProvider[]
                    {
                        new SymmetricKeyIssuerSecurityTokenProvider(issuer, secret)
                    }
                });
        }
What we've implemented in this method is the following:
- Read Auth0's application settings stored in the web.config file.
- We've added the JSON Web Token Bearer middleware to our Owin server. This class accepts a set of options. As you can see, we've set the authentication mode to
Activewhich configures the middleware to check every incoming request and attempt to authenticate the call, and if it is successful, it will create a principal that represents the current user and assign that principal to the hosting environment. - We've set the issuer of our JSON Web Token (Domain Name) along with the base64 encoded symmetric key (Client Secret) which will be used to sign the generated JSON Web Token.
Now if we want to secure any end point in our Web API, all we need to do is to add the [Authorize] attribute to any Web API controller, so that requests containing a valid bearer token can only access it.
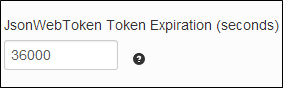
The JWT Token expiration time can be set in the settings page of your Auth0 Application as in the image below. The default value is 36000 seconds (10 hours).
Step 1.7: Add a Secure Shipments Controller
Now we want to add a secure controller to serve our Shipments. We'll assume that this controller will return shipments only for authenticated users. To keep things simple, we'll return static data, so let's add a new controller named ShipmentsController and paste the code below:
[RoutePrefix("api/shipments")]
    public class ShipmentsController : ApiController
    {
        [Authorize]
        [Route("")]
        public IHttpActionResult Get()
        {
            return Ok(Shipment.CreateShipments());
        }
    }

    #region Helpers

    public class Shipment
    {
        public int ShipmentId { get; set; }
        public string Origin { get; set; }
        public string Destination { get; set; }

        public static List<Shipment> CreateShipments()
        {
            List<Shipment> ShipmentList = new List<Shipment>
            {
                new Shipment {ShipmentId = 10248, Origin = "Amman", Destination = "Dubai" },
                new Shipment {ShipmentId = 10249, Origin = "Dubai", Destination = "Abu Dhabi"},
                new Shipment {ShipmentId = 10250,Origin = "Dubai", Destination = "New York"},
                new Shipment {ShipmentId = 10251,Origin = "Boston", Destination = "New Jersey"},
                new Shipment {ShipmentId = 10252,Origin = "Cairo", Destination = "Jeddah"}
            };

            return ShipmentList;
        }
    }

    #endregion
Notice how we added the Authorize attribute on the Get method so that if you tried to issue HTTP GET request to the endpoint http://localhost:port/api/shipments you will receive a HTTP status code 401 unauthorized. That's because the request you sent till this moment doesn't contain JWT in the authorization header. You can check it using this endpoint: http://auth0api.azurewebsites.net/api/shipments
Step 1.8: Add new user and Test the API
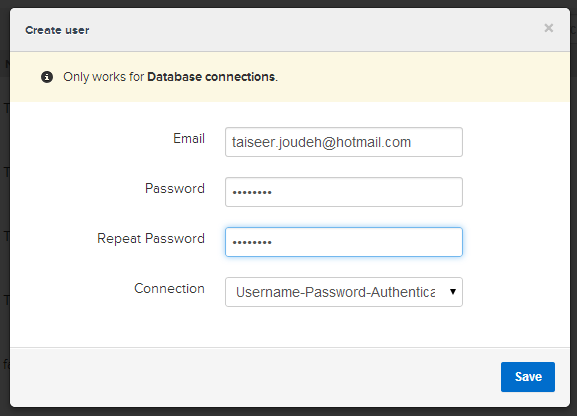
The Auth0 dashboard allows you to manage users registered in the applications you've created under Auth0, so to test the API we've created, we need to create a user before. I'll jump back to Auth0 dashboard and navigate to the Users tab then click New. A popup window will appear as the image below. This window will allow us to create a local database user, so fill up the form to create new user. I'll use taiseer.joudeh@hotmail.com and 87654321 as the email and password respectively.
Once the user is created we need to generate a JWT token so we can access the secured endpoint. To generate the JWT, we can send an HTTP POST to https://tjoudeh.auth0.com/oauth/ro. This endpoint will work only for local database connections and AD/LDAP since other type of authentication require user's approval. You can check Auth0's API playground here. To get the JWT token, open your favorite REST client and issue a POST request as the image below:
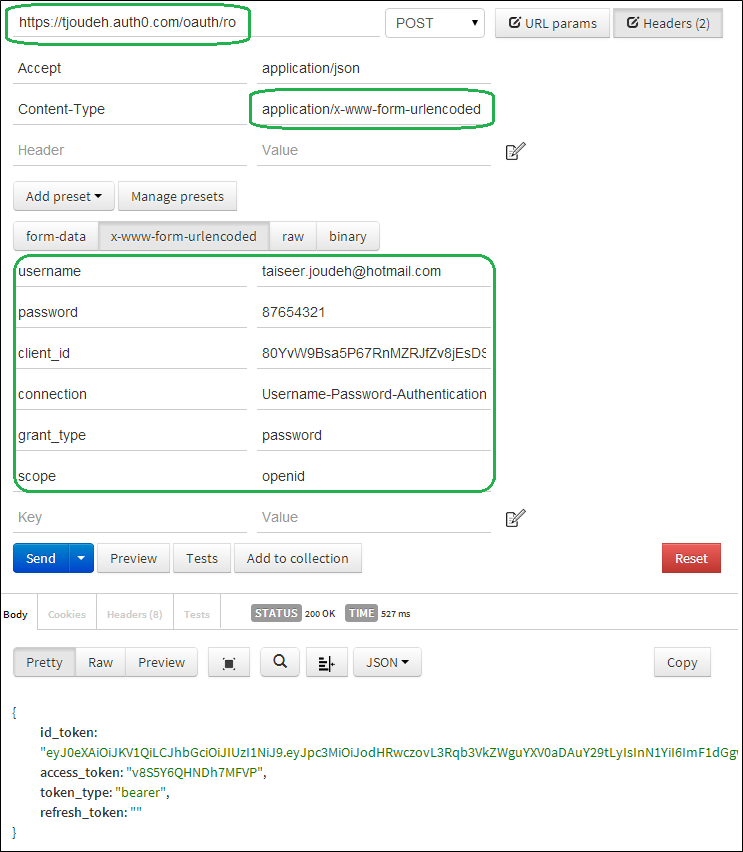
Notice that the content-type and payload type is x-www-form-urlencoded so that the payload body will contain encoded URL. Notice as well that we've specified the Connection for this token and the grant_type. If all is correct, we'll receive the JWT token (`id_token) on the response.
The "grant_type" indicates the type of grant being presented in exchange for an access token, in our case it is password.
Now we want to use this token to request the secure data using the http://auth0api.azurewebsites.net/api/shipments endpoint so we'll issue a GET request and we'll pass the bearer JWT token in the Authorization header. We need to send this bearer token along with each request we want the user to be authenticated.
The GET request will be as the image below:
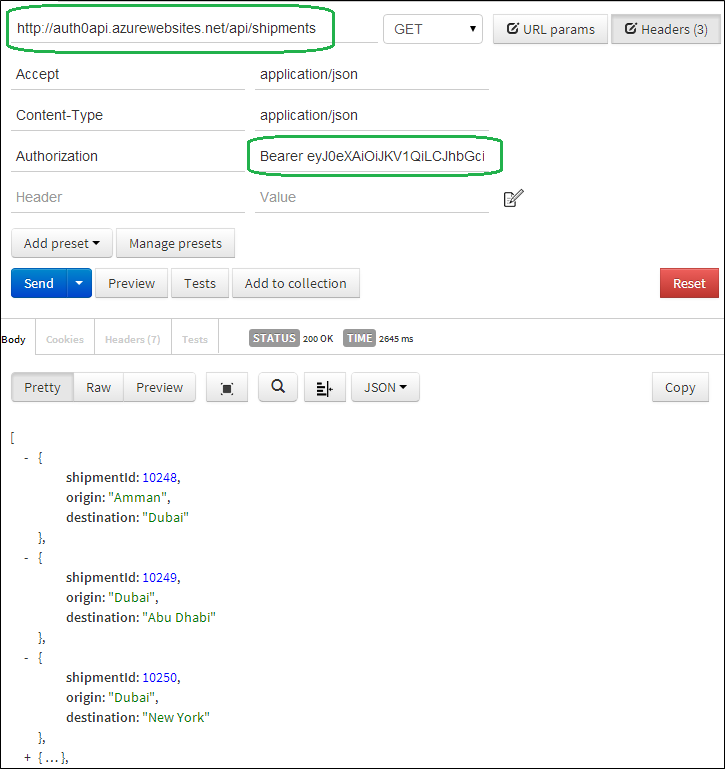
If all is correct, we'll receive an HTTP status 200 Ok along with the secured data in the response body. If you try to change any character of the signed token, we'll directly receive an HTTP status code 401 unauthorized.
Now, our back-end API is ready to be consumed by the front-end app we'll build in the next section.
Section 2: Building the Front-end SPA
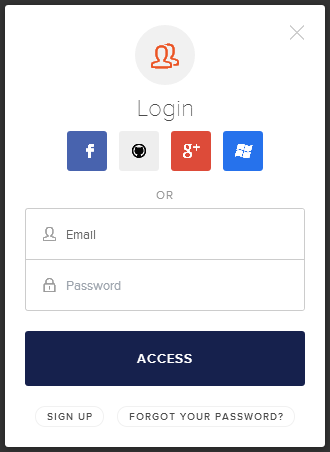
Now we want to build an SPA using AngularJS which will communicate with the back-end API we created earlier. Auth0 provides a very neat and feature rich JavaScript plugin named Auth0 Widget. This widget is very easy to implement in any web app. When you use it, you will get features out of the box such as social integration with social providers, integration with AD, and sign up/forgot password features. The widget plugin looks as the image below:
The enabled social login providers can be controlled from Auth0's dashboard using the Connection tab, so for example if you want to enable LinkedIn, you just need to activate it on your Auth0 application and it will show directly on the Widget.
Step 2.1: Add the Shell Page (Index.html)
First of all, we need to add the "Single Page" which is a container for our application. This page will contain a link to sign in, a section that will show up for authenticated users only, and a ng-view directive which will be used to load partial views. The html for this page will be as the below:
<!DOCTYPE html>
<html>
    <head>
        <link href="content/app.css" rel="stylesheet" />
        <link href="https://netdna.bootstrapcdn.com/bootstrap/3.0.3/css/bootstrap.min.css" rel="stylesheet">
    </head>
    <body ng-app="auth0-sample" class="home" ng-controller="mainController">
        <div class="login-page clearfix">
          <div class="login-box auth0-box" ng-hide="loggedIn">
            <img src="https://i.cloudup.com/StzWWrY34s.png" />
            <h3>Auth0 Example</h3>
            <p>Zero friction identity infrastructure, built for developers</p>
             <a ng-click="login()" class="btn btn-primary btn-lg btn-block">SignIn</a>
          </div>
             <!-- This log in page would normally be done using routes
          but for the simplicity of the excercise, we're using ng-show -->
          <div ng-show="loggedIn" class="logged-in-box auth0-box">
            <img ng-src="{{ "{{auth.profile.picture" }}}}" class="avatar"/>
            <h3>Welcome {{ "{{auth.profile.name" }}}}</h3>
            <div class="profile-info row">
                <div class="profile-info-label col-xs-6">Nickname</div>
                <div class="profile-info-content col-xs-6">{{ "{{auth.profile.nickname" }}}}</div>
            </div>
            <div class="profile-info row">
                <div class="profile-info-label col-xs-6">Your JSON Web Token</div>
                <div class="profile-info-content col-xs-6">{{ "{{auth.idToken | limitTo:12" }}}}...</div>

            </div>
                 <div class="profile-info row">
                    <a ng-href ="#/shipments" class="btn btn-success btn-sm btn-block">View my shipments</a>
               </div>
               <div class="profile-info row">
                    <a ng-click="logout()" class="btn btn-danger btn-sm btn-block">Log out</a>
               </div>
          </div>
          <div data-ng-view="">
        </div>
        </div>
        <script src="https://code.angularjs.org/1.2.16/angular.min.js" type="text/javascript"></script>
        <script src="https://code.angularjs.org/1.2.16/angular-cookies.min.js" type="text/javascript"></script>
        <script src="https://code.angularjs.org/1.2.16/angular-route.min.js" type="text/javascript"></script>
        <script src="app/app.js" type="text/javascript"></script>
        <script src="app/controllers.js" type="text/javascript"></script>
    </body>
</html>
Step 2.2: Add reference to auth0-angular.js and Widget libraries
Now we need to add a reference to auth0-angular.js. This file is the AngularJS module which allows us to trigger the authentication process and parse the JSON Web Token with the ClientID we obtained once we created the Auth0 application.
Also, we need to add a reference to the Widget plugin which will be responsible to show the nice login popup we've showed earlier. To implement this add the reference to those new JS files (lines 5 and 6)at the bottom of the index.html page:
<!--rest of HTML is here-->
<script src="https://code.angularjs.org/1.2.16/angular.min.js" type="text/javascript"></script>
<script src="https://code.angularjs.org/1.2.16/angular-cookies.min.js" type="text/javascript"></script>
<script src="https://code.angularjs.org/1.2.16/angular-route.min.js" type="text/javascript"></script>
<script src="https://cdn.auth0.com/w2/auth0-widget-4.js"></script>
<script src="https://cdn.auth0.com/w2/auth0-angular-0.4.js"> </script>
<script src="app/app.js" type="text/javascript"></script>
<script src="app/controllers.js" type="text/javascript"></script>
Step 2.3: Booting up our AngularJS app
We'll add a new file named app.js, which will be responsible for configuring our AngularJS app, so add this file and paste the code below:
var app = angular.module('auth0-sample', ['auth0-redirect', 'ngRoute']);
app.config(function (authProvider, $httpProvider, $routeProvider) {
authProvider.init({ domain: 'tjoudeh.auth0.com', clientID: '80YvW9Bsa5P67RnMZRJfZv8jEsDSerDW', callbackURL: location.href });});
By looking at the code above you will notice that we've injected the dependency auth0-redirect to our module. Once it is injected, we can use the authProvider service which we'll use to configure the Auth0 service. Therefore, we need to set the values for the domain, clientID, and callbackURL. Those values are obtained from the Auth0 application we've created earlier. Once you set the callbackURL, you need to visit Auth0's application settings and set the same callbackURL as the image below:

Once the user is successfully authenticated, Auth0 will redirect the user to the callbackURL with a hash containing an accesstoken and the JSON Web Token (`idtoken`).
Step 2.4: Showing up the Widget Plugin
Now it is time to show the Widget once the user clicks on the SignIn link. For that, we need to add a file named controllers.js. Inside this file we'll define a controller named mainController. The implementation for this controller is as the code below:
app.controller('mainController', ['$scope', '$location', 'auth', 'AUTHEVENTS',
  function ($scope, $location, auth, AUTHEVENTS) {

    $scope.auth = auth;
    $scope.loggedIn = auth.isAuthenticated;

    $scope.$on(AUTHEVENTS.loginSuccess, function () {
      $scope.loggedIn = true;
      $location.path('/shipments');
    });
    $scope.$on(AUTHEVENTS.loginFailure, function () {
      console.log("There was an error");
    });

    $scope.login = function () {
        auth.signin({popup: false});
    }

    $scope.logout = function () {
        auth.signout();
        $scope.loggedIn = false;
        $location.path('/');
    };

}]);
You can notice that we are injecting the auth service and AUTH_EVENTS. Inside the login function we are just calling auth.signin and passing popup:false as an option. The nice thing here is that auth0-angularjs module broadcasts events related to successful/unsuccessful logins so all child scopes which are interested to listen to this event can handle the login response. So in our case when the login is successful (User is authenticated) we'll set the flag named loggedIn to true and redirect the user to a secure partial view named shipments which we'll add in the following steps.
Once the user is authenticated the JSON Web Token and the access token are stored automatically using AngularJS cookie store so you won't have to worry about refreshing the single page application and losing the authenticated user context. All this is done by the Widget and auth0-angularjs module.
Note:To check how to customize the Widget plugin check the link here.
To add support for signing out users, all we need to do is call auth.signout and redirect the user to the application root. auth0-angular will take care of clearing the stored token from the cookie store.
Step 2.5: Add Shipments View and Controller
Now we want to add a view which should be accessed by authenticated users only, so we need to add a new partial view named shipments.html. It will only render the static data from the http://auth0api.azurewebsites.net/api/shipments endpoint when issuing a GET request. The html for the partial view is as follows:
<div class="row">
<div class="col-md-4">
</div>
<div class="col-md-4">
<h5><strong>My Secured Shipments</strong> </h5>
<table class="table table-striped table-bordered table-hover">
<thead>
<tr>
<th>Shipment ID</th>
<th>Origin</th>
<th>Destination</th>
</tr>
</thead>
<tbody>
<tr data-ng-repeat="shipment in shipments">
<td>
{{ "{{shipment.id" }}}}
</td>
<td>
{{ "{{shipment.origin" }}}}
</td>
<td>
{{ "{{shipment.destination" }}}}
</td>
</tr>
</tbody>
</table>
</div>
<div class="col-md-4">
</div>Now, open the controller.js file and add the implementation for shipmentsController as the code below:
app.controller('shipmentsController', ['$scope', '$http', '$location', function ($scope, $http, $location) {
    var serviceBase = "http://auth0api.azurewebsites.net/";
    $scope.shipments = [];
    init();

    function init() {
        getShipments();
    }
    function getShipments() {
        var shipmentsSuccess = function (response) {
            $scope.shipments = response.data;
        }
        var shipmentsFail = function (error) {
            if (error.status === 401) {
                $location.path('/');
            }
        }
        $http.get(serviceBase + 'api/shipments').then(shipmentsSuccess, shipmentsFail);
    }
}]);
The implementation for this controller is pretty straight forward. We are just sending an HTTP GET request to the secured http://auth0api.azurewebsites.net/api/shipments endpoint. If the call has succeeded we will set the returned shipments in the $scope and if it failed because the user is unauthorized (HTTP status code 401) then we'll redirect the user to the application root.
Now to be able to access the secured end point we have to send the JSON Web Token in the authorization header for this request. As you notice, we are not setting the token value inside this controller. The right way to do this is to use AngularJS Interceptors. Thankfully, `auth0-angularjs module makes implementing this very simple. This interceptor will allow us to capture every XHR request and manipulate it before sending it to the back-end API so we'll be able to set the bearer token if the token exists in the cookie store (user is authenticated).
Step 2.6: Add the Interceptor and Configure Routes
All you need to do to add the interceptor is to push it to $httpProvider service interceptors array. Setting the token with each request will be done by auth0-angularjs module automatically after that.
To configure the shipments route we need to map the shipmentsController with shipments partial view using $routeProvider service, so open the app.js file again and replace all the code in it with the code snippet below:
var app = angular.module('auth0-sample', ['auth0-redirect', 'ngRoute', 'authInterceptor']);
app.config(function (authProvider, $httpProvider, $routeProvider) {
authProvider.init({ domain: 'tjoudeh.auth0.com', clientID: '80YvW9Bsa5P67RnMZRJfZv8jEsDSerDW', callbackURL: location.href }); $httpProvider.interceptors.push('authInterceptor'); $routeProvider.when("/shipments", { controller: "shipmentsController", templateUrl: "/app/views/shipments.html" }); $routeProvider.otherwise({ redirectTo: "/" });});
By completing this step we are ready to run the application and see how Auth0 simplified and enriched the experience of user's authentication.
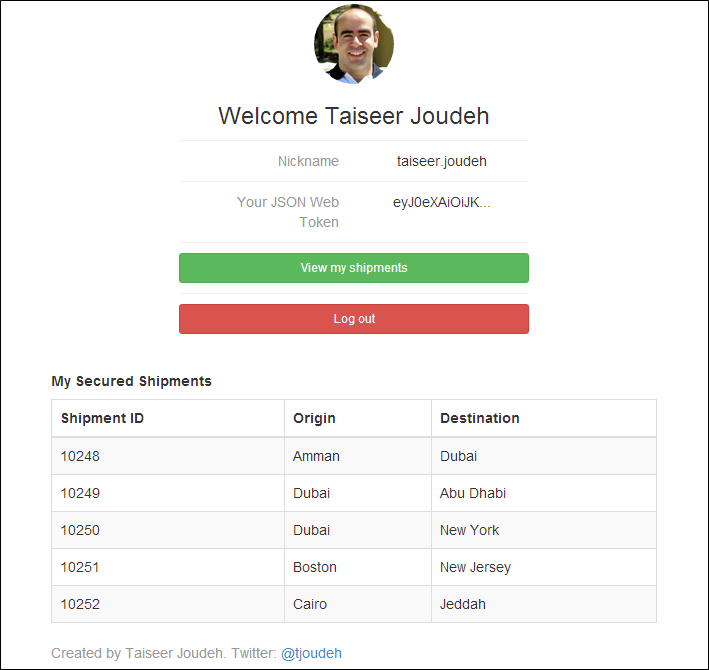
If all is implemented correctly, after you are authenticated using either a social login or a database account, your profile information and the secured shipments view will look as the image below:
That's it for now folks!
I hope this step by step post will help you to integrate Auth0 with your applications. If you have any question please drop me a comment.