
Python is my favorite programming language. Its adaptability, readability, and coding speed are unique and make python a powerful choice in various projects, from data science projects to scripting and, of course, APIs.
Python is a popular choice for API development, not only because it is one of the most loved programming languages, but also because of its rich ecosystem of libraries and frameworks that serve that goal, libraries with immense popularity such as Django, Flask, and FastAPI.
But which framework should you use to build your APIs with Python? It’s 100% up to you, but there are important considerations to keep in mind. After all, some of these frameworks are different, even from the ideology.
- Django is an all-inclusive framework. It provides tools and modules for handling API requests, serialization, database connections, automatic admin UI generation, and so much more.
- Flask, on the contrary, is a minimalist framework, it provides only the necessary tools, but it extends its functionality with additional libraries and frameworks. The great part is, you decide exactly what you need for your project, nothing more.
- FastAPI is a relatively new framework. It makes use of newer python features such as type-hints, concurrency handling (with async), and it’s super fast.
I work a lot with Flask and FastAPI, and I love both. I love the flexibility and adaptability of these frameworks, and for today's article, we will be focusing on Flask.
The following tips and practices are the result of research and more than eight years of experience building and shipping production-grade APIs with Python:
- Design your API endpoints with proper names and HTTP verbs
- How to properly structure your application
- Build your documentation from the code
- Testing
Let’s get started! 🚀
Design Your API Endpoints with Proper Names and HTTP Verbs
An adequately designed API is easy and straightforward for developers to understand. By reading the URI and HTTP verb (more on this later), a developer can pretty much have a good understanding of what to expect to happen when calling a particular method.
But how does that work? Let’s start with naming URIs. In REST, we called Resource to a first-level data representation. Naming these resources consistently throughout your API will turn out to be one of the best decisions for the long term.
Note that I highlighted consistently in the previous sentence, as it’s a key factor. Sure, there are particular ways to name your resources, and we will cover them, but being consistent is more important to the actual convention you choose.
Let’s start getting practical by modeling a simple eCommerce website with customers, orders, and a checkout process.
Our primary resource is customers, which is a collection of the instance customer. With this information, we can identify the collection resource by the URI /customers or a single resource by using the URI /customers/{customerId}. Subsequently, we can identify sub-resources such as orders, and we can identify them as /customers/{customerId}/orders, or a single order resource by /customers/{customerId}/orders/{orderId}.
Best practices naming resources
- Use nouns in their plural form to represent resources, eg:
- ✅ Users of a system:
/users,/users/{userId} - ✅ User’s playlists:
/users/{userId}/playlists,/users/{userId}/playlists/{playlistId}
- ✅ Users of a system:
- Use hyphens “-” to separate words and improve redeability
- ✅
/users/{userId}/-mobile-devices - ❌
/users/{userId}/mobileDevices - ❌
/users/{userId}/mobile_devices
- ✅
- Use forward slashes “/’ to indicate hierarchy
- ✅
/users/{userId}/mobile-devices - ❌
/users-mobile-devices/{userId} - ❌
/users-mobile-devices/?userId={userId}
- ✅
- Use only lowercase letters in URIs
- ✅
/users/{userId}/mobile-devices - ❌
/Users/{userId}/Mobile-Devices
- ✅
Now that we understand how to name resources, we need to think about actions. There are methods in our APIs that are procedural by nature and are not related to a specific resource, e.g., checkout, run, play, etc.
Best practices naming actions
- Use verbs to represent actions, e.g.:
- ✅ Execute a checkout action:
/users/{userId}/cart/checkout
- ✅ Execute a checkout action:
- Same as resources, use hyphens, forward slashes, and lowercase letters.
One crucial point here is to differentiate between CRUD functions and actions, as both are actions. In REST, CRUD operations, such as Create, Read, Update and Delete, are handled through HTTP verbs and not by the URI.
But what are HTTP verbs or HTTP request methods?
HTTP defines a set of request methods to indicate an action to be performed for a resource (sounds familiar?). The list includes several, but we will be focusing on 5:
- GET: should be for data retrieval.
- POST: should be used to create a new resource.
- PUT: should be used to update information about a specific resource.
- DELETE: should be used to delete a particular resource.
- PATCH: should be used to update partial information about a particular resource.
Example for our eCommerce website
- ✅ GET
/users: lists of all users. - ✅ POST
/users: creates a new user. - ✅ PUT
/users/{userId}: updates a user. - ✅ DELETE
/users/{userId}: deletes a specific user. - ✅ PATCH
/users/{userId}: partially updates a user. - ✅ GET
/users/{userId}/orders: lists of all orders for a particular user. - ✅ POST
/users/{userId}/cart/checkout: runs the checkout process.
What you shouldn't do:
- ❌
/users/get-all - ❌
/users/create - ❌
/users/{userId}/list-orders
In any form of GET, POST, or another verb.
How to Properly Structure Your Application
I’d like to start this section by saying that there’s no one correct way to structure your application depending on application size, modules, requirements, or even personal preferences. This could vary. However, I’d like to introduce you to how my team structures Flask applications, and we used this setup for multiple production projects.
You can follow the explanation of the structure in the article, and you can also find this structure ready to use in the Flask API starter kit on github.
project/
    api/
        model/
            __init__.py
            welcome.py
        route/
            home.py
        schema/
            __init__.py
            welcome.py
        service
            __init__.py
            welcome.py

    test/
        route/
            __init__.py
            test_home.py
        __init.py

    .gitignore
    app.py
    Pipfile
    Pipfile.lock
Let’s now break it down and explain each module.
All the application magic happens inside the API module (/api), there, we split the code into 4 main parts:
- The
modelsare the data descriptor of our application, in many cases related to the database model. How each model is defined will heavily depend on the library you use to connect to your database. - The
routesare the URIs to our application, where we define our resources and actions. - The
schemasare the definitions for inputs and outputs of our API, what parameters are allowed, what information we will output. They correlate to our resources, but they are not necessarily the same as our models. - The
servicesare modules that define application logic or interact with other services or the db layer. Routes should be as simple as possible and delegate all logic to the services.
Each endpoint in Flask can be defined on its own or by groups called blueprints. In my case, I like the grouping Blueprints provide, and I use them for each resource. Let’s take a look at what an example of our welcome route (./api/route/home.py) would look like:
from http import HTTPStatus
from flask import Blueprint
from flasgger import swag_from
from api.model.welcome import WelcomeModel
from api.schema.welcome import WelcomeSchema

home_api = Blueprint('api', __name__)


@home_api.route('/')
@swag_from({
    'responses': {
        HTTPStatus.OK.value: {
            'description': 'Welcome to the Flask Starter Kit',
            'schema': WelcomeSchema
        }
    }
})
def welcome():
    """
    1 liner about the route
    A more detailed description of the endpoint
    ---
    """
    result = WelcomeModel()
    return WelcomeSchema().dump(result), 200
Let’s break all of it into 3 pieces:
home_api = Blueprint('api', __name__)
Here is where we declared our Blueprint, which we can consequently use to declare our endpoints or routes. In this case, our grouping is pretty basic, but we can do much more with grouping, like defining prefixes, resource folders, and more.
For example if we would like to have our home blueprint always as a nested route of /home-service, we could do:
home_api = Blueprint('api', __name__, url_prefix='/home-service')
Next we declare one route, but we split it in 2 parts:
@home_api.route('/')
@swag_from({
    'responses': {
        HTTPStatus.OK.value: {
            'description': 'Welcome to the Flask Starter Kit',
            'schema': WelcomeSchema
        }
    }
})
We use annotations on top of functions to convert them into endpoints and provide additional information, e.g., documentation information, more on that in the next section.
And finally, our route code, which is just a Python function.
def welcome():
    """
    1 liner about the route
    A more detailed description of the endpoint
    ---
    """
    result = WelcomeModel()
    return WelcomeSchema().dump(result), 200
Note that we don’t simply return a string or JSON object directly, but we use our schemas instead. In our example, I’m using flask-marshmallow serialization library for its purposes.
Build Your Documentation from the Code
You build your API, you shipped to production, and developers are eager to consume it, but how would they know what endpoints are available and how to use them? The simple answer is by reading the documentation.
The documentation can be built in 2 ways, you can open up an editor and write it “manually”, or you can use the code to generate your documentation. If you like the idea of automatic documentation, you will love swagger.
Swagger is an open-source specification that allows you to describe each element of your API so that any machine or system can interpret it and interact with it. Thanks to this specification, many tools have been developed to provide rich interfaces to make our documentation dynamic and interactive, but also to provide developers with tools to easily generate these swagger files.
For Flask, there are multiple libraries for automatic Swagger generation, but my favorite is flasgger. Flassger provides annotations and other tools to generate your documentation, and it also provides a pretty web interface where you can see each endpoint, its inputs, and outputs and even run the endpoints directly from the docs.
Here is an image of it in action:
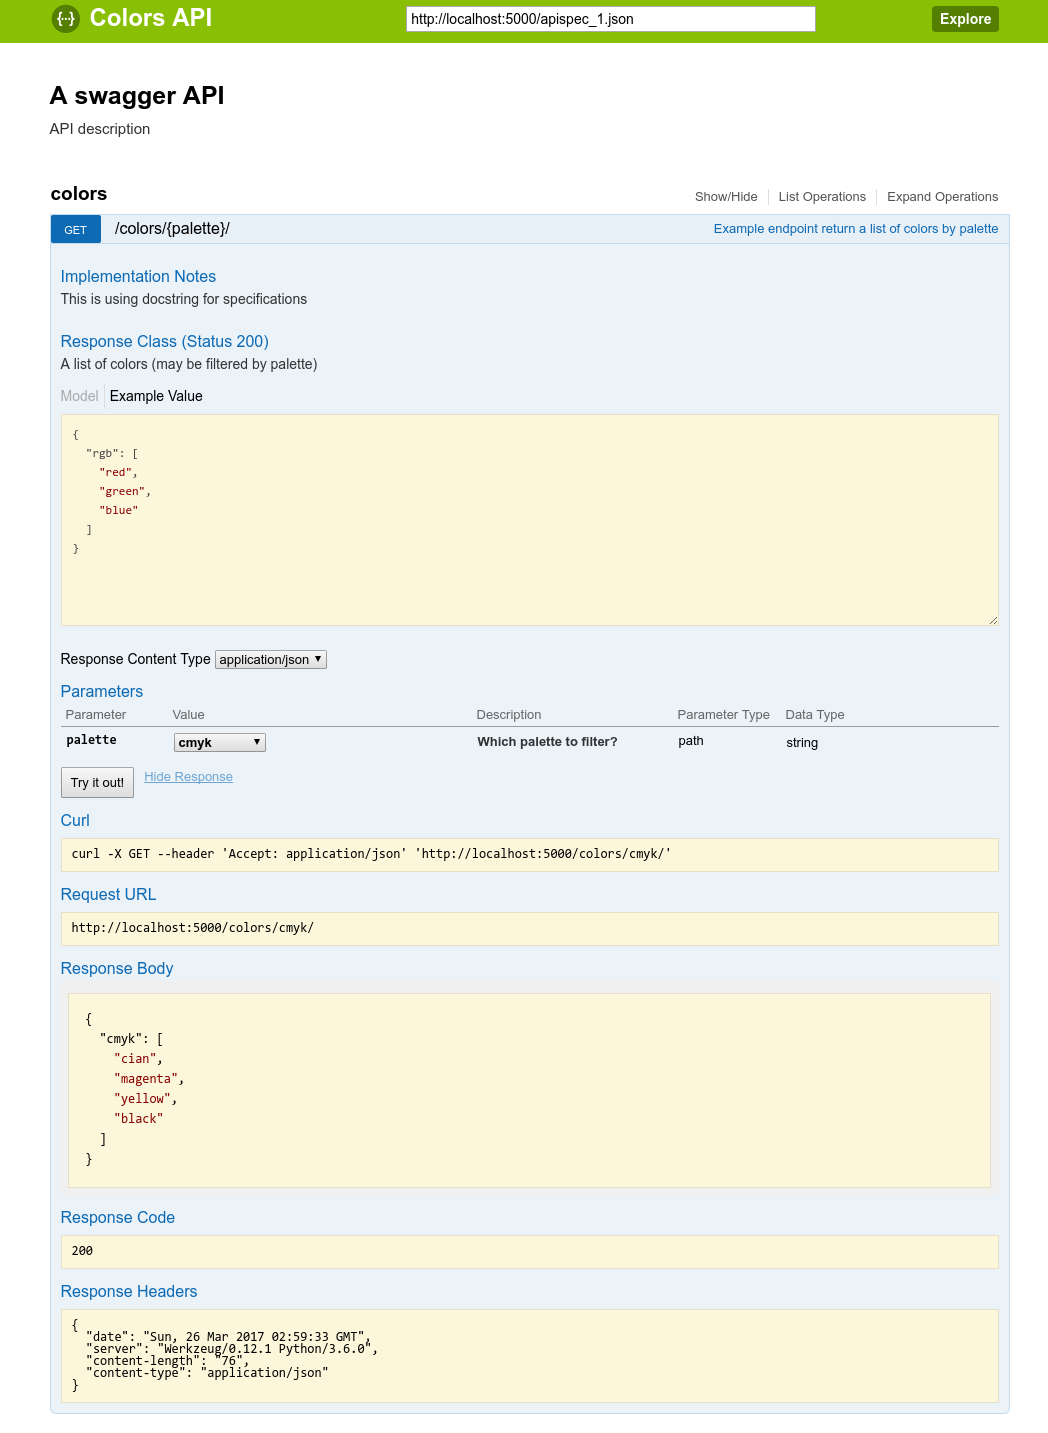
It’s highly configurable and compatible with our serialization library by using an additional library called apispec. It’s all pretty easy to set up, but you can also make use of the Flask starter kit, and you will have it all done for you.
But once you have it up and running, where is the information taken for the docs? From 2 places:
Remember our swag_from function annotation? There we can provide detailed information about the inputs and outputs
  @swag_from({
      'responses': {
          HTTPStatus.OK.value: {
              'description': 'Welcome to the Flask Starter Kit',
              'schema': WelcomeSchema
          }
      }
  })
We can also use string literals in functions to provide a description for the endpoint, similar to what we did here:
  def welcome():
      """
      1 liner about the route
      A more detailed description of the endpoint
      ---
      """
There are many more options and customizations; it’s all well documented on their official docs.
Testing
If you are like me, perhaps you hate writing tests, but if you are like me, you know it’s worth it. Testing, when done properly, increases efficiency and quality in the long run. They also reassure developers when making changes, refactoring, or building new features on existing systems.
Building tests shouldn’t be too hard, and it should happen naturally during development. I struggled a lot with it in the past because I’d always first develop the feature, the endpoint, or the function and then write the tests, just to get it done.
I’m not saying that approach is wrong, but there’s a better way. TDD, or test-driven development, it’s a concept idea where you write tests first, and just then you write the actual code we want to test.
How does it work? Let’s suppose we need to write a function that will add 2 numbers and return the result; exciting, right?
With TDD, our approach would be first to write the tests.
def test_answer():
    assert sum_two_numbers(3, 5) == 8
Next, we run the tests, and it fails because our function doesn’t even exist yet. So next, we write our function:
def sum_two_numbers(num1, num2):
    return num1 * num2
Next, we rerun our tests, and they still fail. Our assertion fails, but why? It turns out that I made a simple mistake. As clumsy as I am, I put a * instead of a +; this would have been very hard to notice without our tests, but thanks god, we have them.
We fix our function, and now everything runs perfectly.
def sum_two_numbers(num1, num2):
    return num1 + num2
In the exercise we did, it sounds kind of silly, but with more complex functions and code mistakes happen, and having tests first will help a lot; I say that from experience.
Conclusion
Best practices can be different for different frameworks, problems to solve, or even people, there’s no one way of doing things right, and that’s something I love about programming. However, having basic principles to rely on when designing and developing APIs can help your team, and other developers consume your API products.
Being consistent in naming, separating concepts in modules or folders in your project, documenting directly from your code, and properly testing are just examples of things that can make your life easier, more productive, and take you to the next level.
I hope you enjoyed reading this article!
About the author

Juan Cruz Martinez
Staff Developer Advocate