
TL;DR: In this article, we're going to use the Aurelia JavaScript framework to build a TypeScript application that lets you search for movies or pick from a list of current popular movies, and add them to a 'watch later' list. We're also going to use Auth0 to require authentication for movie list management.
If you would like to follow along, the source code for this article is available on GitHub.
Adding Auth0 support
In the next section, we're going to be adding the facility to add movies to the watch list and displaying all of the movies on the watch list on the screen. However, we're going to make it so that the user has to be signed in for the 'add' button to become available. So, we're going to manage user authentication by using the Auth0 login page.
To do this, you first need to sign up for a free Auth0 account if you don't already have one. Once you have created your account, you will have access to your account management page where you can add an application.
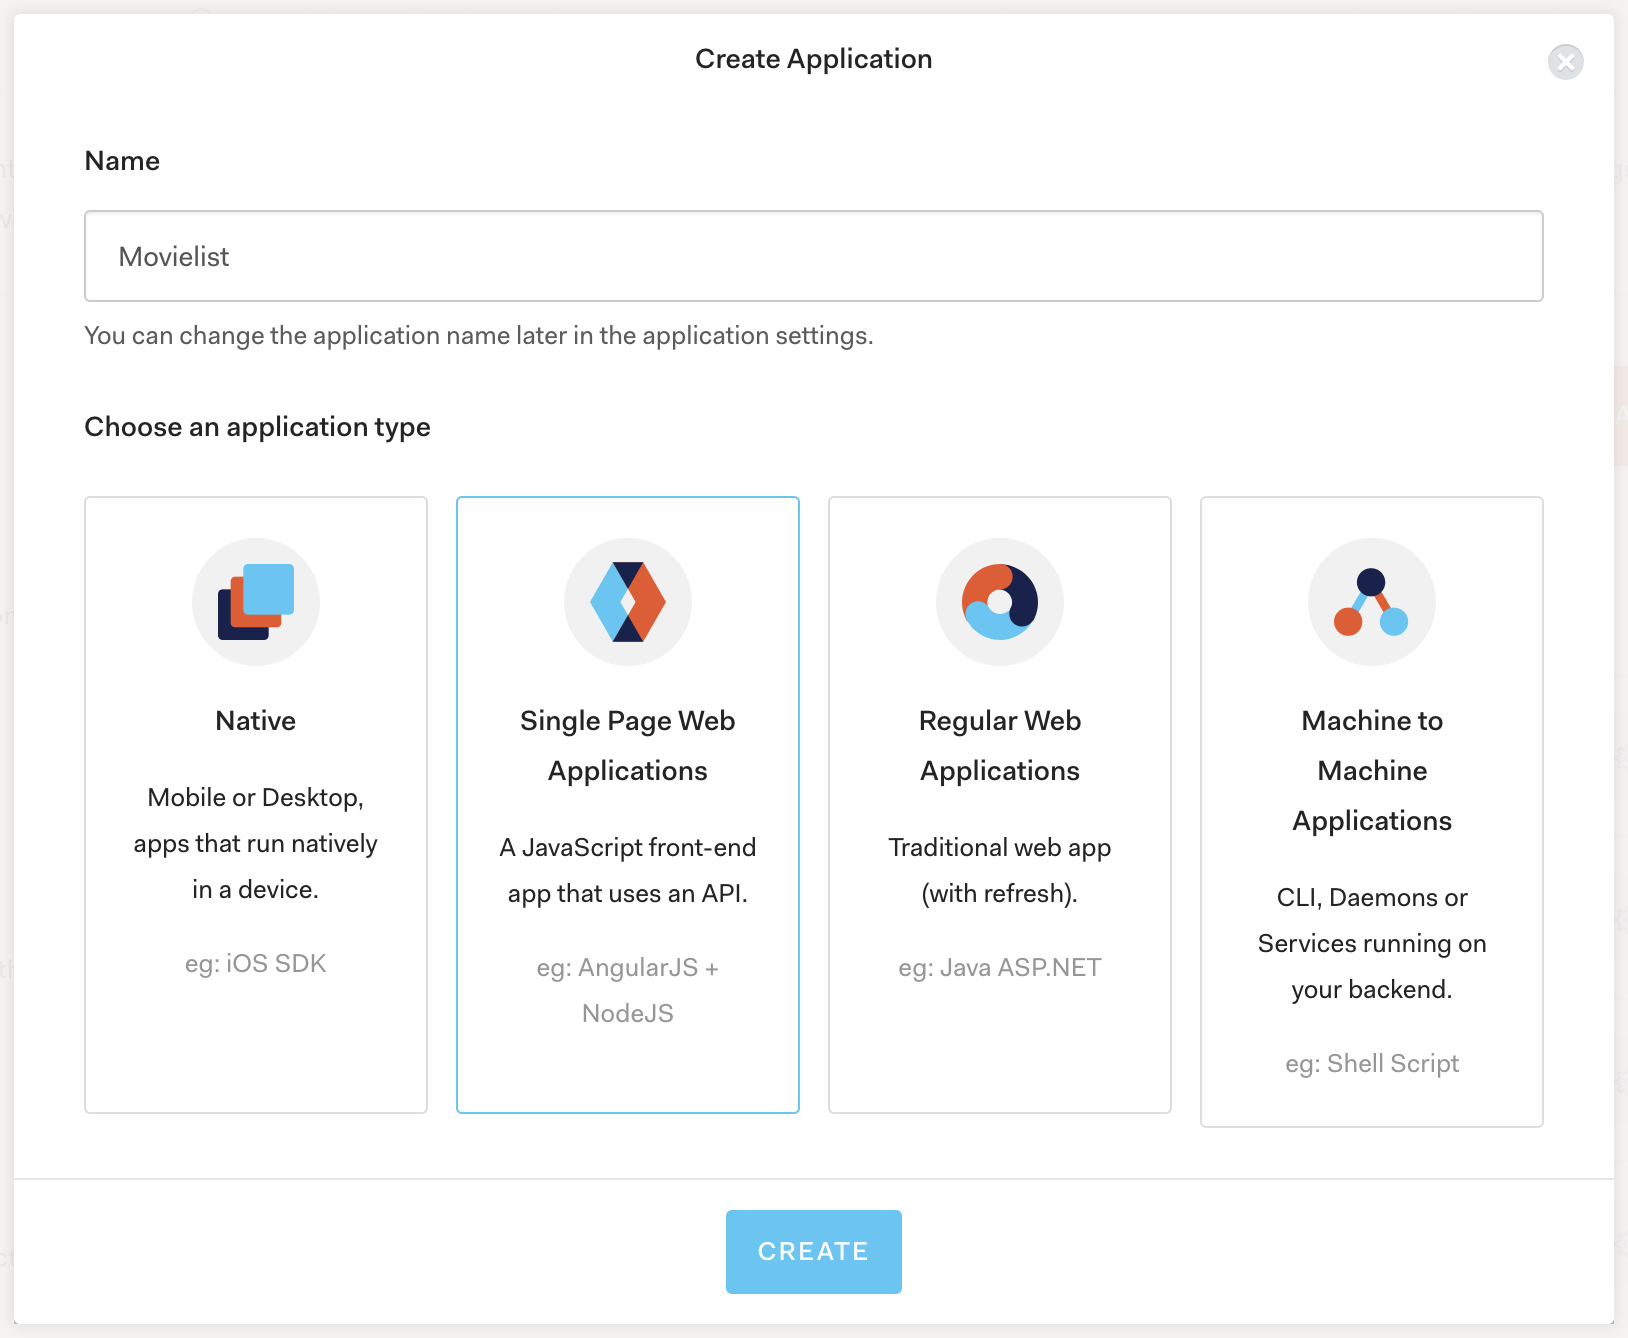
From this page, click 'Create application'. On the next page, enter a name for your app (I called mine 'Movielist') and for the 'application type', select 'Single Web Page Applications:
Next, click the 'Create' button. On the next screen, select the 'Settings' tab, and scroll to the 'Allowed Callback URLs' field. In this box, insert the following value:
http://localhost:8080/callback
Scroll a little further down, and enter the following value for the 'Allowed Logout URLs':
http://localhost:8080/
Finally, click the 'Save changes' button at the bottom of the page to commit your changes. From this point, feel free to set up social connections. You can then enable them for your app in the Application options under the Connections tab. For mine, I've enabled 'GitHub' and 'Google'.
Configuring our app for Auth0
From your Auth0 Application Settings page, copy the value for Client ID. Next, open aurelia_project/environments/dev.ts and modify the configuration object to include the Client ID value that's in your clipboard. You will also need to head back to the settings page and retrieve the 'domain' value:
// aurelia_project/environments/dev.ts

export default {
  debug: true,
  testing: true,
  apiKey: 'd25d7a6ef37e1f8d1d30d96be59c6a3e',
  auth0: {
    clientId: '<your Auth0 client ID>',
    domain: '<your Auth0 domain>'
  }
};
In order to work with Auth0, we need to install the auth0-js package, as well as the TypeScript type definitions, which will make working with the library a bit easier:
npm install --save-dev auth0-js @types/auth0-js
Next, we're going to create a class that handles our authentication strategy for us. Create a new file src/auth-service.ts, and create the class AuthService inside it, bringing in some imports that we're going to be using:
// src/auth-service.ts

import { WebAuth, Auth0DecodedHash } from "auth0-js";
import { autoinject } from "aurelia-framework";
import { Router } from "aurelia-router";
import { EventEmitter } from "events";
import env from "./environment";

@autoinject
export class AuthService {
  private accessToken: string;
  private id_token: string;
  private expires_at: string;

  authNotifier = new EventEmitter();

  auth0 = new WebAuth({
    domain: env.auth0.domain,
    clientID: env.auth0.clientId,
    redirectUri: "http://localhost:8080/callback",
    audience: `https://${env.auth0.domain}/userinfo`,
    responseType: "token id_token",
    scope: "openid"
  });

  constructor(private router: Router) {}
}
Here we've set up quite a few things that we'll make use of in the next few code snippets, but the main thing about this code is the Auth0 WebAuth configuration. These values are mostly pulled from the configuration that we defined in the previous section, but make sure that the value for redirectUri matches the value that was given in the settings for your Auth0 application. The value for audience is calculated based on the domain.
Notice that we've also pulled in Router so that we can send the user to the right place once they've logged in.
Fleshing out the authentication service class
Let's put some methods into this class to perform authentication, and handling of the callback from Auth0 once the user has logged in. First up, login():
// src/auth-service.ts

login(): void {
  localStorage.setItem('location', JSON.stringify({ url: this.router.currentInstruction.fragment }));
  this.auth0.authorize();
}
Here we delegate most of the work to the auth0.authorize() call, which will redirect the user to the Auth0 login page. However, we also store the current route that the user is on so that once the user has logged in, we can redirect them back to the page that they were on when they hit the login button. Although we only have a couple of pages, remember that the user can search for movies so this will allow them to continue where they left off with their search.
Next, the handleAuthentication() method. This will handle the callback once Auth0 has returned control to our application:
// src/auth-service.ts

handleAuthentication(): void {
  this.auth0.parseHash((err, authResult) => {
    if (authResult && authResult.accessToken && authResult.idToken) {
      this.setSession(authResult);

      const savedLocation = JSON.parse(localStorage.getItem('location'));
      const navigateTarget = savedLocation.url || 'watchlist';

      this.router.navigate(navigateTarget);

      this.authNotifier.emit('authChange', { authenticated: true });
    } else if (err) {
      console.log(err);
    }
  });
}
The call to auth0.parseHash() will allow the auth0-js library to process the token information sent to use from Auth0 in the return URL. We then take that information and create out auth session by storing those values in memory (the setSession() method is defined next). The rest of the code here deals with the loading of the previously saved URL and returning the user to where they left off. We also emit an event to any listeners to let them know that the authentication state has changed.
Next, setSession():
// src/auth-service.ts

setSession(authResult: Auth0DecodedHash): void {
  const expiresAt = JSON.stringify(
    authResult.expiresIn * 1000 + new Date().getTime()
  );

  this.accessToken = authResult.accessToken;
  this.id_token = authResult.idToken;
  this.expires_at = expiresAt;
}
After working out the expiry time, we simply store the token values for later use.
The next thing we need is the ability to determine whether or not the user is currently logged in, and we can do that with an isAuthenticated() method:
// src/auth-service.ts

isAuthenticated(): boolean {
  if (!this.accessToken)
    return false;

  const expiresAt = JSON.parse(this.expires_at);
  return new Date().getTime() < expiresAt;
}
To do this, we just check if this.accessToken has been defined. If it has, we also check that the current time is still within the calculated expiry time.
Finally, we need a way to log out of the application:
// src/auth-service.ts

logout(): void {
  delete this.accessToken;
  delete this.id_token;
  delete this.expires_at;

  this.authNotifier.emit('authChange', { authenticated: false });
}
Now that the AuthService class has been defined, we can start to use it in the next section.
Routing the Auth0 callback
In order for the callback from Auth0 to work correctly, we'll need to create some routing for it. To achieve this, we need to:
- Create a new component to invoke the
handleAuthentication()method in the authentication service - Configure the Aurelia router to accept the
/callbackURL and pass it on to this new callback component.
Let's update the router configuration first. Open app.ts and modify the router configuration to route /callback to a new component that will handle the route:
// src/app.ts

config.map([
  { route: ['', 'watchlist'], name: 'watchlist', title: 'Watchlist', moduleId: PLATFORM.moduleName('pages/watchlist'), nav: true },
  { route: 'popular', name: 'popular', title: 'Popular movies', moduleId: PLATFORM.moduleName('pages/popularmovies'), nav: true },
  { route: 'search/:term', name: 'search', moduleId: PLATFORM.moduleName('pages/searchresults')},
  { route: 'callback', name: 'callback', moduleId: PLATFORM.moduleName('callback') }
]);
Next, create a new file in the src directory called callback.ts, and insert a new Callback class:
// src/callback.ts

import { autoinject } from 'aurelia-framework';
import { AuthService } from 'auth-service';

@autoinject
export class Callback {
  constructor(private auth: AuthService) {
    auth.handleAuthentication();
  }
}
Here is where we invoke the call to handleAuthentication() and where the auth session is created, completing the round—trip which enables the user to log into our application.
Creating the movie watch list
Now we can get to the meat of the application: adding movies to a 'watch list'. This will involve:
- adding an 'add' button on each movie from search results or popular movies
- adding a 'remove' button on each movie inside the watch list
- the facility to add and remove a movie to/from an array in local storage
- a new view to display the movies from the watch list using the
MovieListcomponent we created earlier
The interaction with local storage is going to be marshaled through a new class called WatchlistManager. Create a new file inside the src folder called watchlist-manager.ts, and start by importing some types that we'll need:
// src/watchlist-manager.ts

import { EventEmitter } from 'events';
import { Movie } from "moviedb-promise";

const storageKey = 'watchlist';

export class WatchlistManager {
}
Let's add an array to store the movies once they've been read from local storage, and an EventEmitter so that other types can subscribe to events that we generate:
// src/watchlist-manager.ts

private items: Movie[];
notifier = new EventEmitter();

constructor() {
  this.items = this.load();
}
Next, we need methods to load and save the data from/to local storage:
// src/watchlist-manager.ts

private load(): Movie[] {
  return localStorage.getItem(storageKey)
  ? JSON.parse(localStorage.getItem(storageKey))
  : [];
}

private save(): void {
  localStorage.setItem(storageKey, JSON.stringify(this.items));
}
We also need methods to add and remove movies to/from the watch list. Notice that we're emitting some events to others to let them know that we've added or removed a movie, and what movie it was. This will come in handy later when we configure the UI to show whether something has just been added to the watch list or not:
// src/watchlist-manager.ts

add(movie: Movie) {
  if (!this.isAdded(movie)) {
    this.items.push(movie);
    this.save();

    this.notifier.emit('movie:added', movie, this.items);
  }
}

remove(movie: Movie) {
  if(this.isAdded(movie)) {
    this.items.splice(this.items.indexOf(movie), 1);
    this.save();
    this.notifier.emit('movie:removed', movie, this.items);
  }
}
Finally, we can implement a couple utility methods to retrieve the items, and to determine whether or not a movie is in the watchlist:
// src/watchlist-manager.ts

get() {
  return this.items;
}

isAdded(movie: Movie): boolean {
  return this.items.find(m => m.id == movie.id) != undefined;
}
This gives us everything we need to load, store, add and remove movies.
The next thing we can do is create a new page which displays movies that are currently on the watch list. This will be very similar to the 'popular movies' and 'search results' pages; we're just changing where the movies come from.
Create a new component inside the pages folder:
au generate component Watchlist
Open watchlist.html and populate it with the following template:
<!-- src/pages/watchlist.html -->
<template>
  <require from="../components/movielist"></require>
  <movie-list movies.bind="watchlist.get()" title="Your watchlist"></movie-list>
  <div class="alert alert-info" if.bind="!hasMovies">
    <h4 class="alert-heading">There's nothing here!</h4>
    <p>Try looking through <a href="${router.generate('popular')}">popular movies</a> to add them to your watchlist</p>
  </div>
</template>
The main difference here compared to the other pages that we've done, is that there's a new panel on this screen which displays a short message on the screen when there are no movies in the watch list, and a prompt to try looking through the popular movies list. This is just a link to the 'popular movies' page, generated by the router. Otherwise, it pulls in the MovieList component and assigns the movies property to the value watchlist.get(), which is one of the methods that we created in the previous step.
Now open watchlist.ts and configure it like so:
// src/pages/watchlist.ts

import { Router } from 'aurelia-router';
import { autoinject } from "aurelia-framework";
import { WatchlistManager } from '../watchlist-manager';

@autoinject
export class Watchlist {
  hasMovies: boolean;

  constructor(private watchlist: WatchlistManager, private router: Router) {
    this.hasMovies = watchlist.get().length > 0;

    const handler = (movie, list) => this.hasMovies = list.length > 0;

    this.watchlist.notifier.addListener('movie:removed', handler);
  }
}
Here we bring in the WatchlistManager we created earlier using dependency injection, as well as the router. We set hasMovies to a value depending on whether or not there are any movies in the watch list (thus showing the "There's nothing here!" panel) and we also listen out for the movie:removed event from the watch list manager. This enables us to resurface the panel if the user were to remove the last movie on the watch list.
Finally, let's reconfigure the router so that the watch list is shown by default when the home page is loaded. We will also have a third route which will still enable us to reach the list of popular movies. Open up app.ts again and reconfigure the router to include the watch list page:
// src/app.ts

config.map([
  { route: ['', 'watchlist'], name: 'watchlist', title: 'Watchlist', moduleId: PLATFORM.moduleName('pages/watchlist'), nav: true },
  { route: 'popular', name: 'popular', title: 'Popular movies', moduleId: PLATFORM.moduleName('pages/popularmovies'), nav: true },
  { route: 'search/:term', name: 'search', moduleId: PLATFORM.moduleName('pages/searchresults')},
  { route: 'callback', name: 'callback', moduleId: PLATFORM.moduleName('callback') }
]);
Notice that we've set nav: true on the watch list route as well, which means if you reload the page now, you'll see both 'Watchlist' and 'Popular movies' appear in the navigation bar. Also, you should now see the panel letting you know that you haven't added anything to the watch list yet — let's fix that now!
To start adding movies to the watch list, we need to revisit the Movie component and add some buttons on there. We're going to add two buttons — one for adding a movie if it's not already in the list, and one for removing the movie when it's already in the list.
Open movie.html and add three buttons into the card-body element:
<!-- src/components/movie.html -->
<template>
  <!-- require movie.css -->
  <div class="card">
    <!-- ... div.movie-card ... -->
    <div class="card-body">
      <h5 class="card-title">${model.title}</h5>
      <p>Avg. rating: ${model.vote_average}</p>
      <a if.bind="!isAuthenticated" click.trigger="auth.login()" href="#" class="btn btn-success">Sign in</a>
      <a if.bind="!isInWatchlist && isAuthenticated" click.trigger="addMovie(model)" href="#" class="btn btn-success">Add</a>
      <a if.bind="isInWatchlist && isAuthenticated" click.trigger="removeMovie(model)" href="#" class="btn btn-outline-success">Remove</a>
    </div>
  </div>
</template>
The 'add' button will invoke the addMovie() function, while the 'remove' button will invoke the removeMovie() function. If the user hasn't logged in yet, the 'Sign in' button will invoke the login process and redirect the user to Auth0 for authentication.
Let's add the methods for adding and removing movie into the class defined in movie.ts:
// src/components/movie.ts

addMovie(movie: MovieModel) {
  this.watchlist.add(movie);
  this.isInWatchlist = true;
}

removeMovie(movie: MovieModel) {
  this.watchlist.remove(movie);
  this.isInWatchlist = false;
}
We'll also need to bring in the WatchlistManager and AuthService types into the constructor, as well as a new property to record whether the movie is in the watch list or not:
// src/components/movie.ts

import { autoinject, bindable } from 'aurelia-framework'; // this has been modified to include 'autoinject'
import { WatchlistManager } from '../watchlist-manager';
import { AuthService } from '../auth-service';

// ...

@autoinject
export class Movie {
  //...
  isInWatchlist = false;
  isAuthenticated = false;
  //...

  constructor(private watchlist: WatchlistManager, private auth: AuthService) {
    this.isAuthenticated = auth.isAuthenticated();

    auth.authNotifier.addListener('authChange', this.authChangeHandler);
  }

  //...

  private authChangeHandler(state) {
    this.isAuthenticated = state.authenticated;
  }
Finally, we need to somehow initialize isInWatchlist when the component is loaded, as well as doing some tidying up when the component system is finished with this component. We can achieve both of those things by adding the bind and detached methods inside the Movie class:
// src/components/movie.ts

bind() {
  this.isInWatchlist = this.watchlist.isAdded(this.model);
}

detached() {
  this.auth.authNotifier.removeListener('authChange', this.authChangeHandler);
}
The reason we would like to remove our change handler function from the event listener is that it could otherwise introduce a memory leak. To prevent this, we can remove our change listener function from the auth notifier whenever the component is detached from the system.
With this code in place, you should now be able to sign in to your application using the Auth0 login page, add and remove movies to and from the watch list, and be able to browse to the watch list page and see the list of movies that you've added. Furthermore, you should be able to do this from either the popular movies page or the search results page!
The last thing to achieve is logging out of the application. We're going to do this by placing a link inside the navigation bar which allows the user to log out (we can add it after <search-box></search-box>), which will also update any links on the page allowing the user to sign in again. Open header.html and adjust the markup to include this new link after the search box:
<!-- src/components/header.html -->
<!-- ... -->
<ul class="navbar-nav">
  <li class="nav-item" if.bind="isAuthenticated"><a href="#" click.trigger="auth.logout()" class="nav-link">Log out</a></li>
</ul>
<!-- ... -->
Next, we need to modify the component code for the header to bring in the authentication service, and to handle things when the auth state changes. Update header.ts to look like the following:
// src/components/header.ts

import { autoinject } from 'aurelia-framework';
import { Router } from 'aurelia-router';
import { AuthService } from 'auth-service';

@autoinject
export class Header {
  appTitle = "Movielist";
  isAuthenticated = false;

  constructor(private router: Router, private auth: AuthService) {
    this.isAuthenticated = auth.isAuthenticated();

    auth.authNotifier.on('authChange', state => {
      this.isAuthenticated = state.authenticated;
    });
  }
}
With this in place, you will be able to log out of the application and all of the 'Add' and 'Remove' buttons on each movie will update to reflect the change in auth state.
“I just built a movie listing application with Aurelia.”
Tweet This
Summary and next steps
In this article, you saw how to create an Aurelia TypeScript application that allowed you to browse for popular movies or search for your own favorites. We saw how to create components using the CLI tool, how to bind variables between the component and the template, and how to use dependency injection and the autoinject decorator to bring in other types and create a loosely—coupled framework of code.
We created an Auth0 application and use the Auth0 JavaScript library to enable the user to log in using the Auth0 login page. Once the user is authenticated, they can begin to add and remove movies to and from a watch list that they can refer to later. Once they're done adding movies, they're able to log out of the application again.
The application could be further extended to support TV shows or could use the information retrieved from Auth0 to get profile-based information such as the user's email address or avatar for display somewhere, creating a profile of sorts. Instead of watch lists being stored in local storage, they could be stored inside a database enabling a user to 'share' a watch list with another user. All these are useful features that are left as an exercise for you, the reader, to have fun with.
About the author

Steve Hobbs
Developer Experience Engineer