
This is a guest post by Diego Poza. He is a systems engineer who is passionate about technology. He works as a developer lead and specializes in emerging technologies, architecture, and technical writing. You can follow him on his blog
The purpose of this post is to show a very simple Ember 2.0 application that uses JSON Web Tokens (JWT) to authenticate to a protected API. You can get the sample app from this GitHub repository.
What is Ember 2.0?
Ember is an MVC flavored framework, but in its 2.0 version this has changed to a components oriented approach, as you can see in the following image.

Ember evolution: from 1.x to 2.0
Ember 2.0 does not introduce any new features, as those features (Glimmer rendering engine, new computed syntax, HTML-style component invocation, and more) were already published in previous versions of Ember. In fact the dev team states that Ember's latest stable release, v1.13, is Ember 2.0 in disguise. You have to also take into account that the features deprecated in v1.x versions will be removed from 2.0.
This means that if you manage to create a v1.13 application with no deprecation warnings, then migrating to 2.0 will be straightforward, as there will not be breaking changes.
Using 2.0 with Ember-cli
As you may know ember-cli is a command line utility for developing Ember apps that was adopted by the dev team. However, the current release only supports Ember v1.13. Therefore, to use Ember 2.0 and take advantage of ember-cli, we have to tweak the application it has generated.
Once you have created your Ember application with ember-cli, edit the bower.json file, look for the Ember version, and replace it with '2.0.0-beta.3'. After that, delete the bowercomponents/ember_ folder and run:
bower install to fetch the 2.0 beta version. You may be prompted to manually choose the Ember version, as it cannot be resolved automatically. If this happens, just choose Ember 2.0.0 beta 3 to continue.
Note: Take into account that this workaround is only needed because v2.0 is not the stable release, and it is highly likely that ember-cli will support 2.0 when it becomes stable.
Creating a simple app that uses JWT
Our simple app will consist of a login form, and a page that shows a random quote obtained by calling the protected API. The server that will authenticate us and provide the secured API is Auth0's NodeJS JWT Authentication Sample.
The app will have two routes: one for the login form, and one for showing the quotes, as you can see in the following code.
// router.js
Router.map(function() {
  this.route('login');
  this.route('protected');
});
To work with JWT we will use a plugin called Ember Simple Auth that can be downloaded from here
(http://ember-simple-auth.com/). Follow the "how to use it" instructions in the site to install it. This plugin will help us protect the routes as well as creating code to authenticate us and authorize requests.
On the application route, we will use the ApplicationRouteMixin, which will create an application session and provide actions for authenticating and invalidating the session. You can see the application route code below, which only has the invalidate action.
// app/routes/application.js
import Ember from 'ember';
import ApplicationRouteMixin from 'simple-auth/mixins/application-route-mixin';
export default Ember.Route.extend(ApplicationRouteMixin, {
    actions: {
        invalidateSession: function() {
            this.get('session').invalidate();
        }
    }
});
We will take advantage of the aforementioned methods to display login/logout buttons depending on the session's authentication state. This is done in the application template, as shown below.
  <!-- app/templates/application.hbs -->
  {{ "{{#if session.isAuthenticated" }}}}
    <p><a {{ " action 'invalidateSession' " }}>Logout</a></p>}}
  {{ "{{else" }}}}
    <p><a {{ " action 'sessionRequiresAuthentication' " }}>Login</a></p>}}
  {{ "{{/if" }}}}
Ember Simple Auth also provides the AuthenticatedRouteMixin mixin, to secure the routes that should be only available when the user is authenticated. In our case, this is the protected route, as you can see below. If not authenticated it will trigger a redirection to the login route.
// app/routes/protected.js
import Ember from 'ember';
import AuthenticatedRouteMixin from 'simple-auth/mixins/authenticated-route-mixin';
export default Ember.Route.extend(AuthenticatedRouteMixin, {
});
Last, there is the LoginControllerMixin, which allows you to specify the controller that will perform the login process.
// app/controllers/login.js
import Ember from 'ember';
import LoginControllerMixin from 'simple-auth/mixins/login-controller-mixin';
export default Ember.Controller.extend(LoginControllerMixin, {
});
From here two new concepts arise: Authenticators & Authorizers.
Authenticators implement the logic necessary to authenticate the session. You will have one authenticator for every authentication mechanism / provider you use. Authorizers, on the other hand, use the secret information acquired by the authenticator to authorize subsequent requests.
You can see our custom implementations below:
// app/authenticators/custom.js
import Ember from 'ember';
import Base from 'simple-auth/authenticators/base';
export default Base.extend({
    tokenEndpoint: 'http://localhost:3001/sessions/create',
    restore: function(data) {
        return new Ember.RSVP.Promise(function(resolve, reject) {
            if (!Ember.isEmpty(data.token)) {
                resolve(data);
            } else {
                reject();
            }
        });
    },

    authenticate: function(options) {
        return new Ember.RSVP.Promise((resolve, reject) => {
            Ember.$.ajax({
                url: this.tokenEndpoint,
                type: 'POST',
                data: JSON.stringify({
                    username: options.identification,
                    password: options.password
                }),
                contentType: 'application/json;charset=utf-8',
                dataType: 'json'
            }).then(function(response) {
                Ember.run(function() {
                    resolve({
                        token: response.id_token
                    });
                });
            }, function(xhr, status, error) {
                var response = xhr.responseText;
                Ember.run(function() {
                    reject(response);
                });
            });
        });
    },

    invalidate: function() {
        console.log('invalidate...');
        return Ember.RSVP.resolve();
    }
});
Note: In the authenticate function, inside the function of the first then statement, we are saving the token that comes in the id_token property of the response of the server, only when the promise is resolved successfully. The token is then saved in the token property and can be obtained later in the path session.content.secure.token, as shown in the custom authorizer below.
// app/authorizers/custom.js
import Ember from 'ember';
import Base from 'simple-auth/authorizers/base';
export default Base.extend({
    authorize: function(jqXHR, requestOptions) {
        var accessToken = this.get('session.content.secure.token');
        if (this.get('session.isAuthenticated') && !Ember.isEmpty(accessToken)) {
            jqXHR.setRequestHeader('Authorization', 'Bearer ' + accessToken);
        }
    }
});
You can see that the Authenticator calls the token endpoint with the user credentials and returns the token. It also has methods to invalidate the session and to restore it. On the other hand, the Authorizer gets the saved token and adds the Authorization header in each Ajax call.
The last important thing you have to take into account about the plugin is how to configure it correctly. To do this, set the desired configuration properties in the environment.js file. The most relevant properties are the following:
Store: This specifies where the session state will persist so it survives page reload. In this case it is set to use the local storage.
Authorizer: This property specifies the authorizer that will be used. In our case this is the custom authorizer.
CrossOriginWhitelist: This is a very important property for our scenario. By default the Ember simple auth plugin will not authorize requests going to a different origin than the one the Ember.js application was loaded from. Therefore we have to explicitly enable authorization for additional origins, such as the origin of the NodeJS JWT Authentication Sample.
RouteAfterAuthentication: This property defines the route that the app will redirect to after successful authentication. In our example, that will be the protected route.
You can see the environment.js file for our sample below.
// config/environment.js
...
ENV['simple-auth'] = {
    store: 'simple-auth-session-store:local-storage',
    authorizer: 'authorizer:custom',
    crossOriginWhitelist: ['http://localhost:3001/'],
    routeAfterAuthentication: '/protected'
};
...
Components
As we mentioned at the start of the post, the Ember 2.0 approach for creating applications has changed to be component driven. Therefore, we created components for our login form view (login-form) and for the protected view (get-quotes).
Ember components are based on the W3C Web Components specification, which are views that are completely isolated. Properties accessed in its templates go to the view object and actions are targeted at the view object. There is no access to the surrounding context or outer controller; all contextual information must be passed in. Components should have a well-defined interface to the outside world and can broadcast events. A component must have a dash in its name to avoid conflicts with built-in controls that wrap HTML elements. You can see a component definition in the following image.
“Components should have a well-defined interface to the outside world and can broadcast events.”
Tweet This
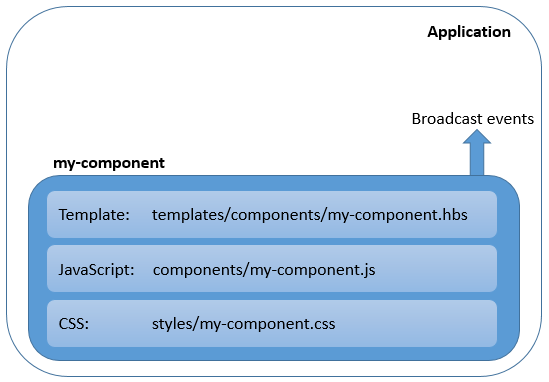
Component definition
Let's see how the login-form component is defined. You can see that the view is defined in the templates/components/login-form.hbs file, and its content is exactly the same as a regular view.
  <!-- app/templates/components/login-form.hbs -->
  <form {{ "{{action 'authenticate' on='submit'" }}}}>
    <div class="form-group">
      <label for="identification">Login</label>
      {{ "{{input value=identification placeholder='Enter Login' class='form-control'" }}}}
    </div>
    <div class="form-group">
      <label for="password">Password</label>
      {{ "{{input value=password placeholder='Enter Password' class='form-control' type='password'" }}}}
    </div>
    <button type="submit" class="btn btn-default">Login</button>
  </form>
  {{ "{{#if errorMessage" }}}}
    <div class="alert alert-danger">
      <strong>Login failed:</strong> {{ "{{errorMessage" }}}}
    </div>
  {{ "{{/if" }}}}
Notice the identification and password values will be passed to the authenticate action, which is defined in the component logic, as seen in the following code.
// app/components/login-form.js
import Ember from 'ember';
export default Ember.Component.extend({
    authenticator: 'authenticator:custom',
    actions: {
        authenticate: function() {
            var credentials = this.getProperties('identification', 'password');
            this.get('session').authenticate('authenticator:custom', credentials).catch((message) => {
                this.set('errorMessage', message);
            });
        }
    }
});
Notice that the component logic is practically the same as what you would put in a controller, with the exception that you are extending an Ember.Component instead of an Ember.Controller.
Note: In the future Ember 2.1, the dev team is planning to add Routable components, which will simplify the way in which a route can simple redirect to a component instead of a view.
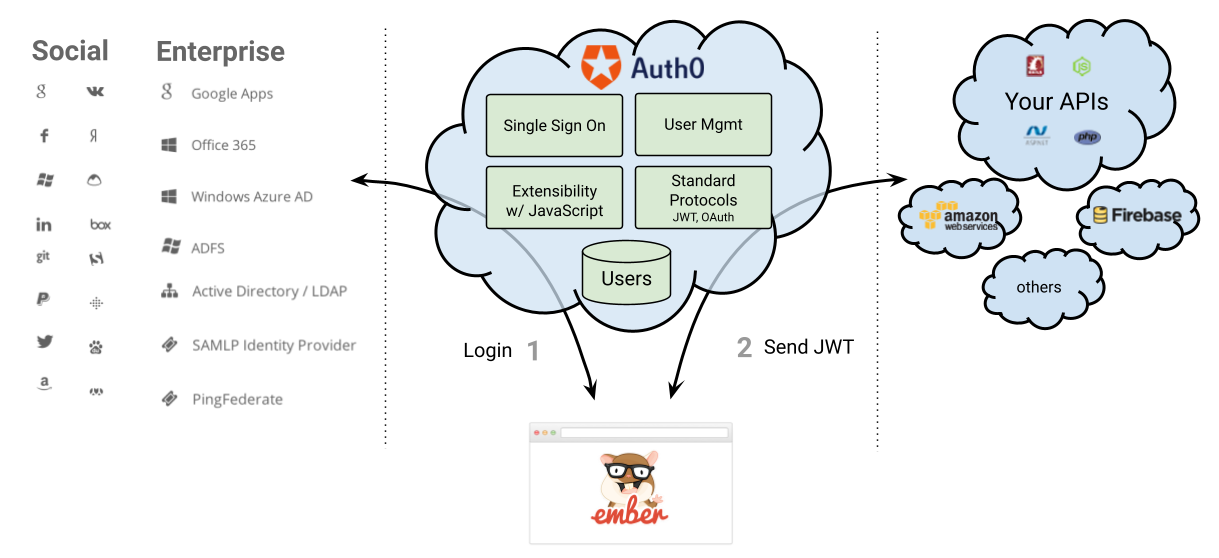
Aside: Using Ember 2.0 with Auth0
Auth0 issues JSON Web Tokens on every login for your users. That means that you can have a solid identity infrastructure, including Single Sign On, User Management, support for Social (Facebook, Github, Twitter, etc.), Enterprise (Active Directory, LDAP, SAML, etc.) and your own database of users with just a few lines of code. You can use our EmberSDK which uses ember-simple-auth to integrate Auth0 with Ember 2.0 to avoid having to deal with Authentication again!
Summarizing
The following image summarizes the application flow:

Application flow
When successfully logging in, the session is created and the Authenticator stores the JWT in local storage. Whenever generating an AJAX request to the app or to any whitelisted origin, such as the JWT server, the authentication header with the JWT will be appended by the authorizer, validating all subsequent requests to the the Authentication Sample server.
Getting random quotes from the protected API
As a final note, take into account that you may receive deprecation warnings due to the way that the Ember Simple Auth plugin uses Ember's container. You can just ignore these warnings for the time being, as we expect that the plugin will be updated when Ember 2.0 is released.
Hope this post has been useful to you.
About the author

Diego Poza
Sr Manager, Developer Advocacy (Auth0 Alumni)