
TL;DR: Aurelia is a great client-side JavaScript framework and adding JWT authentication to Aurelia apps is easy with the aurelia-auth package. Check out the GitHub repo for this article to find out how to add authentication to your Aurelia app.
Aurelia is a client-side JavaScript framework that has been gaining a lot of popularity lately. One of the nice aspects of Aurelia is that it anticipates common application needs and provides simple conventions for accomplishing them. In some ways, Aurelia is similar to Angular 2, so parts of it may look familiar if you've checked out Angular 2 already.
“Aurelia anticipates common application needs and provides simple conventions for accomplishing them.”
Tweet This
Getting Started
Getting started with Aurelia is a piece of cake. The framework's getting started guide offers an in-depth set of instructions and a seed project that make it very simple to get up and running quickly.
Aurela has a cli tool. You can run npm install -g aurelia-cli to get the new cli tool. Then just run au new and the CLI will setup your project and you'll have an app ready for deploy within a few minutes. You can read more about it in the CLI documentation.
This tutorial will expand upon the seed project and show how to add JWT authentication to a random quote application. We'll be using the NodeJS JWT Authentication Sample as our backend to show how we can retrieve a JWT upon login, save it in local storage, and send it along with every subsequent request. Our app will let all visitors retrieve a random quote, but logged-in users will be able to get a super-secret quote.
Two Ways to Get Going
You can go through the getting started guide that Aurelia provides and follow along, changing files in their seed project as we go. Alternatively, you can clone the the project for this tutorial and follow along from there.
If you are starting from Aurelia's seed project, be sure to split it out into two subdirectories, client and server. The server directory is where the NodeJS JWT authentication sample will go.
To get the server setup, you can follow the instructions in the readme for the NodeJS JWT Authentication Sample.
A Little Help from Aurelia-Auth
To help us with our token dealings on the front-end, we'll use the awesome aurelia-auth plugin provided by Paul van Bladel, along with some pointers from his sample app repo.
Setting up the Client Config Files
There's a bit of configuration setup to do, but once it's in place, things will be a breeze.
After doing npm install and jspm install to pull in all the dependencies, we'll need to also install the aurelia-auth plugin. We can do this with jspm within the client directory:
jspm install github:paulvanbladel/aurelia-auth
Application Bootstrap Config
Let's give our app the name quotes-app and reflect this in the body tag of index.html where the app loads.
  <!-- client/index.html -->

  ...

  <body aurelia-app="quotes-app">
    <script src="jspm_packages/system.js"></script>
    <script src="config.js"></script>
    <script>
      System.config({
        "paths": {
          "*": "dist/*.js"
        }
      });
    </script>
    <script>
      System.import('aurelia-bootstrapper');
    </script>
  </body>

  ...
Aurelia looks for a JavaScript file with the same name in the src directory for the main app config details. Let's create that now:
// client/src/quotes-app.js

import config from './auth-config';

export function configure(aurelia) {

  // Here we provide configuration for our application and can
  // bring in the configuration settings we put within auth-config.js
  // that will tell the aureliauth plugin the specific settings
  // for our application's authentication context.
  aurelia.use
    .standardConfiguration()
    .developmentLogging()
    .plugin('paulvanbladel/aureliauth', (baseConfig) => {
         baseConfig.configure(config);
    });

  aurelia.start().then(a => a.setRoot());
}
You can see here that we're importing a file called auth-config.js and that it's the export from this file that is passed to the baseConfig for the plugin. The auth-config file will let us override the aurelia-auth plugin's defaults with our own specifics. Let's create it now:
// client/src/auth-config.js

// Specific settings for our application's
// authentication context. These will override
// the default settings provided by aureliauth

var config = {

  // Our Node API is being served from localhost:3001
  baseUrl: 'http://localhost:3001',
  // The API specifies that new users register at the POST /users enpoint.
  signupUrl: 'users',
  // Logins happen at the POST /sessions/create endpoint.
  loginUrl: 'sessions/create',
  // The API serves its tokens with a key of id_token which differs from
  // aureliauth's standard.
  tokenName: 'id_token',
  // Once logged in, we want to redirect the user to the welcome view.
  loginRedirect: '#/welcome',

}

export default config;
The API is accessible at localhost:3001, so we set this as our baseUrl. Next, we will set up the proper endpoints needed for signing users up and logging them in. We also need to override the tokenName with what our API serves, which in this case is id_token. Our API serves both id_token and access_token but we'll see how to handle the access_token later in the tutorial. Finally, we say that we want to redirect the users to the welcome view once they log in.
Application Routing Config
We'll now need to set up the application's routing configuration. Let's first set up the HTML that will require and load our nav bar and other views:
  <!-- client/src/app.html -->
  <template>
    <require from='./nav-bar'></require>

    <nav-bar router.bind="router"></nav-bar>

    <div class="container">
      <router-view></router-view>
    </div>

  </template>
Here, we are requiring the nav-bar and binding it to the router. We will serve our views from the <router-view> within our containing <div>.
// client/src/app.js

import 'bootstrap';
import 'bootstrap/css/bootstrap.css!';

import {inject} from 'aurelia-framework';
import {Router} from 'aurelia-router';
import HttpClientConfig from 'paulvanbladel/aureliauth/app.httpClient.config';
import AppRouterConfig from 'router-config';

// Using Aurelia's dependency injection, we inject Aurelia's router,
// the aurelia-auth http client config, and our own router config
// with the @inject decorator.
@inject(Router, HttpClientConfig, AppRouterConfig)

export class App {

  constructor(router, httpClientConfig, appRouterConfig) {

    this.router = router;

    // Client configuration provided by the aureliauth plugin
    this.httpClientConfig = httpClientConfig;

    // The application's configuration, including the
    // route definitions that we've declared in router-config.js
    this.appRouterConfig = appRouterConfig;
  };

  activate() {

    // Here, we run the configuration when the app loads.
    this.httpClientConfig.configure();
    this.appRouterConfig.configure();

  };
}
The HTTP configuration that aurelia-auth provides is what handles adding the JWT as a header if the user is authenticated. The httpClientConfig file has logic that checks for the existence of a token in localstorage and then adds an Authorization header with a value of Bearer <token> if one exists. The token will be sent for all HTTP requests to the API but will obviously only be needed for protected resources.

We can keep our routing logic within the main app.js file, as is done in many Aurelia projects, but in our case, we'll put this configuration in a separate file called router-config.js that we are injecting. Let's set up this routing configuration:
// client/src/router-config.js

import {AuthorizeStep} from 'paulvanbladel/aureliauth';
import {inject} from 'aurelia-framework';
import {Router} from 'aurelia-router';

// Using Aurelia's dependency injection, we inject Router
// with the @inject decorator
@inject(Router)

export default class {

  constructor(router) {
    this.router = router;
  };

  configure() {

    var appRouterConfig = function(config) {

      config.title = 'Random Quotes App';

      // Here, we hook into the authorize extensibility point
      // to add a route filter so that we can require authentication
      // on certain routes
      config.addPipelineStep('authorize', AuthorizeStep);

      // Here, we describe the routes we want along with information about them
      // such as which they are accessible at, which module they use, and whether
      // they should be placed in the navigation bar
      config.map([
          { route: ['','welcome'], name: 'welcome', moduleId: './welcome', nav: true, title:'Welcome' },
          { route: 'random-quote', name: 'random-quote', moduleId: './random-quote', nav: true, title:'Random Quote' },
          // The secret-quote route is the only one that the user needs to be logged in to see,  so we set auth: true
          { route: 'secret-quote', name: 'secret-quote', moduleId: './secret-quote', nav: true, title:'Super Secret Quote', auth: true },
          { route: 'signup', name: 'signup', moduleId: './signup', nav: false, title:'Signup', authRoute: true },
          { route: 'login', name: 'login', moduleId: './login', nav: false, title:'Login', authRoute: true },
          { route: 'logout', name: 'logout', moduleId: './logout', nav: false, title:'Logout', authRoute: true }
        ]);
      };

    // The router is configured with what we specify in the appRouterConfig
    this.router.configure(appRouterConfig);

  };
}
Aurelia gives us the ability to customize the navigation pipeline with some extensibility points, including an authorize route filter. Using this filter means we can specify which routes we would like authentication to be required for. Since our super-secret-quotes route needs to remain top secret until the user is logged in, we put auth: true in it. We hook into this filter by calling addPipelineStep, passing in the AuthorizeStep that is provided by the aurelia-auth plugin.
With the configuration out of the way, let's get to coding the actual routes and their views! We'll need to have files that take care of each route in place before the app will work so you can comment out the routes in router-config.js that aren't ready yet.
Setting up Routes and Views
Two files are required for each route in Aurelia--a JavaScript file for the view model logic and an HTML file for the view itself. Views are enclosed within <template> tags but are otherwise created with normal HTML that can make use of Aurelia's databinding.
The Nav Bar and Welcome Route
Let's start at the top and setup the navigation bar.
  <!-- nav-bar.html -->

  ...

  <ul class="nav navbar-nav">
    <li repeat.for="row of router.navigation | authFilter: isAuthenticated" class="${row.isActive ? 'active' : ''}">
      <a data-toggle="collapse" data-target="#bs-example-navbar-collapse-1.in" href.bind="row.href">${row.title}</a>
    </li>
  </ul>

  <ul if.bind="!isAuthenticated" class="nav navbar-nav navbar-right">
    <li><a href="/#/login">Login</a></li>
    <li><a href="/#/signup">Signup</a></li>
  </ul>

  <ul if.bind="isAuthenticated" class="nav navbar-nav navbar-right">
    <li><a href="/#/logout">Logout</a></li>
  </ul>

  ...
Notice here that we're running a filter on the repeated navigation items with authFilter: isAuthenticated. This allows us to hide any nav menu items that are to be protected if the user isn't authenticated, and this is how we will hide the super-secret-quote menu item when the user isn't logged in. We're also conditionally showing the Signup, Login, and Logout links. See the GitHub repo for the rest of the markup.
// client/src/nav-bar.js

import {bindable} from 'aurelia-framework';
import {inject} from 'aurelia-framework';
import {AuthService} from 'paulvanbladel/aureliauth';

@inject(AuthService)

export class NavBar {
  // User isn't authenticated by default
  _isAuthenticated = false;
  @bindable router = null;

  constructor(auth) {
    this.auth = auth;
  };

  // We can check if the user is authenticated
  // to conditionally hide or show nav bar items
  get isAuthenticated() {
    return this.auth.isAuthenticated();
  };
}
Here in the nav-bar.js file, we have a method that checks whether the user is logged in, which is what we hook into in the view.
The Aurelia seed comes with a welcome route, but in our case, we can trim it down to be simpler.
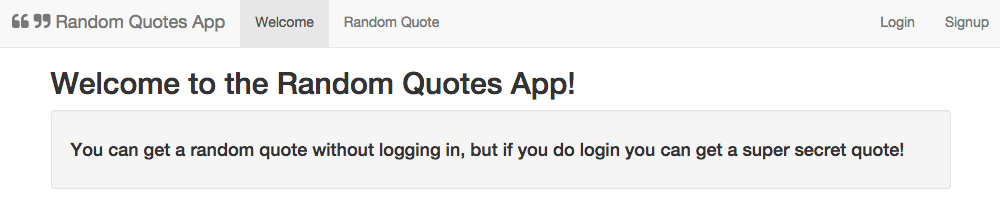
  <!-- client/src/welcome.html -->

  <template>
    <section>
      <h2>${heading}</h2>

      <div class="well">
        <h4>${info}</h4>
      </div>

    </section>
  </template>
The JavaScript becomes simpler as well.
// client/src/welcome.js

export class Welcome {

  heading = 'Welcome to the Random Quotes App!';
  info = 'You can get a random quote without logging in, but if you do log in you can get a super secret quote!';

}
Signup, Login, and Logout
Next, let's set up the signup, login, and logout routes.
Signup
  <!-- client/src/signup.html -->

  ...

  <form role="form" submit.delegate="signup()">
    <div class="form-group">
      <label for="email">Email</label>
      <input type="text" value.bind="email" class="form-control" id="email" placeholder="Email">
    </div>
    <div class="form-group">
      <label for="password">Password</label>
      <input type="password" value.bind="password" class="form-control" id="password" placeholder="Password">
    </div>
    <button type="submit" class="btn btn-default">Signup</button>
  </form>
  <hr>
  <div class="alert alert-danger" if.bind="signupError">${signupError}</div>

  ...
In this view, we're providing two <input>s that take the user's email and password. We've also got an alert box at the bottom to show the user any errors that are returned. We'll need to set up the view models for these next.
// client/src/signup.js

import {inject} from 'aurelia-framework';
import {AuthService} from 'paulvanbladel/aureliauth';

// Using Aurelia's dependency injection, we inject the AuthService
// with the @inject decorator
@inject(AuthService)

export class Signup {

  heading = 'Sign Up';

  // These view models will be given values
  // from the signup form user input
  email = '';
  password = '';

  // Any signup errors will be reported by
  // giving this view model a value in the
  // catch block within the signup method
  signupError = '';

  constructor(auth) {
    this.auth = auth;
  };

  signup() {

    // Object to hold the view model values passed into the signup method
    var userInfo = { email: this.email, password: this.password }

    return this.auth.signup(userInfo)
    .then((response) => {
      localStorage.setItem('access_token', response.access_token);
      console.log("Signed Up!");
    })
    .catch(error => {
      this.signupError = error.response;
    });

  };
}
The signup() method uses aurelia-auth to send a POST request to the API, which either creates a new user or returns an error if there was a problem. During the process of creating a new user, if successful, both id_token and access_token are returned. The aurelia-auth plugin automatically stores the id_token in localStorage, while we manually store the access_token returned.
Note: The aurelia-auth plugin automatically stores just one token, thus the reason why we are storing the access_token manually.
Login
The login route is pretty similar. You'll just need to swap out submit.delegate="signup()" forsubmit.delegate="login()" and adjust the other pieces of markup appropriately.
The JavaScript for login looks similar as well, but this time, we are sending the POST request to the sessions/create endpoint:
// client/src/login.js

import {AuthService} from 'aurelia-auth';
import {inject} from 'aurelia-framework';

@inject(AuthService)

export class Login {

  heading = 'Log in';

  // User inputs will be bound to these view models
  // and when submitting the form for login
  email = '';
  password = '';

  // This view model will be given an error value
  // if anything goes wrong with the login
  loginError = '';

  constructor(auth) {
    this.auth = auth;
  };

  login() {
    return this.auth.login(this.email, this.password)
    .then(response => {
      localStorage.setItem('access_token', response.access_token);
      console.log("Login response: " + response);
    })
    .catch(error => {
      this.loginError = error.response;
    });
  };
}
Logout
The logout route essentially follows the same pattern using authService.logout() to remove the user's JWT from localstorage. See the repo for further detail.
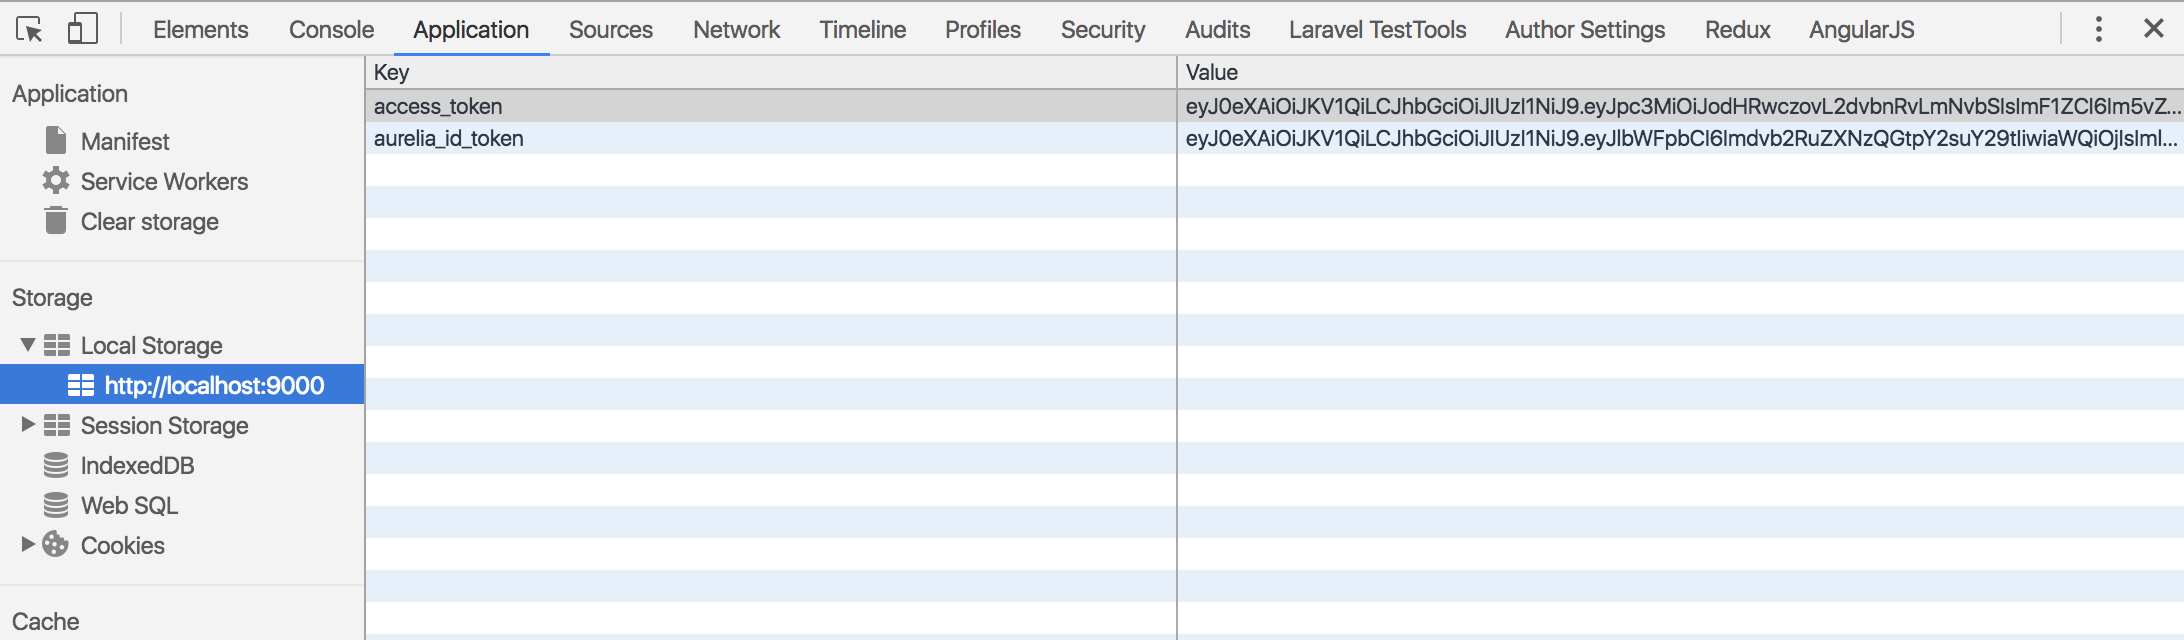
With all this in place, we should now be able to sign up, log in, and log out users. Test it out to make sure that everything is running as expected. If everything is working properly, when the user logs in there will be two tokens set in localStorage as aurelia_id_token and access_token.
The Random Quote and Super-Secret Quote Routes
With signup, login, and logout in place, we now need to create the files for our quote routes. Let's first take care of the random-quote route.
  <!-- client/src/random-quote.html -->

  <template>
    <section class="col-sm-12">
        <h2>${heading}</h2>
        <div class="row">
          <div class="well">
            <h4>${randomQuote}</h4>
          </div>
        </div>
    </section>
  </template>
This view simply displays the heading and the text of the quote that we retrieve.
// client/src/random-quote.js

import {inject} from 'aurelia-framework';
import {HttpClient} from 'aurelia-http-client';

// Using Aurelia's dependency injection, we inject HttpClient
// with the @inject decorator to make HTTP requests
@inject(HttpClient)

export class RandomQuote {

  heading = 'Random Quote';

  // View model that will be populated with the
  // the random quote retrieved from the API and
  // displayed in the view
  randomQuote = '';

  constructor(http) {
    this.http = http;
  };

  activate() {
    return this.http.get('http://localhost:3001/api/random-quote')
    .then(response => {
      this.randomQuote = response.content;
    }).catch(error => {
      console.log('Error getting quote');
    });
  };
}
We want to fetch the quote when the route is hit, so within the activate() method, we are making a GET request to our random-quote endpoint, which is located at localhost:3001/api/random-quote. If we get a good response, we set the quote text onto randomQuote so that it can be accessed in the view.
The super secret-quote route is a little bit different. We are making a request to a different endpoint. We are also sending an Authorization header with a Bearer token, which is an access token in this case.
In case you are wondering why we are using an access_token, and not id_token, check out why you should use access tokens to secure an api.
For the view in secret-quote.html, make sure to change ${randomQuote} to ${secretQuote}.
// client/src/secret-quote.js

import {inject} from 'aurelia-framework';
import {HttpClient} from 'aurelia-http-client';

// Using Aurelia's dependency injection, we inject HttpClient
// with the @inject decorator to make HTTP requests
@inject(HttpClient)

export class SecretQuote {

  heading = 'Super Secret Quote';

  // View model that will be populated with the
  // the secret quote retrieved from the API and
  // displayed in the view
  secretQuote = '';

  constructor(http) {
    this.http = http.configure(x => {
      x.withHeader('Authorization', 'Bearer ' + localStorage.getItem('access_token'));
    });
  };

  activate() {
    return this.http.get('http://localhost:3001/api/protected/random-quote')
    .then(response => {
      this.secretQuote = response.content;
    }).catch(error => {
      console.log('Error getting quote');
    });
  };
}
If there is no valid access_token in localStorage, we won't be able to get to this route. If somehow we got to it, the request would fail because no JWT would be sent to the server.

Aside: Using Aurelia with Auth0
Auth0 issues JSON Web Tokens on every login for your users. This means that you can have a solid identity infrastructure, including single sign-on, user management, support for social (Facebook, Github, Twitter, etc.), enterprise (Active Directory, LDAP, SAML, etc.) and your own database of users with just a few lines of code.
You can use Lock to integrate Auth0 with Aurelia as well and avoid having to deal with authentication!
To start, sign up for your free Auth0 account if you haven't already. Then bring in the Auth0Lock script.
  <!-- Auth0 Lock script -->
  <script src="//cdn.auth0.com/js/lock-8.1.min.js"></script>

  <!-- Setting the right viewport -->
  <meta name="viewport" content="width=device-width, initial-scale=1.0, maximum-scale=1.0, user-scalable=no" />
Next, instantiate Lock with your Auth0 credentials.
// app.js

export class App {

  lock = new Auth0Lock('AUTH0_CLIENT_ID', 'AUTH0_DOMAIN');

  ...
}
To log a user in, create a login method that opens the Lock widget and saves the returned profile and JWT in local storage.
// app.js

login() {
  this.lock.show((err, profile, token) => {
    if(err) {
      console.log(err);
    }
    else {
      localStorage.setItem('profile', JSON.stringify(profile));
      localStorage.setItem('id_token', token);
      this.isAuthenticated = true;
    }
  });
}
Important API Security Note: If you want to use Auth0 authentication to authorize API requests, note that you'll need to use a different flow depending on your use case. Auth0 idToken should only be used on the client-side. Access tokens should be used to authorize APIs. You can read more about making API calls with Auth0 here.
To make authenticated HTTP calls, simply attach the user's JWT as an Authorization header. This can be done on a per request basis, or you can configure all HTTP calls to include the header.
// app.js

// Send the Authorization header with the JWT in a single HTTP call

getSecretThing() {
  this.http.fetch('/api/protected-route', {
    headers: {
      'Authorization': 'Bearer ' + localStorage.getItem('access_token')
    }
  })
  .then(response => response.json())
  .then(data => this.secretThing = data.text);
}
// Send the Authorization header in all HTTP calls

// app.js

constructor(http) {
  this.http = http;
  this.http.configure(config => {
    config.withDefaults({
      headers: {
        'Authorization': 'Bearer ' + localStorage.getItem('access_token')
      }
    });
  });
}
To log the user out, simply remove their profile and JWT from local storage.
// app.js

logout() {
  localStorage.removeItem('profile');
  localStorage.removeItem('id_token');
  localStorage.removeItem('access_token');
  this.isAuthenticated = false;
}
That's it! You now have authentication with Auth0 in your Aurelia app.
For more details, including how to protect certain route in your app, check out the Auth0 Aurelia docs. There you can also download a seed project to get started from scratch.
Wrapping Up
Protecting routes that we want to limit to logged-in users is actually quite simple with the aurelia-auth plugin because we can set the app up such that, if users aren't logged in, they can't see or reach protected routes. If, for whatever reason, users were able to get to a route they shouldn't be at and they don't have a valid JWT, any HTTP requests they make will be denied by the server. Properly authenticated users will have a valid JWT in localstorage, which will be sent along as a header with all the requests they make which will give them access to protected resources.
Aurelia is a great next-generation JavaScript framework with a growing user base. As we have seen in this tutorial, we can easily get users signed up and authenticated using the aurelia-auth plugin.
About the author

Ryan Chenkie
Developer
Ryan is a Google Developer Expert, the host of the Entrepreneurial Coder Podcast, the author of Securing Angular Applications, and an all-around fanatic about application security.View profile