
TL;DR: In the first part of this tutorial, we introduced the Elm language by building a simple Elm Application that called an API. Now we'll authenticate with JSON Web Tokens to make protected API requests. The full code is available in this GitHub repository.
Elm is a functional language that compiles to JavaScript. Its robust compiler and static typing make it a nice option for developing applications for the browser that are free of runtime errors. In the first part of this Elm tutorial, we built a small web app to introduce the language and its syntax.
Authenticating the Chuck Norris Quoter App
Now we'll continue to build out our Chuck Norris Quoter app to add user registration, login, and make authenticated API requests with JSON Web Tokens. We'll also use JavaScript interop to persist user sessions with local storage.
Registering a User
Last time, we finished up by retrieving Chuck Norris quotes from the API. We also need registration so users can be issued access tokens with which to access protected quotes. We'll create a form that submits a POST request to the API to create a new user and return an access token.
After the user has registered, we'll display a welcome message:
Here's the complete Main.elm code for this step:
src/Main.elm - Step 3: Registering a User
We'll start with new imports:
import Json.Decode as Decode exposing (..)
import Json.Encode as Encode exposing (..)
We'll be sending objects and receiving JSON now instead of just working with a string API response, so we need to be able to translate these from and to Elm records.
{-
    MODEL
    * Model type
    * Initialize model with empty values
    * Initialize with a random quote
-}

type alias Model =
    { username : String
    , password : String
    , token : String
    , quote : String
    , errorMsg : String
    }

init : (Model, Cmd Msg)
init =
    ( Model "" "" "" "" "", fetchRandomQuoteCmd )
Our model needs to hold more data than just a quote now. We've added username, password, token, and errorMsg (to display any API errors from authentication).
We'll initialize our application with empty strings for all of the above.
{-
    UPDATE
    * API routes
    * GET and POST
    * Encode request body
    * Decode responses
    * Messages
    * Update case
-}

-- API request URLs

...

registerUrl : String
registerUrl =
    api ++ "users"
The API route for POSTing new users is http://localhost:3001/users so we'll create registerUrl to store this.
-- Encode user to construct POST request body (for Register and Log In)

userEncoder : Model -> Encode.Value
userEncoder model =
    Encode.object
        [ ("username", Encode.string model.username)
        , ("password", Encode.string model.password)
        ]
The API expects the request body for registration and login to be a JavaScript object in string format that looks like this: { username: "string", password: "string" }
An Elm record is not the same as a JavaScript object so we need to encode the applicable properties of our model before we can send them with the HTTP request. The userEncoder function utilizes Json.Encode to take the model and return the encoded value.
-- POST register / login request


authUser : Model -> String -> Http.Request String
authUser model apiUrl =
    let
        body =
            model
                |> userEncoder
                |> Http.jsonBody
    in
        Http.post apiUrl body tokenDecoder
We'll use a POST HTTP request this time as opposed to the simple getString used for the quote in the previous step. The same settings can be used for both register and login with the exception of the API route which we'll pass in an argument.
We'll call this effect function authUser (for "authenticate a user"). The type says "authUser takes model as an argument and a string as an argument and returns a request that succeeds with a string".
Let's take a closer look at these lines:
...
        body =
            model
                |> userEncoder
                |> Http.jsonBody
<| and |> are aliases for function application to reduce parentheses. <| is backward function application.
body = model <| userEncoder <| Http.jsonBody takes the results of the last function and passes it as the last argument to the function on its left. Written with parentheses, the equivalent would be: body = model (userEncoder (Http.jsonBody)).
We'll run the userEncoder function to encode the request body.
Next we want to send the HTTP POST request with the API URL and then take the JSON result and decode it with a tokenDecoder function that we'll create in a moment.
We now have our authUser effect so we need to create an authUserCmd command. This should look familiar from fetching quotes earlier. We're also passing the API route as an argument. We'll create a GetTokenCompleted message to handle errors and successes as well.
authUserCmd : Model -> String -> Cmd Msg
authUserCmd model apiUrl =
    Http.send GetTokenCompleted (authUser model apiUrl)


getTokenCompleted : Model -> Result Http.Error String -> ( Model, Cmd Msg )
getTokenCompleted model result =
    case result of
        Ok newToken ->
            ( { model | token = newToken, password = "", errorMsg = "" } |> Debug.log "got new token", Cmd.none )

        Err error ->
            ( { model | errorMsg = (toString error) }, Cmd.none )
In the getTokenCompleted function's Ok case, we've authenticated the user now, so we can clear the password and any errors. This is a good place to verify that everything is working as expected, so let's log the updated model to the browser console using the |> forward function application alias and a Debug.log: { model | token = newToken, password = "", errorMsg = "" } |> Debug.log "got new token".
Note: After verifying our expectations in the browser console, we should remove the
Debug.log.
We'll also define the tokenDecoder function that ensures we can work with the response from the HTTP request:
-- Decode POST response to get access token


tokenDecoder : Decoder String
tokenDecoder =
    Decode.field "access_token" Decode.string
When registering or logging in a user, the response from the API is JSON shaped like this:
{
    "access_token": "someJWTTokenString",
    "id_token": "someJWTTokenString"
}
ID tokens should only be used on the client side. We'll decode the access_token to extract its contents as a string that will be returned on success. The access token is the one that we need in order to make authorized API requests.
We want to display authentication errors to the user. Unlike the error case we implemented earlier, getTokenCompleted's Err won't discard its argument. The type of the error argument is Http.Error. This is a union type that could be a few different errors. For the sake of simplicity, we're going to convert the error to a string and update the model's errorMsg with that string.
Note: A good exercise later would be to translate the different errors to more user-friendly messaging.
Now we will set up a way for our UI to interact with the model:
-- Messages

type Msg
    ...
    | SetUsername String
    | SetPassword String
    | ClickRegisterUser
    | GetTokenCompleted (Result Http.Error String)


-- Update


update : Msg -> Model -> (Model, Cmd Msg)
update msg model =
    case msg of
        ...

        SetUsername username ->
            ( { model | username = username }, Cmd.none )

        SetPassword password ->
            ( { model | password = password }, Cmd.none )

        ClickRegisterUser ->
            ( model, authUserCmd model registerUrl )

        GetTokenCompleted result ->
            getTokenCompleted model result
The SetUsername and SetPassword messages are for sending form field values to update the model. ClickRegisterUser is the onClick for our "Register" button. It runs the authUserCmd command we just created and passes the model and the API route for new user creation.
GetTokenCompleted is the response handling function for the authUser request. Its argument is the token string result. We'll update our model with the token so we can use it to request protected quotes later.
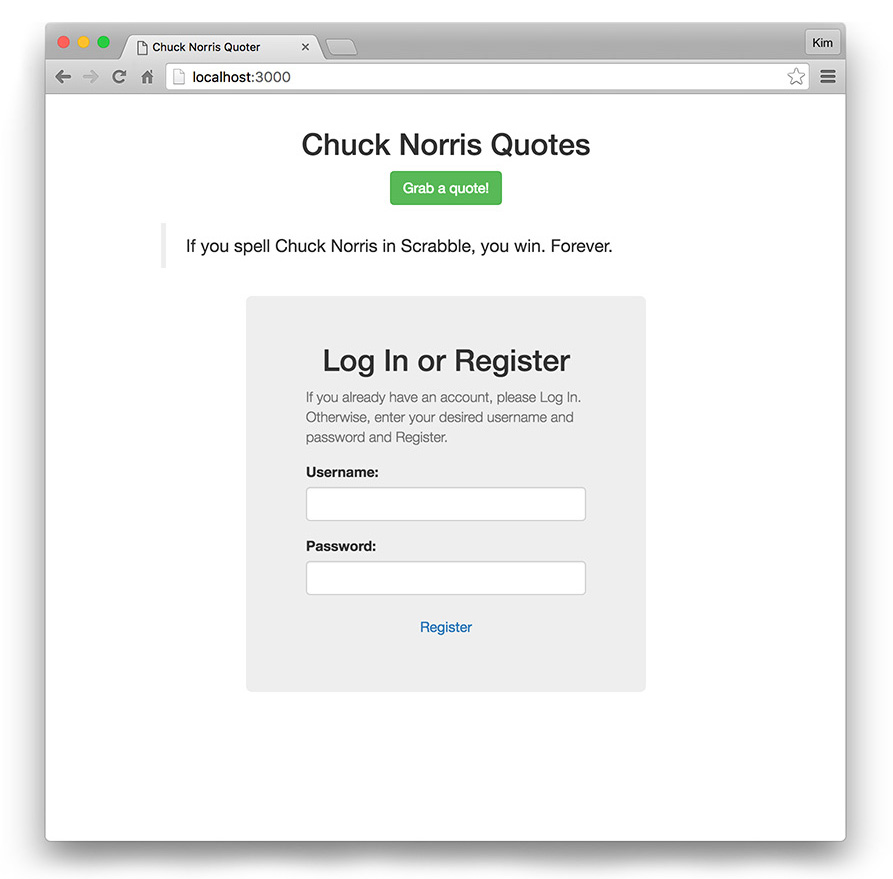
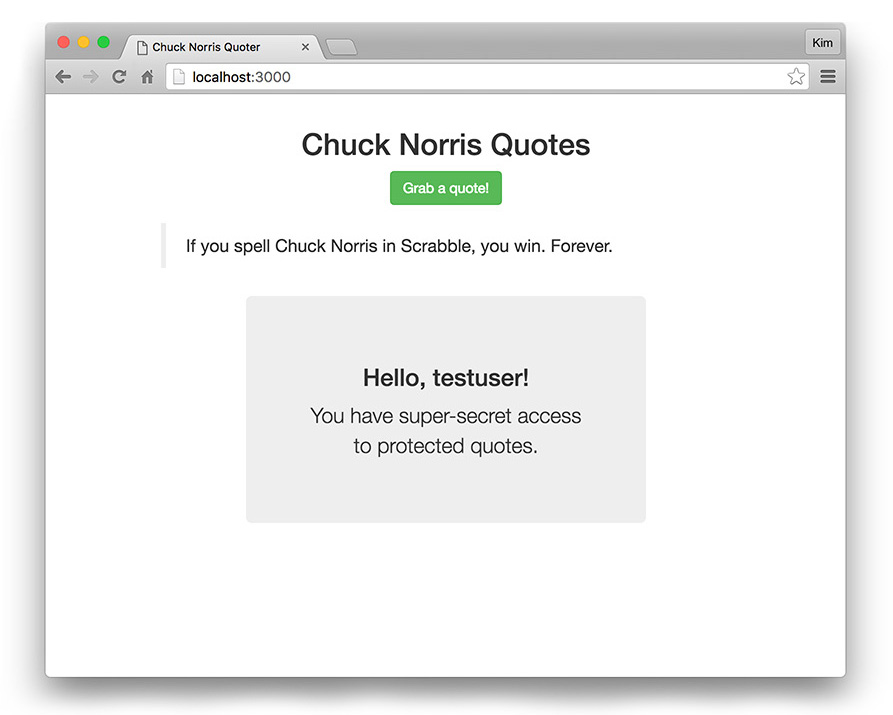
{-
    VIEW
    * Hide sections of view depending on authenticaton state of model
    * Get a quote
    * Register
-}


view : Model -> Html Msg
view model =
    let
        -- Is the user logged in?
        loggedIn : Bool
        loggedIn =
            if String.length model.token > 0 then
                True
            else
                False

        -- If the user is logged in, show a greeting; if logged out, show the login/register form
        authBoxView =
            let
                -- If there is an error on authentication, show the error alert
                showError : String
                showError =
                    if String.isEmpty model.errorMsg then
                        "hidden"
                    else
                        ""

                -- Greet a logged in user by username
                greeting : String
                greeting =
                    "Hello, " ++ model.username ++ "!"
            in
                if loggedIn then
                    div [ id "greeting" ]
                        [ h3 [ class "text-center" ] [ text greeting ]
                        , p [ class "text-center" ] [ text "You have super-secret access to protected quotes." ]
                        ]
                else
                    div [ id "form" ]
                        [ h2 [ class "text-center" ] [ text "Log In or Register" ]
                        , p [ class "help-block" ] [ text "If you already have an account, please Log In. Otherwise, enter your desired username and password and Register." ]
                        , div [ class showError ]
                            [ div [ class "alert alert-danger" ] [ text model.errorMsg ]
                            ]
                        , div [ class "form-group row" ]
                            [ div [ class "col-md-offset-2 col-md-8" ]
                                [ label [ for "username" ] [ text "Username:" ]
                                , input [ id "username", type_ "text", class "form-control", Html.Attributes.value model.username, onInput SetUsername ] []
                                ]
                            ]
                        , div [ class "form-group row" ]
                            [ div [ class "col-md-offset-2 col-md-8" ]
                                [ label [ for "password" ] [ text "Password:" ]
                                , input [ id "password", type_ "password", class "form-control", Html.Attributes.value model.password, onInput SetPassword ] []
                                ]
                            ]
                        , div [ class "text-center" ]
                            [ button [ class "btn btn-link", onClick ClickRegisterUser ] [ text "Register" ]
                            ]
                        ]
    in
        div [ class "container" ]
            [ h2 [ class "text-center" ] [ text "Chuck Norris Quotes" ]
            , p [ class "text-center" ]
                [ button [ class "btn btn-success", onClick GetQuote ] [ text "Grab a quote!" ]
                ]
              -- Blockquote with quote
            , blockquote []
                [ p [] [ text model.quote ]
                ]
            , div [ class "jumbotron text-left" ]
                [ -- Login/Register form or user greeting
                  authBoxView
                ]
            ]
There's a lot of new stuff in the view but it's mostly form HTML. We'll start with some logic to hide the form once the user is authenticated; we want to show a greeting in this case.
Remember that view is a function. This means we can do things like create scoped variables with let expressions to conditionally render parts of the view.
For the sake of simplicity, we'll check if the model's token string has a length to determine if the user is logged in. In a real-world application, token verification might be performed in a route callback to ensure proper UI access. For our Chuck Norris Quoter, the token is needed to get protected quotes so all the loggedIn variable does is show the form versus a simple greeting.
We'll then create the authBoxView. This contains the form and greeting and executes either depending on the value of loggedIn. We'll also display the authentication error if there is one.
If the user is logged in, we'll greet them by their username and inform them that they have super-secret access to protected quotes.
If the user is not logged in, we'll display the Log In / Register form. We can use the same form to do both because they share the same request body. Right now though, we only have the functionality for Register prepared.
After the heading, instructional copy, and conditional error alert, we need the username and password form fields. We can supply various attributes:
input [ id "username", type_ "text", class "form-control", Html.Attributes.value model.username, onInput SetUsername ] []
...
input [ id "password", type_ "password", class "form-control", Html.Attributes.value model.password, onInput SetPassword ] []
There are a few things that may stand out here: type_ has an underscore after it because type is a reserved keyword. Html.Attributes.value is fully qualified because value alone is ambiguous in context because the compiler could confuse it with Json.Decode.value. onInput is a custom event handler that gets values from triggered events. When these events are fired we want to update the username or password in the model.
After our form fields, we'll include a "Register" button with onClick ClickRegisterUser. We'll use Bootstrap's CSS to style this button like a link since it will live next to a Log In button later.
Finally, we'll use our authBoxView variable in the main view. We'll place it below our Chuck Norris quote in a jumbotron.
Now we can register new users in our app. When successfully registered, the user will receive a token and be authenticated. The view will then update to show the greeting message. Try it out in the browser. You should also try to trigger an error message!
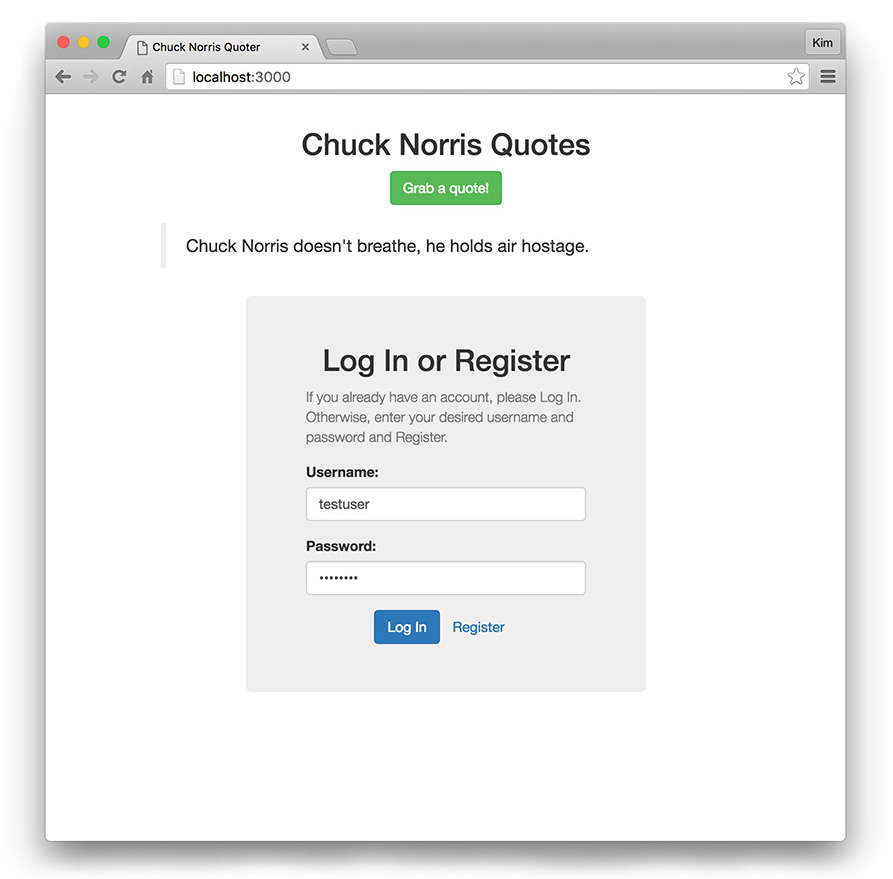
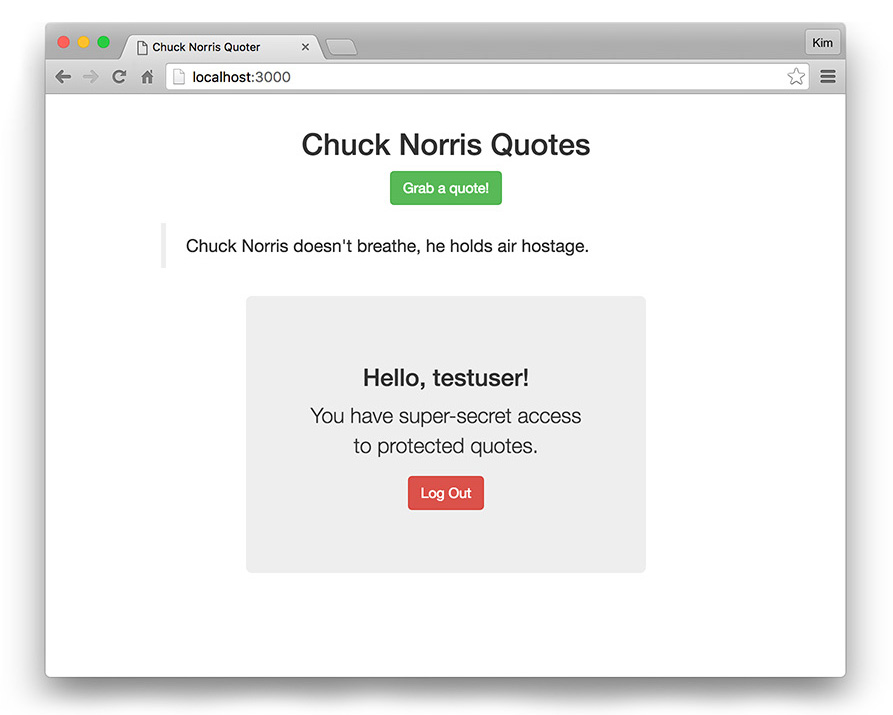
Logging In and Logging Out
Now that users can register, they need to be able to log in with existing accounts.
We also need the ability to log out.
The full Main.elm code with login and logout implemented will look like this:
src/Main.elm - Logging In and Logging Out
Login works like Register (and uses the same request body), so creating its functionality should be straightforward.
-- API request URLs

...

loginUrl : String
loginUrl =
    api ++ "sessions/create"
We'll add the login API route, which is http://localhost:3001/sessions/create.
We already have the authUser effect and authUserCmd command, so all we need to do is create a way for login to interact with the UI. We'll also create a logout.
-- Messages


type Msg
    ...
    | ClickLogIn
     ...
    | LogOut


-- Update


update : Msg -> Model -> (Model, Cmd Msg)
update msg model =
    case msg of
         ...

        ClickLogIn ->
            ( model, authUserCmd model loginUrl )

        ...

        LogOut ->
            ( { model | username = "", token = "" }, Cmd.none )
ClickLogIn runs the authUserCmd command with the appropriate arguments. LogOut resets authentication-related data in the model record to empty strings. We don't need to reset the password or errorMsg because we already did so when we successfully retrieved a token in GetTokenCompleted.
...

if loggedIn then
    div [id "greeting" ][
        h3 [ class "text-center" ] [ text greeting ]
        , p [ class "text-center" ] [ text "You have super-secret access to protected quotes." ]
        , p [ class "text-center" ] [
            button [ class "btn btn-danger", onClick LogOut ] [ text "Log Out" ]
        ]
    ]

...

, div [ class "text-center" ] [
    button [ class "btn btn-primary", onClick ClickLogIn ] [ text "Log In" ]
    , button [ class "btn btn-link", onClick ClickRegisterUser ] [ text "Register" ]
]

...
There are minimal updates to the view. We'll add a logout button in the greeting message in authBoxView. Then in the form we'll insert the login button before the register button.
Registered users can now log in and log out. Our application is really coming together!
Note: A nice enhancement might be to show different forms for logging in and registering. Maybe the user should be asked to confirm their password when registering?
Getting Protected Quotes
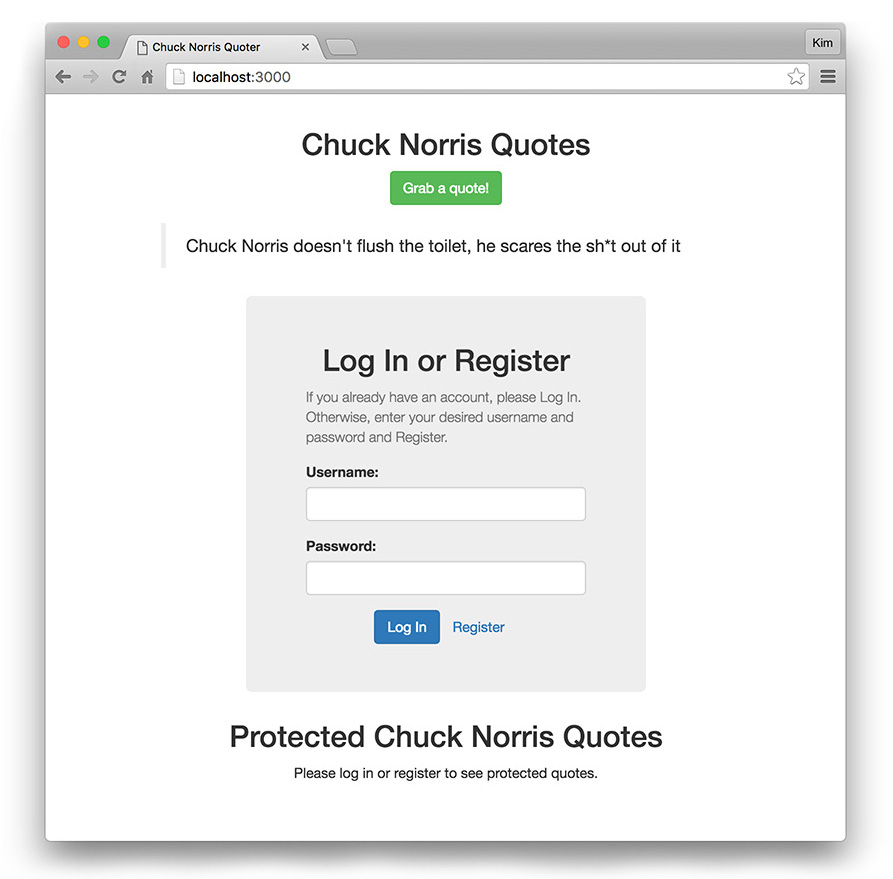
It's time to make authorized requests to the API to get protected quotes for authenticated users. Our logged out state will look like this:
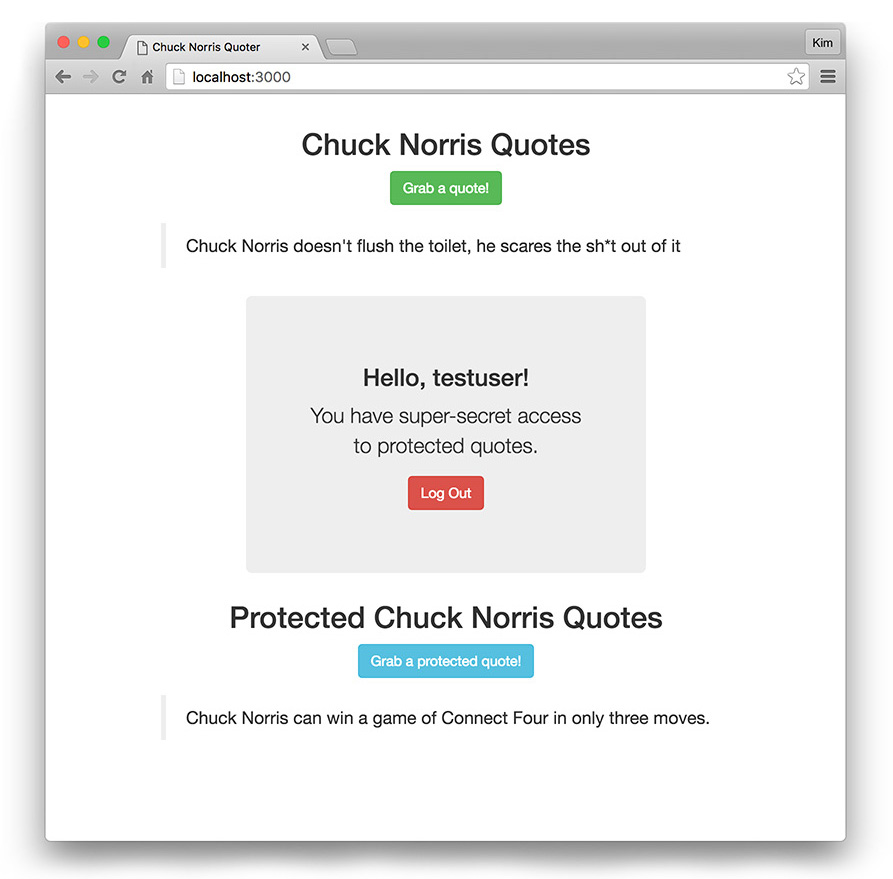
If a user is logged in, they'll be able to click a button to make API requests to get protected quotes:
Here's the completed Main.elm code for this step:
src/Main.elm - Getting Protected Quotes
Let's update our model:
{-
    MODEL
    * Model type
    * Initialize model with empty values
    * Initialize with a random quote
-}

type alias Model =
    { username : String
    , password : String
    , token : String
    , quote : String
    , protectedQuote : String
    , errorMsg : String
    }

init : (Model, Cmd Msg)
init =
    ( Model "" "" "" "" "" "", fetchRandomQuoteCmd )
We're adding a protectedQuote property to the Model type alias. This will be a string. We'll add another pair of double quotes "" to the init tuple to initialize our app with an empty string for the protected quote.
-- API request URLs

...

protectedQuoteUrl : String
protectedQuoteUrl =
    api ++ "api/protected/random-quote"
Add the API route for the protectedQuoteUrl: http://localhost:3001/api/protected/random-quote.
-- GET request for random protected quote (authenticated)


fetchProtectedQuote : Model -> Http.Request String
fetchProtectedQuote model =
    { method = "GET"
    , headers = [ Http.header "Authorization" ("Bearer " ++ model.token) ]
    , url = protectedQuoteUrl
    , body = Http.emptyBody
    , expect = Http.expectString
    , timeout = Nothing
    , withCredentials = False
    }
        |> Http.request


fetchProtectedQuoteCmd : Model -> Cmd Msg
fetchProtectedQuoteCmd model =
    Http.send FetchProtectedQuoteCompleted (fetchProtectedQuote model)


fetchProtectedQuoteCompleted : Model -> Result Http.Error String -> ( Model, Cmd Msg )
fetchProtectedQuoteCompleted model result =
    case result of
        Ok newQuote ->
            ( { model | protectedQuote = newQuote }, Cmd.none )

        Err _ ->
            ( model, Cmd.none )
We'll create the HTTP request to GET the protected quote. The type for this request is "fetchProtectedQuote takes model as an argument and returns an HTTP request that succeeds with a string". We'll use a fully qualified HTTP request and define an Authorization header, an empty body, and expect a string response. The value of our authorization header is Bearer plus the user's token string. We then Http.request our POST request.
Next is the fetchProtectedQuoteCmd function. We're quite familiar with these commands now and there are no surprises here.
Finally, we'll implement the FetchProtectedQuoteCompleted message. Again, this is very similar to our previous HTTP completed functions. We'll update the model with the quote string from the API on success and discard the argument for an error.
-- Messages

type Msg
    ...
    | GetProtectedQuote
    | FetchProtectedQuoteCompleted (Result Http.Error String)
    ...

-- Update

update : Msg -> Model -> (Model, Cmd Msg)
update msg model =
    case msg of
        ...

        GetProtectedQuote ->
            ( model, fetchProtectedQuoteCmd model )

        FetchProtectedQuoteCompleted result ->
            fetchProtectedQuoteCompleted model result

        ...
There are no new concepts in the implementation of the messages here. GetProtectedQuote returns the command and FetchProtectedQuoteCompleted updates the model.
    -- If user is logged in, show button and quote; if logged out, show a message instructing them to log in
        protectedQuoteView =
            let
                -- If no protected quote, apply a class of "hidden"
                hideIfNoProtectedQuote : String
                hideIfNoProtectedQuote =
                    if String.isEmpty model.protectedQuote then
                        "hidden"
                    else
                        ""
            in
                if loggedIn then
                    div []
                        [ p [ class "text-center" ]
                            [ button [ class "btn btn-info", onClick GetProtectedQuote ] [ text "Grab a protected quote!" ]
                            ]
                          -- Blockquote with protected quote: only show if a protectedQuote is present in model
                        , blockquote [ class hideIfNoProtectedQuote ]
                            [ p [] [ text model.protectedQuote ]
                            ]
                        ]
                else
                    p [ class "text-center" ] [ text "Please log in or register to see protected quotes." ]
    in
        div [ class "container" ]
            [ h2 [ class "text-center" ] [ text "Chuck Norris Quotes" ]
            , p [ class "text-center" ]
                [ button [ class "btn btn-success", onClick GetQuote ] [ text "Grab a quote!" ]
                ]
              -- Blockquote with quote
            , blockquote []
                [ p [] [ text model.quote ]
                ]
            , div [ class "jumbotron text-left" ]
                [ -- Login/Register form or user greeting
                  authBoxView
                ]
            , div []
                [ h2 [ class "text-center" ] [ text "Protected Chuck Norris Quotes" ]
                  -- Protected quotes
                , protectedQuoteView
                ]
            ]
In the let, we'll add a protectedQuoteView under the authBoxView variable. We'll use a variable called hideIfNoProtectedQuote with an expression to output a hidden class to the blockquote. This will prevent the element from being shown if there is no quote.
We'll represent logged in and logged out states using the loggedIn variable we declared earlier. When logged in we'll show a button to GetProtectedQuote and the quote. When logged out we'll show a paragraph with copy telling the user to log in or register.
At the bottom of our view function, we'll add a div with a heading and our protectedQuoteView.
Check it out in the browser—our app is almost finished!
Persisting Logins with Local Storage
We have the primary functionality done now. Our app gets quotes, allows registration, login, and gets authorized quotes. The last thing we'll do is persist logins.
We don't want our logged-in users to lose their data if they refresh their browser or leave and come back. To do this we'll implement localStorage with Elm using JavaScript interop. This is a way to take advantage of features of JS in Elm code. After all, Elm compiles to JavaScript so it only makes sense that we would be able to do this.
When we're done, our completed Main.elm will look like this:
src/Main.elm - Persisting Logins with Local Storage
The first things you may notice are changes to our Main module and program and init:
...

main : Program (Maybe Model) Model Msg
main =
    Html.programWithFlags
        { init = init
        , ...

...

init : Maybe Model -> ( Model, Cmd Msg )
init model =
    case model of
        Just model ->
            ( model, fetchRandomQuoteCmd )

        Nothing ->
            ( Model "" "" "" "" "" "", fetchRandomQuoteCmd )

...
We need to switch from program to programWithFlags. The type therefore changes from Program Never to Program (Maybe Model) Model Msg. This means we might have a model provided at initialization. If the model is already in local storage it will be available. If we don't have anything stored when we arrive we'll initialize without it.
We also need to update init and its type annotation to handle the fact that the app may be initializing with a model (Maybe Model). If there's data present from local storage, we'll set the model. If there isn't, we'll initialize the same way we did previously.
So where does this potential initial model come from? We need to write a little bit of JavaScript in our src/index.html's <script> tag:
...
    var storedState = localStorage.getItem('model');
    var startingState = storedState ? JSON.parse(storedState) : null;
    var elmApp = Elm.Main.fullscreen(startingState);

    elmApp.ports.setStorage.subscribe(function(state) {
        localStorage.setItem('model', JSON.stringify(state));
    });

    elmApp.ports.removeStorage.subscribe(function() {
        localStorage.removeItem('model');
    });
...
There is no Elm here. We will use JavaScript to check local storage for previously saved model data. Then we'll establish the startingState in a ternary that checks storedState for model data. If data is found we'll JSON.parse it and pass it to our Elm app. If there is no model yet, we'll pass null.
Then we need to set up ports so we can use features of localStorage in our Elm code. We'll call one port setStorage and subscribe to it so we can do something with messages that come through the port. When state data is sent we'll use the setItem method to set a model and save the stringified data to localStorage. The removeStorage port will remove the model item from localStorage. We'll use this when logging out.
Now we'll go back to Main.elm:
-- Helper to update model and set localStorage with the updated model


setStorageHelper : Model -> ( Model, Cmd Msg )
setStorageHelper model =
    ( model, setStorage model )
We need a helper function of a specific type to save the model to local storage in multiple places in our update. Because the update type always expects a tuple with a model and command message returned, we need our helper to take the model as an argument and return the same type of tuple. We'll understand how this fits in a little more in a moment.
fetchRandomQuoteCompleted model result =
    case result of
        Ok newQuote ->
            setStorageHelper { model | quote = newQuote }

...

getTokenCompleted model result =
    case result of
        Ok newToken ->
            setStorageHelper { model | token = newToken, password = "", errorMsg = "" }

...

fetchProtectedQuoteCompleted model result =
    case result of
        Ok newPQuote ->
            setStorageHelper { model | protectedQuote = newPQuote }

...

-- Ports


port setStorage : Model -> Cmd msg


port removeStorage : Model -> Cmd msg

...

update msg model =
    case msg of ...
        LogOut ->
            ( { model | username = "", token = "" }, removeStorage model )
We need to define the type annotation for our setStorage and removeStorage ports. They'll take a model and return a command. The lowercase msg is significant because this is an effect manager and its type is actually Cmd a. It does not send messages back to the program. Keep in mind that using Cmd Msg here will result in a compiler error.
Finally, we're going to go up and replace some of our Ok returns in our HTTP completed functions with the setStorageHelper. We'll also use the removeStorage command for logging out. This helper will return the tuple that our update function expects from all branches so we won't have to worry about type mismatches.
We will call setStorageHelper and pass the model updates that we want to propagate to the app and save to local storage. We're saving the model to storage when the user is successfully granted a token and when they get a protected quote. On logout, we'll remove the localStorage model item.
Now when we authenticate, local storage will keep our data so when we refresh or come back later, we won't lose our login state or our latest protected quote.
If everything compiles and works as expected, we're done with our basic Chuck Norris Quoter application!
Aside: Using Auth0 with Elm
Auth0 provides registration, login, and authentication with JSON Web Tokens. We can add Auth0 authentication to an Elm app by setting up a couple of additional Elm modules and importing them for use in an app's Main.elm file. Marcus Griep has a great Elm Workshop with 0.17 available on GitHub that includes an Auth0.elm module and an Authentication.elm module.
These modules are great resources to help you implement Auth0 with Elm. We will introduce and build on them in a new app to demonstrate how to use auth0.js with JSON Web Tokens. The modules will be imported into our Main.elm file and we'll use JS interop to interface with Auth0's Centralized Login Page.
You can download the complete code for the Elm app with Auth0 integration at this GitHub repo.
Important security note: In this demo, we're adding authentication to the client side but we are not securing a backend. If you have an API for your application, the API should always be secured. You can do this with the token provided by Auth0.
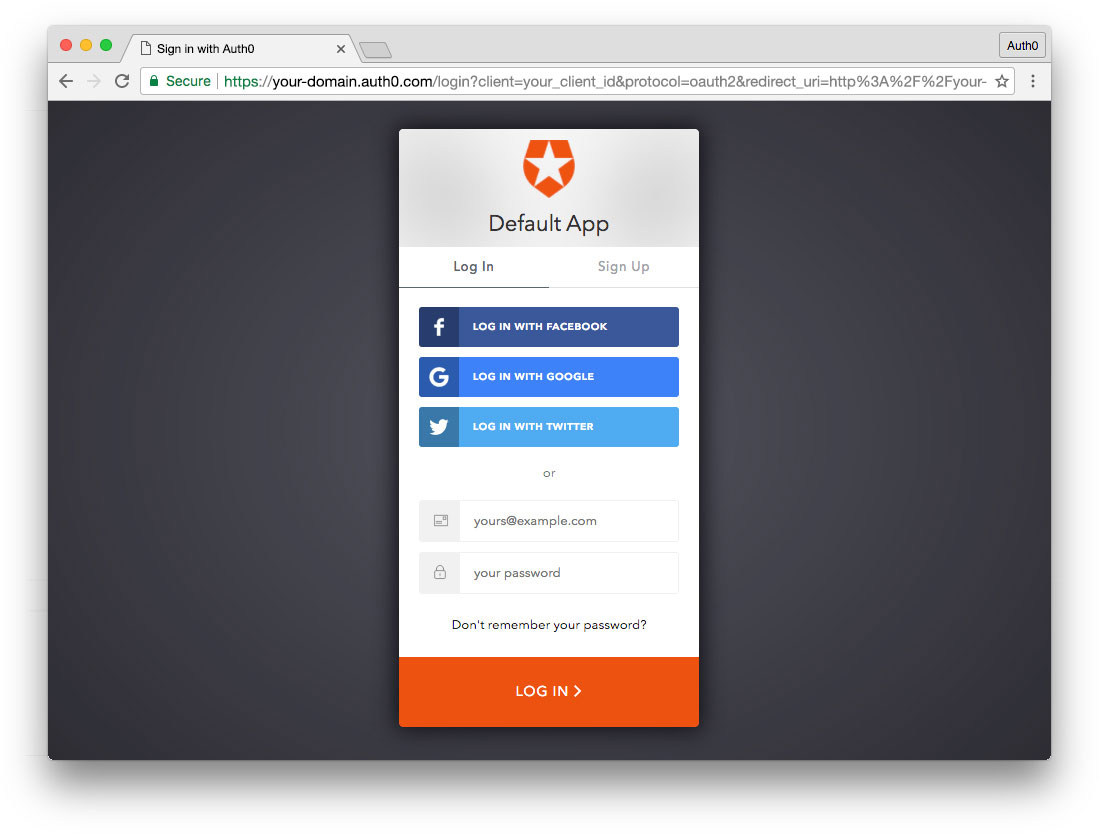
Sign Up for Auth0
The first thing we'll need is an Auth0 account. Follow these simple steps to get started:
- Sign up for a free Auth0 account.
- In your Auth0 Dashboard, create a new client.
- Name your new app and select "Single Page Web Applications".
- In the Settings for your newly created app, add
http://localhost:8888to the Allowed Callback URLs.
Auth0.js Interop and Local Storage
In our src/index.html file, we'll use JavaScript to implement ports that call the Auth0 authorize() endpoint to log in, and log out:
<!-- index.html -->
<!DOCTYPE html>
<html>
  <head>
    <meta charset="utf-8">
    <meta name="viewport" content="width=device-width, initial-scale=1.0, maximum-scale=1.0, user-scalable=no" />
    <title>Elm with Auth0</title>
    <script src="Main.js"></script>
    <script src="Auth0.js"></script>
    <script src="Authentication.js"></script>
    <link rel="stylesheet" href="https://maxcdn.bootstrapcdn.com/bootstrap/3.3.7/css/bootstrap.min.css">
  </head>
  <body>
  </body>
  <script src="https://cdn.auth0.com/js/auth0/9.0.0/auth0.min.js"></script>
  <script>
    var webAuth = new auth0.WebAuth({
      domain: '[YOUR_AUTH0_DOMAIN]', // e.g., you.auth0.com
      clientID: '[YOUR_AUTH0_CLIENT_ID]',
      scope: 'email',
      responseType: 'token',
      redirectUri: 'http://localhost:8888'
    });
    var storedProfile = localStorage.getItem('profile');
    var storedToken = localStorage.getItem('token');
    var authData = storedProfile && storedToken ? { profile: JSON.parse(storedProfile), token: storedToken } : null;
    var elmApp = Elm.Main.fullscreen(authData);
    // Auth0 authorize subscription
    elmApp.ports.auth0authorize.subscribe(function(opts) {
      webAuth.authorize();
    });
    // Log out of Auth0 subscription
    elmApp.ports.auth0logout.subscribe(function(opts) {
      localStorage.removeItem('profile');
      localStorage.removeItem('token');
    });
    // Watching for hash after redirect
    webAuth.parseHash({ hash: window.location.hash }, function(err, authResult) {
      if (err) {
        return console.error(err);
      }
      if (authResult) {
        webAuth.client.userInfo(authResult.accessToken, function(err, profile) {
          var result = { err: null, ok: null };
          var token = authResult.accessToken;
          if (err) {
            result.err = err.details;
            // Ensure that optional fields are on the object
            result.err.name = result.err.name ? result.err.name : null;
            result.err.code = result.err.code ? result.err.code : null;
            result.err.statusCode = result.err.statusCode ? result.err.statusCode : null;
          }
          if (authResult) {
            result.ok = { profile: profile, token: token };
            localStorage.setItem('profile', JSON.stringify(profile));
            localStorage.setItem('token', token);
          }
          elmApp.ports.auth0authResult.send(result);
        });
        window.location.hash = '';
      }
    });
  </script>
</html>
First we need to add our compiled Elm files as well as the Auth0 lock widget JavaScript file:
<script src="Main.js"></script>
<script src="Auth0.js"></script>
<script src="Authentication.js"></script>
...
<script src="https://cdn.auth0.com/js/auth0/9.0.0/auth0.min.js"></script>
Then we'll create an Auth0 WebAuth instance:
var webAuth = new auth0.WebAuth({
  domain: '[YOUR_AUTH0_DOMAIN]', // e.g., you.auth0.com
  clientID: '[YOUR_AUTH0_CLIENT_ID]',
  scope: 'email',
  responseType: 'token',
  redirectUri: 'http://localhost:8888'
});
Replace [YOUR_AUTH0_CLIENT_ID] and [YOUR_AUTH0_DOMAIN] with your app client's ID and domain from your Auth0 dashboard Client settings.
Next we'll set up the JS to instantiate the Elm application with flags and ports to interoperate with the lock widget and localStorage. We'll request a stored profile and token and if available, we'll recreate an object that matches the record we'll use in the Auth0.elm module for a LoggedInUser. Then we'll create ports to call the authorize() endpoint and log out, adding and removing items from local storage accordingly. Finally, we'll parse the hash and retrieve the profile when the user logs in at the centralized login page and is redirected back to our app, sending the resulting data to our Elm app via an auth0authResult port.
Auth0 Module
Next we'll build our Auth0.elm module:
-- Auth0.elm

module Auth0
    exposing
        ( AuthenticationState(..)
        , AuthenticationError
        , AuthenticationResult
        , RawAuthenticationResult
        , Options
        , defaultOpts
        , LoggedInUser
        , UserProfile
        , Token
        , mapResult
        )


type alias LoggedInUser =
    { profile : UserProfile
    , token : Token
    }


type AuthenticationState
    = LoggedOut
    | LoggedIn LoggedInUser


type alias Options =
    {}


type alias UserProfile =
    { email : String
    , email_verified : Bool
    }


type alias Token =
    String


type alias AuthenticationError =
    { name : Maybe String
    , code : Maybe String
    , description : String
    , statusCode : Maybe Int
    }


type alias AuthenticationResult =
    Result AuthenticationError LoggedInUser


type alias RawAuthenticationResult =
    { err : Maybe AuthenticationError
    , ok : Maybe LoggedInUser
    }


mapResult : RawAuthenticationResult -> AuthenticationResult
mapResult result =
    case ( result.err, result.ok ) of
        ( Just msg, _ ) ->
            Err msg

        ( Nothing, Nothing ) ->
            Err { name = Nothing, code = Nothing, statusCode = Nothing, description = "No information was received from the authentication provider" }

        ( Nothing, Just user ) ->
            Ok user


defaultOpts : Options
defaultOpts =
    {}
This module handles responses from Auth0 authentication requests. It defines authentication state and types for the user's profile, JWT, authentication errors, and results.
Authentication Module
Now we need a way for the Auth0 module to interface with the authentication logic for our Elm app. We'll set this up in an Authentication.elm file:
-- Authentication.elm

module Authentication
    exposing
        ( Msg(..)
        , Model
        , init
        , update
        , handleAuthResult
        , tryGetUserProfile
        , isLoggedIn
        )

import Auth0


type alias Model =
    { state : Auth0.AuthenticationState
    , lastError : Maybe Auth0.AuthenticationError
    , authorize : Auth0.Options -> Cmd Msg
    , logOut : () -> Cmd Msg
    }


init : (Auth0.Options -> Cmd Msg) -> (() -> Cmd Msg) -> Maybe Auth0.LoggedInUser -> Model
init authorize logOut initialData =
    { state =
        case initialData of
            Just user ->
                Auth0.LoggedIn user

            Nothing ->
                Auth0.LoggedOut
    , lastError = Nothing
    , authorize = authorize
    , logOut = logOut
    }


type Msg
    = AuthenticationResult Auth0.AuthenticationResult
    | ShowLogIn
    | LogOut

update : Msg -> Model -> ( Model, Cmd Msg )
update msg model =
    case msg of
        AuthenticationResult result ->
            let
                ( newState, error ) =
                    case result of
                        Ok user ->
                            ( Auth0.LoggedIn user, Nothing )

                        Err err ->
                            ( model.state, Just err )
            in
                ( { model | state = newState, lastError = error }, Cmd.none )

        ShowLogIn ->
            ( model, model.authorize Auth0.defaultOpts )

        LogOut ->
            ( { model | state = Auth0.LoggedOut }, model.logOut () )


handleAuthResult : Auth0.RawAuthenticationResult -> Msg
handleAuthResult =
    Auth0.mapResult >> AuthenticationResult


tryGetUserProfile : Model -> Maybe Auth0.UserProfile
tryGetUserProfile model =
    case model.state of
        Auth0.LoggedIn user ->
            Just user.profile

        Auth0.LoggedOut ->
            Nothing


isLoggedIn : Model -> Bool
isLoggedIn model =
    case model.state of
        Auth0.LoggedIn _ ->
            True

        Auth0.LoggedOut ->
            False
We need to import the Auth0 module so we can reference it. The model provides a way for our Main Elm module to send data into the Authentication module. We'll do this by passing arguments to Authentication's init function from the Main module. We'll establish a Msg union type and then in our update function, we can handle authentication results, call the Auth0 authorize endpoint to log in at the centralized login page, and log out.
Implementing Auth0 in Main.elm
Our modules are ready to use. We'll import them in our Main.elm program file and create our model, update, and view:
-- Main.elm

port module Main exposing (..)

import Html exposing (..)
import Html.Events exposing (..)
import Html.Attributes exposing (..)
import Auth0
import Authentication


main : Program (Maybe Auth0.LoggedInUser) Model Msg
main =
    Html.programWithFlags
        { init = init
        , update = update
        , subscriptions = subscriptions
        , view = view
        }


type alias Model =
    { authModel : Authentication.Model
    }


-- Init

init : Maybe Auth0.LoggedInUser -> ( Model, Cmd Msg )
init initialUser =
    ( Model (Authentication.init auth0authorize auth0logout initialUser), Cmd.none )


-- Messages

type Msg
    = AuthenticationMsg Authentication.Msg


-- Ports

port auth0authorize : Auth0.Options -> Cmd msg
port auth0authResult : (Auth0.RawAuthenticationResult -> msg) -> Sub msg
port auth0logout : () -> Cmd msg


-- Update

update : Msg -> Model -> ( Model, Cmd Msg )
update msg model =
    case msg of
        AuthenticationMsg authMsg ->
            let
                ( authModel, cmd ) =
                    Authentication.update authMsg model.authModel
            in
                ( { model | authModel = authModel }, Cmd.map AuthenticationMsg cmd )


-- Subscriptions

subscriptions : a -> Sub Msg
subscriptions model =
    auth0authResult (Authentication.handleAuthResult >> AuthenticationMsg)


-- View

view : Model -> Html Msg
view model =
    div [ class "container" ]
        [ div [ class "jumbotron text-center" ]
            [ div []
                (case Authentication.tryGetUserProfile model.authModel of
                    Nothing ->
                        [ p [] [ text "Please log in" ] ]

                    Just user ->
                        [ p [] [ text ("Hello, " ++ user.email ++ "!") ] ]
                )
            , p []
                [ button
                    [ class "btn btn-primary"
                    , onClick
                        (AuthenticationMsg
                            (if Authentication.isLoggedIn model.authModel then
                                Authentication.LogOut
                                else
                                Authentication.ShowLogIn
                            )
                        )
                    ]
                    [ text
                        (if Authentication.isLoggedIn model.authModel then
                            "Log Out"
                            else
                            "Log In"
                        )
                    ]
                ]
            ]
        ]
We'll use programWithFlags because we want to check for an existing user and token in local storage upon initialization. The model contains the Authentication model record we set up earlier.
In the init function, we will init Authentication and pass in arguments for the ports that show the lock and log out. We'll also pass the initial user from local storage if available (recall that we set this up in index.html to mirror the LoggedInUser type from the Auth0 module).
We need to subscribe to the auth0authResult port to listen for external input from Auth0 hash parsing.
Note:
>>represents function chaining.
Finally, the view displays a message and button to log in if there is no authentication data in storage, and a greeting with the user's email along with a logout button if there is.
Elm: Now and Future
We made a simple app but covered a lot of ground with Elm's architecture, syntax, and implementation of features you'll likely come across in web application development. Authenticating with JWT was straightforward and packages and JS interop offer a lot of extensibility.
Elm began in 2012 as Evan Czaplicki's Harvard senior thesis and it's still a newcomer in the landscape of front-end languages. That isn't stopping production use though: NoRedInk has been compiling Elm to production for almost a year (Introduction to Elm - Richard Feldman) with no runtime exceptions and Evan Czaplicki is deploying Elm to production at Prezi. Elm's compiler offers a lot of test coverage "free of charge" by thoroughly checking all logic and branches. In addition, the Elm Architecture of model-view-update inspired Redux.
Elm also has an active community. I particularly found the elmlang Slack to be a great place to learn about Elm and chat with knowledgeable developers who are happy to help with any questions.
There are a lot of exciting things about Elm and I'm looking forward to seeing how it continues to evolve. Static typing, functional programming, and friendly documentation and compiler messaging make it a clean and speedy coding experience. There's also a peace of mind that Elm provides—the fear of production runtime errors is a thing of the past. Once Elm compiles, it just works, and that is something that no other JavaScript SPA frameworks can offer.
About the author

Kim Maida
Group Manager, Developer Content