How many of us have a Raspberry Pi collecting dust somewhere around the house? I bought one in 2017 to build something amazing but ended up not doing anything with it for years.
After seeing some Reddit posts about a "smart mirror" device over the years, I decided it was finally time to try my hand at IoT (Internet of Things) and create a mirror that would display a custom message for me.
However, I also wanted to be the only person capable of changing the text that my smart mirror displays. Because of this, I decided to protect the update functionality of my message API using Auth0.
Tools of the Trade
To get a Raspberry Pi smart mirror working as is, you will need to have the following:
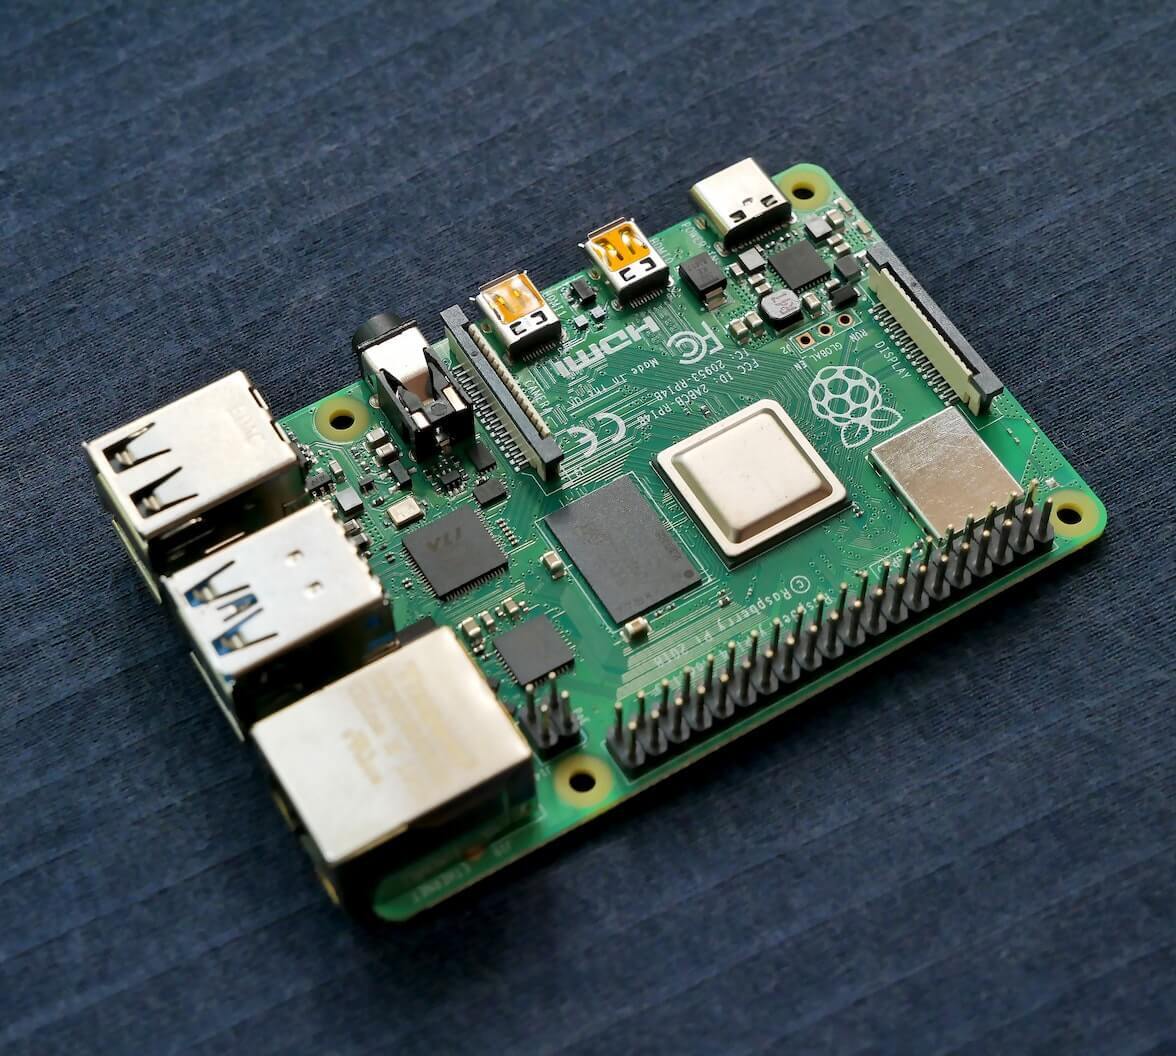
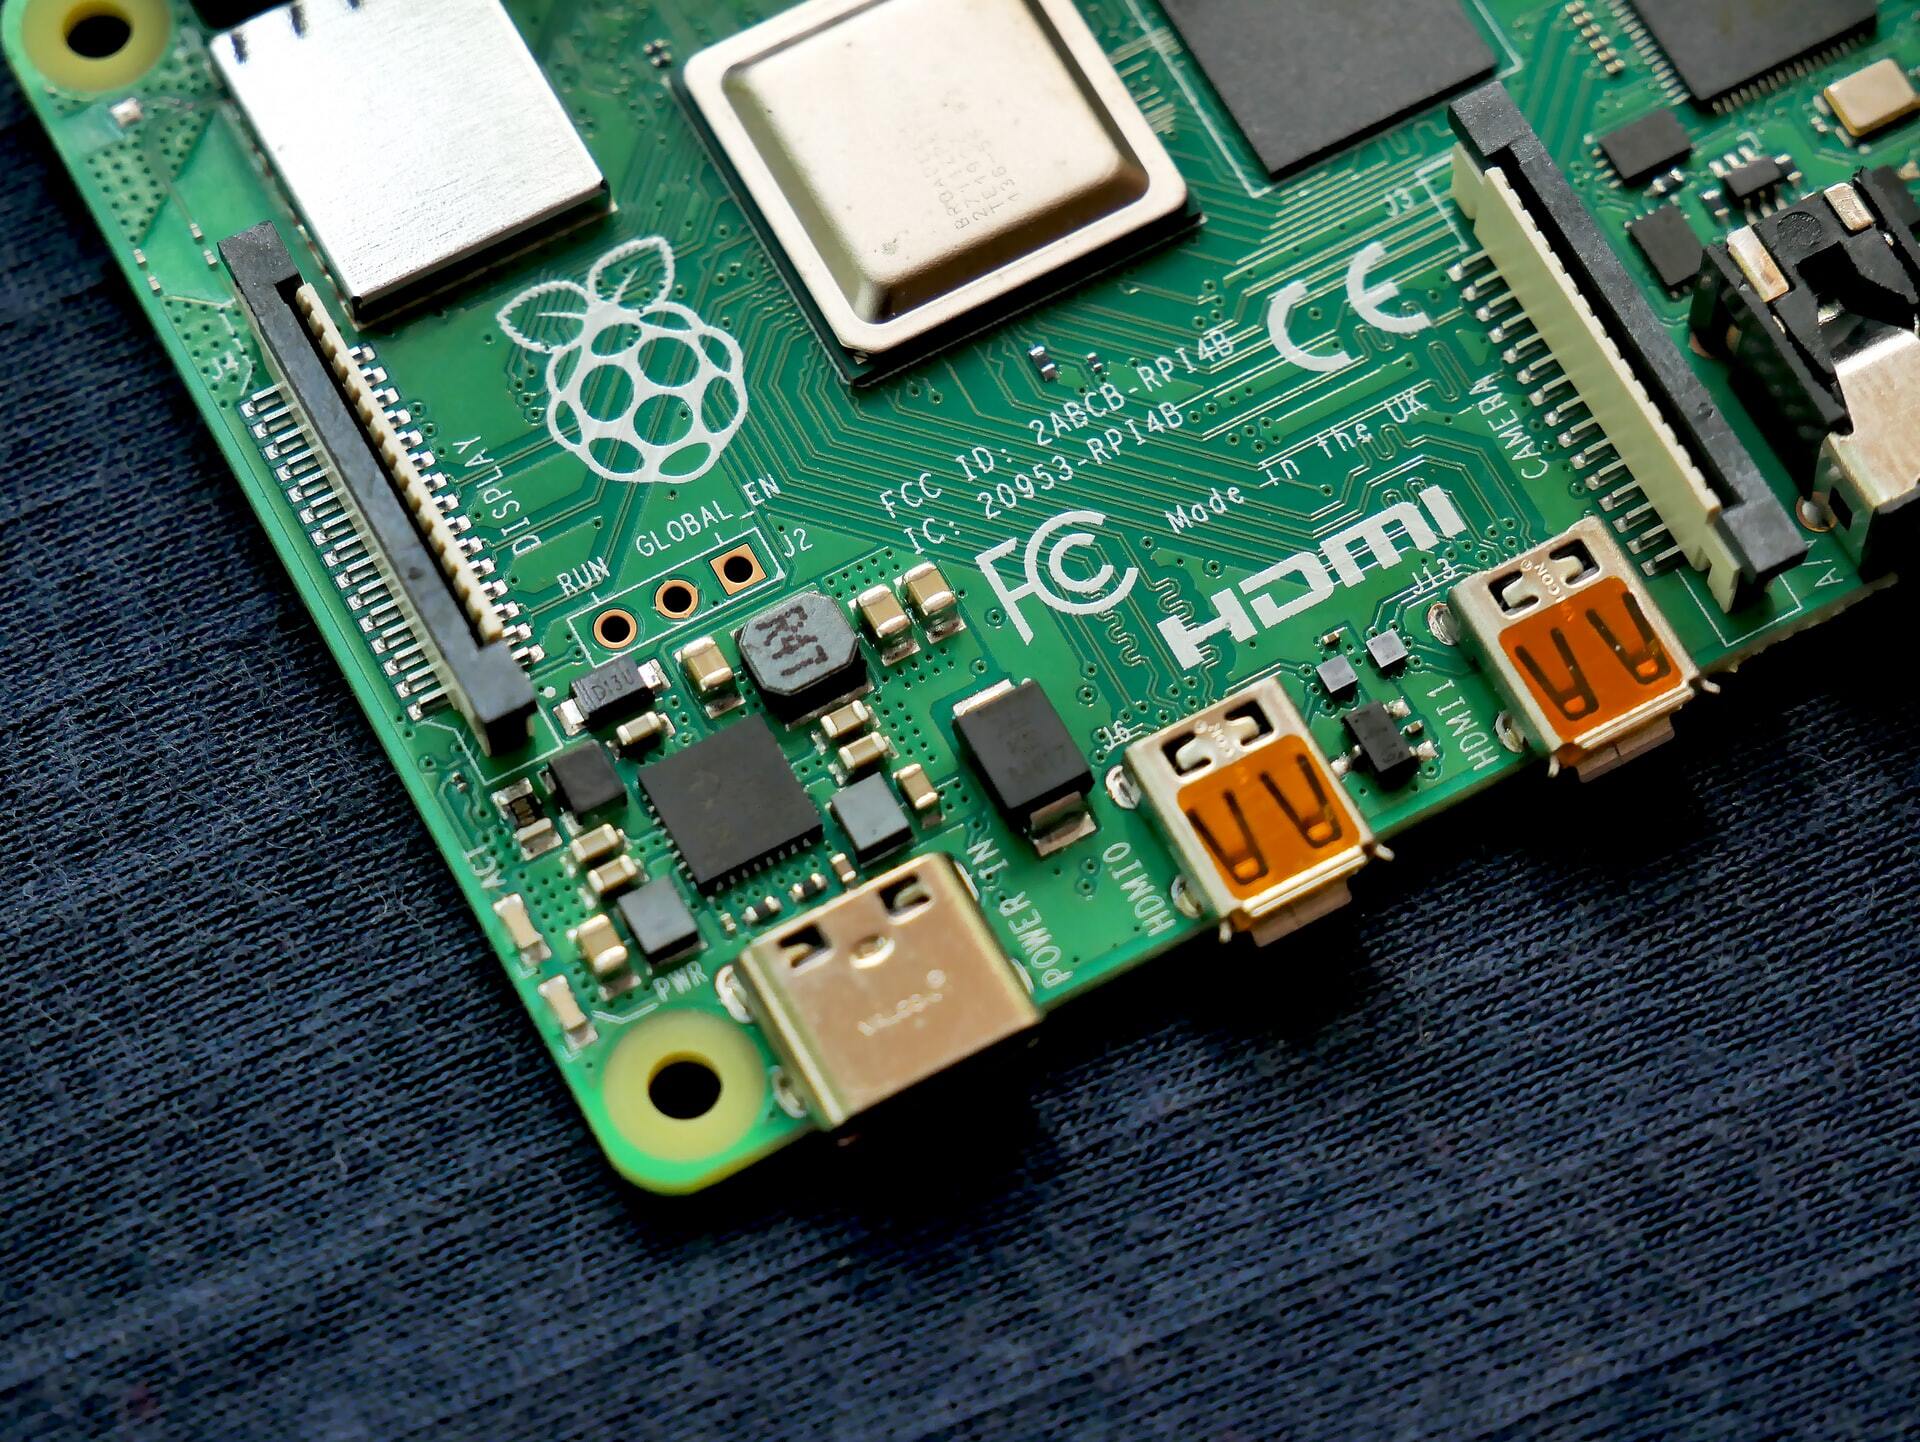
- Raspberry Pi (3 or 4)
- Corresponding cables (HDMI & micro-USB)
- Computer monitor with wooden frame
- Two-way mirror
To send custom messages to your project securely, you will need the following:
- An IDE or some method to edit files.
- I tried to download Visual Studio Code on my Pi 3, and it didn't work. It was a little too much to download and install on the little device. I installed vim because it’s lightweight. If you prefer a GUI editor, try Geany.
- Visual Studio Code works on the Pi 4, and you can get it from their download page. Download the .deb ARM version if you're running 32-bit Raspberry Pi OS, or the .deb ARM64 version if you're running the 64-bit OS. (To determine if you're running 32- or 64-bit Raspberry Pi OS, enter
uname -min a terminal. If the response isarm7l, you're running 32-bit. If the response isaarch64, you're running 64-bit.)
- Node and npm on both the Pi and your computer
- An Auth0 account for securing a client app and an API.
- Heroku or somewhere to host the client application. You'll also need a DB like Postgres
Part 1: The Magic Mirror
The smart mirror is built with a two-way mirror on top of a monitor. A two-way mirror is a glass that is reflective on one side and clear on the other. This allows us to see our reflection while allowing light from the other side to leak through. The monitor is removed from its normal casing and wrapped with a wood frame.
If you are handy, you can attempt to create the custom frame yourself. However, in the interest of time and not trusting my woodworking skills, I decided to grab the "Vilros Magic Glass Mirror and Frame" kit from Amazon.

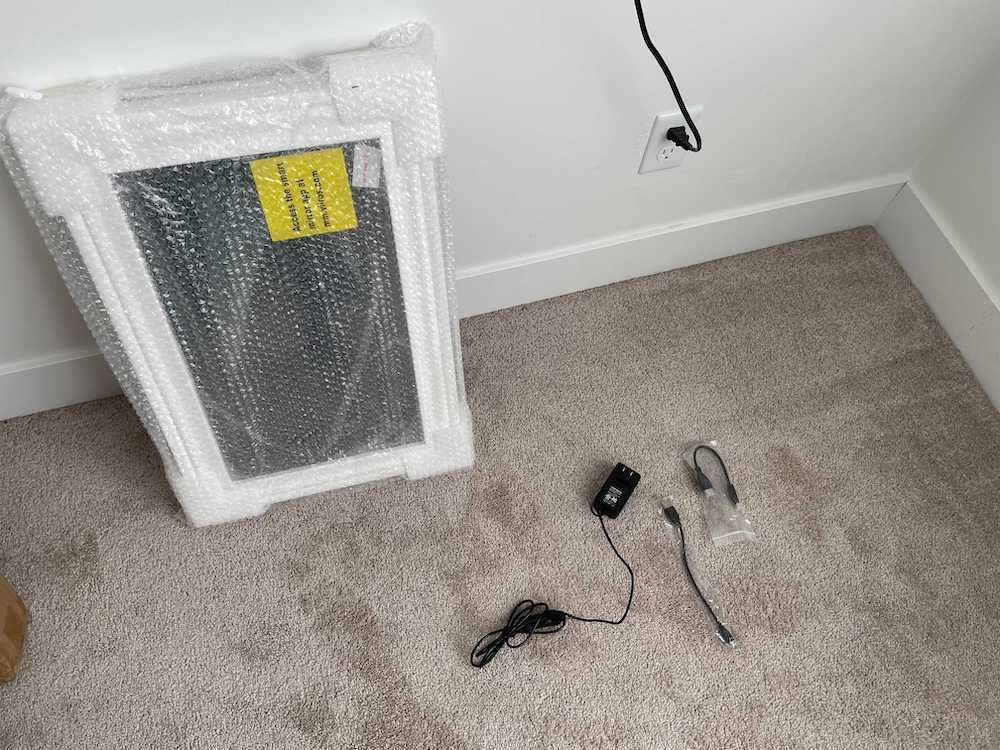
The mirror comes with a monitor already tucked away behind a beautiful frame. The best part is that the back of the frame even has an opening that includes HDMI and micro USB ports. You will need both for the Raspberry Pi.
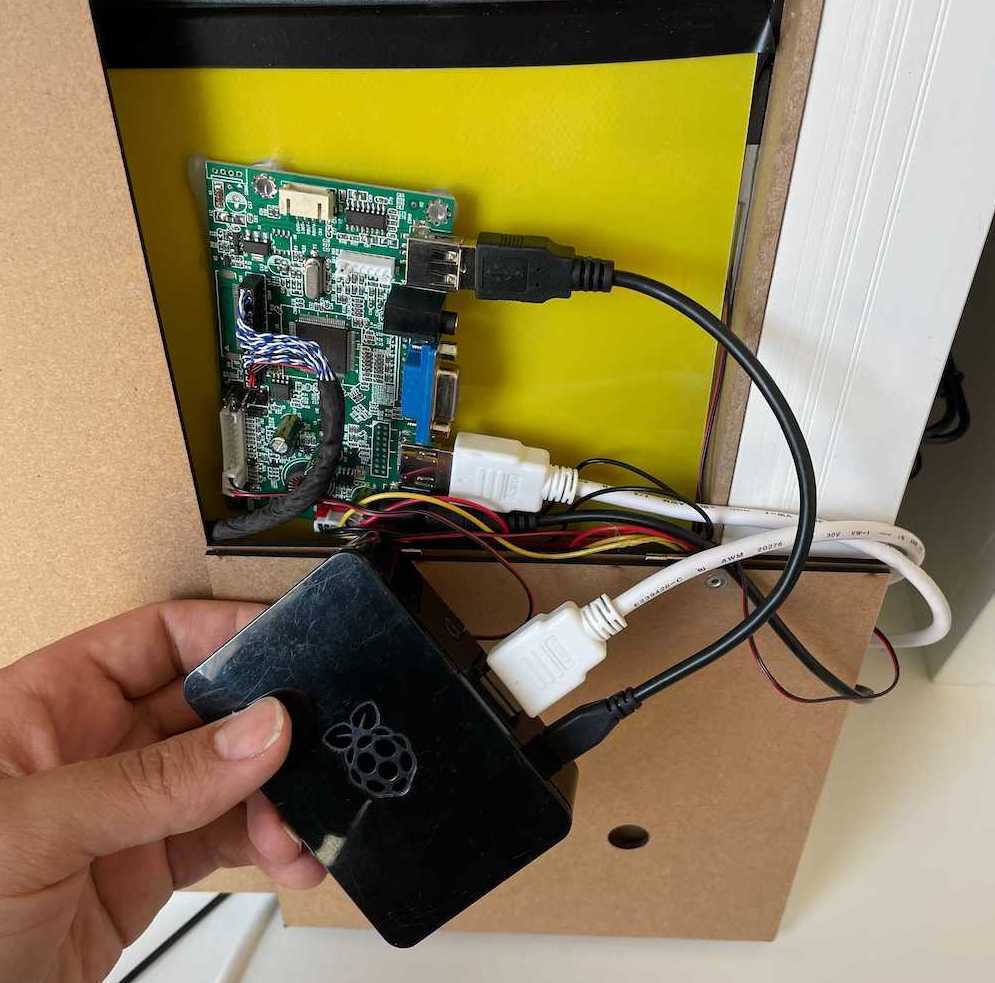
As you can see in the picture above, you'll need to connect to the Raspberry Pi to the mirror monitor's board with HDMI cable for the video feed and a USB-A-to-micro USB cable to provide power to the Pi.
Configure the Raspberry Pi
The Raspberry Pi that I am using is a generation three. The fourth generation is the latest version out today, and that will work as well.
Thankfully, there is a lot of open-source code already out on the web for us to piggyback on. I went with Magic Mirror. It uses Electron behind the scenes to run a continuous running screen. It comes with many default modules, which act similarly to npm modules. They are self-contained code blocks that are plug and play with the running Electron app.
The default Magic Mirror repository comes with a dozen or so default modules. Some of which include the weather, the latest news, and calendar updates. One of these default modules is the "Compliments" module that displays random compliments. We'll use this module, and later on, we'll update it to send a public GET request to retrieve custom messages)
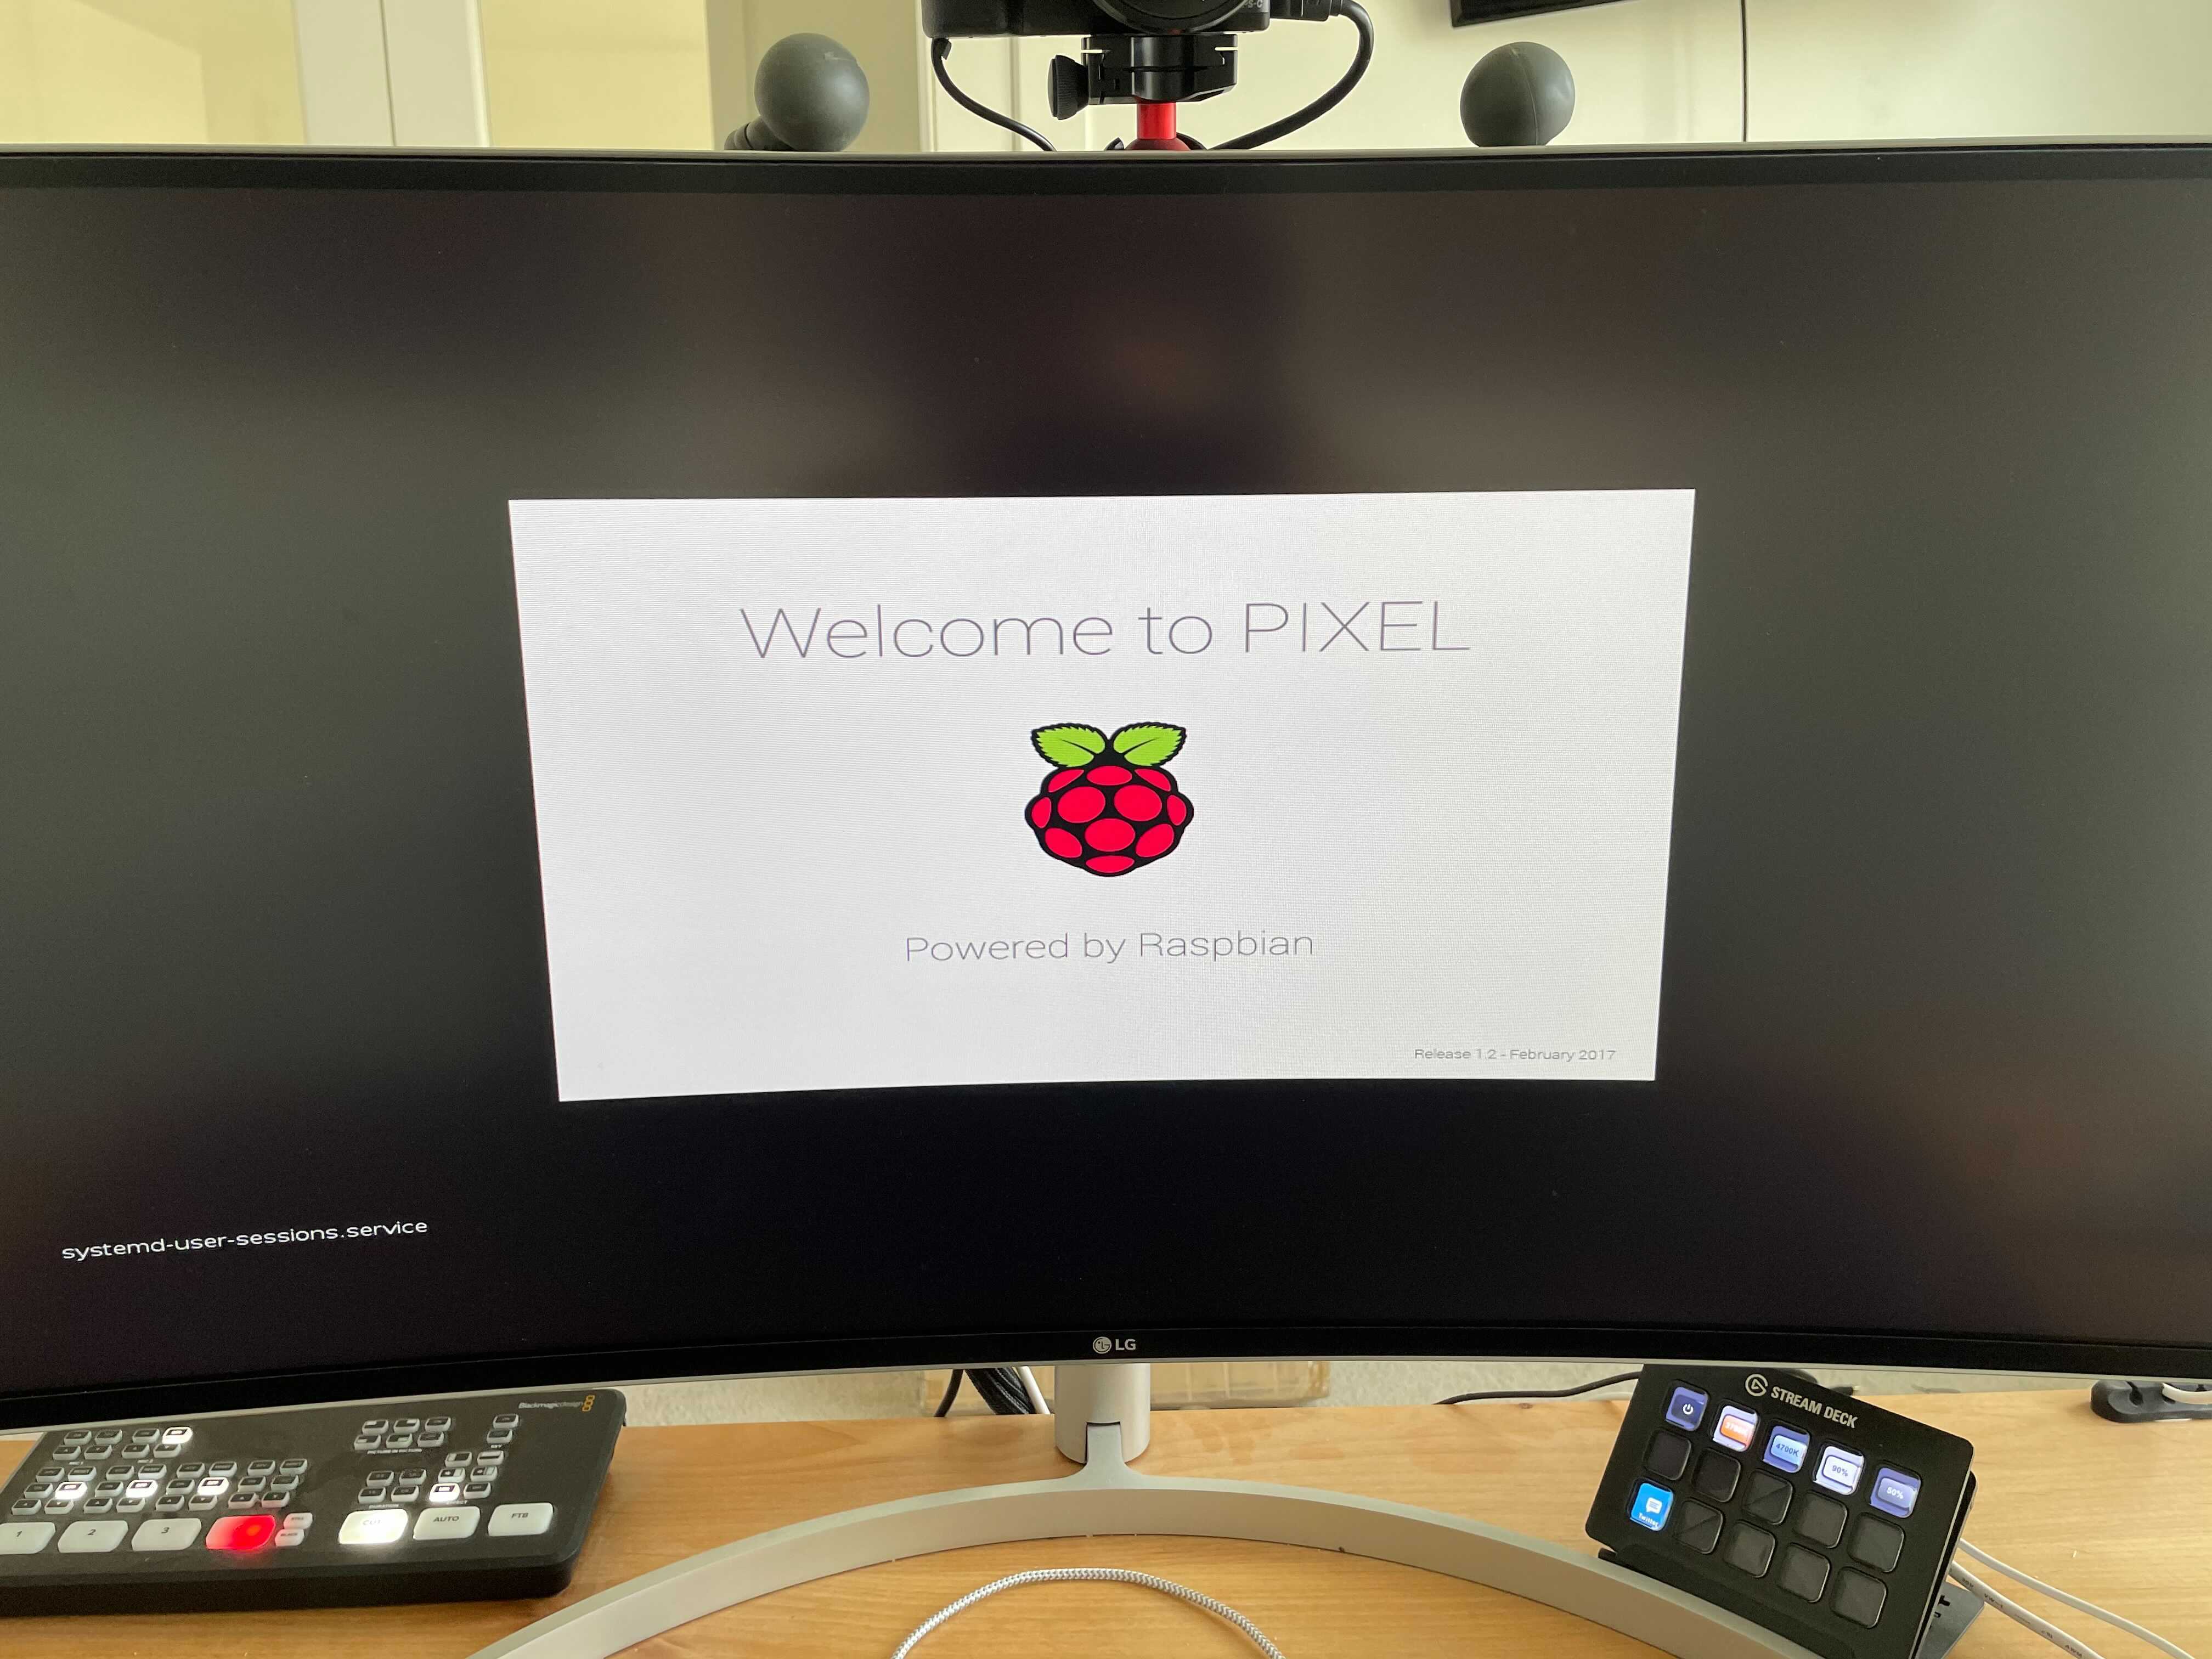
Before I go any further, you need to make sure that your Raspberry Pi is running at least the "Stretch" version of Raspberry Pi OS (which used to go by the name “Raspbian”). As of today, "Buster" is out, and that works fine as well.
When I fired up my old Raspberry Pi, it was using "Jessie", which does NOT work because it has some issues with running Electron. I found that it's easier to update from "Jessie" to "Stretch" first, before trying to make the jump to "Buster". If you need to upgrade your Pi, then continue reading. If not, then you can skip the next section, which is all about upgrading your Raspberry Pi OS.
Upgrading your Raspberry Pi OS Version
Go ahead and connect your Raspberry Pi to a monitor, mouse and keyboard. Once your screen loads, connect to a wifi connection.
Walking through these steps will take about an hour to two to complete, mainly because it takes time to download the new version, install it, and reboot.
Once your Pi boots up and you see the home screen, click on the Terminal icon, near the left side of toolbar at the top of the screen. Once a Terminal window opens, enter the following commands:
sudo apt-get update
sudo apt-get upgrade
sudo apt-get dist-upgrade
The commands above will make sure that you're running the latest revision of the OS currently installed on your Raspberry Pi. During the process, you may need to reboot it.
This is also a good time to upgrade your Pi's firmware. You can do this by entering the following command:
sudo rpi-update
If you choose to update the firmware, reboot your Pi once the update process has completed.
Next up, you'll need to update the sources to apt-get. The commands below replace “jessie” with “stretch” in the files that specify the repository locations used by apt-get.
sudo sed -i 's/jessie/stretch/g' /etc/apt/sources.list
sudo sed -i 's/jessie/stretch/g' /etc/apt/sources.list.d/raspi.list
Finally, with the local repositories updated, we can actually do the update
sudo apt-get update && sudo apt-get upgrade -y
sudo apt-get dist-upgrade -y
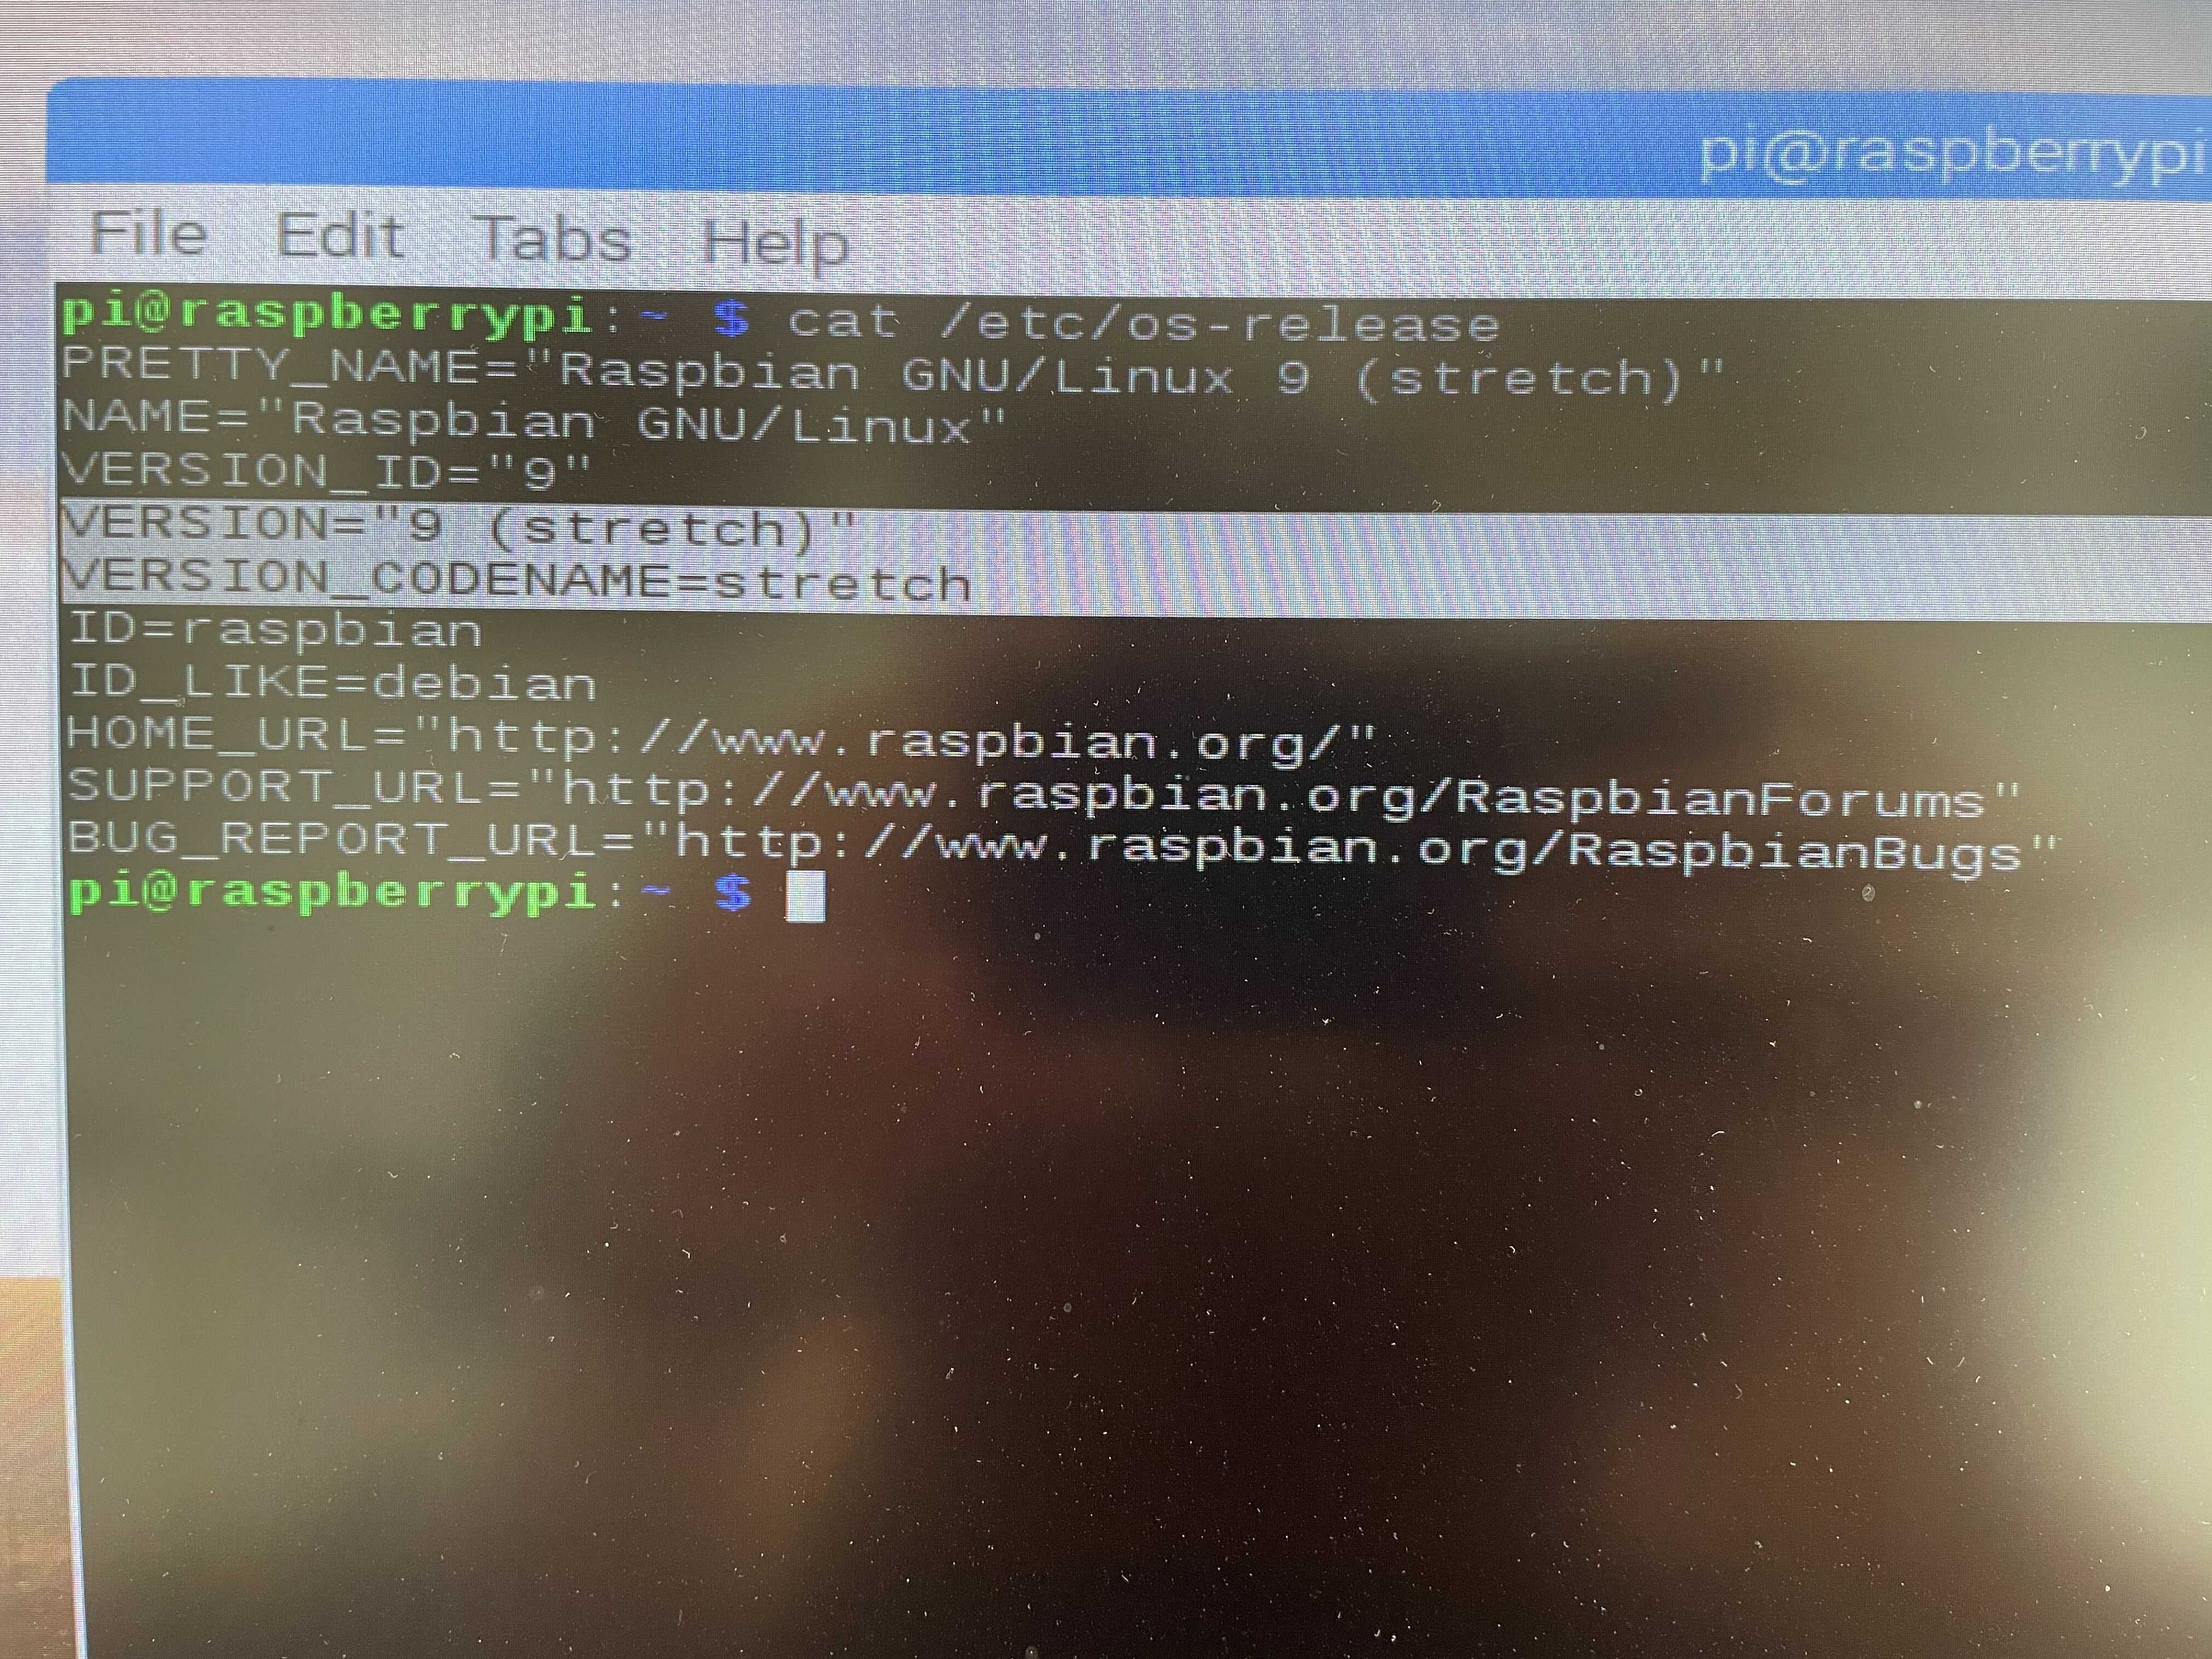
Once you've run all the update commands, you can ensure that you were successful by running the following in your terminal:
cat /etc/os-release
This outputs the contents of the /etc/os-release file, which contains system information about your Pi, including the version of Raspberry Pi OS that you are now running. If the VERSION_CODENAME value is stretch or buster, you're good to go!
Install and Configure the MagicMirror Code
With your Raspberry Pi updated, it's time to install MagicMirror.
curl -sL https://deb.nodesource.com/setup_10.x | sudo -E bash -
Then run this command with sudo (superuser permissions by default) to actually install it on your machine:
sudo apt install -y nodejs
With Node.js in place, clone the MagicMirror repository and check out the master branch:
git clone https://github.com/MichMich/MagicMirror`
Make the repository folder your current directory:
cd MagicMirror/
Install the Node.js project dependencies:
npm install
Make a copy of the config sample file in order to be able to make changes to the application's modules:
cp config/config.js.sample config/config.js
Finally, start the Node.js application:
npm run start
You should see a screen like the one below on your Raspberry Pi's display:
To exit MagicMirror, press control-Q.
Working with Modules
As I mentioned above, the MagicMirror repository comes with some default modules, and there are many more to choose from. Most of these are plug-adn-play with our repo. Here are some fun ones you can try adding to your personal project:
- MMM-MyScoreboard: displays today's sports scores for favorite teams
- MM-concert-calendar: displays concerts in the your area (when things get back to normal)
- MMM-COVID19: displays reported cases of COVID-19
Tips and Tricks for Your Smart Mirror Project
Are you having fun yet? Guess what - it can be even better! Here are some tips to improve your project and the development experience:
- Rotating the Raspberry Pi screen for a vertical view
- Disable sleep mode
- Automatically running MagicMirror on reboot
- Quick hints for using vim
- Updating your Pi’s timezone (appears by default on the electron app)
Part 2: Sending Custom Messages to Your Mirror!
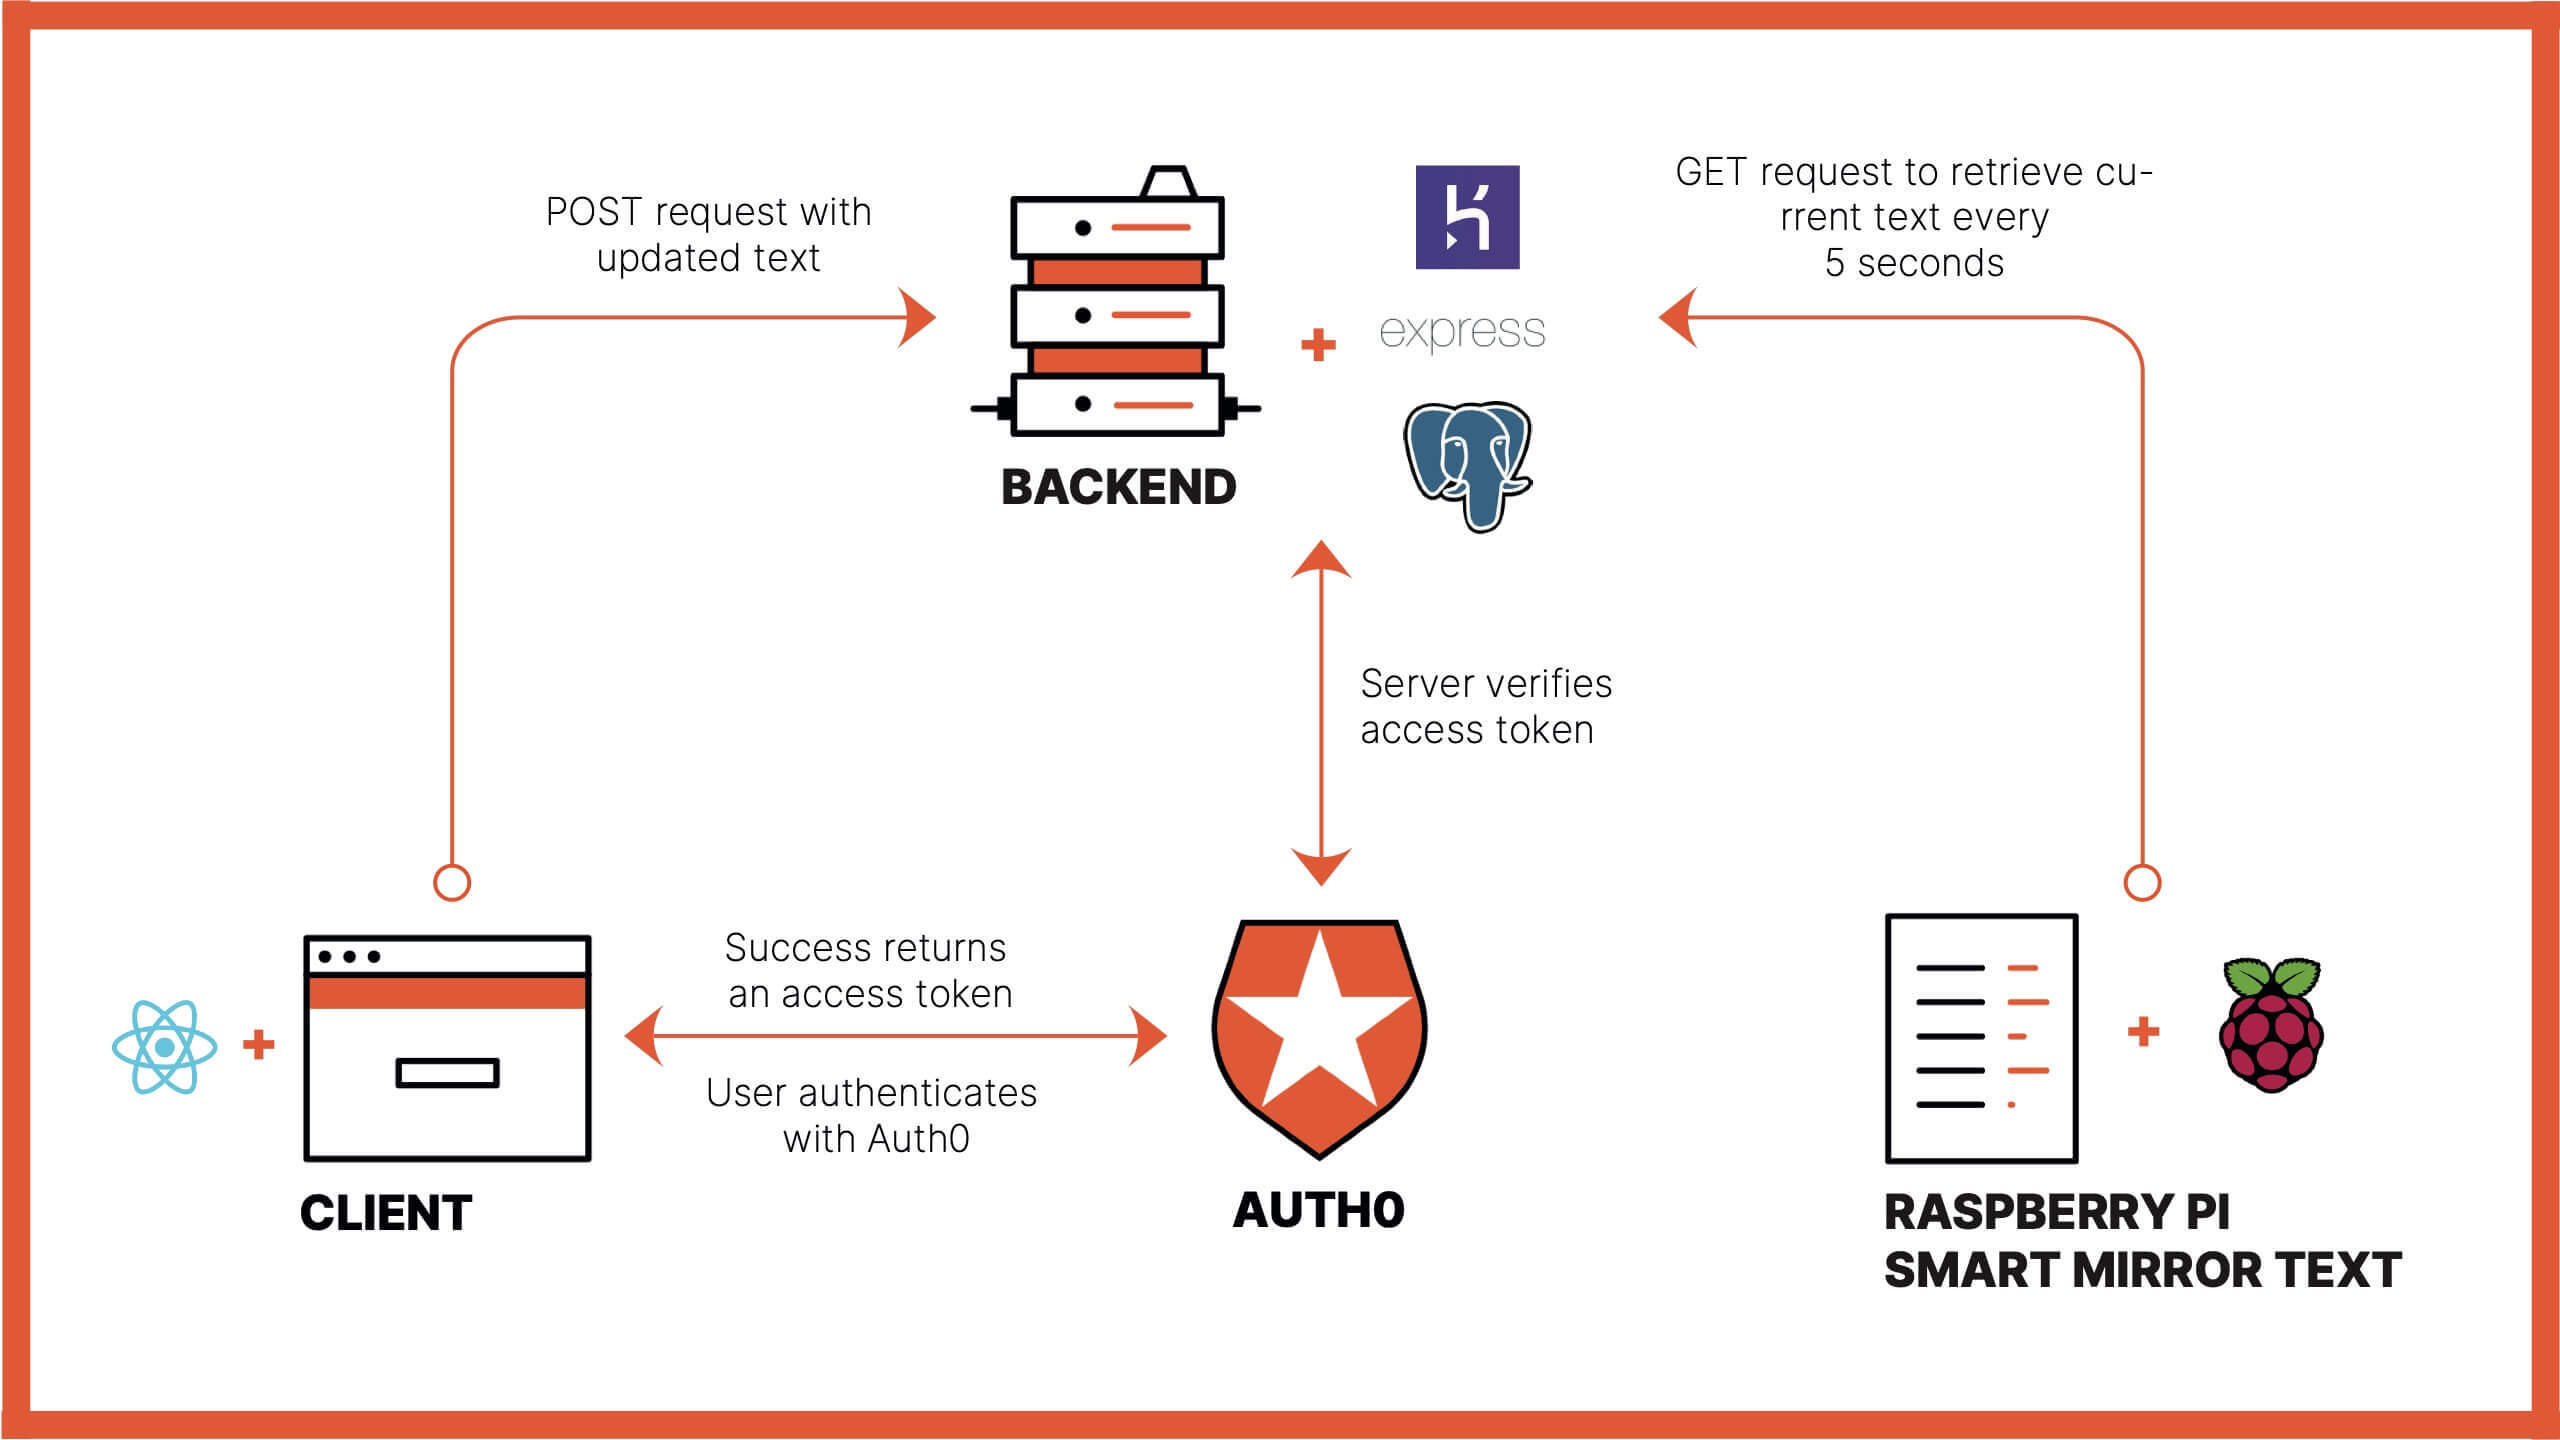
Alright, now that we have a successful working Raspberry Pi smart mirror, now it's time to wire it up with an API, client, and Auth0. These technologies will enable us to:
- Authenticate on a web application and type a message into a input box.
- Make a
POSTrequest with the updated message and an access token. - Verify the access token on the API and if successful, update a Postgres database table.
- Update the compliments module within the MagicMirror code (on the Raspberry Pi) to ping a
GETrequest that will return the most up to date message.
Update the MagicMirror Compliments Module
The MagicMirror application's "compliments" file controls the randomly-selected compliments displayed in large text on the lower half of the screen. In this project, we'll repurpose it to retrieve custom messages.
MagicMirror -> modules -> default -> compliments -> compliments.js
This snippet below is also found in the cloned repo mentioned in the next section, within the file magicmirror.js.
Module.register("compliments", {
defaults: {
result: "Loading...",
updateInterval: 5000,
remoteFile: "https://auth0-magic-mirror.herokuapp.com/v1/meeting",
fadeSpeed: 4000
},

getScripts: function () {
return ["moment.js"];
},

start: function () {
Log.info("Starting module: " + this.name);

    var self = this;
    setInterval(function () {
      self.complimentFile(function (response) {
        var text = JSON.parse(response).status || "Loading...";
        self.config.result = text;
        self.updateDom(self.config.fadeSpeed);
      });
    }, this.config.updateInterval);

},

complimentFile: function (callback) {
var xobj = new XMLHttpRequest(),
isRemote =
this.config.remoteFile.indexOf("http://") === 0 ||
this.config.remoteFile.indexOf("https://") === 0,
path = isRemote
? this.config.remoteFile
: this.file(this.config.remoteFile);
xobj.overrideMimeType("application/json");
xobj.open("GET", path, true);
xobj.onreadystatechange = function () {
if (xobj.readyState === 4 && xobj.status === 200) {
callback(xobj.responseText);
}
};
xobj.send(null);
},

getDom: function () {
var wrapper = document.createElement("div");
wrapper.className = this.config.classes
? this.config.classes
: "thin xlarge bright pre-line";
var text = this.config.result;
var parts = text.split("\n");
var compliment = document.createElement("span");
for (var part of parts) {
compliment.appendChild(document.createTextNode(part));
compliment.appendChild(document.createElement("BR"));
}
compliment.lastElementChild.remove();
wrapper.appendChild(compliment);

    return wrapper;

}
});
This snippet above uses a public GET request to retrieve a message to display on the mirror. Once you complete the ExpressJS/Heroku/Postgres steps below, you'll need to come back and update the value of remoteFile with your endpoint.
Make sure to run npm start again and watch your Pi ping the public GET route every five seconds, and display the text!
Security with Auth0
Privacy and security are obviously important with this project. We don't want just anyone to be able to change the text that eventually gets displayed on the mirror. In order to prevent unauthorized parties from posting text messages to the mirror, we will set up authentication on the client and authorization on the server. Thankfully, both of these processes are extremely easy to set up with Auth0.
You will first need to sign up for an Auth0 account if you do not already have one.
Step 1: Create an Application
Press the Create Application button in the top right corner. Choose the Single Page Web Applications option and give it a good name.
After the application is created, the only configuration you need to do is to update three text boxes:
- Allowed Callback URLs
- Allowed Logout URLs
- Allowed Web Origins
We will update these text boxes with localhost for local development and the URL for the location where you'll put the client application. I put mine on Heroku, so this is what my configuration settings look like:
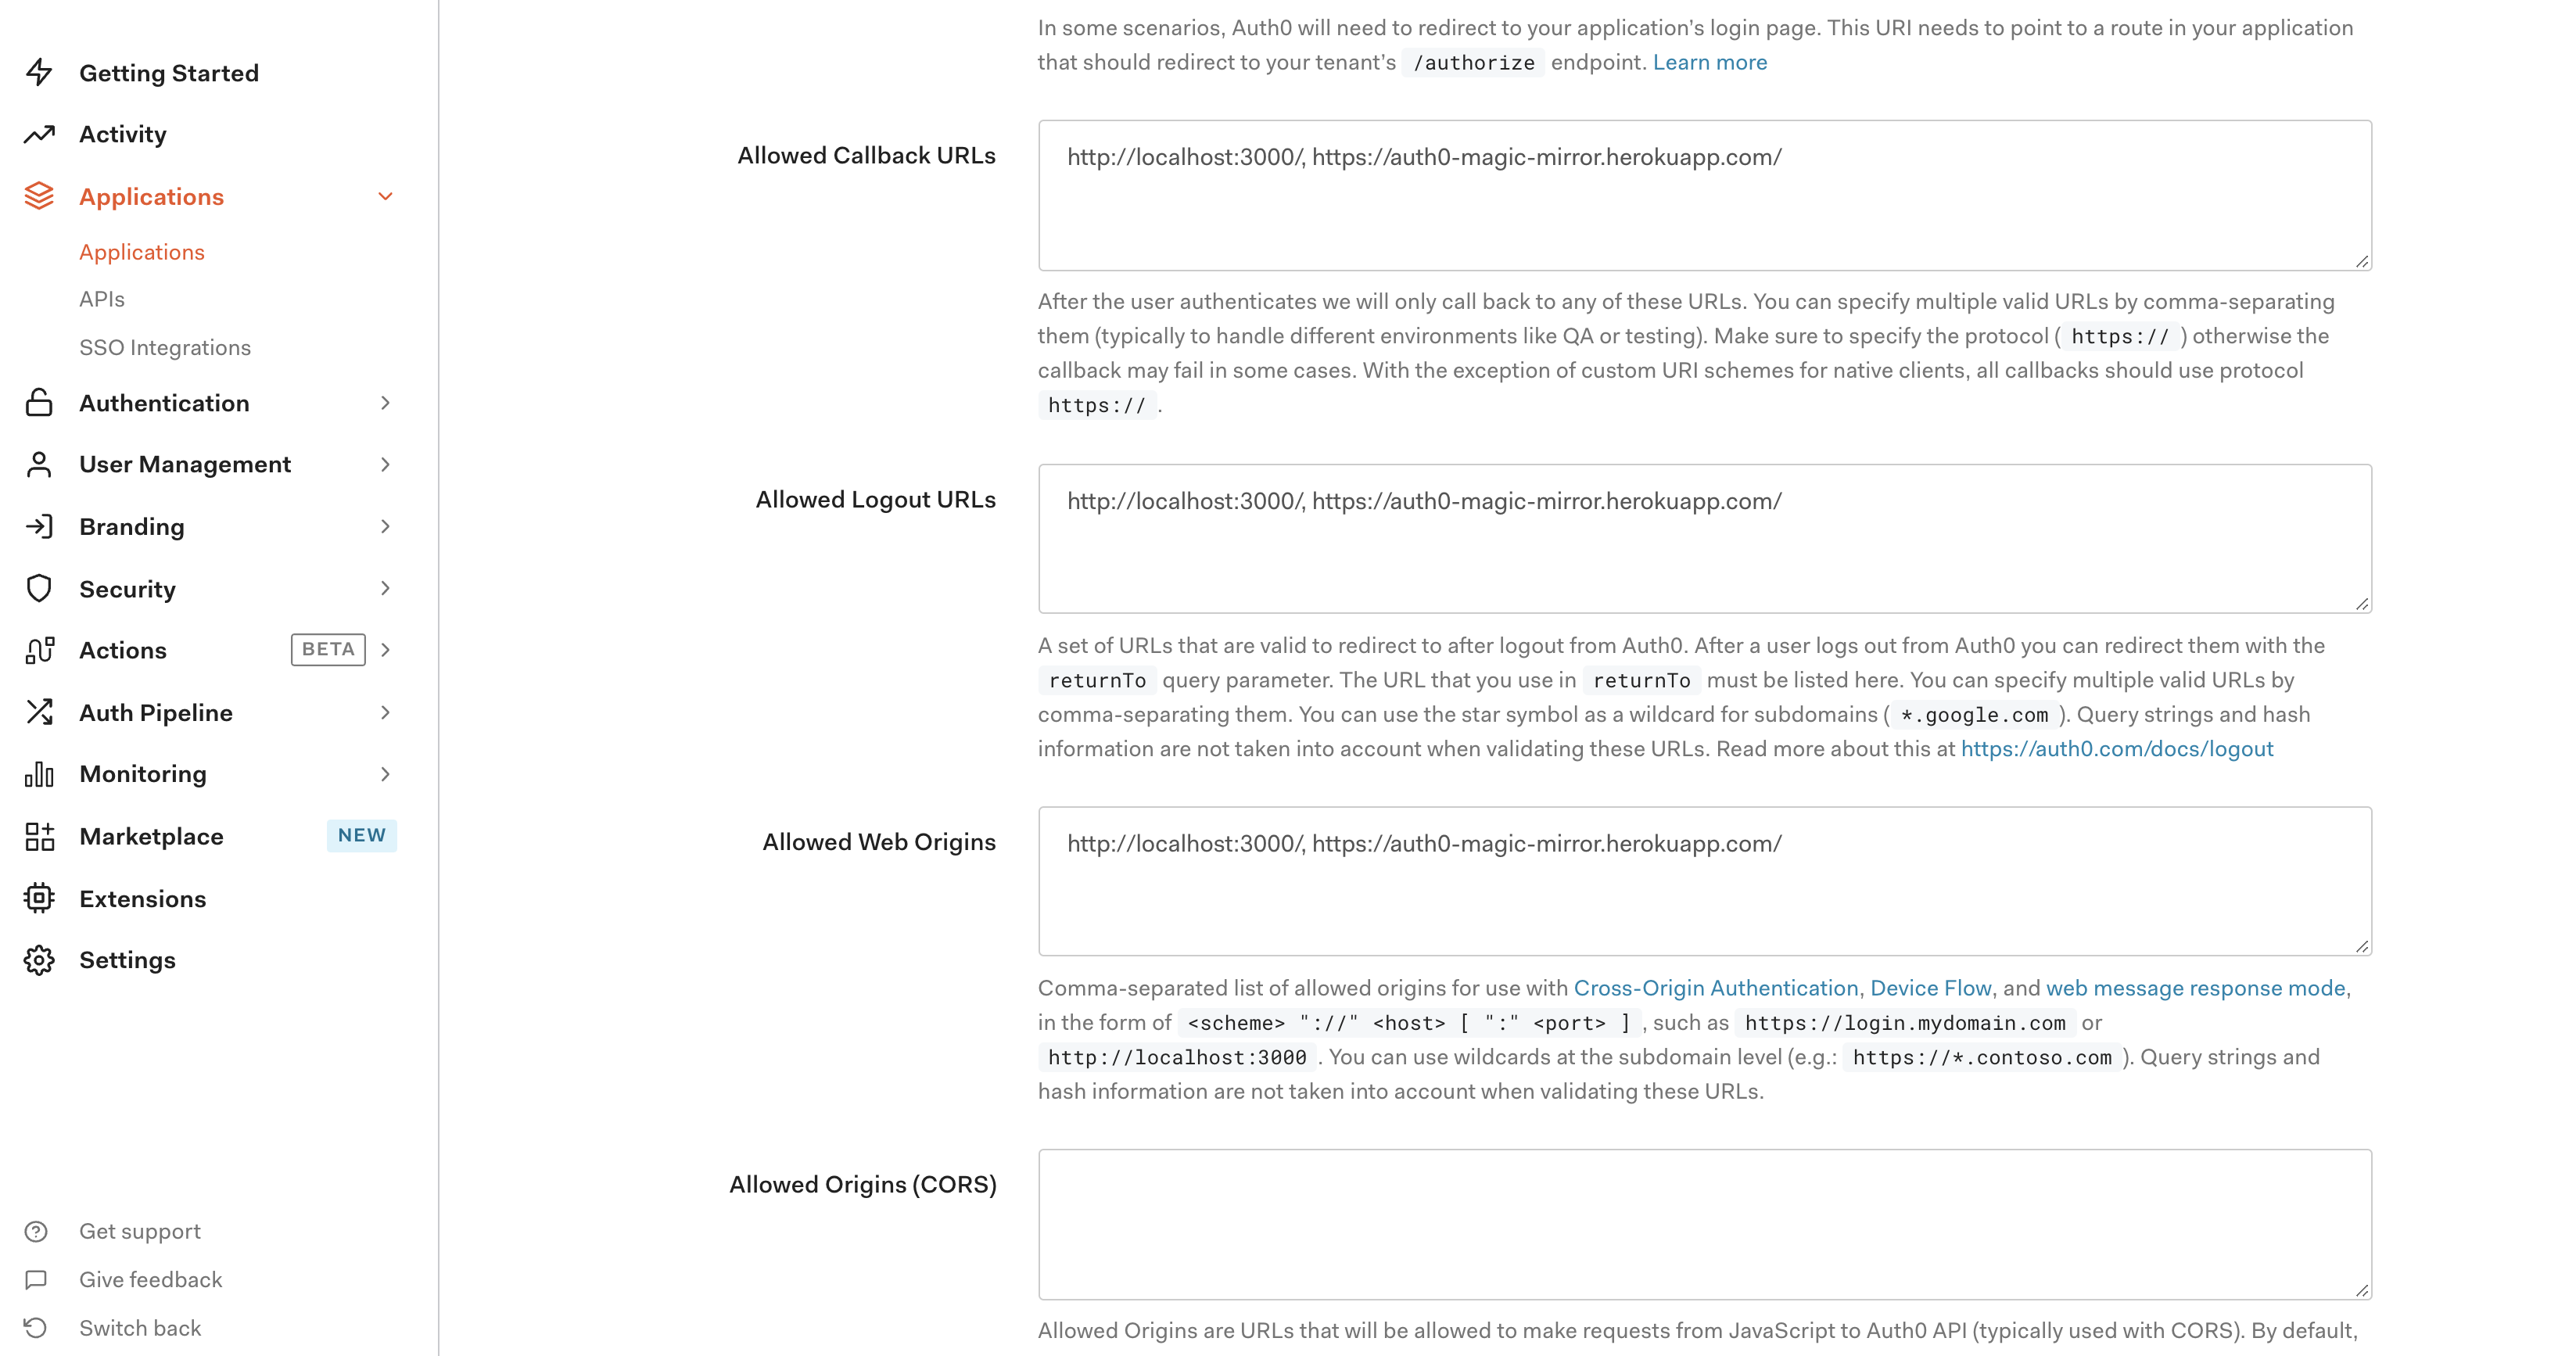
I filled out the text boxes as follows:
Allowed Callback URLs
http://localhost:3000/, https://auth0-magic-mirror.herokuapp.com/
The above value is the URL that Auth0 can use to redirect your users after they successfully log in.
Allowed Logout URLs
http://localhost:3000/, https://auth0-magic-mirror.herokuapp.com/
The above value is the URL that Auth0 can use to redirect your users after they log out.
Allowed Web Origins
http://localhost:3000/, https://auth0-magic-mirror.herokuapp.com/
Again, make sure you are using your application's URLs, and not the ones above, which are for mine.
That's all we need to do for the authentication part, though we will be back later to grab some of this application's basic information to put within our React code.
Step 2: Create an API
Next up, we'll need to create an Auth0 API. We want to protect the ExpressJS route that does the actual updating of the text sent to the magic mirror.
The previous step set up the authentication of a user so that we know who they are, and we can use their access token to verify if they have the correct authorization to update the text.
On the Auth0 dashboard's left-hand navigation bar, click on APIs, then click the Create API button. You will be asked for details about the API to be created:
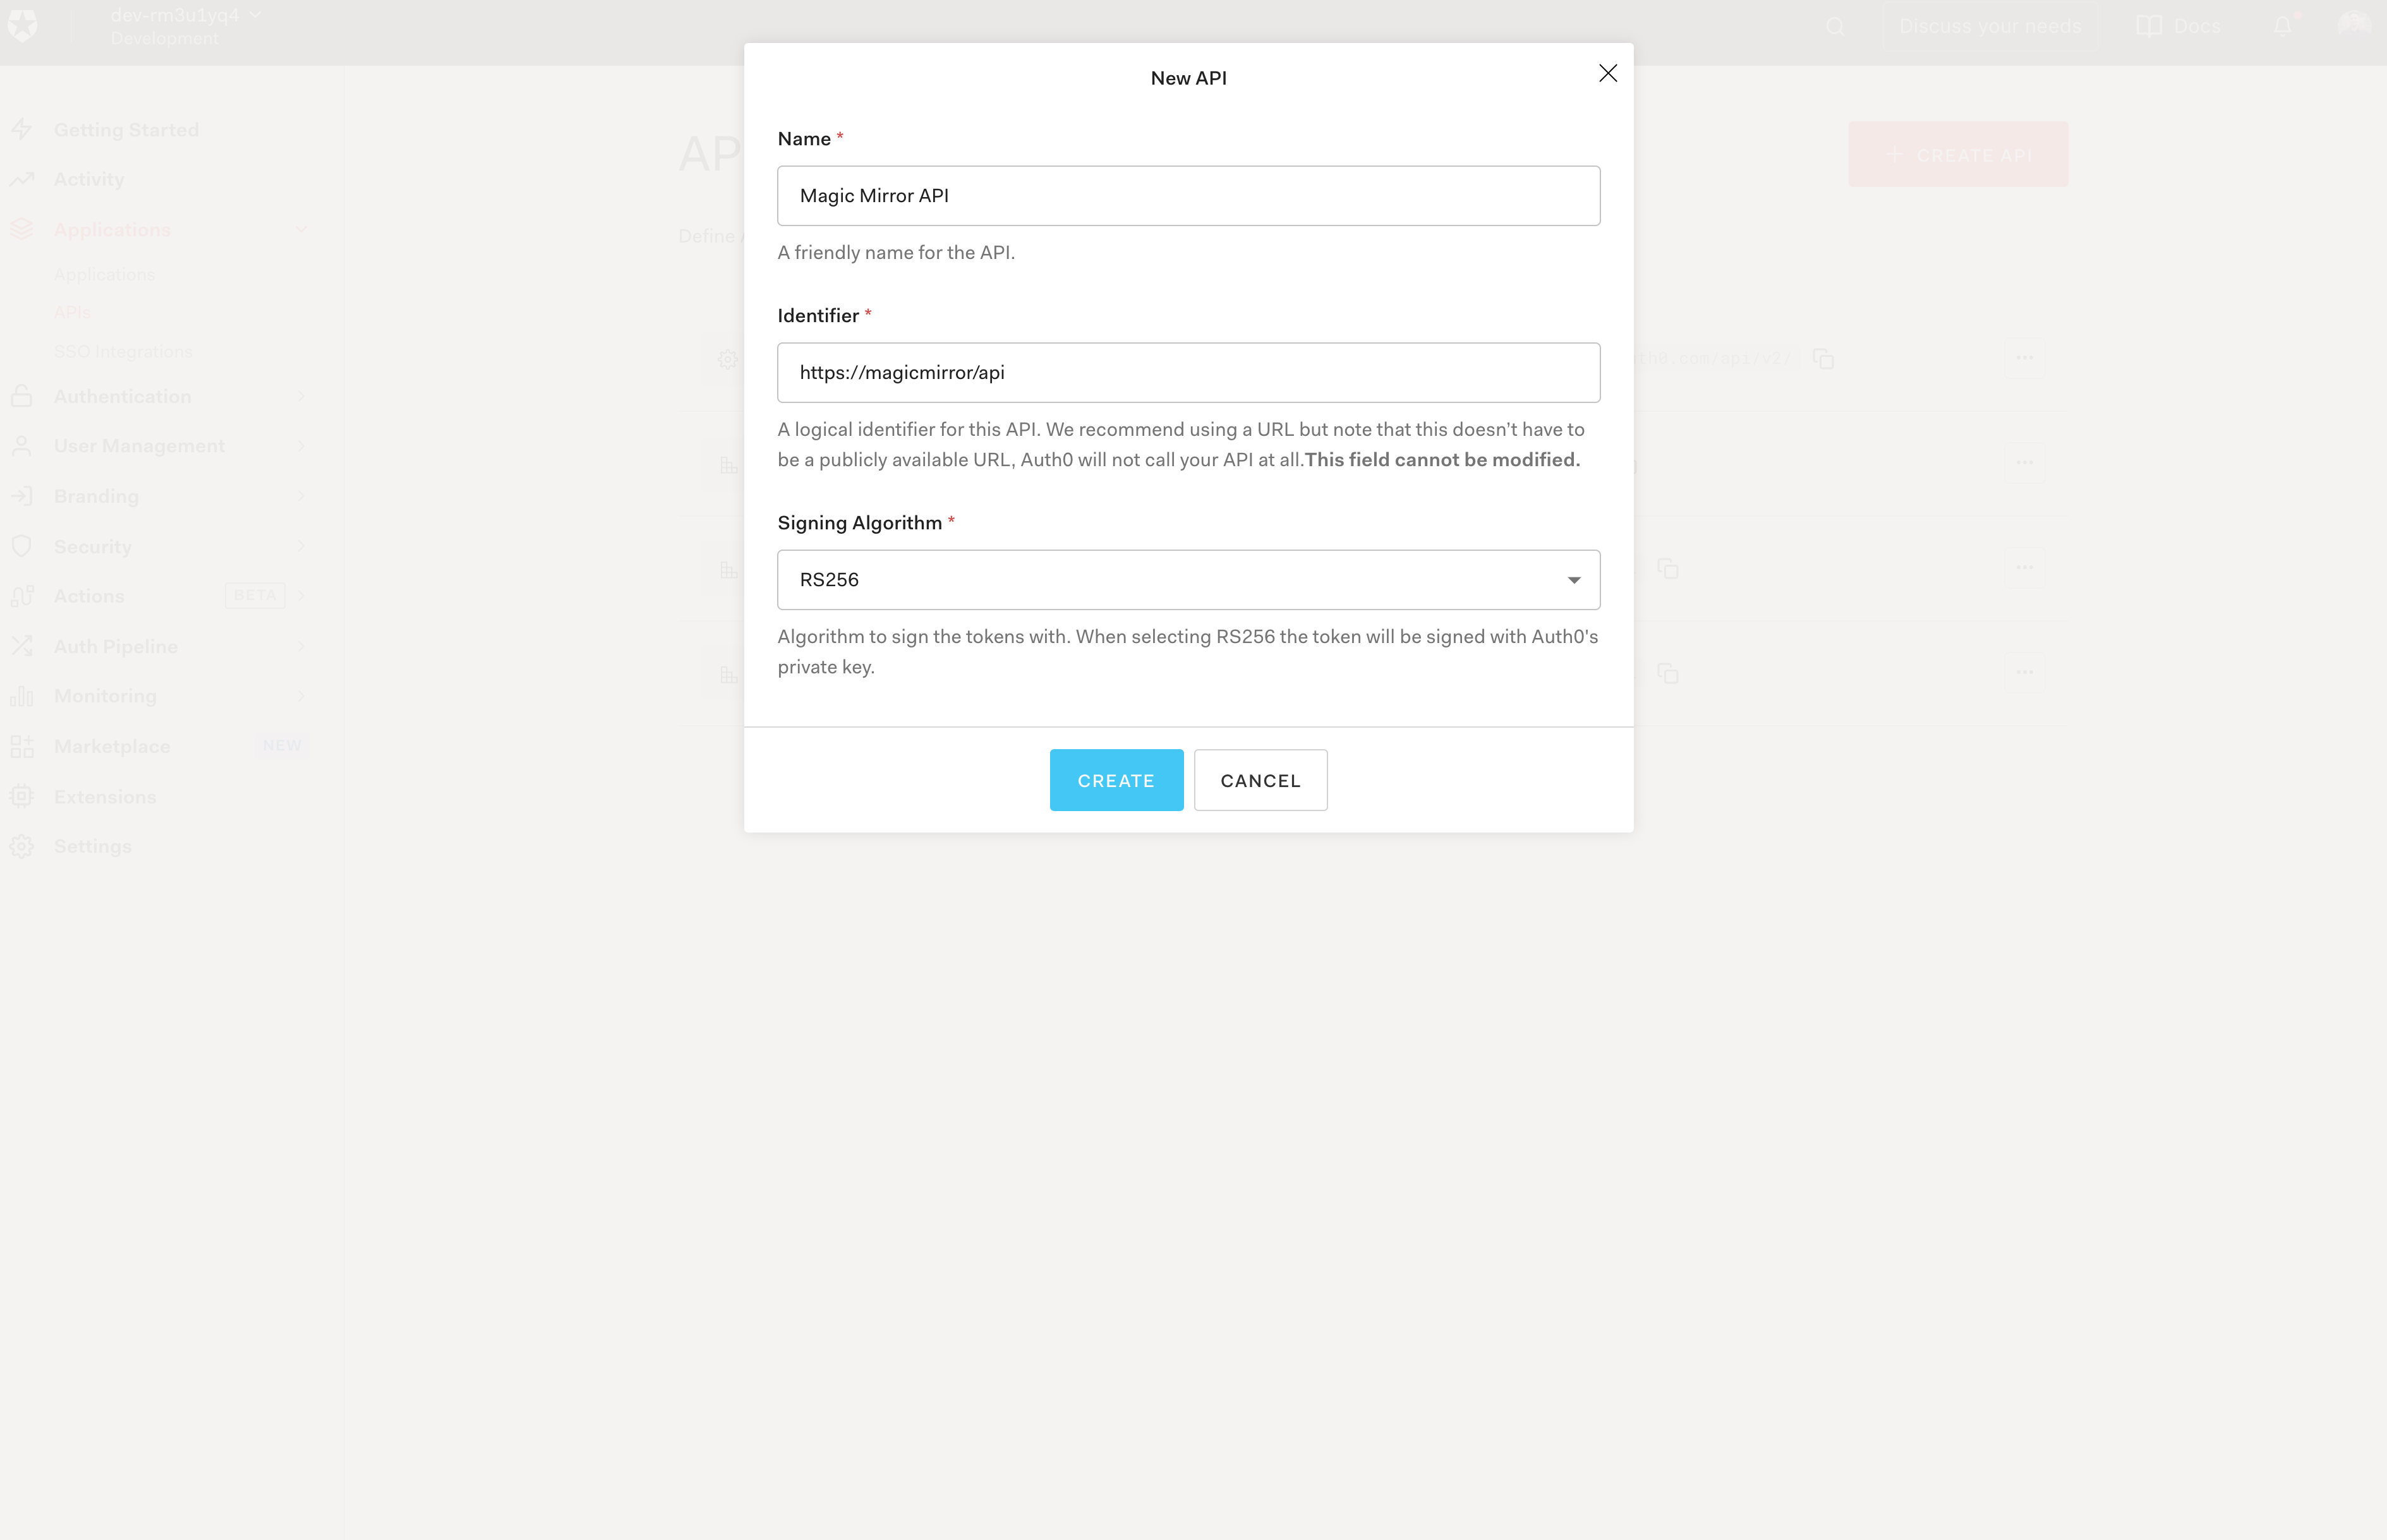
Give the API a good name and identifier. This is what I used for mine:
- Name:
Magic Mirror API - Identifier:
https://magicmirror/api
Clicking the Create button will take you to the Settings page. We'll need some information about this API, so don't close out of this screen just yet.
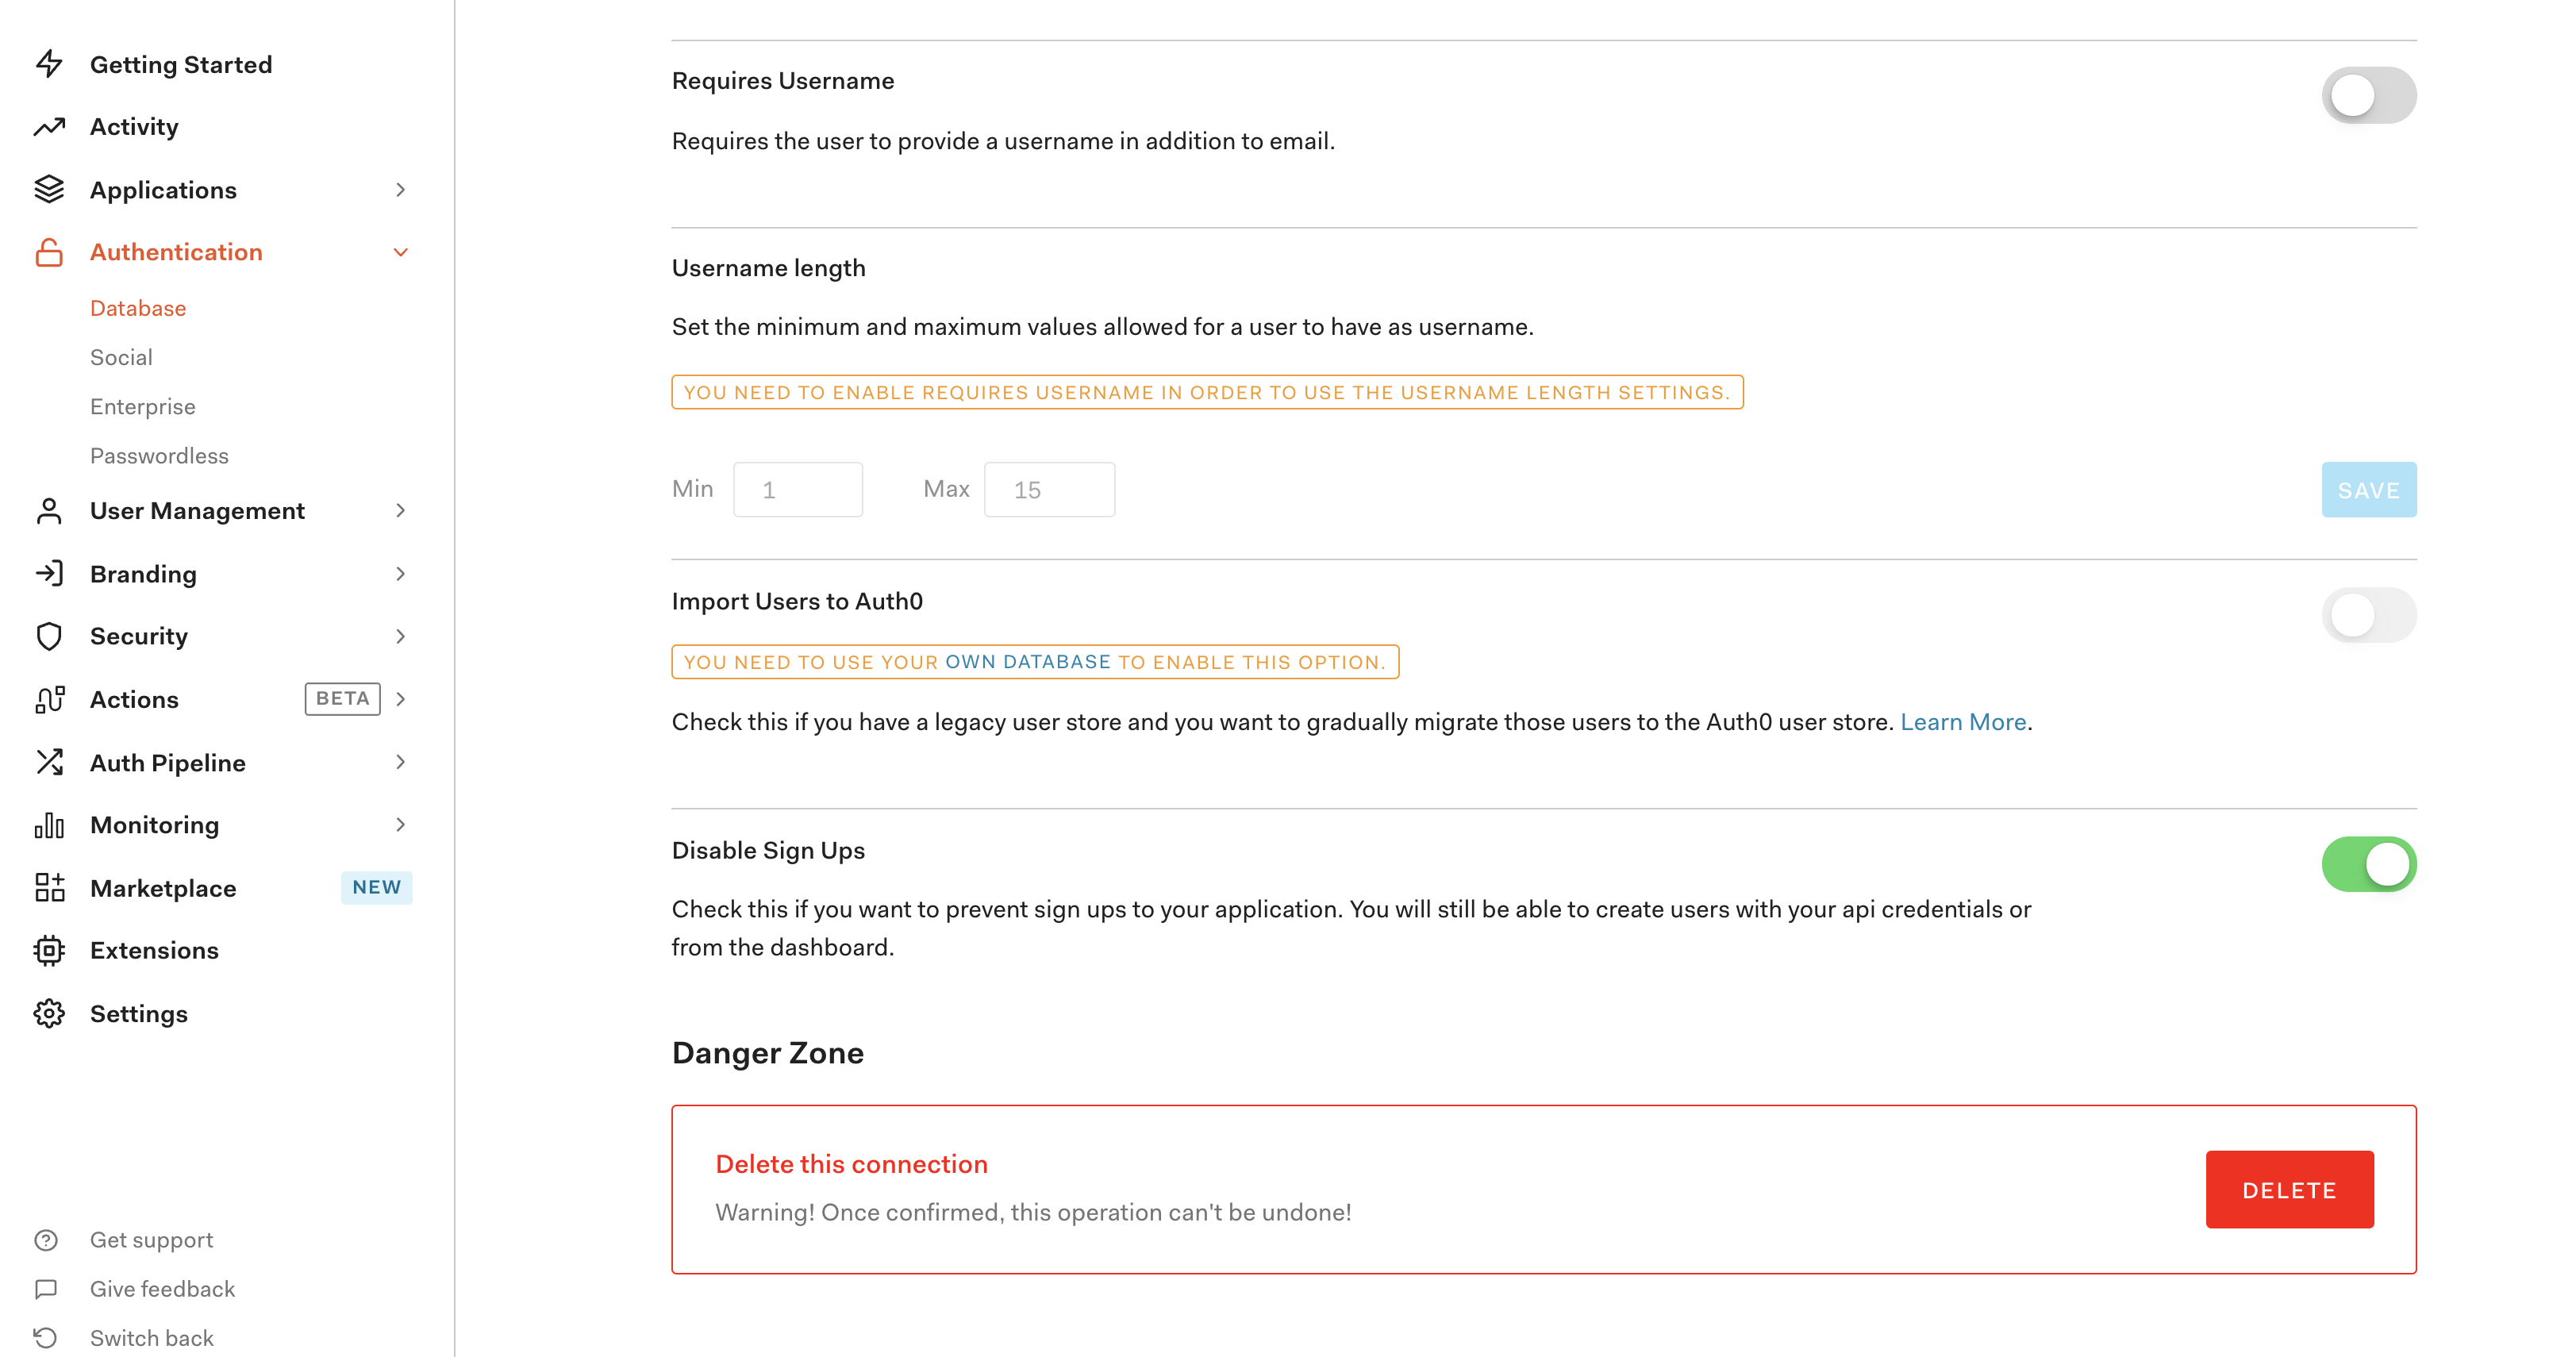
Step 3: Disable New Signups
It defeats the purpose of securing the POST request with Auth0 if anyone could sign up for your client and send the updated text. So we need to disable any new sign-ups.
In the left sidebar, navigate to Authentication -> Database -> Username-Password-Authentication, then toggle Disable Sign Ups to the "on" position.
Clone the Project's Repository

Go ahead and clone the auth0-magic-mirror repo. This is the repo that creates the client and also has the ExpressJS GET and POST routes for getting and updating the mirror text.
Once you download the project, create a file named .env file at its root and add this to it on the first line:
DATABASE_URL=
The project won't work yet. If you try to start it with yarn and yarn start, it will fail because of the missing value for DATABASE_URL in the .env file. We'll add this value soon.
The Client Code
Everything needed for the React setup lives inside the project's /public/home.js file. This file holds the Home React component, animations, data fetching, and Auth0 SDK for authentication.
We'll wrap the Home component with the Auth0 provider and passing the app's credentials that we set up above. Open /public/home.js, scroll to the end of the file, and replace the domain, clientId, and audience values with the values from your Auth0 dashboard settings:
<Auth0Provider
domain="your-domain.auth0.com"
clientId="your clientId"
audience="your API audience/identifier"
redirectUri={window.location.origin}

>

    <Home />

</Auth0Provider>,
When we wrap our component with this, we get access to functions and values from the useAuth0 hook, which comes from the Auth0 Reach SDK, and comes from this code in /public/home.js:
const {
isLoading,
error,
isAuthenticated,
loginWithRedirect,
getAccessTokenSilently
} = useAuth0();
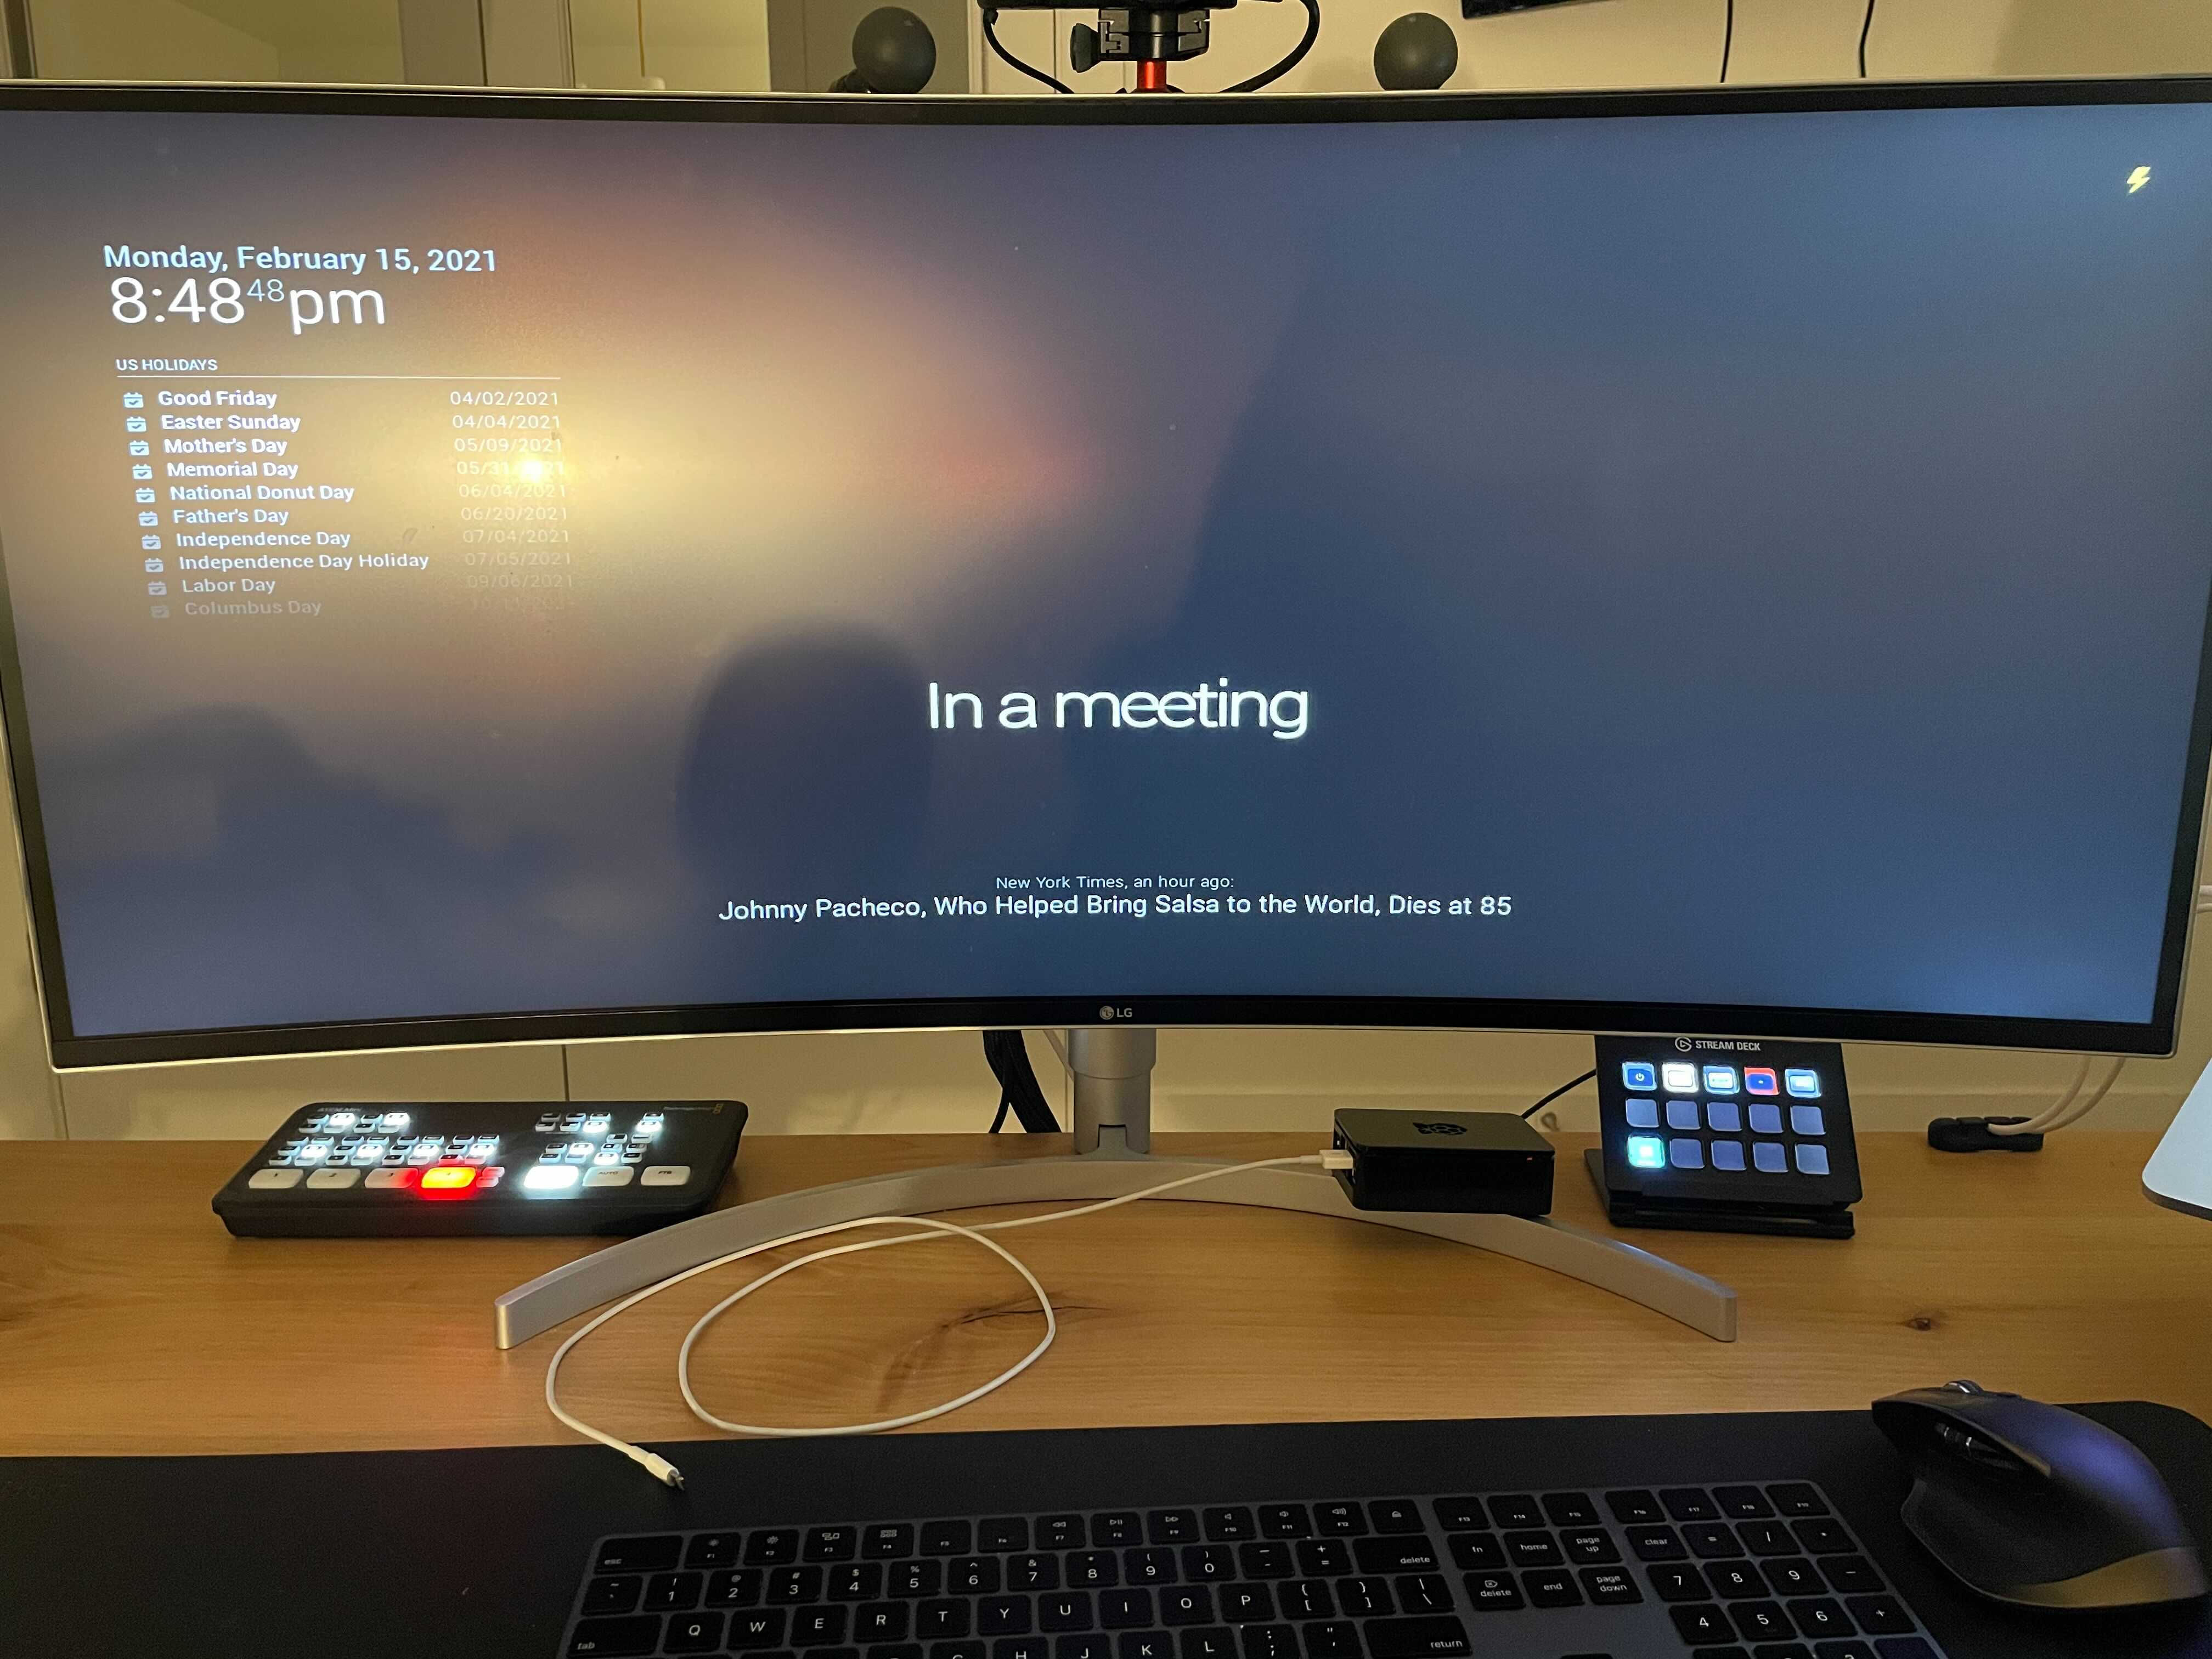
We'll use these properties to make sure a user authenticates when first loading the site. Then we'll grab their access token and send it with the POST request containing the updated message, which comes from either the main input box or one of the three pre-set buttons — In a meeting, Free to chat, and Focus time — on the bottom of the page.
Here is the code that grabs that access token and sends it along:
const sendText = async (custom) => {
setSuccess(null);
setResponseLoading(true);
const token = await getAccessTokenSilently();
const res = await axios({
method: "post",
url: "https://auth0-magic-mirror.herokuapp.com/v1/update-meeting",
data: { status: custom || text },
headers: {
Authorization: `Bearer ${token}`
}
});
if (res.status === 200) {
setSuccess("Request sent successfully!");
} else {
setSuccess("Opps, there was an error");
}
setResponseLoading(false);
};
Notice that the access token is put within the Authorization header within a string that starts with Bearer. This token is sent to an ExpressJS route, which we will review next. It is verified against our Auth0 API, and if successful, it will allow the update to the message.
To learn more about the Auth0 React SDK, check out this video.
Registering with a Hosting Service
You'll then need to host this site, preferably somewhere that gives you a database to work with. I went with Heroku because it provides both the hosting and the Postgres database free of charge.
There are other hosting options other than Heroku, and some of them might be easier to set up:
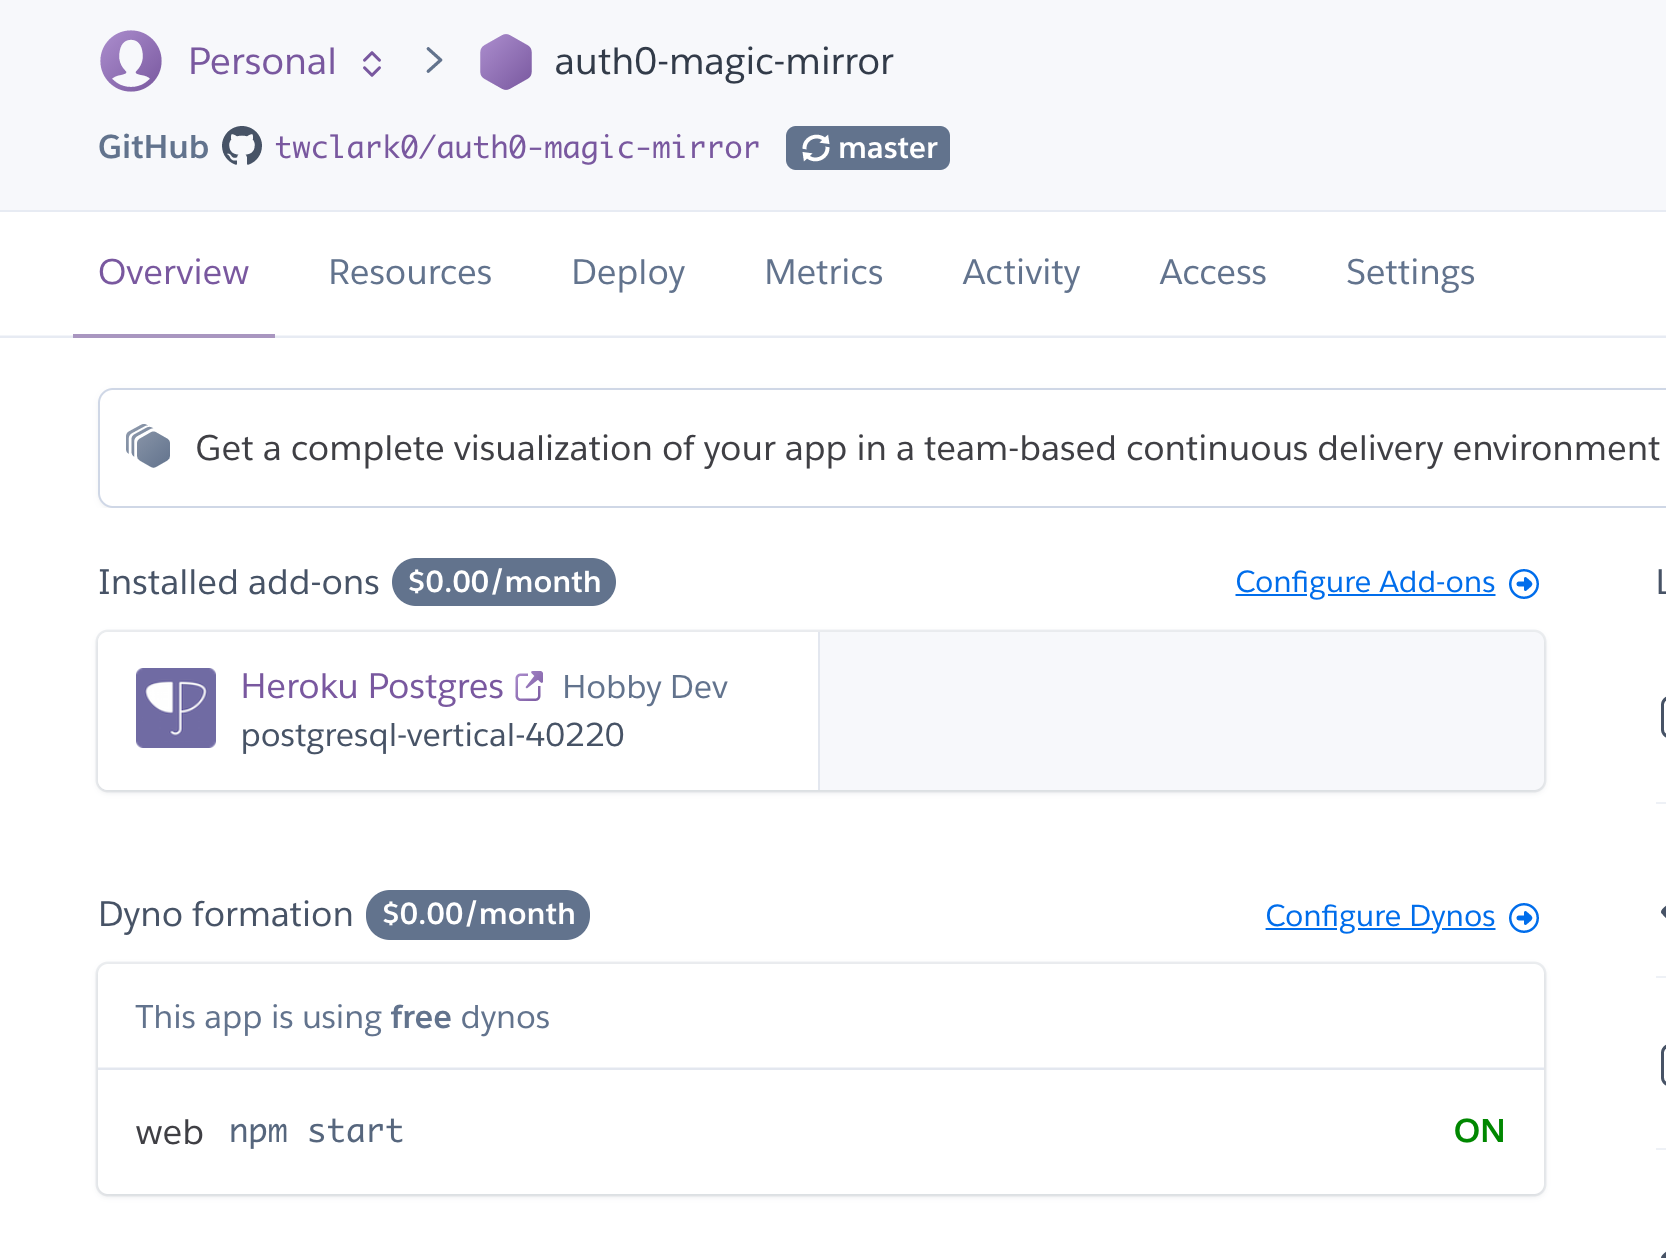
Head over to Heroku and create a free account. If you don't have an account already, you can sign up for one. You'll need to fill out some basic information, and you'll be given a free account within seconds.
Here is more information on setting up a Heroku account..
Once you've set up the service, you'll want to grab the URL for the site and the Postgres URL:
- Put the Postgres DB URL into the
DATABASE_URLvariable in the.envfile that you created earlier, within your locally cloned repository. - Put the URL of the hosted site into the
urlproperty of theresobject in the/public/home.jsfile, which is located on line 73.
Once you have updated these line, commit the files and push them to a git repository you own.
From your local terminal, connect to the Heroku Postgres table and run the following command:
create table mirror (updated_at date, status text);
then run;
insert into mirror values (now(), 'hello world');
This will get you in a good state when your routes try to work with the table.
Try running the site locally to make sure everything works correctly. Remember that the commands to do this are yarn, followed by yarn run start, or yarn run dev for nodemon to run.
Once the site is running, you should be able to type messages in the input box and see the Postgres table update with them.
You can now deploy this app! (I set up automatic deployment within Heroku so that it builds automatically with my push. This is done by connecting to Github under the "Deploy" tab).

The API Code
The API code is pretty straightforward as well. Located inside the project's /index.js file, it consists of just a GET and a POST endpoint. The GET endpoint is public for all to see, which is what the Pi will ping to get the updated message.
app.get("/v1/meeting", (req, res) => {
const client = new Client({
connectionString: process.env.DATABASE_URL,
ssl: {
rejectUnauthorized: false
}
});
client.connect();
client.query("SELECT status, updated_at from mirror;", (err, data) => {
if (err) {
res.status(500);
} else {
res.json(data.rows[0]);
}
client.end();
});
});
At the same time, the POST request does, as I mentioned previously, verifies the access token sent and will authorize the user's request or not. Once again, this is in the /index.js file:
app.post("/v1/update-meeting", authorizeAccessToken, (req, res) => {
try {
const client = new Client({
connectionString: process.env.DATABASE_URL,
ssl: {
rejectUnauthorized: false
}
});
client.connect();
client.query(
`UPDATE mirror set status = $1, updated_at = now();`,
[req.body.status],
(err, data) => {
if (err) {
res.status(500).send(JSON.stringify(err));
} else {
res.send("Successfully updated");
}
client.end();
}
);
} catch (error) {
res.status(500).send(error);
}
});
The important part of this code snippet is the middleware object authorizeAccessToken. It utilizes two Auth0 npm packages, and combined with some of your Auth0 API details, verifies the provided access token. Here's its code, which is located in /index.js:
const authorizeAccessToken = jwt({
secret: jwksRsa.expressJwtSecret({
cache: true,
rateLimit: true,
jwksRequestsPerMinute: 5,
jwksUri: `https://${authConfig.domain}/.well-known/jwks.json`
}),
audience: authConfig.audience,
issuer: `https://${authConfig.domain}/`,
algorithms: ["RS256"]
});
If there is an issue with the provided access token, it will fail and respond with an error status.
All Together Now!
Working example of Raspberry Pi mirror
With your text now displaying on the Electron app, now we can connect the Pi with our mirror.
If you purchased the pre-packaged two way mirror, the connection is actually really simple! All you need to do is make two connections between the Pi and the mirror. For power, connect the Pi's micro-USB to the mirror's USB port and for video, connect the Pi's HDMI to mirror's HDMI. With these two connections, all you need to do is plug in the Mirror's power and we're good to go!

About the author

Tyler Clark
Senior Developer Advocate Engineer