
TL;DR: In this article, you will learn how to use Java EE (Enterprise Edition) technologies, such as JavaServer Faces (JSF), to build robust web applications. You can find the complete source code developed throughout this article in this GitHub repository.
Securing JavaServer Faces and Java EE with Auth0
At this moment, your application contains: a basic entity that represents micro-posts (MicroPost); the MicroPostService class that works as a database; and a public page (index.xhtml) that shows micro-posts. Having these elements properly configured, you can start thinking about enabling your users to write their own micro-posts. To do so, you will need to distinguish between different users in a secure way. That's where Auth0 comes in handy.
Auth0, a global leader in Identity-as-a-Service (IDaaS) that provides thousands of enterprise customers with modern identity solutions, allows you to handle authentication in your app with features like Social Login, Multifactor Authentication, and much more with just a few clicks.
Besides bringing all these features to the table, you will see that one of the greatest benefits of using Auth0 to handle authentication is that you will be ready in just a few minutes. More, Auth0 offers all these benefits based on open standards.
So, to start taking advantage of all the benefits provided by Auth0, you can sign up for a free Auth0 account here. After signing up to your account, you will move to the Applications section of your Auth0 dashboard and click on the Create Application button. When you click this button, Auth0 will ask you for two things:
- A name for your application: As this is just a description that will allow you to distinguish this application from others that you might end up creating, you can add something like "JSF and Java EE App" to this field (or something more meaningful if you prefer).
- An application type: As this is a traditional web app that is controlled by a server (that is, an app that is rendered by a backend), you will choose Regular Web Application for its type.
After filling up this form and clicking on the Create button, Auth0 will redirect you to the Quick Starts tab of your new application. From there, you will have to move to the Settings tab, add http://localhost:8080/callback to the Allowed Callback URLs field, and hit the Save Changes button.
Note: As a security measure, Auth0 will only redirect users to URLs registered in this field. As such, you will need to specify an URL in your app that will be in charge of getting users back and initiating a session based on the message produced by Auth0. To learn more about how Auth0 really works underneath the surface, you can check this resource.
Now, you can focus on developing the code necessary to secure your Java EE application with Auth0. For that, you will create seven different classes, each one with its own purpose:
Auth0AuthenticationConfig: This class will work as an environment variable container. That is, whenever you need to reference variables that change in different environments (development, qa, production, etc), you will use this class.Auth0Principal: This class will extend theCallerPrincipalclass (principals are instances that represent the identity of users) provided by Java EE to make two users' properties easily available to your app: theiridand theirpicture(CallerPrincipalalso makesnameavailable by default).Auth0JwtCredential: This class will extend theCredentialJava EE class and will hold an instance ofAuth0Principalrelated to a particular user.Auth0IdentityStore: This class will extend theIdentityStoreJava EE class to enable the framework to use theAuth0JwtCredentialextension.UserSession: For each user authenticated (i.e., for each session), your app will create an instance of this class to facilitate the process of getting the user details (id,name, andpicture) and to enable users to sign out.CallbackServlet: This class will be responsible for intercepting HTTP requests to/callbackto redirect them to a specific view.Auth0LoginAuthenticationMechanism: This class will extend theHttpAuthenticationMechanismJava EE class to allow (or deny) users' requests based on whether they are trying to access a public view or not. If the view is not public, then the app will allow access only to users previously authenticated. Also, this class will be responsible for handling the authentication workflow for users returning from Auth0.
Before you can jump into coding these classes, there are other three files that you will have to create and one that you will have to update. For starters, you will have to open your pom.xml file and add the dependencies needed to secure your Java EE application:
<?xml version="1.0" encoding="UTF-8"?>
<project ...>
  <!-- ... leave the rest untouched ... -->

  <dependencies>
    <!-- ... other depedencies ... -->
    <dependency>
      <groupId>org.glassfish.soteria</groupId>
      <artifactId>javax.security.enterprise</artifactId>
      <version>1.0</version>
    </dependency>
    <dependency>
      <groupId>com.auth0</groupId>
      <artifactId>mvc-auth-commons</artifactId>
      <version>1.0.0</version>
    </dependency>
  </dependencies>
  <!-- ... build ... -->
</project>
The first dependency, javax.security.enterprise, is the reference implementation of the Java EE Security (JSR 375) specification. The second one, mvc-auth-commons, is an open-source library that Auth0 provides to facilitate the integration of your apps with its services.
After adding these dependencies, you will have to create a new file called jboss-web.xml inside the src/main/webapp/WEB-INF directory with the following code:
<?xml version="1.0"?>
<jboss-web>
  <security-domain>jaspitest</security-domain>
</jboss-web>
Without this file, Thorntail won't enable the JASPIC (Java Authentication Service Provider Interface for Containers) service for your application (that is, no security context will be available in your app).
With this file in place, the next thing you will have to do is to create a new directory called resources inside the src/main directory. Then, inside this directory, you will create a file called project-defaults.yml and add the following code to it:
auth0:
  domain: <YOUR-AUTH0-DOMAIN>
  clientId: <YOUR-AUTH0-APPLICATION-CLIENT-ID>
  clientSecret: <YOUR-AUTH0-APPLICATION-CLIENT-SECRET>
  scope: openid profile email
  callbackUri: /callback
This file configures the environment variable that the Auth0AuthenticationConfig class will encapsulate. Note that you will have to replace all the placeholders above with your own Auth0 values:
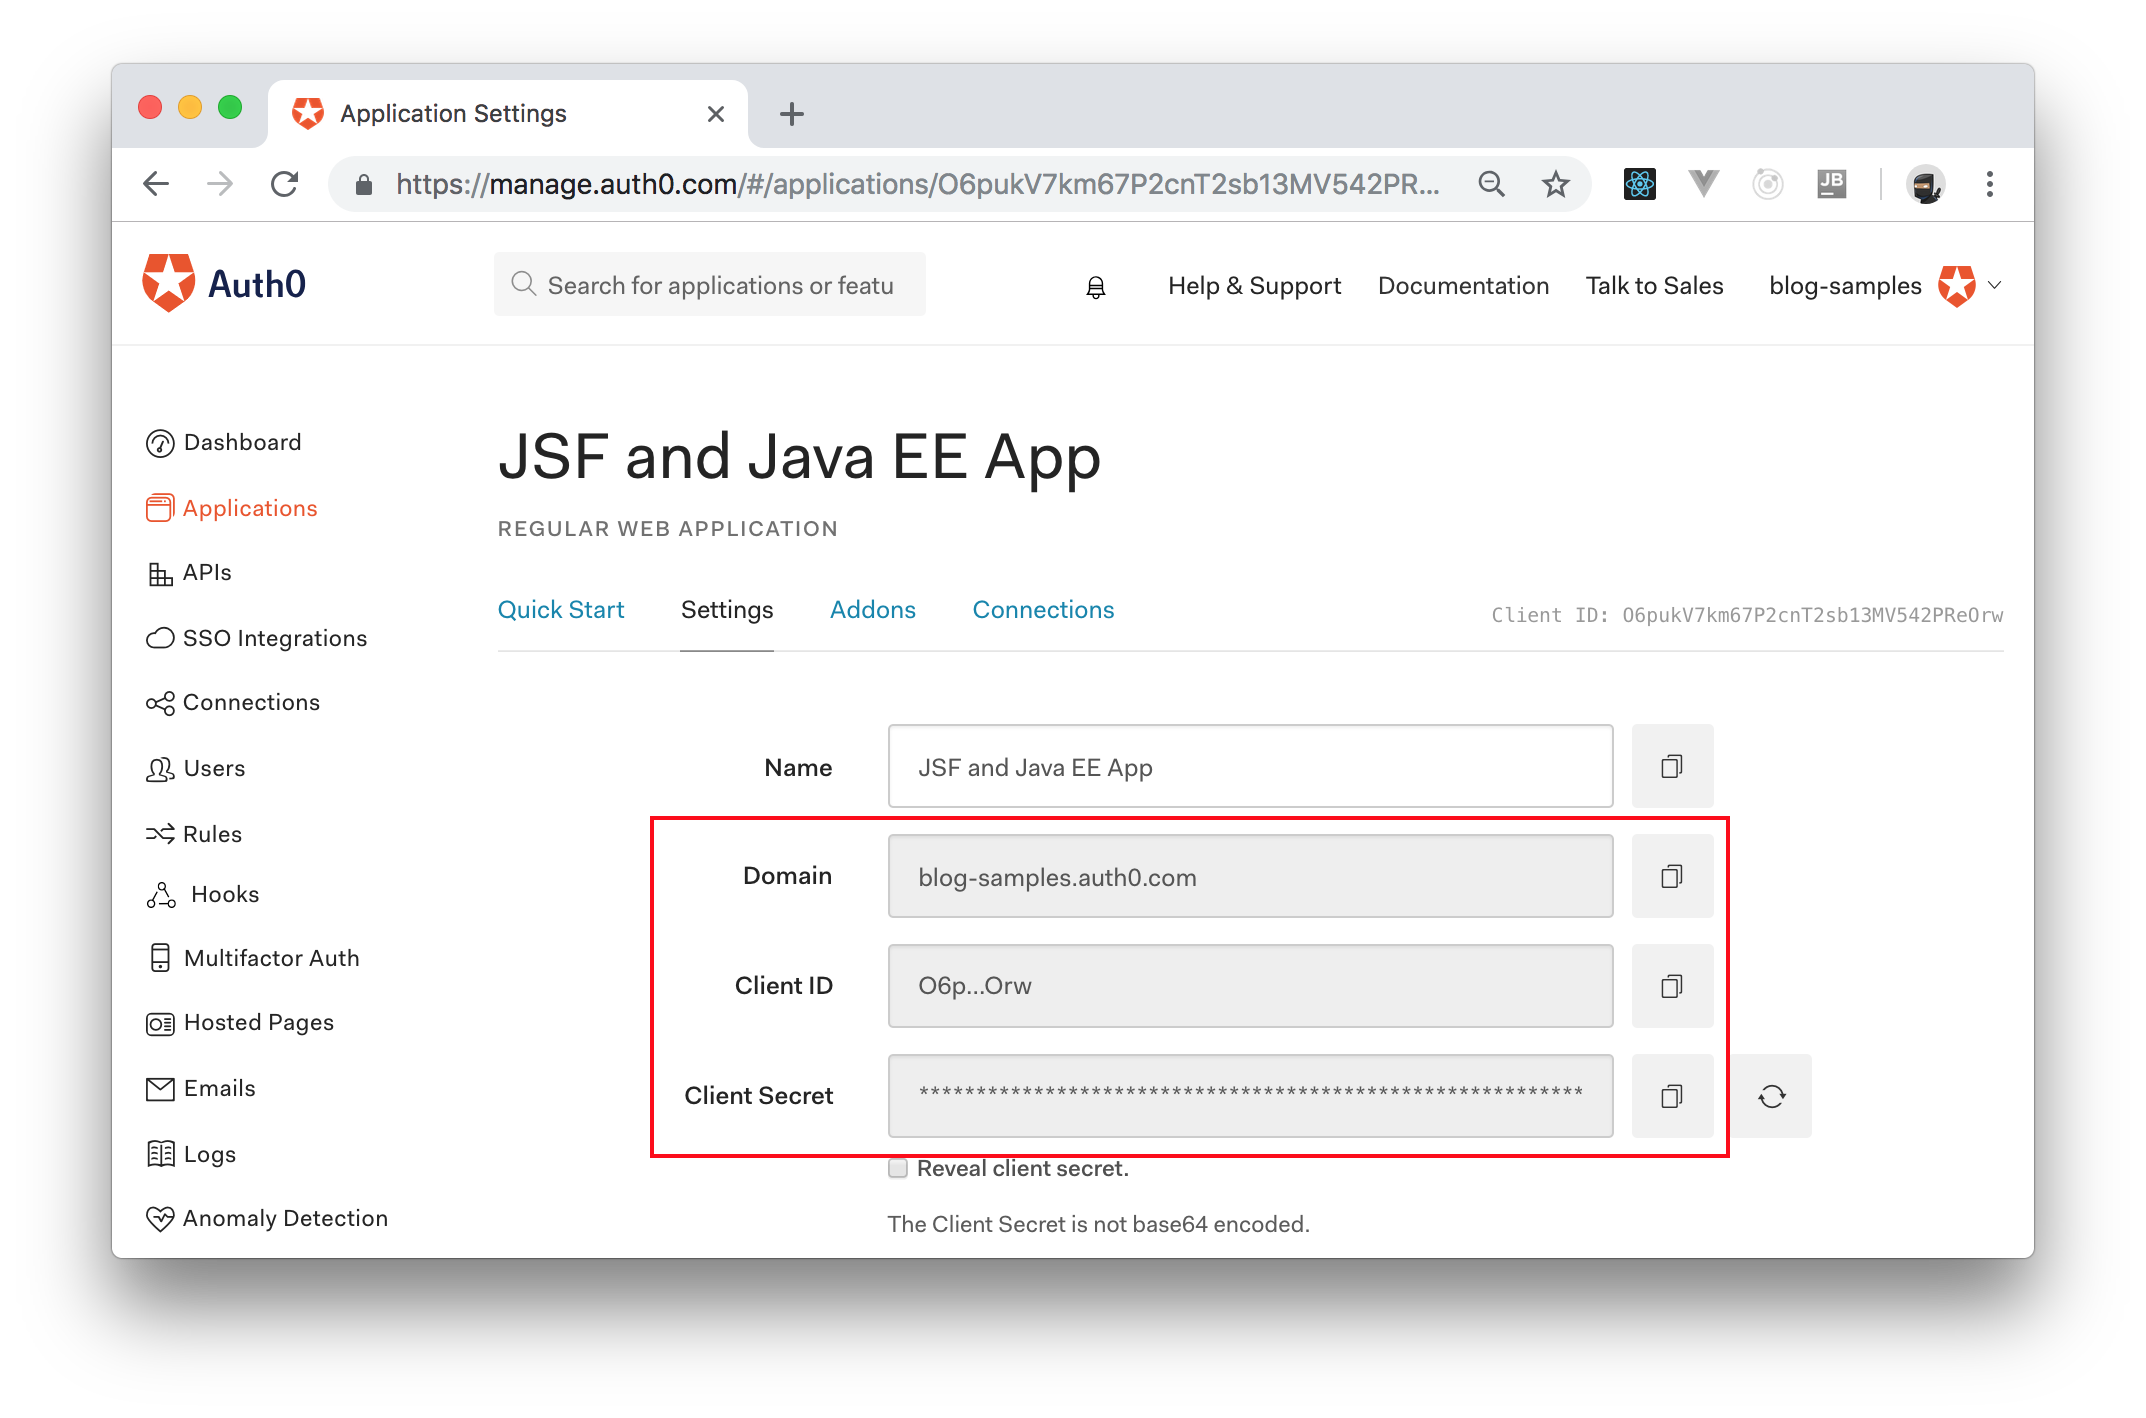
<YOUR-AUTH0-DOMAIN>: For this placeholder, you will have to use the domain that you chose while creating your Auth0 account (or while creating a new Auth0 tenant for this project).<YOUR-AUTH0-APPLICATION-CLIENT-ID>: For this placeholder, you will have to use the value available in the Client ID field of the Auth0 Application you created above.<YOUR-AUTH0-APPLICATION-CLIENT-SECRET>: For this placeholder, you will have to use the value available in the Client Secret field of the same Auth0 Application.
You can find all the values needed to replace these placeholders in the Settings tab of the Auth0 Application you created before, as shown in the following screenshot:
When you finish creating this file, the next thing you will do is to create a view with restricted access to authenticated users only. You don't need to implement any specific feature in this view yet. Your goal now is to learn how to secure JSF routes with Auth0. Therefore, you can create a file called dashboard.xhtml in the src/main/webapp directory and define a simple view that shows nothing else than a title:
<?xml version='1.0' encoding='UTF-8' ?>
<html xmlns="http://www.w3.org/1999/xhtml"
      xmlns:ui="http://xmlns.jcp.org/jsf/facelets">

<body>

<ui:composition template="./WEB-INF/template.xhtml">

  <ui:define name="content">
    <h2>Secured Dashboard</h2>
  </ui:define>

</ui:composition>

</body>
</html>
Now, to start developing the Java code needed to secure your app with Auth0, you will create a package called identity in the com.auth0.microblog package and then you will create the Auth0AuthenticationConfig class inside this package with the following code:
package com.auth0.microblog.identity;

import org.wildfly.swarm.spi.runtime.annotations.ConfigurationValue;

import javax.enterprise.context.ApplicationScoped;
import javax.inject.Inject;

@ApplicationScoped
public class Auth0AuthenticationConfig {

  @Inject
  @ConfigurationValue("auth0.domain")
  private String domain;

  @Inject
  @ConfigurationValue("auth0.clientId")
  private String clientId;

  @Inject
  @ConfigurationValue("auth0.clientSecret")
  private String clientSecret;

  @Inject
  @ConfigurationValue("auth0.scope")
  private String scope;

  @Inject
  @ConfigurationValue("auth0.callbackUri")
  private String callbackUri;

  public String getDomain() {
    return domain;
  }

  public String getClientId() {
    return clientId;
  }

  public String getClientSecret() {
    return clientSecret;
  }

  public String getScope() {
    return scope;
  }

  public String getCallbackUri() {
    return callbackUri;
  }
}
As mentioned, you will use this class only to transport values from the project-defaults.yml file to any other class that might need them.
After creating this class, you will create the Auth0Principal class (also inside the com.auth0.microblog.identity package) and will add the following code to it:
package com.auth0.microblog.identity;

import javax.security.enterprise.CallerPrincipal;

public class Auth0Principal extends CallerPrincipal {
  private String id;
  private String picture;

  Auth0Principal(String id, String name, String picture) {
    super(name);
    this.id = id;
    this.picture = picture;
  }

  public String getId() {
    return id;
  }

  public String getPicture() {
    return picture;
  }
}
Then, you will create the IdentityStore specialization needed to validate JWT credentials. For that, you will create the Auth0IdentityStore class inside the com.auth0.microblog.identity and add the following code to it:
package com.auth0.microblog.identity;

import javax.enterprise.context.ApplicationScoped;
import javax.security.enterprise.credential.Credential;
import javax.security.enterprise.identitystore.CredentialValidationResult;
import javax.security.enterprise.identitystore.IdentityStore;

@ApplicationScoped
public class Auth0IdentityStore implements IdentityStore {

  @Override
  public CredentialValidationResult validate(final Credential credential) {
    CredentialValidationResult result = CredentialValidationResult.NOT_VALIDATED_RESULT;
    if (credential instanceof Auth0JwtCredential) {
      Auth0JwtCredential jwtCredential = (Auth0JwtCredential) credential;
      result = new CredentialValidationResult(jwtCredential.getAuth0Principal());
    }
    return result;
  }
}
Now, you will create the Auth0JwtCredential class to define the Credential specialization that integrates with Auth0. You will also create this class inside the com.auth0.microblog.identity package and you will add the following code to it:
package com.auth0.microblog.identity;

import com.auth0.jwt.JWT;
import com.auth0.jwt.interfaces.DecodedJWT;

import javax.security.enterprise.credential.Credential;

class Auth0JwtCredential implements Credential {
  private final Auth0Principal auth0Principal;

  Auth0JwtCredential(final String token) {
    DecodedJWT jwt = JWT.decode(token);
    String userId = jwt.getClaim("sub").asString();
    String name = jwt.getClaim("name").asString();
    String picture = jwt.getClaim("picture").asString();
    this.auth0Principal = new Auth0Principal(userId, name, picture);
  }

  Auth0Principal getAuth0Principal() {
    return auth0Principal;
  }
}
Next, you will create the UserSession class inside the same identity package and will add the following code to it:
package com.auth0.microblog.identity;

import javax.enterprise.context.SessionScoped;
import javax.faces.context.FacesContext;
import javax.inject.Inject;
import javax.inject.Named;
import javax.security.enterprise.SecurityContext;
import java.io.Serializable;

@Named
@SessionScoped
public class UserSession implements Serializable {
  @Inject
  SecurityContext securityContext;

  public boolean isLoggedIn() {
    return securityContext.getCallerPrincipal() != null;
  }

  public String getId() {
    return getPrincipal().getId();
  }

  public String getName() {
    return getPrincipal().getName();
  }

  public String getPicture() {
    return getPrincipal().getPicture();
  }

  public String logout() {
    FacesContext.getCurrentInstance().getExternalContext().invalidateSession();
    return "/index.xhtml?faces-redirect=true";
  }

  private Auth0Principal getPrincipal() {
    return (Auth0Principal) securityContext.getCallerPrincipal();
  }
}
As already explained, the goal of this class is to facilitate access to the current user profile. This is achieved by injecting the securityContext to make the Principal instance of the current user available in the class and by defining some facades to this principal's methods (i.e., to getId, getName, and getPicture).
Note that the logout method enables users to sign out with the help of the FacesContext class that JSF makes available to apps. Also notice that, if you fail to add ?faces-redirect=true to the string returned by this method, JSF will end up rendering the contents of index.xhtml without changing the route that the user sees when they click on log out.
The next thing you will do now is to create the Auth0LoginAuthenticationMechanism class (still inside the identity package) with the following code:
package com.auth0.microblog.identity;

import com.auth0.AuthenticationController;
import com.auth0.IdentityVerificationException;
import com.auth0.Tokens;

import javax.enterprise.context.ApplicationScoped;
import javax.enterprise.inject.Produces;
import javax.inject.Inject;
import javax.security.enterprise.AuthenticationStatus;
import javax.security.enterprise.authentication.mechanism.http.AutoApplySession;
import javax.security.enterprise.authentication.mechanism.http.HttpAuthenticationMechanism;
import javax.security.enterprise.authentication.mechanism.http.HttpMessageContext;
import javax.security.enterprise.identitystore.CredentialValidationResult;
import javax.security.enterprise.identitystore.IdentityStoreHandler;
import javax.servlet.http.HttpServletRequest;
import javax.servlet.http.HttpServletResponse;

@ApplicationScoped
@AutoApplySession
public class Auth0LoginAuthenticationMechanism implements HttpAuthenticationMechanism {

  private Auth0AuthenticationConfig config;
  private IdentityStoreHandler identityStoreHandler;
  private AuthenticationController authenticationController;

  @Inject
  public Auth0LoginAuthenticationMechanism(Auth0AuthenticationConfig config, IdentityStoreHandler identityStoreHandler) {
    this.config = config;
    this.identityStoreHandler = identityStoreHandler;
    this.authenticationController = AuthenticationController
      .newBuilder(config.getDomain(), config.getClientId(), config.getClientSecret())
      .build();
  }

  @Override
  public AuthenticationStatus validateRequest(HttpServletRequest req, HttpServletResponse res,
                                              HttpMessageContext context) {
    if (isCallbackRequest(req)) {
      CredentialValidationResult result = CredentialValidationResult.NOT_VALIDATED_RESULT;

      try {
        Tokens tokens = authenticationController.handle(req);
        Auth0JwtCredential credential = new Auth0JwtCredential(tokens.getIdToken());
        result = identityStoreHandler.validate(credential);
      } catch (IdentityVerificationException e) {
        e.printStackTrace(); //TODO: Add proper logging
      }

      return context.notifyContainerAboutLogin(result);
    }

    if (req.getRequestURL().toString().endsWith("/index.xhtml") ||
      req.getRequestURL().toString().contains("javax.faces.resource")) {
      return context.doNothing();
    }

    if (context.getCallerPrincipal() == null) {
      return context.redirect(createLoginUrl(req));
    } else {
      return context.doNothing();
    }
  }

  private boolean isCallbackRequest(HttpServletRequest request) {
    return (request.getRequestURI().equals(config.getCallbackUri()) && request.getParameter("code") != null);
  }

  private String createLoginUrl(final HttpServletRequest req) {
    String redirectUri =
      req.getScheme() + "://" + req.getServerName() + ":" + req.getServerPort() + config.getCallbackUri();
    return this.authenticationController.buildAuthorizeUrl(req, redirectUri)
      .withAudience(String.format("https://%s/userinfo", config.getDomain()))
      .withScope(config.getScope())
      .build();
  }
}
This class introduces four methods:
- a constructor (
Auth0LoginAuthenticationMechanism()): You define this constructor to create an instance ofAuthenticationController, which is used by thecreateLoginUrlmethod to create the authentication URL. validateRequest: Since this class implements theHttpAuthenticationMechanisminterface and that you are adding@AutoApplySessionto it, Java EE calls this method to validate if a particular request is valid or not. Your definition of this method does three things: if the request is asking for the/callbackroute, then this class tries to validate the user that is returning from Auth0; if the request is trying to accessindex.xhtmlor any resource that containsjavax.faces.resource(this prefix is added by JSF to static resources like images, CSS files, and JS files), then this method simply allows (context.doNothing()) the request; lastly, if the request is not originated from an authenticated user, then this method redirects the user to Auth0 so they can authenticate.isCallbackRequest: This method simply encapsulates the logic needed to identify if a request is related to the callback URL that Auth0 calls after users authenticate.createLoginUrl: This method creates the URL that unauthenticated users must visit to authenticate.
With this class in place, the last thing you will do is to create the CallbackServlet class to define the view that Auth0 will call after your users authenticate. So, create this class inside the com.auth0.microblog.identity package and add the following code to it:
package com.auth0.microblog.identity;

import java.io.IOException;
import javax.servlet.annotation.WebServlet;
import javax.servlet.http.HttpServlet;
import javax.servlet.http.HttpServletRequest;
import javax.servlet.http.HttpServletResponse;

@WebServlet(urlPatterns = {"/callback"})
public class CallbackServlet extends HttpServlet {

  @Override
  protected void doGet(final HttpServletRequest req, final HttpServletResponse res) throws IOException {
    res.sendRedirect("/dashboard.xhtml");
  }
}
As you can see, when Auth0 redirects your users back to your app, the CallbackServlet class will move your users to the dashboard.xhtml file. As dashboard.xhtml does not reference a public resource (that is, it does not endsWith("/index.xhtml") and it does not contains("javax.faces.resource")), the Auth0LoginAuthenticationMechanism class will check if the user is authenticated (context.getCallerPrincipal() == null). If they are, your app will render the page requested.
After you create all these Java classes and these configuration files, you can now rebuild your project and run it again:
# rebuild the project
./mvnw clean package

# run it again
java -jar target/jsf-javaee-microblog-thorntail.jar
Then, if you open the public page of your app (http://localhost:8080/index.xhtml) on a browser, you will still be able to consume its contents without signing in. However, if you try to open http://localhost:8080/dashboard.xhtml, your app will redirect you to Auth0. After signing in, Auth0 will redirect you back to http://localhost:8080/callback where your session will be created and, after that, your app will move you to the http://localhost:8080/dashboard.xhtml page. Not hard, right?
“Securing Java EE applications with Auth0 is easy.”
Tweet This
Wrapping Up
Now that you have secured your JSF application, you can focus on developing its lasts features. For starters, you will redefine the template.xhtml file as follows:
<?xml version='1.0' encoding='UTF-8' ?>
<!DOCTYPE html>
<html xmlns="http://www.w3.org/1999/xhtml"
      xmlns:ui="http://xmlns.jcp.org/jsf/facelets"
      xmlns:h="http://xmlns.jcp.org/jsf/html"
      xmlns:p="http://primefaces.org/ui">

<h:head>
  <meta http-equiv="Content-Type" content="text/html; charset=UTF-8"/>
  <title>Thorntail Facelet</title>
  <link rel="stylesheet" href="https://stackpath.bootstrapcdn.com/bootstrap/4.1.3/css/bootstrap.min.css"/>
  <style>
    body {
      padding-top: 80px;
    }

    ul.navbar-nav {
      flex-direction: row;
    }

    ul.navbar-nav li {
      margin-left: 15px;
    }

    img.picture {
      margin-right: 10px;
      border-radius: 50%;
      max-width: 45px;
    }

    div.ui-growl.ui-widget {
      z-index: 2000 !important;
    }
  </style>
</h:head>

<h:body>
  <h:form id="messages">
    <p:growl id="growl" sticky="true"/>
  </h:form>

  <div class="container">
    <nav class="navbar fixed-top bg-secondary">
      <a class="navbar-brand text-white" href="/index.xhtml">MicroPosts</a>
      <ul class="navbar-nav">
        <li class="nav-item">
          <a class="nav-link text-white" href="/dashboard.xhtml">Dashboard</a>
        </li>
        <li class="nav-item">
          <h:form>
            <h:commandLink styleClass="nav-link text-white"
                           rendered="#{userSession.loggedIn}"
                           action="#{userSession.logout()}">
              Logout
            </h:commandLink>
          </h:form>
        </li>
      </ul>
    </nav>
    <ui:insert name="content"/>
  </div>
</h:body>

</html>
On the new version of your template, you are defining some CSS styles to make your UI more appealing. Then, you are adding a Growl PrimeFaces component (p:growl) so you can show nice pop-ups with messages like "Micro post added successfully". After that, before the content that each specific route produces (i.e., before ui:insert name="content"), you are adding a nice Bootstrap navigation header where your users will be able to:
- navigate to the main, public page (
href="/index.xhtml"); - navigate to the dashboard (
/dashboard.xhtml); - and logout (
action="#{userSession.logout()}), if they are logged in first, of course.
Note that, if your users are not logged in, they won't see the Logout option and, if they click on the Dashboard one, your app will redirect them to Auth0 so they can authenticate first.
After redefining your template, you will make your dashboard more useful. That is, you will enable users to share their thoughts through a text field and these thoughts will become publicly available on the home page of your app. So, create a class called DashboardController inside the com.auth0.microblog package and add the following code to it:
package com.auth0.microblog;

import com.auth0.microblog.identity.UserSession;

import javax.enterprise.context.RequestScoped;
import javax.faces.application.FacesMessage;
import javax.faces.context.FacesContext;
import javax.inject.Inject;
import javax.inject.Named;
import java.util.List;

@Named
@RequestScoped
public class DashboardController {
  @Inject
  UserSession userSession;

  @Inject
  private MicroPostsService microPostsService;

  private String content;

  public String getUserName() {
    return userSession.getName();
  }

  public String getPicture() {
    return userSession.getPicture();
  }

  public void addMicroPost() {
    microPostsService.addMicroPost(
      new MicroPost(userSession.getId(), userSession.getName(), userSession.getPicture(), content)
    );
    FacesMessage message = new FacesMessage(FacesMessage.SEVERITY_INFO, "Micro post added successfully.", null);
    FacesContext.getCurrentInstance().addMessage(null, message);
    content = "";
  }

  public List<MicroPost> getMicroPosts() {
    return microPostsService.getMicroPosts(userSession.getId());
  }

  public String getContent() {
    return content;
  }

  public void setContent(String content) {
    this.content = content;
  }
}
As you can see, this class has the following characteristics:
- a
@Namedannotation that makes it consumable by other components and views; - a
@RequestScopedannotation that informs your Java EE container that your app will need one instance of this class per request; - an
UserSessionproperty that is injected (@Inject) by the container so this class can get details about the logged-in user; - a
MicroPostsServiceinstance so this class can query and insert micro-posts on your mock database; - a
Stringproperty calledcontentthat will hold the text inserted by users in the "Share your thoughts" field; - two methods (
getUserNameandgetPicture) that will allow your new dashboard route to show details about who is logged in; - two methods (
addMicroPostandgetMicroPosts) that will allow your new dashboard route to consume and insert micro-posts in your fake database; - and getters and setters methods (
getContentandsetContent) for thecontentproperty so your new dashboard can manipulate its value.
With this class in place, the last thing you will have to do is to redefine the dashboard.xhtml file to make it interact with the DashboardController you just created. So, open this file and replace its contents with this:
<?xml version='1.0' encoding='UTF-8' ?>
<html xmlns="http://www.w3.org/1999/xhtml"
      xmlns:ui="http://xmlns.jcp.org/jsf/facelets"
      xmlns:h="http://xmlns.jcp.org/jsf/html"
      xmlns:p="http://primefaces.org/ui">

<body>

<ui:composition template="./WEB-INF/template.xhtml">

  <ui:define name="content">
    <div class="row">
      <div class="col-12">
        <p>
          <h:graphicImage styleClass="picture" value="#{dashboardController.picture}" />
          <h:outputText value="#{dashboardController.userName}"/>
        </p>
        <p:panel header="Share your thoughts" style="margin-bottom:20px">
          <h:form>
            <div class="form-group">
              <p:inputText placeholder="C'mon, express your mind."
                           styleClass="form-control"
                           id="content"
                           required="true"
                           value="#{dashboardController.content}"/>
            </div>
            <p:commandButton value="Add Micro Post" id="ajax" update=":messages:growl :microPosts content"
                             actionListener="#{dashboardController.addMicroPost}"
                             styleClass="ui-priority-primary"/>
          </h:form>
        </p:panel>
      </div>
    </div>
    <div class="row">
      <div class="col-12">
        <p:dataTable var="microPost" id="microPosts" value="#{dashboardController.microPosts}">
          <p:column headerText="Name">
            <h:outputText value="#{microPost.content}" />
          </p:column>
        </p:dataTable>
      </div>
    </div>
  </ui:define>

</ui:composition>

</body>
</html>
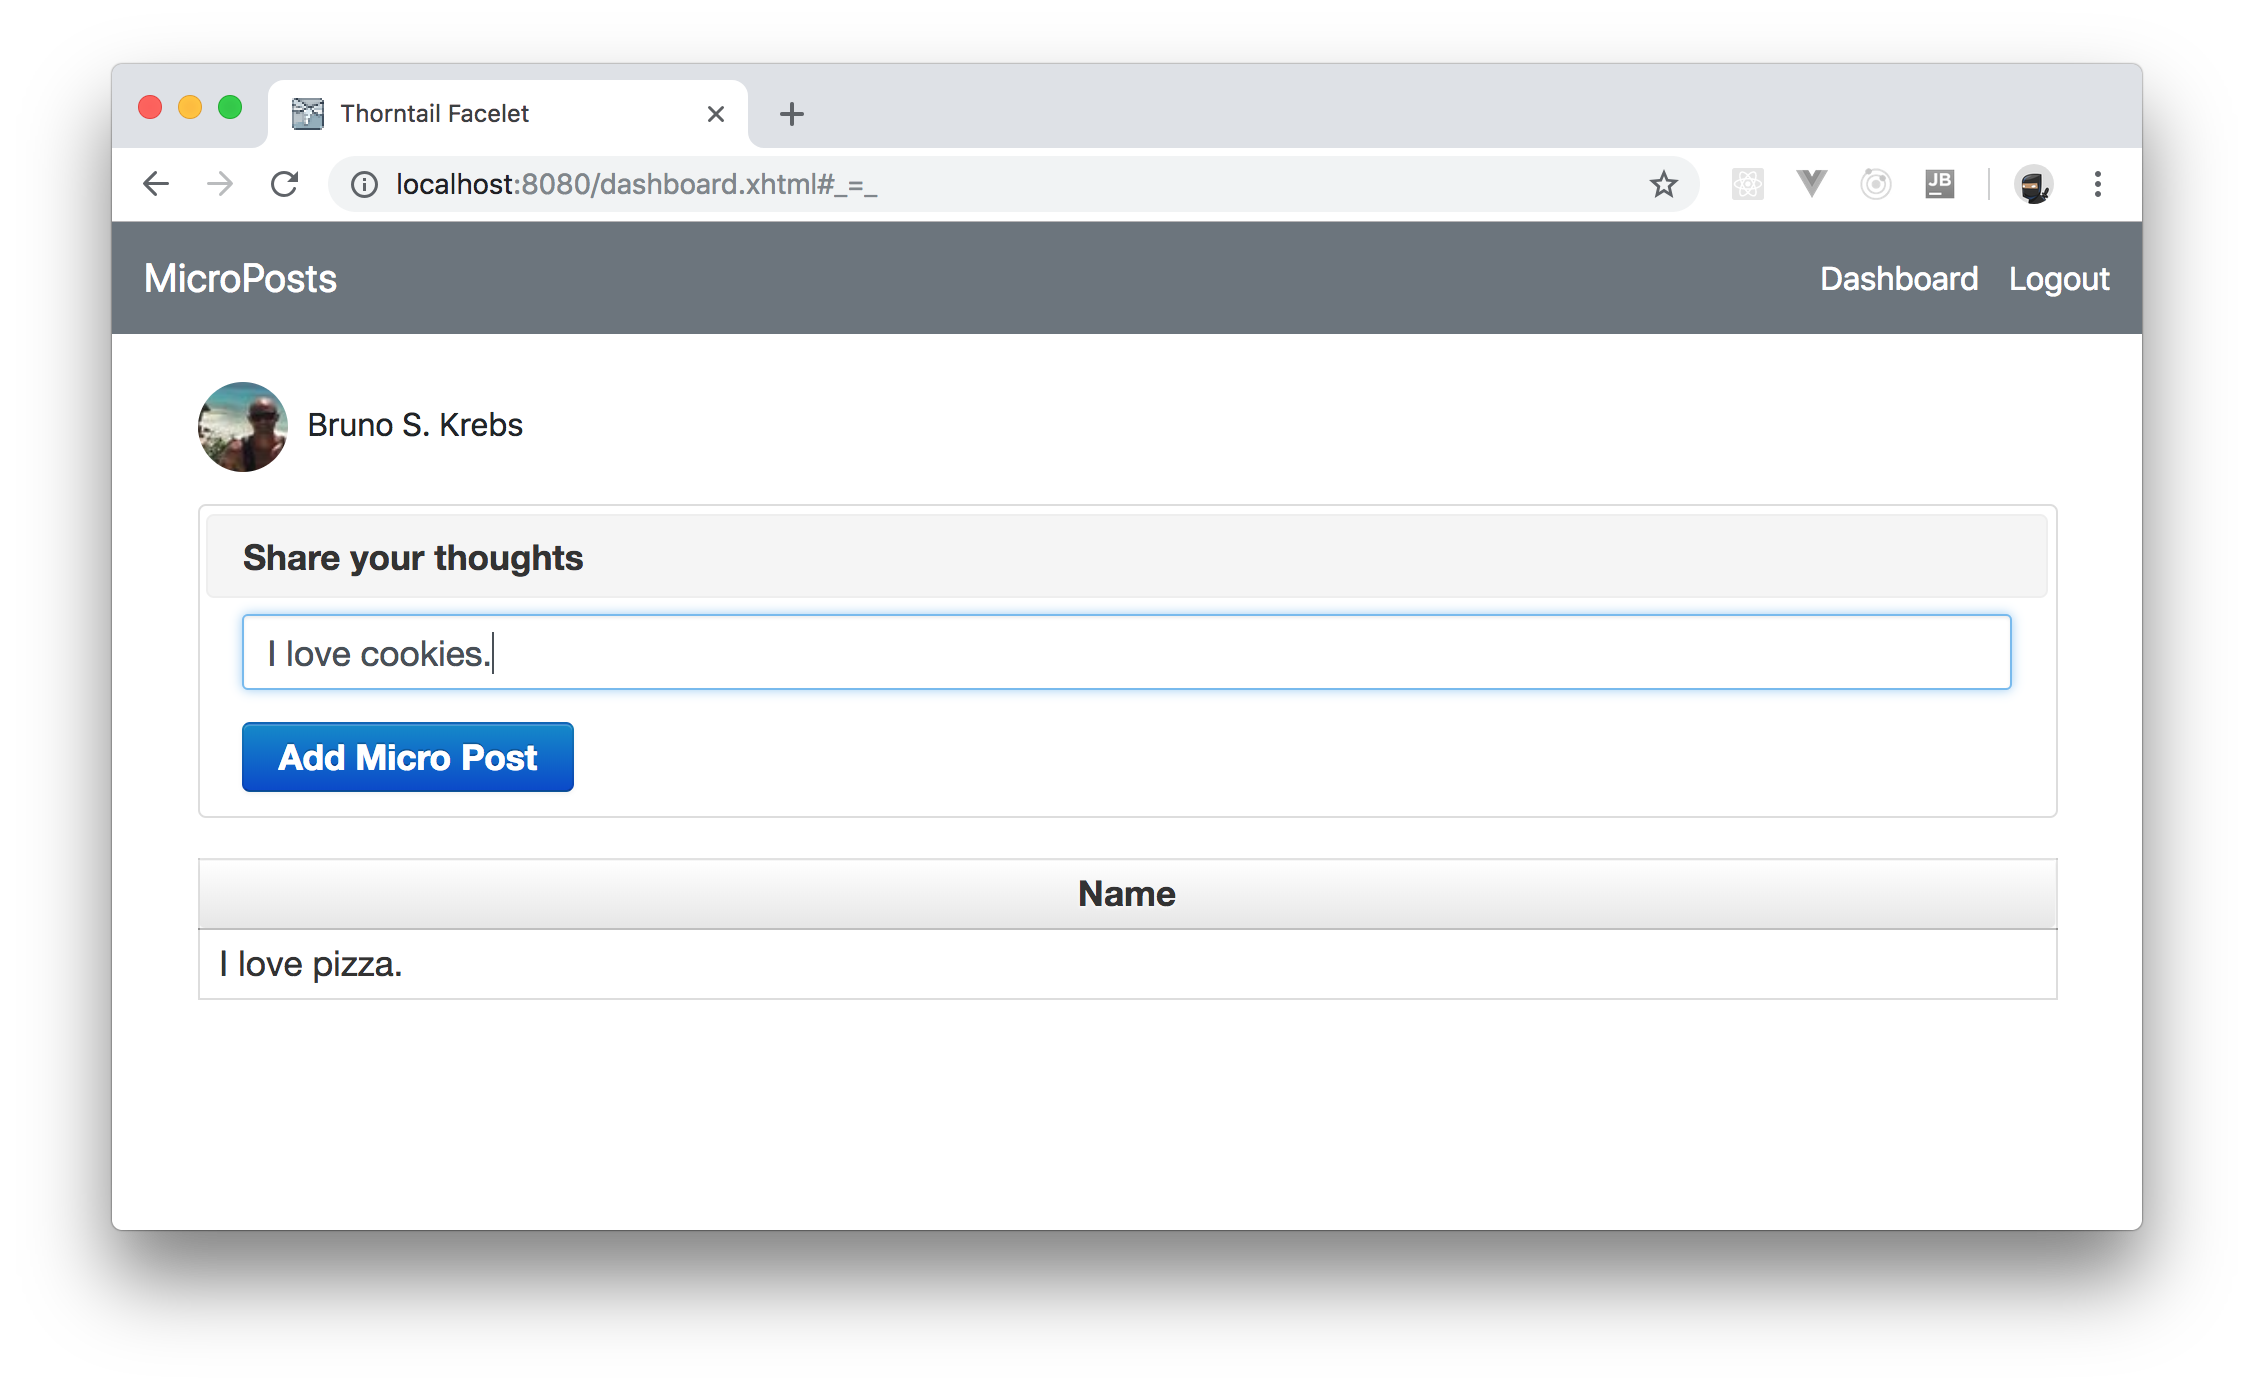
The new version of your dashboard route is now divided into two sections. The first section defines a panel (p:panel) with a form (h:form) inside where users will be able to share their thoughts. The second section defines a table (p:dataTable) where your users will be able to see what micro-posts they have created so far.
Now, to see the whole application up and running, you can issue the following commands:
# rebuild the application
./mvnw clean package

# run the app
java -jar target/jsf-javaee-microblog-thorntail.jar
Then, if you open your app in a browser (http://localhost:8080/index.xhtml) you will see that it now contains a nice navigation bar and, if you authenticate yourself, and navigate to the dashboard route, you will be able to create new micro-posts.
“I just built a secure Java EE and JavaServer Faces microblog engine.”
Tweet This
Conclusion
Throughout this article, you learned how to develop a microblog engine with Java EE and JavaServer Faces. You started from scratch (i.e., with an empty directory), then you used Maven to scaffold your application. After that, you started creating some Java classes and defined a public route (index.xhtml) and, in the end, you learned how to secure your Java EE application with Auth0.
With this knowledge, you will be able to start developing your next Java EE projects in no time. Cool, isn't it?
About the author

Bruno Krebs
R&D Content Architect (Auth0 Alumni)