
TL;DR: In this article, you will learn how to use Java EE (Enterprise Edition) technologies, such as JavaServer Faces (JSF), to build robust web applications. You can find the complete source code developed throughout this article in this GitHub repository.
What You Will Build
To see JavaServer Faces and Java EE in action, in this article, you will build a simple microblog web application. Visitor of your application, without having to authenticate themselves, will be able to see every publication that your users add. However, to share their thoughts through the app, first, visitors will have to authenticate themselves through Auth0. The goal here is to have a sample application that is both complete (in the sense of having public and protected views) and easy to grasp (without complex and long source code).
Why Use Auth0?
Auth0, the global leader in Identity-as-a-Service (IDaaS), provides thousands of enterprise customers with a Universal Identity Platform for their web, mobile, IoT, and internal applications. Along with other features, Auth0 allows you to integrate into your apps features like:
How the Integration with Auth0 Works?
Auth0 is all about open standards. Whenever you are using Auth0 to secure your application, you can rest assured that you are using battle-tested, state-of-the-art solutions that rely on standards like OAuth 2.0, OpenID Connect, and SAML. In fact, in this article, you will secure your JavaServer Faces and Java EE application with OAuth 2.0 and OpenID Connect.
Note: If you are not acquainted with these standards, don't worry. Auth0 facilitates using both standards through mature, open-source libraries. Also, you can always learn more about these topics in our documents.
Basically speaking, when visitors want to authenticate themselves, your app will redirect them to the Auth0 Login Page. There, visitors will be able to choose an authentication method that you have configured in your account (e.g., through a social IdP like Google) and, when they choose, Auth0 will validate their account and will redirect your users back to your web application. At that moment, your web application will get an authorization code that it will use to get an ID Token (i.e., a token that contains user profile attributes represented in the form of claims).
Note: The flow briefly explained above refers to web applications only. If you were developing another application type (like a mobile app or a single-page app (SPA)), you would use another flow.
Sounds complex? Fear not! Most of the flow explained above is covered by the libraries that you will use. As such, you will be able to focus on what matters in your app, its special features.
Prerequisites
To follow this article along, you will need four things:
- Some previous experience with Java. Not that much is needed though, the instructions here will be precise enough to get you started.
- JDK 8 (Java Development Kit 8) locally installed.
- Maven, the open source project management tool supported by the Apache Software Foundation, locally installed.
- A Java IDE (Integrated Development Environment). One of IntelliJ, Eclipse, or NetBeans will suffice.
Having these, you are good to go and can start creating your JavaServer Faces and Java EE web application.
Scaffolding a Java EE Web App
To manage your application's source code and to build a runnable file from it, you will use Maven. Maven is a software project management tool that relies on an XML file called pom.xml to run tasks like compiling and packaging.
Therefore, to start scaffolding your application, you will:
- create a new directory to hold all the source code of your application;
- create the project structure (i.e., directories and Java packages);
- and create and define a starting
pom.xmlfile that you will use with Maven.
To do this, open a terminal, and issue the following commands:
# create a directory for your project
mkdir jsf-javaee-microblog

# move into this new directory
cd jsf-javaee-microblog

# create a Java package for your app
mkdir -p ./src/main/java/com/auth0/microblog

# create a directory for JSF-related files
mkdir -p ./src/main/webapp/WEB-INF

# create the pom.xml file
touch pom.xml
If you have previous experience developing with Java, you will probably remember that there are many ways (way too many) to develop and to deploy your applications. For example, back in the day, the most popular approach among Java developers was to create a .war (Web ARchive) file that they could (theoretically) deploy on any application server. Then, they would have to choose and configure an application server (e.g., JBoss, Wildfly, WebLogic, etc.) to serve their web application.
Although this approach is still feasible, nowadays, a much better (and more popular) approach is to create a fat JAR (Java ARchive) file that encapsulates your source code alongside the application server that serves it. Then, to run this app, instead of installing and configuring an external application server, you can simply execute the web app in a single command.
Although this approach facilitates the process, you still need to choose an application server to run your app. In this article, you will use Thorntail, a lightweight application server developed by RedHat. What is cool about Thorntail is that you can activate Java EE features such as JAX-RS (for RESTful APIs), CDI (for Contexts and Dependency Injection), and JSF just by declaring a single dependency (called a Fraction).
Now that you have a basic understanding about how you will structure your application and about the application server that you will use to run it, you can open the pom.xml file (with any text editor) and add the following code to it:
<?xml version="1.0" encoding="UTF-8"?>
<project xmlns="http://maven.apache.org/POM/4.0.0" xmlns:xsi="http://www.w3.org/2001/XMLSchema-instance"
    xsi:schemaLocation="http://maven.apache.org/POM/4.0.0 http://maven.apache.org/maven-v4_0_0.xsd">
  <modelVersion>4.0.0</modelVersion>

  <groupId>com.auth0</groupId>
  <artifactId>microblog</artifactId>
  <version>1.0.0-SNAPSHOT</version>
  <packaging>war</packaging>

  <name>JavaServer Face and Java EE Microblog</name>

  <properties>
    <version.thorntail>2.2.1.Final</version.thorntail>
    <maven.compiler.source>1.8</maven.compiler.source>
    <maven.compiler.target>1.8</maven.compiler.target>
    <failOnMissingWebXml>false</failOnMissingWebXml>
    <project.build.sourceEncoding>UTF-8</project.build.sourceEncoding>
  </properties>

  <dependencyManagement>
    <dependencies>
      <dependency>
        <groupId>io.thorntail</groupId>
        <artifactId>bom</artifactId>
        <version>${version.thorntail}</version>
        <scope>import</scope>
        <type>pom</type>
      </dependency>
    </dependencies>
  </dependencyManagement>
  <dependencies>
    <dependency>
      <groupId>io.thorntail</groupId>
      <artifactId>jaxrs</artifactId>
    </dependency>
  </dependencies>

  <build>
    <finalName>jsf-javaee-microblog</finalName>
    <plugins>
      <plugin>
        <groupId>io.thorntail</groupId>
        <artifactId>thorntail-maven-plugin</artifactId>
        <version>${version.thorntail}</version>
        <executions>
          <execution>
            <goals>
              <goal>package</goal>
            </goals>
          </execution>
        </executions>
      </plugin>
    </plugins>
  </build>
</project>
With that in place, you can save and close this file. Then, you can import your project in your preferred IDE (all of them have means to import Maven projects) and create a new class called MicroblogApplication inside the com.auth0.microblog package. Inside this class, you will add the following code:
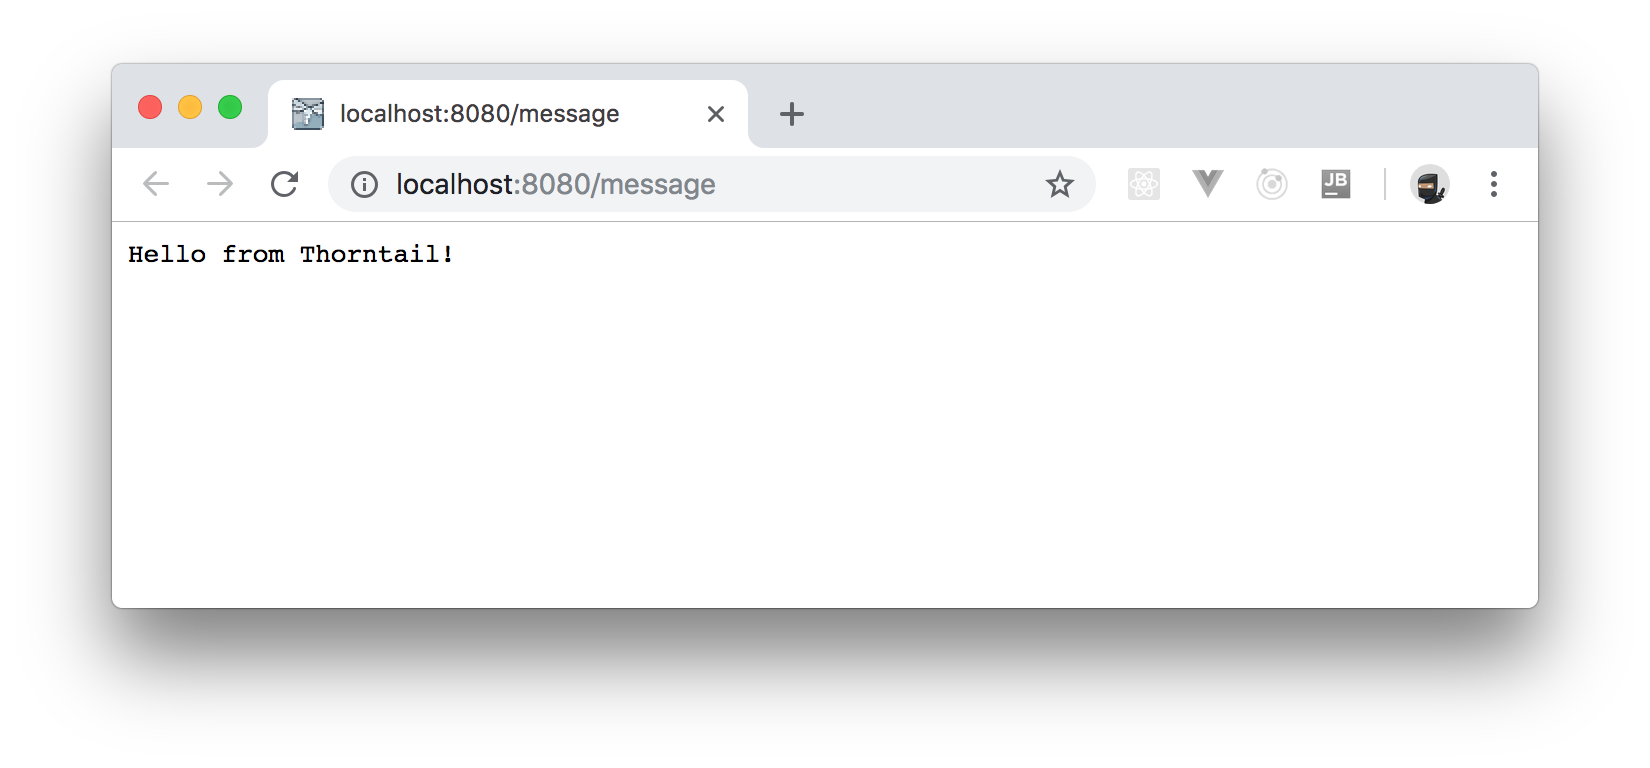
// ./src/main/java/com/auth0/microblog/MicroblogApplication.java
package com.auth0.microblog;

import javax.ws.rs.ApplicationPath;
import javax.ws.rs.GET;
import javax.ws.rs.Path;
import javax.ws.rs.Produces;
import javax.ws.rs.core.Application;
import javax.ws.rs.core.Response;

@ApplicationPath("/")
@Path("/message")
public class MicroblogApplication extends Application {
  @GET
  @Produces("text/plain")
  public Response doGet() {
    return Response.ok("Hello from Thorntail!").build();
  }
}
What this class is doing is to define a new REST endpoint that simply returns a message saying "Hello from Thorntail!" when users issue HTTP GET request to the /message path.
Now, to run this app, go back to your terminal and issue the following commands:
# use Maven wrapper
mvn -N io.takari:maven:wrapper -Dmaven=3.5.4

# use Maven to package the application in a fat JAR file
./mvnw clean package

# run the fat JAR artifact
java -jar target/jsf-javaee-microblog-thorntail.jar
Note: The first command will add Maven Wrapper to your project. This is both needed (the latest release,
v3.6.0, causes an error while trying to build the project) and a good practice. To learn more, check out this resource.
In one or two minutes, after Thorntail finishes bootstrapping (you will see a message saying THORN99999: Thorntail is Ready in your terminal), you can either open http://localhost:8080/message in a web browser, or use HTTP clients like curl to issue a request to your endpoint:
curl http://localhost:8080/message
# response: Hello from Thorntail!%
Note: You will not develop any other RESTful endpoints from now on. The idea here is to have a simple way to test your application structure for the first time.
Configuring JavaServer Faces in Your Web App
Having confirmed that you are able to run your Java EE application on Thorntail, the next thing you will do is to configure JavaServer Faces in your project. To do so, you will start by opening the pom.xml file and by including the following dependencies on it:
<?xml version="1.0" encoding="UTF-8"?>
<project ...>
  <!-- ... everything else stays untouched ... -->

  <!-- ... dependencyManagement and its children stay untouched ... -->

  <dependencies>
    <!-- ... other dependencies ... -->
    <dependency>
      <groupId>io.thorntail</groupId>
      <artifactId>cdi</artifactId>
    </dependency>
    <dependency>
      <groupId>io.thorntail</groupId>
      <artifactId>jsf</artifactId>
    </dependency>
    <dependency>
      <groupId>org.jboss.spec.javax.faces</groupId>
      <artifactId>jboss-jsf-api_2.2_spec</artifactId>
      <version>2.2.14</version>
    </dependency>
  </dependencies>

  <!-- ... build ... -->
</project>
By adding these three dependencies to your project, you are actually adding only two features to it. First, through the io.thorntail.cdi dependency, you are making the CDI (Contexts and Dependency Injection) feature available in your app. Second, through both io.thorntail.jsf and org.jboss.spec.javax.faces.jboss-jsf-api_2.2_spec dependencies, you are making your app support the JavaServer Faces specification.
With that in place, the next thing you will have to do is to add a file called web.xml to the ./src/main/webapp/WEB-INF directory. Inside this file, you will add the following XML:
<?xml version="1.0" encoding="UTF-8"?>
<web-app version="3.1" xmlns="http://xmlns.jcp.org/xml/ns/javaee"
         xmlns:xsi="http://www.w3.org/2001/XMLSchema-instance"
         xsi:schemaLocation="http://xmlns.jcp.org/xml/ns/javaee http://xmlns.jcp.org/xml/ns/javaee/web-app_3_1.xsd">
  <context-param>
    <param-name>javax.faces.PROJECT_STAGE</param-name>
    <param-value>Development</param-value>
  </context-param>

  <servlet>
    <servlet-name>Faces Servlet</servlet-name>
    <servlet-class>javax.faces.webapp.FacesServlet</servlet-class>
    <load-on-startup>1</load-on-startup>
  </servlet>
  <servlet-mapping>
    <servlet-name>Faces Servlet</servlet-name>
    <url-pattern>*.xhtml</url-pattern>
  </servlet-mapping>
</web-app>
The main goals of this file are to:
- register an instance of the
FacesServletclass to manage HTTP requests and to construct user interfaces (HTML pages) to send as response; - and to define that this Servlet will only handle requests that ask for
.xhtmlfiles.
Besides that, you are using this file to define that the PROJECT_STAGE of your app is Development. This will make your logs more verbose, which will help you debug any problem that might occur. Note that, when moving your app to production, you must change this parameter to make the app faster and to avoid leaking sensitive information about your source code.
After that, what you will do is to add a controller (an Enterprise Bean) that will encapsulate some business logic. To do so, create a new class called IndexController inside the com.auth0.microblog package with the following code:
// ./src/main/java/com/auth0/microblog/IndexController.java
package com.auth0.microblog;

import javax.enterprise.context.ApplicationScoped;
import javax.inject.Named;

@Named
@ApplicationScoped
public class IndexController {
  public String getMessage() {
    return "Hello from JavaServer Faces!";
  }
}
As you can see, for now, your "business logic" is only a method that, when called, returns a static message. What is important to note, though, is that your bean contains two annotations:
@Named: Without this annotation, your JSF views (.xhtmlfiles), wouldn't be able to use your bean.@ApplicationScoped: This annotation defines that your controller is going to have a single instance and that this instance will last as long as your web app is running. Soon, you will use similar annotations that will configure different beans with different durations.
After defining your first controller, you can start defining your JSF views. However, before creating a concrete view, you will define a template (a basic structure) for all views. To do so, create a new file called template.xhtml inside the ./src/main/webapp/WEB-INF directory and add the following code to it:
<?xml version='1.0' encoding='UTF-8' ?>
<!DOCTYPE html>
<html xmlns="http://www.w3.org/1999/xhtml"
      xmlns:ui="http://xmlns.jcp.org/jsf/facelets"
      xmlns:h="http://xmlns.jcp.org/jsf/html">

<h:head>
  <meta http-equiv="Content-Type" content="text/html; charset=UTF-8"/>
  <title>Thorntail Facelet</title>
  <link rel="stylesheet" href="https://stackpath.bootstrapcdn.com/bootstrap/4.1.3/css/bootstrap.min.css"/>
  <style>
    img.picture {
      margin-right: 10px;
      border-radius: 50%;
      max-width: 45px;
    }
  </style>
</h:head>

<h:body>
  <div class="container">
    <ui:insert name="content"/>
  </div>
</h:body>

</html>
Note: Wondering why you are using the
xhtmlextension instead ofhtml? This is a convention followed by Java developers while using JavaServer Faces and Facelets (JSF's rendering engine).
There are a few important things to notice about this file:
- You are defining that your views will use HTML 5 (
<!DOCTYPE html>). - You are adding two XML namespaces to this file:
uiandh. These namespaces give you access to JSF features like the ability to define where your app must render the concrete content (ui:insert). - You are adding Bootstrap to your app to make its user interface more appealing.
- You are using some tags introduced by JSF to define the structure of your app (
h:headandh:body).
With the template defined, you can define your first concrete app. So, create a new file called index.xhtml inside the ./src/main/webapp directory and add the following code to it:
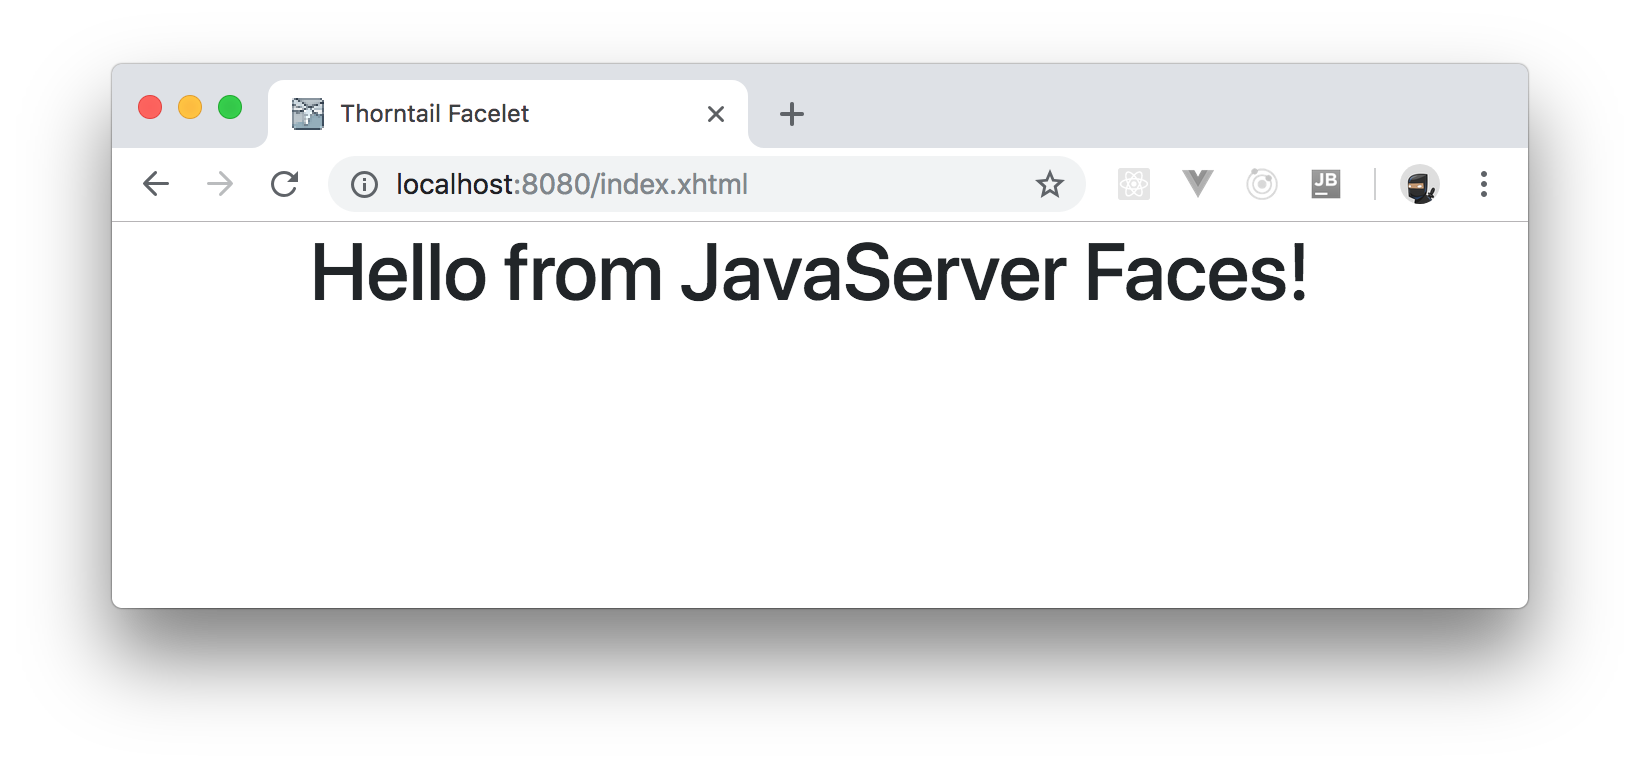
<?xml version='1.0' encoding='UTF-8' ?>
<html xmlns="http://www.w3.org/1999/xhtml"
      xmlns:ui="http://xmlns.jcp.org/jsf/facelets"
      xmlns:h="http://xmlns.jcp.org/jsf/html">

<body>

<ui:composition template="./WEB-INF/template.xhtml">

  <ui:define name="content">
    <div class="row">
      <div class="col-12">
        <h1>
          <h:outputText value="#{indexController.message}" />
        </h1>
      </div>
    </div>
  </ui:define>

</ui:composition>

</body>
</html>
Here, you are defining that your concrete view uses the template.xhtml file to define its basic structure. Then, you are using the ui:define JSF tag to indicate what JSF will render inside the content section of this template. The most interesting feature in this file is that you are using the h:outputText JSF tag to output the message defined in your indexController class.
That's it. You just finished configuring JavaServer Faces in your Java EE web application. Before testing it, you will have to remove your MicroblogApplication class you created before (it won't work anymore), then, you can open your terminal and issue the following commands:
# use Maven to package the application in a fat JAR file
./mvnw clean package

# run the fat JAR artifact
java -jar target/jsf-javaee-microblog-thorntail.jar
After Thorntail finishes bootstrapping your app, if you open http://localhost:8080/index.xhtml in a web browser, you will see a white screen with the static message you defined in your IndexController bean.
“Configuring JSF in Java EE applications supported by Thorntail can't be easier.”
Tweet This
Developing a Blog Engine with JavaServer Faces and Java EE
As you already configured your Java EE project to support JSF and CDI, you can now start developing your application per se. For starters, you can create an entity to represent the micro-posts that your users will submit. To do so, create a class called MicroPost inside the com.auth0.microblog package with the following code:
package com.auth0.microblog;

public class MicroPost {
  private String authorId;
  private String author;
  private String authorPicture;
  private String content;

  public MicroPost(String authorId, String author, String authorPicture, String content) {
    this.authorId = authorId;
    this.author = author;
    this.authorPicture = authorPicture;
    this.content = content;
  }

  public String getAuthorId() {
    return authorId;
  }

  public String getAuthor() {
    return author;
  }

  public String getAuthorPicture() {
    return authorPicture;
  }

  public String getContent() {
    return content;
  }
}
As you can see, micro-posts will have the following structure:
authorId: A property that will identify (on the application level) the author of the post.author: A property that will have the name of the author.authorPicture: A property that will point to a link with the picture of the author.content: A property that will have the content that the author wrote.
After creating this entity, you can create a service that will work as the facade between your project and a database that persists records of this entity. In this article, to make things easier to grasp, you won't use any real database (not even in memory). However, on any production-ready app, you would do so and you would define a service to interface the communication with the database, just like you are going to do.
So, create a new class called MicroPostsService inside the com.auth0.microblog package and add the following code to it:
package com.auth0.microblog;

import javax.enterprise.context.ApplicationScoped;
import java.io.Serializable;
import java.util.ArrayList;
import java.util.List;
import java.util.stream.Collectors;

@ApplicationScoped
public class MicroPostsService implements Serializable {
  private List<MicroPost> microPosts = new ArrayList<>();

  public void addMicroPost(MicroPost microPost) {
    microPosts.add(microPost);
  }

  public List<MicroPost> getMicroPosts() {
    return microPosts;
  }

  public List<MicroPost> getMicroPosts(String userId) {
    return microPosts.stream()
      .filter(microPost -> microPost.getAuthorId().equals(userId))
      .collect(Collectors.toList());
  }

   MicroPostsService() {
    microPosts.add(
      new MicroPost("id123", "Bruno Krebs",
        "https://cdn.auth0.com/blog/profile-picture/bruno-krebs.png",
        "Developing with JavaServer Faces is cool.")
    );

    microPosts.add(
      new MicroPost("id123", "Bruno Krebs",
        "https://cdn.auth0.com/blog/profile-picture/bruno-krebs.png",
        "Java EE and JSF together make a powerful stack.")
    );
  }
}
The implementation of this service is quite simple. There, you have:
- a
microPostsvariable that is anArrayList(this is where your app will "persist" micro-posts); - a method called
addMicroPostthat you will use to add new items to themicroPostsarray; - a method called
getMicroPoststhat you will use to retrieve all micro-posts in your app; - and another method called
getMicroPoststhat you will use to return micro-posts of a particular author.
Also, you will notice that this class includes a constructor at the bottom. You are defining this constructor to add some fake data to your service so you can have something to show while creating a nice page for your app.
Adding the PrimeFaces Component Library to your Web App
While developing with JavaServer Faces, the most popular component library that you can use (with the greatest support and biggest community around) to support you in the development process is PrimeFaces. This component library has been around for many years and it counts with more than 100 components (like calendar, data tables, dialogs, etc.). Besides helping you become more productive by giving you access to a library of this size, PrimeFaces also helps you create a good-looking app by letting you choose some predefined theme to your components.
As such, the next thing you will do is to install PrimeFaces in your web app. To do so, open your pom.xml file and add the following dependencies to it:
<?xml version="1.0" encoding="UTF-8"?>
<project...>

  <!-- ... all other properties ... -->

  <!-- ... PrimeFace repository... -->
  <repositories>
    <repository>
      <id>primefaces</id>
      <name>Primefaces Repository</name>
      <url>https://repository.primefaces.org</url>
    </repository>
  </repositories>

  <dependencies>
    <!-- ... all other dependencies ... -->
    <dependency>
      <groupId>org.primefaces</groupId>
      <artifactId>primefaces</artifactId>
      <version>6.2</version>
    </dependency>
    <dependency>
      <groupId>org.primefaces.themes</groupId>
      <artifactId>bootstrap</artifactId>
      <version>1.0.10</version>
    </dependency>
  </dependencies>

  <!-- ... build ... -->
</project>
Note: PrimeFaces themes are not distributed in the Maven Central Repository. That is why you need to define the custom repository that points to
https://repository.primefaces.org.
With this change, you are actually adding two dependencies to your project:
org.primefaces.primefaces: the PrimeFaces component library itself;- and
org.primefaces.themes.bootstrap: a theme that makes PrimeFaces components look like Bootstrap components.
To make PrimeFaces use the Bootstrap theme, you will have to update the web.xml file as follows:
<?xml version="1.0" encoding="UTF-8"?>
<web-app ...>
  <!-- ... context-param ... -->

  <context-param>
    <param-name>primefaces.THEME</param-name>
    <param-value>bootstrap</param-value>
  </context-param>

  <!-- ... servlet and servletMapping ... -->
</web-app>
Now, you can open your index.xhtml file and replace its contents with this:
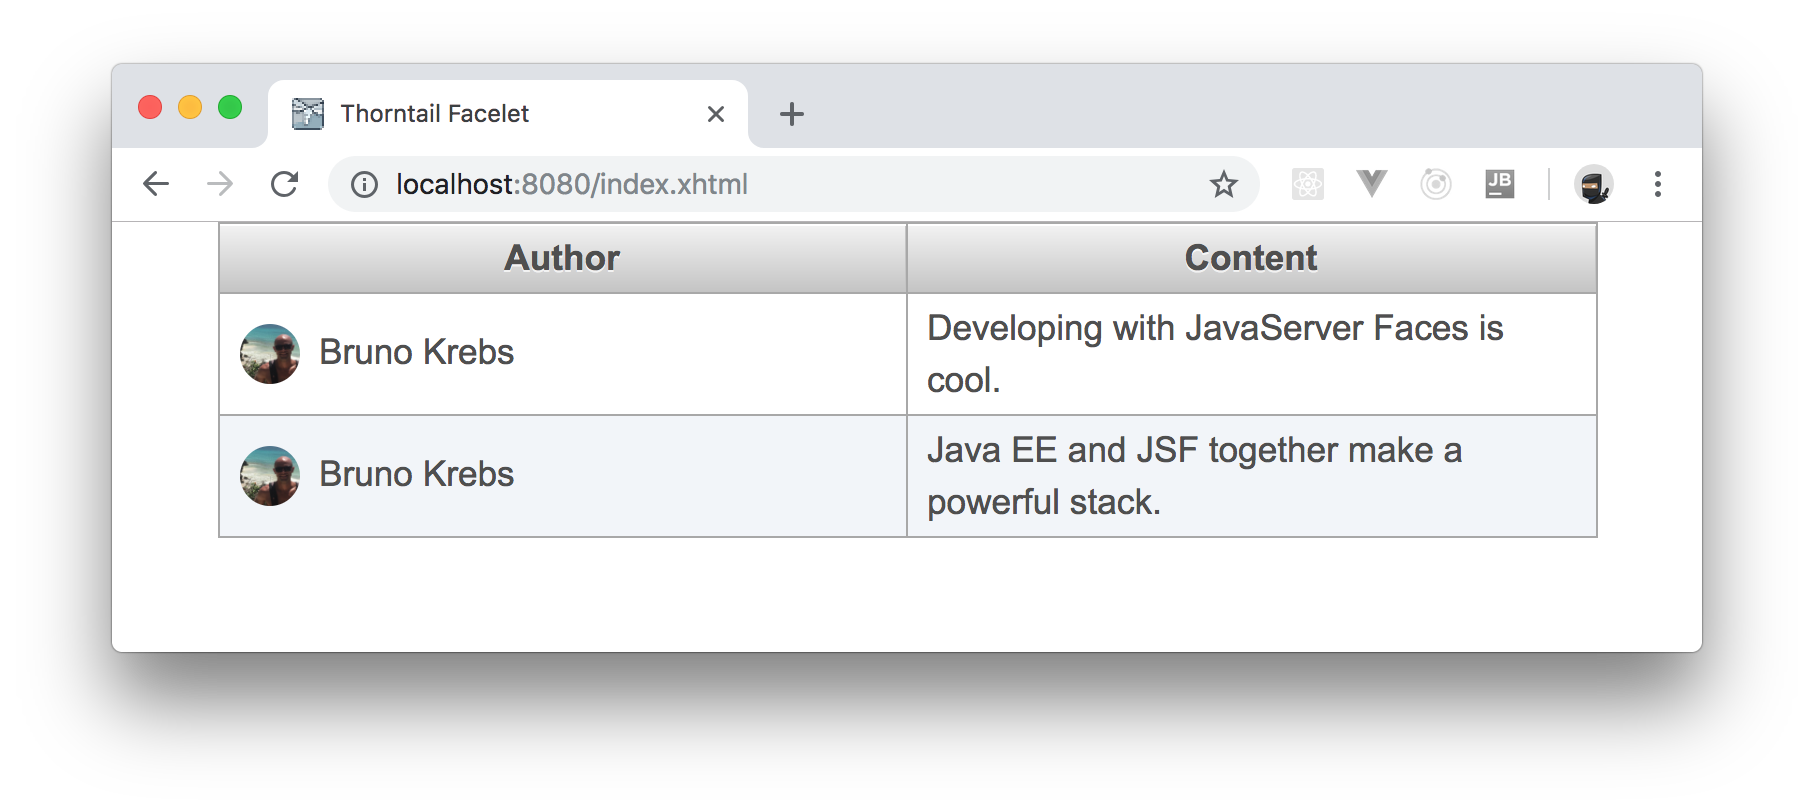
<?xml version='1.0' encoding='UTF-8' ?>
<html xmlns="http://www.w3.org/1999/xhtml"
      xmlns:ui="http://xmlns.jcp.org/jsf/facelets"
      xmlns:h="http://xmlns.jcp.org/jsf/html"
      xmlns:p="http://primefaces.org/ui">

<body>

<ui:composition template="./WEB-INF/template.xhtml">

  <ui:define name="content">
    <div class="row">
      <div class="col-12">
        <p:dataTable var="microPost" id="microPosts" value="#{indexController.microPosts}">
          <p:column headerText="Author">
            <h:graphicImage styleClass="picture" value="#{microPost.authorPicture}" />
            <h:outputText value="#{microPost.author}"/>
          </p:column>
          <p:column headerText="Content">
            <h:outputText value="#{microPost.content}" />
          </p:column>
        </p:dataTable>
      </div>
    </div>
  </ui:define>

</ui:composition>

</body>
</html>
The new version of this file is making use of the p:dataTable component provided by PrimeFaces to create an HTML table with all micro-posts available in your app. Note that the data table contains a value property that contains an EL (Expression Language) pointing to indexController.microPosts. This is instructing JSF that this component will consume data from the microPosts method of the indexController instance. However, your current IndexController class contains only a method that returns a static string.
To fix that, open the IndexController class and replace its code with this:
package com.auth0.microblog;

import javax.enterprise.context.RequestScoped;
import javax.inject.Inject;
import javax.inject.Named;
import java.util.List;

@Named
@RequestScoped
public class IndexController {
  @Inject
  private MicroPostsService microPostsService;

  public List<MicroPost> getMicroPosts() {
    return microPostsService.getMicroPosts();
  }
}
There are only three changes that you are introducing with this refactoring. First, you are marking IndexController with the @RequestScoped annotation. With this annotation, Java EE will, from now on, create new instances for each request that arrives at your app.
Second, you are defining a variable called microPostsService and you are telling Java EE to inject an instance for you. In this case, as your MicroPostsService class is marked with @ApplicationScoped, there will be only one instance available that will support all users in your app. Having this single instance enables you to have a single source of truth when it comes to the list of micro-posts.
Lastly, you are removing the method that returned the static message and you are adding in its place the getMicroPosts method that your new index.xhtml view is consuming.
After these modifications, you can issue the following commands to run your app:
# using Maven to build your project
./mvnw clean package

# running your web app
java -jar target/jsf-javaee-microblog-thorntail.jar
After that, if you open http://localhost:8080/index.xhtml in a web browser, you will see the new home page of your microblog engine:
About the author

Bruno Krebs
R&D Content Architect (Auth0 Alumni)