

Transcription
Good afternoon. This is Kassandra Parch with Auth0. Today we're going to do our Docker 101 webinar. Would someone let me know in chat if you all can see my screen? It should be a GitHub webpage. Okay, cool. All right, so today we're going to talk about Docker and ways you can use it. It's aimed at developers mostly. There are some deployment notes in there, but a lot of this is why you as a developer might care about Docker as opposed to someone who's just infrastructure or dev ops. So we'll start with talking about what Docker is and why you care. So Docker is a tool for running, creating, and managing application containers.
Now, it sounds like something you wouldn't care about as a developer, but there are some great advantages to running your applications and containers in development. One of these things in the ever-present Works On My Machine problem. If you've had that, that's something, it's a giant pain. So that is resolved by Docker containers because if you run your application in a Docker container you know you're getting the same machine every time. So external dependencies, things like that, that are maybe installed on your development machine won't affect the application running inside the Docker container.
You don't have to figure out how to install all the dev tools that you need on your machine other than what you use to write code. For instance, if your application relies on a redis server, trying to install a redis server on a Mac or a Windows machine can be downright impossible, but if you have a redis Docker container as part of your dev environment you just need to pull down the Docker container, run it, and you have your own redis database. So as a developer that can be really easy and really helpful, especially when I personally have started a new job, and we didn't use containers, so setting up my dev machine took literally two weeks of my time to get all the tools running and everything running up to specification.
Now, of course this is probably a nightmare story, but still, it can lower your development machine setup time. So if you're an app deployment person, app deployments are difficult enough, and containers are not only great in themselves, but there's a ton of tooling that's outside the scope of this particular webinar that makes deploying application containers and managing them a lot easier, and if you have your developers developing on the same machines that you're going to deploy to, that can also help with production problems. You know, something popping up randomly only in production because it worked on the dev's machine but not on your container.
So let's talk a bit about what a container is and why it's different from a VM. I'm going to pull up some Docker documentation here on this because their diagram is just the best way to explain it. So with a virtual machine you're running an OS and all the binaries and libraries that you need, then your app. All of these are managed by a hyper-visor. That's something like Virtual Box, which is on your host operating system, which is on your infrastructure. Now, this has several uses outside of Docker, but these VM's can get very large. A single Windows 10 development VM for instance is 20 gigs. So if you have a laptop and you're running a micro-services platform, you know, getting all those VM's could be ridiculously difficult for your hard drive.
With containers we are emulating the OS that the container is running, and we've got the Docker engine emulating that operating system. The containers each contain their binaries and libraries that they need to run, and then your app. So they tend to be much smaller. For instance, an entire OS running Node at Argon, the latest stable version, is about 600 megs. It's still kind of large, but it's way smaller than the 20 gigs or 2 gigs that you would need for Windows and Linux systems specifically.
So let's talk a little bit about images versus containers, because we're going to use both in this webinar. Now, a container is a running application. You create a container using an image. So think of an image like a recipe. We'll even go into that more when we talk about Docker files and writing them. So you create a container from an image. However, the trick there is that you commit an image, and that becomes a container. So it's kind of also like a template, if you will. Ygit our container can be a template that can be turned into an image. So there is a two-way street there. You create containers from images and you create images from containers. I'll show you a little bit of that during demonstration. Also, the questions panel, feel free to ask questions at any time. I can see it even though it's not up on the screen you all can see, and I will gladly answer questions as we go.
So Y containers. So I've gone over most of this, and so if you've ever used something like NVM, Node Version Manager or RVM, Review Version Manager, those can be a real pain. Just keeping multiple versions of a programming language running on your one dev machine can take a toll, especially if you are running into a problem. I for one use a node module called Particle CLI for a particular robotics controller, and it only works in certain versions of Node, and it's not my default Node Version Manager version of Node. So when I try to run it, it will crash pretty far into the procedure, so I've already spent two minutes trying to get all the information together, and then it crashes and I have to change the version of Node and redo all of that. It can be an absolute nightmare, and Docker can help with that by saying, "Okay, I run this application in this Docker container. I know what version of Node it has or Review or Python or whatever it is that it has, so I don't have to install it on my machine and manage multiple versions on that machine."
By developing your application in a Docker container you keep your development machine clean, repeatable, and uniform. So because it's recreated from a Docker file every time, because you would need to make changes to the Docker file to make a change to everyone's container, you can eliminate problems that arise in the environment by undoing the changes you may have made to your own Docker container, pulling down a fresh one, and running the app in that. It also makes it way easier to update dependencies across development machines. Instead of telling everybody, "Look, you need to update redis on your dev machine," you update your Docker image with a newer version of redis, and then when they all pull down the repository with the Docker file in it and regen their Docker image, the new version of redis will come along with it.
So it can help from a developer perspective in terms of ease of use not just the first time, but as you're updating things. It also helps for complicated systems. For instance, if you've ever tried to install LAMP or WAMP or MAMP, Linux, Mac, Windows, PHP system with MySQL, ugh, right? That's ridiculous. But getting a LAMP system in a container spun up is ridiculously easy, and upgrading it is as easy as changing the Docker file and telling everybody to rebuild their image. Or you can have a Git Hook that rebuilds their image every time they pull.
From a deployment perspective automated deployments are ridiculously easy with containers. There are a lot of tools out there to help you between Google's Cooper Netties, [SP] AWS has a lot of Docker tooling, and Docker itself is generating more and more tooling as the days go by. Core OS and a lot of platforms as a service now accept Docker containers, AWS, Heroku, a lot of them accept Docker containers as a running instance, which can be really handy if you need to scale up a small system.
So let's actually get into the code. So what we're going to do first is we're going to take a look at...I'm going to make this a little bigger. We're going to take a look at what it takes to pull down a Docker container and run it. We're going to do this through a shell script that I wrote because live coding is not always the best idea. So I'm going to pull it up here in my ID. What I've got here is Docker Run. Now, Docker is the Docker command line tool. The installation process is available on Docker's webpage. Run means I'm going to start a machine. I'm naming it My Node Machine because otherwise it names it for me, and stopping it and removing it are a little more difficult. So I make sure to name my machine. Dash P exposes a port to my local host. So I'll be able to access via local host port 3000 any application on this that exposes itself to 3000.
The "-it" means that it's going to be an interactive, and I'll show you the difference between interactive and a daemon as a part of this workshop, and Node:argon. So that's the base image for the container I'm going to run. Node means it's a Node JS platform, and Argon is the release tag. Argon is the long term release that's currently the latest one from Node. So let's run this and see what happens.
Okay, you'll notice I get a Node prompt. So I can say, "Let A equal hello, let B equal world, let C equal A plus a space plus a B." Right, because I'm in the interactive. Okay, interesting. All right, well yeah, that's why live coding is always difficult, but as you can see this is a typical node. Now, here's the trick I'm going to open up a new tab and I'm going to run Docker PS. Now, this is how you show all of your running containers.
Note that a Docker container shuts down when its name command exits. So I say Docker PS, and you see my Node machine running, right? Well, if I go into this tab and close the Node shell, and then I go back to my other tab and Docker PS again, you'll notice it's no longer running. If you want to see all machines, not just the ones that are running, add "-A." So you can see it exited 10 seconds ago. That's because the command is Node. When I stop the Node command like I did with that interactive, it shuts off. We'll talk about daemonizing Docker files or Docker containers here in a moment so that we don't have to leave a tab running and we can just let our web app run in the background, but I just want you to keep that in mind.
So I'm going to remove my container by saying, "Docker RM, My Node Machine," and if you want to know what images are available on your machine, you run Docker Images. If you want to remove an image, you say, "Docker RMI," and then the name of the image. I'm not going to do this because pulling images does take a while, and I want at least these two images to be available for you to see. I will show you removing an image once we create our own.
Okay, that's cool in that I can pull a Node thing, but what if I want to customize this? The way we're going to do that is we're going to re-run our Node machine from the last one, and then I'm doing to say, "Docker execute dash," on this machine. So now I'm logged into this machine. So I'm logged into my Node machine. I really like Nodemon for running Node Project because it will restart every time it sees a change, and that way I don't have to close and reload my server. So I'm going to say, "NPN install -g nodemon."
As you can see, it's installing. It's going to take a second because it pulls a few modules. Now, what we're going to do now that I've customized this machine by installing Nodemon is I'm going to commit it and create an image out of it. Like I said, there's that two-way street where you create containers from images and images from containers. So I've created a container from an image by starting up this container. Now, I'm going to turn this container that I've customized into an image. I'm going to exit my shell and I'm going to stop my machine. So now when I Docker PS-A, you can see I've exited. The command to turn a container into an image is Docker Commit.
So the syntax here is the container you would like to commit, the name of the image, which I'll call Dev, and a colon and a tag, and this is going to be Dev.1. I'm going to hit enter. As you can see, it gives me a hash. So now when I say, "Docker images," you can see I have Dev01 as my Docker image.
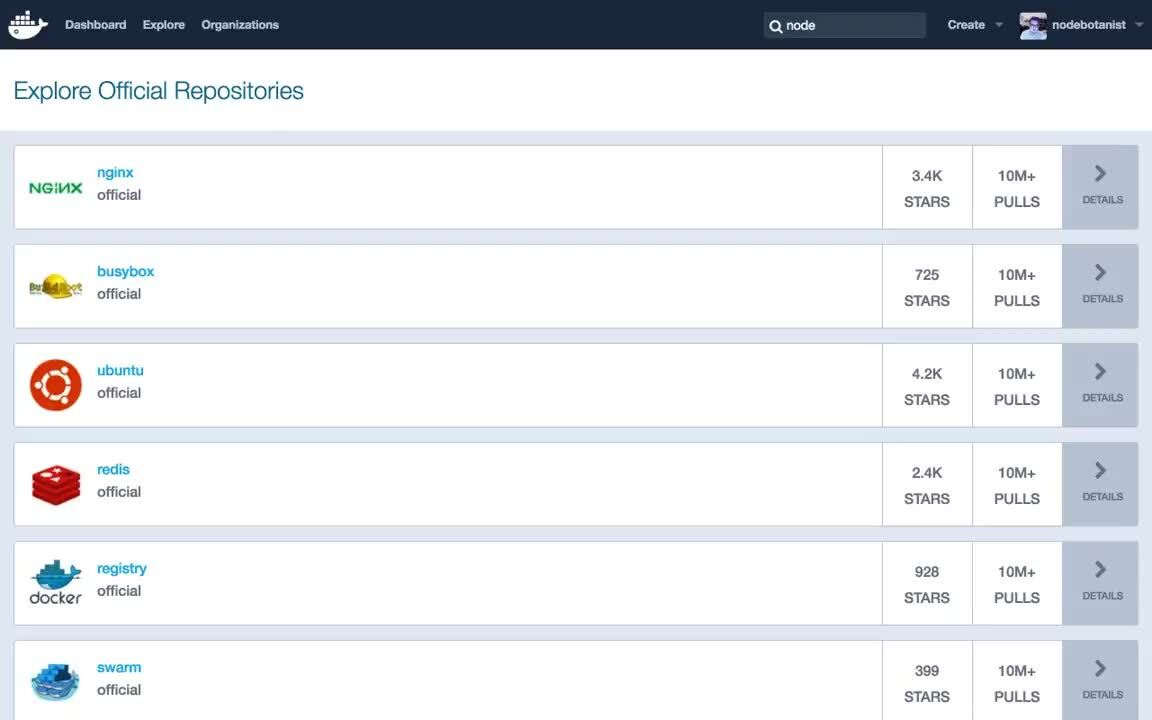
So let's talk a little bit about Docker Hub. I had that pulled up. So this is Docker Hub. So it's kind of like NPM or GitHub, but for Docker images. So you'll notice there are a bunch of official repositories here. These are ones you can pull down and have available. There's also a search tool. So for instance, the way I found the Node one was by going to Node, and as you can see, Node Argon is...Where did you go? There we go. Node Argon. So you can see all the different versions and tags that are available to you for each image on these pages. You can push to your own repository. That's where this Velocity one was. I did a talk at Velocity Con, and this is where I stored my Docker instance from that. What I'll do is Docker push, I believe it's Dev.01, Node Botanist, Dev@0.1. Sorry about this. I should have scripted this one out as well. Option, name tag. Okay.
I need to log in, don't I? There we go. Now I'm going to Docker push Dev@0.1. At, that should be a colon. Sorry about that. A little bit too much Node in my brain. So now unauthorized, authorization required. Let's see if adding this will help. All right, I will figure out the push thing in a moment, but you can push up to your repository and it will show up under your username. You don't need a username to download any of these that are available. You just need a username to push to your own setup.
Do we have any questions so far? Let me make this pop out so I can see it. There we go. Are there requirements to create a local Docker hub? I believe the Docker hub technology is open source, so you can create your own Docker hub, but I would need to look into that further. I'll type this answer in as well. I believe you can. Docker hub should be open source. Needs more research. Okay. Is the version 0.1 required? No, the version 0.1 is for my purposes. Basically I wish to use semantic versioning because I'm going to create several dev images here in the next hour, and I wanted to name them all the same. So it is not required, but it is highly recommended.
Fix my syntax there. Okay, cool. So now that we've created a container and we've created our own image from that container, as you remember we've created dev.01, we're going to make our own container that we can create dynamically. By that I mean we're going to use a Docker file. So I'm going to see into my Demo 1. Perfect. Okay, so let's take a look at these files that are in here.
First we're going to take a look at the Docker file itself. Now, I'm going to post links in chat sometimes. I did post a link to the demo code in chat, if you can see it. Let me know. I posted the full link to the GitHub repo where all this demo code is. So if you want to follow along there I'll repost it just in case you didn't see it or anything like that. Cool. It's in there. Now, this Docker file is going to create a very similar machine to what we had before. However, it's not going to install Nodemon, but we can add that. So I'm going to talk to you about directives. Now, I have syntax highlighting that highlights my directives in blue. The From is the original image you are going to build off of. That's why I said, "From Node Argon," because I want to customize a Node machine running LTS.
Env determines environment variables, and this machine requires term. One of the options is Xterm. So I use that. Next we're going to run a command that we would run from the command line. You use the Run to do that, and what I do is I create a directory for my code. The copy directory copies from your local host. In here I'm copying the source directory and everything in it into the code directory that we just made. Then WORKDIR changes the working directory that you're currently in. So we're going to move into our code folder and we're going to run NPM install. That's because when you look at this SRC folder it's got a package.json and a hello.js.
Now, note there is a very important file called the Docker Ignore file. Now, you want to run NPM install on your container. You do not want to copy your Node module folder from your host to your container, especially if you have native modules running on your machine. So I'm actually going to need to create that Docker file in this folder and edit it and say, "Node modules." That way my Node modules folder does not get copied by that copy directive.
So now that I have everything in place we're going to look at the build command, and what this does is it turns my directory with my Docker file into an image. Docker build is the way we do that. The tag is Dev:1.0. Dev is the name of the image, and colon, and then the tag of the image. Like I said, I want to name them all Dev. They're just different versions of Dev, but you can do wahtever you like here. Then "." means in this directory that I'm in. It will look for a Docker file like the one we have in that directory.
So let's build our image. So this will take a little longer the first time you run it because it will have to pull down the Node Argon image, because that's what it's based off of, but as you can see it starts from Node Argon, environment term, X term, run at MIGDR code. Now, one thing that's really great about debugging Docker is you'll see removing intermediate container, removing intermediate container. That it creates a new container for every step in your Docker file. So if your Docker file fails you can look at the container that came out of the process and see what the state was, and that can help you debug. For instance, if you say, "I want to run this file," and your container fails there, you can look at the container that was last created, go in, and say, "That file moved. That's why my Docker file failed." Just a good thing to keep in mind. It creates a container for each step and then removes it when the step is successfully completed. So if it fails you can see the container on the step that failed.
So now when I say Docker Images in my terminal, I now have Dev1.0. So I'd like to run this. Now let's take a look at the Docker run command again, this time from the perspective of we're going to run a web app. Actually let's look at the web app itself. What we copied was the source file, and we copied to package.json over there, and we have a dependency of express, and hello.js is our name. Let's look at hello.js. This is just the Hello World from Express. It's looking at port 3000 and it's gonna send back Hello World. When I look at Run what I've got here is "-d." That will run it as a daemon. Now, keep in mind this command, if it crashes, will terminate the Docker container. So as long as my web server is running my Docker container will remain up.
The "-d" means it will run in the background instead of providing us with a prompt like it did on the first one. Now, the "-p" exposes a port to my local machine. On the right is the port from the container and on the left is the port I want to bind to on my local machine. Now this is the image we want to run. So we want to run Dev1.0. Finally I've established a name for my container, just as I did for the first one, for easy removal. Let's run it.
I run Docker PS. You can see that it is running. Now I'm gonna go to my browser and I'm gonna go to Local Host port 1337, and as you can see, from my container it is forwarding 3000 on the container to 1337 on my machine, and I can see, "Hello world." So I now have a web app that I can develop on my machine, deploy to container, and see on my machine. So this is cool, but that means every time I change the code I need to rebuild the image, right? No. Luckily there are ways to write Docker containers specifically for development that will allow me to change the code and still not have to rebuild the Docker file. Let's take a look at that now.
I'm gonna move into my Demo 2 folder. Let me clear this out. I'm gonna go into my code editor and we're gonna look at the changes that we've made in Demo 2. Hello.js is the same, as is the package.json. So our code is the same. The difference is going to be in our Docker file. Note, I'm only copying the package.json this time. We're going into our code directory and running NPM Install. The reason for that is, only copying package.json, is I'm going to use what's called a volume mount onto my host machine from the container so that my container can see a part of my host machine's file system. This way I can change things in the file system on my computer and they will be reflected in the container.
Also note, I need to uncomment this line. We are gonna install Nodemon, and this command, Nodemon Hello JS, will reload every time that something changes in my code. I'm going to save this and I'm going to look at Build Demo 2. This one is, we just need a tag of Dev2.0 and the dot for the directory that we're in. So let's build it.
So it's installing all of my Node modules because it copied my package.json over. This is to bootstrap, by the way. That way when I start the container I don't have to reinstall all my NPM modules. That's mostly what this is for. So it installed Nodemon and now it's installing Express because it's installing from the package.json. The first one was Nodemon. So I see Docker Images, I see Dev2.0 on the list. So I'm going to go into Code and look at the way I'm running this.
Now, this one's a little more interesting. So we've got this V. What V does is it takes the directory on the left from my machine and needs to be an absolute path to the directory on the right on the container. You'll notice in our Docker file we made a code directory. Now again I'm going to take the port, I'm going to bind this one to 1338. The name is Dev2 and the base image is Dev2.0. Let's watch it run.
Let's make sure it worked. It is still up. That's great. What we'll do now is we'll go to port 1338. Now what I want you to see here is port 1337 is still working. You can run as many Docker containers on your machine as it can handle. I wouldn't recommend running several at a time on a single machine, but just note that you can run multiples as long as you make sure they bind to different ports and things like that.
Now, the main benefit here was the volume mount. So what I'm going to do is add a file to my source directory. I'm gonna touch source/test.js. Now what I'm gonna do is Docker Exec a shell into Dev2. I'm gonna LS. I'm in the cold folder, so I'm gonna LS. So you can see the test.js file in there. That is because of the volume mount that we created when we ran the image. The other way I'm gonna show this ability to change is by going into hello.js, I'm gonna go into source, hello.js, and I'm gonna change World to Webinar. Now, because Nodemon is running, when I go back to my browser and I go back to the tab that had 1338 running on it...I believe it was tab four. Here we are.
When I refresh the page it says, "Hello webinar," without having to rebuild the image because of that file system mount. It's watching my file system and Nodemon runs on the container because it detects a change in hello.js, even though that hello.js is actually on my host machine and not really on the container. Any questions so far? We're about halfway through the demo. [inaudible 00:30:58]
The Docker engine really is the minimum requirement to run Docker containers on a prod server. There are lots of tools that will help you stage servers to set them up. I know there are a lot of platforms as a service, but yeah, the minimum you'd need is the Docker engine command line tool, and that's it. But I would recommend using tooling if you're gonna run a projection application to help scale and to make sure containers stay up and to be flexible, especially monitoring and alerts.
Send that answer. Okay. So we now have a developer environment that reflects the changes in our system. So demo three, what we're gonna do is, let's say we want to add a database to our application. Let's say we want to add a redis database to our application. We're gonna take a look at how to do that. First I'm gonna exit that. Yeah, all my machines are still running. I'm gonna CD in demo three, clear this out, go into my code editor, and show you the differences. So I made that a little bit more complicated of a file. That's because I'm in the wrong folder. Here we are.
Source, hello.js. Okay, so we've got Express and redis installed. We're gonna connect to a host. This IP might change. I will show you how to get that IP in just a moment, because we'll need the IP of the redis container that is running. When we get x/ we're gonna look for a key and a value in the query parameters. If we send a key and a value it sets the key to the value in the redis server. If you send just a key it tries to get the key from the redis server. Otherwise it just says, "Hello webinar." In our package.json we have our dependencies as Express and redis.
Now I need to run a database container so that I will have access to my redis database. So what I'm going to do is, I'm actually gonna go into code three on this tab as well, clear it out, and I'm gonna run the Run DB script. I put it in the Demo Three folder. There we go. That's right. Okay.
Now when I Docker PS you can see that I have a redis image running. Now, this is just a base redis image. It's not anything changed. I'll actually show you the run PP code. Docker run, name redis DB, expose the port, 6379 to 6379, and then daemonize it, and it's from the base redis image. When you don't include a tag it assumes the latest tag. So now that we've run our database we need to find the IP of our database so that when we launch our code it will connect correctly.
The way we do this is, it's kind of using a regular expression. What we're doing is we're saying, "Docker inspect," and I want the format to be inside Network Settings.networks. I want the IP address and that's it. So first I'll show you what Docker inspect looks like without that, and then I'll show you how to get the IP. Docker inspect redis. Whoa, that's a lot of information, and if I want to find the IP address there are quite a few IP addresses in here, so I don't know which one I'm looking for. So that's why I have my little script here. So the IP did change. So I'm going to copy and I'm gonna go into my code in hello.js and change the host, then save it. Now I'm ready to run this container that contains my web application, which I will show you the script for. We're on Demo Three.
So we're volume mounting Demo Three's source code this time. We're doing port 1339, and the machine name is Dev3. [inaudible 00:36:00] I really just named everything and numbered everything so that if I accidentally left a Docker container running it wouldn't give me an error and I'd have to try to figure out what that is in the webinar. Then to build it it's just build with the tag of Dev3.0 with a dot, and my Docker file is just like last time, it's just I'm going to be exposing another container to this application. So I'm gonna build Demo Three and it's gonna install Nodemon, and then it's gonna install redis and Express. Oh, good. It installed Nodemon from cache. Awesome.
All right, so then I say Docker images. I now have Dev 1, 2, and 3. So I'm going to say, "Run Demo Three." Docker PS. All right. It says it's running. So I'm going to go to Local Host port 1339 and I'm going to give it a key of color and a value of blue. Key colors set with blue. All right. Now I'm going to go to Local Host 1339 and just ask for the key of color. Your value for the color is blue. It's actually going into the redis server and saying, "I need the key for color." So that's how you run two different containers and link them together, however finding the IP address every time you launch site container and doing all of that all over again is just a pain. So what we're gonna do is talk about Docker Compose.
I do this by going into my Demo Four. Now, Docker Compose is a tool meant for multiple container deploys of a web application like the one we just did with the Docker file and a base image. This is especially handy when you want to use two custom images for your setup. Let's go into the code and take a look.
Now, instead of a Docker file I have a Docker-compose.yml file. Version is always two. This is not the version of your app. This is the version of Docker Compose. It will yell at you if you put one or anything other than two. Services are what we are defining. So services are the containers that we would like to run as part of this Docker Compose. For web, which will be the name of it, I specify my image, which is Dev3.0. I tell it what ports I want to map to. I want 1340 on my local machine to be 3000 on the container. And volumes, I can use a relative path here. So I'm saying I want the source in Demo Four to map to code, and it says, "Depends on redis." So what that means is it will give me an error if redis can't spin up.
Now, redis is named Redis. Keep that in mind. That's the host name so if Web wants to access Redis, it uses instead of an IP it's just going to use the name Redis. If Redis for some reason wanted to access Web, you would just use the name Web. They're on their own internal network that Docker creates for you while also exposing itself to my host network. All I have here is image redis. Now to take our YML file and turn it into machines we're going to say, "Docker-compose up." Oh, I forgot. I need to run it with D. Just like with our Docker run, when I run Docker Compose up I need to add a D because that will daemonize it. Okay.
So now when I Docker PS you can see Demo Four Web One, Demo Four Redis One. So I've got my two containers here, right? Now let's take a look at the code. The only thing that's changed in my hello.js is instead of hosting an IP the host is redis. I'm going to save it and I'm going to go check, I'm going to do Local Host port 1340 and I'm going to say, "Key equals color and value is orange." Key color is set with orange. Local Host 1340, key color, and value for the color was orange.
Now, I'd also like to point out that on Local Host 1339 when I refreshed key color, it's still blue because it is on a different container. As the Docker PS shows my compose redis is on a different container than the redis I spun up for Dev3.0.
So yeah, now I can talk a little bit about the Docker GUI tools. So there are some Docker GUI tools available for Mac and Windows, and I believe Linux as well. Kitematic is one of them and it allows you to spin up machines without the command line, and it will just ask you to be a...be a graphical interface for your Docker containers. There is a lot to learn in the Docker documentation. I need a link for that. Docker docs. Say that...That's not actually a tongue twister, I guess. Docs.docker.com. I'm gonna put that in the . . .
Now I will pause for questions, but other than that I've gone through everything I'm going to go through. So thank you for listening. I hope you learned something, and again, the GitHub link is in the chat. So feel free to pull down that GitHub repo and play around with the Docker files. Thanks for listening.