TL;DR: In this article we're going to demonstrate how we can use Flask to build a GraphQL API that can create and return flexible and meaningful data. First we'll setup our backend using Flask and an SQLite database. Next we'll bring in GraphQL to build an API that will allow us to interact with quidditch teams, players, and games. Finally we'll demonstrate the value this graph-based database modeling can bring to our application by testing out two different authorization models to extend permissions to players from the Auth0 dashboard.
All code for this application can be found on GitHub. If you want to jump right in, just clone the repository and follow the instructions in the README to run the application.
Authorization Models with Auth0
In a typical application, you might have different "tiers" of users. Let's say you have a blog and a database of users who interact with the blog. The first set of users, let's call them subscribers, can only view public blog posts. Next you have the users who manage the blog and are permitted to see the blog's dashboard. Even within that set of users you might have admins and editors, both of which have different permissions. So how would we control who can see what? A popular way to do this is with role based access control. We'd simply assign each of those users the role of either subscriber, admin, or editor and then associate certain permissions with that role.
This is a great authorization model for a lot of applications, but sometimes as your application grows, you might find you're creating more and more one-off roles and permissions. Maybe you created a subsection of the blog that only users who have been subscribed for over a year have access to. Should you create a role specifically for that?
In our application, we're going to use our flexible GraphQL API with Auth0's rules to implement two other options for handling these more complex authorization scenarios: Attribute-based Access Control and Graph-Based Access Control
Attribute-based Access Control (ABAC)
Attribute-based access control means we're authorizing our user to have access to something based on a trait associated with that user. So in the above example, instead of assigning each user who has been subscribed for over a year a special role for that, we'd just look at the created_at field associated with that user and allow or deny access based on that.
Graph-based Access Control (GBAC)
Graph-based access control is where we allow access to something based on how that data relates to other data. In the blog example, we might want to allow a guest author access to the posts section of the dashboard, but only let them view and edit posts that they wrote. In this case, we need to check the relationship between a post and the user before allowing access. Usually we'll have an author_id field on the post that will link back to the id field of a user. If that relationship exists, we can grant post editing access for that user. If not, we can simply deny them on the spot.

So what does this have to do with a graph structured data? Modeling our data in a graph-like structure is a great way to bring flexibility to our data and really make relationships the top priority. As applications become increasingly complex, it gets much harder to manage roles and permissions.
“Graph-based access control is where we allow access to something based on how that data relates to other data.”
Tweet This
Think of an application as massive as Facebook. You allow your profile to be viewed by your friends and also friends of friends. Some user clicks to view your profile, so now Facebook needs to run a query to search through all of that person's friends and then search all of friends of those friends before it can authorize them to view your profile. That's a lot of work! By modeling these relationships in a graph, we can just select out any point in the graph and "hop" to the next data point to see that relationship. Then we just define rules that use those relationships or data attributes to make authorization decisions. That's exactly what we're going to do in this article.

Why Flask and GraphQL
We're going to be using Flask as our application backend. Flask is a simple and flexible web framework for Python that provides us with tools that will make our application development much faster and easier. Flask is super lightweight, so it's a perfect choice for a simple but extensible backend.
We'll also be using GraphQL to build a simple API. GraphQL is a query language that allows us to create APIs or work with existing APIs. It was created by Facebook and publicly released in 2015. Since then it's been gaining a ton of traction from both individual developers and also big companies such as Airbnb and Shopify.
“Flask is a simple and flexible web framework for Python!”
Tweet This
Instead of your data being accessed in a table format, imagine it's a graph. Once we establish what data points are exposed in that graph in the backend, we can use the frontend to pick and choose exactly what data we want and how we want it formatted. The client query dictates the response.
Some notable features:
- It can be used with any language or database
- Can be used on top of existing REST APIs
- Gives the client side more control
Prerequisites
Because Flask is a web framework for Python, we need to have Python on our machines.
You can check if it's installed on your system by opening your terminal and running:
python --version
If a version is not returned, you're going to need to download and install the latest version from the Python website. For this tutorial, we'll be using Python 3.
Next we're going to be using Pip, which is a package manager for Python, similar to npm. If you downloaded a recent version of Python 3 (3.4 or higher), pip should have been installed with it. If not, you can install it here.
You can double check if it's installed with:
pip --version
Setting Up our Application
Before we jump into GraphQL, let's setup our Flask backend and then get our database ready for querying.
First things first, let's setup our project directory.
Create a folder called flask-quidditch-manager. Then enter into that folder and we'll create our first file, which will serve as the entry point for our application app.py. You can do this in your terminal with the following commands:
mkdir flask-quidditch-manager
cd flask-quidditch-manager
touch app.py
You can open your preferred code editor now and let's get started with Python.
Creating a virtual environment
Whenever you're creating a Python project that requires external packages, it's a good idea to create a virtual environment. This will keep all of our dependencies isolated to that specific project. If we just installed every package globally on our system, we could eventually run into problems if we had a scenario where two different projects required different versions of the same package. So let's setup our virtual environment now. If you're on Python 3, the module venv should already be installed on your system. If not, you can find installation instructions here.
Make sure you're in the project folder flask-quidditch, and run the following command:
For Mac/Linux:
python3 -m venv env
For Windows:
py -3 -m venv env
This will create a folder in your project folder called env where we can store all of our dependencies.
Next we just need to activate it. All you have to do is run the activate script that's inside the folder we created. In this case it's located at env/Scripts/activate. The env part of the path will be replaced by whatever you named the environment.
If you're on Windows use:
env\Scripts\activate
If you're on Mac or Linux use:
. env/bin/activate
Your terminal should now look similar to this:

Whenever you're ready to exit the environment, just run deactivate in your terminal.
Setting up Flask
Now that we have a virtual environment to store our dependencies, we're finally ready to setup Flask! In your terminal run:
pip install flask
This creates a site-packages folder nested inside your env folder.
Now let's setup a basic skeleton app. Open up your empty app.py file and paste in the following:
# app.py
# import flask
from flask import Flask
# initialise flask object
app = Flask(__name__)
# Create home route
@app.route('/')
def home():
  return 'Hello world'
if __name__ == '__main__':
  app.run(debug=True)
The first thing we're doing here is importing Flask. Next we're creating a Flask instance called app. In the next line, we're creating a basic home route that returns Hello world. when called. This is just for testing purposes to make sure our server is running. The last line is actually how we'll start up our server. We're passing debug=True so that we don't have to restart the server every time we make a change to our code.
Let's start it up now to make sure everything is working properly!
python app.py
Now if you go to localhost:5000 in your browser, you should be greeted with Hello World.
Setting Up our Database
Next up let's create our database! We're going to have three tables: players, teams, and games, so let's see how we can create those.
SQLite and SQLAlchemy
We'll be using SQLite for our application's database. It's a lightweight database that's great for small applications such as our Quidditch Manager. While Python comes with built-in support for SQLite, it can be a bit tedious to work with if you need to write a lot of SQL queries.
To make things easier, we're going to be using SQLAlchemy, which is an ORM (object-relational mapper) that will help us to interact with our database.
In your terminal, run the following pip command:
pip install sqlalchemy
Create a new file called database.py. Paste in the following code and then we'll go over it.
from sqlalchemy import create_engine
from sqlalchemy.ext.declarative import declarative_base
from sqlalchemy.orm import scoped_session, sessionmaker
 # Database setup
# Sqlite will just come from a file
engine = create_engine('sqlite:///quidditch.db')
db_session = scoped_session(sessionmaker(autocommit=False, autoflush=False, bind=engine))
 Base = declarative_base()
Base.query = db_session.query_property()
First we need to import create_engine from the sqlalchemy package. Next we're going to create our database file using create_engine. This is the starting point for our SQLite database. Then we create a session so we can interact with the database. Next we construct a base class Base for our class definitions (we'll use this later when we're creating our models). Finally Base.query is going to be required for making our queries later on.
Creating our models
Next up we're going to create our models. A model is a class that represents the structure of our data. Each model will map to a table in our database and include information such as the field name, type, if it's nullable, and more. We can also define any relationships between our tables in our model classes.
Create a new file called models.py.
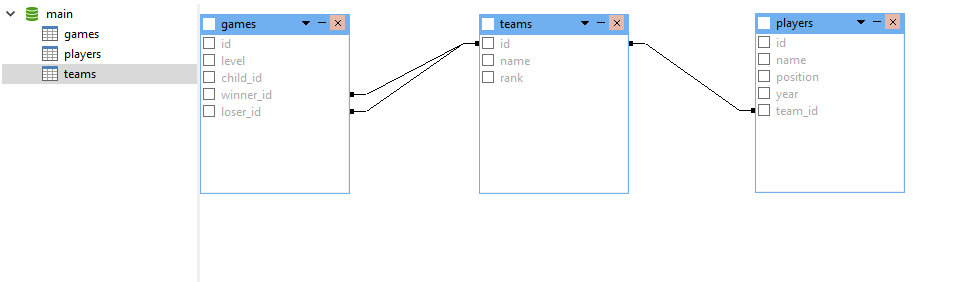
Our database will have three tables, players, teams, and games, so we're going to have one class for each of them.
In models.py, paste in the following chunk of code and then we'll walk through all of it to see what's going on here.
# models.py
from database import Base
from sqlalchemy import Column, ForeignKey, Integer, String
from sqlalchemy.orm import backref, relationship
 # Create our classes, one for each table
 class Team(Base):
    __tablename__ = 'teams'
    id = Column(Integer, primary_key=True)
    name = Column(String(50))
    rank = Column(Integer, nullable=False)
    players = relationship('Player', backref='on_team', lazy=True)
    def __repr__(self):
        return '<Team %r>' % self.name
 class Player(Base):
    __tablename__ = 'players'
    id = Column(Integer, primary_key=True)
    name = Column(String(50), nullable=False)
    position = Column(String(50), nullable=False)
    year = Column(Integer, nullable=False)
    team_id = Column(Integer, ForeignKey('teams.id'), nullable=False)
    def __repr__(self):
        return '<Player %r>' % self.name
 class Game(Base):
    __tablename__ = 'games'
    id = Column(Integer, primary_key=True)
    level = Column(String(30), nullable=False)
    child_id = Column(Integer, ForeignKey('games.id'), nullable=True)
    winner_id = Column(Integer, ForeignKey('teams.id'), nullable=False)
    loser_id = Column(Integer, ForeignKey('teams.id'), nullable=False)
    child = relationship('Game', remote_side=[id])
    def __repr__(self):
        return '<Game %r>' % self.winner_id
Here's the basic flow of what we're doing:
- Importing the base class,
Base, for filling out our tables - Define our three classes:
Team,Player, andGame(note that they're all singular) - Set the table name for each class
- Create variables that represent each column of each table
- Specify any attributes required of that column
- Define any relationships between tables
- Define what get's returned if we call this class
These classes are basically the lifeblood of our database. When we create our database in the next step, it's going to setup the tables and columns exactly how we told it to in this file.
Just a quick sidenote, you may have noticed in the teams table we have a players column that's using db.relationship(). This is how we create a one to many relationship using SQLAlchemy. All we're saying is that one team can have many players, but a player can only belong to one team. These relationships are important to define now so that we can model them in our graph later. You can learn more about creating relationships in SQLAlchemy in this article.
Creating and Seeding our Database
Now that we've done all that setup, we can finally create our database! In your terminal, type python to start a Python shell. We're first going to import the db object from our app and our classes from model.py. Then we'll just run SQLAlchemy's create_all() method to create the database.
python
from database import Base, engine, db_session
from models import Team, Player, Game
Base.metadata.create_all(bind=engine)
You should now see a quidditch.db file in the root of your project folder.
Our database structure now looks like this:
The final step before we move onto GraphQL is populating our database with data. We'll walk through the commands you can use in the Python shell to add data to the tables, but the data itself is pretty trivial and time-consuming to enter by hand, so head to the seeder.txt file in the GitHub repo to get all the data for this example.
Let's manually enter Gryffindor into the teams table. Go to your terminal and open the Python shell by typing python and then enter the following:
team1 = Team(name='Gryffindor', rank=1)
db_session.add(team1)
db_session.commit()
This is the process we'll use to add any new row into a table. We're just calling the class for that table and specifying the attributes. Note that we don't need to specify the id as that's auto-generated.
Let's add our first player as well. We've already imported the classes, so we don't need to do it again.
player1 = Player(name='Harry Potter', year=1, position='Seeker', on_team=team1)
db_session.add(player1)
db_session.commit()
You may have noticed that for the last attribute we called it on_team when the column is called team_id. Because we've already defined a relationship between the players table and teams table, we can actually just use that backref we created earlier and assign it to the team1 variable we just created for the Gryffindor team. That way we don't have to go through the trouble of looking up what id Gryffindor was assigned. Pretty neat!
To exit Python, just press ctrl + Z and hit enter.
Getting Started with GraphQL
Alright now that we've setup Flask and have our database ready to go, let's finally play with GraphQL!
Integrating GraphQL with Graphene
First we need to install a few dependencies so we can bring GraphQL into our application.
pip install flask-graphql graphene graphene-sqlalchemy
flask-graphql - Flask Package that will allow us to use GraphiQL IDE in the browser graphene - Python library for building GraphQL APIs graphene-sqlalchemy - Graphene package that works with SQLAlchemy to simplify working with our models
Creating our schemas
Next let's create our schema. The schema is going to represent the graph-like structure of our data so that GraphQL can know how to map it.
Instead of the traditional tabular structure of data, imagine we have a graph of data. Each square in the image below represents a node and each line connecting them is considered and edge.
Node - A node in a graph represents the data item itself, e.g. a player, game, or team
Edge - An edge connects 2 nodes and represents the relationship between them, e.g. a player belongs to a team
Each node will also have attributes associated with it. In this case we can see some of the position attributes such as Captain and Seeker, represented as ovals.

If setup properly, GraphQL gives us the ability to select any tree from that graph. If we want to grab all players who are captains we can do that. If we want to grab all of the game data for a particular team, we can do that as well. GraphQL makes our data super flexible and gives the client more control over the type of data and structure of data that's returned to it.
But before we can start doing any queries, we're going to have to setup our schema with the help of our models that we defined earlier. Luckily Graphene makes this pretty simple for us.
Create a new file called schema.py and paste the following code in.
from models import Team
from models import Player
from models import Game
import graphene
from graphene import relay
from graphene_sqlalchemy import SQLAlchemyObjectType, SQLAlchemyConnectionField
 class PlayerObject(SQLAlchemyObjectType):
    class Meta:
        model = Player
        interfaces = (graphene.relay.Node, )
 class TeamObject(SQLAlchemyObjectType):
    class Meta:
        model = Team
        interfaces = (graphene.relay.Node, )
 class GameObject(SQLAlchemyObjectType):
    class Meta:
        model = Game
        interfaces = (graphene.relay.Node, )
 class Query(graphene.ObjectType):
    node = graphene.relay.Node.Field()
    all_players = SQLAlchemyConnectionField(PlayerObject)
    all_teams = SQLAlchemyConnectionField(TeamObject)
    all_games = SQLAlchemyConnectionField(GameObject)
 schema = graphene.Schema(query=Query)
This is a lot to digest, so let's break it down.
- Import our models
- Import our Graphene packages we installed earlier
- For each class, tell Graphene to expose all attributes from that model
- Create a query class
- In the query class, define queries for getting all entries for each of the classes defined above
Let's fill out that queries section a little more so we can demonstrate how to resolve more complex queries.
Back in schema.py, keep everything the same, but add in the following code to the Query class:
# schema.py
 from sqlalchemy import or_
 class Query(graphene.ObjectType):
    node = graphene.relay.Node.Field()
    all_players = SQLAlchemyConnectionField(PlayerObject)
    all_teams = SQLAlchemyConnectionField(TeamObject)
    all_games = SQLAlchemyConnectionField(GameObject)
     # Get a specific player (expects player name)
    get_player = graphene.Field(PlayerObject, name = graphene.String())
    # Get a game (expects game id)
    get_game = graphene.Field(GameObject, id = graphene.Int())
    # Get all games a team has played (expects team id)
    get_team_games = graphene.Field(lambda: graphene.List(GameObject), team = graphene.Int())
    # Get all players who play a certain position (expects position name)
    get_position = graphene.Field(lambda: graphene.List(PlayerObject), position = graphene.String())
     # Resolve our queries
    def resolve_get_player(parent, info, name):
        query = PlayerObject.get_query(info)
        return query.filter(Player.name == name).first()
    def resolve_get_game(parent, info, id):
        query = GameObject.get_query(info)
        return query.filter(Game.id == id).first()
    def resolve_get_team_games(parent, info, team):
        query = GameObject.get_query(info)
        return query.filter(or_(Game.winner_id == team, Game.loser_id == team)).all()

    def resolve_get_position(parent, info, position):
        query = PlayerObject.get_query(info)
        return query.filter(Player.position == position).all()
 schema = graphene.Schema(query=Query)
So what's going on here? We're adding some more complex queries that can't just rely on the models above to display their data. For example, we're expecting GraphQL to get all games a team has played, but we haven't told it how to do that. We have to create resolvers that will work with our SQLite database and get that information to be added to the graph.
get_player
This will allow us to request any single player by name. We're passing in the PlayerObject, so we'll have access to all attributes for that player.
Now we just need to setup a function to resolve that player, meaning the actually query we do on the database to get them. We're just searching the player table until we find a player whose name is equal to the one we passed in.
get_game
This is similar to get player, except here we're getting a single game by id.
getteamgames
Here we're requesting data about all games played by a certain team. We're going to allow the client to pass in a team's id and from there they can request any information they'd like about games that team has either won or lost. When we resolve that query, we're just searching the database for any games where the team's id matches the winner_id or loser_id. Also note back in the get_team_games variable, we need to specify that we want a List of games instead of just one.
get_position
Our final query will allow the client to specify a player's position and then we'll return back all player's who match that position.
Testing Queries with GraphiQL
Now that we have our schema setup, let's see how we can actually make those queries from the client.
GraphiQL
GraphQL comes with this awesome IDE called GraphiQL that allows us to test our GraphQL queries directly in the browser. This will allow us to test our API calls in the same structure that the client will use.
Back in app.py, let's create a new endpoint for the route /graphql.
# app.py
from flask import Flask
from flask_graphql import GraphQLView
from schema import schema
 # initialise flask object
app = Flask(__name__)
 app.add_url_rule(
    "/graphql", view_func=GraphQLView.as_view("graphql", schema=schema, graphiql=True)
)
 if __name__ == '__main__':
    app.run(debug=True)
Your final app.py file should match the above. We aren't using that original home route anymore that we created for testing purposes, so you can go ahead and delete that now.
Make sure you still have your app running (python app.py) and head on over to localhost:5000/graphql. We can enter our test queries on the left and it will immediately spit out the results on the right. This is very similar to how a client would consume our GraphQL API, so if we ever wanted to extend this example to have a frontend, these are the queries we'd use.
Let's test out one of our initial queries now.
Get all players with name
{
  allPlayers {
    edges {
      node {
        name
      }
    }
  }
}
Think back to that graph of our data that we had above. To get all players, first we need to walk along all the lines in the graph (edges) that point to each player (nodes). Once we hit a node, we have access to all attributes of that node that were defined in our schema, which is this case is everything. Note that by convention, when we're making GraphQL queries we have to use camel case.
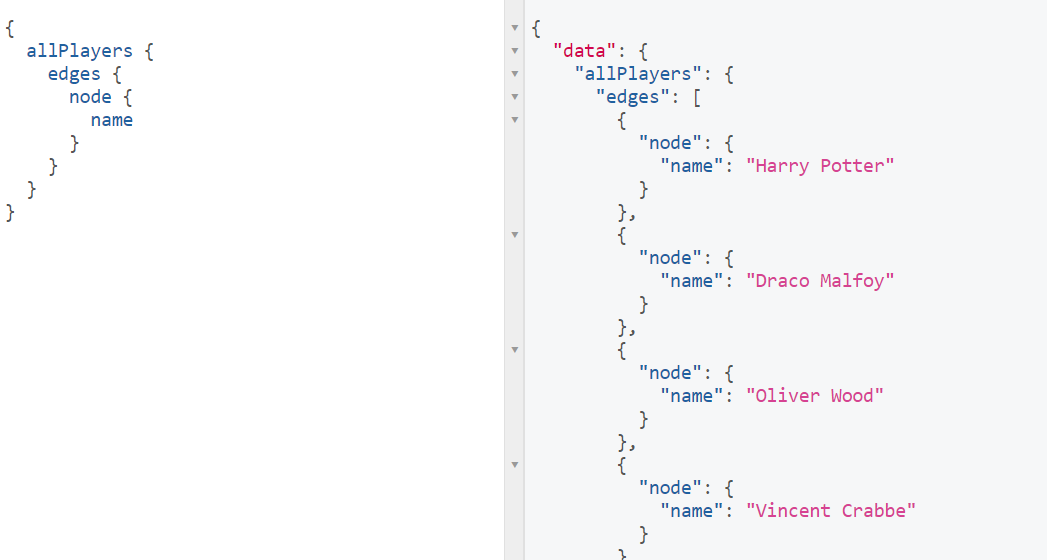
In a normal REST API, if you did a query to get a user it might return a lot of unnecessary attributes about the user. With GraphQL, we can request exactly what we want.
Let's look at another example to demonstrate this.
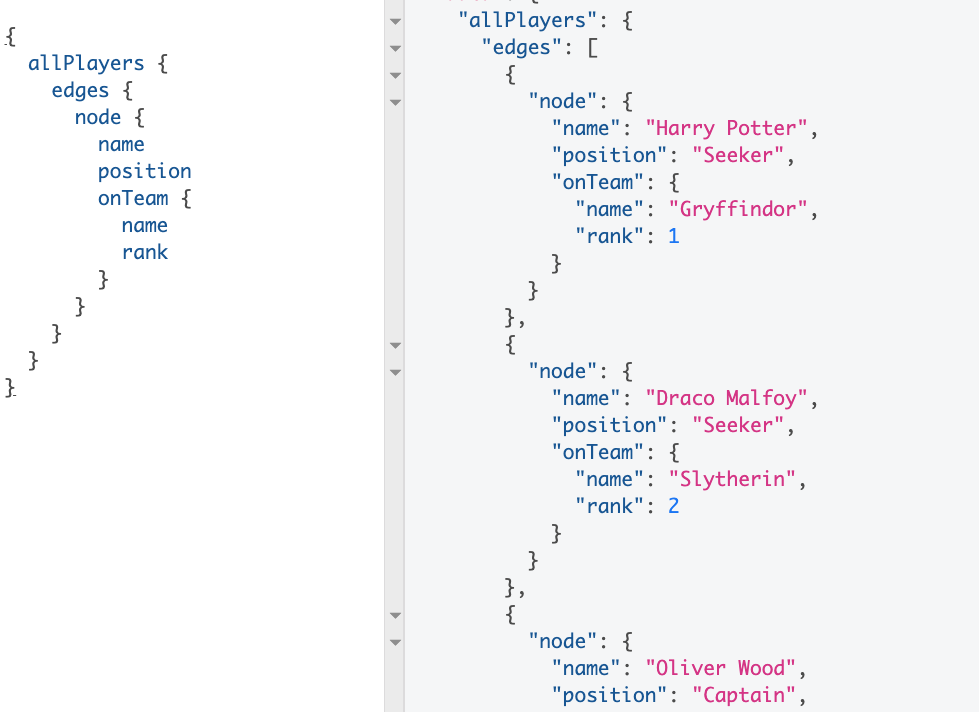
Get all players with their name, team name, and position
{
  allPlayers {
    edges {
      node {
        name
        position
        onTeam {
          name
          rank
        }
      }
    }
  }
}
This time we're going to request all players with their name, position, and team name. We're able to access onTeam because back when we setup our models, we defined a relationship between teams and players where we created that pseudo-column on the players table. This is how we can use it now! Instead of just getting back an id, we can request the name directly.
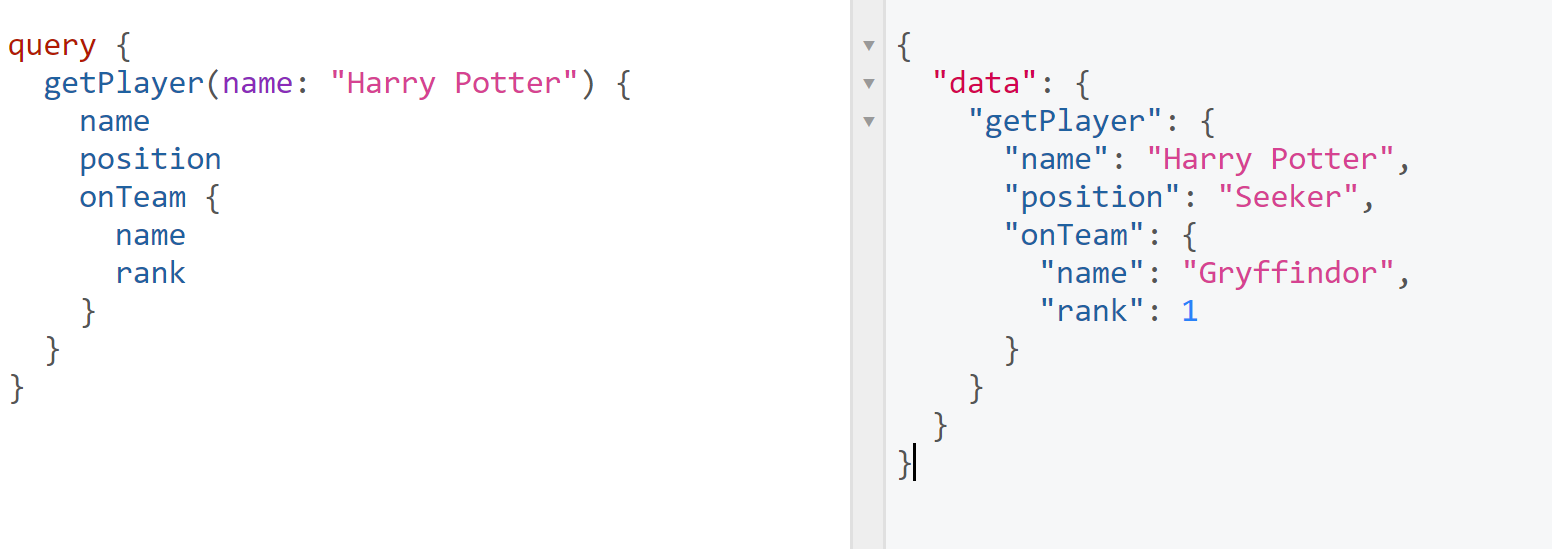
Get a single player with their position, team name, and team rank
query {
  getPlayer(name: "Harry Potter") {
    name
    position
    onTeam {
      name
      rank
    }
  }
}
GraphQL also lets you pass in arguments. This time we just want a single player by name and we also want to get their position, team name, and team rank.
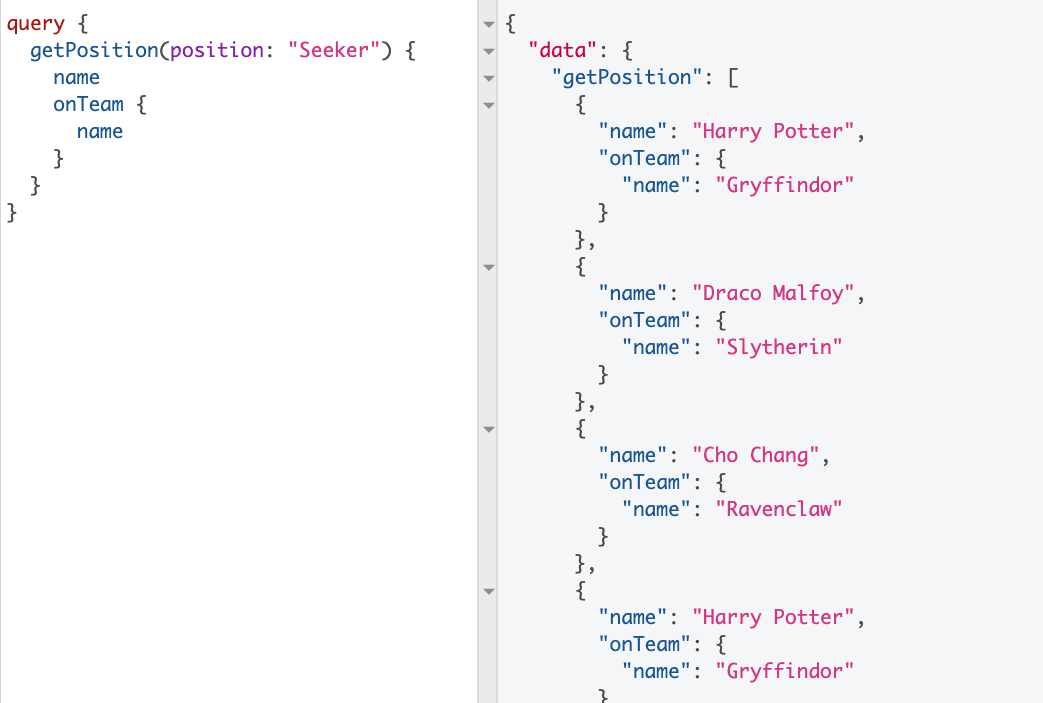
Get all players whose position is "Seeker"
query {
  getPosition(position: "Seeker") {
    name
    onTeam {
      name
    }
  }
}
For our final example, let's get all players, but we only want those who are Seekers.
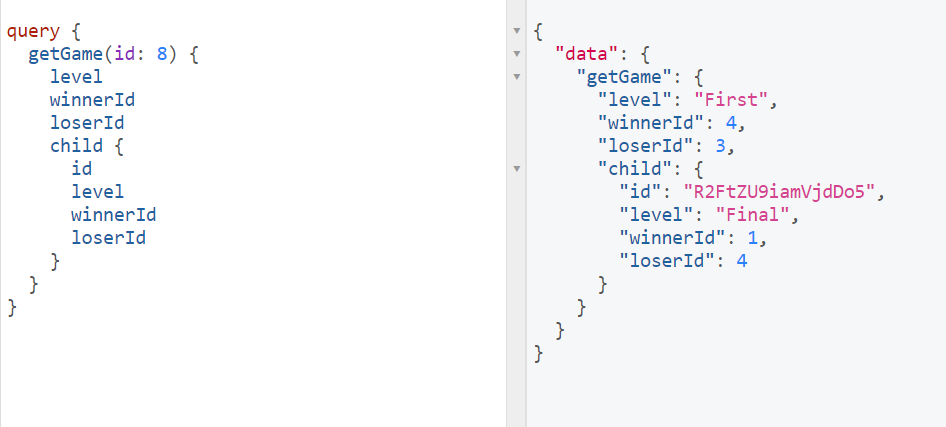
Get a game and the child game associated with it
query {
  getGame(id: 8) {
    level
    winnerId
    loserId
    child {
      id
      level
      winnerId
      loserId
    }
  }
}
This is a great use case for graph-structured data. In this scenario we basically have a sports bracket. We're asking for attributes of a specific game such as who won and who lost. We can also hop over to the next game node and see what the child (or results of this game) was and then get information about that game as well.
Creating Auth0 Authorization Rules
As mentioned at the beginning of this article, there are a few different ways we can authorize a user to have certain permissions in an application. The most widely used one is role based access control, which is where we have a user and we assign it roles. The roles then dictate the permissions that user has. This structure works fine for small simple applications, but a lot of larger applications make authorization decisions that rely heavily on either attributes of a user or the relationships a user has to data.
Now that we've created our GraphQL API, we can use that flexible data to implement two different authorization models: Attribute-based Access Control and Graph-Based Access Control.
Creating an ABAC rule
Attribute based access control means we're authorizing our user to access something based on an attribute of that user, resources, or the request at hand..
In our quidditch example, let's say our application has special forums where all players with certain attributes can chat with each other. For example, every player who is in the same year at Hogwarts will be able to access the chat for their year. It doesn't matter what team they're on, as long as they have the same value for year.
We can actually create this rule pretty easily through the Auth0 dashboard. Let's see it in action.
First, sign up for a free Auth0 account here. You'll be prompted to create a tenant domain or just accept the auto-generated one. Fill out your account information and then you'll enter into the dashboard.
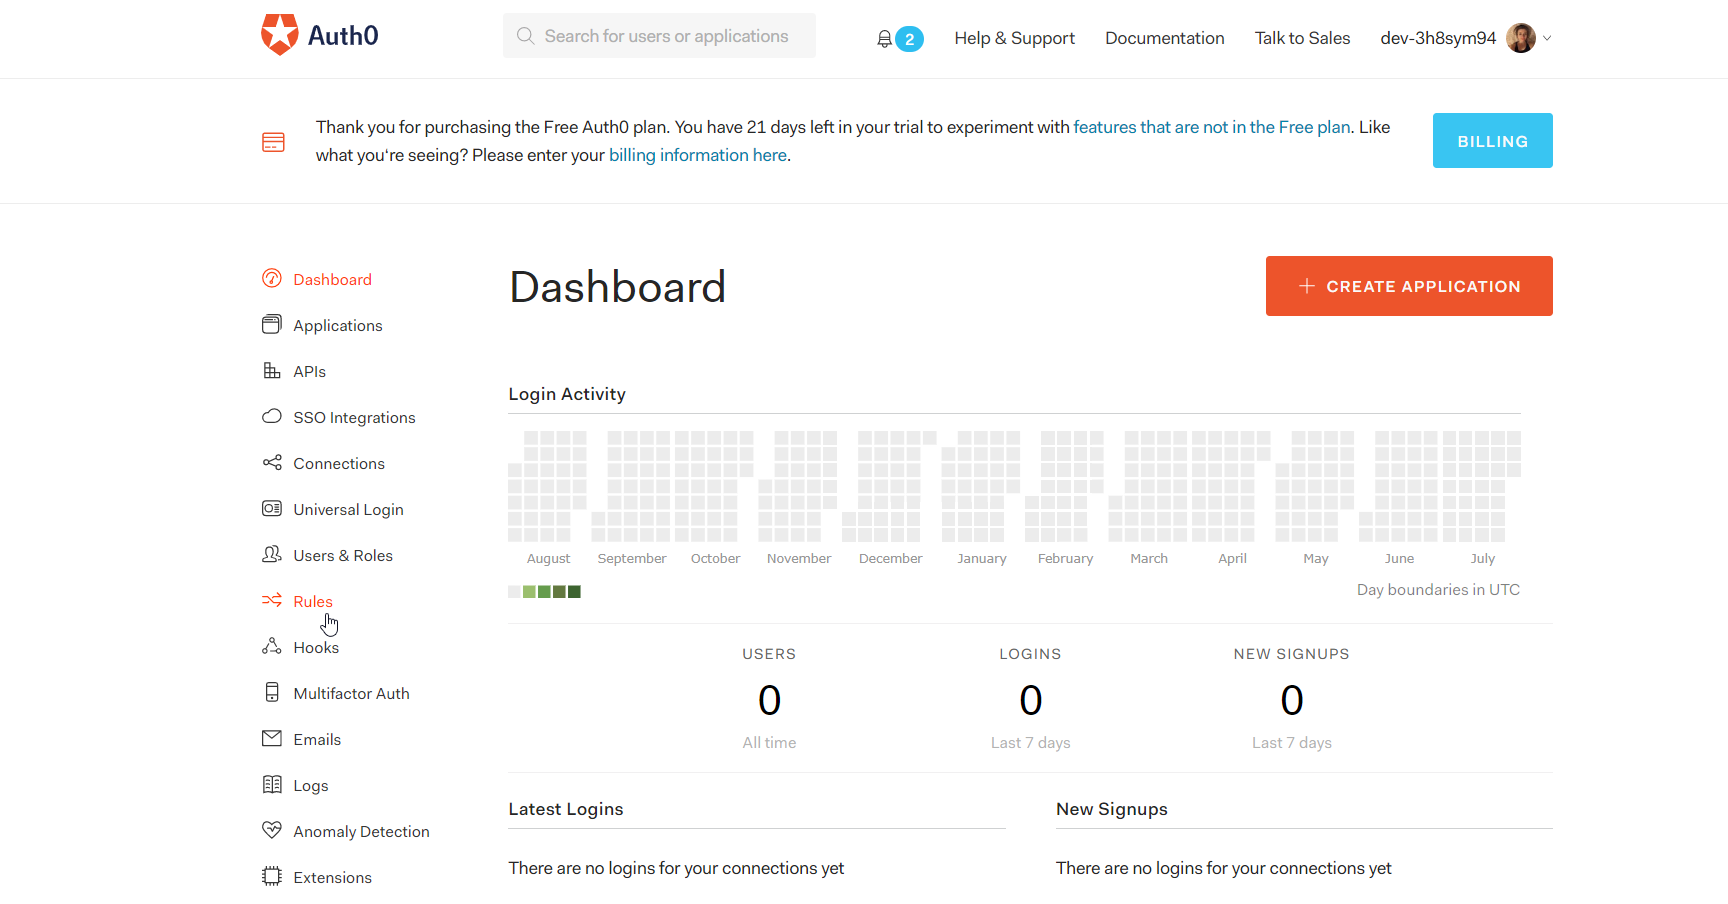
Click on "Rules" on the left-hand side.
Auth0 rules are special functions you can create that will run whenever a user logs into your application. They allow us to add information to a user's profile, ban specific users based on certain attributes, extend permissions to users, and more.
Press "Create Rule" and let's make a rule that will extend a chat permission to a user based on what year they're in at Hogwarts.
// Give the user permissions to access the chat for their year
 function (user, context, callback) {

  const axios = require('axios');
  const name = user.name;

  axios({
    url: 'https://4ee74187.ngrok.io/graphql',
    method: 'post',
    data: {
      query: `
        {
          getPlayer(name: "${name}") {
            name
            position
            year
          }
        }
        `
    }
   }).then((result) => {
      if (result.data.data.getPlayer.year) {
        let playerYear = result.data.data.getPlayer.year;
        context.accessToken.scope = context.accessToken.scope || [];
        context.accessToken.scope.push([`year_${playerYear}_chat`]);
        return callback(null, user, context);
      } else
        return callback(new UnauthorizedError('Access denied.'));
    }).catch(err => {
      return callback(err);
    });
}
First we're going to require axios so we can make the call to our GraphQL API. We have access to the user who's trying to access the chat through the user variable. Let's just grab the name from the user and pass that into our getPlayer query. Of course in the real world we wouldn't use name since that isn't unique, but this example is just for demonstration.
Next we just need to wait for this response and when it comes back, check if that user has a year set. If so, we push the permission for access to that year's chat onto their access token's scope.
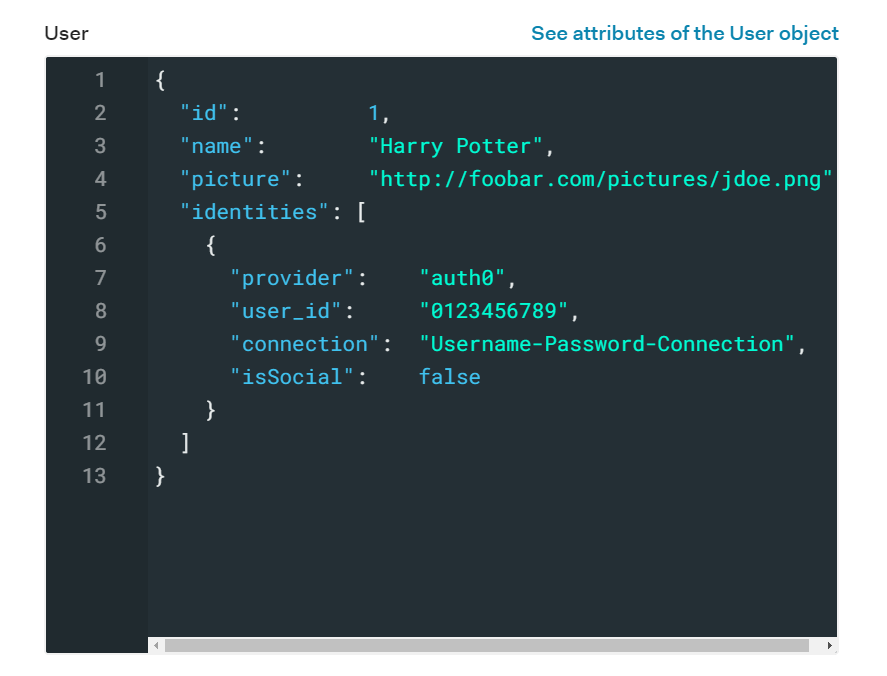
Let's test that this works. Click "Try this rule" and we can run the rule with a mock user.
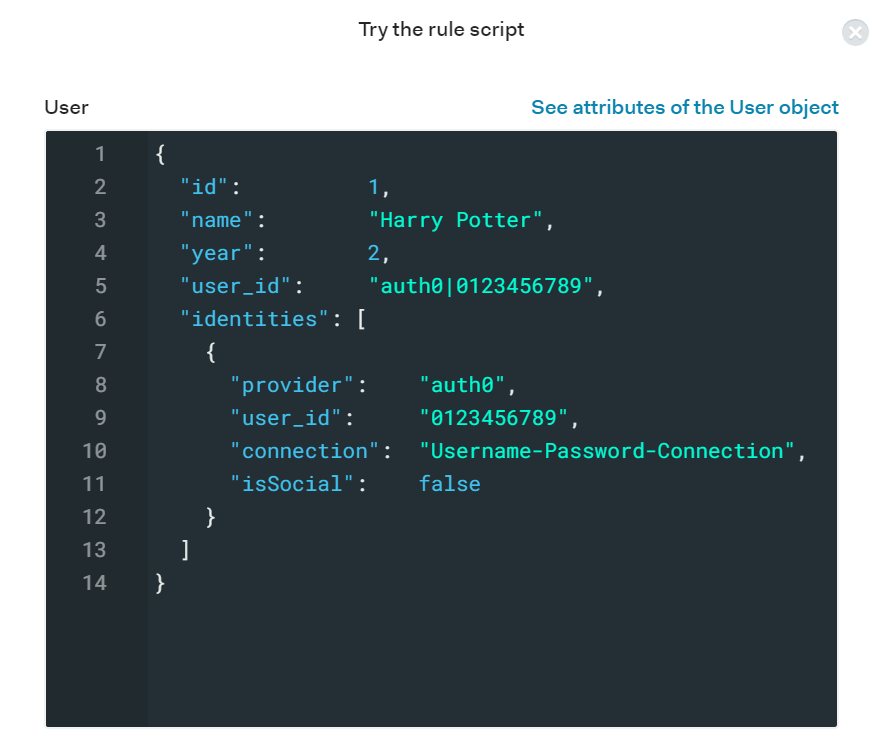
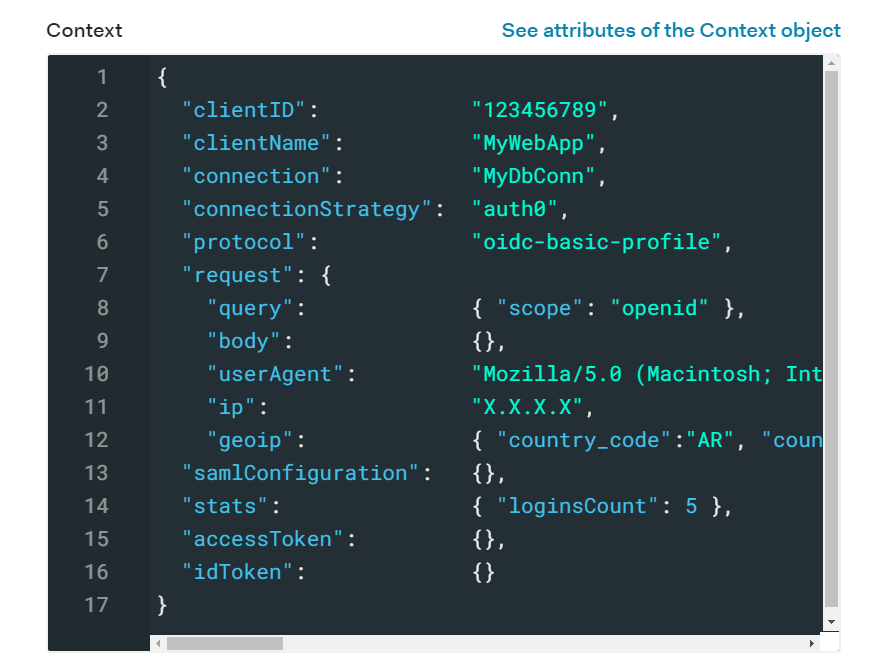
Our user during login
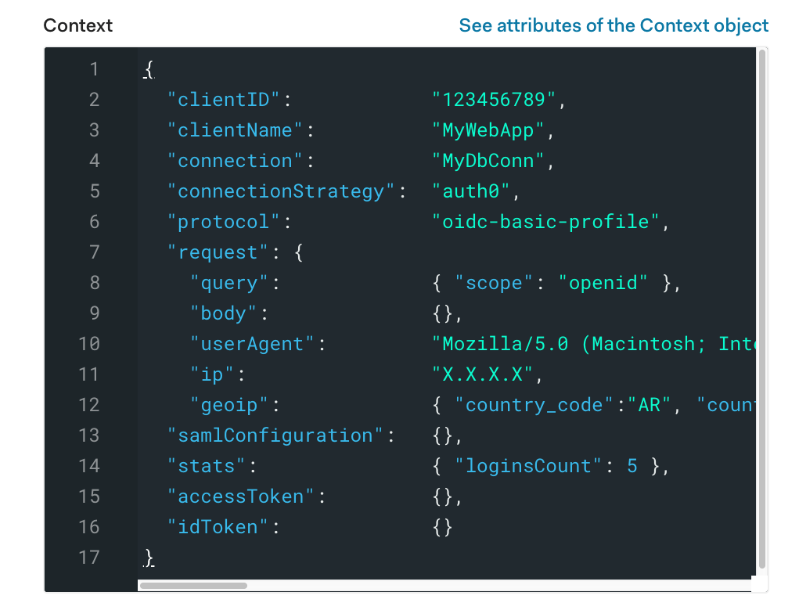
This is what the user object looks like before logging in. We have our user's basic information like id and name. Then in the next image we can see the user's context object, which holds information about the authentication transaction. Notice that the accessToken scope is currently empty. Click "Try" so we can run this rule against this user.
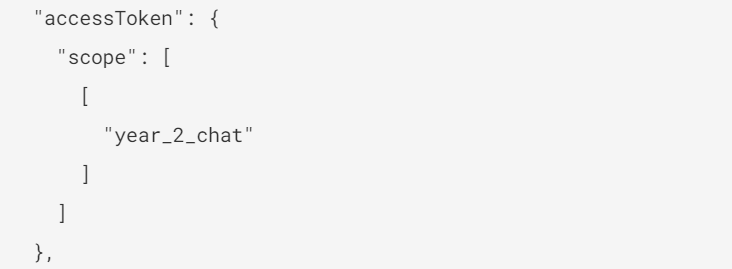
After logging in
Now our user is returned and if you look at the context object, we can see a year_2_chat permission has been added to the access token's scope.
Denying a user
This is a quick way to grant permissions dynamically. We can setup our app so that in order to access a certain year's chatroom, you must have the correct permission for that year. So if a player in her 3rd year tries to access Year 2 Chat, she will be denied.
Creating a GBAC rule
Next up, let's create our graph based rule.
For this scenario, let's imagine that we need to restrict view access of player's profiles based on what team they're on.
A player can see the profile of every other player on their team, but no one else.
We want to create a rule that jumps in after a user logs in and determines what players the user will be able to see.
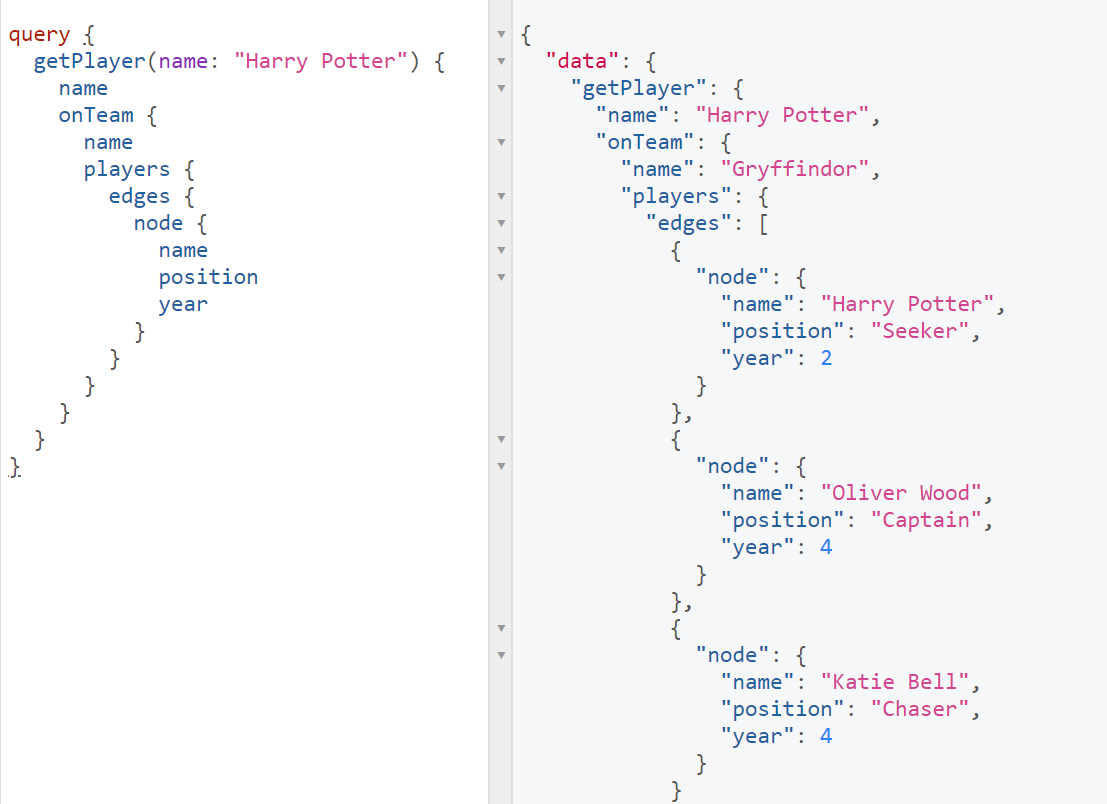
First we'll run the getPlayer query for the user that's logging in. In that query, we'll use the onTeam relationship to pull what team the user is on. From there we can use the players relationship to grab all of the players that are on that team. This is the query and the data that we're going to use to determine what the user can access:
Create a new rule with the following:
function (user, context, callback) {
  const axios = require('axios');

  if (! user.id)
    return callback(new UnauthorizedError('Access denied. Please login.'));

  axios({
    url: 'https://4ee74187.ngrok.io/graphql',
    method: 'post',
    data: {
      query: `
        {
          getPlayer(name: "${user.name}") {
            name
            onTeam {
              name
              players {
                edges {
                  node {
                    name
                    position
                    year
                  }
                }
              }
            }
          }
        }
      `
    }
   }).then((result) => {
      if (result.data.data.getPlayer.onTeam) {
        context.viewablePlayers = result.data.data.getPlayer.onTeam.players.edges;
        return callback(null, user, context);
      } else
        return callback(new UnauthorizedError('Please join a team to see players.'));
    }).catch(err => {
      return callback(err);
    });
}
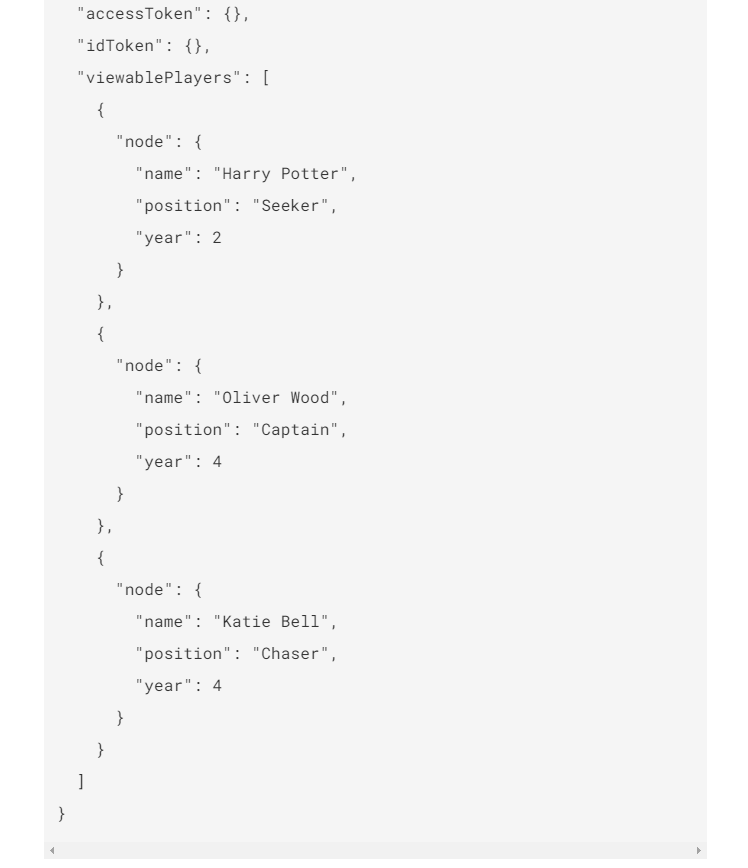
Before/during login
Harry Potter clicks the login button to get into his dashboard. The rule will run and modify the context object based on those relationships. Just for demonstration purposes to verify it's working, we'll add his list of viewable players to the context object. We could also add specific permissions based on this information as well.
After logging in
Harry Potter is in and now has access to these teammates:
Wrap Up
We've covered a lot in this post and even though it takes some work to setup, I hope you can see the value of integrating GraphQL into your application. It gives the client the power to request exactly what they want and it also can help expand the capabilities of your application's authorization flow. We can simplify this even further by using rules in Auth0's dashboard to extend permissions or assign roles based on certain attributes or relationships. Thanks for following along and be sure to leave any questions below!
About the author

Holly Guevara
Former Developer Content Manager (Auth0 Alumni)