Auth0 supports Roles and Permissions and allows you to add users' permissions to your access tokens with a convenient toggle in the dashboard. But what if you’re using a more fine-grained solution to make access control decisions, like Auth0 FGA or its open-source counterpart, OpenFGA?
Actions are our way of offering developers flexibility. There are many different use cases for Auth0 Actions, and enriching an access or ID token is one of them. In this blog post, we’ll explore how we can add some relevant user data from our Auth0 FGA decision engine to the access tokens issued by our Auth0 tenant so that we can use that data in our application logic.
Prerequisites
For this blog post, we assume you are familiar with either Auth0 FGA or OpenFGA and have an instance up and running. If you’d like to follow along, you can use the following model and tuples to set up a test store, or you could adapt the code for our Auth0 action later to reflect your use case.
If you are unfamiliar with Auth0 FGA, OpenFGA, or how to get started, read this blog post to learn more.
The OpenFGA Authorization Model
Our model will contain a “user,” an “organization,” and a “document” type. An organization can have admins who are defined users and members who are either directly defined users or any user who’s already an admin for the organization. One or more organizations can own documents, and access rights are determined by the “doccreator” and “docadmin” relations from these organizations.
model
schema 1.1

type user

type organization
relations
    define admin: [user]
    define member: [user] or admin
    define doc_creator: [user] or member
    define doc_admin: [user] or admin

type document
relations
    define owner: [organization]
    define can_create: doc_creator from owner
    define can_delete: doc_admin from owner
OpenFGA Test Tuples
These are the tuples I’ve added to our Auth0 FGA Store. The auth0|62...7f is a user identifier within Auth0 and will be part of the Access Token as the sub claim. We’ll use these user IDs in our action code to look up all organizations belonging to the current user.
[
    {
      "object":"organization:devrel",
      "relation":"admin",
      "user":"user:auth0|62...7f"
    },
    {
      "object":"organization:openfga",
      "relation":"member",
      "user":"user:auth0|62...7f"
    }
]
Let’s Write Our Auth0 Action
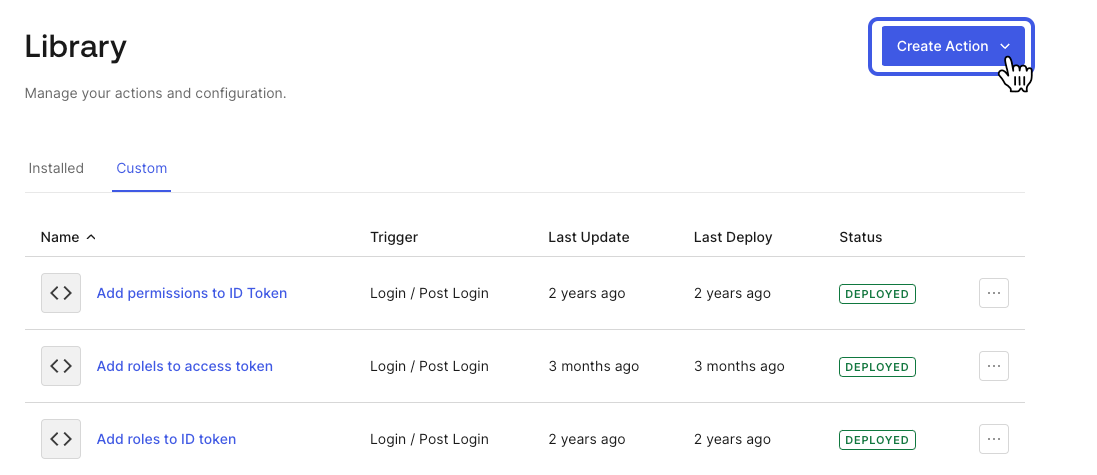
We can create our Action from the Library page under the Actions menu item. Once we’ve navigated to this page, click the “Create Action” button in the top-right corner. This will allow us to install an action from the marketplace, start from an existing template, or write one from scratch. We’ll choose “Choose a template”, as there’s a template available that can serve as a solid basis from which to start.
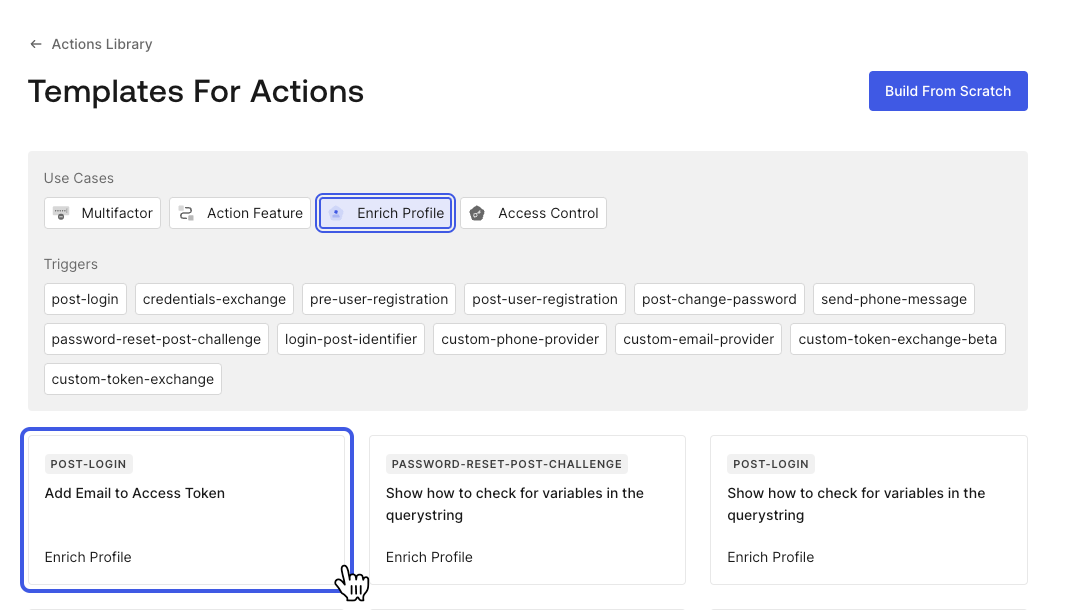
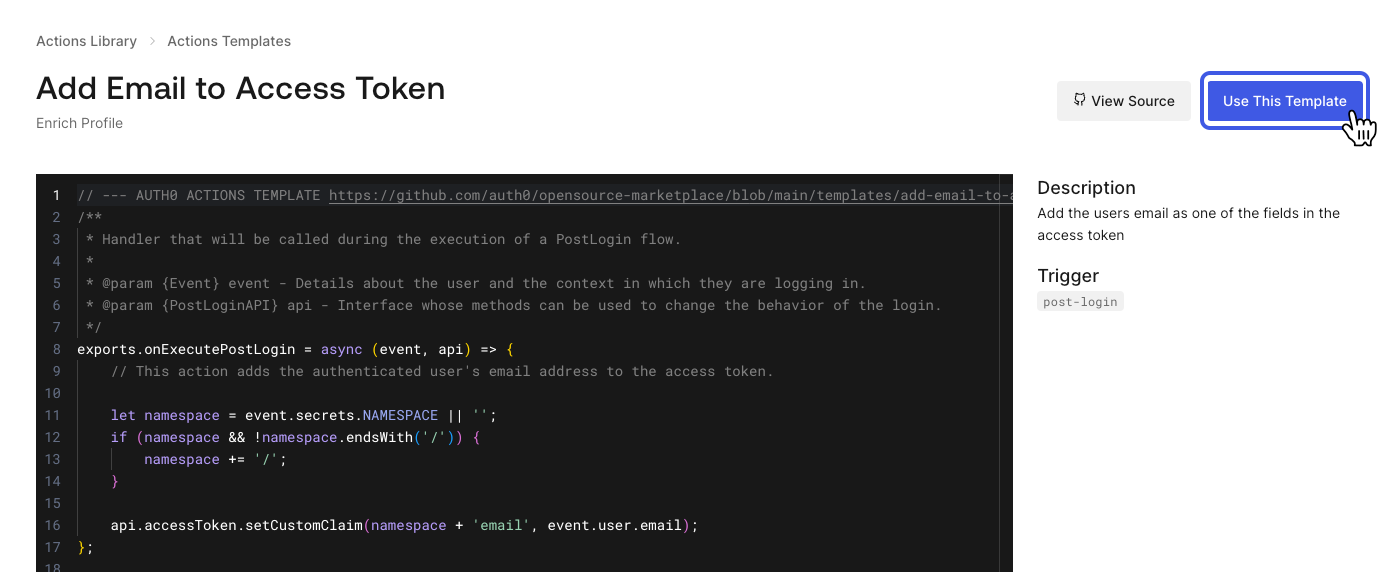
On the next page, select the “Enrich profile” use case and click on the “Add Email to Access Token” template. This template will add an email address to your access tokens, but we’ll adapt it to add organizations from Auth0 FGA instead.
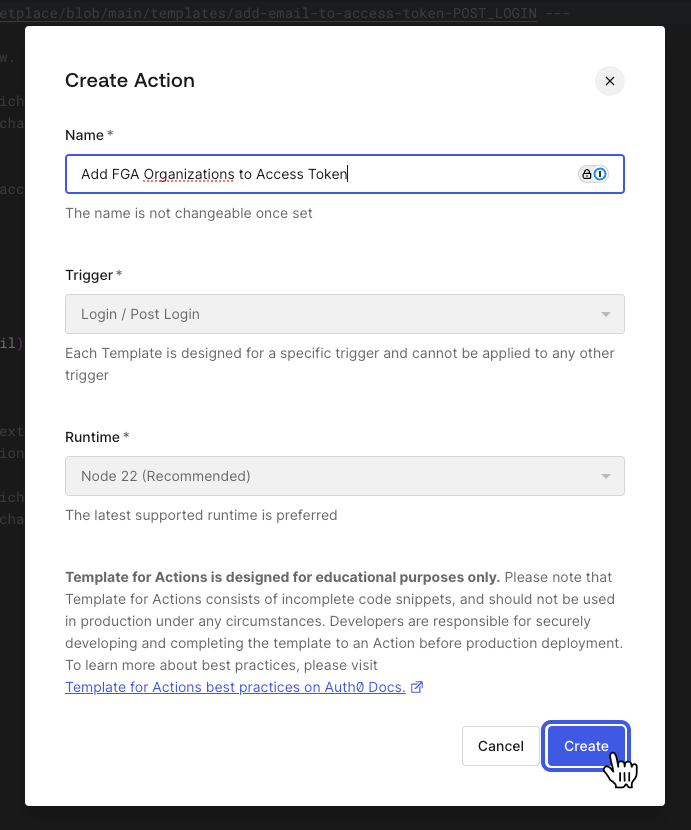
You can now preview the code from the template and click on the “Use This Template” button to install it. The following popup will ask you to give a name to the new action. We will leave the “post-login” trigger and node runtime as is and click “Create”.
Namespace our custom claim
The OpenID Connect specification recommends adding a namespace to custom claim names. The first few lines of code in our onExecutePostLogin function do just that. They check for a secret called namespace and ensure that it ends with a trailing slash.
We can add the namespace to the secrets by clicking on the Key icon in the left-side menu of the Action editor and clicking on the “Add Secret” button. Namespaces are usually a URI, so we will add https://example.com as a NAMESPACE secret. Feel free to change this to a more appropriate namespace.
Install and configure the OpenFGA SDK
The Actions editor also conveniently allows us to install packages from NPM. We can add the OpenFGA SDK by clicking on the box icon on the left side and clicking on the “Add dependency” button. The package name will be @openfga/sdk, and the version can remain “latest”. This will install the @openfga/sdk package so we can import and use it in the Action codebase.
Add the following line to the top of the Action’s codebase:
const { OpenFgaClient, CredentialsMethod } = require('@openfga/sdk');
Now that we’ve imported the OpenFGA client, let’s create a new instance and configure the credentials.
const fgaClient = new OpenFgaClient({
    apiUrl: event.secrets.FGA_API_URL,
    storeId: event.secrets.FGA_STORE_ID,
    authorizationModelId: event.secrets.FGA_MODEL_ID,  // Optional, by default it will use the latest model
    credentials: {
        method: CredentialsMethod.ClientCredentials,
        config: {
            apiTokenIssuer: event.secrets.FGA_API_TOKEN_ISSUER,
            apiAudience: event.secrets.FGA_API_AUDIENCE,
            clientId: event.secrets.FGA_CLIENT_ID,
            clientSecret: event.secrets.FGA_CLIENT_SECRET,
        }
    }
});
It is a good idea to create a new authorized client through the Auth0 FGA dashboard’s settings page for us to use in the Actions editor. Once you’ve created this new client, you can add its Client ID and secret to the Actions editor’s secrets, together with all other necessary configuration parameters.
Here’s a quick overview of what they should look like. Be sure to change the eu1 region in the API URL and Audience to us1 or au1 depending on which jurisdiction you choose when creating your store.
FGA_API_URL=https://api.eu1.fga.dev
FGA_API_AUDIENCE=https://api.eu1.fga.dev/
FGA_API_TOKEN_ISSUER=auth.fga.dev
FGA_CLIENT_ID=0U...4q
FGA_CLIENT_SECRET=pB...kf
FGA_STORE_ID=01...1M
FGA_MODEL_ID=01...9C
List all assigned organizations from Auth0 FGA
Auth0 FGA exposes a list-objects endpoint that can return a set of objects of a particular type assigned to a user, such as all organizations for which a user is a member. This will also consider all indirect relationships, such as when a user is a member because they are an admin for a specific organization.
To use this endpoint, the OpenFGA client we just created exposes a listObjects method where we can pass a user, relation, and object type. Notice that we pass along the user_id from event.user. This is the actual ID of the user who is currently trying to log in.
Add the following snippet below the OpenFGA client initialization code in our Action.
const {objects} = await fgaClient.listObjects({
    user: `user:${event.user.user_id}`,
    relation: "member",
    type: "organization",
})
Add the Assigned Organizations to the Access Token
The last thing left to do is to add the returned organization to our access token. We can re-purpose the last existing line from the template by adding the email to add our organizations instead. With some minimal changes, that code will look something like this.
api.accessToken.setCustomClaim(
  namespace + 'organizations',
  objects.map(organization => organization?.replace('organization:', ''))
);
The list-objects endpoint returns the object type together with the actual objects, so in our case, we can strip organization: from each returned organization. This will keep the organization names, which we can add to the custom claim.
Putting it All Together
If we add some error handling, we’ll end up with an action that should look like this.
const { OpenFgaClient, CredentialsMethod } = require("@openfga/sdk");

exports.onExecutePostLogin = async (event, api) => {
  let namespace = event.secrets.NAMESPACE || "";
  if (namespace && !namespace.endsWith("/")) {
    namespace += "/";
  }

  try {
    const fgaClient = new OpenFgaClient({
      apiUrl: event.secrets.FGA_API_URL,
      storeId: event.secrets.FGA_STORE_ID,
      authorizationModelId: event.secrets.FGA_MODEL_ID,
      credentials: {
        method: CredentialsMethod.ClientCredentials,
        config: {
          apiTokenIssuer: event.secrets.FGA_API_TOKEN_ISSUER,
          apiAudience: event.secrets.FGA_API_AUDIENCE,
          clientId: event.secrets.FGA_CLIENT_ID,
          clientSecret: event.secrets.FGA_CLIENT_SECRET,
        },
      },
    });

    const { objects } = await fgaClient.listObjects({
      user: `user:${event.user.user_id}`,
      relation: "member",
      type: "organization",
    });

    api.accessToken.setCustomClaim(
      namespace + "organizations",
      objects.map((organization) => organization?.replace("organization:", ""))
    );
  } catch (error) {
    api.access.deny("Could not list organizations");
  }
};
The issued access token will now have a custom https://example.com/organizations claim, and when decoded, it can look something like the following:
{
  "iss": "https://<your-tenant>.eu.auth0.com/",
  "sub": "auth0|62...7f",
  "aud": [
    "https://example.com",
    "https://<your-tenant>.auth0.com/userinfo"
  ],
  "iat": 1740579493,
  "exp": 1740665893,
  "scope": "openid profile email address phone",
  "jti": "rDk6D9GigyYTfi2WN492AB",
  "client_id": "T1...aW",
  "https://example.com/organizations": [
    "devrel",
    "openfga"
  ],
}
Wrapping Up
In this article, we’ve gone through the steps to create a new Auth0 Action. This action will run every time a user logs into our application and adds all organizations that the user is a member of to the Access Token. We can use this information in our backend systems by decoding the Access Token, which will be a JSON Web Token, and looking for our custom claim https://example.com/organizations.
The action does the following steps to accomplish this:
- Import the OpenFGA Node.js SDK.
- Make sure we have a namespace configured and that it ends with a slash.
- Create a new instance of the imported OpenFGA client.
- Use this client to list all organizations assigned to the user by using the exposed
listObjects()method. - Return the list of organizations as a custom claim prepended by our namespace in our Access Tokens.
About the author

Sam Bellen
Principal Developer Advocate