
The long-awaited Vue.js 3 is scheduled for release in the 1st quarter of 2020. The announcement of a new API, the Composition API, resulted in some controversy in the Vue community. It has since simmered down, but what is the Composition API anyway?
Although Vue 3, in its entirety, hasn't been released yet, the Composition API is already out and ready to use. In this article, we'll take a look at why the Composition API was introduced, how it works, and how it compares to the options-based API. At the end, we'll build two versions of the same component: one with the Composition API and one with the options-based API!
What is the Composition API
Just to get the obvious concern out of the way, this new API will not break current Vue 2.x options-based code! We can even continue to use the Options API in Vue 3. The Composition API is just an addition to the language that was created to address the limitations of the Options API used in Vue 2. We'll touch on those limitations in the next section.
For now, let's talk about what it is.
Evan You, the creator of Vue, has described the Composition API as a reactive API coupled with the ability to register lifecycle hooks using globally imported functions. This is a little hard to digest, but the main point is that the Composition API provides a different way to manage reactivity at all points in an application, without compromising organization and readability.
At the root of it, the Composition API isn't really adding anything new to the language. Instead, think about it this way: it's exposing some of the internal functions (aka, magic) that Vue already uses, allowing us to use these functions directly in components.
“The Vue 3 Composition API makes Vue internal functions available for use in your Vue applications.”
Tweet This
Adam Wathan has an excellent podcast called Full Stack Radio. If you're interested in learning more about the Composition API and Vue 3 in general, I'd highly recommend checking out Episode 129: Evan You — What's Coming in Vue.js 3.0, where Adam talks in-depth about the Composition API with Evan You.
“New @fullstackradio is out! I talk to @youyuxi about all of the features and changes coming in Vue.js 3.0 🎉 Super deep-dive with lots of technical discussion, brace yourself! 😄”
Tweet This
🚀 New @fullstackradio is out!
I talk to @youyuxi about all of the features and changes coming in Vue.js 3.0 🎉
Super deep-dive with lots of technical discussion, brace yourself! 😄https://t.co/zz9UIA96XEpic.twitter.com/cQlfyGQ5RG
Why the Change?
Before we jump into the comparison, let's look at some of the pain points in Vue 2 that the Composition API aims to solve.
Better extensibility and organization
One major concern among developers was that their Vue projects became hard to manage as they grew in size and complexity.
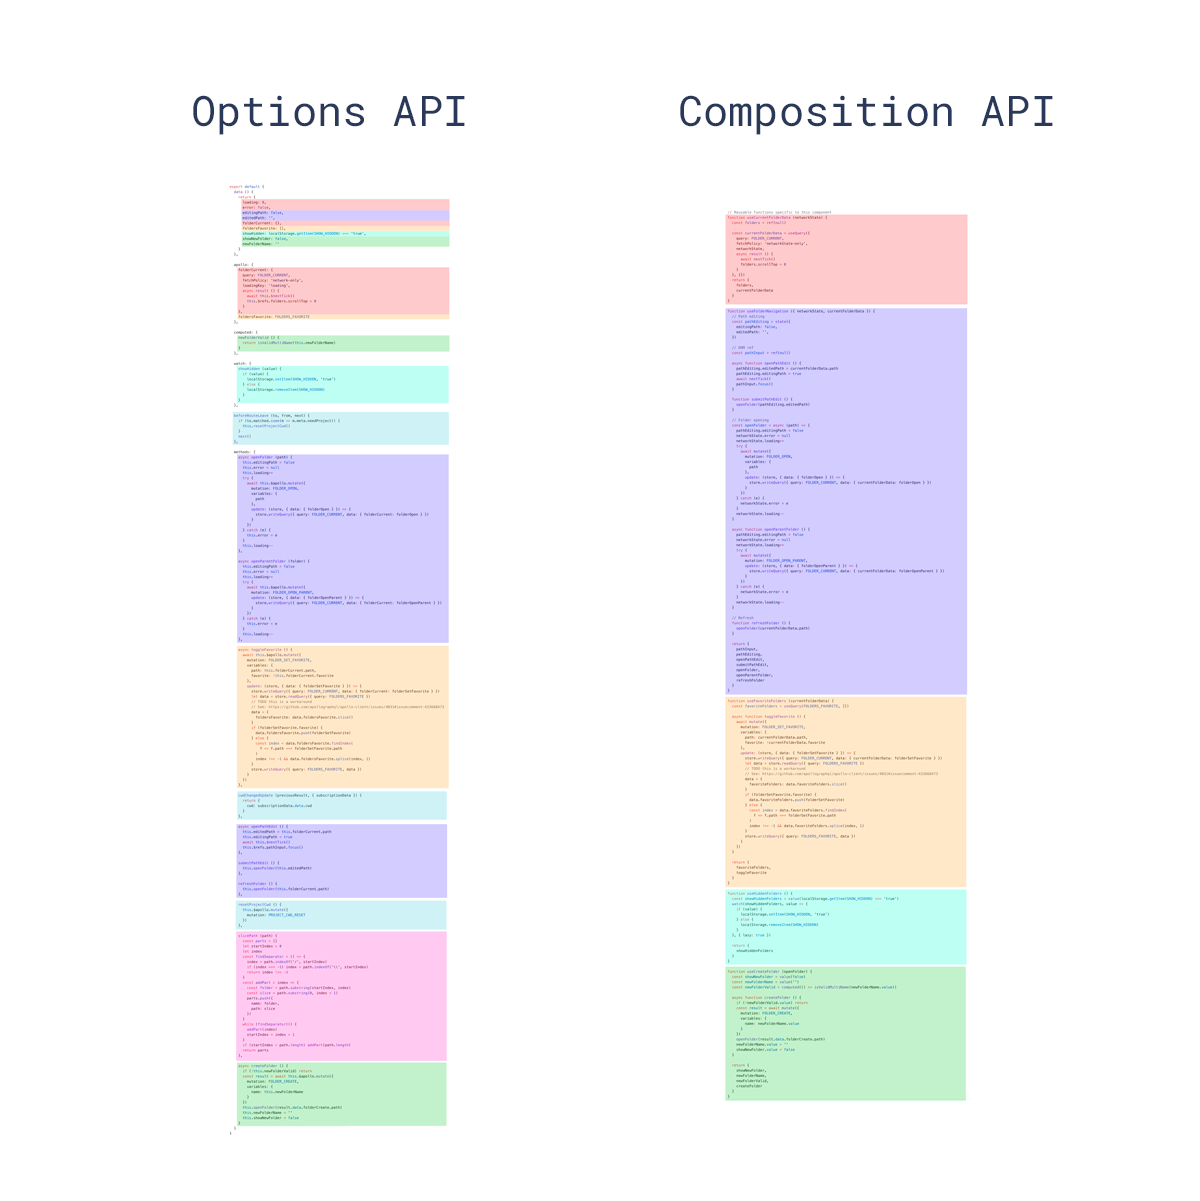
In Vue 2.x, components are organized using options such as data, mounted, methods, etc. Because of this, logic isn't really grouped by feature, which can make it hard to read through a large and complex file. Readers would often have to scroll back and forth to follow what's going on. Another downside of this organization is that it made logic reuse difficult, as features are split up unintuitively in a component.
The Composition API RFC includes this excellent diagram showing the flow of different concerns in the same component built with both the Options API and Composition API. Each color represents a different logical concern. As shown, using composition functions with the Composition API allows for better organization in components.
Better TypeScript support
The next issue with Vue 2.x was that the sometimes confusing nature of this inside components often made it difficult to use TypeScript. The Options API relies on a lot of "magic" from the Vue compiler.
The Composition API, however, uses those internal functions directly, so this behaves as expected in JavaScript. This allows for much better TypeScript support when using the Composition API.
Options API vs. Composition API
The best way to understand the changes is to see it in action.
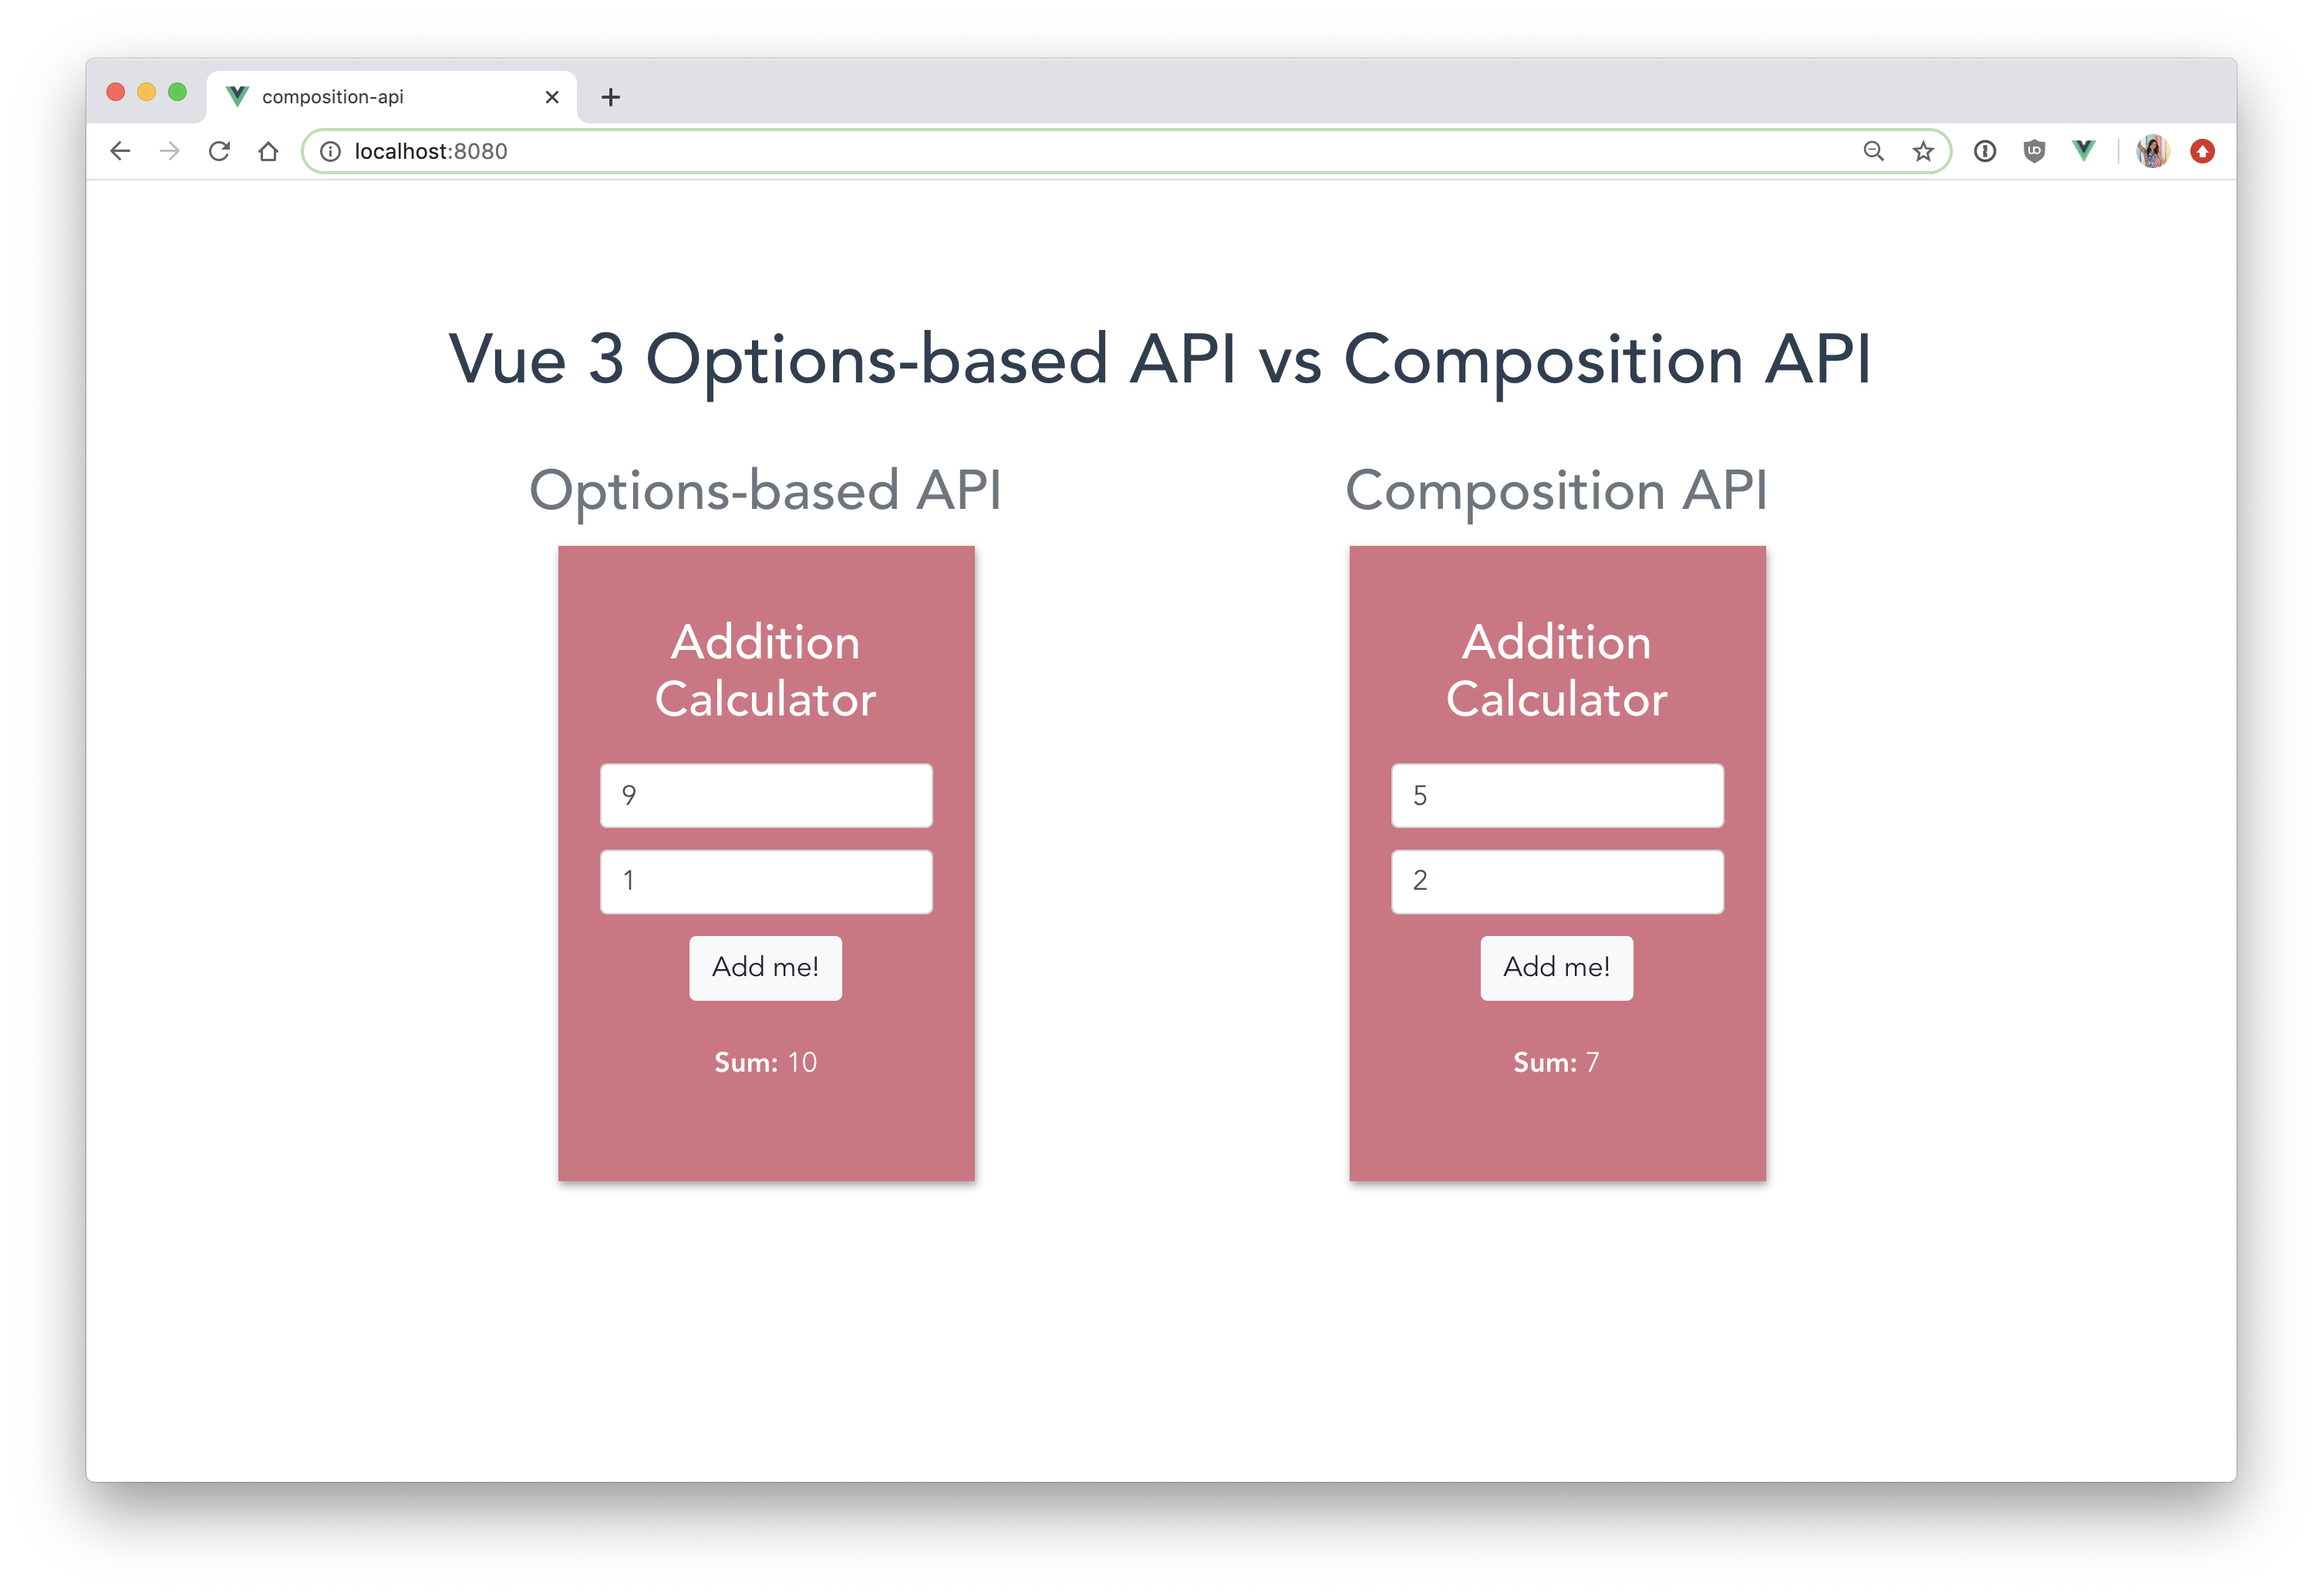
Let's build out a simple component that allows the user to add two numbers with the press of a button. First, we'll quickly review how that would be done with the options-based API. Then we'll rebuild that same component with the Composition API to illustrate the differences.
Building with Options API
Here's what we'll need to create the simple addition calculator pictured above:
- 3 variables — 1st number to add, 2nd number to add, sum
- 2 input boxes — 1st number to add, 2nd number to add
- A method to add the two numbers together
And here's how it's done in Vue 2:
<template>
    <div class="add">
        <h3>Addition Calculator</h3>
        <form id="sum">
            <input type="text" class="form-control" v-model="num1">
            <input type="text" class="form-control" v-model="num2">
            <button @click="addNumbers" type="button" class="btn btn-light">
                Add me!
            </button>
        </form>
        <p><strong>Sum:</strong> {{ sum }}</p>
    </div>
</template>
<script>
export default {
    name: 'Add',
    data() {
        return {
            num1: 0,
            num2: 0,
            sum: 0
        };
    },
    methods: {
        addNumbers: function () {
            this.sum = parseInt(this.num1) + parseInt(this.num2);
        }
    }
}
</script>
<style scoped>
    .add {
        background: #d67182;
        box-shadow: 1px 3px 6px #a3a3a3;
        padding: 50px 30px;
        width: 300px;
        text-align: center;
        margin: 80px auto;
    }
    p, h3 {
        color: #FFFFFF;
    }
    #sum {
        margin-top: 25px;
    }
    .form-control {
        margin-bottom: 15px;
    }
    .btn {
        margin-bottom: 30px;
    }
</style>
Note: We can use
computedhere instead ofaddNumbersto get the value forsumand forego the button altogether. However, we're just going to put it into a separate method to demonstrate how functions and code structure works in the Composition API.
With the Vue 2 options-based API, we have our reactive data object returned in the data() function. Then the AddNumbers() function will be registered in the methods property. To access the variables from data(), we must use this.
Now, this is nested inside the method, so it should refer to the method's object instead of the entire instance, but it doesn't. Vue is working behind the scenes here to handle this for us. In general, this is pretty straightforward and intuitive, but in more complicated cases, this behind the scenes handling can cause unexpected behavior of this.
This "magic" is also part of what has made TypeScript support tough in Vue 2. Now let's look at how this same component is built with the Vue 3 Composition API.
Building with Composition API
To keep this short, we'll just focus on building the component here. If you'd like to practice with the Composition API and rebuild this on your own, the Composition API can be added into a new Vue 2 project by running the following in your terminal:
vue create project-name
npm install @vue/composition-api
Then in the main.js file:
import Vue from 'vue';
import VueCompositionApi from '@vue/composition-api';

Vue.use(VueCompositionApi);
For more information on this, check out the official Vue Composition API repo.
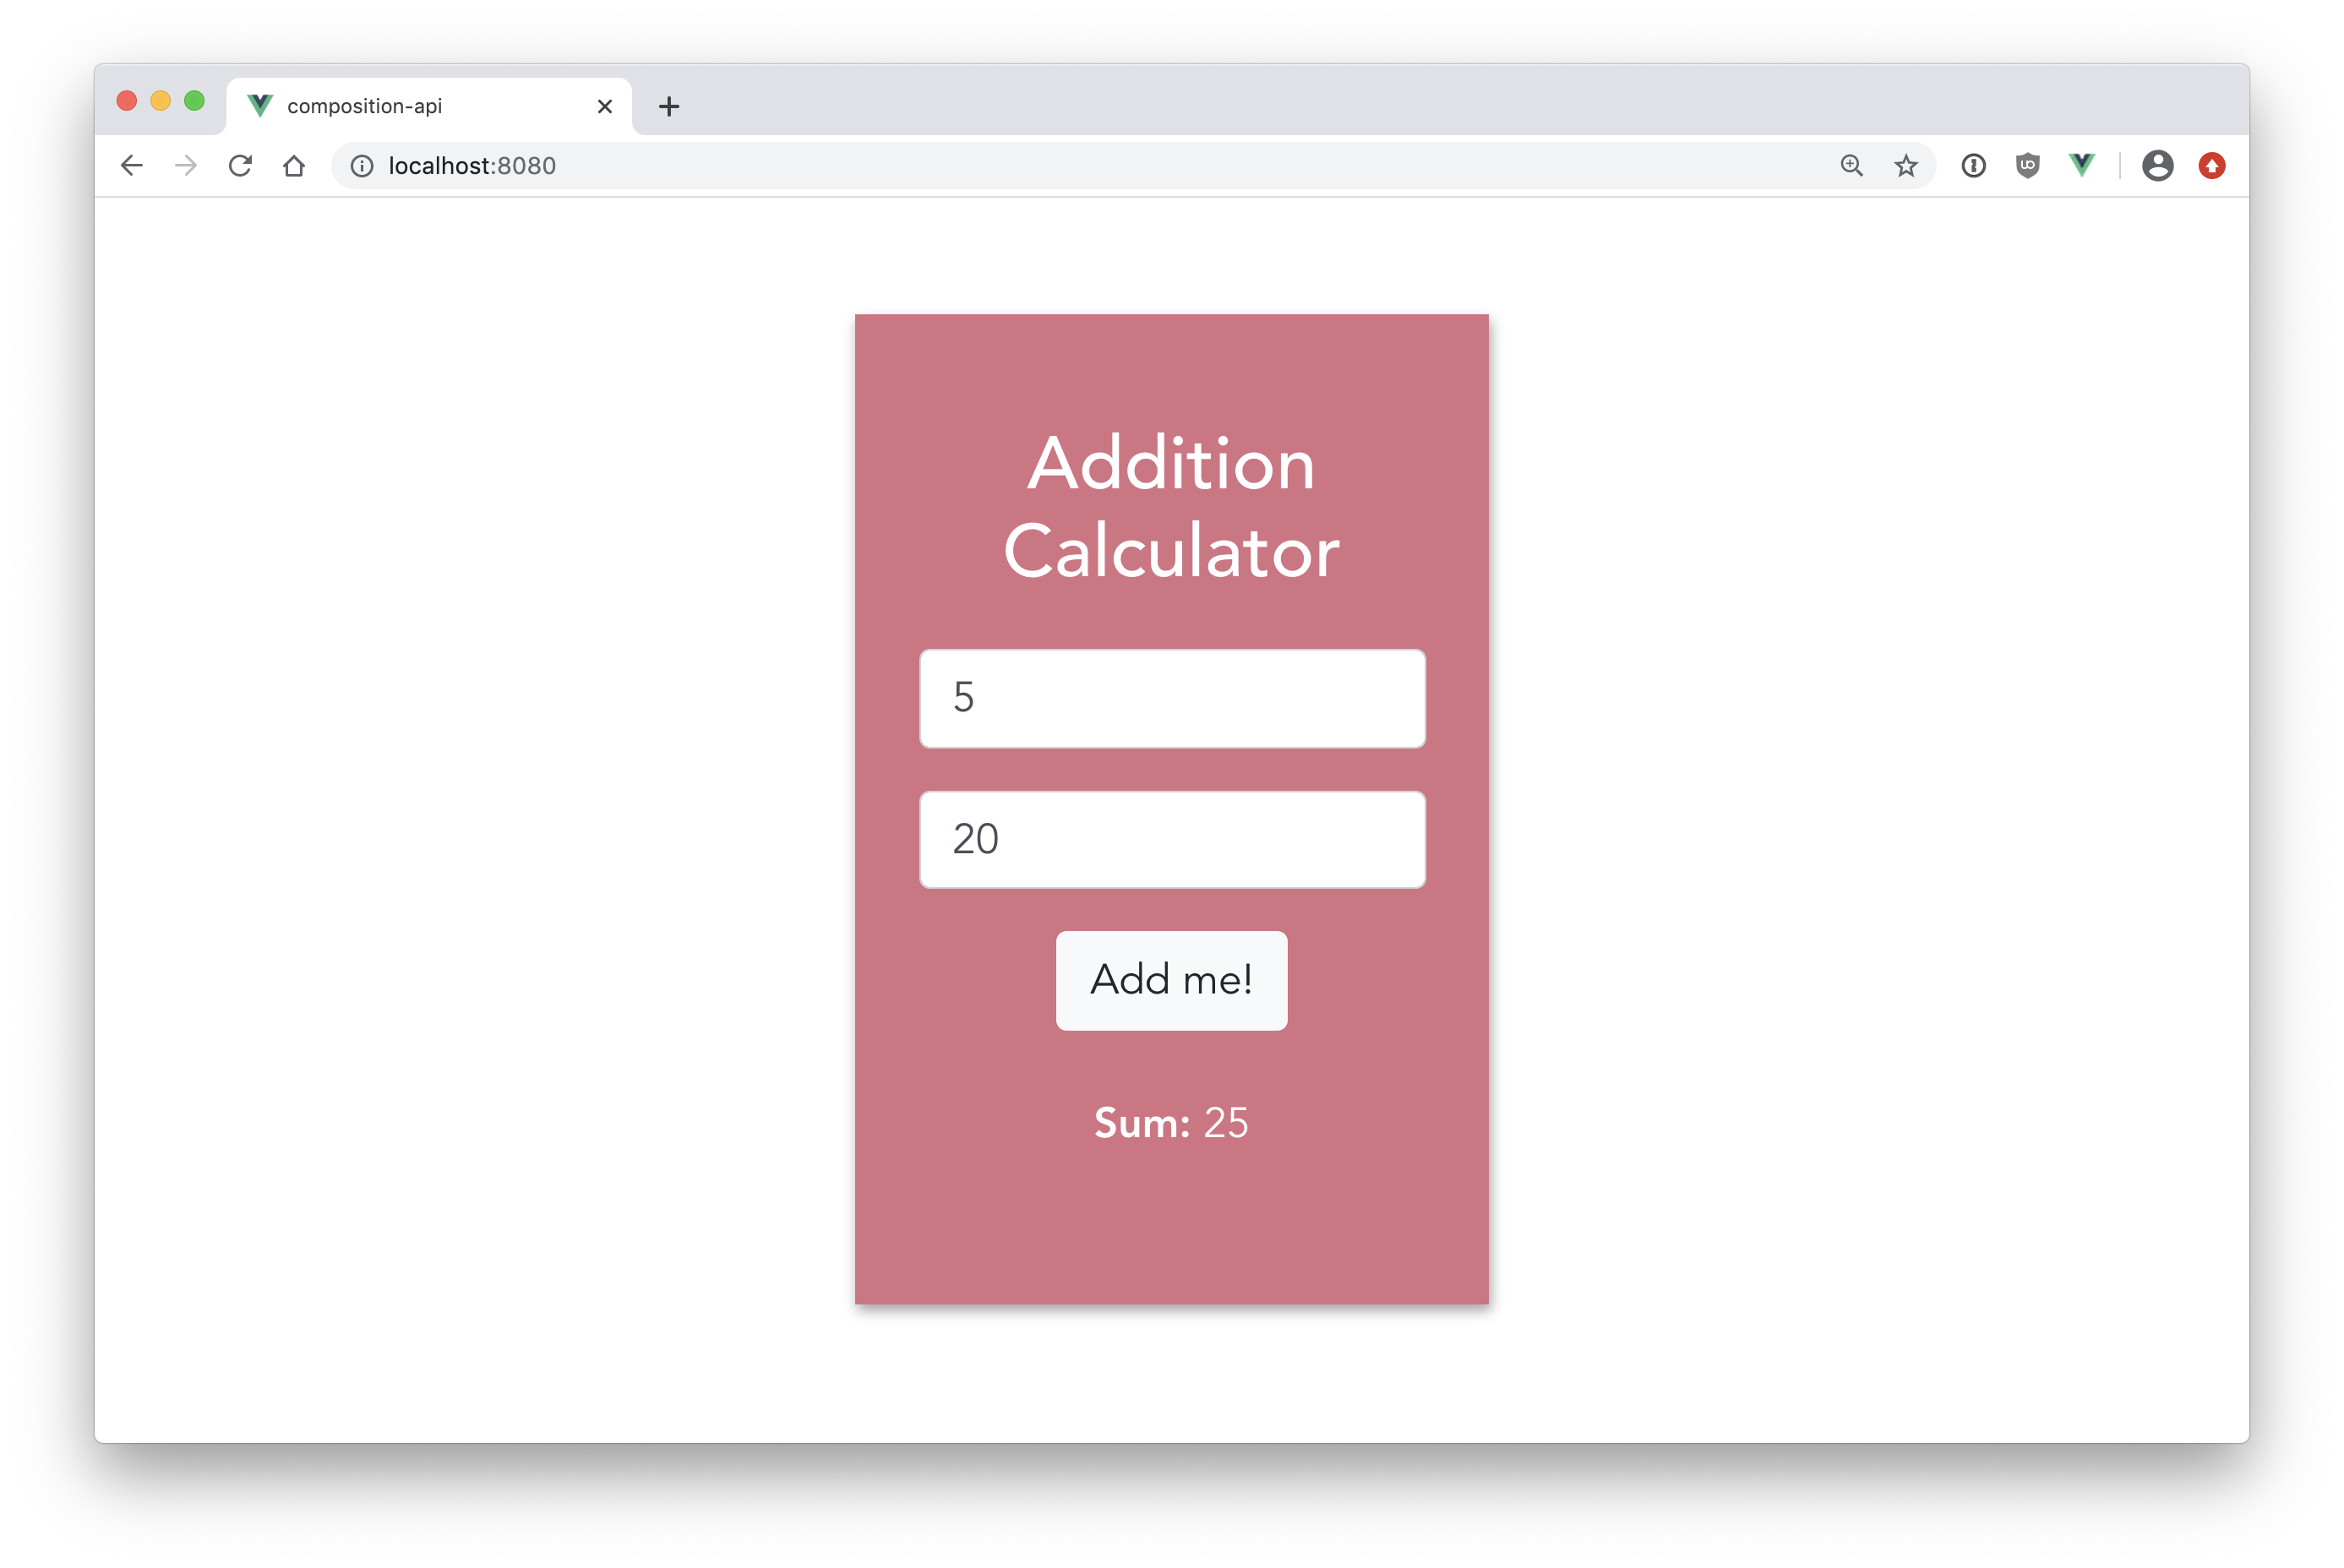
Now onto the final act 🎩! Let's rebuild the addition component using the Composition API. We're going to exclude the <style> section because nothing changes there.
<template>
    <div class="add">
        <h3>Addition Calculator</h3>
        <form id="sumComp">
            <input type="text" class="form-control" v-model="num1">
            <input type="text" class="form-control" v-model="num2">
            <button @click="addNumbers" type="button" class="btn btn-light">
            Add me!
        </button>
        </form>
        <p><strong>Sum:</strong> {{ sum }}</p>
    </div>
</template>
<script>
import { ref } from '@vue/composition-api';
export default {
    name: 'AddComposition',
    setup() {
        let num1 = ref(0);
        let num2 = ref(0);
        let sum = ref(0);
        function addNumbers() {
            sum.value = parseInt(num1.value) + parseInt(num2.value);
        }
        return {
            num1,
            num2,
            sum,
            addNumbers
        }
    }
}
</script>
First, we're importing the functions we need to use from the Composition API at the top. In this case, that's just ref.
Next, notice that everything is now inside a setup() function. Any functions or properties that need to be used in the template should go in setup() since this is how they're returned to the template.
Inside setup(), the reactive variables we're using are defined at the top as standalone variables, as opposed to a return object in the data() function.
The function addNumbers() is also hanging out on its own instead of nested in the methods property. We can now easily reuse our functions across component instances, which will significantly improve the readability of large codebases. Notice also that this is no longer needed to reference variables! Using the Composition API functions directly instead of through Vue component options removes the this magic that was occurring behind the scenes.
Finally, we're returning the functions and properties to the template.
Reactivity: ref vs reactive
One new thing here is the use of ref in the variables, e.g., let num1 = ref(0). This is how we're making our variables reactive! There are two functions that can be used to handle state and reactivity: ref and reactive.
ref()
ref, as shown in this example, takes a value and returns a reactive reference object. This object has a single value: .value that points to the value provided. Notice the use of .value on the variables in the addNumbers() method.
Refs can be created directly, as we've done here, or by using computed().
The computed() getter function will return an immutable (can't be changed) ref object thats value can be accessed with .value(). It can also accept an object with a setter function to make it mutable if necessary.
Earlier, we mentioned that it would be better to find the sum of the numbers with computed(), but we kept it in the method for demonstration's sake.
Here's how it would be done using computed():
let sum = computed(() => parseInt(num1.value) + parseInt(num2.value));
Make sure to add computed to the import at the top as well:
import { computed } from '@vue/composition-api';
Note: Because
computed()creates a ref, it can be used with primitive values as well. Normally the primitive value would get lost because primitives (essentially non-object values, such as a number) are passed by value, not reference.ref, however, will wrap the value and create an object. The value of the object can be referenced withref.value. And then, when thecomputed()value changes,ref.valuewill change as well.
reactive()
The next way to handle reactivity is by using reactive. This is equivalent to Vue.observable() from Vue 2.x. It accepts an object and returns a proxy to that object that will be tracked. In this example, we're using ref for reactivity, but we could easily use reactive instead, like so:
let state = reactive({
    num1: 0,
    num2: 0,
    sum: 0
})
If done this way, then addNumbers() would change to:
function addNumbers() {
    sum = parseInt(num1) + parseInt(num2);
}
This was a very simple example of a component built with the Composition API, but hopefully it has demonstrated how the new API can lead to better code organization and less "magic".
While waiting for Vue 3 to come out, why not experiment with adding authentication to your Vue 2 application? Follow the example below to add authentication to a Vue.js + Node.js application or check out this beginner tutorial to build an events showcase app using the Vue Options API. Remember, the Options API will still be useable in Vue 3, so there's no harm at all in starting with Vue 2 now.
Aside: Authenticate a Vue App
Using Auth0, you can protect your applications so that only authenticated users can access them. Let's explore how to authenticate a Vue application.
If you would like to have a more in-depth explanation of protecting a Vue application, you can follow this fantastic article: Beginner Vue.js Tutorial with User Login.
Setting up Auth0
To begin, you will need an Auth0 account. You can sign up for a free Auth0 account here. Once you are logged in, follow these steps to set up an Auth0 application.
- Go to your Auth0 Dashboard and click the "+ CREATE APPLICATION" button.
- Name your new app and select "Single Page Web Applications". Hit "Create".
- In the Settings for your new Auth0 application, add
http://localhost:8080to the Allowed Callback URLs, Allowed Logout URLs, Allowed Web Origins. Hit "Save Changes" at the bottom of the page.
Vue application
You will need to install the Auth0 auth0-spa-js SDK. To do so, run the following command:
npm install @auth0/auth0-spa-js
Next, within your src/ folder, create an auth folder. Within the auth folder, create a file named index.js. You should now have a path that is src/auth/index.js.
Within that newly created file, paste in the following code:
// src/auth/index.js

import Vue from 'vue';
import createAuth0Client from '@auth0/auth0-spa-js';

/** Define a default action to perform after authentication */
const DEFAULT_REDIRECT_CALLBACK = () =>
  window.history.replaceState({}, document.title, window.location.pathname);

let instance;

/** Returns the current instance of the SDK */
export const getInstance = () => instance;

/** Creates an instance of the Auth0 SDK. If one has already been created, it returns that instance */
export const useAuth0 = ({
  onRedirectCallback = DEFAULT_REDIRECT_CALLBACK,
  redirectUri = window.location.origin,
  ...options
}) => {
  if (instance) return instance;

  // The 'instance' is simply a Vue object
  instance = new Vue({
    data() {
      return {
        loading: true,
        isAuthenticated: false,
        user: {},
        auth0Client: null,
        popupOpen: false,
        error: null,
      };
    },
    methods: {
      /** Authenticates the user using a popup window */
      async loginWithPopup(o) {
        this.popupOpen = true;

        try {
          await this.auth0Client.loginWithPopup(o);
        } catch (e) {
          // eslint-disable-next-line
          console.error(e);
        } finally {
          this.popupOpen = false;
        }

        this.user = await this.auth0Client.getUser();
        this.isAuthenticated = true;
      },
      /** Handles the callback when logging in using a redirect */
      async handleRedirectCallback() {
        this.loading = true;
        try {
          await this.auth0Client.handleRedirectCallback();
          this.user = await this.auth0Client.getUser();
          this.isAuthenticated = true;
        } catch (e) {
          this.error = e;
        } finally {
          this.loading = false;
        }
      },
      /** Authenticates the user using the redirect method */
      loginWithRedirect(o) {
        return this.auth0Client.loginWithRedirect(o);
      },
      /** Returns all the claims present in the ID token */
      getIdTokenClaims(o) {
        return this.auth0Client.getIdTokenClaims(o);
      },
      /** Returns the access token. If the token is invalid or missing, a new one is retrieved */
      getTokenSilently(o) {
        return this.auth0Client.getTokenSilently(o);
      },
      /** Gets the access token using a popup window */

      getTokenWithPopup(o) {
        return this.auth0Client.getTokenWithPopup(o);
      },
      /** Logs the user out and removes their session on the authorization server */
      logout(o) {
        return this.auth0Client.logout(o);
      },
    },
    /** Use this lifecycle method to instantiate the SDK client */
    async created() {
      // Create a new instance of the SDK client using members of the given options object
      this.auth0Client = await createAuth0Client({
        domain: options.domain,
        client_id: options.clientId,
        audience: options.audience,
        redirect_uri: redirectUri,
      });

      try {
        // If the user is returning to the app after authentication...
        if (
          window.location.search.includes('code=') &&
          window.location.search.includes('state=')
        ) {
          // handle the redirect and retrieve tokens
          const { appState } = await this.auth0Client.handleRedirectCallback();

          // Notify subscribers that the redirect callback has happened, passing the appState
          // (useful for retrieving any pre-authentication state)
          onRedirectCallback(appState);
        }
      } catch (e) {
        this.error = e;
      } finally {
        // Initialize our internal authentication state
        this.isAuthenticated = await this.auth0Client.isAuthenticated();
        this.user = await this.auth0Client.getUser();
        this.loading = false;
      }
    },
  });

  return instance;
};

// Create a simple Vue plugin to expose the wrapper object throughout the application
export const Auth0Plugin = {
  install(Vue, options) {
    Vue.prototype.$auth = useAuth0(options);
  },
};
The comments in this file go over what each section does. To find more details about this file, please visit this blog post section.
Connecting Auth0 and the Vue application
To connect your Auth0 app and your Vue app, you will need to bring over some data from your Auth0 app that you set up earlier. You will want those values protected. To do so, create a file named auth_config.json in the root of your Vue application. Then in the .gitignore, you will want to put that newly created file in there.
In that file, put the following values:
// auth_config.json

{
  "domain": "your-domain.auth0.com",
  "clientId": "yourclientid"
}
Back in your Auth0 dashboard, click on the Settings tab of your Auth0 application. You will find the values "Domain" and "Client ID". Copy and paste those values into this file.
Using authentication globally in Vue
To use this authentication globally within the Vue app, you need to update the src/main.js file. Delete everything in the file and replace with the following code:
// src/main.js

import Vue from 'vue';
import App from './App.vue';
import router from './router';

// Import the Auth0 configuration
import { domain, clientId } from '../auth_config.json';

// Import the plugin here
import { Auth0Plugin } from './auth';

// Install the authentication plugin here
Vue.use(Auth0Plugin, {
  domain,
  clientId,
  onRedirectCallback: (appState) => {
    router.push(
      appState && appState.targetUrl
        ? appState.targetUrl
        : window.location.pathname,
    );
  },
});

Vue.config.productionTip = false;

new Vue({
  router,
  render: (h) => h(App),
}).$mount('#app');
Log in and log out buttons
In order to use all this, you will want to add "Log In" and "Log Out" buttons. To do that, wherever you would like your buttons to be in your application, add this code within the <template> section of that file:
<div v-if="!$auth.loading">
  <!-- show login when not authenticated -->
  <a v-if="!$auth.isAuthenticated" @click="login">Log in</a>
  <!-- show logout when authenticated -->
  <a v-if="$auth.isAuthenticated" @click="logout">Log out</a>
</div>
In that same file within the <script> tag, add in these methods:
<script>
  export default {
    name: 'App',
    methods: {
      // Log the user in
      login() {
        this.$auth.loginWithRedirect();
      },
      // Log the user out
      logout() {
        this.$auth.logout({
          returnTo: window.location.origin,
        });
      },
    },
  };
</script>
You now have the necessary code to authenticate your Vue.js application!
More resources
Summary
We've now gone over what the Composition API is, why it was necessary, and how you can build a component using it. The Composition API is already published and ready to use, so make sure you go check it out on GitHub! Let me know below if you'll be trying out the Composition API or sticking to the options-based API. Thanks for reading!
About the author

Holly Guevara
Former Developer Content Manager (Auth0 Alumni)