
In this article we will go through four popular social login providers and learn how to implement them on Android. Read on!
TL;DR: Grab the full code for our examples.
What are Social Logins?
Have you ever wanted to get rid of that cumbersome step of telling your users to create a user profile? Have you ever as a user closed a window or an app due to the tediousness of the sign-up step? Then social login is for you. Social login allows third-party applications to authenticate using the credentials from popular social networks. In other words, rather than forcing users to create a new profile, remember a new password and fill-in all the required details, you can just point them to the login screen of your selected provider and, after a successful authentication step, get all the needed details from that provider. Easier for users AND easier for developers, a combination rarely seen in software development.
Social network providers often can provide additional information about users, such as location, interests, and birthday. Using social logins you can take advantage of this data, to target personalized, relevant content to users.
Almost every major social network provides an API to allow application developers to authenticate users using their systems. In this article we will focus on the four major social login providers: Google, Facebook, Twitter and Instagram.
Single-sign-on, OAuth2 and social logins
Related to social login is the concept of single-sign-on. Single-sign-on allows users visiting different domains to remain logged-in using the same credentials. One can easily picture how social logins can help in doing this: by authenticating using a third-party service, different domains can share user information.
Many social login providers opt to provide a standardized way to authorize access to their login services through the OAuth2 standard. OAuth2 specifies a series of operations that clients can perform against an authorization server. It is the authorization server's job to issue tokens (pieces of information) that can later be used by these clients to access protected resources. In the case of social logins, protected resources are user profiles and other data associated with them. Although the use of OAuth2 for certain tasks has been criticized by various parties, it remains the most common standard for social logins.
In the case of our four providers, all of them provide OAuth-based APIs. Twitter in particular relies on OAuth 1.0a, while other providers use OAuth 2.0. For the purposes of this post however, we will prefer the official native Android libraries of each provider (except for Instagram, for which there is no official Android lib).
Requirements and Setup
For our examples we will use the latest version of Android Studio, the official Android IDE. Go to the site, and follow the install instructions for your platform.
All our examples should work on recent versions of Android. We picked Android 5.0 as base, but older versions should work as well.
Create our sample application
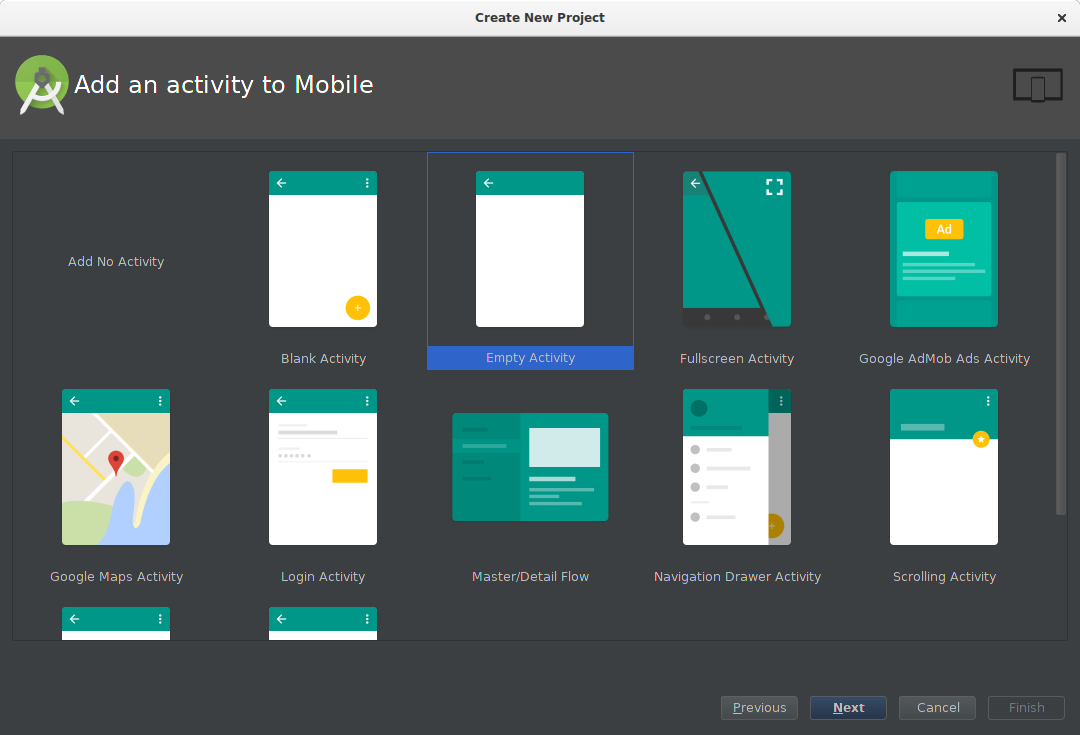
In Android Studio, go to File -> New Project and follow the wizard. When asked about the main screen, select an Empty Activity. Call this activity LoginActivity.
Setup the emulator
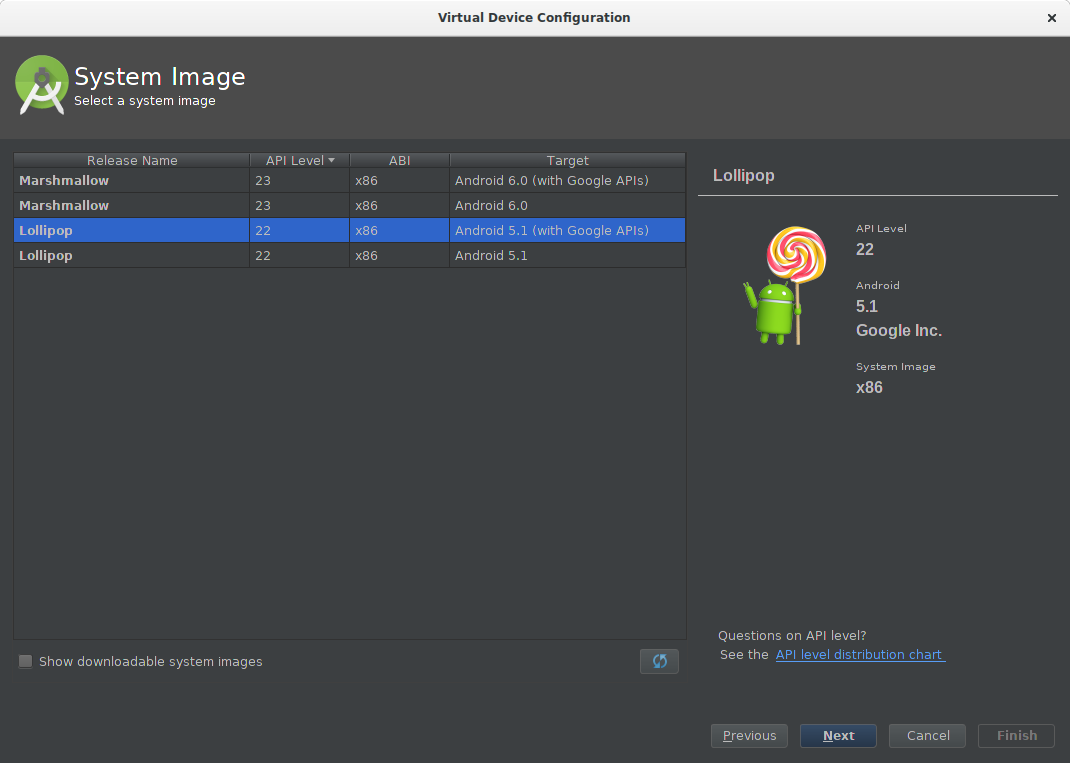
After the wizard is done, it should be possible to run the example using the emulator. If you haven't done so, setup an emulator supporting Google Services (this is required). Go to Tools -> Android -> AVD Manager -> Create Virtual Device. Create a device supporting Google Play. Pick a device that can be accelerated by your platform (x86) and enable GPU acceleration (Use Host GPU). This will ensure the best possible experience for our tests.
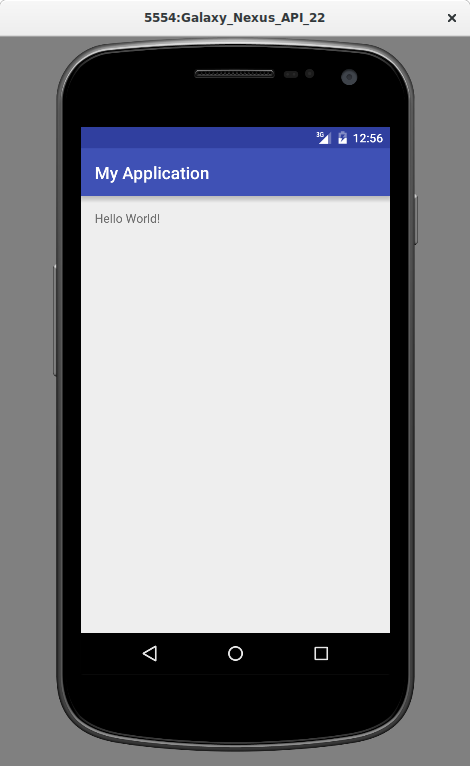
It is now time to run the sample app using the emulator. If everything goes well you should see something like this:
Step-by-step Android Authentication
Now we are all set to start integrating our social logins into our app. Let's dive in:
Facebook provides a native Android SDK to use its services, let's see how to get it integrated:
1. Setup the Repository and Dependencies
On Android Studio's sidebar look for the build.gradle file associated to the project and add the following line:
buildscript {
    repositories {
        // (...)
        mavenCentral() // <-- add this line
        // (...)
    }
    // (...)
}
Then go to the build.grade file for your app module and add the following dependency:
dependencies {
    // (...)
    compile 'com.facebook.android:facebook-android-sdk:4.6.0'
    // (...)
}
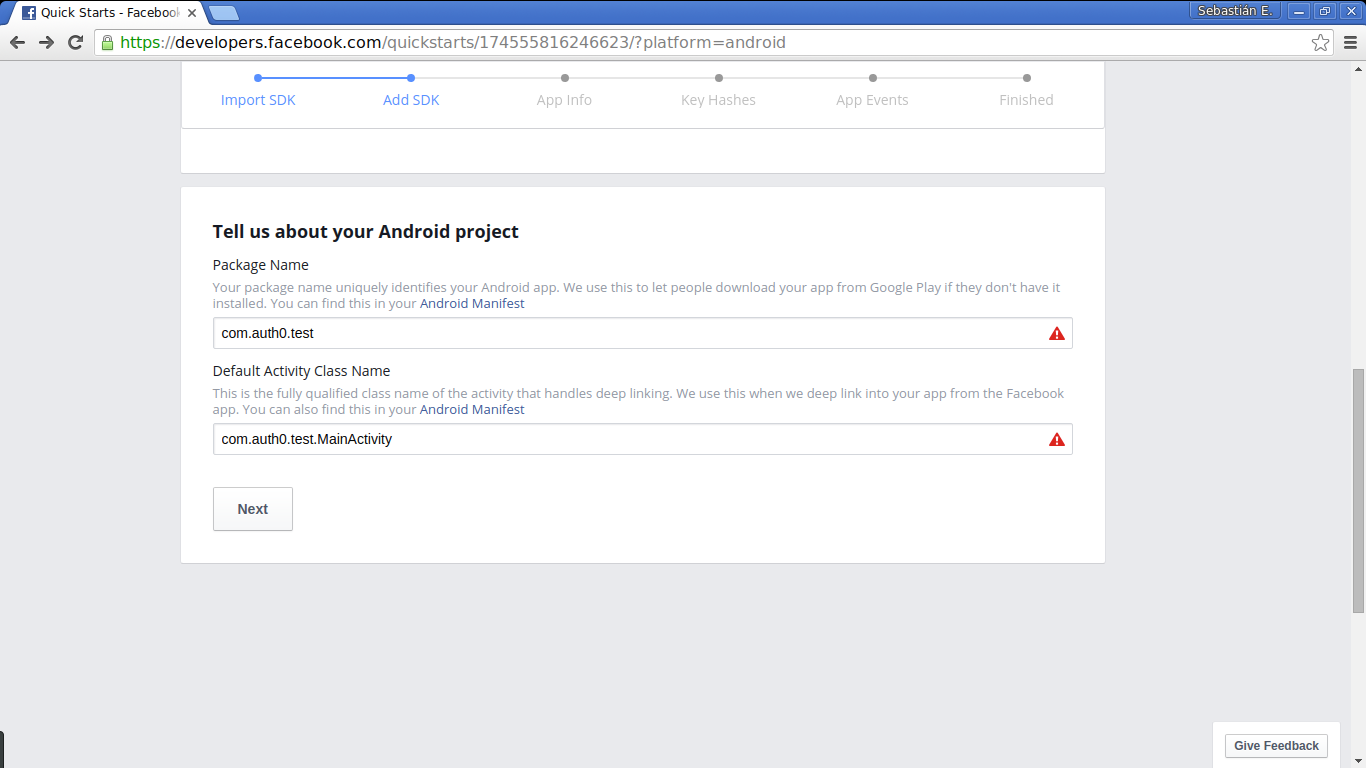
2. Tell Facebook About Your App
Facebook's backend needs to know about your application. Go to https://developers.facebook.com/apps and click Add a New App, then follow the wizard:
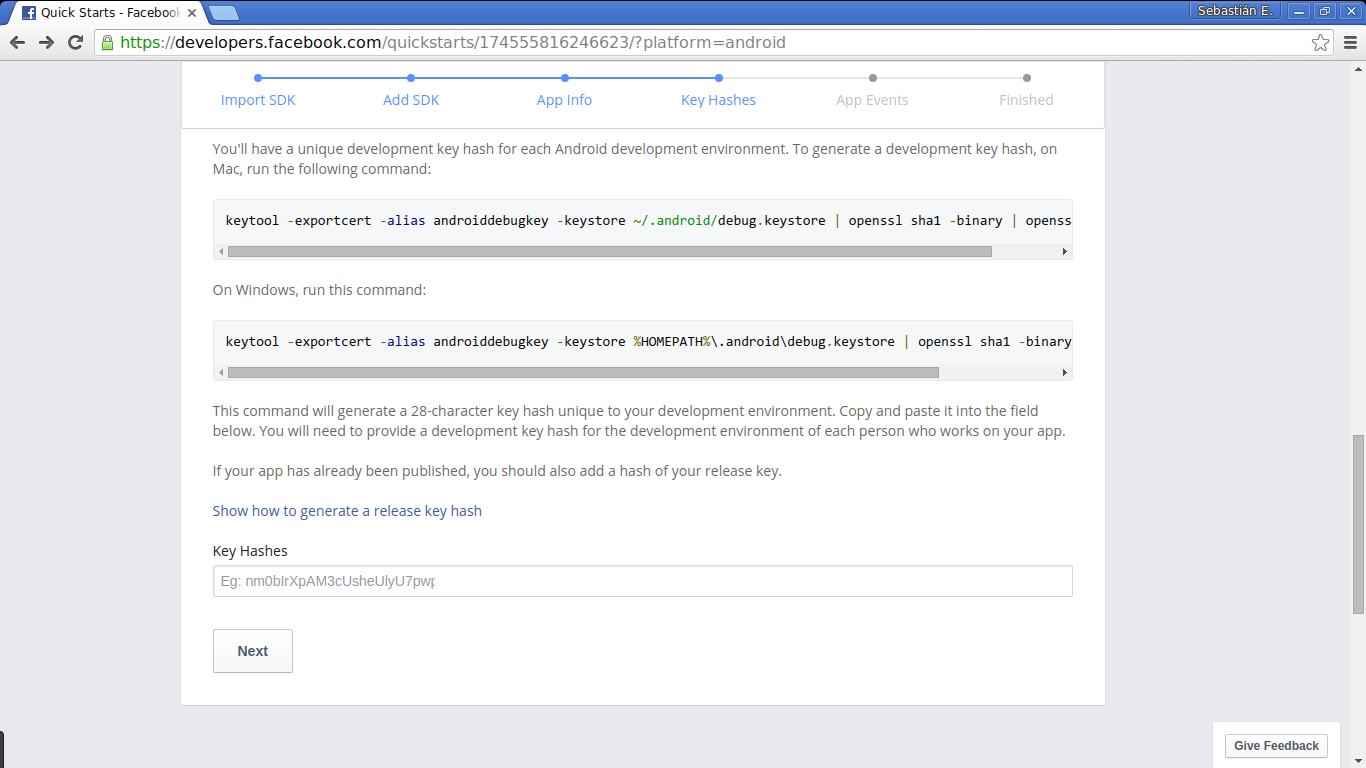
If you are familiar with Android development, you know applications are digitally signed. If not, what you need to know is that there two types of signatures: release and development signatures. Release signatures are used when you publish to the Google Play Store. Development signatures are used otherwise. In this case we are using our development signature. To get it, run the following code in your terminal (the default keystore password is android):
keytool -exportcert -alias androiddebugkey -keystore ~/.android/debug.keystore | openssl sha1 -binary | openssl base64
Input the generated hash code in the form and click next.
You can safely ignore what follows in the Facebook app wizard. Now go to https://developers.facebook.com/apps/ and copy your app id to the clipboard.
3. Setup the SDK in your Android Project
Add your Facebook App ID to your string resources file (string.xml) as facebook_app_id. Then edit your AndroidManifest.xml file to add:
- The necessary permissions (
uses-permission). - The Facebook app id as metadata (
meta-datatag). - The Facebook activity.
<?xml version="1.0" encoding="utf-8"?>
<manifest xmlns:android="http://schemas.android.com/apk/res/android"
    package="auth0.com.socialloginsample">
    (...)

    <uses-permission android:name="android.permission.INTERNET"/>

    (...)

    <application
        android:allowBackup="true"
        android:icon="@mipmap/ic_launcher"
        android:label="@string/app_name"
        android:supportsRtl="true"
        android:theme="@style/AppTheme">

        <meta-data android:name="com.facebook.sdk.ApplicationId" android:value="@string/facebook_app_id"/>

        (...)

        <activity android:name="com.facebook.FacebookActivity"
                android:configChanges=
                    "keyboard|keyboardHidden|screenLayout|screenSize|orientation"
                android:theme="@android:style/Theme.Translucent.NoTitleBar"
                android:label="@string/app_name" />

        (...)

    </application>

    (...)
</manifest>
4. Add the Facebook Login Button
The Facebook SDK for Android comes with a convenient button that can be added easily to our activities. Open activity_login.xml with the text editor. Add a LinearLayout element and put the Facebook button in it:
<LinearLayout
    android:id="@+id/email_login_form"
    android:layout_width="match_parent"
    android:layout_height="wrap_content"
    android:orientation="vertical">

    <com.facebook.login.widget.LoginButton
        android:id="@+id/facebook_sign_in_button"
        android:layout_width="match_parent"
        android:layout_height="wrap_content"
        android:layout_marginTop="15dp"
        android:layout_marginBottom="10dp"
        android:layout_gravity="center_horizontal" />

    (...)

</LinearLayout>
5. Bind Everything With Code
First, do the necessary SDK initialization in your app's main activity onCreate method:
public class LoginActivity extends AppCompatActivity {
    @Override
    protected void onCreate(Bundle savedInstanceState) {
        super.onCreate(savedInstanceState);

        FacebookSdk.sdkInitialize(getApplicationContext());
        mFacebookCallbackManager = CallbackManager.Factory.create();

        // This MUST be placed after the above two lines.
        setContentView(R.layout.activity_login);

        // (...)
    }

    // (...)
}
Setup the callback for button (inside onCreate might be a good choice as well):
public class LoginActivity extends AppCompatActivity {
    @Override
    protected void onCreate(Bundle savedInstanceState) {
        // (...)

        mFacebookSignInButton = (LoginButton)findViewById(R.id.facebook_sign_in_button);
        mFacebookSignInButton.registerCallback(mFacebookCallbackManager,
            new FacebookCallback<LoginResult>() {
                @Override
                public void onSuccess(final LoginResult loginResult) {
                    //TODO: Use the Profile class to get information about the current user.
                    handleSignInResult(new Callable<Void>() {
                        @Override
                        public Void call() throws Exception {
                            LoginManager.getInstance().logOut();
                            return null;
                        }
                    });
                }

                @Override
                public void onCancel() {
                    handleSignInResult(null);
                }

                @Override
                public void onError(FacebookException error) {
                    Log.d(LoginActivity.class.getCanonicalName(), error.getMessage());
                    handleSignInResult(null);
                }
            }
        );
    }

    // (...)
}
Lastly, the proper callback must be bound in the onActivityResult callback:
@Override
public void onActivityResult(int requestCode, int resultCode, Intent data) {
    super.onActivityResult(requestCode, resultCode, data);

    // (...)

    mFacebookCallbackManager.onActivityResult(requestCode, resultCode, data);
}
That's it! In the handleSignInResult method of your activity you can do as you please (usually show another activity or do some operation with the information from the current user).
As expected, Google provides a native Android SDK to handle logins. Let's see how we can add it to our existing app.
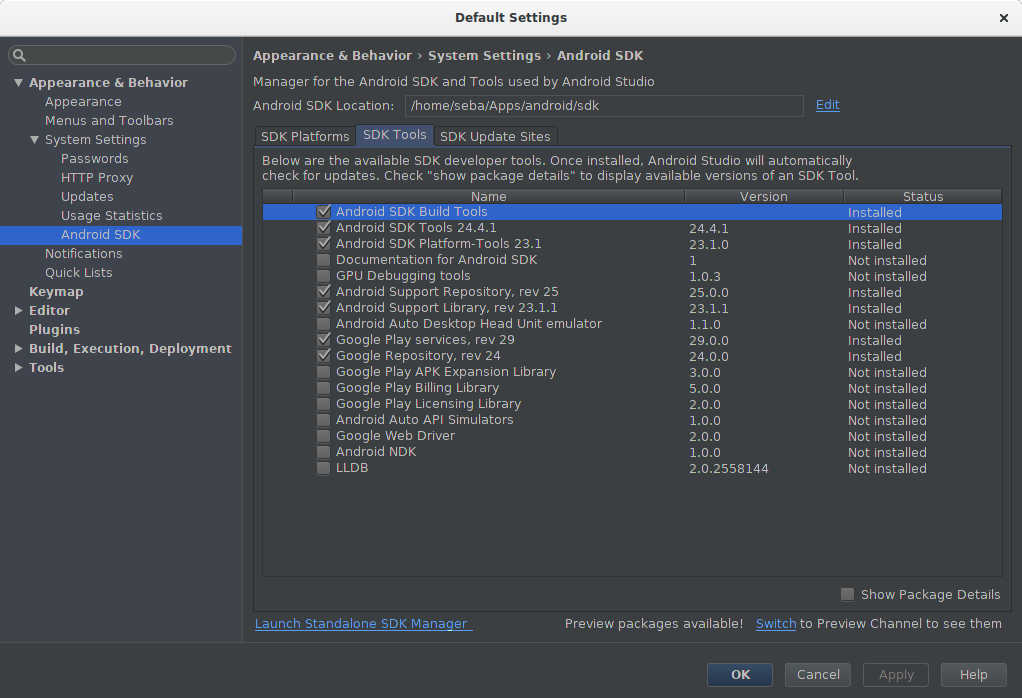
1. Make Sure the Google Play Services SDK is available
In Android Studio, go to Tools -> Android -> SDK Manager -> SDK Tools. In the Extras section make sure Google Play Services is available and enabled.
2. Setup the Repository and Dependencies
Open the build.grade file for your project and add the Play Services classpath:
buildscript {
    // (...)
    dependencies {
        // (...)
        classpath 'com.google.gms:google-services:1.5.0-beta2'
        // (...)
    }
}
Now open the build.grade file for your app module and the Google Services plugin and compile-time dependency:
apply plugin: 'com.android.application'
apply plugin: 'com.google.gms.google-services'

// (...)

dependencies {
    compile fileTree(dir: 'libs', include: ['*.jar'])
    testCompile 'junit:junit:4.12'

    // (...)

    compile 'com.google.android.gms:play-services-auth:8.3.0'

    // (...)
}
3. Tell Google About Your App
Go to the Google Developer Console and add your app. It will first ask for the usual stuff: your app's name and the Android package name for it. After that you will be presented with several Google services which you can enable. Choose Google Sign-In:
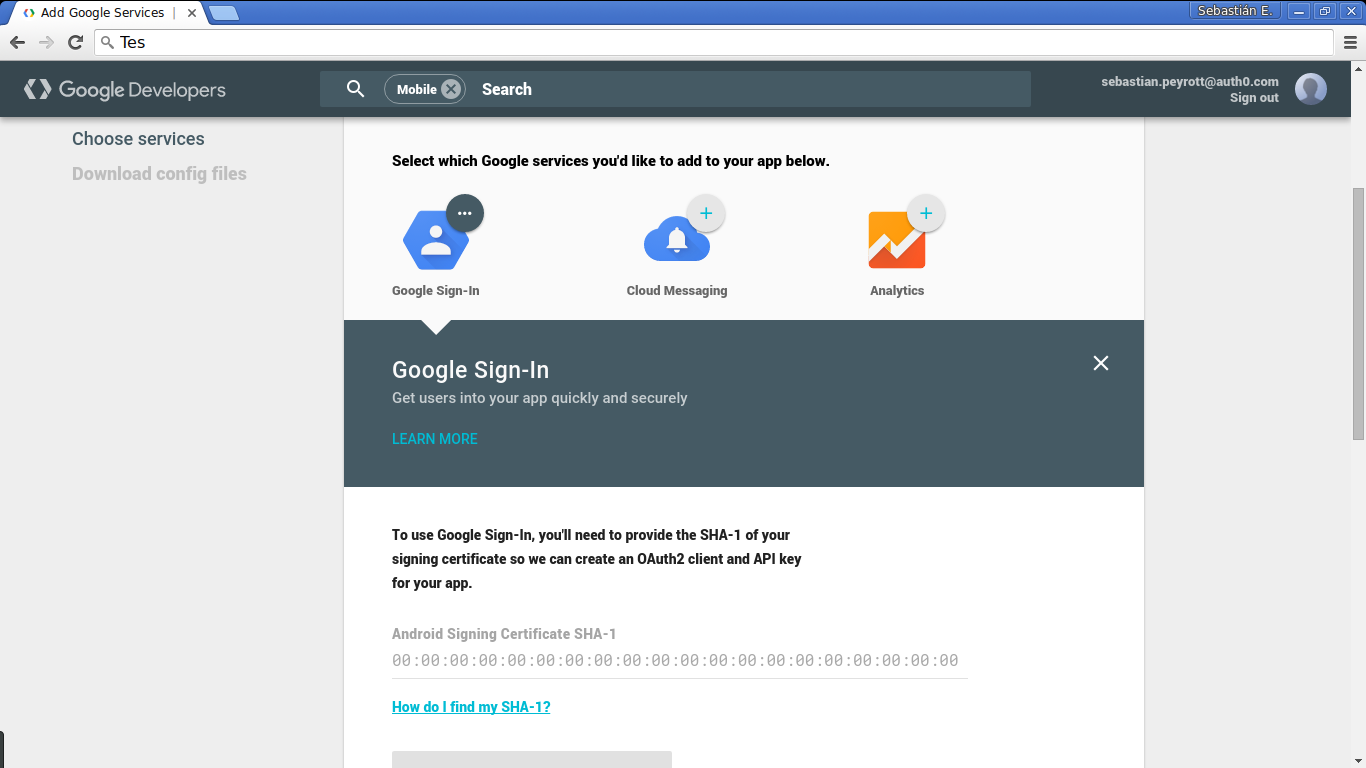
As happened for Facebook sign-in, Google too requires the certificate fingerprint. To get the development fingerprint run the following command (password android):
keytool -exportcert -list -v -alias androiddebugkey -keystore ~/.android/debug.keystore | grep SHA1
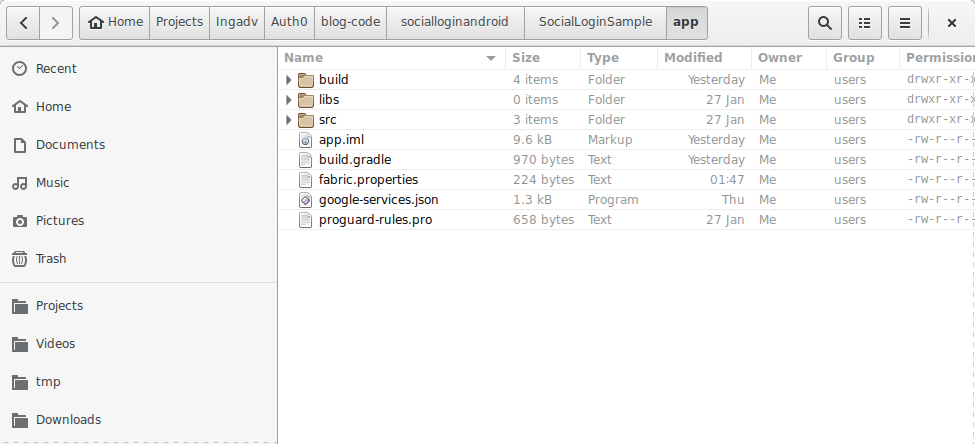
After Google Sign-In is enabled, a new button at the end of the page will appear: Generate Configuration Files. Click it and download the configuration file. Browse to your Android project folder and find the app subfolder. Place the google-services.json file there:
4. Add the Google Sign-In Button
Open the layout file for your login activity (activity_login.xml) and place the button in a container:
(...)

<LinearLayout
    android:id="@+id/email_login_form"
    android:layout_width="match_parent"
    android:layout_height="wrap_content"
    android:orientation="vertical">

    (...)

    <com.google.android.gms.common.SignInButton
        android:id="@+id/google_sign_in_button"
        android:layout_width="match_parent"
        android:layout_height="wrap_content" />

    (...)
</LinearLayout>
5. Glue it all Together with Code
Bind the button to your callback method:
@Override
protected void onCreate(Bundle savedInstanceState) {
    super.onCreate(savedInstanceState);

    // (...)

    mGoogleSignInButton = (SignInButton)findViewById(R.id.google_sign_in_button);
    mGoogleSignInButton.setOnClickListener(new OnClickListener() {
        @Override
        public void onClick(View v) {
            signInWithGoogle();
        }
    });

    // (...)
}
Handle the callback by presenting the Google Sign-In activity:
private static final int RC_SIGN_IN = 9001;

private void signInWithGoogle() {
    if(mGoogleApiClient != null) {
        mGoogleApiClient.disconnect();
    }

    GoogleSignInOptions gso = new GoogleSignInOptions.Builder(GoogleSignInOptions.DEFAULT_SIGN_IN)
            .requestEmail()
            .build();
    mGoogleApiClient = new GoogleApiClient.Builder(this)
            .addApi(Auth.GOOGLE_SIGN_IN_API, gso)
            .build();

    final Intent signInIntent = Auth.GoogleSignInApi.getSignInIntent(mGoogleApiClient);
    startActivityForResult(signInIntent, RC_SIGN_IN);
}
Lastly, handle the result from the activity:
@Override
public void onActivityResult(int requestCode, int resultCode, Intent data) {
    super.onActivityResult(requestCode, resultCode, data);

    // Result returned from launching the Intent from GoogleSignInApi.getSignInIntent(...);
    if (requestCode == RC_SIGN_IN) {
        GoogleSignInResult result = Auth.GoogleSignInApi.getSignInResultFromIntent(data);

        if(result.isSuccess()) {
            final GoogleApiClient client = mGoogleApiClient;

            //handleSignInResult(...)
        } else {
            //handleSignInResult(...);
        }
    } else {
        // Handle other values for requestCode
    }
}
You can now pass the login details from the result object to your custom handleSignInResult method. To get the user details, use result.getSignInAccount(). That's it!
Twitter also provides a native SDK for Android. Let's see how we can integrate it.
1. Setup the Repository and Dependencies
Twitter provides an Android Studio plugin named Fabric. Fabric is also the name of the libraries Twitter provides developers to help in the integration of their APIs. The Fabric plugin comes with a set of wizards to help in the integration of its features. For the purposes of this post we will do all steps manually (no Fabric wizards).
Open the build.gradle file for your project and add the following lines:
buildscript {
    repositories {
        // (...)

        maven { url 'https://maven.fabric.io/public' }

        // (...)
    }
    dependencies {
        // (...)

        classpath 'io.fabric.tools:gradle:1.+'

        // (...)
    }
}

allprojects {
    repositories {
        // (...)

        maven { url 'https://maven.fabric.io/public' }

        // (...)
    }
}
Then in the app module build.gradle file add the following:
// (...)

apply plugin: 'io.fabric'

// (...)

dependencies {
    // (...)
    compile('com.twitter.sdk.android:twitter-core:1.6.3@aar') {
        transitive = true;
    }
    // (...)
}
2. Tell Twitter About Your App
Go to https://apps.twitter.com/ and create a new app. Set the callback URL to any domain under your control but do not leave it blank. This will be ignored by the Twitter SDK for Android, but will cause trouble if left blank.
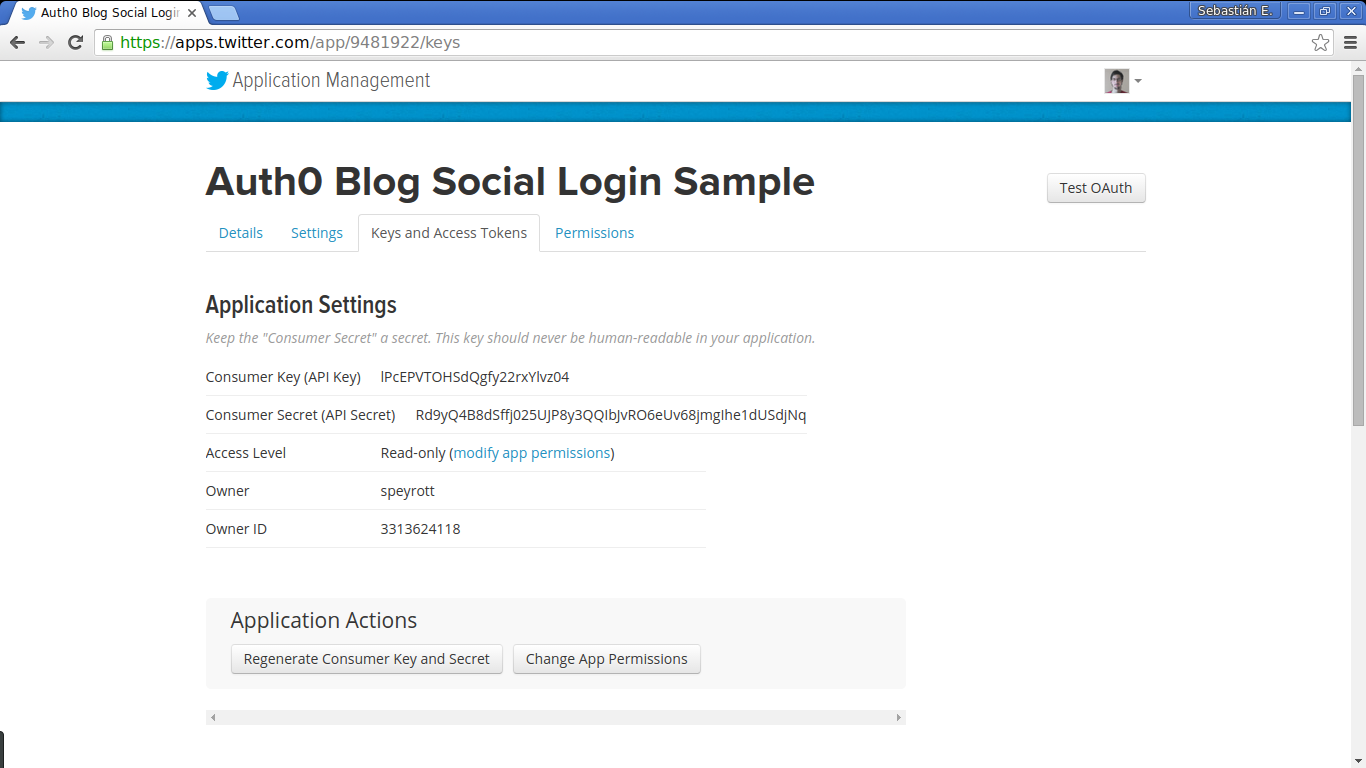
After the app is created, you will be presented with the settings screen. First set your permissions to read-only (nothing more is required for signing-in), then go to the Keys and Access Tokens screen and take note of both the Consumer Key and the Consumer Secret.
You will also need to create an account at fabric.io. Once you have done this, login and go to organizations. Click on your organization and then click on API Key. Put this key in your AndroidManifest.xml file:
<application
        android:allowBackup="true"
        android:icon="@mipmap/ic_launcher"
        android:label="@string/app_name"
        android:supportsRtl="true"
        android:theme="@style/AppTheme">

        (...)

        <meta-data
            android:name="io.fabric.ApiKey"
            android:value="YOUR_FABRIC_API_KEY" />

        (...)

</application>
3. Add the Twitter Sign-In Button
Open activity_login.xml and add the Twitter sign-in button:
<LinearLayout
    android:id="@+id/email_login_form"
    android:layout_width="match_parent"
    android:layout_height="wrap_content"
    android:orientation="vertical">

    (...)

    <com.twitter.sdk.android.core.identity.TwitterLoginButton
        android:id="@+id/twitter_sign_in_button"
        android:layout_width="match_parent"
        android:layout_height="wrap_content"
        android:layout_marginBottom="5dp" />

    (...)

</LinearLayout>
4. Glue Everything With Code
In your login activity class add the following code to initialize Twitter's SDK:
@Override
protected void onCreate(Bundle savedInstanceState) {
    super.onCreate(savedInstanceState);

    // (...)

    // The private key that follows should never be public
    // (consider this when deploying the application)
    TwitterAuthConfig authConfig = new TwitterAuthConfig("lPcEPVTOHSdQgfy22rxYlvz04",
            "Rd9yQ4B8dSffj025UJP8y3QQIbJvRO6eUv68jmgIhe1dUSdjNq");
    Fabric.with(this, new TwitterCore(authConfig));

    // (...)
}
The keys in this block of code are the ones you got in step 2. Note the comment in the block of code. The secret key for your Twitter app should never be made public (the key above was revoked before publishing). This means that embedding the key in code like we have done in this case is a security issue you should consider. The recommended way of handling this is on a best-effort basis. If you are keen on security issues this should immediately trigger an alarm in your head. Yes, Twitter's own API forces us to use insecure practices. One way to mitigate this issue is to use DexGuard to obfuscate strings. This is, however, imperfect and will not prevent a dedicated malicious hacker from getting your secret keys. The only safe way of handling this limitation is by not using the Android native SDK and reverting to the OAuth HTTP-based API. This way the secret key can be stored in a server of your choice. Twitter is aware of this limitation and remains silent in the way of potential fixes. Consider this carefully when picking the native Twitter for Android SDK for your apps.
Now we can add a handler for Twitter's button:
@Override
protected void onCreate(Bundle savedInstanceState) {
    super.onCreate(savedInstanceState);

    // (...)

    mTwitterSignInButton = (TwitterLoginButton)findViewById(R.id.twitter_sign_in_button);
    mTwitterSignInButton.setCallback(new Callback<TwitterSession>() {
        @Override
        public void success(final Result<TwitterSession> result) {
            // handleSignInResult(...);
        }

        @Override
        public void failure(TwitterException e) {
            // handleSignInResult(...);
        }
    });

    // (...)
}
You can get the user details by calling result.data.getUserName().
Finally, it is necessary to handle the response sent from the Twitter sign-in activity:
@Override
public void onActivityResult(int requestCode, int resultCode, Intent data) {
    super.onActivityResult(requestCode, resultCode, data);
    // (...)
    if(TwitterAuthConfig.DEFAULT_AUTH_REQUEST_CODE == requestCode) {
        mTwitterSignInButton.onActivityResult(requestCode, resultCode, data);
    }
    // (...)
}
That's all there is to it. Remember in this case to consider the potential security issues brought by keeping the secret key for Twitter's API in your code.
In contrast with the other social login services in this post, Instagram provides no native library for Android (or any other platform), so we will focus on how to integrate it in our sample using an HTTP API and Android intents.
1. Tell Instagram About Your App
Go to https://www.instagram.com/developer/clients/register/ and register a new app. For the redirect URL we will use a special URL that can be captured by an Android intent. For our example we used sociallogin://redirect (yes, a custom schema is possible and recommended).
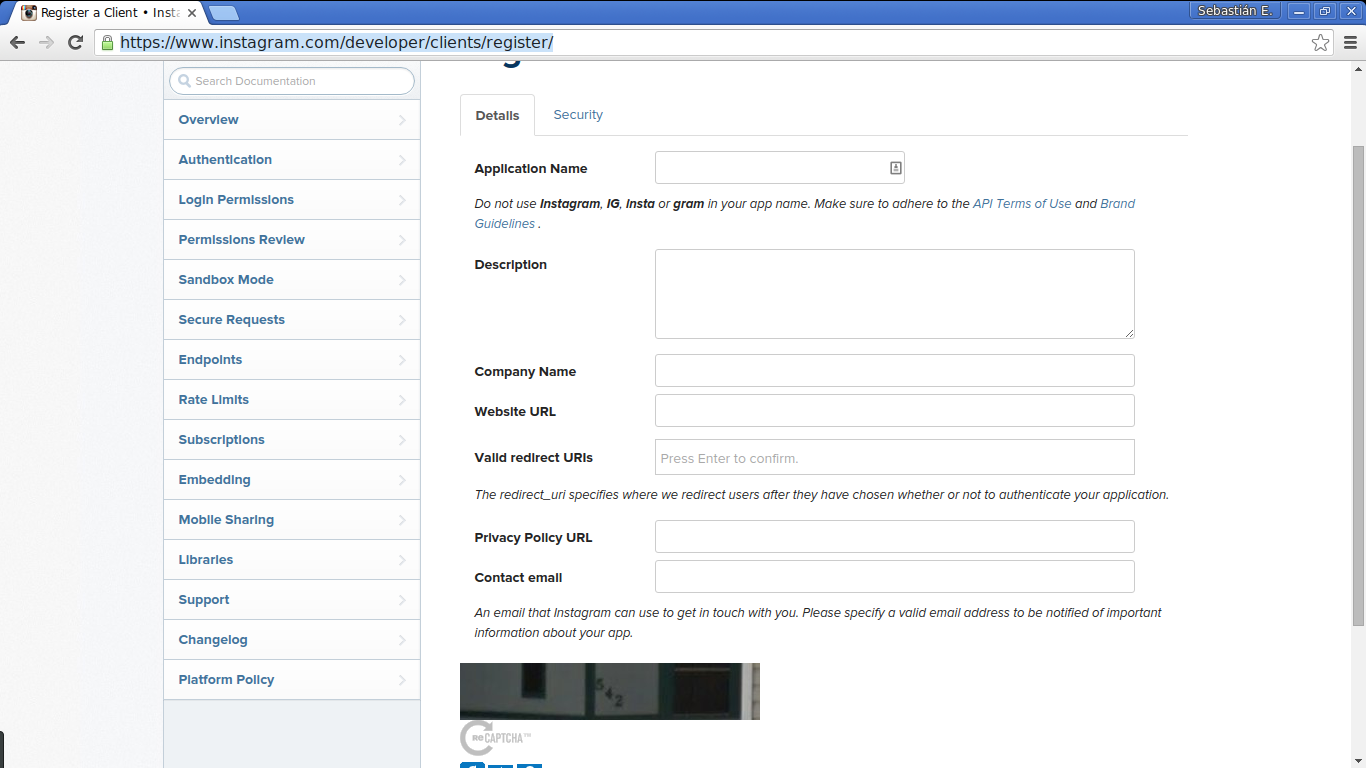
In the security tab enable implicit OAuth by unchecking the box that reads "Disable Implicit OAuth". Implicit OAuth is simpler for the purposes of our example. Read the Instagram authentication docs to find out if the explicit authentication flow is appropriate for your use case.
2. Add an Intent Filter to Catch the Redirect
Once the application is authenticated (or not) by Instagram, a redirect will be performed to the URL set in step 1. We will setup our application to catch those URLs so that it gets launched when the browser is redirected them. Open AndroidManifest.xml and add the following attribute to the login activity:
<activity
    android:name=".LoginActivity"
    android:label="@string/app_name">
    <intent-filter>
        <action android:name="android.intent.action.MAIN" />
        <category android:name="android.intent.category.LAUNCHER" />
    </intent-filter>

    <intent-filter>
        <action android:name="android.intent.action.VIEW" />
        <category android:name="android.intent.category.DEFAULT" />
        <category android:name="android.intent.category.BROWSABLE" />
        <data android:scheme="sociallogin" android:host="redirect" />
    </intent-filter>
</activity>
3. Add a Standard Android Button to the Layout
Open activity_login.xml and add the following:
<LinearLayout
    android:id="@+id/email_login_form"
    android:layout_width="match_parent"
    android:layout_height="wrap_content"
    android:orientation="vertical">

    (...)

    <Button
        android:layout_width="match_parent"
        android:layout_height="wrap_content"
        android:text="@string/action_sign_in_with_instagram"
        android:id="@+id/instagram_sign_in_button" />

    (...)

</LinearLayout>
4. Add the Code
Now add the code to do all the magic. First, setup a handler for the button:
@Override
protected void onCreate(Bundle savedInstanceState) {
    super.onCreate(savedInstanceState);

    // (...)

    mInstagramSignInButton = (Button)findViewById(R.id.instagram_sign_in_button);
    mInstagramSignInButton.setOnClickListener(new OnClickListener() {
        @Override
        public void onClick(View v) {
            signInWithInstagram();
        }
    });

    // (...)
}
And here is signInWithInstagram:
private void signInWithInstagram() {
    final Uri.Builder uriBuilder = new Uri.Builder();
    uriBuilder.scheme("https")
              .authority("api.instagram.com")
              .appendPath("oauth")
              .appendPath("authorize")
              .appendQueryParameter("client_id", "18a8b74da9644bd7a9294caef1c5e76c")
              .appendQueryParameter("redirect_uri", "sociallogin://redirect")
              .appendQueryParameter("response_type", "token");
    final Intent browser = new Intent(Intent.ACTION_VIEW, uriBuilder.build());
    startActivity(browser);
}
You can get your client id from https://www.instagram.com/developer/clients/manage/.
To handle the return from the activity, look for the callback URI:
private void checkForInstagramData() {
    final Uri data = this.getIntent().getData();
    if(data != null && data.getScheme().equals("sociallogin") && data.getFragment() != null) {
        final String accessToken = data.getFragment().replaceFirst("access_token=", "");
        if (accessToken != null) {
            // handleSignInResult(...);
        } else {
            // handleSignInResult(...);
        }
    }
}
You can call this function in the onCreate or onStart callbacks for the activity. With the access token it is then possible to query for information regarding the user by querying https://api.instagram.com/v1/users/self/?access_token=ACCESS-TOKEN. That is all there is to it!
Get the full example code for all providers.
Aside: Don't Repeat Yourself, use Auth0
If you've read this far you probably realized supporting several social logins providers is somewhat cumbersome. Using our Auth0.Android library for Android makes this a breeze. Integrating it is as simple as integrating any of the solutions mentioned above, with the added benefit that you pick which social login providers are supported from the settings dashboard. Yup, that's it: do this integration once and get as many social login providers as you want with a few clicks! Let's see how it is done.
{% include tweetquote.html quotetext="Using the Auth0.Android library makes social login integration a breeze."%}
1. Sign up
Go to https://auth0.com/ and sign-up.
2. Create an empty Android project
Click on File -> New -> New Project and follow the steps. A project like the one we created for our sample above will do just fine.
3. Tell Auth0 About Your app
Open the dashboard and click on Clients/Create Client. When asked, select Native Client.
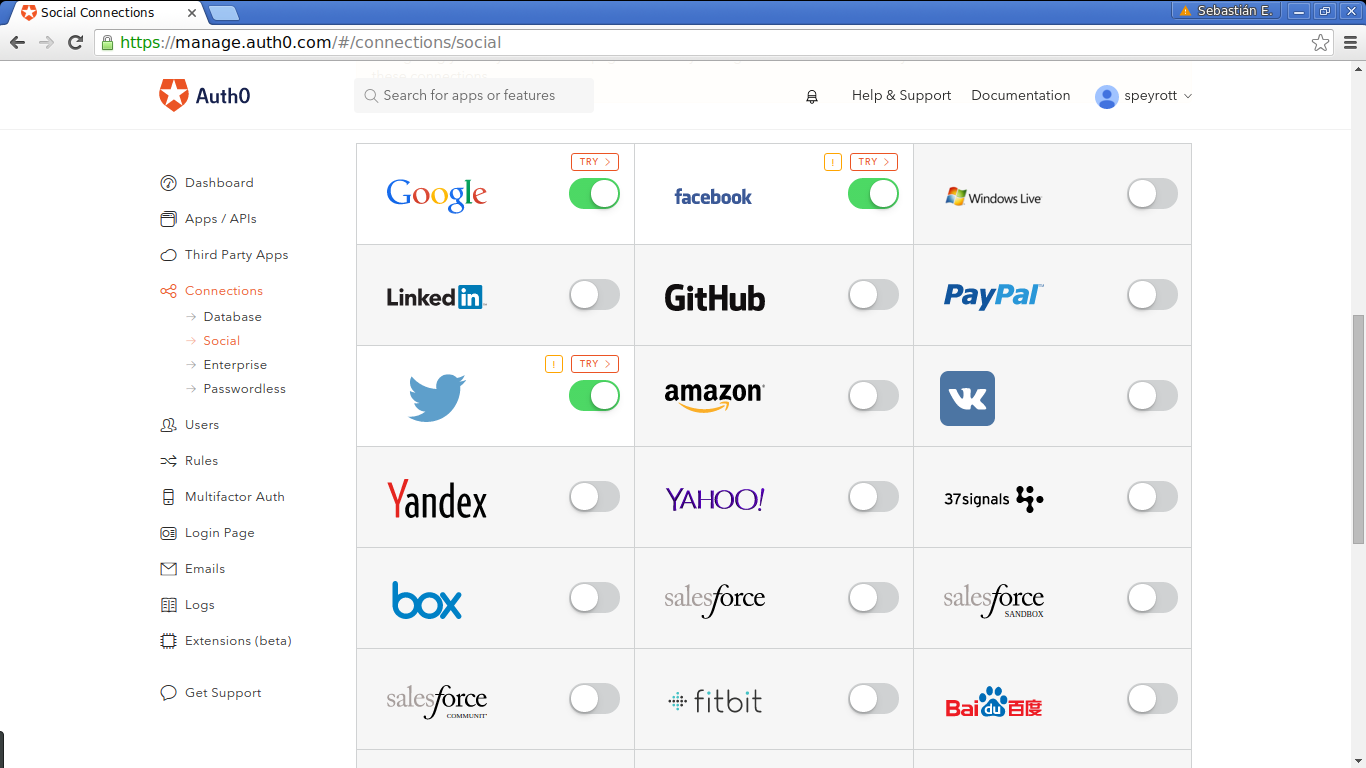
Now go to Connections -> Social and enable as many social providers as you like. Follow the usual steps to get the application ids or consumer keys. For testing, you can leave the fields blank and use Auth0's internal test keys. Don't forget to enable these connections in your new app (Clients -> <CLIENT NAME> -> Connections).
4. Setup Auth0.Android's dependencies
Open your app module build.gradle file and add the following:
apply plugin: 'com.android.application'

android {
    // (...)

    defaultConfig {
        // (...)

        // Add the following line
        manifestPlaceholders = [auth0Domain: "@string/com_auth0_domain", auth0Scheme: "https"]
    }

    packagingOptions {
        exclude 'META-INF/NOTICE'
        exclude 'META-INF/LICENSE'
    }
}

dependencies {
    // (...)
    // Add the following line
    compile 'com.auth0.android:auth0:1.12.+'
}
5. Enable Internet Access in your Manifest File
Open AndroidManifest.xml and add the following:
<uses-permission android:name="android.permission.INTERNET"/>
Now add the client id and Auth0 domain to your strings.xml file. To get these details go to the Auth0 dashboard and select your app, then pick settings.
<resources>
    <!-- (...) -->
    <string name="com_auth0_domain">YOUR AUTH0 DOMAIN</string>
    <string name="com_auth0_client_id">YOUR AUTH0 CLIENT ID</string>
</resources>
6. Glue Everything Together With Code
Put the following code in the activity class that will present the login screen:
if(credentials == null) {
    final Auth0 account = new Auth0(getApplicationContext());
    WebAuthProvider.init(account).start(this, new AuthCallback() {
        @Override
        public void onFailure(@NonNull Dialog dialog) {
            credentials = null;

            // Handle error
        }

        @Override
        public void onFailure(AuthenticationException exception) {
            credentials = null;

            // Handle error
        }

        @Override
        public void onSuccess(@NonNull Credentials credentials_) {
            credentials = credentials_;

            // Do stuff with credentials
        }
    });
}
That's it! Now when that code is triggered by some event, a login screen in your default browser will appear. Once the user logs in, he will be sent back to your application's activity. You can add or remove additional connections from the Auth0 dashboard. No more special cases.
Get the full code.
Conclusion
Social logins are now more important than ever. Many users find the sign-up process cumbersome and expect to be able to sign-in using one their existing accounts from other services. As an application developer, you want to make sure users are not scared away from trying your app because of the dreaded registration step. Adding several login providers is doable but increases the complexity of your app and the time needed to develop it. A great way to prevent this from happening is with our Auth0.Android library. Other benefits include: added security (for instance by not putting secret keys in your app) and professional support from our team. Try it, you won't be disappointed.
Want to learn more about Single Sign-On? Get The Definitive Guide on SSO (74-page free eBook) here.
About the author

Sebastian Peyrott
Senior Engineer