
In multi-layered architectures, data is usually represented differently at each layer. For example, this is what usually happens in client-server applications. In such architectures, communicating between layers may become cumbersome. This can be avoided by harnessing the DTO pattern, which involves defining simple classes to transfer data between layers, thus simplifying communication. The main issue that comes with this approach is that it requires writing a large amount of mapping code, which is an error-prone and tedious task. Thankfully, there is MapStruct, a Java library aimed at avoiding this boilerplate code by automating the mapping process as much as possible.
Firstly, you will dive into the DTO pattern and MapStruct. Then, you will see how to create a demo REST services application aimed at showing how to harness the DTO pattern with MapStruct in Spring Boot in Java.
What is a DTO?
Martin Fowler introduced the concept of a Data Transfer Object (DTO) as an object that carries data between processes in order to reduce the number of method calls.
The DTO pattern can be employed in many different ways, and as I have already shown, the most common approach to exploiting DTOs is to use them to transfer data between different layers of multi-layered architectures. For example, in client-server applications, they are especially useful when employed to send data to a client application, such as an Angular or React Single-Page Application (SPA). When contacted by the client, the server application collects all the requested data, stores it in a custom-defined DTO, and sends it back. This way, the client application can get all the desired data in a single API call. Plus, the server is sending only the minimum amount of data across the wire. You can also use DTOs as both input and output in method calls. For example, by using DTO objects you can define DAO (Data Access Object)-layer methods handling many parameters or return highly-structured data. As a consequence, you get a more concise class with a reduced number of required methods.
All these examples share the same major drawback, which is part of the DTO pattern itself. As mentioned earlier, the DTO pattern depends on mappers aimed at converting data into DTOs and vice versa. This involves boilerplate code and introduces overheads that might not be overlooked, especially when dealing with large data.
What is MapStruct?
MapStruct is a code generator tool that greatly simplifies the implementation of mappings between Java bean types based on a convention over configuration approach. The generated mapping code uses plain method invocations and thus is fast, type-safe, and easy to understand.
In other words, MapStruct is plugged into the Java compiler and can automatically generate mappers at build-time.
Let’s see how to integrate MapStruct into a Spring Boot and Java project to map JPA entities into DTOs with no extra effort.
Prerequisites
This is the list of all the prerequisites for the demo application you are going to build:
- Java >= 1.8
- Spring Boot 2.4.4
- MapStruct 1.4.2.Final
- Gradle >= 4.x or Maven 3.6.x
- MariaDB 10.x
Adding the Required Dependencies
First, you need to add mapstruct and mapstruct-processor to your project’s dependencies.
The latter will be used by MapStruct to generate the mapper implementations during build-time.
If you are a Gradle >= 4.6 user, add these dependencies to your build.gradle file:
dependencies {
    // ...
    implementation "org.mapstruct:mapstruct:1.4.2.Final"
    annotationProcessor "org.mapstruct:mapstruct-processor:1.4.2.Final"
}
For older versions (< 4.6), you need also the gradle-apt-plugin plugin:
plugins {
    // ...
    id "net.ltgt.apt" version "0.21"
}

// ...

dependencies {
    // ...
    compile "org.mapstruct:mapstruct:1.4.2.Final"
    apt "org.mapstruct:mapstruct-processor:1.4.2.Final"
}
If you are a Maven user, add the following dependencies to your pom.xml file:
<dependencies>
    <!-- ... -->
    <dependency>
        <groupId>org.mapstruct</groupId>
        <artifactId>mapstruct</artifactId>
        <version>1.4.2.Final</version>
    </dependency>
</dependencies>

<!-- ... -->

<build>
    <plugins>
        <!-- ... -->
        <plugin>
            <groupId>org.apache.maven.plugins</groupId>
            <artifactId>maven-compiler-plugin</artifactId>
            <version>3.5.1</version>
            <configuration>
                <source>11</source> <!-- depending on your project. In this example, Java 11 is used -->
                <target>11</target> <!-- depending on your project. In this example, Java 11 is used -->
                <annotationProcessorPaths>
                    <path>
                        <groupId>org.mapstruct</groupId>
                        <artifactId>mapstruct-processor</artifactId>
                        <version>1.3.1.Final</version>
                    </path>
                </annotationProcessorPaths>
            </configuration>
        </plugin>
    </plugins>
</build>
Besides a MapStruct dependency, a maven-compiler-plugin plugin must be also configured in your pom.xml file. In order to make the mapstruct-processor work, you need to add it to the annotationProcessorPaths section of the plugin configuration.
Now, you have all you need to start using MapStruct.
Defining the JPA Entities and Their DTOs
Importing the Database
The demo project you are going to see requires a MariaDB database. So, first, you need to set up a MariaDB instance. Then, you can import the mapstruct_demo.sql dump file located in the GitHub Repository supporting this article.
Now, you need to add a MySQL driver to your dependencies. You can achieve this by adding a mysql-connector-java dependency to your pom.xml file:
<dependencies>
    <!-- ... -->
    <dependency>
        <groupId>mysql</groupId>
        <artifactId>mysql-connector-java</artifactId>
        <version>8.0.23</version>
    </dependency>
</dependencies>
Or to your build.gradle file, if you are a gradle user:
dependencies {
    // ...
    compile "mysql:mysql-connector-java:8.0.23"
}
Lastly, you have to configure your Spring Boot application to make it connect to the just defined database. You can achieve this by adding the following lines to your project’s application.properties file:
spring.datasource.url=jdbc:mysql://127.0.0.1:3306/mapstruct_demo
spring.datasource.username=your_username
spring.datasource.password=your_password
spring.datasource.driver-class-name=com.mysql.cj.jdbc.Driver
The demo database is really simple and consists of only three entities, associated as follows:
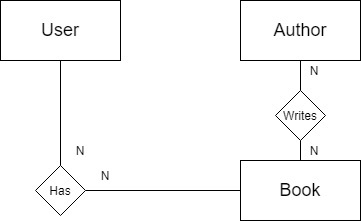
Note that MariaDB is chosen just for simplicity, the approach presented in this article is database-agnostic.
Defining the JPA Entities
Our model domain consists of three JPA entities: User, Author, Book and I recommend placing all your entities in the same package, e.g. com.mapstruct.demo.entities.
You can be defined them as follows:
@Getter
@Setter
@Entity
@Table(name = "user")
public class User {
    @Id
    @GeneratedValue(strategy = GenerationType.IDENTITY, generator = "native")
    @Column
    private int id;

    @Basic
    @Column
    private String email;

    @Basic
    @Column
    private String password;

    @Basic
    @Column
    private String name;

    @Basic
    @Column
    private String surname;

    @ManyToMany(fetch = FetchType.LAZY)
    @JoinTable(
            name = "user_book",
            joinColumns = @JoinColumn(name = "user_id"),
            inverseJoinColumns = @JoinColumn(name = "book_id")
    )
    private Set<Book> books = new HashSet<>();
}
@Getter
@Setter
@Entity
@Table(name = "author")
public class Author {
    @Id
    @GeneratedValue(strategy = GenerationType.IDENTITY, generator = "native")
    @Column
    private int id;

    @Basic
    @Column
    private String name;

    @Basic
    @Column
    private String surname;

    @Basic
    @Column(name = "birth_date")
    @Temporal(TemporalType.DATE)
    private Date birthDate;

    @ManyToMany(fetch = FetchType.LAZY)
    @JoinTable(
            name = "author_book",
            joinColumns = @JoinColumn(name = "author_id"),
            inverseJoinColumns = @JoinColumn(name = "book_id")
    )
    private Set<Book> books = new HashSet<>();
}
@Getter
@Setter
@Entity
@Table(name = "book")
public class Book {
    @Id
    @GeneratedValue(strategy = GenerationType.IDENTITY, generator = "native")
    @Column
    private int id;

    @Basic
    @Column
    private String title;

    @Basic
    @Column(name = "release_date")
    @Temporal(TemporalType.DATE)
    private Date releaseDate;

    @ManyToMany(
            fetch = FetchType.LAZY,
            mappedBy = "books"
    )
    private Set<Author> authors = new HashSet<>();

    @ManyToMany(
            fetch = FetchType.LAZY,
            mappedBy = "books"
    )
    private Set<User> users = new HashSet<>();
}
The @Getter and @Setter annotations used in the code examples above are part of the Project Lombok. They are used to automatically generate getters and setters. This is not mandatory and just an additional way to avoid boilerplate code.
While the other annotations you can see are the standard Hibernate/JPA annotations for mapping Java classes to database tables.
Defining the DTOs
Now, it is time to create their corresponding DTO classes.
Again, I recommend placing all of them in the same package. The approach I usually follow is to nest all my MapStruct DTOs under a
mastruct.dtospackage. So, in our example, the package will becom.mapstruct.demo.mapstruct.dtos.
Keep in mind that while defining DTOs you should think about their possible usages.
For example, as you can see the User entity has a password attribute. Because of security reasons, it's probably not the best idea to return it for example in REST GET endpoints. This is why I am going to define two different DTOs: UserPostDto and UserGetDto.
UserPostDto is going to be used while passing the data required to persist a new User to the Spring Boot application. It is defined as follows:
@Getter
@Setter
public class UserPostDto {
    @JsonProperty("id")
    private int id;

    @Email
    @NotNull
    @JsonProperty("email")
    private String email;

    @NotNull
    @JsonProperty("password")
    private String password;

    @JsonProperty("name")
    private String name;

    @JsonProperty("surname")
    private String surname;
}
Note that the DTO layer is where you should define your validation logic, especially when used as input or output of your RESTful APIs.
In this example, the two required fields are email and password. This is why they are annotated with @NotNull, which is part of Spring Validation. At the same time, the @Email annotation ensures that the provided email will be in a valid format.
On the other hand, the UserGetDto will be used to expose the data of a specific user to the client application and does not require a password field.
@Getter
@Setter
public class UserGetDto {
    @JsonProperty("id")
    private int id;

    @JsonProperty("email")
    private String email;

    @JsonProperty("name")
    private String name;

    @JsonProperty("surname")
    private String surname;
}
Similarly, when returning all the authors in the database you might not be interested in providing all the data on the books they wrote. In such a case, the id and the title should be enough. You can achieve such a result by defining two more DTOs: AuthorAllDto and BookSlimDto.
@Getter
@Setter
public class AuthorAllDto {
    @JsonProperty("id")
    private int id;

    @JsonProperty("name")
    private String name;

    @JsonProperty("surname")
    private String surname;

    @JsonProperty("birthDate")
    private Date birthDate;

    @JsonProperty("books")
    private Set<BookSlimDto> books;
}
@Getter
@Setter
public class BookSlimDto {
    @JsonProperty("id")
    private int id;

    @JsonProperty("title")
    private String title;
}
On the contrary, when returning a Book, you might be interested in providing to the client application the complete list of its Author with all the data. This is an easy task you can accomplish by creating two more DTOs: BookDto and AuthorDto.
@Getter
@Setter
public class BookDto {
    @JsonProperty("id")
    private int id;

    @JsonProperty("title")
    private String title;

    @JsonProperty("releaseDate")
    private Date releaseDate;

    @JsonProperty("authors")
    private Set<AuthorDto> authors;
}
@Getter
@Setter
public class AuthorDto {
    @JsonProperty("id")
    private int id;

    @JsonProperty("name")
    private String name;

    @JsonProperty("surname")
    private String surname;

    @JsonProperty("birthDate")
    private Date birthDate;
}
Now, it is time to see how to use MapStruct to automatically map our JPA entities into DTOs.
Defining the MapStruct Mappers
In order to work properly, MapStruct requires you to define at least one mapper. A MapStruct mapper is an interface or an abstract class annotated with @Mapper. This special annotation is used by the MapStruct code generator to automatically generate a working implementation of this Java file at build-time.
As stated in the official documentation, all readable properties from the source type (e.g. Book) will be mapped into the corresponding property in the target type (e.g. BookDto) in the generated method implementations by default.
As you can see, there is no mention of defining an implementation to the mappers. This is because MapStruct takes care of it automatically. You do not need to define any sort of mapping logic and this is where boilerplate code is avoided.
Now, it is time to show how to define a proper MapStruct mapper.
Again, you should put all your mappers in the same package. I recommend creating a new subpackage called
mappersto nest under themapstructone. By doing so, you will have all the classes related to MapStruct under the samemapstructpackage. All told, the current package will becom.mapstruct.demo.mapstruct.mappers.
In our example, the following mapper will be enough:
@Mapper(
    componentModel = "spring"
)
public interface MapStructMapper {
    BookSlimDto bookToBookSlimDto(Book book);

    BookDto bookToBookDto(Book book);

    AuthorDto authorToAuthorDto(Author author);

    AuthorAllDto authorToAuthorAllDto(Author author);

    List<AuthorAllDto> authorsToAuthorAllDtos(List<Author> authors);

    UserGetDto userToUserGetDto(User user);

    User userPostDtoToUser(UserPostDto userPostDto);
}
By setting the componentModel attribute to spring, the MapStruct processor will produce a singleton Spring Bean mapper injectable wherever you need.
Please, note that you should define an empty mapping method for each of your DTO used. For example, Book is associated with many Authors and BookDto depends on AuthorDto accordingly. So, in order to let MapStruct converting a valid Book into a BookDto, you also need to define a mapping method from AuthorDto to Author.
Another important aspect to be aware of is what happens when you deal with many-to-many relationships. When mapping the relationship attribute, the target Set (or List) will be populated by retrieving the required data using the lazy evaluation mechanism. Then, the mapping process will proceed as expected.
So, in our example, when mapping a Book instance into a BookDto instance, the authors attribute will be populated thanks to the lazy loading. Then, each of them will be converted into an AuthorDto by MapStruct using the authorToAuthorDto(Author author) method.
The mapping logic is not based on magic and if you are curious to see what the MapStruct processor actually generates at build-time, you can find the implementation mapper classes in the target/generated-sources/annotations/annotation/ folder of your project. Let's see how the generated mapper implementation looks like in our example:
@Generated(
    value = "org.mapstruct.ap.MappingProcessor",
    date = "2021-03-11T19:21:44+0100",
    comments = "version: 1.4.2.Final, compiler: javac, environment: Java 13.0.2 (Oracle Corporation)"
)
@Component
public class MapStructMapperImpl implements MapStructMapper {

    @Override
    public BookSlimDto bookToBookSlimDto(Book book) {
        if ( book == null ) {
            return null;
        }

        BookSlimDto bookSlimDto = new BookSlimDto();

        bookSlimDto.setId( book.getId() );
        bookSlimDto.setTitle( book.getTitle() );

        return bookSlimDto;
    }

    @Override
    public BookDto bookToBookDto(Book book) {
        if ( book == null ) {
            return null;
        }

        BookDto bookDto = new BookDto();

        bookDto.setId( book.getId() );
        bookDto.setTitle( book.getTitle() );
        bookDto.setReleaseDate( book.getReleaseDate() );
        bookDto.setAuthors( authorSetToAuthorDtoSet( book.getAuthors() ) );

        return bookDto;
    }

    @Override
    public AuthorDto authorToAuthorDto(Author author) {
        if ( author == null ) {
            return null;
        }

        AuthorDto authorDto = new AuthorDto();

        authorDto.setId( author.getId() );
        authorDto.setName( author.getName() );
        authorDto.setSurname( author.getSurname() );
        authorDto.setBirthDate( author.getBirthDate() );

        return authorDto;
    }

    @Override
    public AuthorAllDto authorToAuthorAllDto(Author author) {
        if ( author == null ) {
            return null;
        }

        AuthorAllDto authorAllDto = new AuthorAllDto();

        authorAllDto.setId( author.getId() );
        authorAllDto.setName( author.getName() );
        authorAllDto.setSurname( author.getSurname() );
        authorAllDto.setBirthDate( author.getBirthDate() );
        authorAllDto.setBooks( bookSetToBookSlimDtoSet( author.getBooks() ) );

        return authorAllDto;
    }

    @Override
    public List<AuthorAllDto> authorsToAuthorAllDtos(List<Author> authors) {
        if ( authors == null ) {
            return null;
        }

        List<AuthorAllDto> list = new ArrayList<AuthorAllDto>( authors.size() );
        for ( Author author : authors ) {
            list.add( authorToAuthorAllDto( author ) );
        }

        return list;
    }

    @Override
    public UserGetDto userToUserGetDto(User user) {
        if ( user == null ) {
            return null;
        }

        UserGetDto userGetDto = new UserGetDto();

        userGetDto.setId( user.getId() );
        userGetDto.setEmail( user.getEmail() );
        userGetDto.setName( user.getName() );
        userGetDto.setSurname( user.getSurname() );

        return userGetDto;
    }

    @Override
    public User userPostDtoToUser(UserPostDto userPostDto) {
        if ( userPostDto == null ) {
            return null;
        }

        User user = new User();

        user.setId( userPostDto.getId() );
        user.setEmail( userPostDto.getEmail() );
        user.setPassword( userPostDto.getPassword() );
        user.setName( userPostDto.getName() );
        user.setSurname( userPostDto.getSurname() );

        return user;
    }

    protected Set<AuthorDto> authorSetToAuthorDtoSet(Set<Author> set) {
        if ( set == null ) {
            return null;
        }

        Set<AuthorDto> set1 = new HashSet<AuthorDto>( Math.max( (int) ( set.size() / .75f ) + 1, 16 ) );
        for ( Author author : set ) {
            set1.add( authorToAuthorDto( author ) );
        }

        return set1;
    }

    protected Set<BookSlimDto> bookSetToBookSlimDtoSet(Set<Book> set) {
        if ( set == null ) {
            return null;
        }

        Set<BookSlimDto> set1 = new HashSet<BookSlimDto>( Math.max( (int) ( set.size() / .75f ) + 1, 16 ) );
        for ( Book book : set ) {
            set1.add( bookToBookSlimDto( book ) );
        }

        return set1;
    }
}
MapStruct is a very versatile library and dozens of different options to achieve custom-mapping logic are available. Showing all of them is not what this article is aimed at, but if you are interested in so, I recommend reading this.
Putting It All Together
One last thing we need to do is define a few Rest Controllers to test our work. You can either clone the GitHub repository that supports this article or continue following this tutorial. To see your DTOs in action you just need to inject the MapStruct mapper into your controllers and use it to deal with your DTO classes.
Let’s see how our UserController will look like. The other controllers are not too different and will be omitted for brevity.
@RestController
@RequestMapping("/users")
public class UserController {

    private MapStructMapper mapstructMapper;

    private UserRepository userRepository;

    @Autowired
    public UserController(
            MapStructMapper mapstructMapper,
            UserRepository userRepository
    ) {
        this.mapstructMapper = mapstructMapper;
        this.userRepository = userRepository;
    }

    @PostMapping()
    public ResponseEntity<Void> create(
            @Valid @RequestBody UserPostDto userPostDto
    ) {
        userRepository.save(
                mapstructMapper.userPostDtoToUser(userPostDto)
        );

        return new ResponseEntity<>(HttpStatus.CREATED);
    }

    @GetMapping("/{id}")
    public ResponseEntity<UserGetDto> getById(
            @PathVariable(value = "id") int id
    ) {
        return new ResponseEntity<>(
                mapstructMapper.userToUserGetDto(
                        userRepository.findById(id).get()
                ),
                HttpStatus.OK
        );
    }

}
Now, you can run your Spring Boot application and start experiencing the power of the DTO pattern and MapStruct. Finally, here are some responses from the APIs you can find in the demo project:
{ "id": 1, "email": "test@test.com", "name": "John", "surname": "Smith" }[ { "id": 1, "name": "Patricia", "surname": "Brown", "books": [ { "id": 2, "title": "DTOs Are Awesome!" }, { "id": 3, "title": "9 Keys To Academic Success" } ] }, { "id": 2, "name": "James", "surname": "Smith", "birthDate": "1964-07-01", "books": [ { "id": 2, "title": "DTOs Are Awesome!" }, { "id": 1, "title": "The Adventure" } ] } ]{ "id": 1, "title": "The Adventure", "releaseDate": "2019-07-14", "authors": [ { "id": 2, "name": "James", "surname": "Smith", "birthDate": "1964-07-01" } ] }
Aside: Securing Spring APIs with Auth0
Securing Spring Boot APIs with Auth0 is easy and brings a lot of great features to the table. With Auth0, you only have to write a few lines of code to get solid identity management solution, single sign-on, support for social identity providers (like Facebook, GitHub, Twitter, etc.), and support for enterprise identity providers (like Active Directory, LDAP, SAML, custom, etc.). In the following sections, you are going to learn how to use Auth0 to secure APIs written with Spring Boot.
Creating the API
First, you need to create an API on your free Auth0 account. To do that, you have to go to the APIs section of the management dashboard and click on "Create API". On the dialog that appears, you can name your API as "Contacts API" (the name isn't really important) and identify it as https://contacts.blog-samples.com (you will need this value later).
Registering the Auth0 Dependency
The second step is to import a dependency called auth0-spring-security-api. This can be done on a Maven project by including the following configuration to pom.xml (it's not harder to do this on Gradle, Ivy, and so on):
    <project ...>
        <!-- everything else ... -->
        <dependencies>
            <!-- other dependencies ... -->
            <dependency>
                <groupId>com.auth0</groupId>
                <artifactId>auth0-spring-security-api</artifactId>
                <version>1.0.0-rc.3</version>
            </dependency>
        </dependencies>
    </project>
Integrating Auth0 with Spring Security
The third step consists of extending the WebSecurityConfigurerAdapter class. In this extension, you are going to use JwtWebSecurityConfigurer to integrate Auth0 and Spring Security:
@Configuration
@EnableWebSecurity
@EnableGlobalMethodSecurity(prePostEnabled = true)
public class SecurityConfig extends WebSecurityConfigurerAdapter {
    @Value(value = "${auth0.apiAudience}")
    private String apiAudience;
    @Value(value = "${auth0.issuer}")
    private String issuer;

    @Override
    protected void configure(HttpSecurity http) throws Exception {
        JwtWebSecurityConfigurer
                .forRS256(apiAudience, issuer)
                .configure(http)
                .cors().and().csrf().disable().authorizeRequests()
                .anyRequest().permitAll();
    }
}
As you don't want to hard code credentials in the code, you make SecurityConfig depend on two environment properties:
auth0.apiAudience: This is the value that you set as the identifier of the API that you created at Auth0 (https://contacts.blog-samples.com).auth0.issuer: This is your domain at Auth0, including the HTTP protocol. For example:https://blog-samples.auth0.com/.
Let's set them in a properties file on your Spring application (e.g. application.properties):
auth0.issuer=https://blog-samples.auth0.com/
auth0.apiAudience=https://contacts.blog-samples.com/
Securing Endpoints with Auth0
After integrating Auth0 and Spring Security, you can easily secure your endpoints with Spring Security annotations:
@RestController
@RequestMapping(value = "/contacts/")
public class ContactController {
    private static final List<Contact> contacts = Lists.newArrayList(
            Contact.builder().name("Bruno Krebs").phone("+5551987654321").build(),
            Contact.builder().name("John Doe").phone("+5551888884444").build()
    );

    @GetMapping
    public List<Contact> getContacts() {
        return contacts;
    }

    @PostMapping
    public void addContact(@RequestBody Contact contact) {
        contacts.add(contact);
    }
}
Now, to be able to interact with your endpoints, you will have to obtain an access token from Auth0. There are multiple ways to do this and the strategy that you will use depends on the type of the client application you are developing. For example, if you are developing a Single Page Application (SPA), you will use what is called the Implicit Grant. If you are developing a mobile application, you will use the Authorization Code Grant Flow with PKCE. There are other flows available at Auth0. However, for a simple test like this one, you can use your Auth0 dashboard to get one.
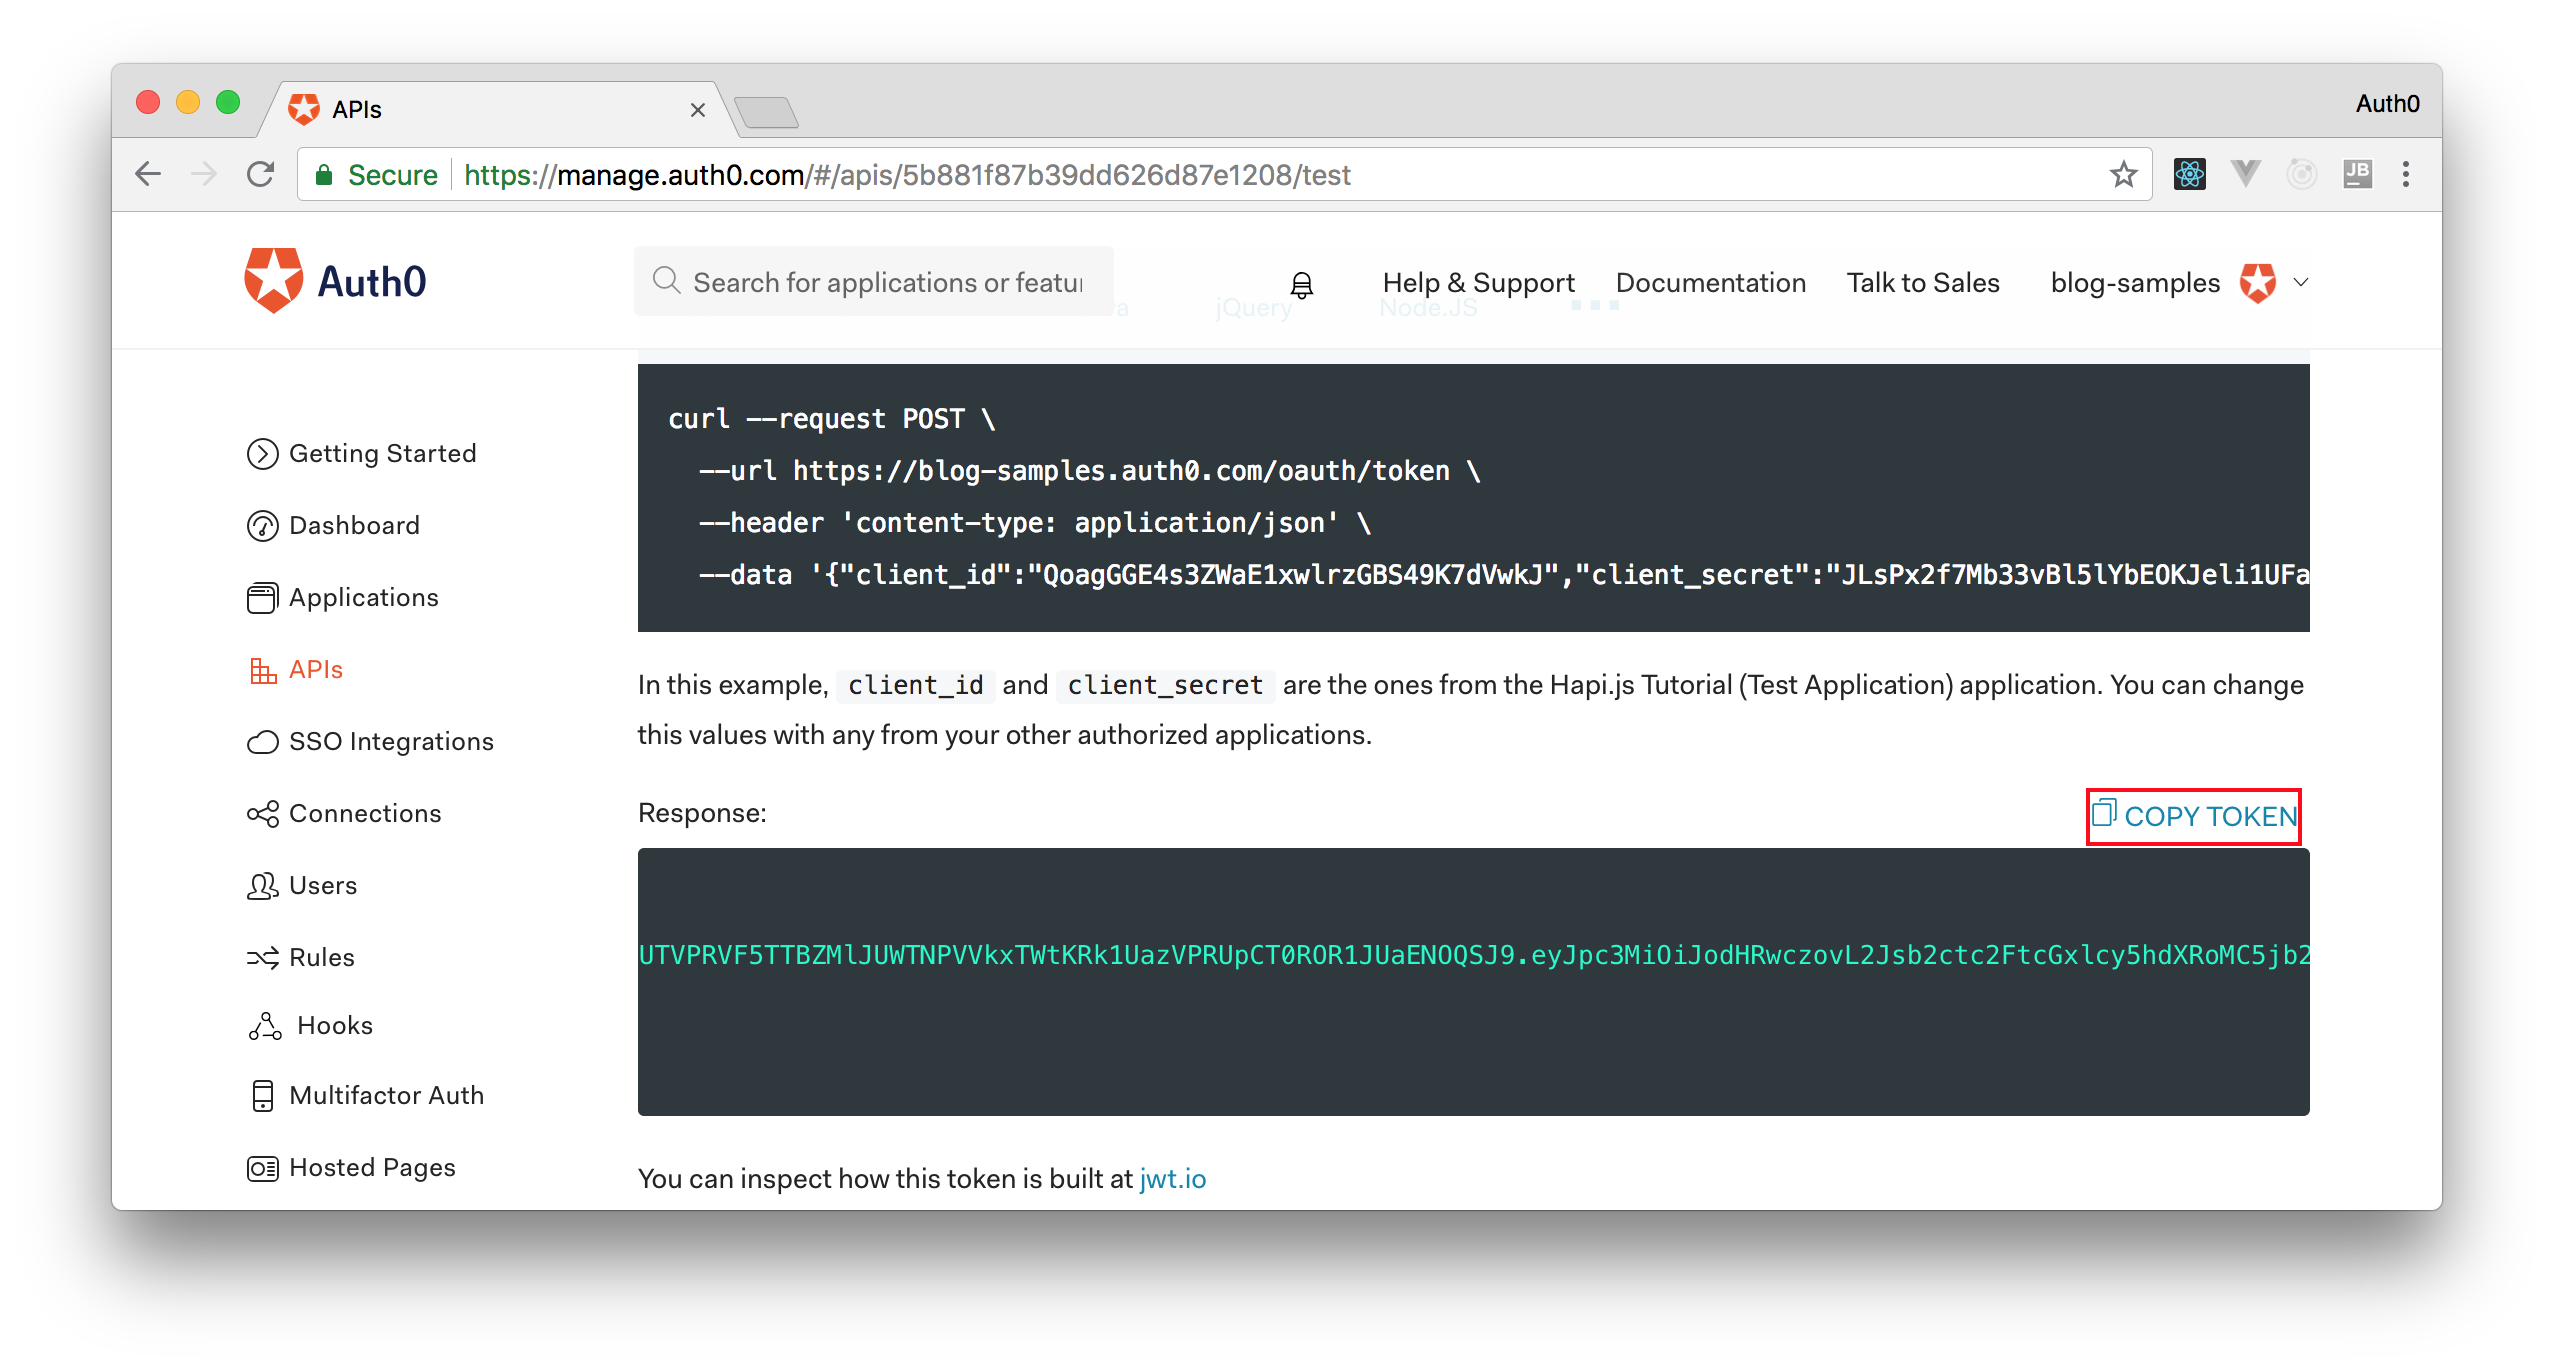
Therefore, you can head back to the APIs section in your Auth0 dashboard, click on the API you created before, and then click on the Test section of this API. There, you will find a button called Copy Token. Let's click on this button to copy an access token to your clipboard.
After copying this token, you can open a terminal and issue the following commands:
    # create a variable with your token
    ACCESS_TOKEN=<OUR_ACCESS_TOKEN>

    # use this variable to fetch contacts
    curl -H 'Authorization: Bearer '$ACCESS_TOKEN http://localhost:8080/contacts/
Note: You will have to replace
<OUR_ACCESS_TOKEN>with the token you copied from your dashboard.
As you are now using your access token on the requests you are sending to your API, you will manage to get the list of contacts again.
That's how you secure your Spring Boot backend API. Easy, right?
Conclusion
In this article, we looked at how to use MapStruct, a Java annotation processor for the generation of type-safe and performant mappers, to automatically map JPA entities into DTOs in Spring Boot and Java. As shown, this is an easy way to avoid boilerplate code and cumbersome activities while being able to exploit all the advantages of the DTO pattern.
Thanks for reading! I hope that you found this article helpful. Feel free to reach out to me with any questions, comments, or suggestions.
About the author

Antonello Zanini
Software Engineer