Kubernetes has become an inevitable part of the modern software infrastructure. Hence managing sensitive data on Kubernetes is also an essential aspect of modern software engineering so that you can put the security back into DevSecOps. Kubernetes offers a way to store sensitive data using the Secret object. While it's better than nothing, it is not really a secret, as it is just base64 encoded strings that anyone with access to the cluster or the code can decode.
Caution: Kubernetes Secrets are, by default, stored unencrypted in the API server's underlying data store (etcd). Anyone with API access can retrieve or modify a Secret, and so can anyone with access to etcd. Additionally, anyone authorized to create a Pod in a namespace can use that access to read any Secret in that namespace; this includes indirect access, such as the ability to create a Deployment. — Kubernetes docs
The problem of reading secrets from the cluster can be fixed using proper RBAC configuration and by securing the API server, check out How to Secure Your Kubernetes Clusters With Best Practices to learn more about RBAC and cluster API security. Securing secrets on the source code is the bigger problem. Everyone who has access to the repositories containing those secret definitions can also decode them. This makes it quite tricky to manage Kubernetes secrets in Git, like every other resource.
Let's see how to setup more secure secrets using the;
- Sealed Secrets,
- External Secrets Operator,
- Secrets Store CSI driver.
You would need a Kubernetes cluster to run the samples. I used k3d to create a local cluster. You can also use kind or minikube for this purpose.
Sealed Secrets
Sealed Secrets is an open-source Kubernetes controller and a client-side CLI tool from Bitnami that aims to solve the "storing secrets in Git" part of the problem, using asymmetric crypto encryption. Sealed Secrets with an RBAC configuration preventing non-admins from reading secrets is an excellent solution for the entire problem.
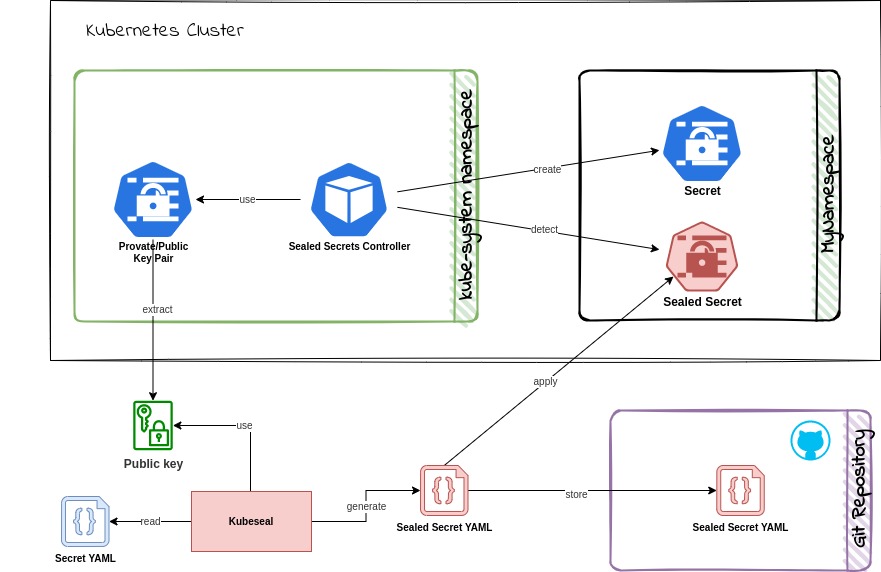
It works as below;
- Encrypt the secret on the developer machine using a public key and the
kubesealCLI. This encodes the encrypted secret into a Kubernetes Custom Resource Definition (CRD) - Deploy the CRD to the target cluster
- The Sealed Secret controller decrypts the secret using a private key on the target cluster to produce a standard Kubernetes secret.
The private key is only available to the Sealed Secrets controller on the cluster, and the public key is available to the developers. This way, only the cluster can decrypt the secrets, and the developers can only encrypt them.
Advantages
- Supports template definition so that metadata can be added to the unsealed secrets. For example, you can add labels and annotations to the unsealed secrets using the template definition.
- The unsealed secrets will be owned by the sealed secret CRD and updated when the sealed secrets are updated.
- Certificates are rotated every 30 days by default, and this can be customized.
- Secrets are encrypted using unique keys for each cluster, namespace, and secret combination (private key + namespace name + secret name), preventing any loopholes in decryption. This behavior is configurable using scopes
strict,namespace-wide, andcluster-wideduring the sealing process. - Can be used to manage existing secrets in the cluster.
- Has a VSCode extension to make it easier to use.
Disadvantages
- Since it unseals the sealed secrets into regular secrets, you can still decode them if you have access to the cluster and namespace.
- Requires resealing for each cluster environment, as the key pair will be unique for each cluster.
Installation
Install the controller on the cluster and the CLI on the local machine.
- Download the
controller.yamlmanifest file from the release page. - Deploy the controller using
kubectl apply -f controller.yamlto your cluster. The controller will be installed on thekube-systemnamespace. The controller will start and be ready in a few moments. - Install the CLI on your local machine using
brew install kubeseal(Linux & macOS) or using the pre-built binaries on the release page.
Usage
Let's create a sealed secret.
- Create a secret using the
kubectl create secretcommand or by hand coding a YAML file as follows:
echo -n secretvalue | kubectl create secret generic mysecret \
  --dry-run=client \
  --from-file=foo=/dev/stdin -o yaml > my-secret.yaml
This will produce a secret definition like the one below;
# my-secret.yaml

apiVersion: v1
data:
  foo: c2VjcmV0dmFsdWU=
kind: Secret
metadata:
  creationTimestamp: null
  name: mysecret
- Seal the secret using the
kubesealCLI. This will encrypt the secret using the public key fetched from the server and produce a sealed secret definition. Themy-secret.yamlfile can be discarded now. You can also download the public key and use it locally in offline mode.
kubeseal --format yaml < my-secret.yaml > my-sealed-secret.yaml
This will produce a sealed secret definition, my-sealed-secret.yaml, like the one below;
# my-sealed-secret.yaml

apiVersion: bitnami.com/v1alpha1
kind: SealedSecret
metadata:
  creationTimestamp: null
  name: mysecret
  namespace: default
spec:
  encryptedData:
    foo: AgA6a4AGzd7qzR8mTPqTPFNor8tTtT5...==
  template:
    metadata:
      creationTimestamp: null
      name: mysecret
      namespace: default
This file is safe to commit to Git or to share with other developers.
- Finally, you can deploy this to the cluster to be unsealed.
kubectl apply -f my-sealed-secret.yaml
- Now, you can see the unsealed secret in the cluster.
kubectl describe secret mysecret
You can use this secret in deployments like any other Kubernetes secret.
External Secrets Operator
Sealed Secrets are a great starting point for securing secrets, but there is an even better way. Using the External Secrets Operator (ESO) and an external secret management system like HashiCorp Vault, AWS Secrets Manager, Google Secrets Manager, or Azure Key Vault. While this is a bit more involved to set up, it is a better approach if you use a cloud provider to host your Kubernetes cluster. ESO supports many such secret managers and watches for changes to external secret stores and keeps Kubernetes secrets in sync.
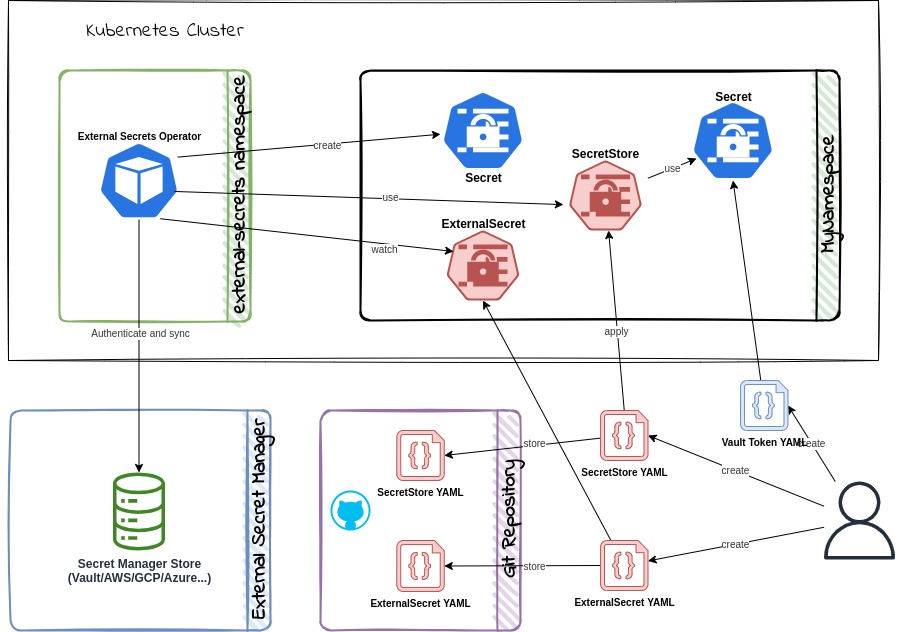
ESO provides four CRDs to manage secrets. The ExternalSecret and ClusterExternalSecret CRD define what data needs to be fetched and how it should be transformed. The SecretStore and ClusterSecretStore CRD define the connection details to the external secret stores. The Cluster variations can be used cluster-wide.
It works as below;
- Create a
SecretStoreCRD to define the connection details to the external secret store. - Create secrets in the external secret store.
- Create an
ExternalSecretCRD to define what data needs to be fetched from the external secret store. - Deploy the CRDs to the target cluster.
- The ESO controller will fetch the data from the external secret store and create a Kubernetes secret.
Advantages
- Secrets are stored in a secure external secret manager, not the code repository.
- Keeps secrets in sync with the external secret manager.
- Works with many external secret managers.
- Can use multiple secret stores in the same cluster.
- Provides Prometheus metrics for monitoring.
Disadvantages
- Needs an elaborate setup to use.
- Creates a Kubernetes secret object which can be decoded if you have access to the cluster and namespace.
- Relies on the external secret manager and its access policies to be secure.
Installation
ESO can be installed via Helm using the following commands:
helm repo add external-secrets https://charts.external-secrets.io

helm install external-secrets \
  external-secrets/external-secrets \
  --namespace external-secrets \
  --create-namespace
If you want to include ESO in your Helm releases, add the --set installCRDs=true flag to the above command.
Let's see how you can use ESO with different secret managers.
Using HashiCorp Vault
HashiCorp Vault is a popular secret manager providing different secret engines. ESO can only be used with the KV Secrets Engine offered by Vault. Vault provides a free and open-source version that you can self-manage and a managed version with a free tier on the HashiCorp Cloud Platform (HCP).
Make sure you have a Key-value secret store setup in your local Vault instance or on the HCP cloud. You can also deploy Vault to your Kubernetes cluster using the Vault Helm chart
- Create a new
SecretStoreCRD,vault-backend.yaml, to define the connection details to Vault.
# vault-backend.yaml

apiVersion: external-secrets.io/v1beta1
kind: SecretStore
metadata:
  name: vault-backend
spec:
  provider:
    vault:
      server: 'YOUR_VAULT_ADDRESS'
      path: 'secret'
      version: 'v2'
      namespace: 'admin' # required for HCP Vault
      auth:
        # points to a secret that contains a vault token
        # https://www.vaultproject.io/docs/auth/token
        tokenSecretRef:
          name: 'vault-token'
          key: 'token'
- Create a secret resource to hold the Vault token. Use a token that has policies with read access to the
secret/path in the Vault KV store.
kubectl create secret generic vault-token \
  --dry-run=client \
  --from-literal=token=YOUR_VAULT_TOKEN
- Create a secret in Vault. If you are using the Vault CLI, you can use the below command to create a secret. Make sure you are logged in to the vault instance from the CLI with appropriate policies.
vault kv put secret/mysecret my-value=supersecret
- Create an
ExternalSecretCRD to define what data needs to be fetched from Vault.
# vault-secret.yaml

apiVersion: external-secrets.io/v1beta1
kind: ExternalSecret
metadata:
  name: vault-example
spec:
  refreshInterval: '15s'
  secretStoreRef:
    name: vault-backend
    kind: SecretStore
  target:
    name: vault-example-sync
  data:
    - secretKey: secret-from-vault
      remoteRef:
        key: secret/mysecret
        property: my-value
- Apply the above CRDs to the cluster, and it should create a Kubernetes secret named
vault-example-syncwith the data fetched from Vault.
kubectl apply -f vault-backend.yaml
kubectl apply -f vault-secret.yaml
You can see the secret in the cluster using the kubectl describe command.
kubectl describe secret vault-example-sync

# output should have the below data
Name:         vault-example-sync
Namespace:    default
Labels:       <none>
Annotations:  reconcile.external-secrets.io/data-hash: ...

Type:  Opaque

Data
====
secret-from-vault:  16 bytes
If you have issues creating the secret, check the events section of the describe output of the ExternalSecret resource.
kubectl describe externalsecret vault-example
If you see permission errors, make sure you use tokens with the right policies.
Other secret managers
Setting up other secret managers is similar to the above steps. The only difference would be the SecretStore CRD and the remoteRef section in the ExternalSecret CRD. You can find official guides for different providers in the ESO documentation.
Secrets Store CSI Driver
The Secrets Store CSI Driver is a native upstream Kubernetes driver that can be used to abstract where the secret is stored from the workload. If you want to use a cloud provider's secret manager without exposing the secrets as Kubernetes Secret objects, you can use the CSI Driver to mount secrets as volumes in your pods. This is a great option if you use a cloud provider to host your Kubernetes cluster. The driver supports many cloud providers and can be used with different secret managers.
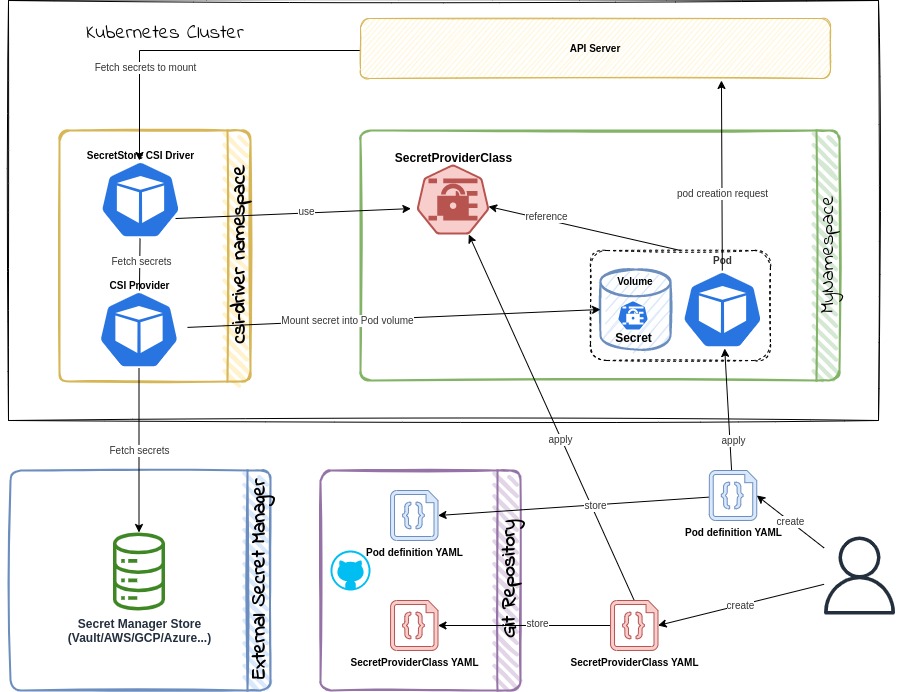
The Secrets Store CSI Driver is a daemonset that communicates with the secret provider to retrieve secrets specified in a SecretProviderClass custom resource.
It works as below;
- Create a
SecretProviderClassCRD to define the details of the secret being fetched from the secret provider. - Create deployments and reference the
SecretProviderClassin the pod's volume spec. - The driver will fetch the secret from the secret provider and mount it as a
tmpfsvolume in the pod during pod startup. This volume will be removed during pod deletion.
The driver can also sync changes to secrets. The driver currently supports Vault, AWS, Azure, and GCP providers. Secrets Store CSI Driver can also sync provider secrets as Kubernetes secrets; if required, this behavior needs to be explicitly enabled during installation.
Advantages
- Secrets are stored in a secure external secret manager, not the code repository.
- Keeps secrets in sync with the external secret manager. It also supports the rotation of secrets.
- Works with all major external secret managers.
- Mounts secrets as volumes in the pod, so they are not exposed as Kubernetes secrets. It can be configured to create Kubernetes secrets as well.
Disadvantages
- Needs an elaborate setup to use and is more complex than ESO.
- Uses more resources than ESO as this needs to run in every node.
- Relies on the external secret store and its access policies to be secure.
Using Google Secret Manager provider
Let us see how to configure the driver to use Google Secret Manager (GSM) as the secret provider.
Make sure you are using a Google Kubernetes Engine (GKE) cluster with the Workload Identity feature enabled. Workload Identity allows workloads in your GKE clusters to impersonate Identity and Access Management (IAM) service accounts to access Google Cloud services. You would also need to enable Kubernetes Engine API, Secret Manager API, and Billing for the project. The gcloud CLI should prompt you to enable these APIs if they are not enabled.
The below command can be used to create a new cluster with Workload Identity enabled using the gcloud CLI.
export PROJECT_ID=<your gcp project>
gcloud config set project $PROJECT_ID

gcloud container clusters create hello-hipster \
  --workload-pool=$PROJECT_ID.svc.id.goog
Install the Secrets Store CSI Driver
Secrets Store CSI Driver can be installed on the cluster with Helm using the following commands:
helm repo add secrets-store-csi-driver https://kubernetes-sigs.github.io/secrets-store-csi-driver/charts

helm install csi-secrets-store \
    secrets-store-csi-driver/secrets-store-csi-driver \
    --namespace kube-system
This will install the driver and CRDs on the kube-system namespace. You also need to install the provider required into the cluster.
Install the GSM provider
Let us install the GSM provider into the cluster. The provider can be installed using the following command:
kubectl apply -f https://raw.githubusercontent.com/GoogleCloudPlatform/secrets-store-csi-driver-provider-gcp/main/deploy/provider-gcp-plugin.yaml
Create a Secret
First, you need to setup a workload identity service account.
# Create a service account for workload identity
gcloud iam service-accounts create gke-workload

# Allow "default/mypod" to act as the new service account
gcloud iam service-accounts add-iam-policy-binding \
    --role roles/iam.workloadIdentityUser \
    --member "serviceAccount:$PROJECT_ID.svc.id.goog[default/mypodserviceaccount]" \
    gke-workload@$PROJECT_ID.iam.gserviceaccount.com
Now let's create a secret that this service account can access.
# Create a secret with 1 active version
echo "mysupersecret" > secret.data
gcloud secrets create testsecret --replication-policy=automatic --data-file=secret.data
rm secret.data

# grant the new service account permission to access the secret
gcloud secrets add-iam-policy-binding testsecret \
    --member=serviceAccount:gke-workload@$PROJECT_ID.iam.gserviceaccount.com \
    --role=roles/secretmanager.secretAccessor
Now you can create a SecretProviderClass resource that will be used to fetch the secret from GSM. Remember to replace $PROJECT_ID with your GCP project ID.
# secret-provider-class.yaml

apiVersion: secrets-store.csi.x-k8s.io/v1
kind: SecretProviderClass
metadata:
  name: app-secrets
spec:
  provider: gcp
  parameters:
    secrets: |
      - resourceName: "projects/$PROJECT_ID/secrets/testsecret/versions/latest"
        path: "good1.txt"
      - resourceName: "projects/$PROJECT_ID/secrets/testsecret/versions/latest"
        path: "good2.txt"
Create a Pod
Now you can create a pod that will use the SecretProviderClass resource to fetch the secret from GSM. Remember to replace $PROJECT_ID with your GCP project ID.
# my-pod.yaml

apiVersion: v1
kind: ServiceAccount
metadata:
  name: mypodserviceaccount
  namespace: default
  annotations:
    iam.gke.io/gcp-service-account: gke-workload@$PROJECT_ID.iam.gserviceaccount.com
---
apiVersion: v1
kind: Pod
metadata:
  name: mypod
  namespace: default
spec:
  serviceAccountName: mypodserviceaccount
  containers:
    - image: gcr.io/google.com/cloudsdktool/cloud-sdk:slim
      imagePullPolicy: IfNotPresent
      name: mypod
      resources:
        requests:
          cpu: 100m
      stdin: true
      stdinOnce: true
      terminationMessagePath: /dev/termination-log
      terminationMessagePolicy: File
      tty: true
      volumeMounts:
        - mountPath: '/var/secrets'
          name: mysecret
  volumes:
    - name: mysecret
      csi:
        driver: secrets-store.csi.k8s.io
        readOnly: true
        volumeAttributes:
          secretProviderClass: 'app-secrets'
Apply the above resources to the cluster.
kubectl apply -f secret-provider-class.yaml
kubectl apply -f my-pod.yaml
Wait for the pod to start, and then exec into the pod and check the contents of the mounted files.
kubectl exec -it mypod /bin/bash
# execute the below command in the pod to see the contents of the mounted secret file
root@mypod:/# cat /var/secrets/good1.txt
Other secret managers
You can find similar guides for the AWS CSI provider, Azure CSI provider and Vault CSI provider.
Conclusion
Sealed Secrets are a great solution for small teams and projects to secure secrets in Git. For larger teams and projects, the External Secrets Operator or the Secrets Store CSI Driver is a better solution to manage secrets securely. The External Secrets Operator can be used with many secret management systems and is not limited to the ones mentioned above. Of course, this should be used with RBAC to prevent non-admins from reading secrets in the cluster. The Secrets Store CSI Driver might be more involved than ESO, but it is a more native solution.
About the author

Deepu K Sasidharan
Principal Developer Advocate