Preface
In this article, you will learn about Kubernetes and develop and deploy a sample application. To avoid being repetitive and to avoid conflicting with other resources, instead of addressing theoretical topics first, this article will focus on showing you what you need to do to deploy your first application on a Kubernetes cluster. The article will not avoid the theoretical topics though; you will learn about them on the fly when needed. This approach will prevent abstract discussions and explanations that might not make sense if introduced prematurely.
At the end of this article, you will have learned how to spin up a Kubernetes cluster (on DigitalOcean), and you will have an application up and running in your cluster. If you find this topic interesting, keep reading!
“This article will teach you how to deploy a sample application in a Kubernetes cluster while learning about the basic concepts. Have fun!”
Tweet This
Quick Introduction to Kubernetes
Kubernetes, if you are not aware, is an open-source system for automating deployment, scaling, and managing containerized applications. With this platform, you can decompose your applications into smaller systems (called microservices) while developing; then you can compose (or orchestrate) these systems together while deploying. As you will learn, Kubernetes provides you different objects that help you organize your applications' microservices into logical units that you can easily manage.
The explanation above, while correct, is probably too vague and too abstract if you are not familiar with Kubernetes and microservices. So, as the goal of this article is to avoid this kind of introduction, you will be better off getting started soon.
How to Spin Up a Kubernetes Cluster
Currently, several services around the globe provide different Kubernetes implementations. Among the most popular ones, you will find:
- Minikube: An open-source tool that you can install in your local machine to use Kubernetes locally. This tool uses a virtualization solution (like VirtualBox or similar) to set up a local Kubernetes cluster.
- Google Kubernetes Engine (GKE): Google's solution that manages production-ready Kubernetes clusters for you.
- Amazon Elastic Kubernetes Service (EKS): Amazon's solution that manages production-ready Kubernetes clusters for you.
- Azure Kubernetes Service (AKS): Azure's solution that provides you managed, production-ready Kubernetes clusters.
- OpenShift Kubernetes: Red Hat's solution that handles Kubernetes clusters for you.
Note: Minikube is the only solution that is free forever (but it is also not that useful, as it runs locally only). Although some of the other solutions offer free tiers that will allow you to get started without paying a dime, they will charge you money to keep your clusters running eventually.
Why Choose DigitalOcean
You might have noticed that the list above did not mention DigitalOcean, even though this article stated that you will use it. The thing is, DigitalOcean just launched its Managed Kubernetes Service, and this service is still on a limited availability mode.
What this means is that DigitalOcean Kubernetes provides full functionality, offers ample support, but that this service is partially production-ready (errors might occur). For this article, though, the current offering is robust enough. Besides that, you will see a referral link in this article that will give you a $100 USD, 60-day credit on DigitalOcean so you can spin up your cluster without paying anything.
Installing Kube Control (kubectl)
Before spinning up a Kubernetes cluster, you will need a tool called kubectl. This tool, popularly known as "Kube Control", is a command-line interface that will allow you to manage your Kubernetes cluster with ease from a terminal. Soon, you will get quite acquainted with kubectl.
To install kubectl, you can head to this resource and choose, from the list shown, the instructions for your operating system. In this list, you will see instructions for:
- Linux (and some of its variations, like Ubuntu);
- macOS (which can be accomplished by using Homebrew or Macports);
- and Windows (which you will find instructions for PowerShell and Chocolatey).
After following these instructions and installing kubectl in your machine, you can issue the following command to confirm that the tool is indeed available:
kubectl version
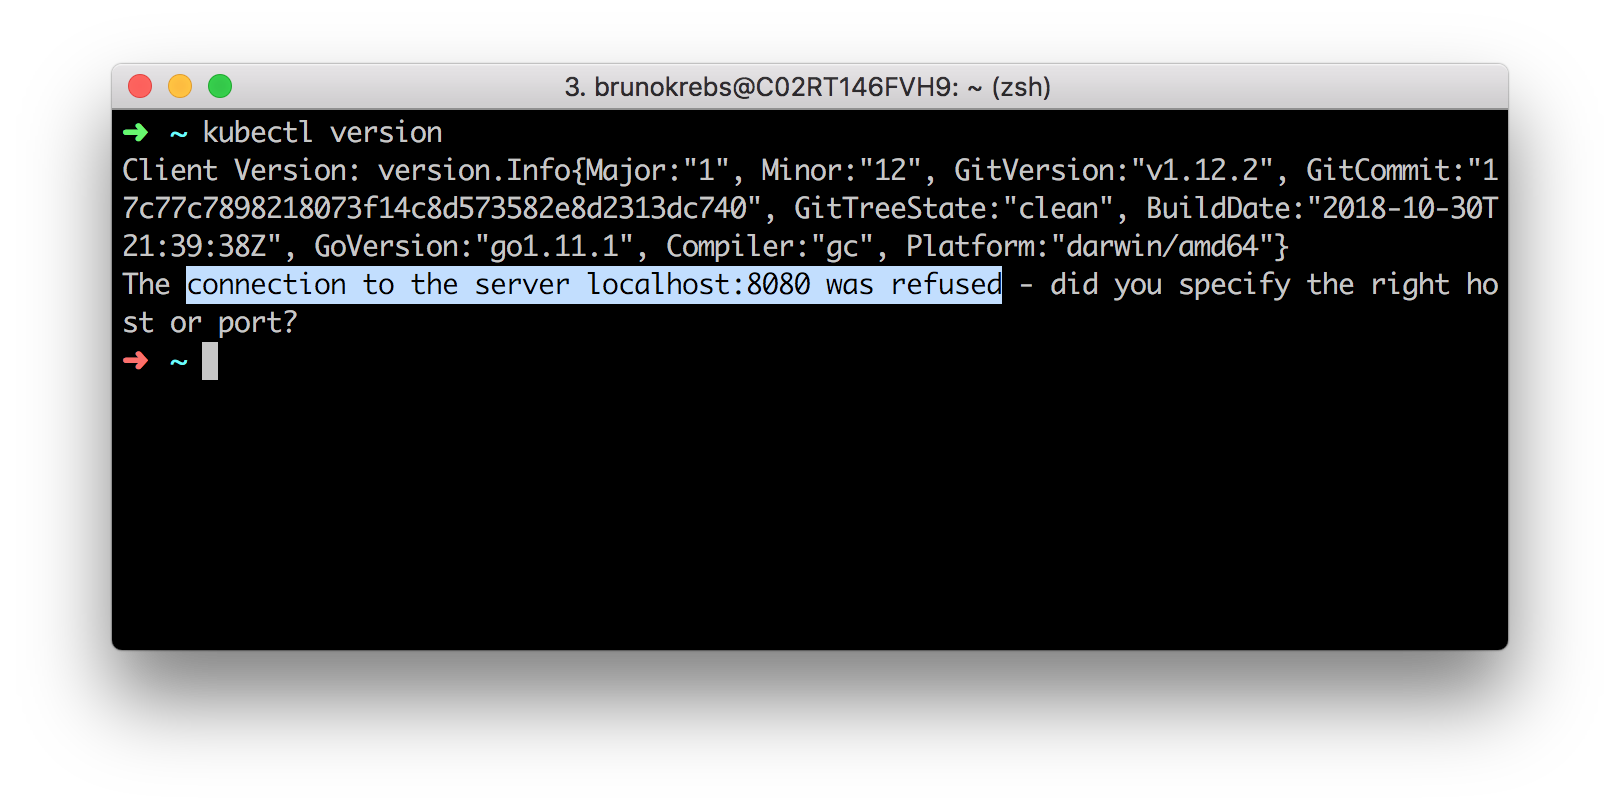
The output of the above command will show the client version (i.e., the release of kubectl) and a message saying that the "connection to the server localhost:8080 was refused." What this means is that you do have kubectl properly installed, but that you don't have a cluster available yet (expected, right?). In the next sections, you will learn how to spin up a Kubernetes cluster.
How to Create a Kubernetes Cluster on DigitalOcean
If you already have a Kubernetes cluster that you will use, you can skip this section. Otherwise, please, follow the instructions here to create your Kubernetes cluster on DigitalOcean. For starters, as mentioned before, you will have to use this referral link. If you don't use a referral link, you will end up paying for your cluster from the very begin.
After using this link to create your account on DigitalOcean, you will get an email confirmation. Use the link sent to you to confirm your email address. Confirming your address will make DigitalOcean ask you for a credit card. Don't worry about this. If you don't spend more than $100 USD, they won't charge you anything.
After inputting a valid credit card, you can use the next screen to create a project, or you can use this link to skip this unnecessary step and to head to the Kubernetes dashboard.
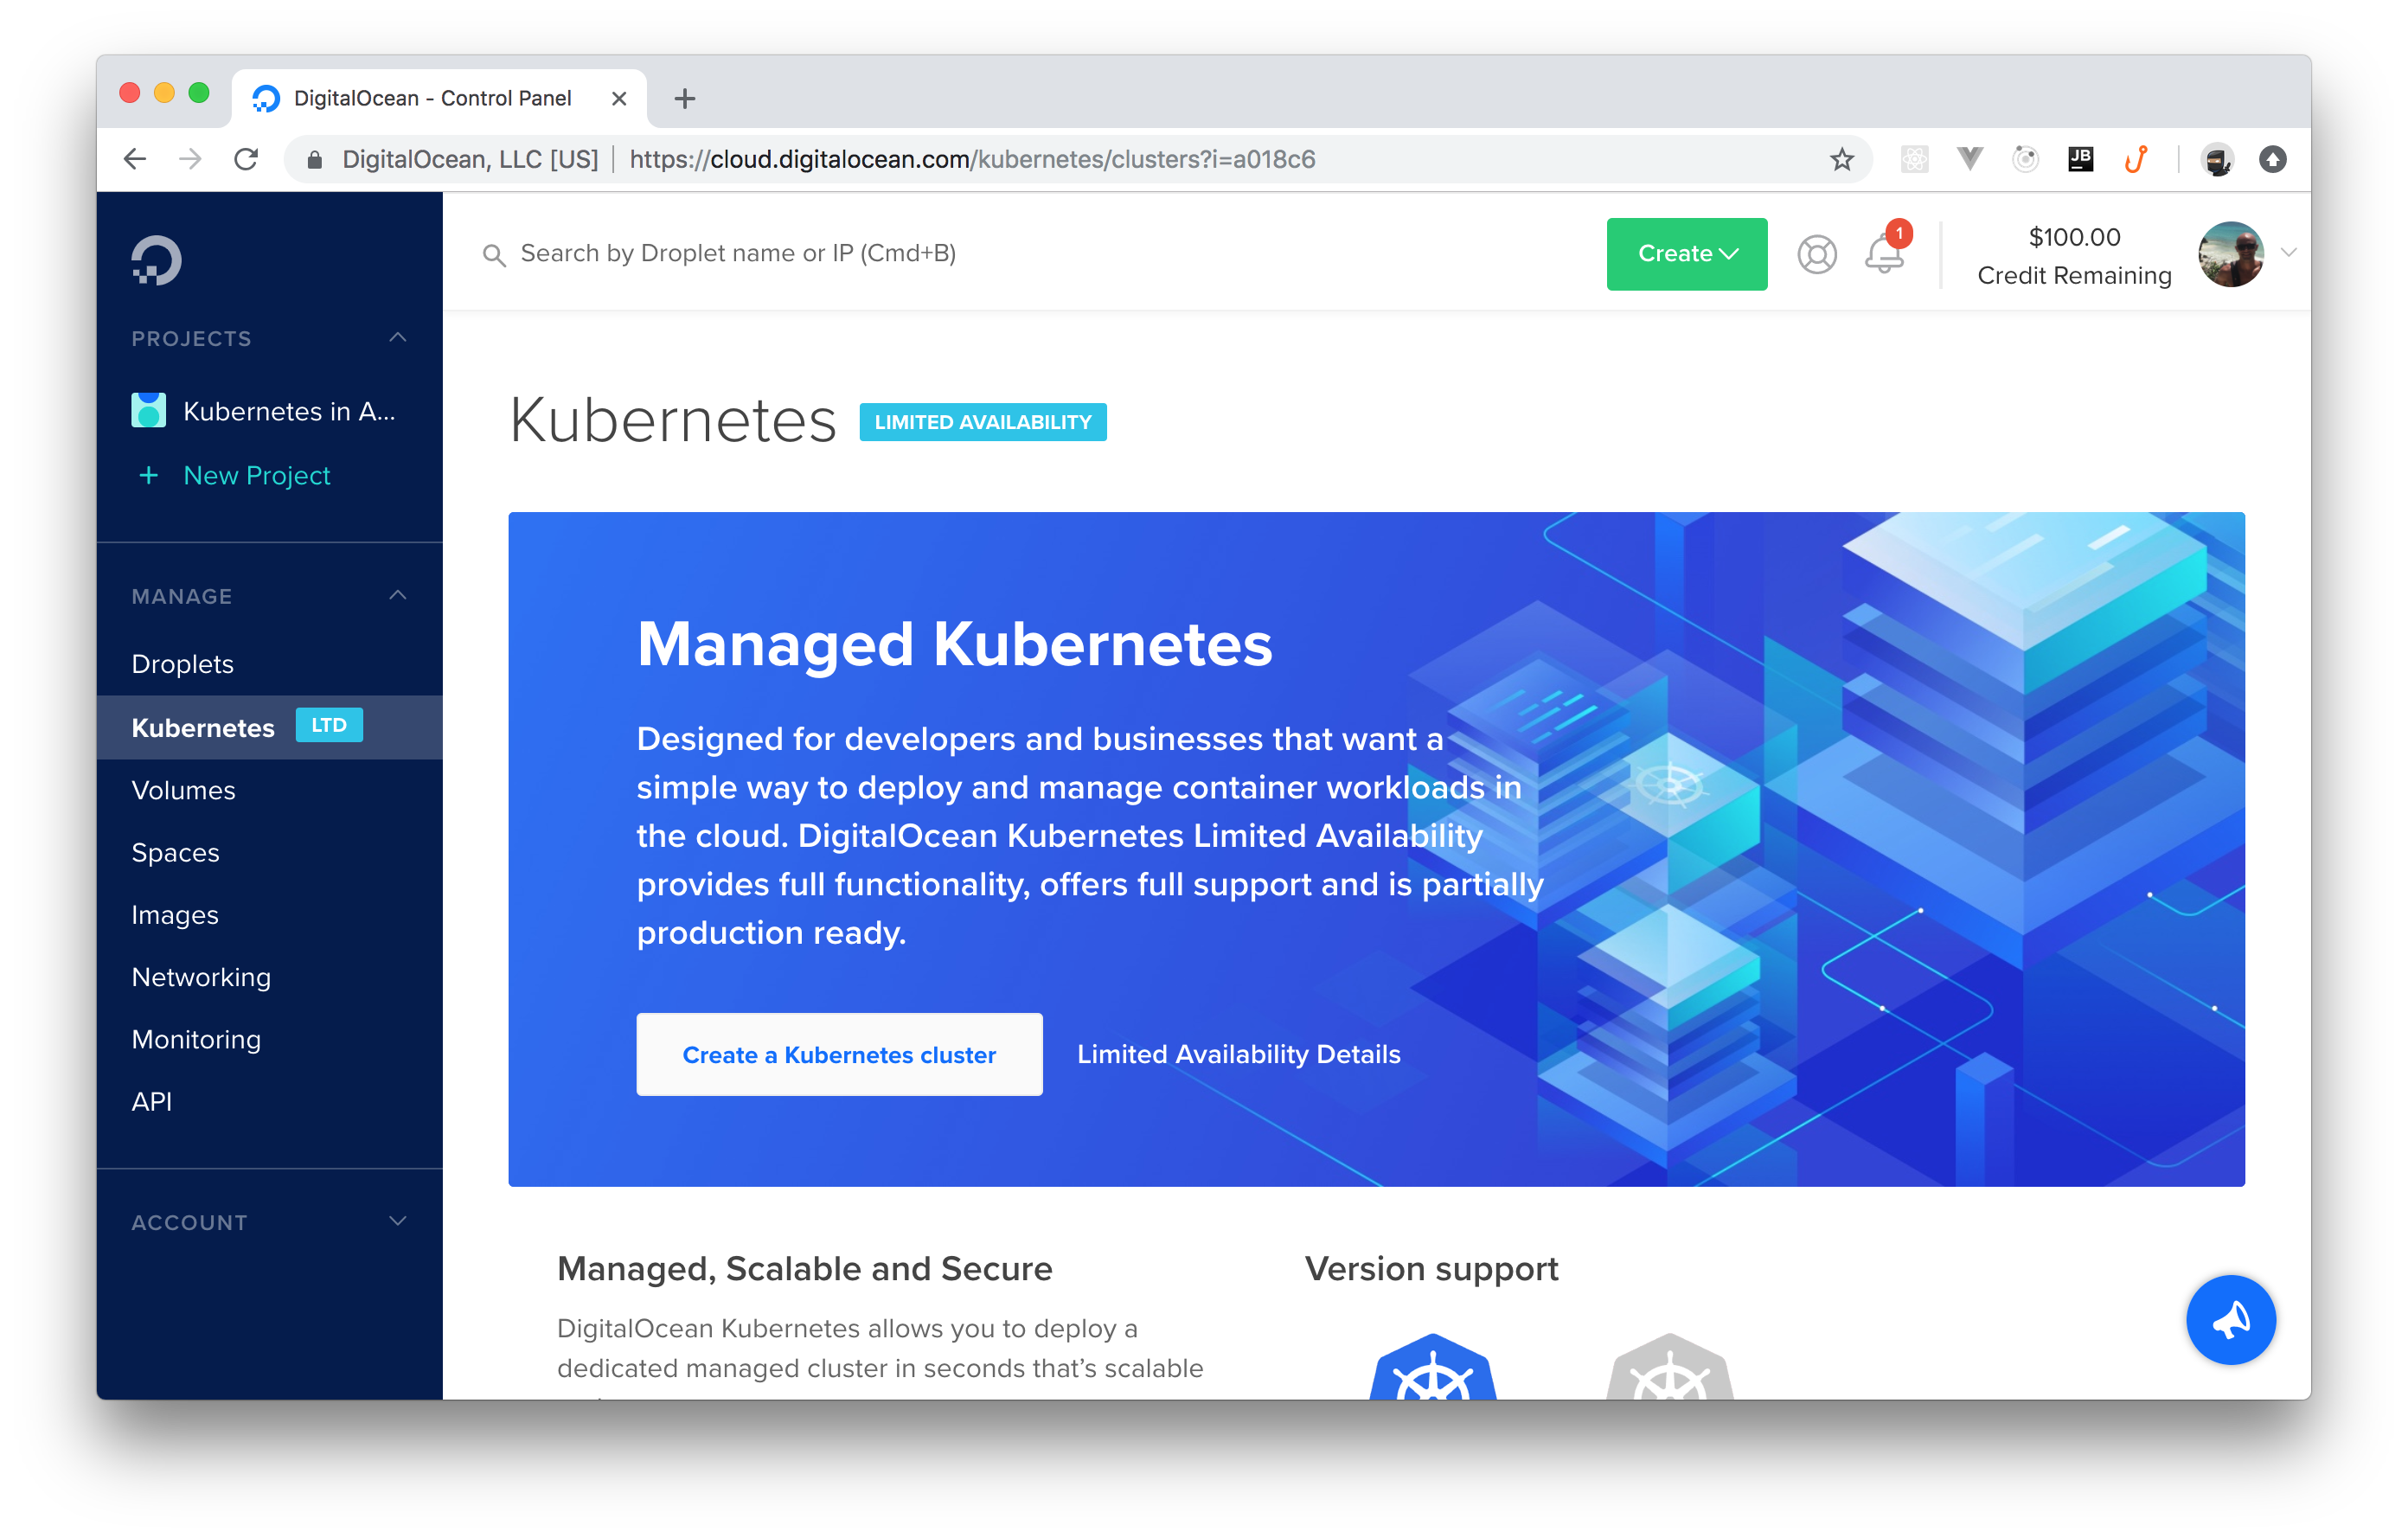
From the Kubernetes dashboard, you can hit the Create a Kubernetes cluster button (you might have to click on Enable Limited Access first). Then, DigitalOcean will show you a new page with a form that you can fill in as follows:
- Select a Kubernetes version: The instructions on this article were tested with the
1.13.5-do.1version. If you feel like testing other versions, feel free to go ahead. Just let us know how it went. - Choose a datacenter region: Feel free to choose whatever region you prefer.
- Add node pool(s): Make sure you have just one node pool, that you choose the
$10/Month per nodeoption, and that you have at least three nodes. - Add Tags: Don't worry about tagging anything.
- Choose a name: You can name your cluster whatever you want (e.g., "kubernetes-tutorial"). Just make sure DigitalOcean accepts the name (e.g., names can't contain spaces).
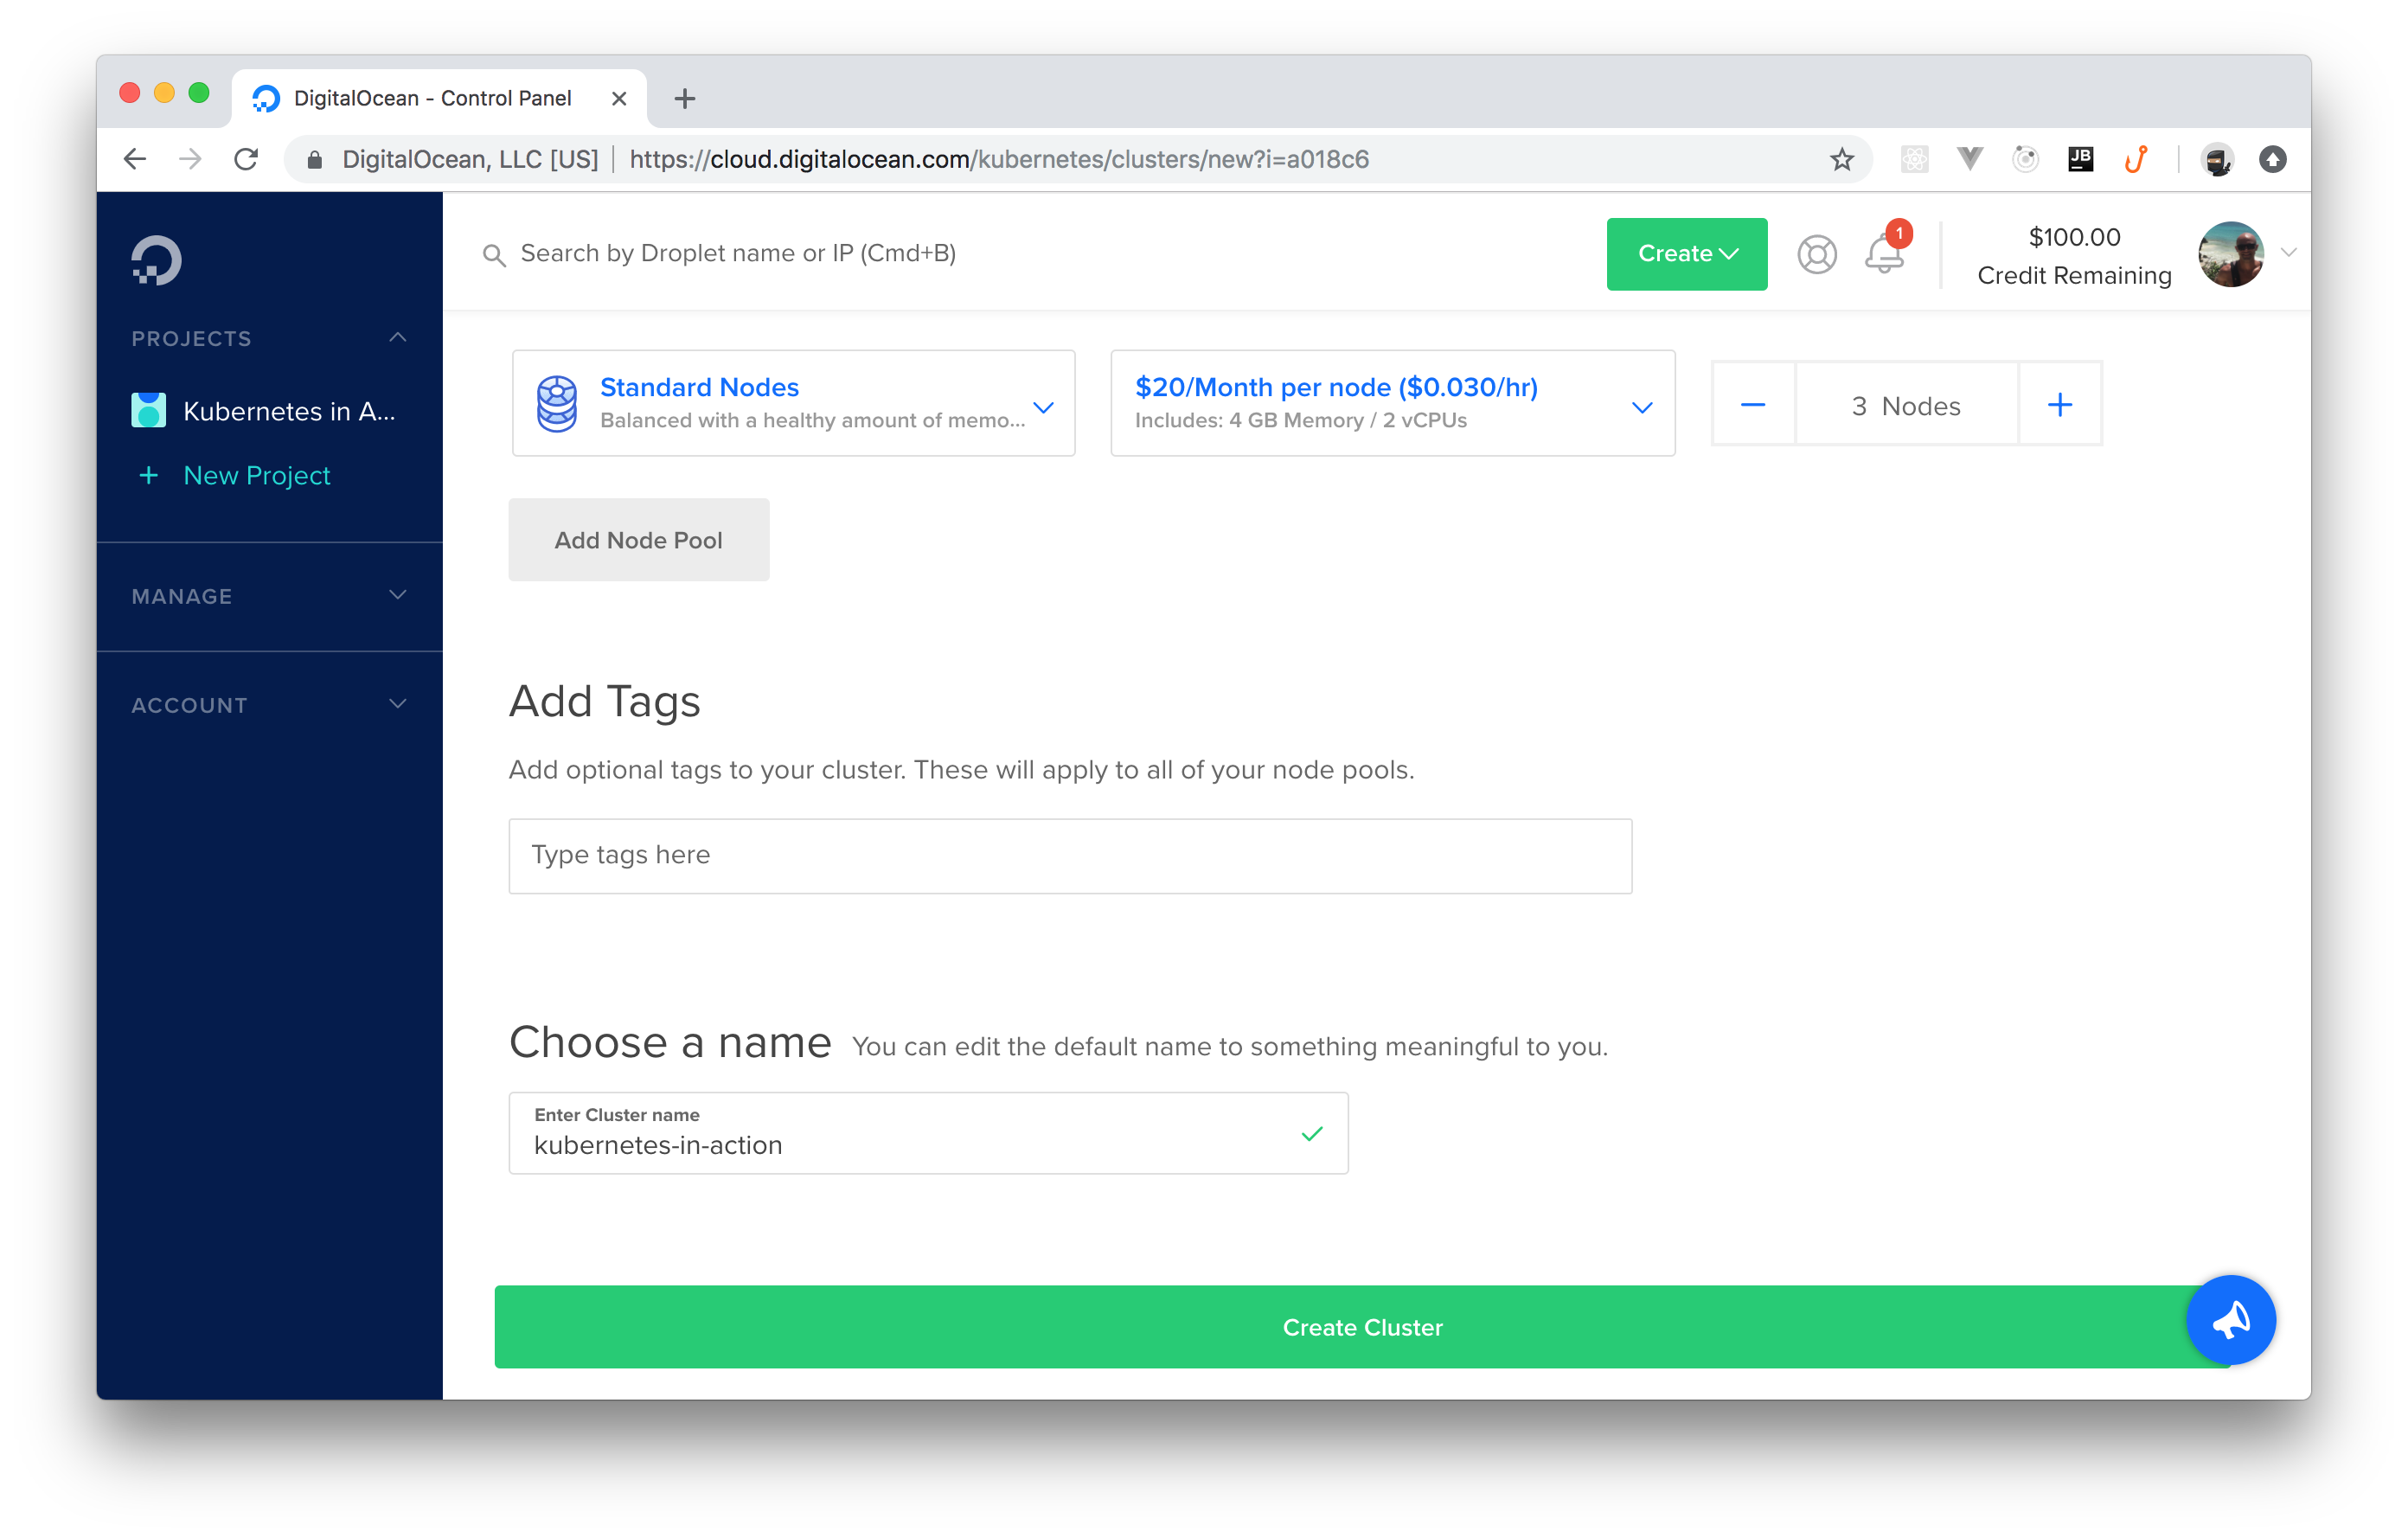
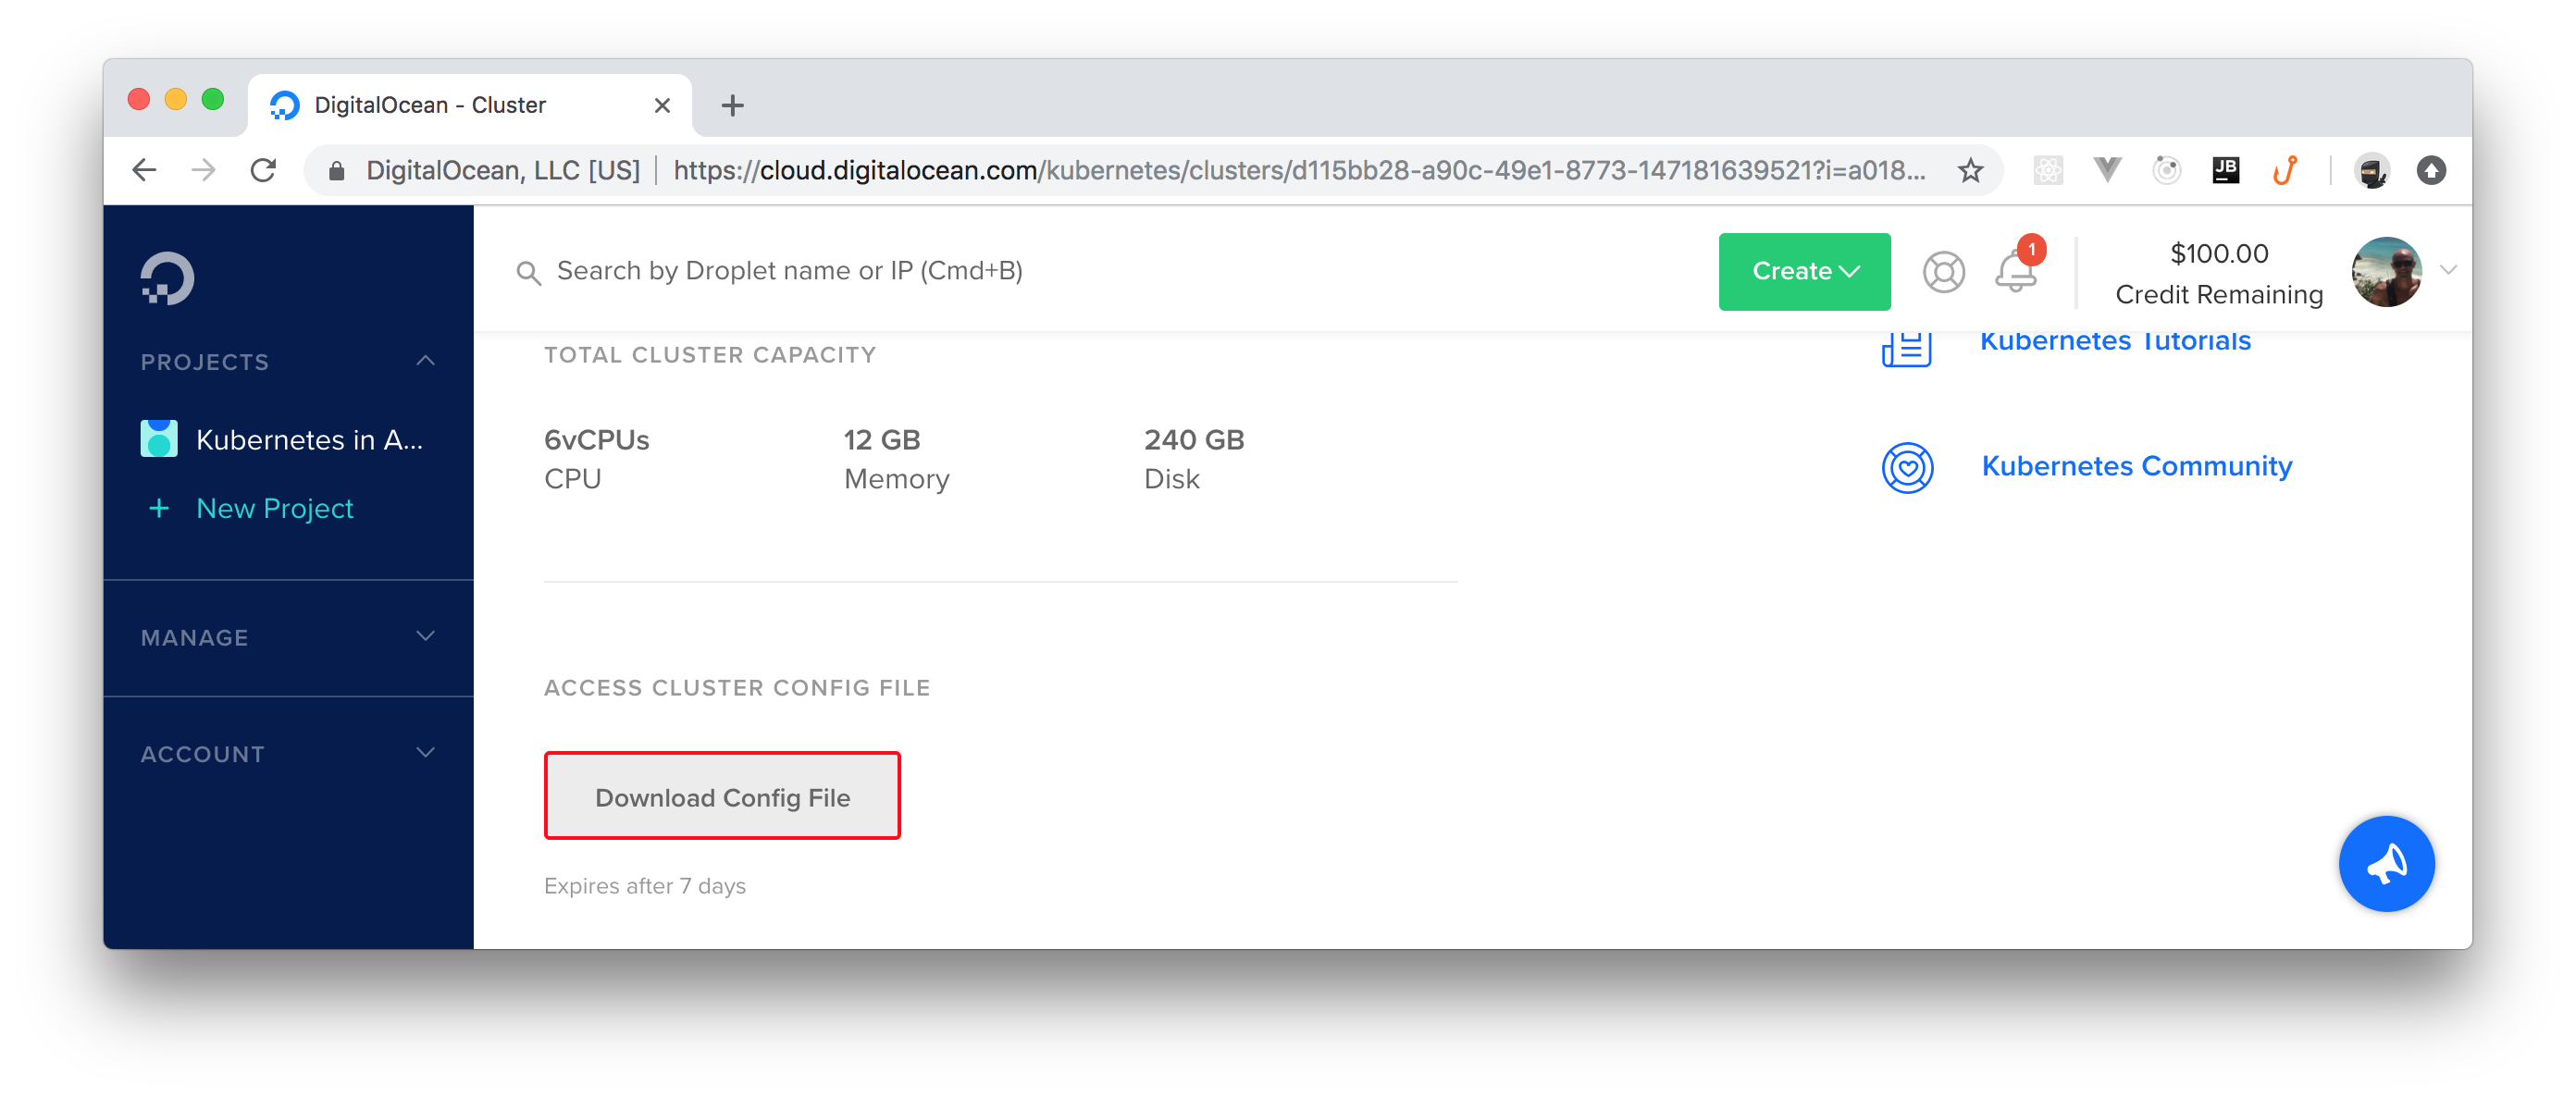
After filling in this form, you can click on the Create Cluster button. It will take a few minutes (roughly 4 mins) before DigitalOcean finishes creating your cluster for you. However, you can already download the cluster's config file.
This file contains the credentials needed for you to act as the admin of the cluster, and you can find it on the cluster's dashboard. After you clicked on the Create Cluster button, DigitalOcean redirected you to your cluster's dashboard. From there, if you scroll to the bottom, you will see a button called Download Config File. Click on this button to download the config file.
When you finish downloading this file, open a terminal and move the file to the .kube directory in your home dir (you might have to create it):
# make sure .kube exists
mkdir ~/.kube

# move the config file to it
mv ~/Downloads/kubernetes-tutorial-kubeconfig.yaml ~/.kube
If needed, adjust the last command with the correct path of the downloaded file.
The ~/.kube directory is a good place to keep your Kubernetes credentials. By default, kubectl will use a file named config (if it finds one inside the .kube dir) to communicate with clusters. To use a different file, you have three alternatives:
- First, you can specify another file by using the
--kubeconfigflag in yourkubectlcommands, but this is too cumbersome. - Second, you can define the
KUBECONFIGenvironment variable to avoid having to type--kubeconfigall the time. - Third, you can merge contexts in the same
configfile and then you can switch contexts.
The second option (setting the KUBECONFIG environment variable) is the easiest one, but feel free to choose another approach if you prefer. To set this environment, you can issue the following command:
export KUBECONFIG=~/.kube/kubernetes-tutorial-kubeconfig.yaml
Note: Your file path might be different. Make sure the command above contains the right path.
Keep in mind that this command will set this environment only on this terminal's session. If you open a new terminal, you will have to execute this command again.
How to Check the Nodes of Your Kubernetes Cluster
Now that you got yourself a Kubernetes cluster and that you defined what credentials kubectl will use, you can start communicating with your cluster. For starters, you can issue the following command to check the nodes that compose your cluster:
kubectl get nodes
After running this command, you will get a list with three or more nodes (depending on how many nodes you chose while creating your cluster). A node, in the context of Kubernetes, is a worker machine (virtual or physical, both apply) that Kubernetes uses to run applications (yours and those that Kubernetes needs to stay up and running).
No matter how many nodes you have in your cluster, the list that the command above outputs will show the name of these nodes, their statuses (which, hopefully, will be ready), their roles, ages, and versions. Don't worry about this information now; you will learn more about nodes in a Kubernetes cluster later.
If you are seeing the list of nodes and all of them are on the ready status, you are good to go.
How to Deploy Your First Kubernetes Application
After all this setup, now it is time to deploy your first Kubernetes application. As you will see, doing so is not hard, but it does involve a good number of steps. As such, to speed up the process, instead of deploying some application that you might have around (which would need some preparation to run on Kubernetes) and instead of creating a brand new one for that, you will deploy a sample application that already exists. More specifically, you will deploy an app that allows users to share what they are thinking. Similar to what people can do on Twitter, but without authentication and way simpler.
How to Create Kubernetes Deployments
Back in the terminal, the first thing you will do is to create a directory that you will use to save a bunch of YAML files (you can name this directory anything you like, for example, kubernetes-tutorial). While using Kubernetes, you will often use this "markup language" to describe the resources that you will orchestrate in your clusters.
After creating a directory, create a file called deployment.yaml inside it and add the following code to it:
apiVersion: apps/v1
kind: Deployment
metadata:
  name: kubernetes-tutorial-deployment
spec:
  replicas: 2
  selector:
    matchLabels:
      app: kubernetes-tutorial-deployment
  template:
    metadata:
      labels:
        app: kubernetes-tutorial-deployment
    spec:
      containers:
      - name: kubernetes-tutorial-application
        image: auth0blog/kubernetes-tutorial
        ports:
          - containerPort: 3000
This configuration file is not hard to understand. Basically, this file is defining a deployment object (kind: Deployment) that creates a container named kubernetes-tutorial-application. This container uses an image called auth0blog/kubernetes-tutorial to run the sample application.
In Kubernetes, to tell your cluster what to run, you usually use images from a registry. By default, Kubernetes will try to fetch images from the public Docker Hub registry. However, you can also use private registries if you prefer keeping your images, well, private.
Don't worry about the other properties of this file now; you will learn about them when the time comes. However, note that the sentences in the last paragraph introduced two new concepts:
- Deployment: Basically speaking, in the context of Kubernetes, a deployment is a description of the desired state of the system. Through a deployment, you inform your Kubernetes cluster how many pods of a particular application you want running. In this case, you are specifying that you want two pods (
replicas: 2). - Container: Containers are the lowest level of a microservice that holds running applications, their libraries, and their dependencies. Containers can be exposed to the world through an external IP address and are usually part of a pod.
Another important thing to learn about is what a pod is. A pod, as defined by the official documentation, is the smallest deployable unit of computing that can be created and managed in Kubernetes. For now, think of pods as groups of microservices (containers) that are so tightly related they cannot be deployed separately. In this case, your pods contain a single container, the sample application.
Note: Nowadays, deployments are the preferred way to orchestrate pods and replication. However, not that long ago, Kubernetes experts used to use Replication Controllers and Replication Sets. You don't need to learn about these other objects to follow along with this tutorial. However, if you are curious, you can read about their differences in this nice resource.
Then, to run this deployment in your Kubernetes cluster, you will have to issue the following command:
# make sure you are inside the kubernetes-tutorial directory
kubectl apply -f deployment.yaml
After running this command, your cluster will start working to make sure that it reaches the desired state. That is, the cluster will make an effort to run both pods (replicas: 2) on your cluster's nodes.
After that, you might be thinking, "cool, I just deployed a sample application into my cluster, now I can start using it through a browser". Well, things are not that simple. The problem is that pods are unreliable units of work that come and go all the time. As such, due to its ephemeral nature, a pod by itself is not accessible by the outside world.
In the previous command, you informed your cluster that you want two instances (pods) of the same application running. Each one of these pods has a different IP address inside your cluster and, if one of them stops working (for whatever reason), Kubernetes will launch a brand new pod that will get yet another IP address. Therefore, it would be difficult for you to keep track of these IP addresses manually. To solve this problem, you will use Kubernetes' services.
Note: Another situation that might make Kubernetes launching new pods for your deployments is if you ask your cluster to scale your application (to be able to support more users, for example).
However, before learning about services, issue the following command to confirm that your pods are indeed up and running:
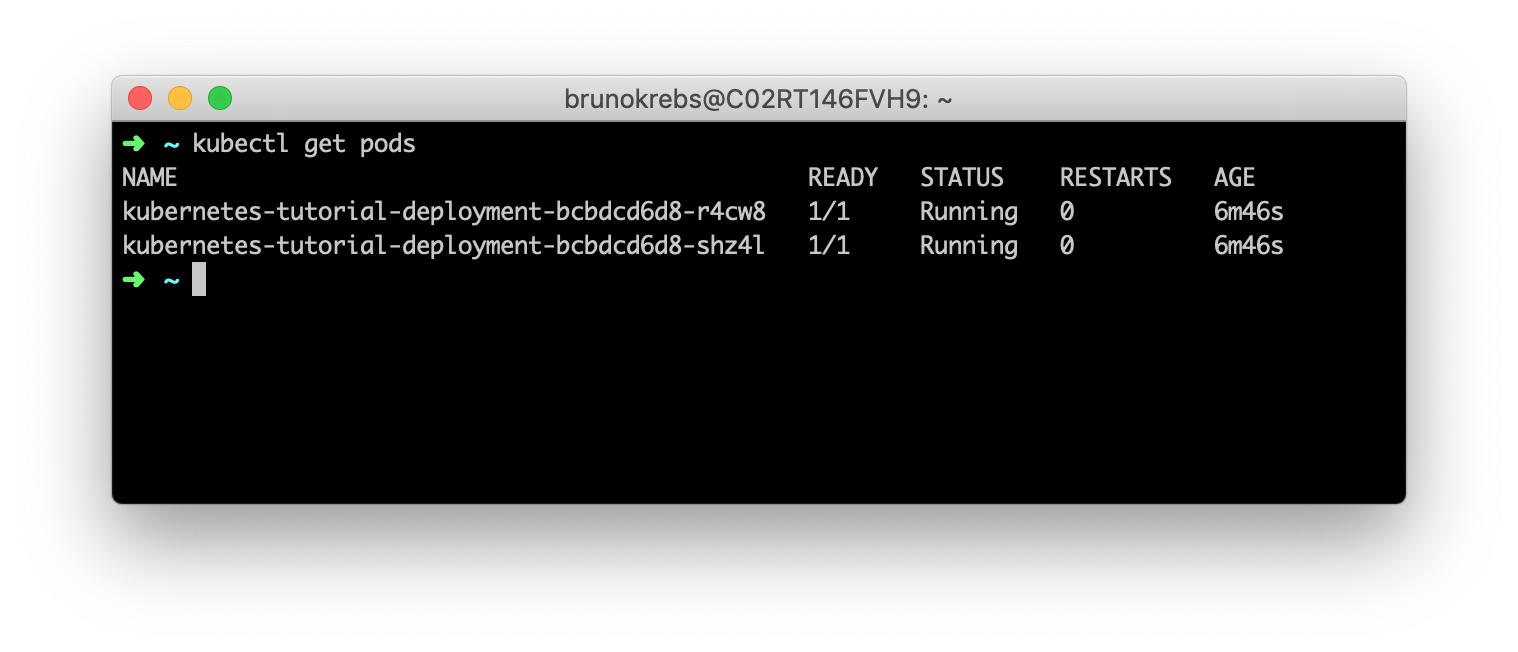
kubectl get pods
By issuing this command, you will get a list of the available pods in your Kubernetes cluster. On that list, you can see that you have two pods (two rows) and that each pod contains one container (the 1/1 on the Ready column). You can also see their statuses, how many times they restarted (hopefully, zero), and their age.
Using Services and Ingresses to Expose Deployments
After learning about pods, deployments, and containers, you probably want to consume your new deployment, right? To do so, you will need to create ingress rules that expose your deployment to the external world. Kubernetes ingress is an "object that manages external access to services in a cluster, typically through HTTP". With an ingress, you can support load balancing, TLS termination, and name-based virtual hosting from within your cluster.
To configure ingress rules in your Kubernetes cluster, first, you will need an ingress controller. As you can see here, there are many different ingress controllers that you can use. In this tutorial, you will use one of the most popular, powerful, and easy-to-use ones: the NGINX ingress controller.
The process to install this controller in your cluster is quite simple. The first thing you will have to do is to run the following command to install some mandatory resources:
kubectl apply -f https://raw.githubusercontent.com/kubernetes/ingress-nginx/master/deploy/static/mandatory.yaml
Then, you will have to issue this command to install another set of resources needed for the controller:
kubectl apply -f https://raw.githubusercontent.com/kubernetes/ingress-nginx/master/deploy/static/provider/cloud-generic.yaml
Note: If you are running your Kubernetes cluster on a service other than DigitalOcean, you will probably need to run a different set of commands. Please, check out this resource to learn more about the differences.
To confirm that the above commands worked, you can issue the following command:
kubectl get pods -n ingress-nginx
This command should list a pod called nginx-ingress-controller-... with the status equals to running. The -n ingress-nginx flag passed to this command states that you want to list pods on the ingress-nginx namespace. Namespaces are an excellent way to organize resources in a Kubernetes cluster. You will learn more about this Kubernetes feature in another opportunity.
Having configured the ingress controller in your cluster, the next thing you will do is to create a service. Wait, a service? Why not an ingress?
The thing is, as your pods are ephemeral (they can die for whatever reason or Kubernetes can spin new ones based on replication rules), you need a static resource that represents all the related pods as a single element (or, in this case, that represents the deployment responsible for these pods). When you define a service for your pods, you will be able to create ingress rules that point to this service.
What you will need now is a ClusterIP service that opens a port for your deployment. To create one, create a file called service.yaml and add the following code to it:
apiVersion: v1
kind: Service
metadata:
  name: kubernetes-tutorial-cluster-ip
spec:
  ports:
  - port: 80
    protocol: TCP
    targetPort: 3000
  selector:
    app: kubernetes-tutorial-deployment
  type: ClusterIP
Note: There are many different types of services available on Kubernetes. ClusterIP, the type you are using, helps you expose your deployments inside the cluster only. That is, this kind of service does not expose deployments to the outside world. There are other types that do that for you (you can learn about them here) but, on this series, you will be not using them.
Then, you can issue the following command to create this service in your cluster:
kubectl apply -f service.yaml
After running this command, Kubernetes will create a service to represent your deployment in your cluster. To know that this service works as a broker for this deployment in particular (or for its pods, actually), you added the selector.app property on the service description (service.yaml) pointing to kubernetes-tutorial-deployment. If you take a look again on the deployment.yaml file, you will notice that you have there a property called labels.app with the same value (kubernetes-tutorial-deployment). Kubernetes will use these properties to tie this service to the deployment's pods.
Another important thing to notice about the service you are creating is that you are defining that this service will listen on port: 80 and that it will targetPort: 3000 on pods. If you check your deployment file, you will see that you defined that your containers will use this port (containerPort: 3000). As such, you must make sure that your service will target the correct port when redirecting requests to your pods.
Note: If you run
kubectl get svcnow, your cluster will list two services. The first one, calledkubernetes, is the main service used by Kubernetes itself. The other one is the one you created:kubernetes-tutorial-cluster-ip. As you can see, both of them have internal IP addresses (CLUSTER-IP). But you won't need to know these addresses. As you will see, ingresses allow you to reference services more cleverly.
After creating your service, you can finally define an ingress (and some rules) to expose this service (and the deployment that it represents) to the outside world. To do this, create a file called ingress.yaml with the following code:
apiVersion: extensions/v1beta1
kind: Ingress
metadata:
  name: kubernetes-tutorial-ingress
spec:
  rules:
  - http:
      paths:
      - path: /
        backend:
          serviceName: kubernetes-tutorial-cluster-ip
          servicePort: 80
In this file, you are defining an ingress resource with a single rule (spec.rules). This rule tells Kubernetes that you want requests pointing to the root path (path: /) to be redirected to the kubernetes-tutorial-cluster-ip service (this is the name of the service that you created before) on port 80 (servicePort: 80).
To deploy the new ingress in your cluster, you can issue the following command:
kubectl apply -f ingress.yaml
Then, to see the whole thing in action, you will need to grab the public IP address of your Kubernetes cluster. To do so, you can issue the following command:
kubectl get svc \
  -n ingress-nginx ingress-nginx \
  -o=jsonpath='{.status.loadBalancer.ingress[0].ip}'
Note: On the command above, you are using a Kubernetes feature called JSONPath to extract the exact property you want from the
ingress-nginxservice (in this case, its public IP address). Learn more about the JSONPath feature here.
This command will output an IP address (e.g., 104.248.109.181) that you can use in your browser to see your application. So, if you open your browser and navigate to this IP address, you will see the sample application you just deployed.
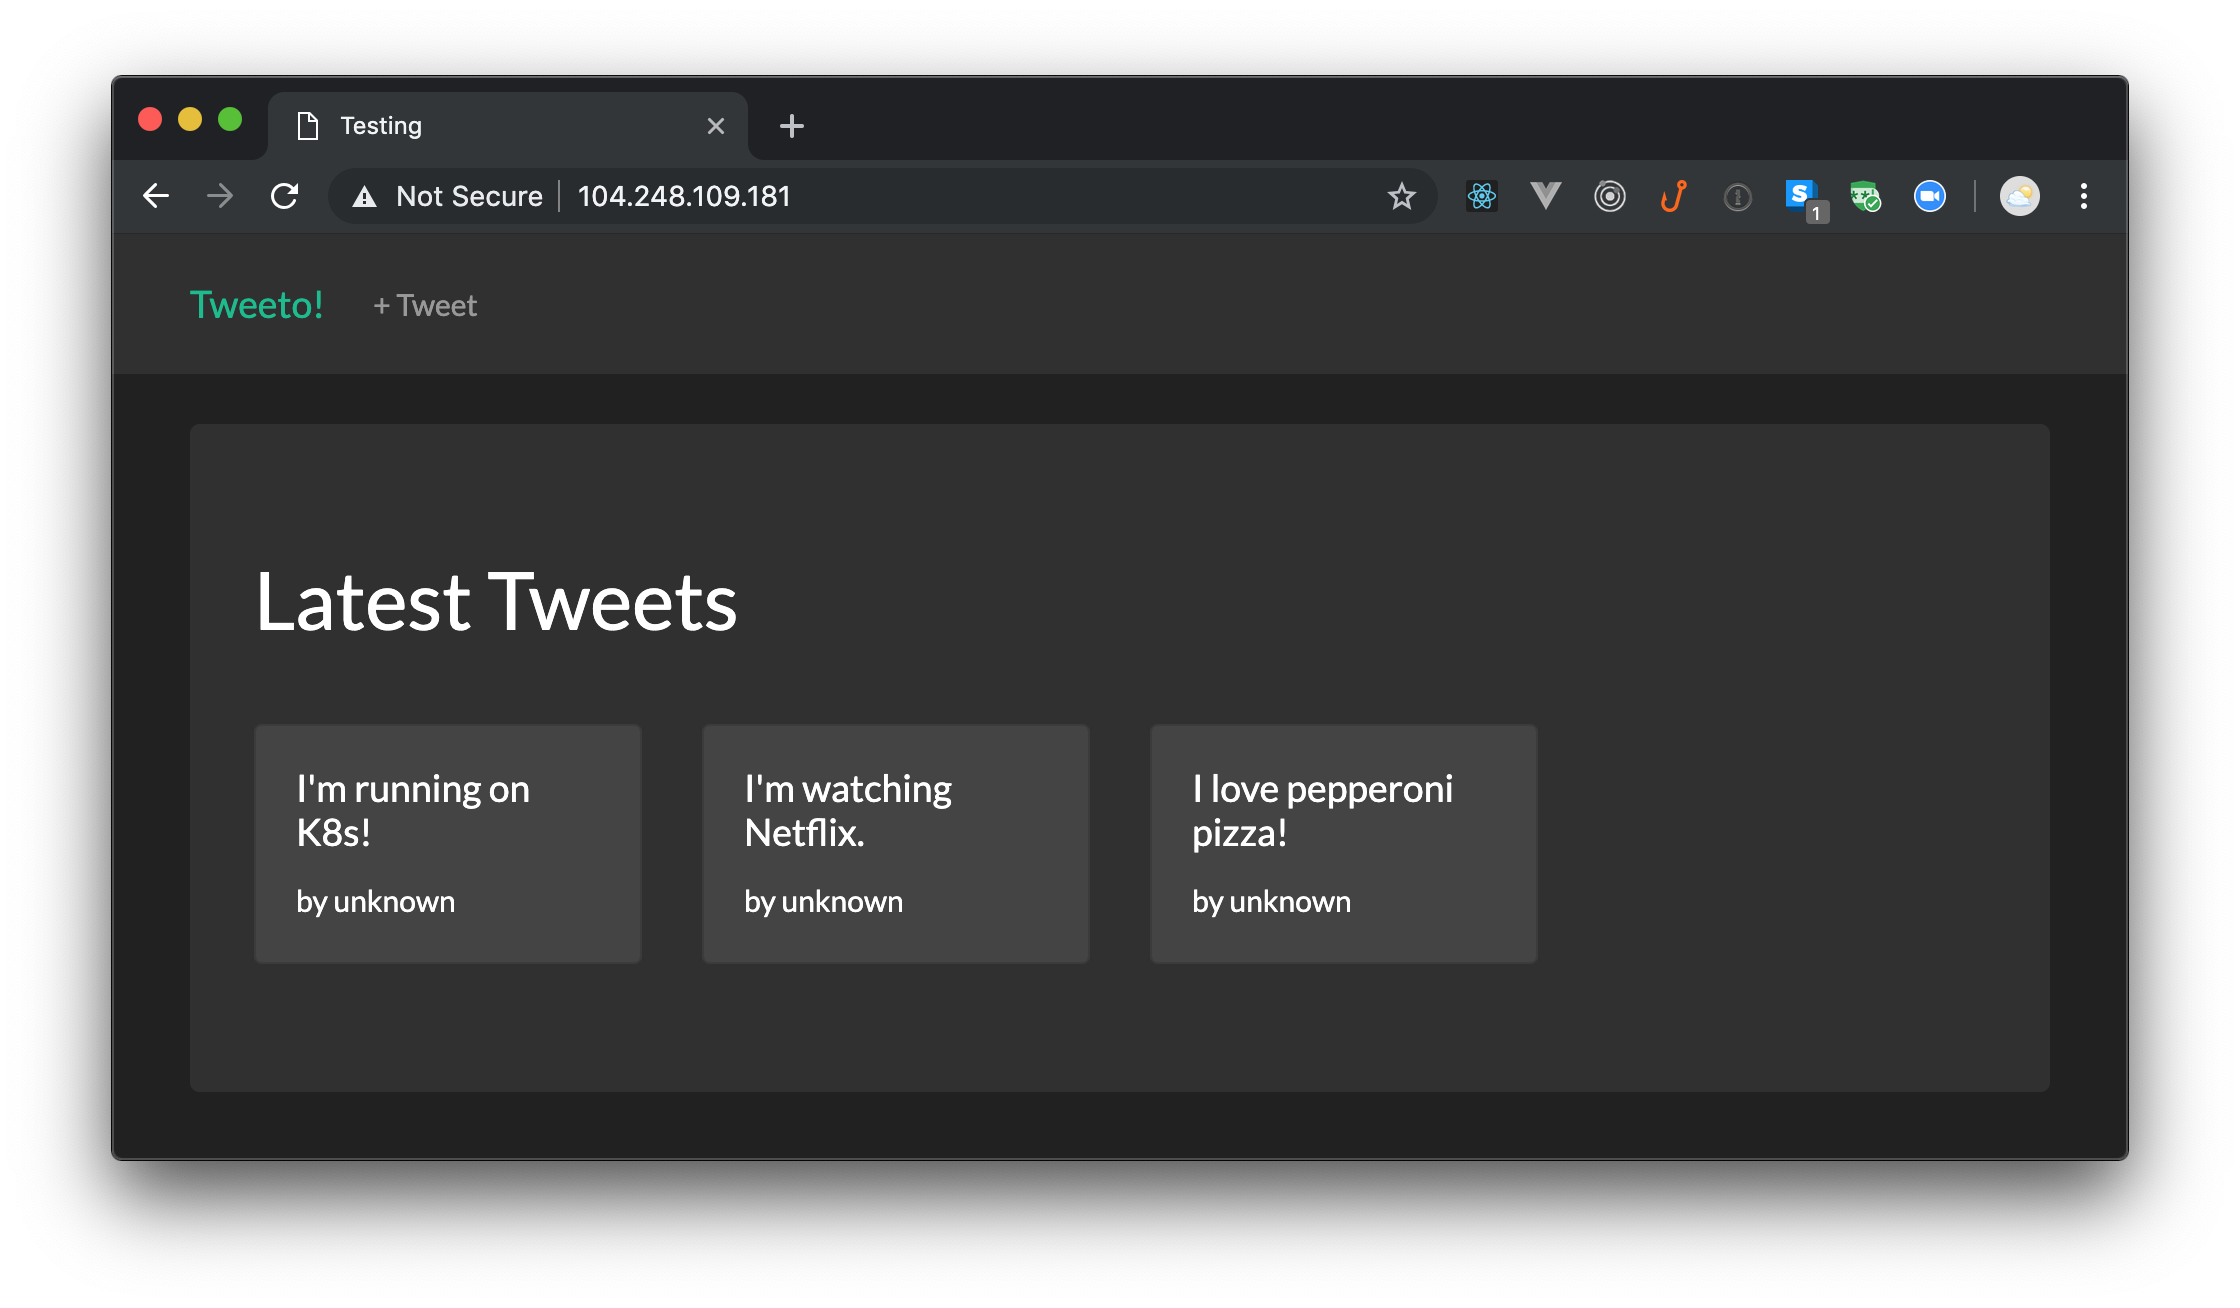
Note: This application is not very useful, it just emulates a much simpler Twitter application where users can share their thoughts. The app doesn't even have an identity management (user authentication) system.
That's it! You just finished configuring your local machine to start working with Kubernetes, and you just deployed your first application on Kubernetes. How cool is that?
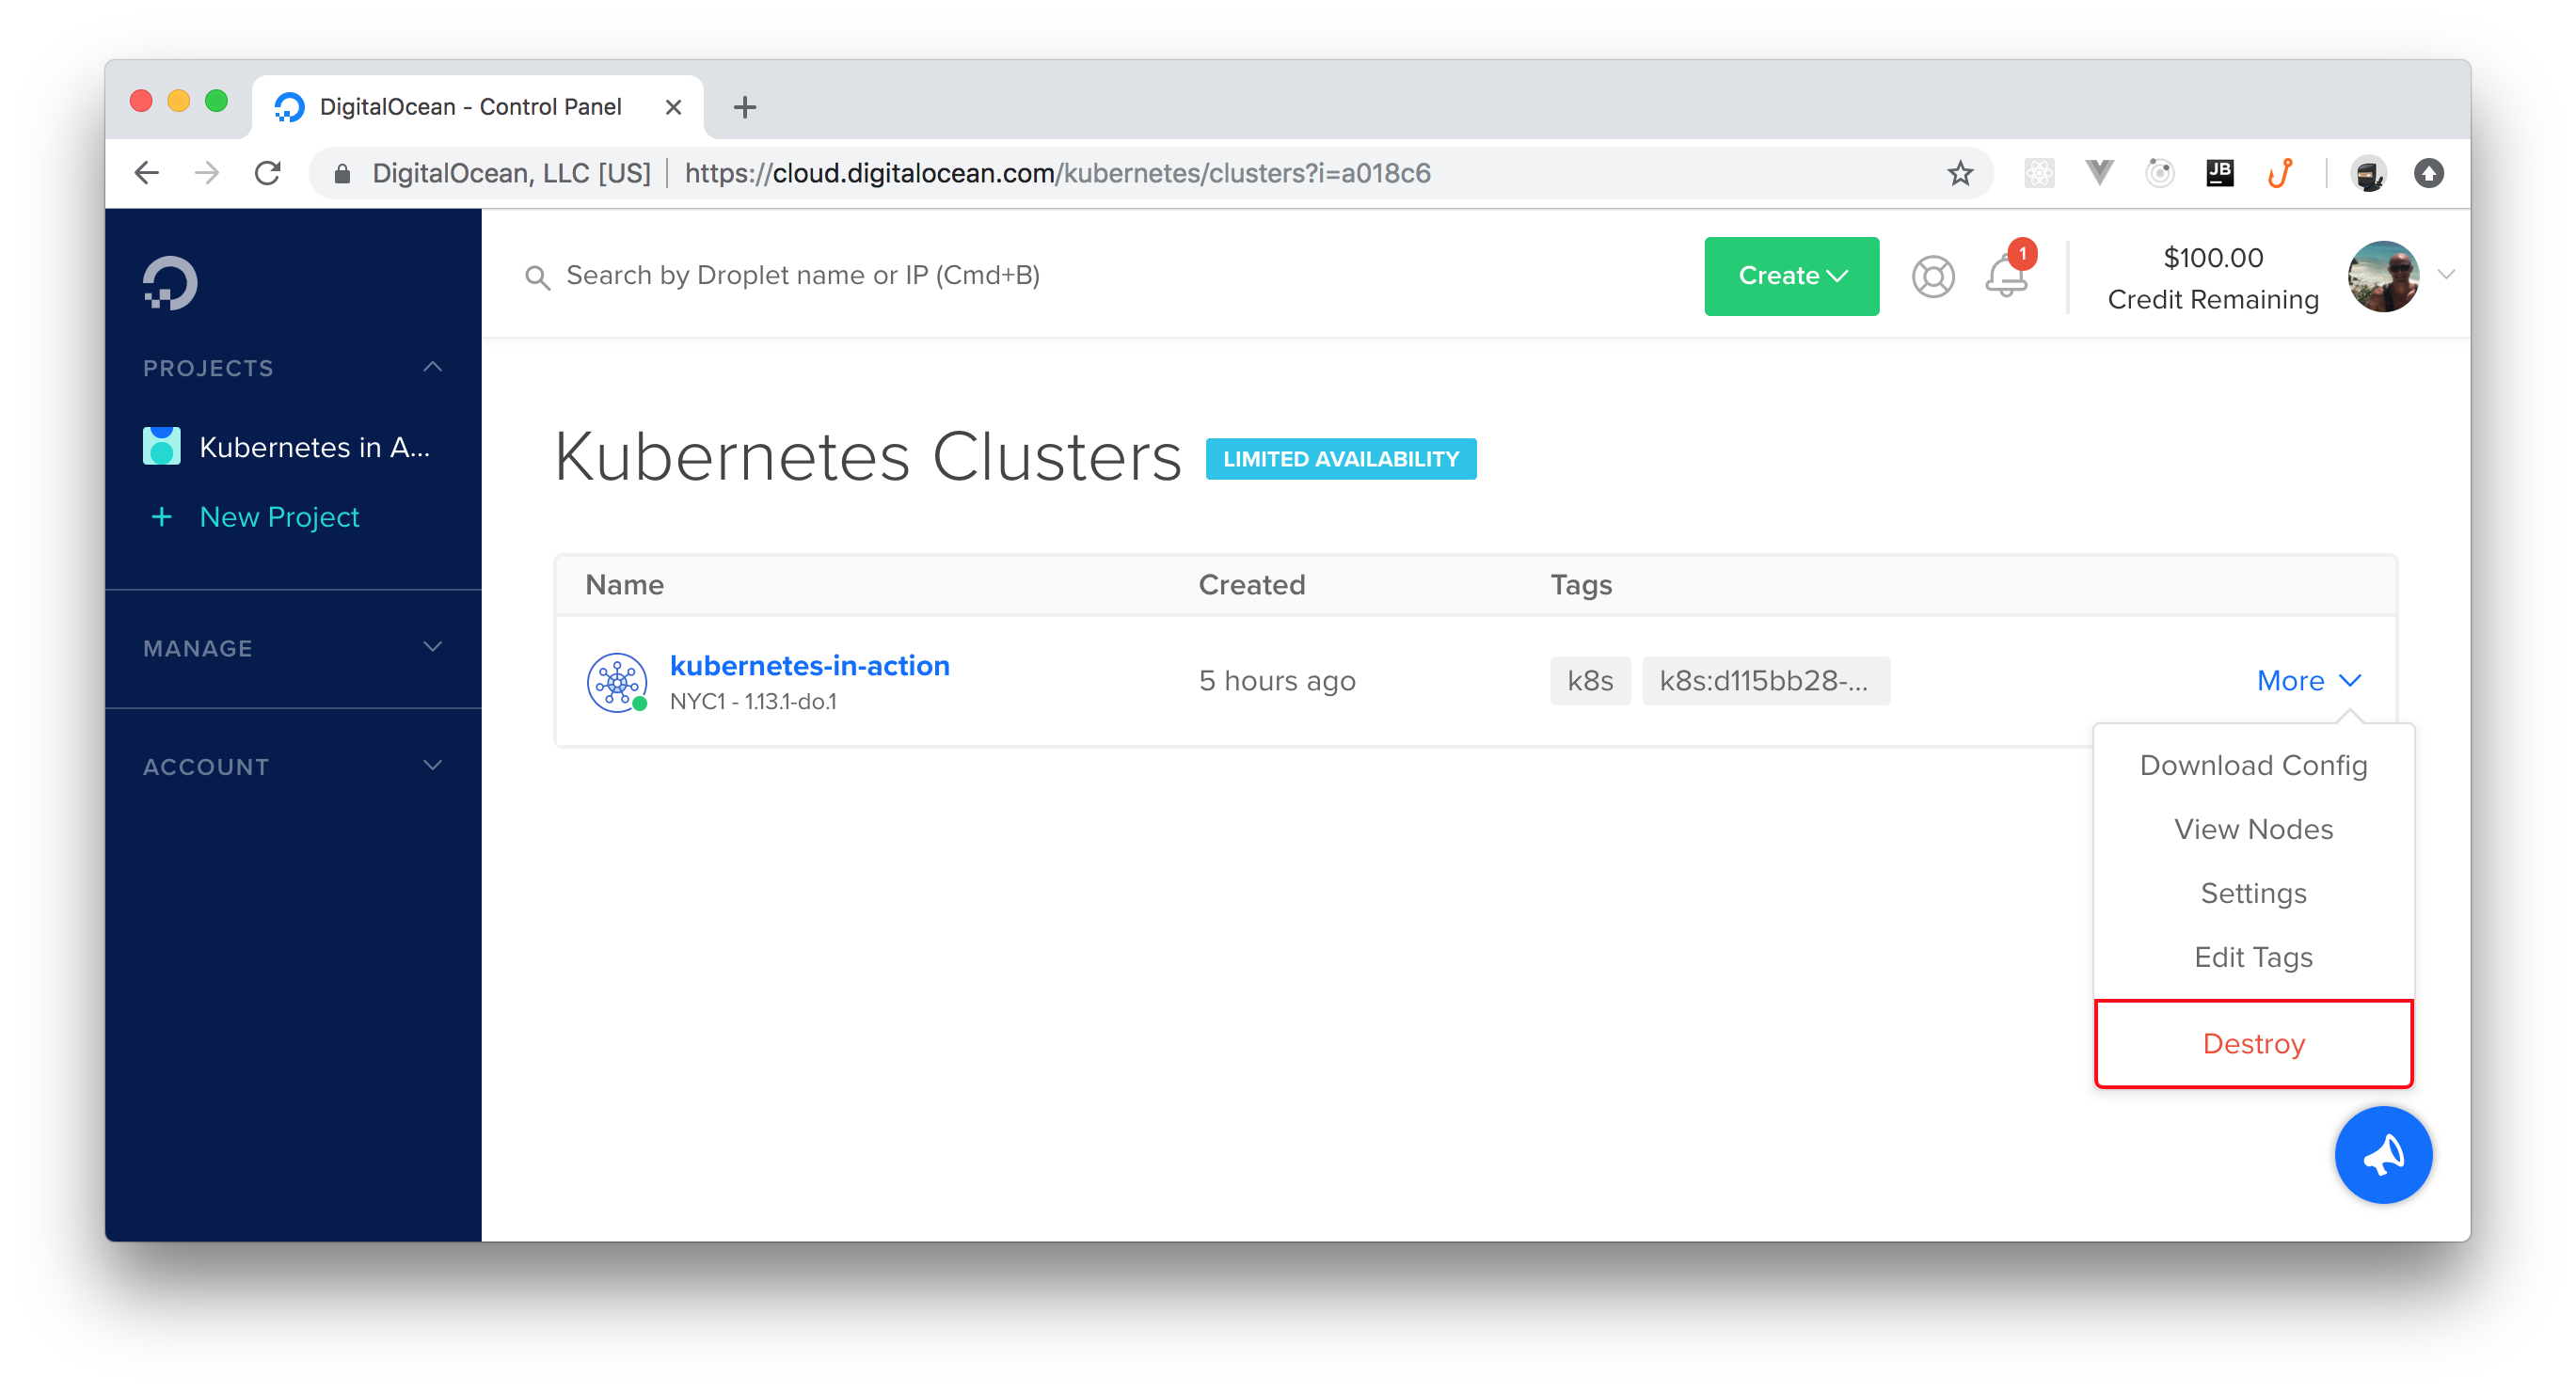
Note: To avoid spending the whole credit DigitalOcean gave you, you might want to delete your cluster soon. To do so, head to the Kubernetes section of your DigitalOcean dashboard, click on the More button on the right-hand side of the screen and click on Destroy. DigitalOcean will ask you to confirm the process.
“I just deployed my first Kubernetes application. So easy!!!”
Tweet This
Conclusion
In this article, you created a Kubernetes cluster on DigitalOcean; then you used it to spin up a sample application. In deploying this app, you learned basic Kubernetes concepts like deployments, pods, containers, services, and ingresses. With this knowledge, you are now ready to move on and start learning about more advanced concepts that will let you orchestrate microservices application on Kubernetes. If you enjoyed the article (and if you want more content about this topic), let us know on the discussion section below.
About Auth0
Auth0 by Okta takes a modern approach to customer identity and enables organizations to provide secure access to any application, for any user. Auth0 is a highly customizable platform that is as simple as development teams want, and as flexible as they need. Safeguarding billions of login transactions each month, Auth0 delivers convenience, privacy, and security so customers can focus on innovation. For more information, visit https://auth0.com.
About the author

Bruno Krebs
R&D Content Architect (Auth0 Alumni)