
TL;DR: If you've built a Streamlit application and must share it securely with an external or internal audience, you'll need to add user authentication features. If your Streamlit application must access secure APIs, you'll need a way to authorize access. In my previous article, Introduction to Streamlit and Streamlit Components, you learned how to extend Streamlit's functionality using its component API, and you built both simple and moderately complex custom Streamlit components. The idea was to equip you with knowledge of a component design that will make it easy now to use Auth0 authentication in Streamlit. My experience with Streamlit can be verified on the official page of Streamlit Creators, and in this article, I will show you in detail exactly how to do that.
Introduction
In the Introduction to Streamlit and Streamlit Components, you learned that Streamlit Components have two parts, namely:
- A frontend is implemented in any web technology you prefer (JavaScript, React, Vue, etc.) and gets rendered in Streamlit apps via an
iframetag. - A Python API which Streamlit client apps use to instantiate the frontend and communicate with it. This API is exposed via the
streamlit.components.v1.declare_componentobject.
In the previous article, we built Component Hero using the Next.js web framework, which in theory allows us to implement nice user experiences with the server-side rendering of static web pages and host API endpoints. I won't build a fancy UI to interact with Auth0 login, but I will use the self-hosted API functionality of Next.js.
The primary purpose of Component Hero is to wrap the core Streamlit components API adding support for passing events (structured objects) between the frontend and Streamlit and handling errors. In this article, we're going to use the same design as Component Hero to build Component Auth0.
Authentication Component Using Auth0
Let's go into the details of building Component Auth0 integrating Auth0 authentication in Streamlit applications and using its identity and access token credentials to invoke protected Streamlit Python functions and protected external APIs.
Before we proceed, let me remind you of some important terminology. The Component Auth0 Python wrapper, which hosts the Streamlit component, will be referred to as component host or Streamlit host and the Streamlit code for the rest of the application as Streamlit client. The component implementation will be called component frontend or simply frontend.
Component Auth0 application demo
This little demonstration gives you an idea of the final goal we will achieve:
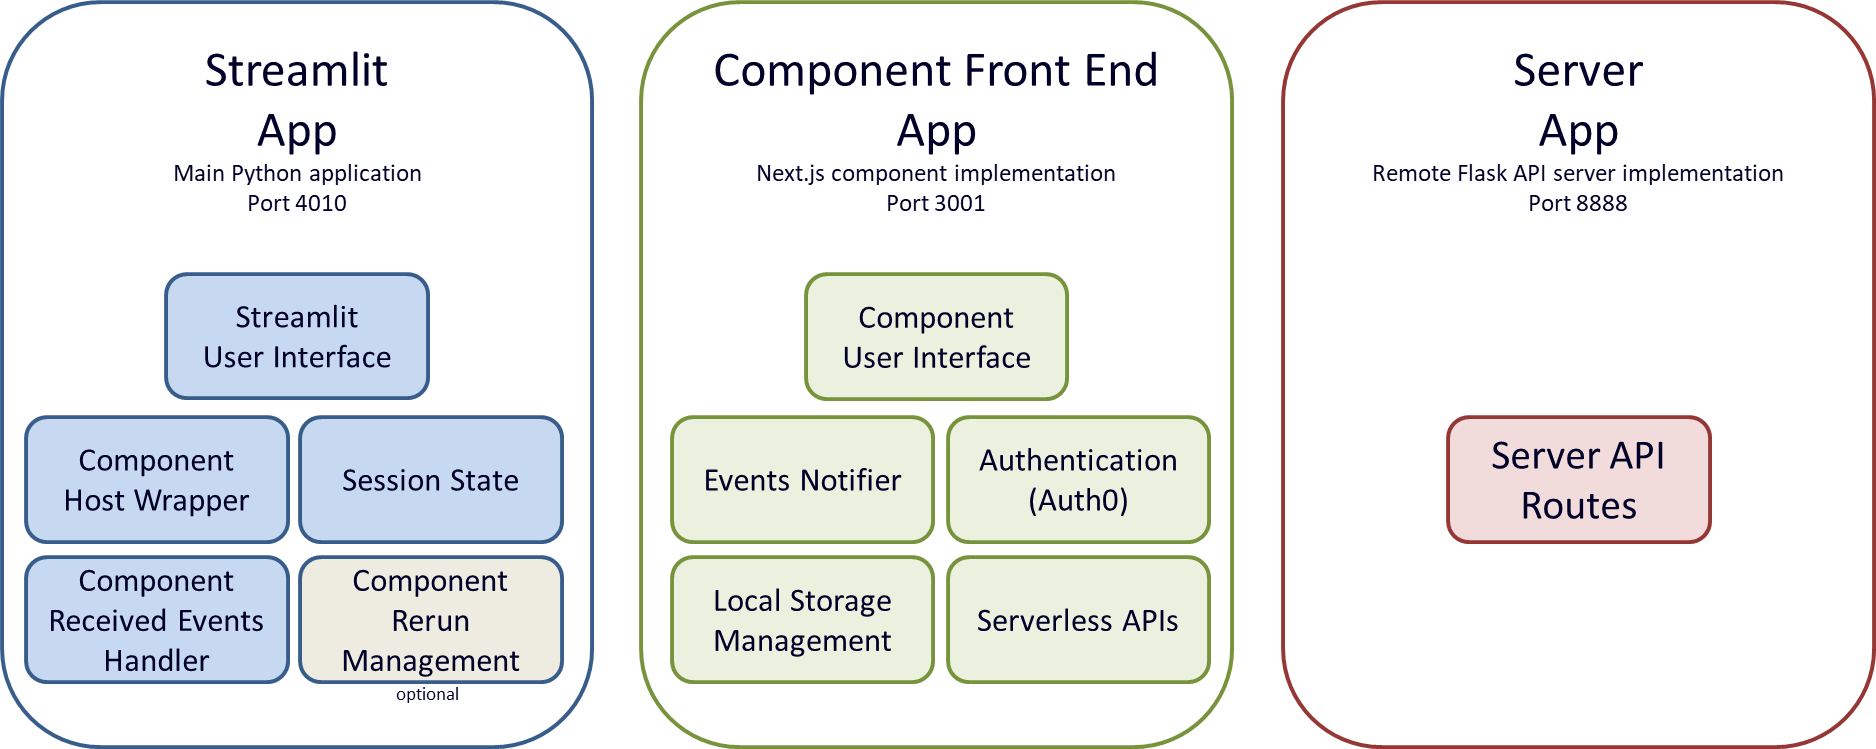
Capabilities
The diagram below shows what will be implemented. The main takeaway is that the Streamlit app server and frontend webserver run as two separate server-based applications. The component implementation cannot be run in Streamlit's server, so it must be executed in its own process and web server. I run Streamlit locally on port 4010 and the frontend locally on port 3001. You can do the same to make it easier to reuse the code and follow the design.
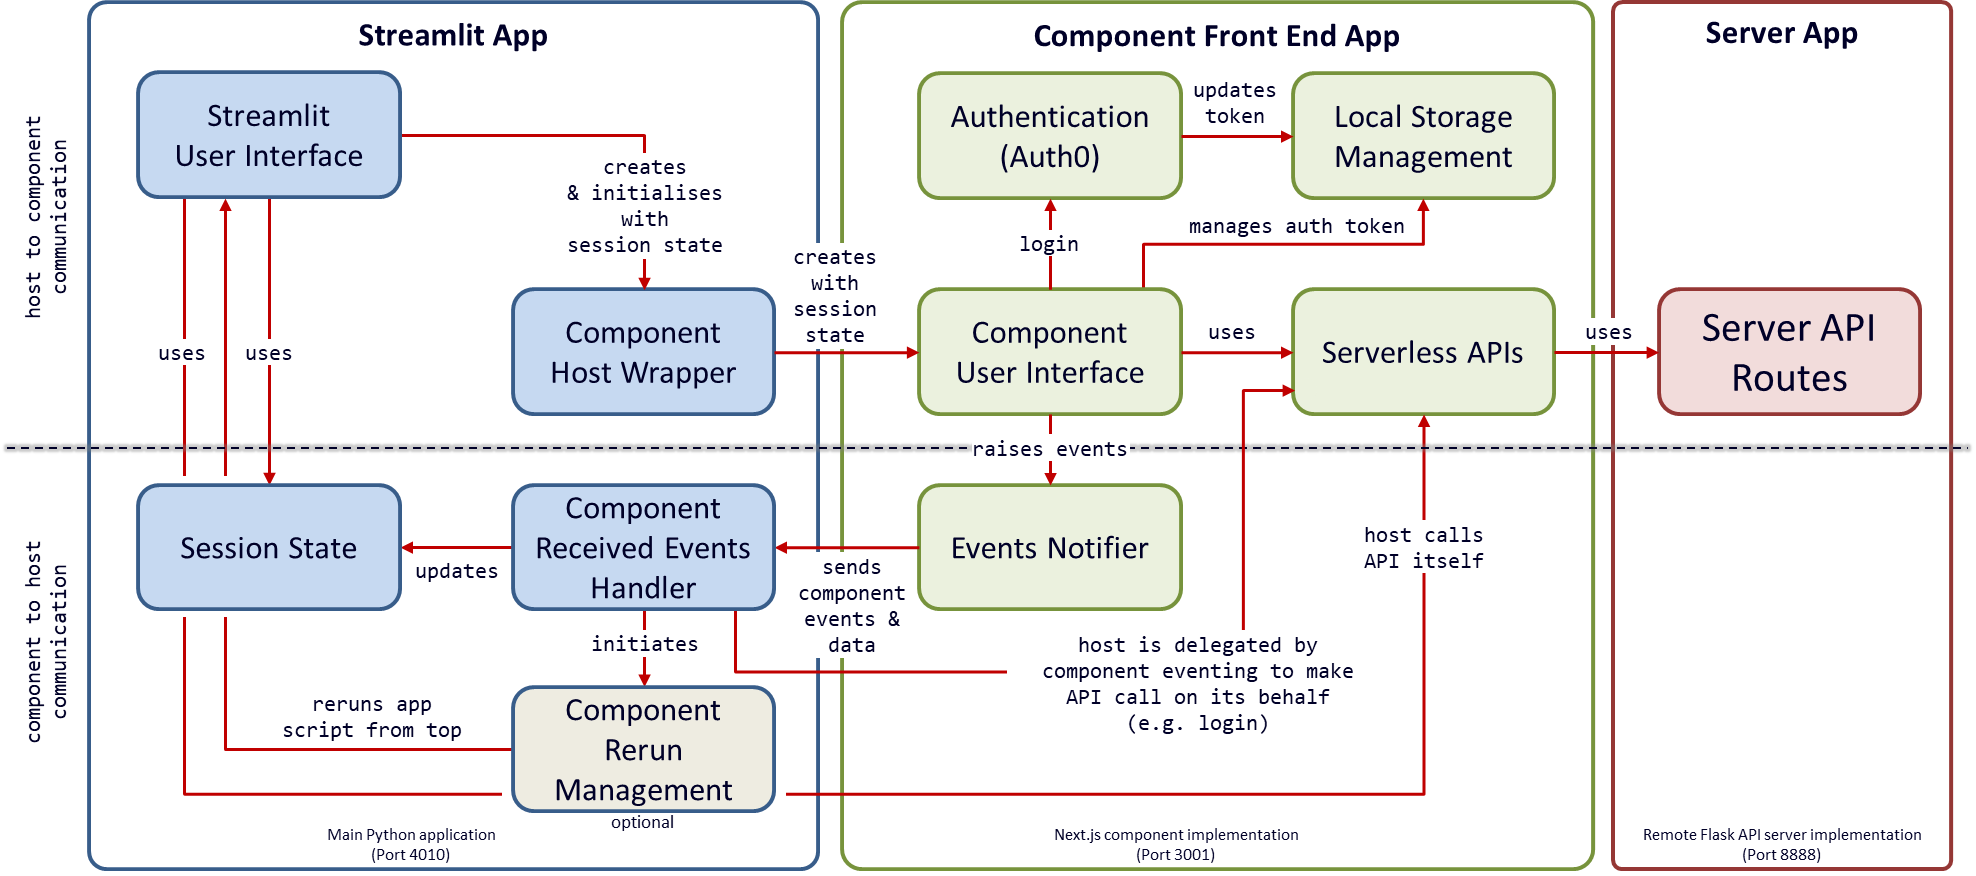
Architecture
The architecture view captures the relationships between the capabilities, shedding light on how the application works.
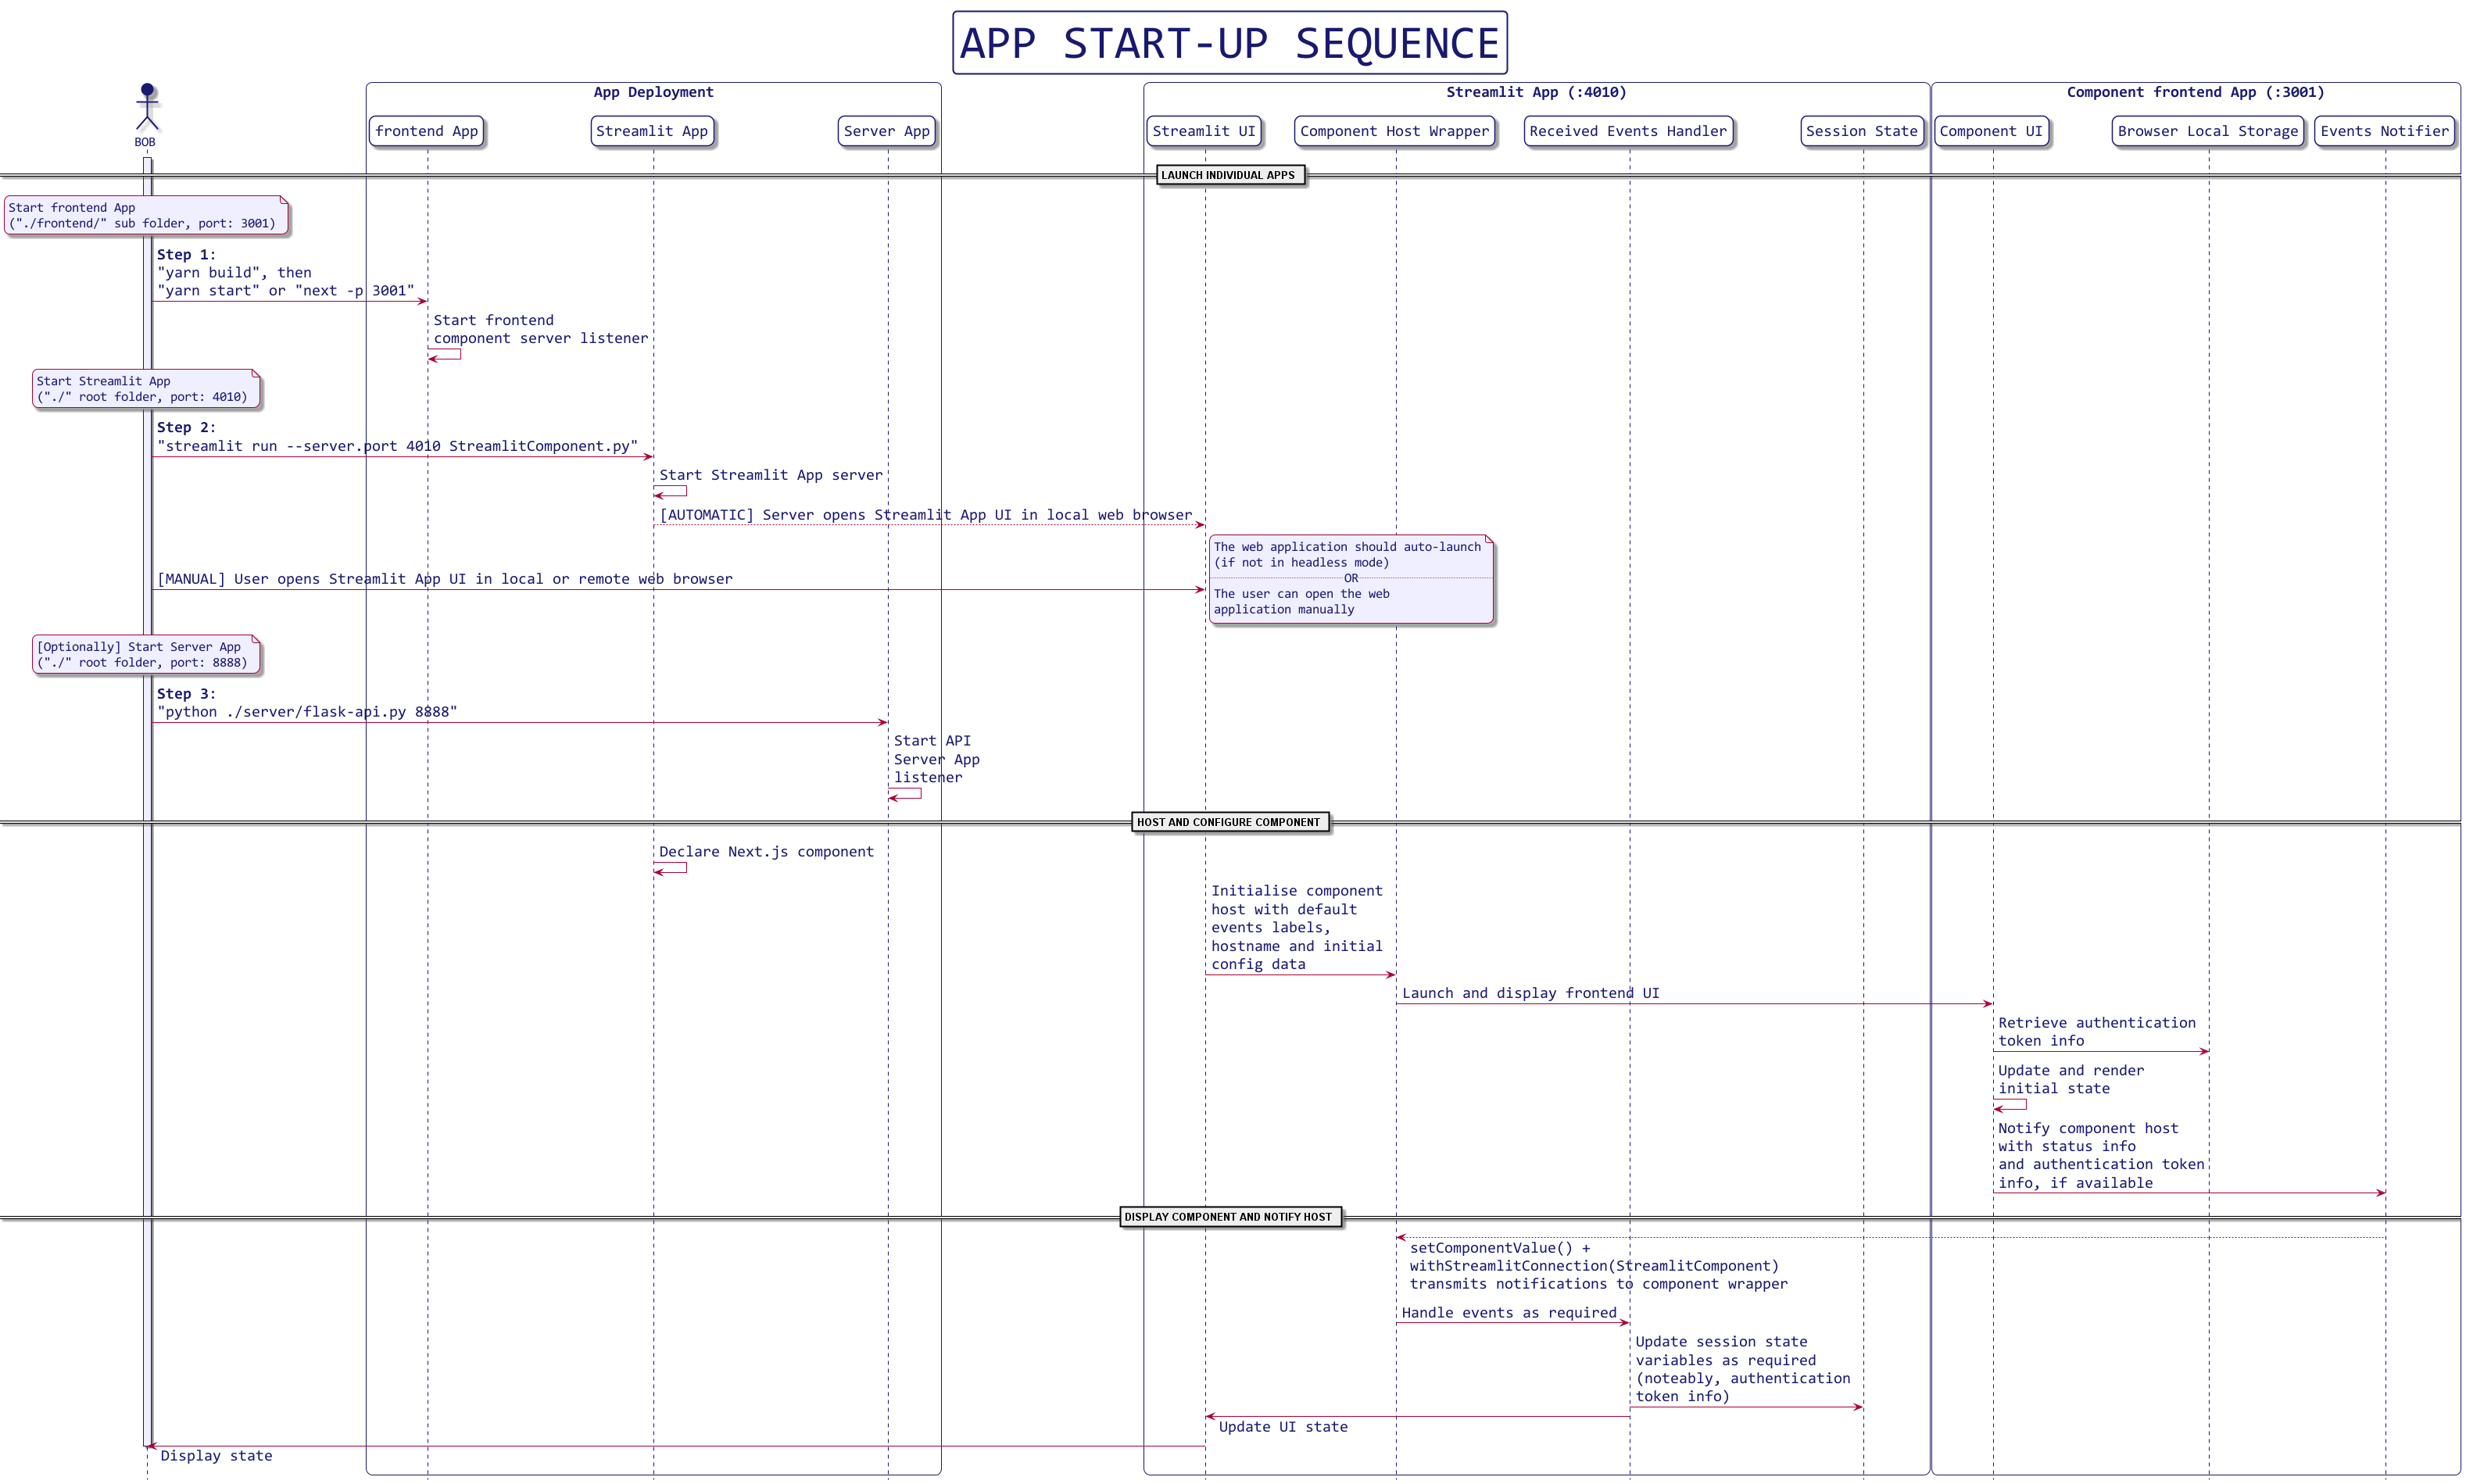
Application start-up sequence
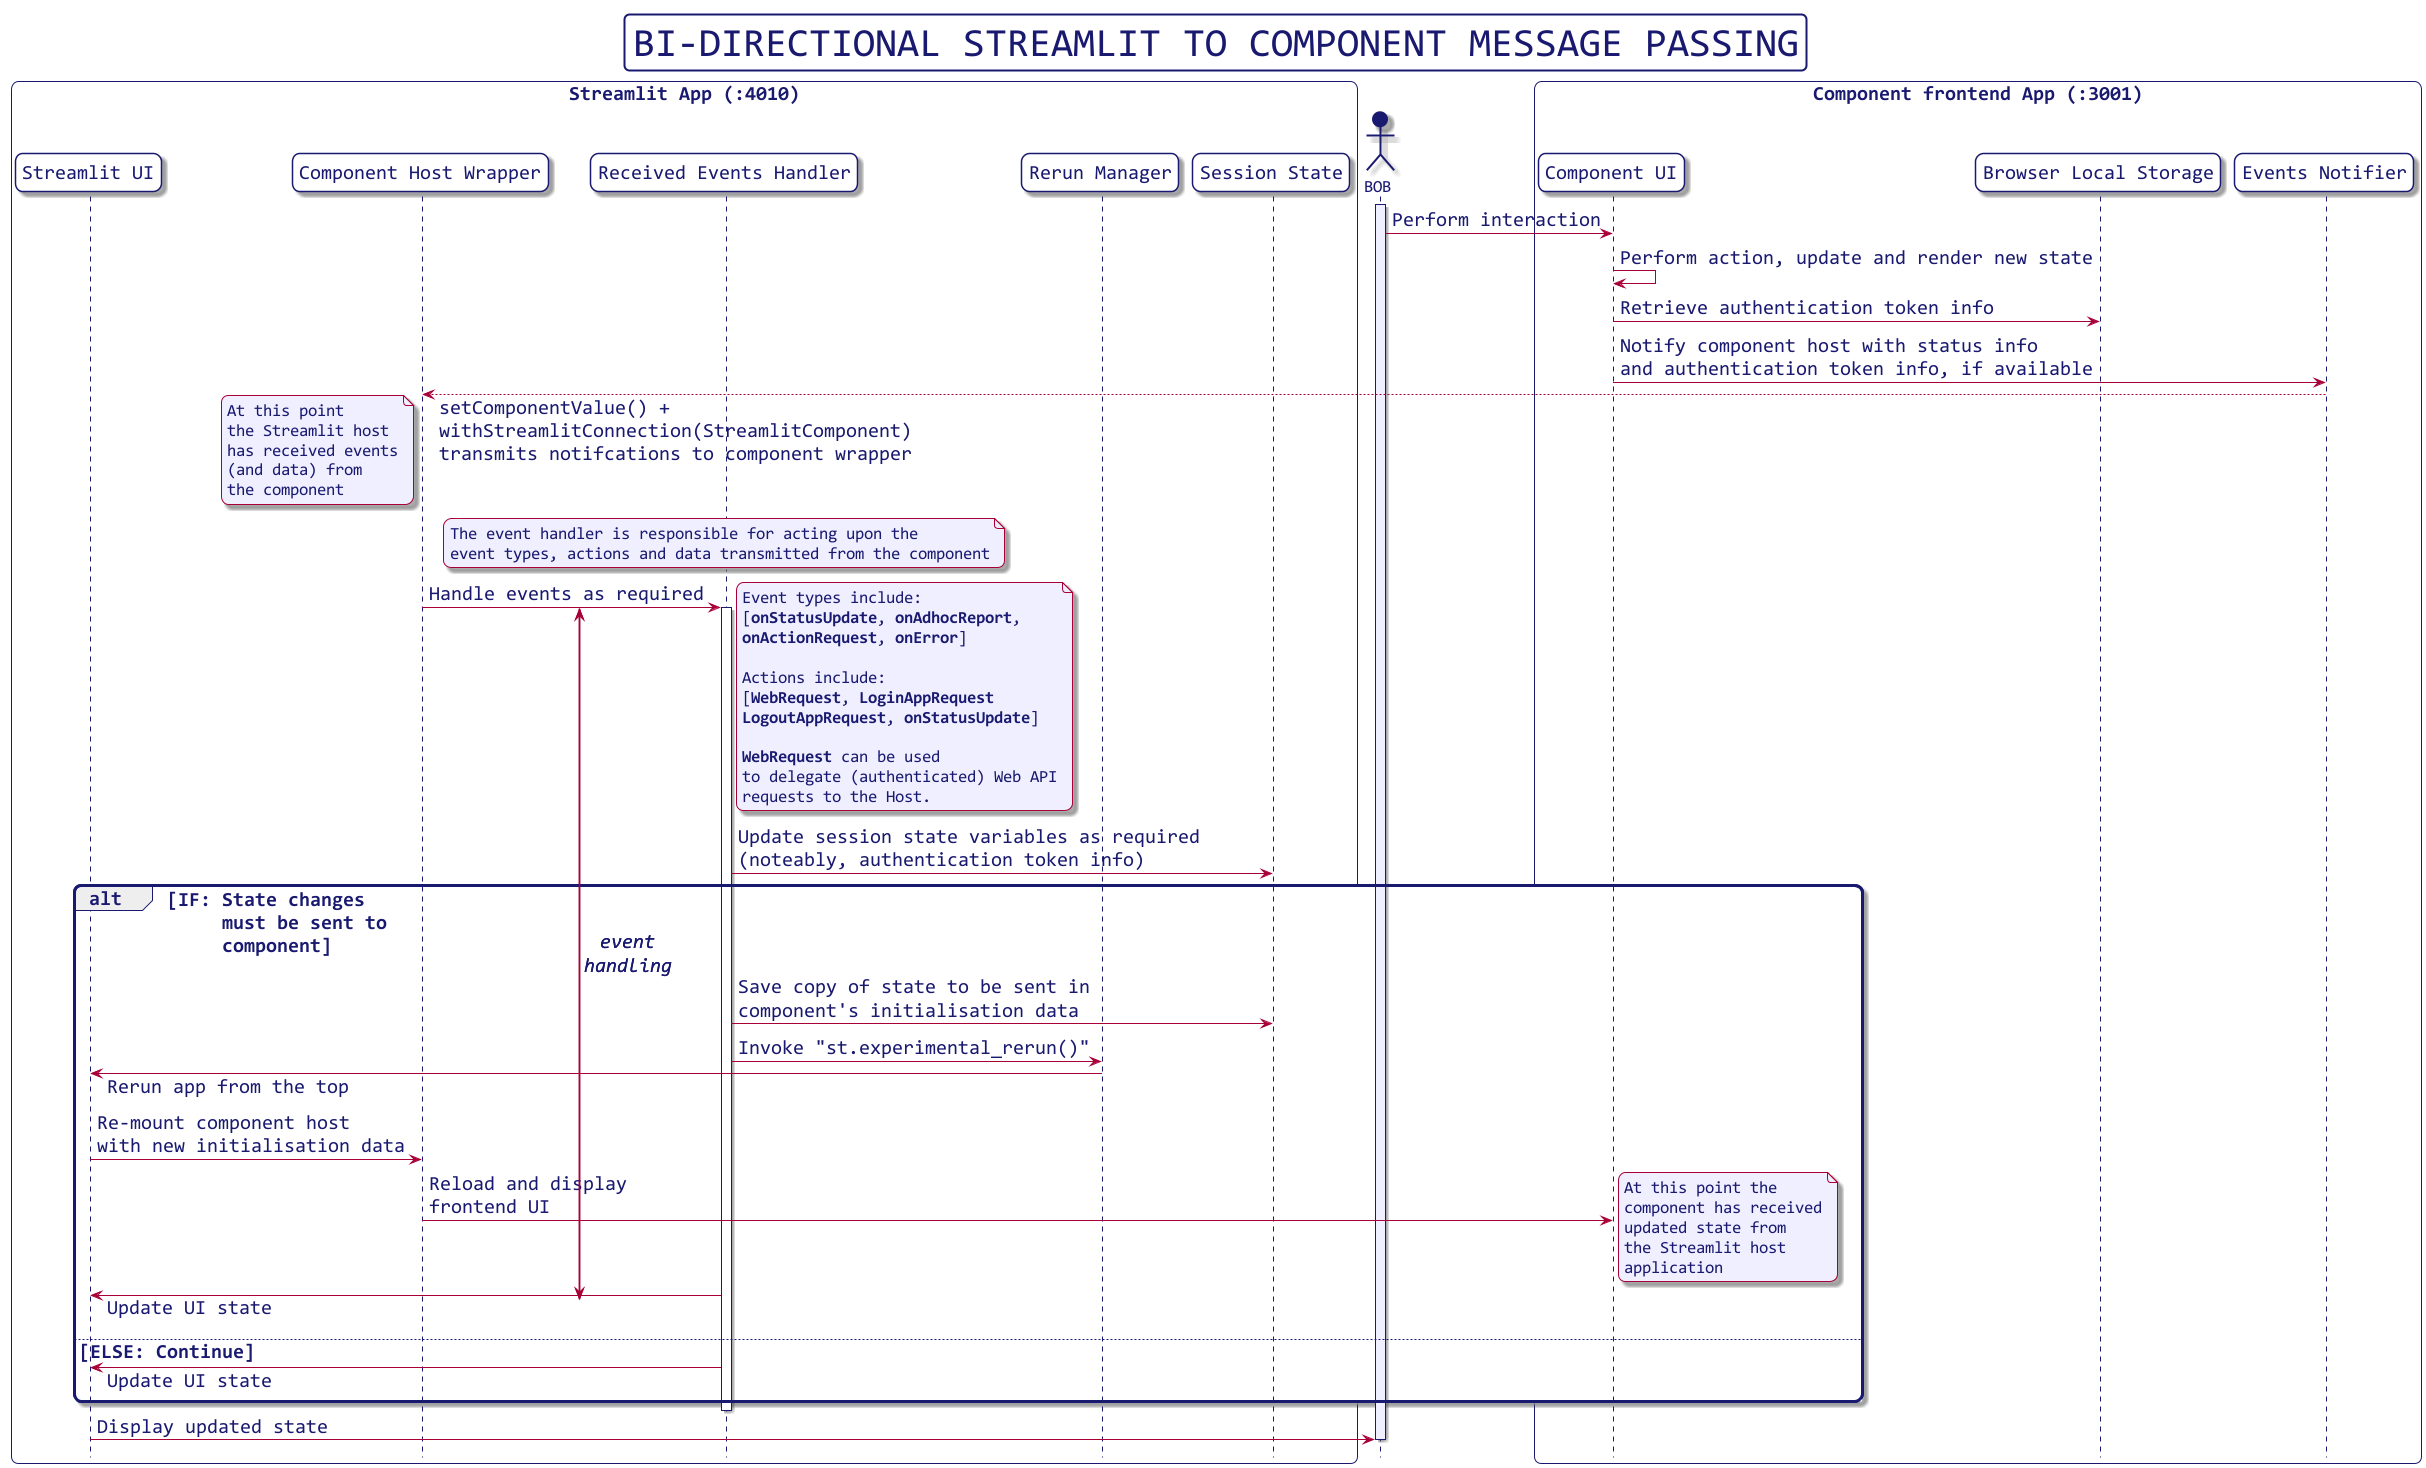
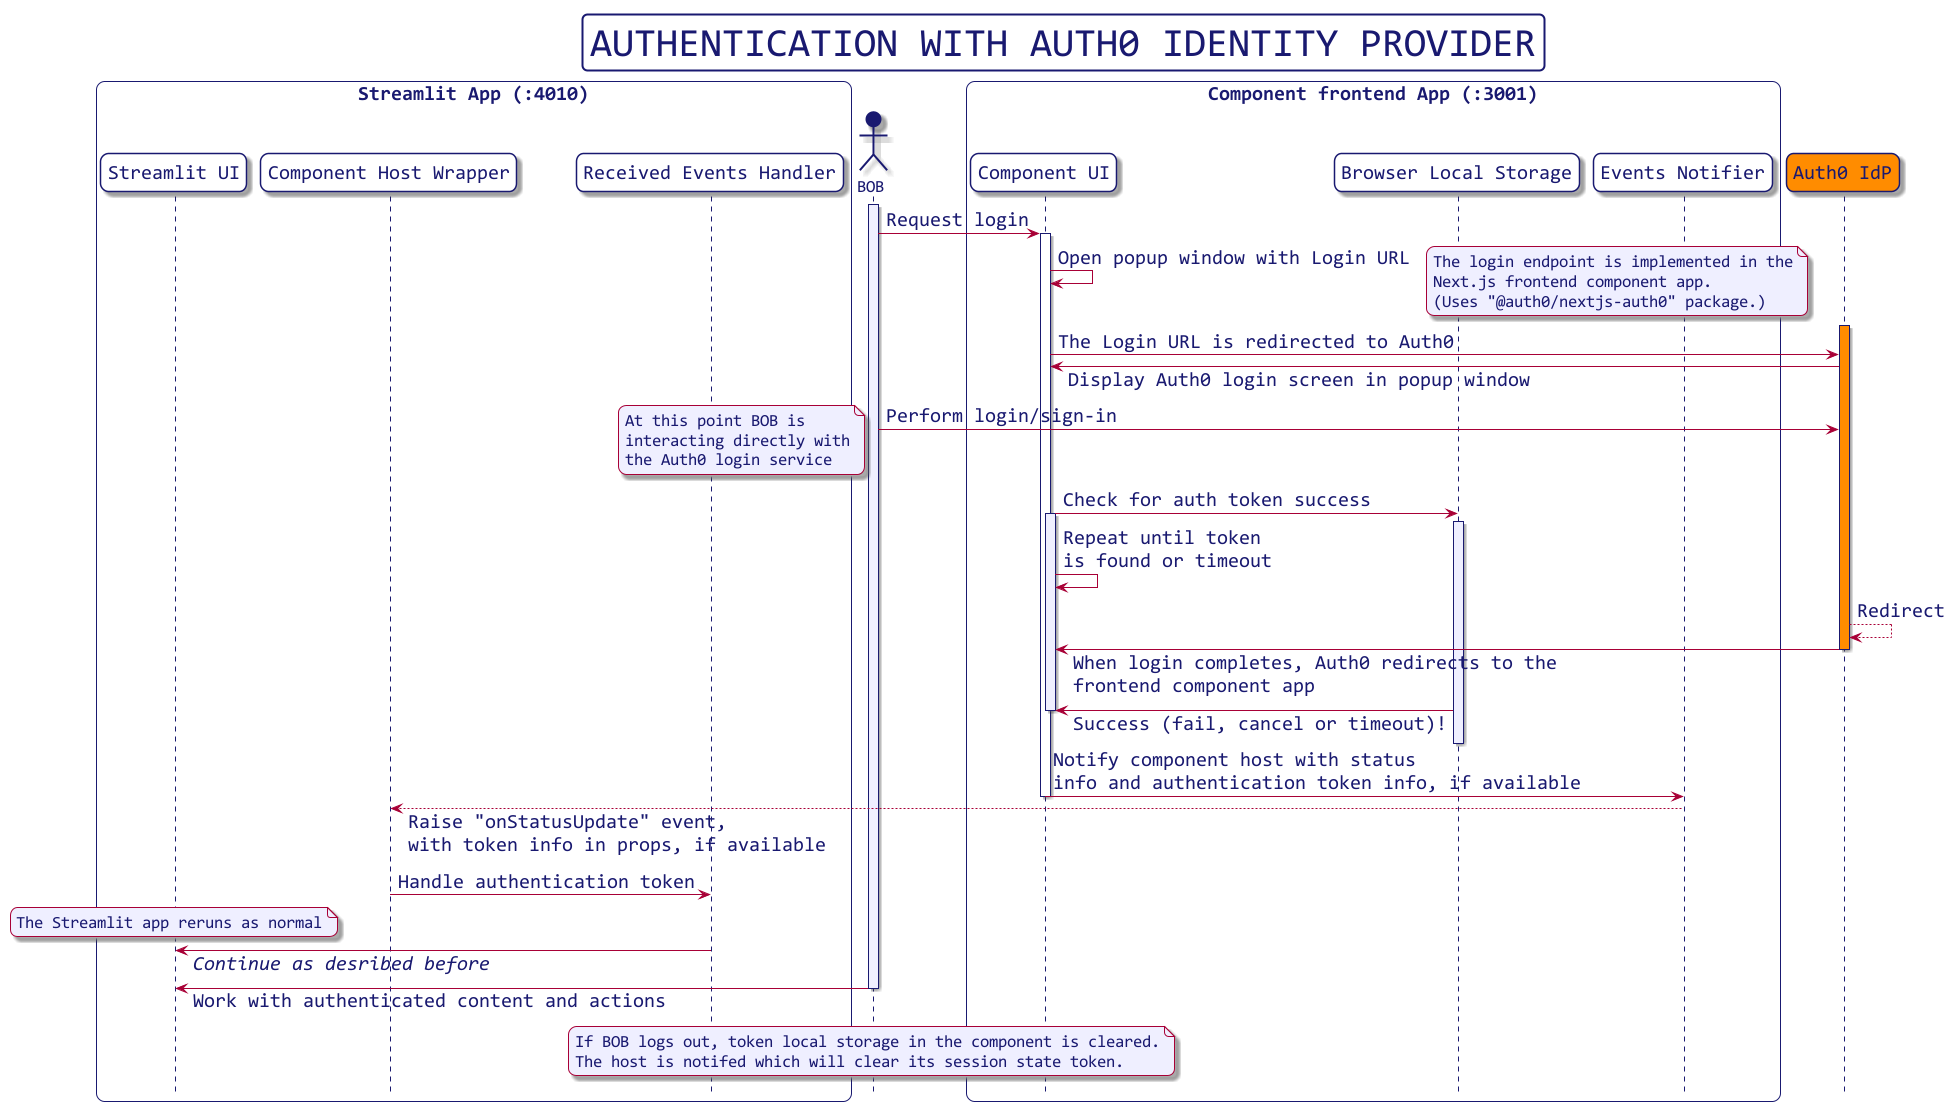
Since this component is fairly complicated, I have a sequence diagram showing the interactions between capabilities, which will help you better follow the code further below.
Component Auth0 implementation details
Now's a good time to download the GitHub repository for this article. Navigate to folder ./article-2/code/auth0/. The code snippets that will be shown in the following sections have been abbreviated a little and will not run on their own.
There are three parts to the Component Auth0 application, which I will explain in some detail:
- The Streamlit component host: a Python wrapper class and an event handler function (embedded in the Streamlit client application)
- The component: a Next.js (React) web app implementing the component (runs on localhost, port 3001)
- The Streamlit client application (runs on localhost, port 4010)
The implementation of these parts is similar to the corresponding parts of Component Hero described in the previous article.
In addition, complementing the application, a standalone service hosts protected API endpoints:
- The Remote APIs service: a Flask server hosting remote/external APIs (runs on localhost, port 8888)
Please refer to the diagrams of the system capabilities and system architecture above as you read the code sections below. In this way, you will have enough detail to replicate the code and make changes to the design and implementation yourself.
[1] Streamlit component host wrapper and event handler
I wrapped Streamlit's component Python API in a Python object called ComponentHost. The component API is components.declare_component() which returns a handle auth0_component. ComponentHost's constructor takes a set of allowed named events and a dict of property values that will be passed to the component frontend when it is first instantiated (mounted). ComponentHost will expect to receive only these named events from the frontend. When it does, they'll be encapsulated in ComponentEvent objects and passed to a user-supplied event handler function. The coordination between ComponentHost, received ComponentEvent(s), and the event handler is mediated by a simple component runner function.
After an instance of ComponentHost is created, in our case component_auth0 in __init__.py, it receives OnStatusUpdate and OnError events from the hosted component. component_auth0 also receives a "delegated host action" OnActionRequest event when the component frontend wants the host to make a web request on its behalf.
./app/modules/init.py
Declare the component.
# Running from dev server (or different port to Streamlit)
COMPONENT_URL = f'{settings.COMPONENT_BASE_URL}/streamlit'
component_auth0 = components.declare_component(name='component_auth0', url=COMPONENT_URL)
./app/modules/auth0_component.py
Auth0 component wrapper.
DEFAULT_EVENTS = ['onStatusUpdate', 'onActionRequest', 'onError']

class ComponentHost():
    declared_component = None   # low level declared component host
    key = None
    events = []
    props = {}

    class ComponentEvent():
        '''
        Object holding an event name (obj.name), data (obj.data), event source (obj.source).
        name and data can be set to `None`.
        '''
        name = None
        data = None
        source = None

        def __init__(self, host, event):
            e = {}
            if isinstance(event, str):
                e = json.loads(event)
            elif isinstance(event, dict):
                e = event

            event_name = e.get('name', None)
            event_data = e.get('data', None)

            # All events are named

            # Filter by allowed events
            if event_name in host.events:
                self.name = event_name
                self.data = event_data
            else: # report error for unknown and null named events
                self.name = 'onError'
                self.data = {'message': f'Component event {event_name} is not allowed. (Data: {event_data})'}

            self.source = host


    def __init__(self, declared_component, key=None, events=DEFAULT_EVENTS, **props):

        self.declared_component = declared_component
        self.key = key
        self.events = events

        # Allowed props
        self.props = {prop: value for prop, value in props.items() if prop in [
            'hostname', 'initial_state'
        ]}
        # Default prop value
        self.props.setdefault('hostname', 'Default Host')
        self.props.setdefault('initial_state', {'message': 'Default Message', 'action': 'Default Action'})
        self.props.setdefault('events', DEFAULT_EVENTS)
        self.props.setdefault("width", "100%") # built-in prop, height is set in the component itself

        print('### Component Host Ready ###')
        print(f'Event queue: {settings.USE_COMPONENT_EVENT_QUEUE}')
        print(f'Props: {json.dumps(self.props)}')

    def next_event(self):
        # Run declared component
        event = self.declared_component(key=self.key, **(self.props))
        return self.ComponentEvent(host=self, event=event)

    def send_event(self, event):
        '''
        Functionality to send events/data to a component is not supported
        by Streamlit, except when the component is initially mounted :(

        On the other hand, the component can pass events to Streamlit as
        and when it needs to.
        '''
        pass


def run_component(declared_component, events, props, event_handler):
    try:
        run_component_sync(declared_component, events, props, event_handler)
    except Exception as ex:
        print('>> Exception running component <<')
        print(str(ex))


def run_component_sync(declared_component, events, props, event_handler):
    component_host = ComponentHost(declared_component, key='login', events=events, **props)
    event =  component_host.next_event()
    if event:
        try:
            report = event_handler(event)
        except Exception as ex:
            print('>> (run_component_sync) Exception in event handler <<', str(ex))
            report = ['>> (run_component_sync) Exception in event handler <<', str(ex)]
        print_report(report)


def print_report(report):
    print()
    print(f'### [{datetime.now()}] Component event handler report ####')
    print(report)
I'll describe the flow of the code shown above. Starting at run_component_sync(declared_component, events, props, event_handler), this takes the declared component, events, and properties and creates a ComponentHost instance. This causes the component to be displayed in the Streamlit client app.
run_component_sync() uses the next_event() function of ComponentHost to receive ComponentEvent events which are raised by interacting with the running component's user interface. These events are passed to the given event handler, which deals with the event as required. It constructs an array of reporting data as it does its work. This report data array object is passed to a simplistic print_report() function to display the report in the console.
./app/componenteventhandler.py
The handle_event() function below is the event handler passed to run_component():
def handle_event(event):
    if not event:
        # return the preserved report
        return st.session_state.report

    name = event.name
    data = event.data

    report = []
    if (not name or not data):
        print('>>> WARNING! - Null name or data. <<<')
        report.append('>>> WARNING! - Null name or data. <<<')
        st.session_state.report = report
        return report

    props = data.get('props', None)
    action = data.get('action', None)

    report.append(name)
    report.append(data)

    if name == 'onActionRequest':
        if action == 'WebRequest':

            label = props['label']
            request_type = props.get('type', 'GET')
            url = props['url']
            headers = props.get('headers', {})
            data = props.get('data', None)
            useauth = props['useauth']
            auth_kind = props['auth_kind']

            if useauth:
                if check_token(st.session_state.token):
                    auth_header = {}
                    if auth_kind == 'BEARER':
                        auth_header = {"Authorization": f"Bearer {st.session_state.token['value']}"}
                    elif auth_kind == 'ACCESSTOKEN':
                        auth_header = {"accesstoken": f"{st.session_state.token['value']}"}
                    if headers:
                        headers.update(auth_header)
                    else:
                        headers = auth_header
                else:
                    report.append({'error': 'Authentication token not available or expired! Please log in.'})

                    return report

            if request_type.upper() == 'GET':
                response = requests.get(url, headers=headers)
            elif request_type.upper() == 'POST':
                response = requests.post(url, headers=headers, data=data)
            else:
                response = None

            if response and response.ok:
                text = json.loads(response.text)
            else:
                text = f'ERROR: {json.loads(response.text)}'

            report.append(f'{label} Response: {text}')

        elif action == 'AppAuthRequest':
            components.iframe(src=props['auth_url'], width=None, height=600, scrolling=True)

        # TEST ACTION ONLY
        elif action == 'UpdateTokenUserInfo':
            sessioninfo = data.get('sessioninfo', None)
            user = sessioninfo.get('user', None) if sessioninfo else None
            token = sessioninfo.get('token', None) if sessioninfo else None
            if (user and token and user['email'] and token['value']):
                st.session_state.email = user['email']
                st.session_state.user = user['name']
                st.session_state.token = token
            else:
                st.session_state.email = None
                st.session_state.user = None
                st.session_state.token = {'value': None, 'value_id_token': None, 'expiry': None}

    elif name == 'onStatusUpdate':
        sessioninfo = data.get('sessioninfo', None)
        user = sessioninfo.get('user', None) if sessioninfo else None
        token = sessioninfo.get('token', None) if sessioninfo else None
        if (user and token and user['email'] and token['value']):
            st.session_state.email = user['email']
            st.session_state.user = user['name']
            st.session_state.token = token
        else:
            st.session_state.email = None
            st.session_state.user = None
            st.session_state.token = {'value': None, 'value_id_token': None, 'expiry': None}

    st.session_state.report = report

    return report
Notice how the event handler sets identity token details in st.session_state when it receives an onStatusUpdate event with a data payload dictionary containing the correct user, email and token keys. user and email are optional.
./app/component_runner.py
The component runner gets everything going with its init() function. This takes the event handler function and runs the component (component_auth0) with its initialization properties and a list of named events that the Streamlit host will handle.
from modules import component_auth0 as declared_component
from modules.auth0_component import run_component

EVENTS  = [ 'onStatusUpdate', 'onActionRequest', 'onError' ]
PROPS   = { 'hostname':'Hero Streamlit App',
            'initial_state': {
                'password': settings.ENCRYPT_PASSWORD,
                'message': 'Default Message',
                'action': 'Default Action'
            },
          }

def init(event_handler):
    run_component(declared_component, EVENTS, PROPS, event_handler)
./app/app.py
The Streamlit client application uses the component by calling the component runner's init() function with the event handler:
import component_runner
from component_event_handler import handle_event

component_runner.init(handle_event)
The component is finally ready to authenticate users of the Streamlit application. It communicates with the Streamlit application via the component host, using custom-named events that are processed by the event handler.
[2] Next.js (React) component implementation
This is the most complex part of Component Auth0, which has a few areas that I will explain in order, namely how to:
- Install the required JavaScript packages, including Next.js and Auth0 Next.js SDK,
- Set up an Auth0 account and create an Auth0 Web application,
- Integrate and configure the Auth0 Web application with Next.js,
- Implement the custom Streamlit Auth0 component frontend in Next.js,
- Invoke the Auth0 Web application from the Streamlit Auth0 component frontend, and finally
- How to pass Auth0's authentication token credentials to the Streamlit Auth0 component frontend.
Let's look at each of these parts in turn.
1. How to install required JavaScript packages
Please refer to Node.js to install the latest version of Node. This article uses Node v16.14.0 LTS. With Node installed, run the command npm install from the ./frontend folder where the package.json file is located. This will install all necessary packages, including Next.js (v12.1.0), React (v17.0.2) and Streamlit's React component library package (v1.4.0). It will also install Auth0's identity provider integration for Next.js, Auth0 Next.js SDK library package (v1.9.0).
If you're not familiar with Next.js, it's worth reading Getting Started to learn more about Next.js. This component was bootstrapped using the with-typescript Next.js example template. The template enables TypeScript's (v4.3.2) features to be used with Next.js, and I also installed the type declarations for React and Node, as explained in the template's documentation.
2. How to set up an Auth0 account and create an Auth0 Web application
Auth0 Management Portal Settings
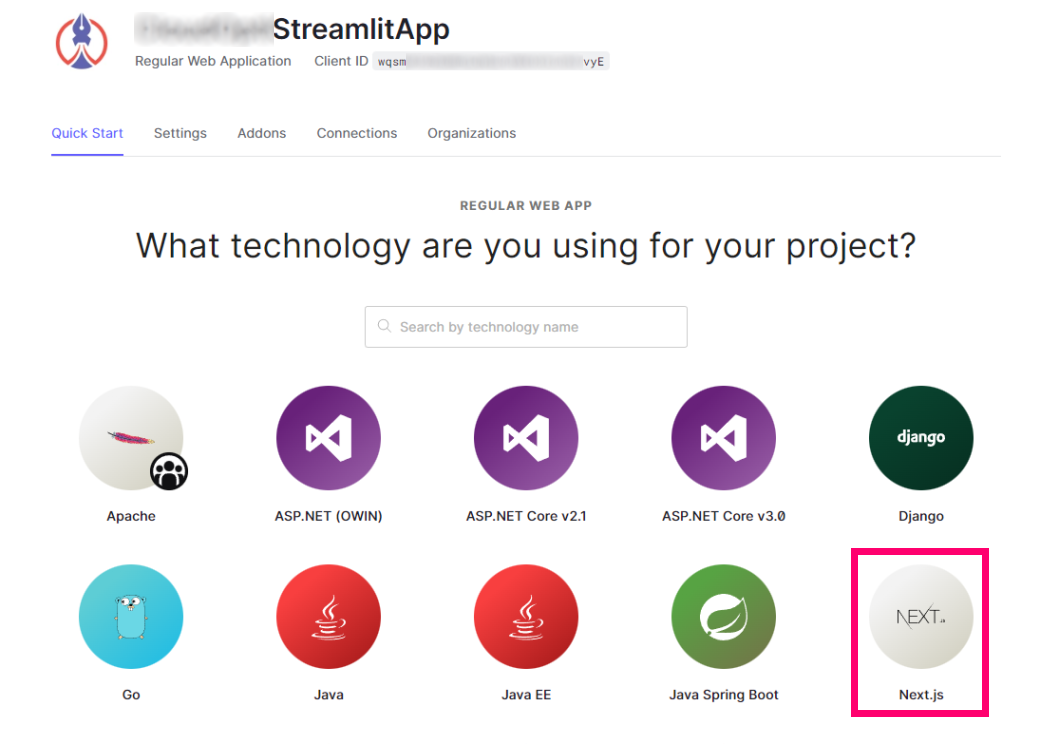
Go to your Auth0 dashboard. Create a new Auth0 account if you don't have one already. Create a new application of the type Regular Web Application in a tenant under your account using the Auth0 management console. (Note: Next.js apps are Web apps because they include both server and client parts.) Call your Web app, MyStreamlitApp.
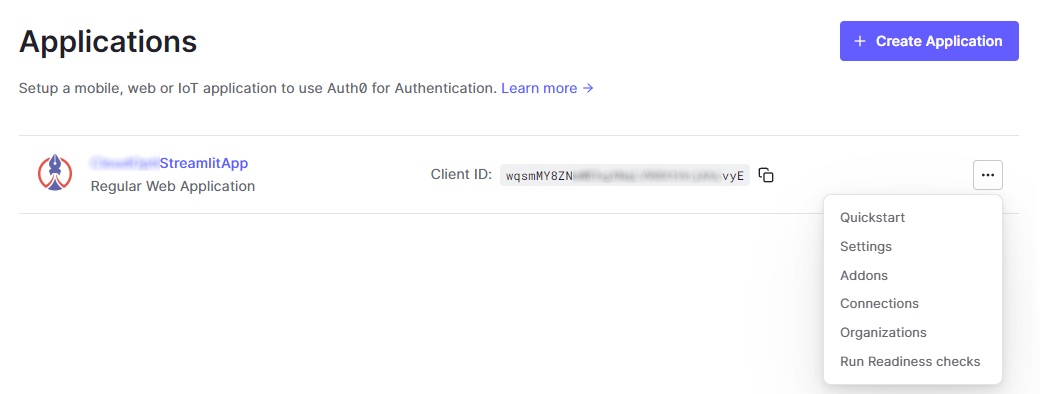
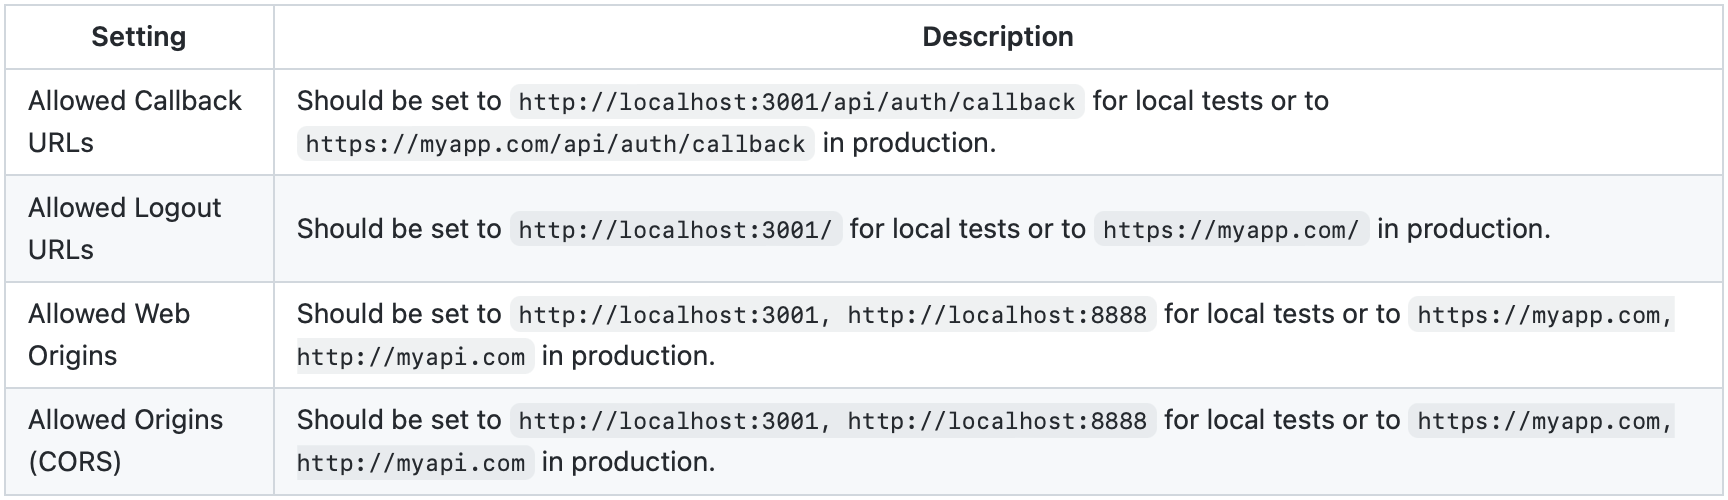
The Auth0 identity service interacts with your Next.js application and needs to know where to redirect web requests after logging in and logging out users of your application. This information is configured under MyStreamlitApp settings:
Environment Variables
Enter the Quick Start tab of MyStreamlitApp (Applications > Applications > MyStreamlitApp > Quick Start) and choose Next.js as the technology you will use in this project.
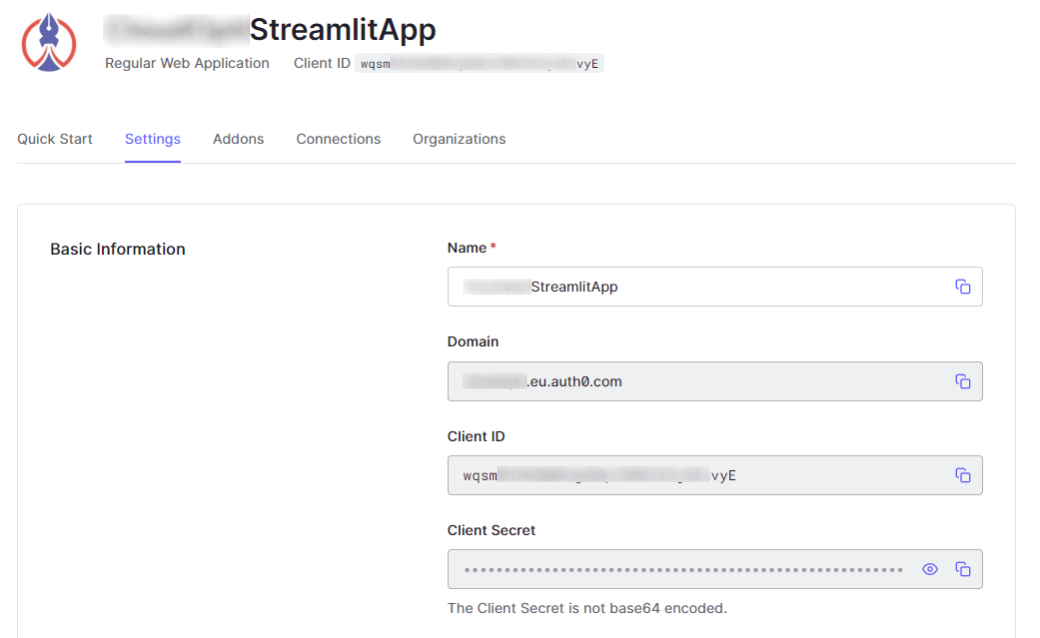
In Configure the SDK section of the quick start, you will see all the environment variables required to configure Auth0 in Component Auth0's settings files (specifically, they are used to configure the UserProvider object in the Auth0 Next.js SDK @auth0/nextjs-auth0 which we will see later in this article). The Auth0 Settings tab of MyStreamlitApp (Applications > Applications > MyStreamlitApp > Settings) is where you can inspect settings values required for Component Auth0 frontend such as Domain, Client ID, and Client Secret.
For local development, create a .env.local file with these required settings, and note the differences for production deployment, where you'd create a .env file instead:
AUTH0_SECRET='YouWillNeverGuessThisSecretKey32' # at least 32 characters, used to encrypt the cookie
AUTH0_ISSUER_BASE_URL='https://YOUR_AUTH0_DOMAIN' # e.g., 'https://myorg.eu.auth0.com' (Auth0 generates this for you based on your tenant)
AUTH0_BASE_URL='http://localhost:3001/' # or https://myapp.com/ in production
AUTH0_CLIENT_ID='YOUR_AUTH0_CLIENT_ID'
AUTH0_CLIENT_SECRET='YOUR_AUTH0_CLIENT_SECRET'
AUTH0_SCOPE='openid profile email name'
AUTH0_AUDIENCE='YOUR_AUTH0_API_IDENTIFIER' # e.g., 'http://myorg.streamlit.app/api' (you provide this & Auth0 uses it identify the audience)
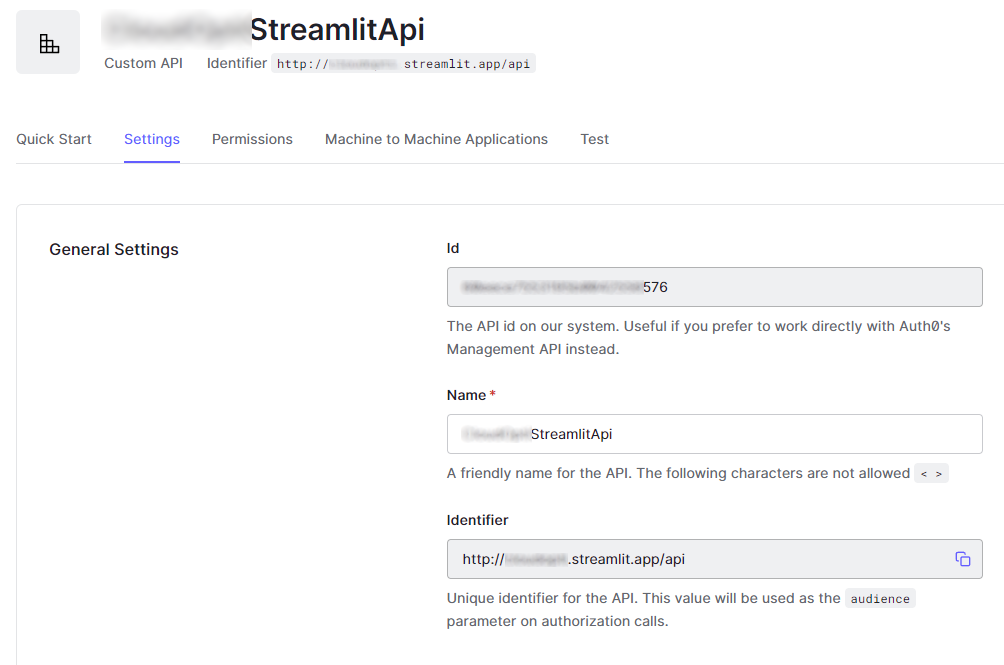
The Audience value is set in Applications > APIs section of the Auth0 dashboard, where you create an API and associate it with your application. Enter Applications > APIs.
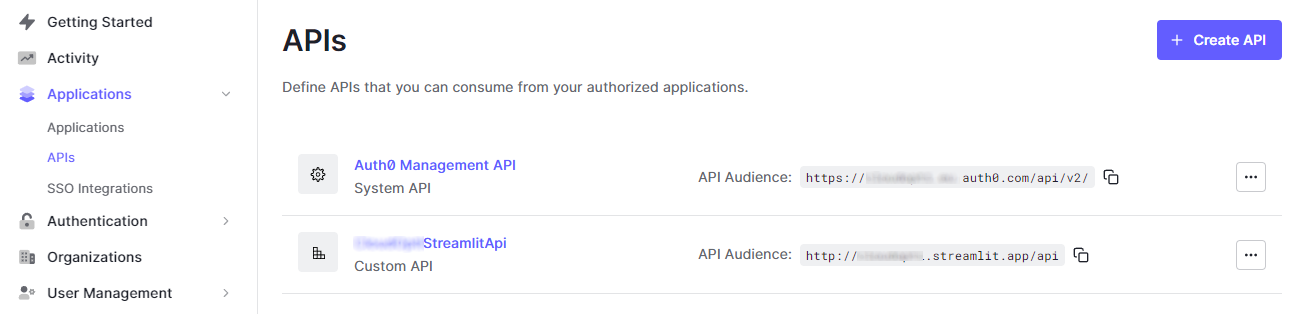
Click Create API, and you will be prompted to enter a name and a friendly (URI) identifier for the API. For example, call it MyStreamlitApi and make the identifier something like http://myorg.streamlit.app/api, which is your Auth0 Domain and suffix /api. This format is my own convention, but any URI is fine as recommended by Auth0. This identifier value is what you use for the Audience value. You will see details of your new API on the API settings page (Applications > APIs > Settings).
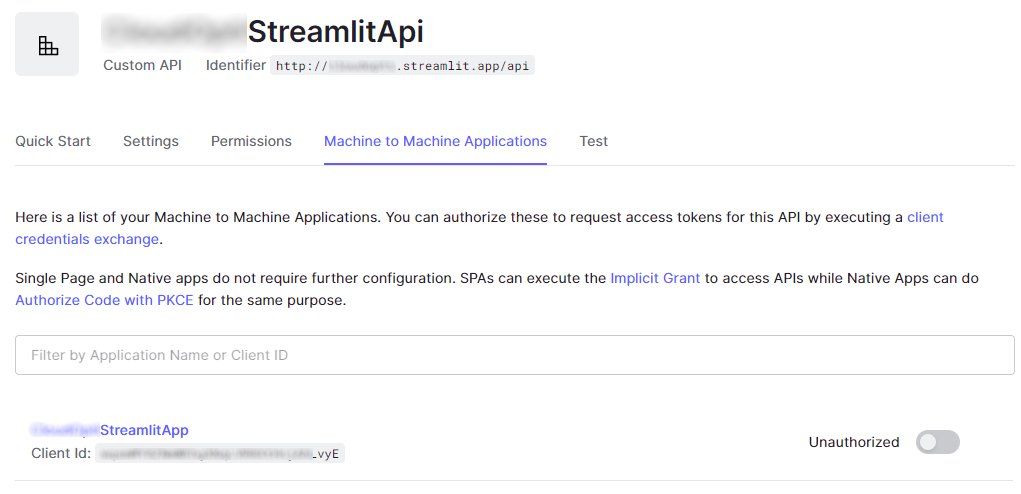
Now enable the API to be invoked from MyStreamlitApp Web app. This is configured in Applications > APIs > Machine to Machine Applications. Here you will see a list of your Machine to Machine Applications and Single Page and Native apps. Since MyStreamlitApp Next.js frontend is a SPA, it doesn't need to be enabled to connect to the API as it can execute the Implicit Grant to access APIs. A Native App like the Remote API Flask server will use Authorize Code with PKCE for the same purpose. We will see this in the Flask server section below.
3. How to integrate and configure the Auth0 Web application with Next.js
Authentication is provided using Auth0 Next.js SDK. This is as simple as importing the UserProvider component from @auth0/nextjs-auth0 and using it to wrap the Next.js top level Component in _app.jsx.
./frontend/pages/_app.jsx
import React from 'react';
import { UserProvider } from '@auth0/nextjs-auth0';

function App({ Component, pageProps }) {
  // You can optionally pass the `user` prop from pages that require server-side
  // rendering to prepopulate the `useUser` hook.
  const { user } = pageProps;

  return (
    <UserProvider user={user}>
        <Component {...pageProps} />
    </UserProvider>
  );
}

export default App;
To manage authentication flows, Next.js has a convenient serverless API mechanism that we can use to delegate all interactions with Auth0. This is done in the /api/auth serverless API endpoint. We implement /api/auth/[...auth0].js as follows:
./frontend/pages/api/auth/[...auth0].js
import { handleAuth } from '@auth0/nextjs-auth0';
export default handleAuth();
The Auth0 Next.js SDK auto-configures routes for /api/auth/login, /api/auth/callback, /api/auth/logout, and /api/auth/me, which means we can conveniently assume these routes exist in our application and when they are invoked, the SDK will use handleAuth to just do the right thing! (Naturally, you can override the default behaviors for these ready-made routes. Please consult the Auth0 SDK documentation.)
4. How to implement the custom Streamlit Auth0 component frontend
The Streamlit component UI (or Streamlit frontend) is a simple Next.js web page that displays a login/logout link and the user's current authentication status. The web page is embedded by the Streamlit host (./app/modules/auth0_component.py) in the Streamlit application (./app/app.py). The Streamlit frontend web page is implemented in ./frontend/pages/streamlit/streamlit.tsx. As you will learn below shortly, the Auth0 authentication runs on a separate web page to the Streamlit frontend, and the login/logout authentication flow takes place within that web page. When the flow completes, user and access token information (i.e., the jwt token) is extracted from the login session and persisted in web browser local storage. We now somehow need to pass the token data into the Streamlit frontend, from which it needs to be passed to the Streamlit application via the Streamlit host. How does that work? Well, it's not as complicated as it sounds. The Streamlit frontend just listens for changes in the state of the authentication jwt token in web browser local storage. When a change is detected, the Streamlit frontend sends an OnStatusUpdate event to the Streamlit host. The Streamlit application receives this update and can act accordingly based on the authentication status of the user.
When the stored token change is detected, its value is passed to the Streamlit host using Streamlit.setComponentValue(). You should examine these functions in the frontend source code to fully understand what happens and when: getSessionInfo(), listenForAuthChangeAndNotifyHost(), and updateStateAndNotifyHost(). The function, listenForAuthChangeAndNotifyHost(), is called periodically using a simple heartbeat mechanism that ensures local storage changes are constantly monitored and acted upon. The heartbeat happens whenever the Streamlit component is running in the Streamlit app. In my sample application, the component is always running and visible at the top of the Streamlit application page, but, strictly speaking, you only need to run the component when the user wishes login or logout.
The Python wrapper part of the component takes an event_handler function as an argument. handle_event() is a minimal implementation of this function, as you've seen earlier (in ./app/component_event_handler.py). This function stores the token in st.session_state, which has global session scope in the Streamlit application. Using session state ensures the token survives Streamlit script reruns and provides thread-safe isolation between different users of your application (and their sessions, of course).
For debugging purposes, handle_event() constructs an array of informational data, which is returned to the Streamlit host. The function print_report() just prints this data to the console (see ./app/modules/auth0_component.py). Change this function to suit your needs.
If the Streamlit app needs to call an external API requiring authentication, it can pass the session state token as a Bearer token in the Authorization request header. The external API can then validate the bearer token using the Auth0 service. See the Flask server section below for an example of a secured external API which is called from the Streamlit app.
Here's the Streamlit component frontend implementation:
./frontend/pages/streamlit/streamlit.tsx
import React, { useState, useEffect } from 'react'
import {
  withStreamlitConnection,
  ComponentProps,
  Streamlit,
} from 'streamlit-component-lib'

import STORAGE from '../../utils/storage'

// All values in seconds
const HEARTBEAT_INTERVAL_SECONDS = 2

const FRAME_HEIGHT = 25

const StreamlitComponent = (props: ComponentProps) => {

  console.log('======== Streamlit component ========')

  const getSessionInfo = async () => {
    const sessionInfoStr = await STORAGE.getItem('sessionInfo')
    if (sessionInfoStr) {
      const sessionInfo = JSON.parse(String(sessionInfoStr))
      const me = sessionInfo.user
      if (me) {
        const name = me.name || `${me.given_name} ${me.family_name}` || me.nickname || me.email
        const email = me.email || me.sub
        const user = { user: me, name: name, email: email }
        const token = sessionInfo.token // {value: accessToken, value_id_token: idToken, expiry: tokenExpiresAt}
        console.log('STC getSessionInfo (user): ' + JSON.stringify(user))
        console.log('STC getSessionInfo (token): ' + JSON.stringify(token))
        return {user: user, token: token}
      }
    }
    console.log('STC getSessionInfo (NULL)')
    return {user: null, token: null}
  }

  const [heartbeater, setHeartbeater] = useState(true)
  const [auth0LoginWindow, setAuth0LoginWindow] = useState(null)

  const [hostname, setHostname] = useState('None')
  const [message, setMessage] = useState('None')
  const [sessionInfo, setSessionInfo] = useState({user: null, token: null})
  const [state, setState] = useState({
    hostname: hostname, message: message, isError: false, error: null,
    sessioninfo: null
  })

  const initializeProps = async (props: ComponentProps) => {
    if ('hostname' in props.args && 'initial_state' in props.args) {
      console.log('STC initializeProps')
      setHostname(props.args.hostname)
      setMessage(props.args.initial_state['message'])
      delete props.args.hostname
      delete props.args.initial_state
    }
  }

  const sendEvent = async (name: string, data: any) => {
    if (props.args.events.includes(name)) {
      Streamlit.setComponentValue({ name: name, data: data })
    } else {
      Streamlit.setComponentValue({ name: 'onError', data: data })
    }
  }

  const updateStateAndNotifyHost = async (msg: string = null, error: string = null) => {
    setMessage(msg || message)
    try {
      const currSessionInfo = await getSessionInfo()
      setSessionInfo(currSessionInfo)
      const currState = {
        hostname: hostname, message: msg || message, isError: false, error: error,
        sessioninfo: currSessionInfo
      }
      setState(currState)
      await sendEvent('onStatusUpdate', currState)
    } catch (err) {
      console.log(`updateStateAndNotifyHost error: ${err}`)
    }
  }

  // !! This function is the main driver of events in this component !!
  // Must be run inside useEffect hook... see below hook with heartbeater dependency
  // (i.e., runs everytime the beat pulses)
  const listenForAuthChangeAndNotifyHost = async () => {
    const heartbeat = setTimeout(async () => {

      const currSessionInfo = await getSessionInfo()
      console.log(`>> STC BEAT <<`)
      if ((sessionInfo?.token?.value || null) !== (currSessionInfo?.token?.value || null)) {
        // logged in change
        if (currSessionInfo?.token?.value) {
          console.log('STC User, Token, Expiry set on login')
          updateStateAndNotifyHost('Logged in')
        // logged out change
        } else {
          console.log('STC User, Token, Expiry cleared on logout')
          updateStateAndNotifyHost('Logged out')
        }
        handleLoginWindowCloser()
      }

      // Ping the component API every second beat to keep the server alive!
      if (heartbeater) {
        const resp = await fetch(`${process.env.NEXT_PUBLIC_API_BASE_URL}/api/ping`)
        const ping = await resp.json()
        console.log(ping)
      }

      // Simulate a pulse by flip-flopping the flag; this drives the useEffect hook
      setHeartbeater(!heartbeater)

    }, HEARTBEAT_INTERVAL_SECONDS * 1000)

    return heartbeat
  }

  useEffect(() => {
    const heartbeat = listenForAuthChangeAndNotifyHost()
    heartbeat.then(() => clearTimeout())
  }, [heartbeater])

  // One shot initializer for props
  useEffect(() => {
    initializeProps(props)
    Streamlit.setFrameHeight(FRAME_HEIGHT)
  }, [])

  // One shot initializer for state
  useEffect(() => {
    const initState = async () => {
      try {
        const currSessionInfo = await getSessionInfo()
        setSessionInfo(currSessionInfo)
      } catch (err) {
        console.log(`useEffect initializer error: ${err}`)
      }
    }
    initState()
  }, [])

  useEffect(() => {
    updateStateAndNotifyHost()
  }, [hostname])

  // ----------------------------------------------------

  // Many examples here: https://stackoverflow.com/questions/847185/convert-a-unix-timestamp-to-time-in-javascript
  const timestampToDateString = (timestamp: string): string => {
    const a = new Date(parseInt(timestamp) * 1000)
    const months = ['Jan', 'Feb', 'Mar', 'Apr', 'May', 'Jun', 'Jul', 'Aug', 'Sep', 'Oct', 'Nov', 'Dec']
    const year = a.getFullYear()
    const month = months[a.getMonth()]
    const date = a.getDate()
    const hour = a.getHours()
    const min = a.getMinutes()
    const sec = a.getSeconds()
    const time = date + ' ' + month + ' ' + year + ' ' + hour + ':' + min + ':' + sec
    return time
  }

  const handleLoginWindowOpener = async () => {
    const W = 425
    const H = 525

    // Fixes dual-screen position                             Most browsers      Firefox
    const dualScreenLeft = window.screenLeft !==  undefined ? window.screenLeft : window.screenX
    const dualScreenTop = window.screenTop !==  undefined   ? window.screenTop  : window.screenY

    const width = window.innerWidth ? window.innerWidth : document.documentElement.clientWidth ? document.documentElement.clientWidth : screen.width
    const height = window.innerHeight ? window.innerHeight : document.documentElement.clientHeight ? document.documentElement.clientHeight : screen.height

    const systemZoom = 1
    // const systemZoom = width / window.screen.availWidth
    const left = (width - W) / 2 / systemZoom + dualScreenLeft
    const top = (height - H) / 2 / systemZoom + dualScreenTop
    const settings = `scrollbars=yes, width=${W / systemZoom}, height=${H / systemZoom}, top=${top}, left=${left}`
    // console.log(settings)
    const popup = window.open('/','_auth0_login', settings)

    if (window.focus) popup.focus()

    setAuth0LoginWindow(popup)
  }

  const handleLoginWindowCloser = async () => {
    if (auth0LoginWindow) {
      auth0LoginWindow.close()
      setAuth0LoginWindow(null)
      // setTimeout(() => { auth0LoginWindow.close(); setAuth0LoginWindow(null); }, 500);
    }
  }

  // ----------------------------------------------------

  return (
    <header>
      <span className="text-md text-pink-600">
        <button onClick={handleLoginWindowOpener}>{sessionInfo.user ? 'Click to logout...' : 'Click to login...'}</button>
      </span>
      <span className="text-md text-gray-600">
        {' | '}{hostname} {sessionInfo.token?.expiry ? ` (current login valid till ${timestampToDateString(sessionInfo.token.expiry)})` : ' (logged out)'}
      </span>
    </header>
  )
}

export default withStreamlitConnection(StreamlitComponent)
5. How to invoke the Auth0 Web application from the Streamlit Auth0 component frontend
When the login/logout link in the Streamlit frontend is clicked, a popup window is shown, prompting the login/logout interaction that will subsequently occur with Auth0 (please ensure your browser allows popups!). This popup window is implemented in ./frontend/pages/AuthApp.js. You can modify the app to inline the login screen in the component frontend, but I felt a popup was a better experience.
Clicking login/logout link in AuthApp.js invokes the corresponding /api/auth/login or /api/auth/logout API which delegates to handleAuth() in ./frontend/pages/api/auth/[...auth0].js. handleAuth() causes the Auth0 login screen to be displayed in the popup window. Note that the user is now interacting directly with the Auth0 identity service. Once the user has completed their login/logout flow, Auth0 sets the authentication session, which will hold the user's current credentials (the Auth0 SDK takes care of this for you), and the popup window is closed.
6. How to pass Auth0's authentication token credentials to the Streamlit Auth0 component frontend
When the login/logout flow completes, hooks in AuthApp.js extract user and access token information (i.e., the jwt token) from the login session and persists it in web browser local storage.
As we've discussed above, the Streamlit frontend will be listening for jwt token changes in local storage and, when detected, OnStatusUpdate events will be sent to the Streamlit host and onwards to the Streamlit application.
Tip: The native browser window.localstorage API would have been sufficient to store the Auth0 session, but I chose instead to use the localforage library. This library uniformly manages different browser storage schemes via a unified interface over Indexed DB, Web SQL, Local Storage, and Memory Storage. A persistent storage scheme (e.g., Indexed DB) ensures tokens survive closing down and restarting your browser window. See ./frontend/utils/storage.js for the actual setting I'm currently using. With your browser's developer tools, you can inspect the data being stored when login and logout actions are performed. Try closing your application browser tab when logged in and restart it to confirm that you are still logged in.
Here are the interesting code paths in AuthApp.js:
./frontend/pages/AuthApp.js
    // Extracts from AuthApp.js

    // Authentication session state
    const [sessionInfo, setSessionInfo] = useState({
        user: session?.user,
        token: {
            value: session?.accessToken,
            value_id_token: session?.idToken,
            expiry: session?.accessTokenExpiresAt
        }
    })

    // Hook always runs to update auth session state
    useEffect(() => {
        setSessionInfo({
            user: session?.user,
            token: {
                value: session?.accessToken,
                value_id_token: session?.idToken,
                expiry: session?.accessTokenExpiresAt
            }
        })
    }, [])

    // Hook runs when auth session state (sessionInfo) changes; updates local storage
    useEffect(async () => {
        if (sessionInfo.user?.email) {
            console.log('AuthApp (set session info: user, token, expiry)')
            await STORAGE.setItem('sessionInfo', JSON.stringify(sessionInfo))
        } else {
            console.log('AuthApp (remove session info: user, token, expiry)')
            await STORAGE.removeItem('sessionInfo')
        }
    }, [sessionInfo])
In summary, when the user logs in, the jwt authentication token state is saved in local storage by the Streamlit component frontend. The frontend implements a simple polling listener which looks for token state changes in browser local storage and notifies the Streamlit component host with this information, which passes it to the Streamlit application. The Streamlit application can use the jwt id token to grant or deny access to functionality and the jwt access token to make calls to external APIs requiring authentication.
You can display the login page in isolation by going to http://localhost:3001. The frontend server must be running.
Details on how to run the solution are below.
[3] Streamlit client app
Earlier I described the Streamlit component host wrapper and event handler. The remainder of the Python part of the application is the Streamlit client application which provides an interactive user experience. This part is trivial to implement, given the nice capabilities of Streamlit's built-in UI widgets. The token state is saved in session state by the event handler and allows or denies access to sub-pages in the client application, and enables protected external APIs to be called too. Whilst access is denied, the client application prompts the user to log in through the Next.js (React) Streamlit component.
./app/app.py
This is the main client application.
import streamlit as st
import settings

# Initialize Session State variables:
if 'message' not in st.session_state:
    st.session_state.message='To use this application, please login...'
if 'token' not in st.session_state:
    st.session_state.token={'value': None, 'expiry': None}
if 'user' not in st.session_state:
    st.session_state.user=None
if 'email' not in st.session_state:
    st.session_state.email=None
if 'report' not in st.session_state:
    st.session_state.report=[]

from common import messageboard, check_token
import dumb_app, dumber_app

messageboard = st.empty()

def main():
    if settings.USE_AUTHENTICATION:
        AUTH_LABEL = 'Authenticate'

        label = AUTH_LABEL
        if (check_token(st.session_state.token)):
            label = f'{st.session_state.user} ({st.session_state.email})'

        with st.expander(label, expanded=True):
            import component_runner
            from component_event_handler import handle_event

            component_runner.init(handle_event)

            # force a rerun to flip the expander label
            just_logged_in = bool(check_token(st.session_state.token) and label == AUTH_LABEL)
            just_logged_out = bool(not check_token(st.session_state.token) and label != AUTH_LABEL)
            if (just_logged_in or just_logged_out):
                st.experimental_rerun()

    pages = {
        'DuMMMy aPp 1': [dumb_app.main],      # DUMMY APP 1
        'DUmmmY ApP 2': [dumber_app.main],    # DUMMY APP 2
    }

    def _launch_apps():
        messageboard.empty()
        choice = st.sidebar.radio('What do you want to do?', tuple(pages.keys()))
        pages[choice][0](title=choice, *pages[choice][1:])

    if settings.USE_AUTHENTICATION:
        if (check_token(st.session_state.token)):
            _launch_apps()
        else:
            messageboard.info('Please login below...')
    else:
        _launch_apps()

    st.markdown('---')

    if st.checkbox('Show debug info', False):
        st.write('Token:', st.session_state.token)
        st.write('User:', st.session_state.user)
        st.write('Email:', st.session_state.email)

    # ABOUT
    st.sidebar.title('Component Auth0 Demo')
    st.sidebar.info('Streamlit application integrating Auth0 user identity and API access authentication.\n\n' + \
        '(c) 2022. CloudOpti Ltd. All rights reserved.')
    st.sidebar.markdown('---')

if __name__ == '__main__':
    st.sidebar.image('./images/logo.png', output_format='png')
    main()
./app/dumb_app.py
This is the logged-in view.
import streamlit as st
import requests
import json

import settings
from common import messageboard, check_token

def main(title):
    st.sidebar.header('Settings')

    capabilities = {'Do Nothing 😦': 'nothing', 'Call Public API 😄': 'something', 'Call Secure API 😎': 'everything'}
    capability = st.sidebar.radio('Select app capability', capabilities.keys())
    action = capabilities[capability]

    st.title(title)
    st.write(f'## Welcome to the app that does {capabilities[capability]}! {capability[-1]}')

    response = None
    base_url = settings.REMOTE_API_BASE_URL

    # Example public API call
    if capabilities[capability] == 'something':
        response = requests.get(base_url + '/api/ping')

    # Example protected API call
    if capabilities[capability] == 'everything':
        if check_token(st.session_state.token):
            headers = {"Authorization": f"Bearer {st.session_state.token['value']}", "accesstoken": f"{st.session_state.token['value']}"}
        else:
            messageboard.error('Something went wrong! Authentication token not available.')

        response = requests.get(base_url + '/api/pong', headers=headers)

    json_ = None
    if response and response.ok:
        json_ = json.loads(response.text)
        data = json_['data']
        st.info(data)
    elif response:
        st.error(f'ERROR: {response.text}')
[4] Flask server hosting external API endpoints
The Flask server provides a couple of very simple API endpoints, /api/ping (public) and /api/pong (protected). They return a timestamped JSON object. To deal with potential CORS issues, an @app.after_request decorator adds the necessary response headers to allow the response to propagate into the Next.js/React component. You can easily write component code to pass an OnActionRequest event with WebRequest action and auth_kind 'BEARER' to delegate an authenticated API call to the host, or you can code the web request directly in your Streamlit app.
The Flask server implementation validates the token, and
/api/pongendpoint checks for the presence of anAuthorization: Bearer <token>in the header.
The Flask application is copied directly from the Auth0 Python Backend/API Server Quickstart sample application. I made a few minor and obvious modifications to the public and secure endpoints.
My implementation is in ./server/flask-api.py. Run the Flask server as follows:
# First, ensure required packages are installed
$ cd ./server
$ pip install -r requirements.txt
# Run the Flask server
$ cd ./server
$ python flask-api.py 8888
You can test if the server is running correctly by visiting http://localhost:8888/api/ping in your web browser.
If you encounter
SSLError("Can't connect to HTTPS URL because the SSL module is not available")making HTTPS calls from the server, it could be because, in some Windows Python distributions, e.g., Anaconda, the SSL DLLs can't be located. Anaconda installs these in~\Anaconda3\Library\bin. The fix is to copy them to~\Anaconda3\DLLs(in my case, Anaconda is installed inC:\ProgramData\Anaconda3).
The libraries to copy from ~\Anaconda3\Library\bin to ~\Anaconda3\DLLs are:
libcrypto-1_1-x64.*
libssl-1_1-x64.*
I have not tested for this issue on Unix or macOS Python distributions, but the solution should be similar to the above for Windows Python distributions.
Additional System Design Details
In this section, you will find important details of the settings files that will enable you to fully understand and run Component Auth0.
Frontend settings file
Create a .env file in the root of the frontend repository and add these environment variables. For local development, you can instead create a .env.local file.
See env.sample, which is a template for .env and .env.local.
# https://github.com/auth0/nextjs-auth0/blob/main/V1_MIGRATION_GUIDE.md

# PUT VARS HERE WHICH SHOULD NOT BE IN MACHINE ENV OR SETTINGS

# https://manage.auth0.com/dashboard

# Nextjs - Auth0 SDK v1.0 settings (must use these exact names)
AUTH0_SECRET='YouWillNeverGuessThisSecretKey32' # at least 32 characters, used to encrypt the cookie
AUTH0_ISSUER_BASE_URL='https://YOUR_AUTH0_DOMAIN' # e.g., 'https://myorg.eu.auth0.com' (Auth0 generates this for you based on your tenant)
AUTH0_BASE_URL='http://localhost:3001/' # or https://myapp.com/ in production
AUTH0_CLIENT_ID='YOUR_AUTH0_CLIENT_ID'
AUTH0_CLIENT_SECRET='YOUR_AUTH0_CLIENT_SECRET'
AUTH0_SCOPE='openid profile email name'
AUTH0_AUDIENCE='YOUR_AUTH0_API_IDENTIFIER' # e.g., 'http://myorg.streamlit.app/api' (you provide this & Auth0 uses it to identify the audience)
AUTH0_ALGORITHMS=['RS256']

# Not used in SDK auto-config
# AUTH0_COOKIE_SECRET='YouWillNeverGuessThisSecretKey32'
# AUTH0_COOKIE_DOMAIN='http://myorg.com'
# AUTH0_CALLBACK='/api/auth/callback'
# AUTH0_LOGOUT_REDIRECT='/'

# API General
NEXT_PUBLIC_REMOTE_API_BASE_URL='http://localhost:8888'
NEXT_PUBLIC_API_BASE_URL='http://localhost:3001'

# API Server
API_ID='YOUR_AUTH0_API_ID' # An alphanumeric value that you can get under the settings section of the API
API_AUDIENCE='YOUR_AUTH0_API_IDENTIFIER' # e.g., 'http://myorg.streamlit.app/api' (you provide this & Auth0 uses it to identify the audience)

# If you have an API for Machine to Machine Apps, e.g. an API Client (these get created by Auth0 when API is created)
# API_CLIENT_ID='YOUR_AUTH0_M2M_APP_API_ID'
# API_CLIENT_SECRET='YOUR_AUTH0_M2M_APP_API_SECRET'

NEXT_RUN_PORT=3001

NEXT_PUBLIC_CORS_ORIGINS=['http://localhost:3001', 'http://localhost:8888']
Streamlit (backend) settings file
Create a .env file in the root of the Streamlit app repository and include appropriate environment variables.
See env.sample, which is a template for .env. The .env file is loaded by ./app/settings.py. Python scripts that require access to settings values will import settings.py.
# PUT VARS HERE WHICH SHOULD NOT BE IN MACHINE ENV OR SETTINGS

COOKIE_SECRET='YouWillNeverGuessThisSecretKey32'
COOKIE_DOMAIN='https://myorg.com'

# API General
COMPONENT_BASE_URL='http://localhost:3001'
API_BASE_URL='http://localhost:3001'
REMOTE_API_BASE_URL='http://localhost:8888'

# Component settings
USE_COMPONENT_EVENT_QUEUE='False'
Whilst the above settings files appear to be almost identical, it is not possible to merge them into one shared settings file. The frontend and Streamlit (backend) applications are separate deployments. In a production environment, these deployments are likely to be distributed across two separate machines or VMs.
Flask (server) settings file
Create a .env file in the root of the server repository and include appropriate environment variables.
##### Auth0 App Settings (same as used in frontend) #####
AUTH0_DOMAIN='YOUR_AUTH0_DOMAIN' # e.g., 'myorg.eu.auth0.com' (Auth0 generates this for you based on your tenant)
API_AUDIENCE='YOUR_AUTH0_API_IDENTIFIER' # e.g., 'http://myorg.streamlit.app/api' (you provide this & Auth0 uses it to identify the audience)
Running the application
Ensure you have installed the required frontend packages by running npm install from the ./frontend folder. The frontend component app uses Next.js, Tailwind CSS, and Auth0.
The frontend and backend applications are started individually from their root directory folders. Enter the ./frontend folder and in separate terminal windows, run yarn <command>, where <command> is dev in one terminal and start-streamlit in another terminal. Run the commands in this order.
When the Streamlit app starts, the component may not load immediately; it will take until it has been statically compiled. Check the Next.js console and wait till it has finished compiling, then refresh the Streamlit browser window. Recall that
yarn buildwill pre-compile the Next.js app, after which you can runyarn startto start the compiled frontend app (i.e., instead of usingyarn dev, which starts the Next.js server and only compiles the application on-demand).
Start the Flask server first with yarn start-api, then use the Streamlit app to call the public and secure API endpoints hosted by it.
Below is the scripts section in ./frontend/package.json, which contains the commands that can be run with yarn.
"scripts": {
  "dev": "npx next dev -p 3001",
  "build": "next build --debug",
  "start": "npx next start -p 3001",
  "start-streamlit": "cd ../app && streamlit run --server.port 4010 app.py",
  "start-api": "python ../server/flask-api.py 8888",
  "start-all": "concurrently "npx next start -p 3001" "cd ../server && python flask-api.py 8888" "cd ../app && streamlit run --server.port 4010 app.py"",
  "typecheck": "tsc"
}
If you install the concurrently package (npm install -g concurrently), you can simultaneously start the frontend, Streamlit application, and Flask server in one command using yarn start-all, or from the command line, you could type:
$ concurrently "yarn start" "yarn start-api" "yarn start-streamlit"
Sequence diagrams for some key use cases
Bi-directional message passing
Authentication
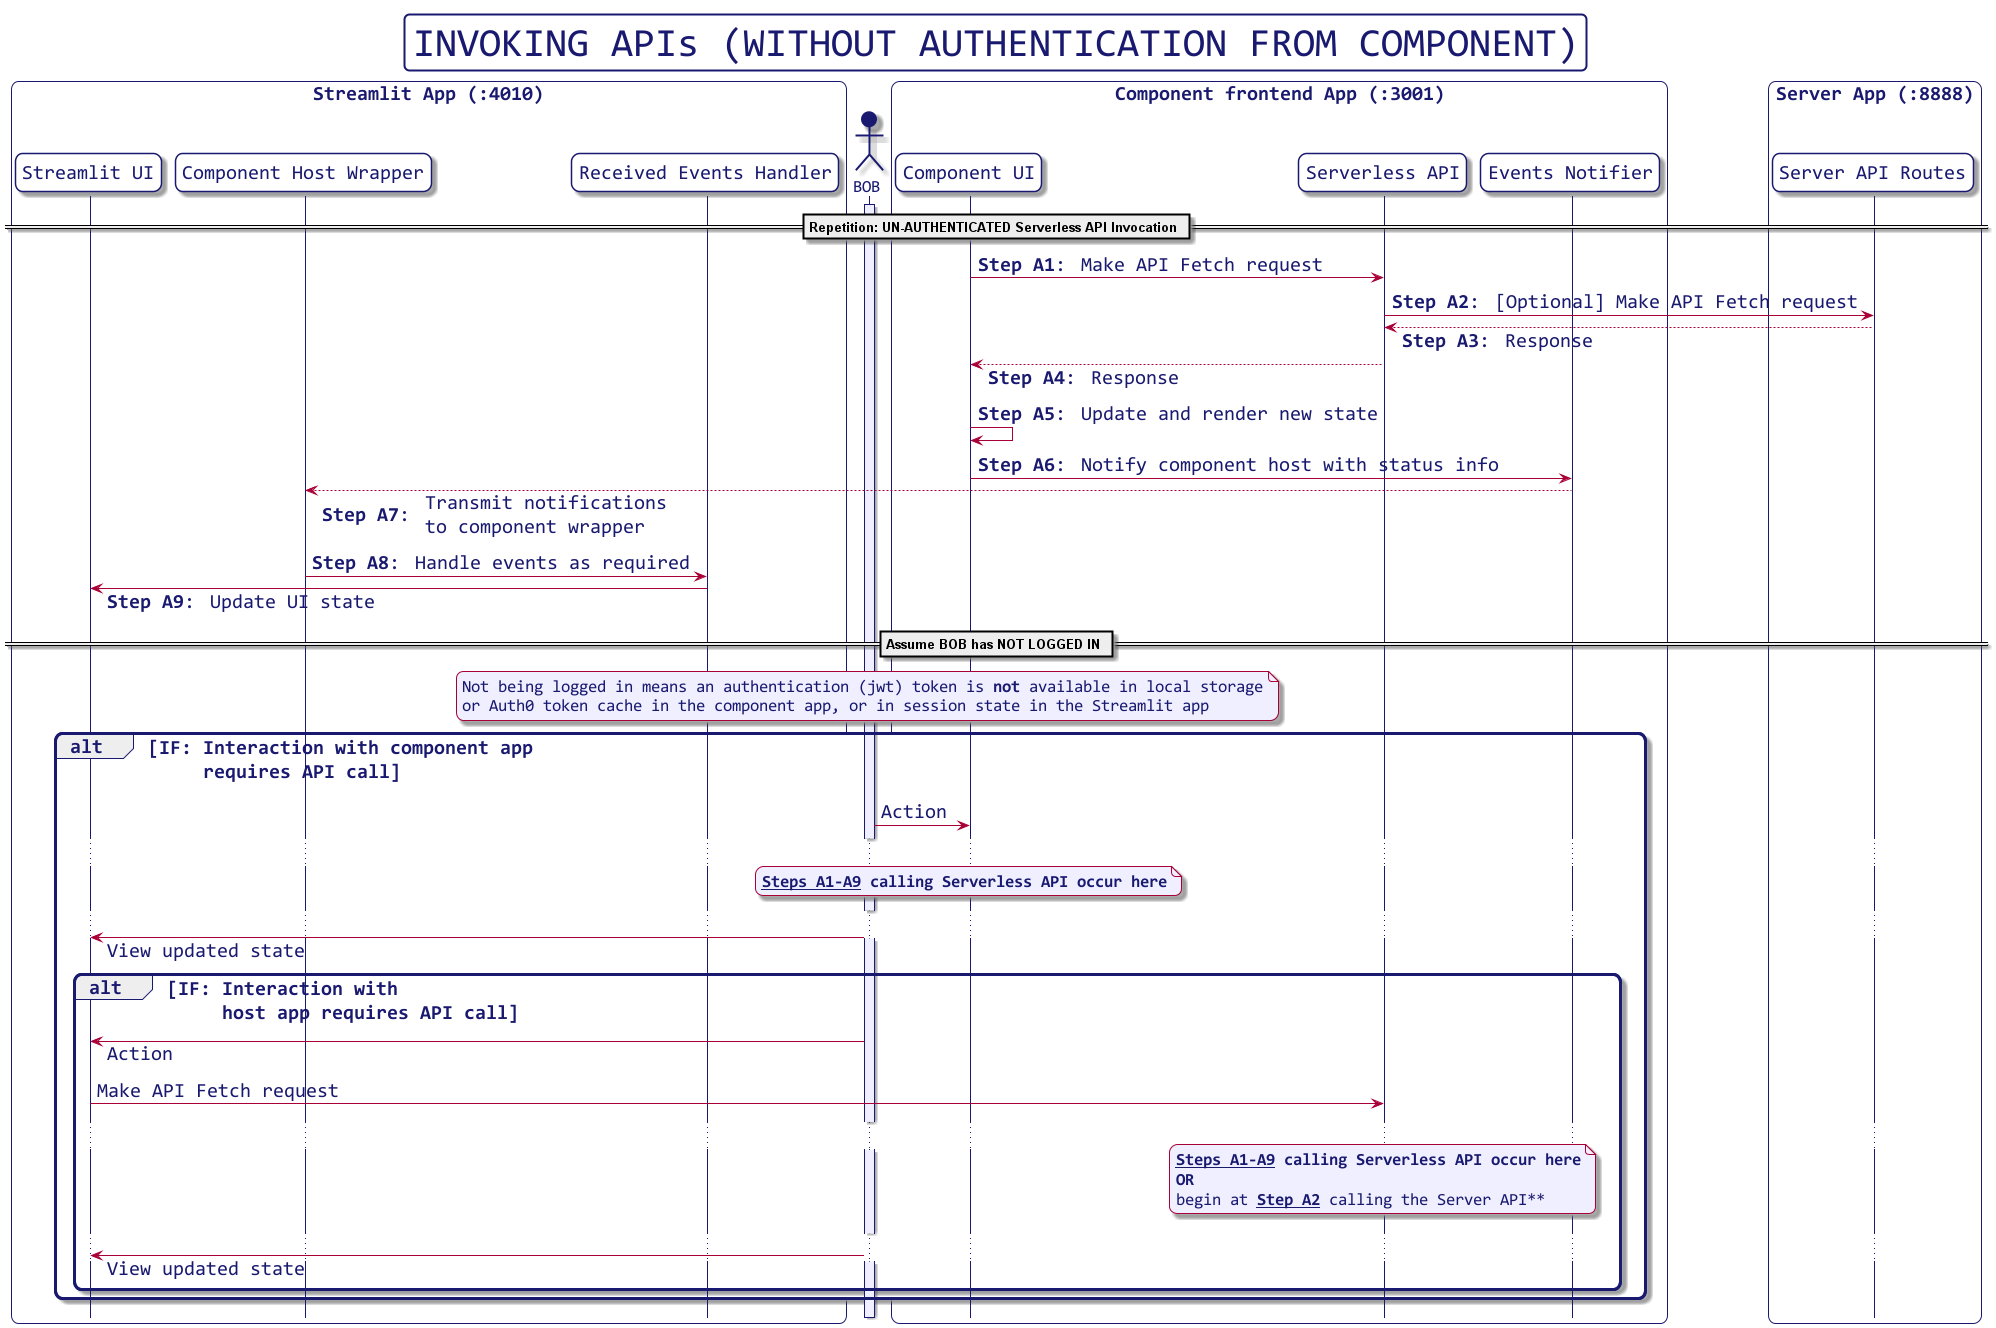
Invoking APIs without Auth
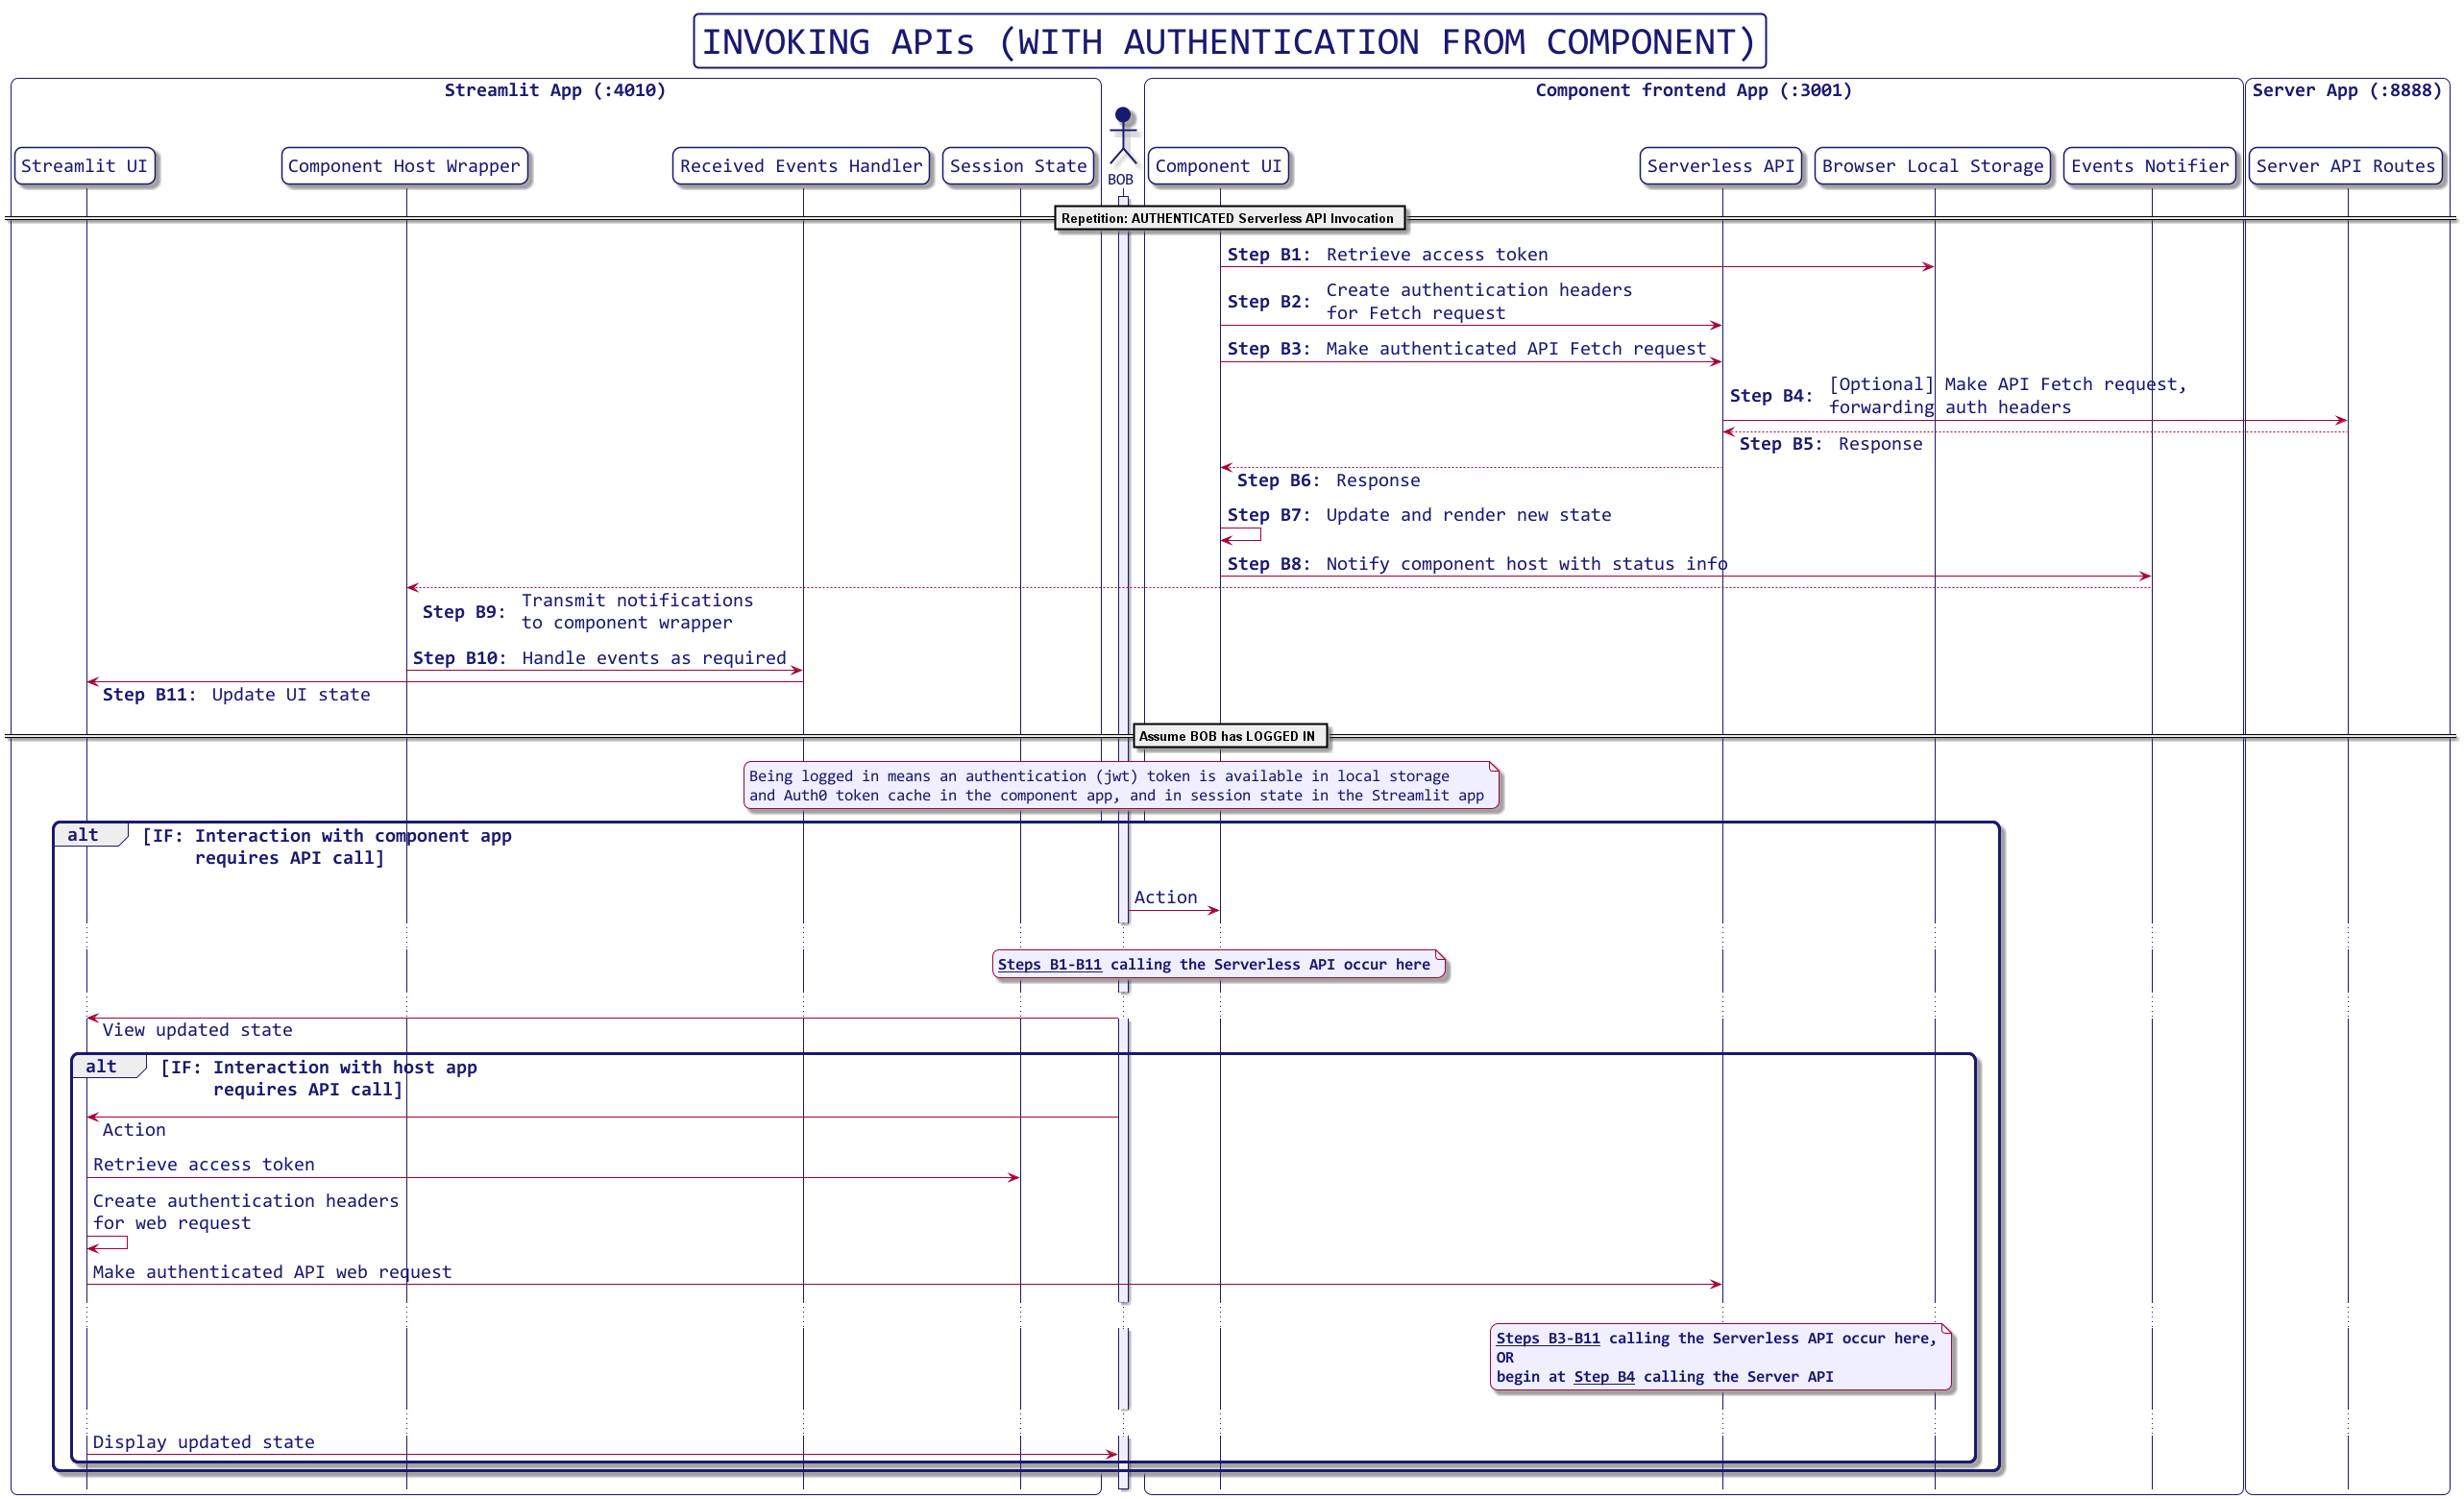
Invoking APIs with Auth
Resources
- Pre-requisite of this article: Introduction to Streamlit and Streamlit Components
- GitHub Repo for this article
- Try Auth0
- The Auth0 blog
- Try NextJS
- The Ultimate Guide to Next.js Authentication with Auth0
- Authenticated Todo App
- LocalForage
Please raise any issues you may have with the code on GitHub, and leave me a star if you enjoyed this article. I look forward to your feedback.
About the author

Arvindra Sehmi
Startups Strategy Advisor
I work with a few tech start-ups providing technical strategy and product development advice and seed investment. I've rediscovered the joys of hands-on software development and actively engage with various developer communities to learn myself and educate sharing what I know. Previously, I was CIO at Oxford Economics for 10 years bringing 25 years’ prior experience in capital markets and high-technology software industries, enterprise software architecture and solutions development. Before that I spent eight years at Microsoft as a global business manager and award-winning software architect and technical evangelist.
Earlier in my career, I was CTO at a start-up building advanced social media analytics products followed by a couple of years as an executive coach and mentor, and IT change management and strategy consulting to a number of small and medium sized businesses.