
The HTTPS protocol is mandatory for any website or web application. It guarantees trust and security, and its wide adoption is due to the effort of browser providers and other supporters. However, many developers still use HTTP in their development environment. Why should you switch to HTTPS if it's not a production environment? Let's discuss.
Why Use HTTPS During Local Development?
Hopefully, you use HTTPS in your production environment since security is a primary concern for your web application. But why should you enable HTTPS in your local development environment? You are comfortable with your http://localhost. What are the security concerns in your local environment?
Check out this blog post to learn more about how HTTPS works.
There are different reasons to enable HTTPS, even for your localhost. Let's take a look at some of them.
Environment parity
The first and perhaps most logical reason is that the development environment should be similar to the production environment. This is one of the main principles of modern software development and deployment. It's one of the tenets of the twelve-factor methodology: dev/prod parity. Having development and production environments configured similarly helps reduce the risk of experiencing issues in production that you cannot find in development.
For example, suppose you are using a JavaScript library from an HTTP-based CDN. Everything works as expected in your local development environment. However, in your HTTPS-based production environment, things may go differently. You have mixed content in your pages, i.e., your page is composed of content delivered through HTTPS and content delivered through HTTP. Browsers may refuse to load an HTTP-based resource from an HTTPS-based page. This is a security measure to prevent HTTPS downgrade attacks. It is just a simple example of an issue you can get only in your production environment. Other hard to detect problems could arise if you keep different protocols in the two environments.
Strong security policies
Enabling HTTPS in your production environment isn't enough to keep security for your application and the data it handles. I mentioned earlier the HTTPS downgrade risks your application may be exposed to. To enforce your application avoiding mixed content and blocking insecure requests, you should use Content Security Policy (CSP). This standard security layer helps mitigate certain types of attacks. In particular, it prevents possible unintentional protocol switches.
To learn more about Content Security Policy (CSP), check out this article explaining how to prevent protocol switches and this one about preventing XSS attacks.
If you use CSP to prevent your application from switching from HTTPS to HTTP, you need to use HTTPS in both production and development environments. The CSP directives wouldn't work in an HTTP-based environment. In other words, if you care about your application security in production, you can't help but use HTTPS even in your development environment.
Using specific browser features
If you want to use some advanced features supported by modern browsers, you need to use HTTPS in your local development environment. This applies to service workers, secure cookies, or prefixed cookies, for example.
Some browsers allow you to use plain HTTP by explicitly specifying localhost or 127.0.0.1 as the host name while testing a service worker. However, this violates the environment parity principle discussed earlier. In addition, it is strongly discouraged by browser manufacturers.
Custom hostname
Usually, you use localhost as the name for your local machine. This is a reserved name and is mapped to the 127.0.0.1 IP address. Browsers treat it in a special way, especially in terms of security.
However, there are situations where you may need to use a custom hostname, such as myapplication or myhost.dev or something else. For example, you can use a custom hostname to rely on meaningful names to distinguish multiple development environments. You can do it by editing your machine's hosts file.
Warning: changing the content of your
hostsfile may create access problems to certain Internet domains.
In this case, your browser won't consider it a secure site, but it will when you enable HTTPS.
Other reasons
So far, you have learned about the most common reasons you should enable HTTPS in your development environment, but there are many more. For example, if you want to use HTTP/2 or if your third-party library explicitly requires HTTPS.
There are several reasons to change to HTTPS in your local development, but after all, the environment parity principle is the primary reason.
Some may think to start a new project with HTTP support and switch to HTTPS later when the project has grown. This approach is based on the common thought that switching from HTTP to HTTPS is painless. Learn about some of the issues that Stack Overflow ran into by reading the story of their migration.
How Does HTTPS in Localhost Work?
The HTTPS protocol is an extension of HTTP. In HTTPS, the server and the client exchange encrypted data using the Transport Layer Security (TLS) protocol.
You don't need to understand every little detail of the encryption mechanism for the purpose of this article, but a little basic terminology is necessary for what you'll be doing next. For example, you need to know that data exchanged between the client and the server is encrypted using the Public-Key Cryptography, which is based on a private and public key pair. The server provides the client with its public key through a digital certificate issued by a Certificate Authority.
Learn more on encryption and certificates
The HTTPS encryption mechanism is based on Public-Key Cryptography, and the whole infrastructure to guarantee trust and security is based on the Public-Key Infrastructure (PKI).
Without going into details, to enable HTTPS, a web server needs a private key and a public key to set up encrypted communication with clients. The public key is included in a digital certificate issued by a Certificate Authority (CA), which guarantees that it belongs to that server with that specific domain name.
Check out this article if you want to have a high-level overview of Public-Key Cryptography.
When your browser reaches out to an HTTPS-enabled web server, it receives the server's digital certificate, which contains the server's public key. The first thing the browser does is check that the server's domain name matches the domain name in the certificate. This validation ensures that the public key comes from a trusted source. The browser also checks other things, such as the certificate expiration date and the Certificate Authority that issued that certificate.
In a production environment, you need a certificate issued by a real Certificate Authority. However, you can be more relaxed in a development environment and create your own certificate, known as your self-signed certificate.
Learn web security through a hands-on exploration of some of the most notorious threats.
Download the free ebook
A Practical Example: Node and HTTPS
Now you have a high-level vision of what you need to enable HTTPS in your development environment. Let's put these concepts into practice by setting up a basic example using Node.js.
Each development framework may have its own procedures or tools. Please, check out your framework's documentation for specific information. One thing that stays the same in all frameworks is the need for a private and public key pair and a certificate for the public key.
Creating the certificate
Earlier you read that you could create your own certificate for your development environment. But how can you do it? The best-known and most powerful tool is probably OpenSSL. However, it requires a good knowledge of Public-Key Infrastructure concepts. In most cases, you don't have advanced requirements for your HTTPS environment. So, using a simple tool like mkcert is a great choice.
Install mkcert in your machine following the instructions for your operating system.
The first time you use mkcert, you must run the following command to install a local Certificate Authority:
mkcert -install
When running this command, you may notice a warning message like the following:
Warning: "certutil" is not available, so the CA can't be automatically installed in Firefox! ⚠️
Install "certutil" with "brew install nss" and re-run "mkcert -install" 👈
This is related to supporting the trust store in Firefox. If you are not using Firefox, you can ignore this message.
Installing a local CA avoids your browser complaining that it does not trust the certificate you are about to create.
Once you install your local CA, you are ready to create a certificate and a key pair for your development environment.
I suggest you create a folder to put your Node.js project and the certificate. Say you named this folder my-secure-app, move to this folder and run the following command:
mkcert localhost
After the command runs, you will find two files in your folder:
localhost-key.pem, which is the file containing your private key,localhost.pem, which is the certificate containing the public key.
The certificate you have generated assures your browser that the public key it will receive is from the server named localhost. You can choose a different name instead of localhost when you generate your certificate. Just remember to register that name in your hosts file as a custom domain.
Setting up the HTTPS server with Node.js
It's time to build your HTTPS-enabled server with Node.js.
In the same folder where you put the key and certificate files, create a server.js file with the following content:
const https = require('https');
const fs = require('fs');

const options = {
  key: fs.readFileSync('localhost-key.pem'),
  cert: fs.readFileSync('localhost.pem')
};

https.createServer(options, function (req, res) {
  res.writeHead(200);
  res.end("I'm HTTPS-enabled!");
}).listen(8080);

console.log("The server is listening to port 8080 with HTTPS enabled.");
The first line of the file imports the https module, which is the key to this implementation. The options constant gets the values of the private key and the certificate from the respective files. Finally, you create a server based on these options and listening to the 8080 port. That's all!
Run the server with the following command:
node server.js
Then, head your browser to http://localhost:8080. You'll get a screen like the following:
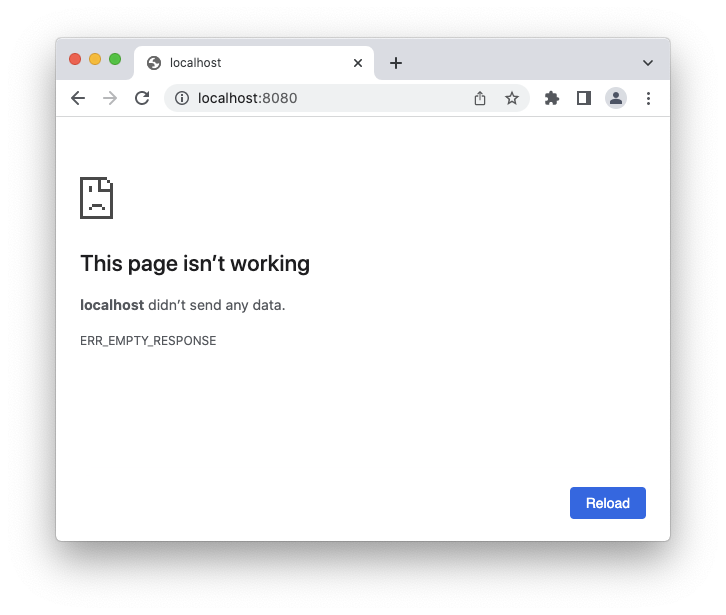
This screen tells you that the server does not initialize a plain HTTP communication. If you change that address to https://localhost:8080, you will get the following page:

This time the server replied to your request as expected. You are ready to develop your application using HTTPS.
Try out the most powerful authentication platform for free.
Get started →Summary
Throughout this article, you learned a few reasons why it's a good practice to use HTTPS in your development environment. Beyond the necessity of having a development environment similar to the production environment, some browser features may require HTTPS.
You learned that you need a pair of cryptographic keys and a certificate to enable HTTPS in your development web server. Finally, you saw how to create a simple Node.js server that uses HTTPS.
I hope that you now have the initial understanding of how to configure and set up HTTPS in your local development environment. If you have any questions, please reach out to me using the comments below. I'll be happy to answer your questions about this fascinating topic. Let's make the Internet safer by using HTTPS everywhere!
About the author

Andrea Chiarelli
Principal Developer Advocate
I have over 20 years of experience as a software engineer and technical author. Throughout my career, I've used several programming languages and technologies for the projects I was involved in, ranging from C# to JavaScript, ASP.NET to Node.js, Angular to React, SOAP to REST APIs, etc.
In the last few years, I've been focusing on simplifying the developer experience with Identity and related topics, especially in the .NET ecosystem.