
Overview
In this article, we are going to explore using Next.js, Auth0, and Supabase to build a classic Todo app. Each user will only be able to see their own todos, so we will need to implement authentication, authorization, and a database.
This article will cover the following:
- configuring Auth0, Next.js, and Supabase to work together seamlessly
- using the
nextjs-auth0library for authentication - implementing Row Level Security (RLS) policies for authorization
- what a JWT is and how to sign our own
- using PostgreSQL Functions to extract values from a JWT
The final version of the Todo app code can be found here.
Prerequisites
This article does not assume prior experience with any of these technologies; however, you will need Node.js installed to follow along. In addition, plan to have accounts for the managed services in the section below (Auth0 and Supabase). Both are free as of this writing and don't require a credit card.
Stack
Next.js is a React framework that makes building efficient web apps super easy. It also gives us the ability to write server-side logic — which we will need to ensure our application is secure — without needing to maintain our own server.
Auth0 is an authentication and authorization solution that makes managing users and securing applications a breeze. It is an extremely battle-tested and mature solution for auth.
Supabase is an open-source backend-as-a-service, which makes it possible to build an application in a weekend and scale to millions. It is a convenient wrapper around a collection of open-source tools that enable database storage, file storage, authentication, authorization, and real-time subscriptions. While these are all great features, this article will only use database storage and authorization.
"Wait, if Supabase handles auth, why are we using Auth0?"
One of the real strengths of Supabase is the lack of vendor lock-in. Maybe you already have users in Auth0, your company has a lot of experience with it, or you're interacting with other applications that use it. Any of the Supabase components can be swapped out for a similar service and hosted anywhere.
So let's do just that!
Auth0
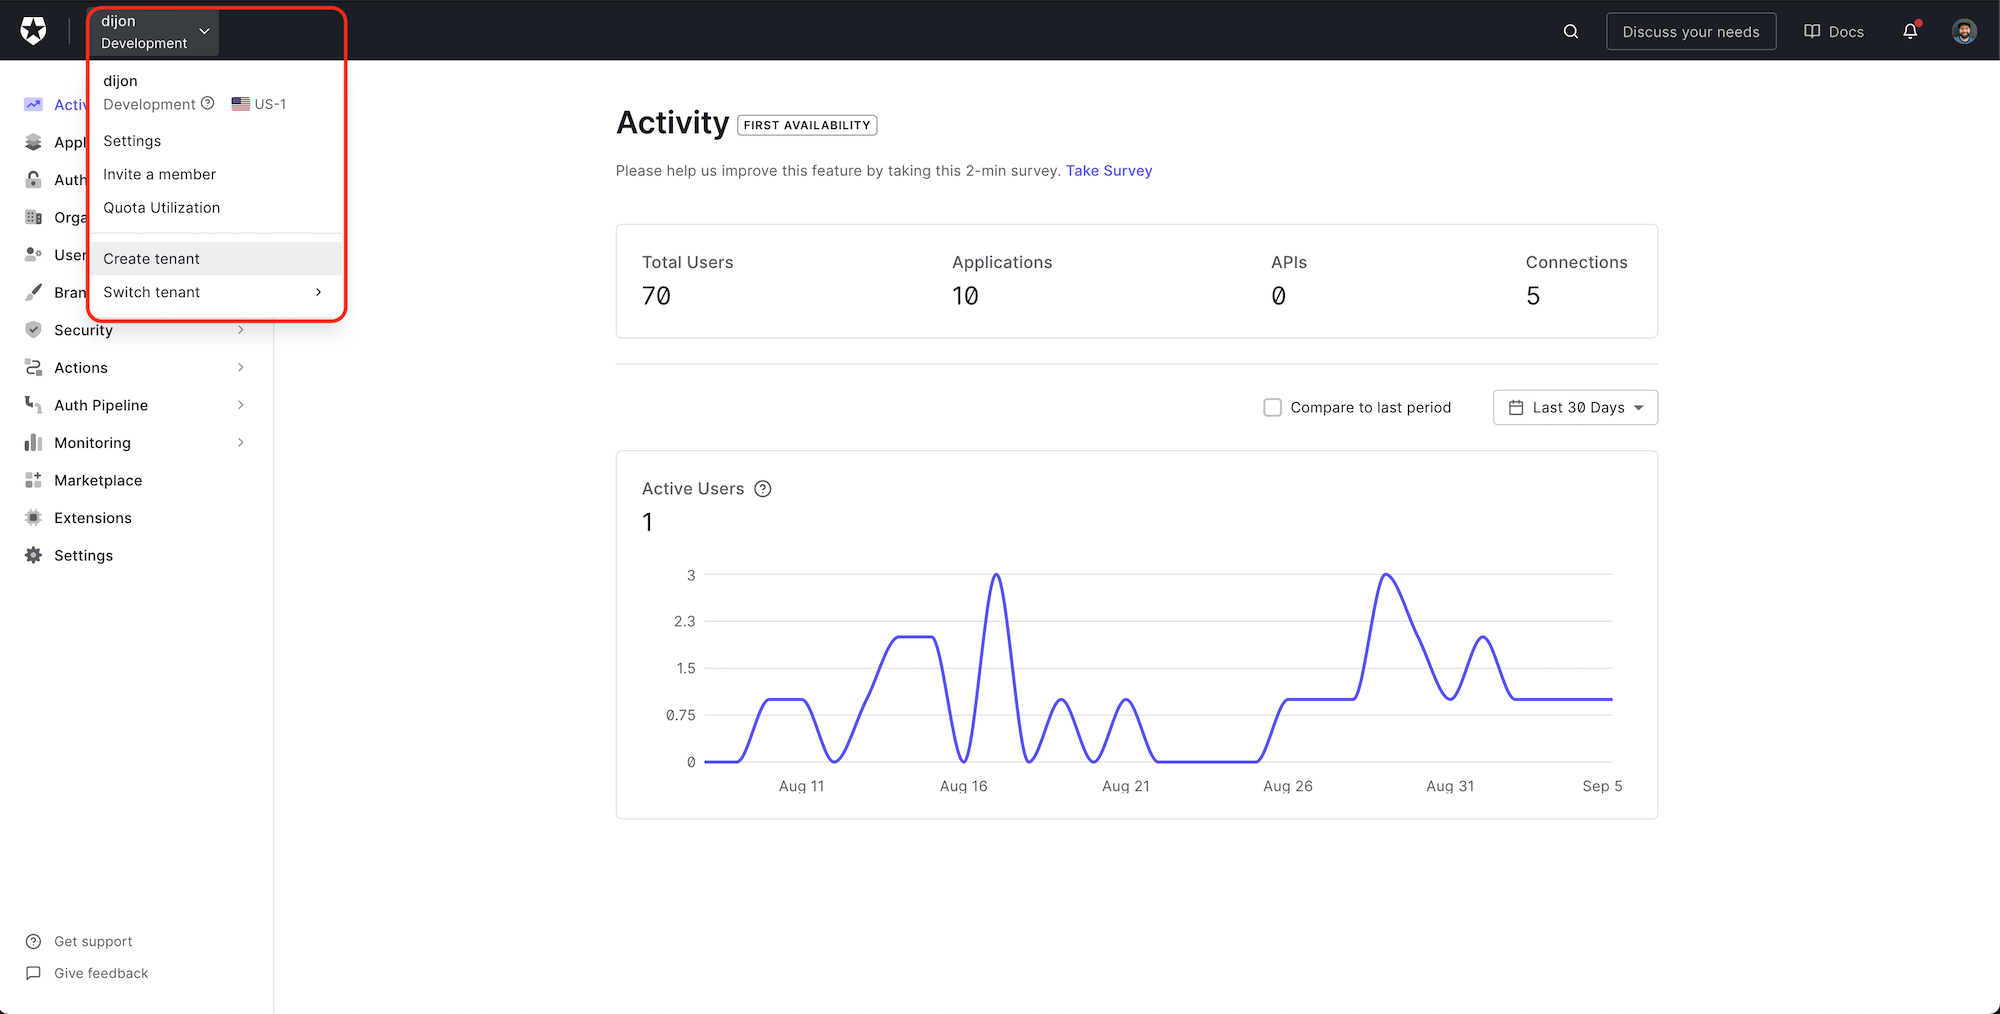
The first thing we need to do is sign up for a free account with Auth0. Once at the dashboard, we need to create a new Tenant for our project.
A tenant is a way of isolating our users and settings from other applications we have with Auth0.
Click the name of your account in the top left, and then select Create tenant from the dropdown.
Give your tenant a unique Domain, set the Region closest to you, and leave the Environment Tag set to Development.
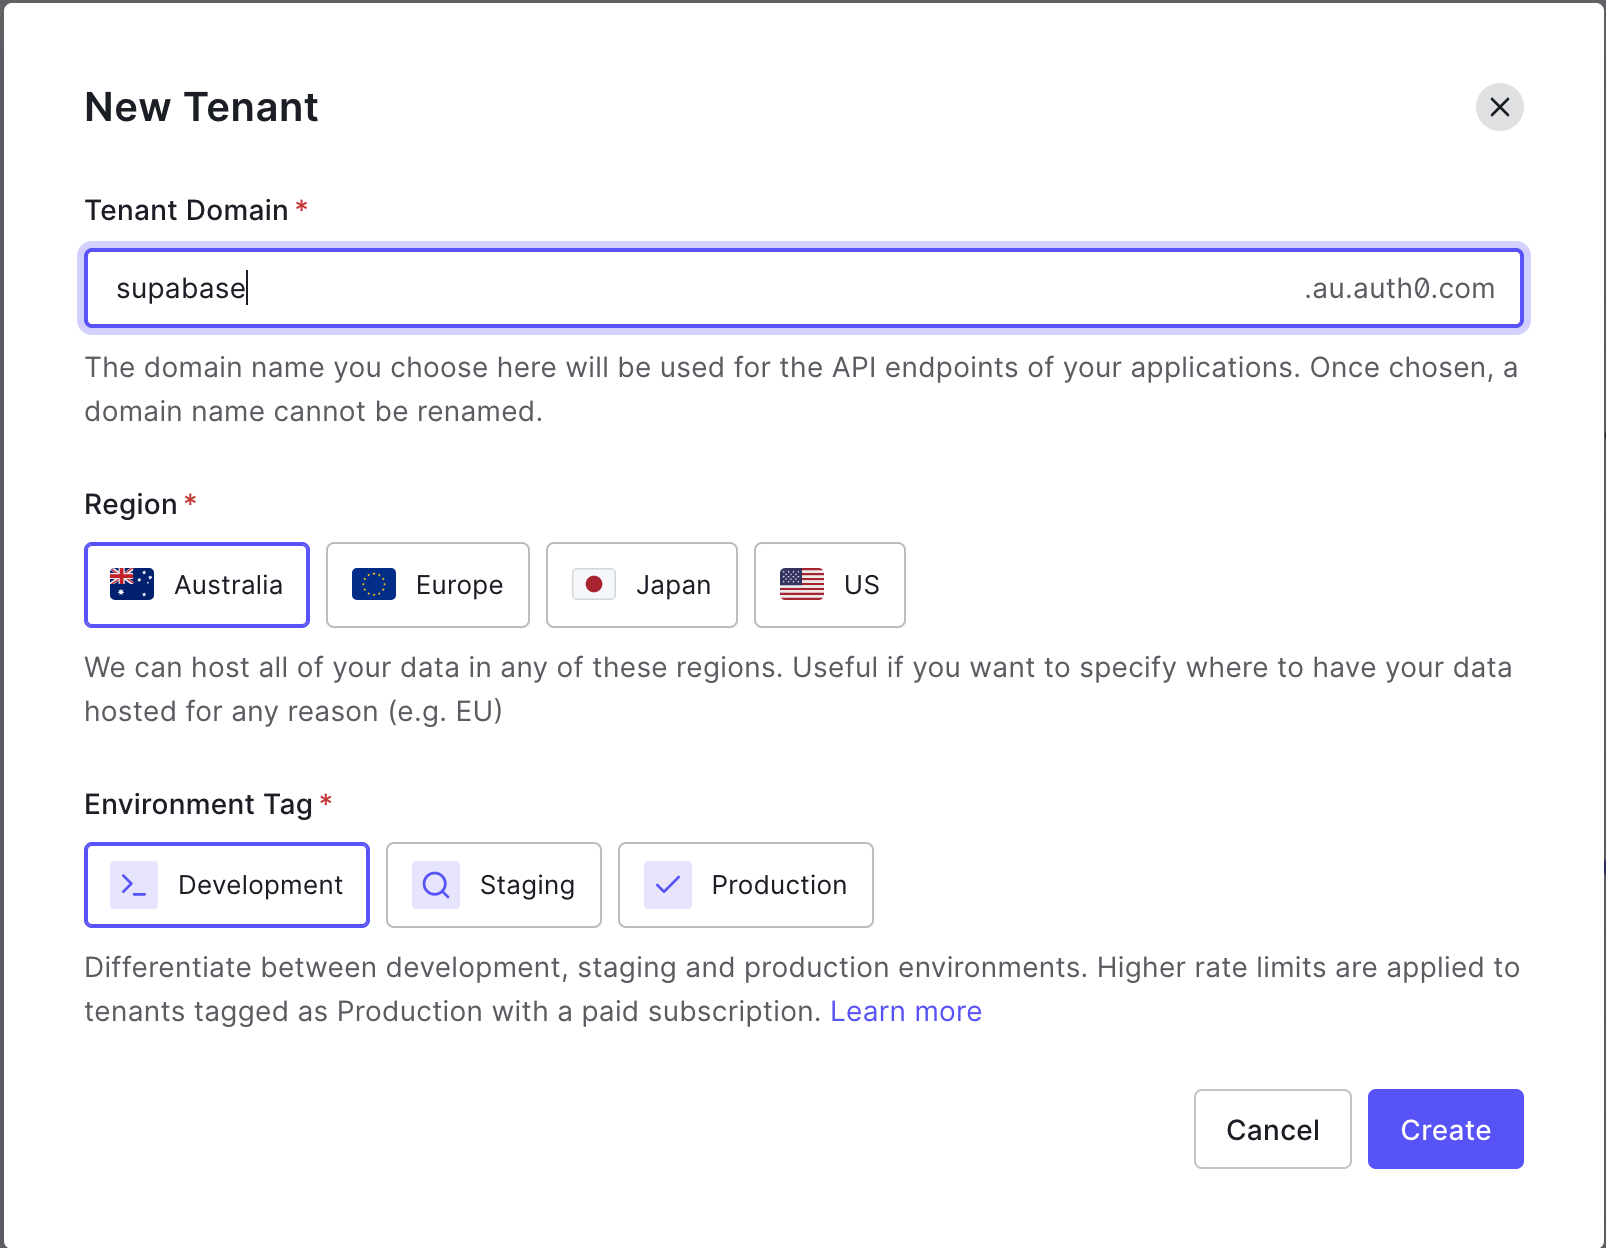
In a production application, you want your region to be as close as possible to the majority of your users.
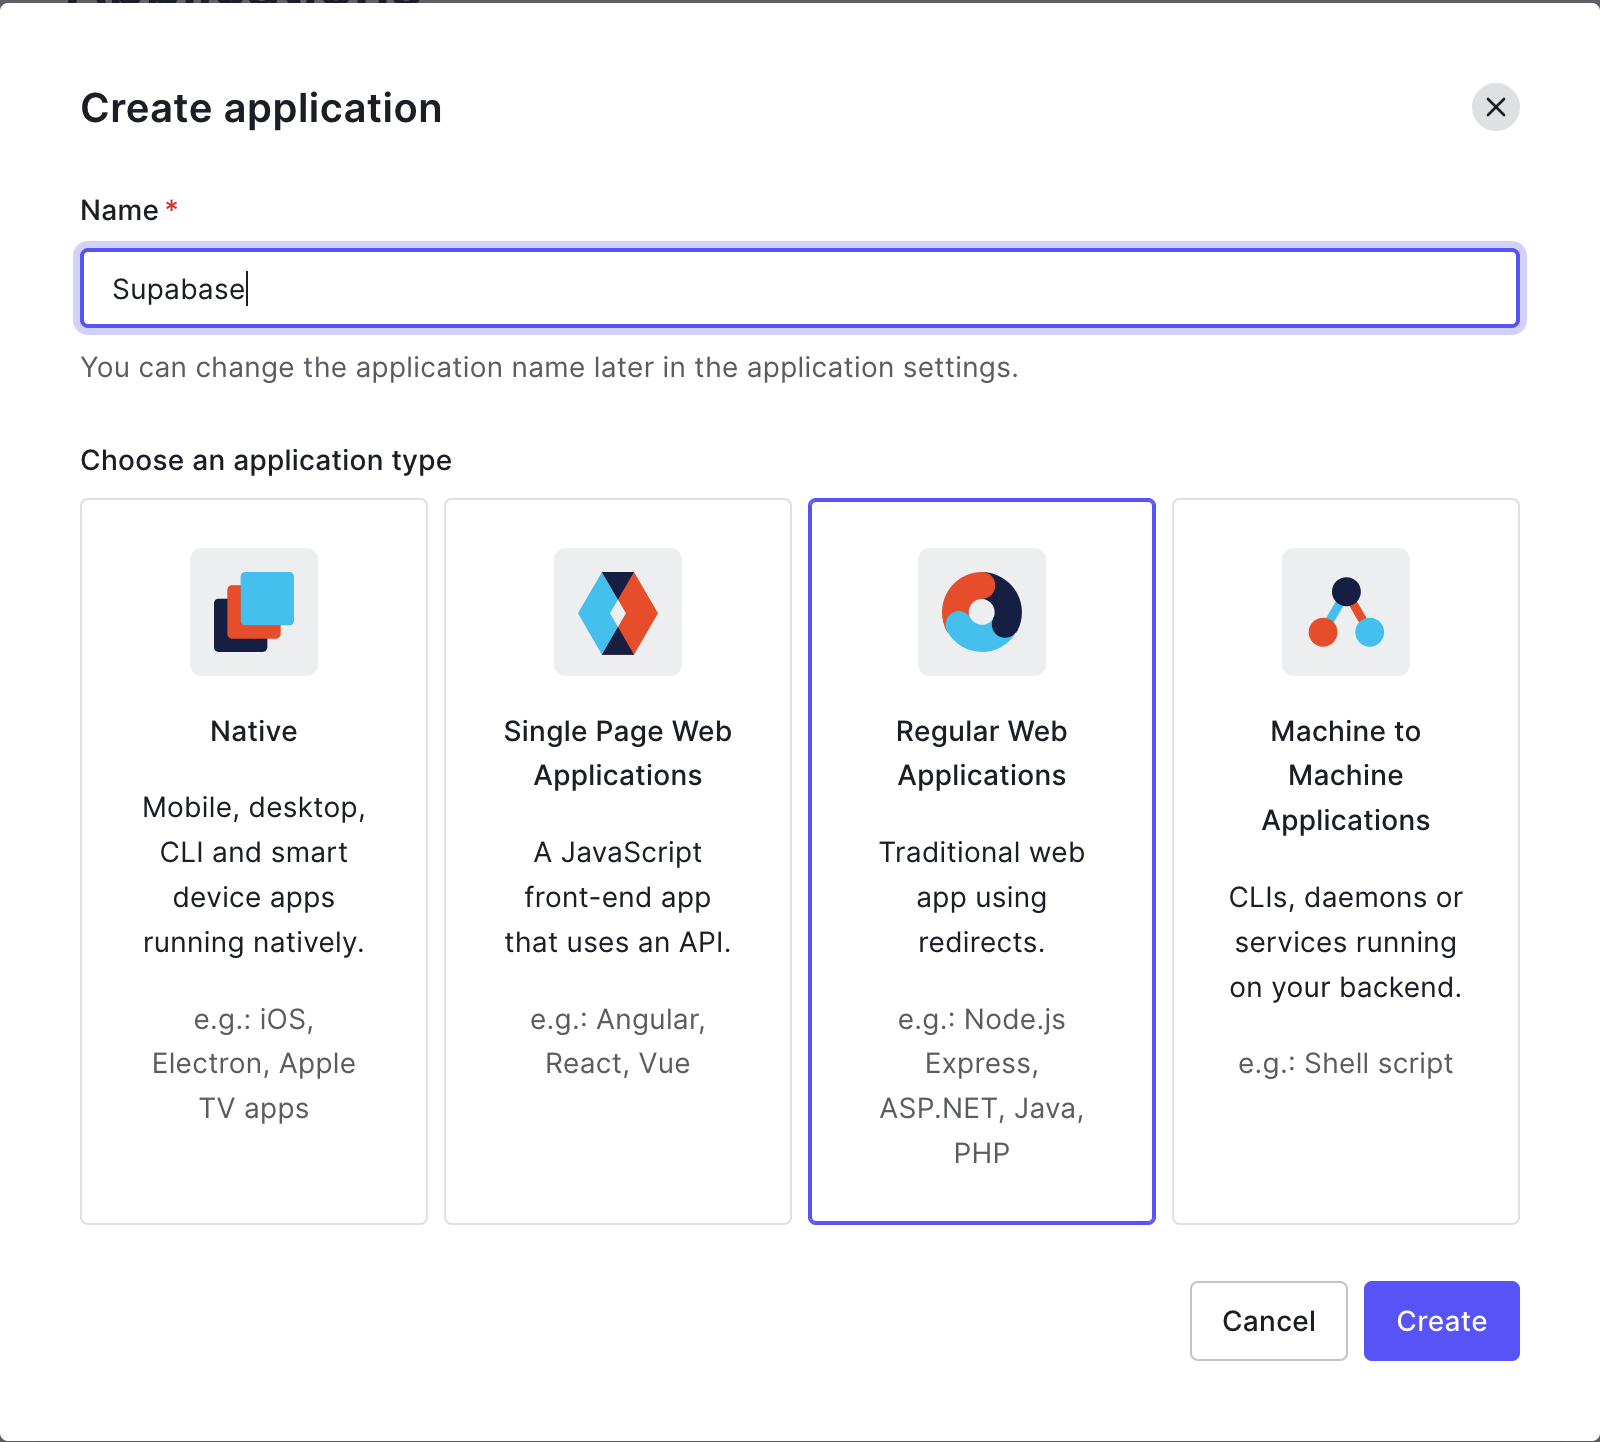
Next, we want to create an Application. Select Applications > Applications from the sidebar menu, and click + Create Application. We want to give it a name (this can be the same as the Tenant) and select Regular Web Applications. Click Create.
From the application's page you are redirected to, select the Settings tab and scroll down to the Application URIs section.
Add the following:
Allowed Callback URLs: http://localhost:3000/api/auth/callback
Allowed Logout URLs: http://localhost:3000
Go to Advanced Settings > OAuth and confirm the JSON Web Token (JWT) Signature Algorithm is set to RS256 and that OIDC Conformant is enabled. Be sure to save your changes.
Awesome. We now have an Auth0 instance configured to handle authentication for our application. So let's build an app!
While we could use any web application framework for this example, I am going to use Next.js. It gives us a super-efficient React application and includes file-based routing out of the box. In addition, it allows us to run server-side logic while building our app with getStaticProps and (when the user requests a page) with the getServerSideProps function. We will need to do things like authentication server-side, but we don't want the hassle of setting up, maintaining, and paying for another server.
Next.js
The fastest way to create a Next.js application is by using the create-next-app package:
npx create-next-app supabase-auth0
Replace the contents of pages/index.js with:
// pages/index.js

import styles from "../styles/Home.module.css";

const Index = () => {
  return <div className={styles.container}>Working!</div>;
};

export default Index;
Run the project in Development mode:
npm run dev
And confirm it is working at http://localhost:3000.
Authentication
Let's integrate the nextjs-auth0 package. This is a convenient wrapper around the Auth0 JS SDK but specifically built for Next.js:
npm i @auth0/nextjs-auth0
Create a new folder at pages/api/auth/ and add a file called [...auth0].js with the following content:
// pages/api/auth/[...auth0].js

import { handleAuth } from "@auth0/nextjs-auth0";

export default handleAuth();
The
[...auth0].jsis a catch all route. This means that any url that starts with/api/auth0will load this component —/api/auth0,/api/auth0/login,/api/auth0/some/deeply/nested/urletc.
This is one of those awesome things nextjs-auth0 gives us for free! Calling handleAuth() automatically creates a collection of convenient routes — such as /login and /logout — and all the necessary logic for handling tokens and sessions. There're no extra steps required besides calling this method.
Replace the contents of pages/_app.js with:
// pages/_app.js

import "@/styles/globals.css";
import { UserProvider } from "@auth0/nextjs-auth0/client";

export default function App({ Component, pageProps }) {
  return (
    <UserProvider>
      <Component {...pageProps} />
    </UserProvider>
  );
}
Create a .env.local file in your root project folder and add the following:
AUTH0_SECRET=generate-this-below
AUTH0_BASE_URL=http://localhost:3000
AUTH0_ISSUER_BASE_URL=https://<name-of-your-tenant>.<region-you-selected>.auth0.com
AUTH0_CLIENT_ID=get-from-auth0-dashboard
AUTH0_CLIENT_SECRET=get-from-auth0-dashboard
See the Next.js documentation for Environment variables to learn more.
Generate a secure AUTH0_SECRET by running:
node -e "console.log(crypto.randomBytes(32).toString('hex'))"
AUTH0_CLIENT_IDandAUTH0_CLIENT_SECRETcan be found atApplications > Settings > Basic Informationin the Auth0 Dashboard.
You will need to quit the Next.js server and re-run the
npm run devcommand anytime new environment variables are added to the.env.localfile
Let's update our pages/index.js file to add the ability to sign in and out:
// pages/index.js

import styles from "../styles/Home.module.css";
import { useUser } from "@auth0/nextjs-auth0/client";
import Link from "next/link";

const Index = () => {
  const { user } = useUser();

  return (
    <div className={styles.container}>
      {user ? (
        <p>
          Welcome {user.name}! <Link href="/api/auth/logout">Logout</Link>
        </p>
      ) : (
        <Link href="/api/auth/login">Login</Link>
      )}
    </div>
  );
};

export default Index;
We are using the useUser() hook to get the user object if they have signed in. If not, we are rendering a link to the Login page.
Next.js'
Linkcomponent is being used to enable client-side routing rather than needing to reload the entire page from the server.
We can also add the ability to handle the loading and error states:
// pages/index.js

import styles from "../styles/Home.module.css";
import { useUser } from "@auth0/nextjs-auth0/client";
import Link from "next/link";

const Index = () => {
  const { user, error, isLoading } = useUser();

  if (isLoading) return <div className={styles.container}>Loading...</div>;
  if (error) return <div className={styles.container}>{error.message}</div>;

  // rest of component
};

export default Index;
We need our users to be signed in to see their todos or add a new todo. To accomplish this, we'll protect this route — requiring the user to be signed in. We'll also automatically redirect them to the /login route if they are not.
Thankfully, the nextjs-auth0 library makes this super simple with the withPageAuthRequired function. We can tell Next.js to call this function on the server before rendering our page by setting it to the getServerSideProps function.
Add the following to the pages/index.js file:
// other imports
import { withPageAuthRequired } from "@auth0/nextjs-auth0";

// rest of component

export const getServerSideProps = withPageAuthRequired();

// other export
This function checks if we have a user signed in and handles redirecting them to the Login page if not. If we have a user, it automatically passes the user object to our Index component as a prop. Since this is happening on the server before our component is rendered, we no longer need to handle loading, error states, or whether or not the user is logged in. This means we can significantly clean up our rendering logic.
This is what our entire file should look like:
// pages/index.js

import styles from "../styles/Home.module.css";
import { withPageAuthRequired } from "@auth0/nextjs-auth0";
import Link from "next/link";

const Index = ({ user }) => {
  return (
    <div className={styles.container}>
      <p>
        Welcome {user.name}! <Link href="/api/auth/logout">Logout</Link>
      </p>
    </div>
  );
};

export const getServerSideProps = withPageAuthRequired();

export default Index;
Very clean!
We want to display a list of todos as the landing page, but first, we need somewhere to store them.
Supabase
Head over to database.new to create a free Supabase account. From the dashboard, click New project and choose your Organization.
Enter a name and password, and select a region geographically close to what you chose for your Auth0 region.
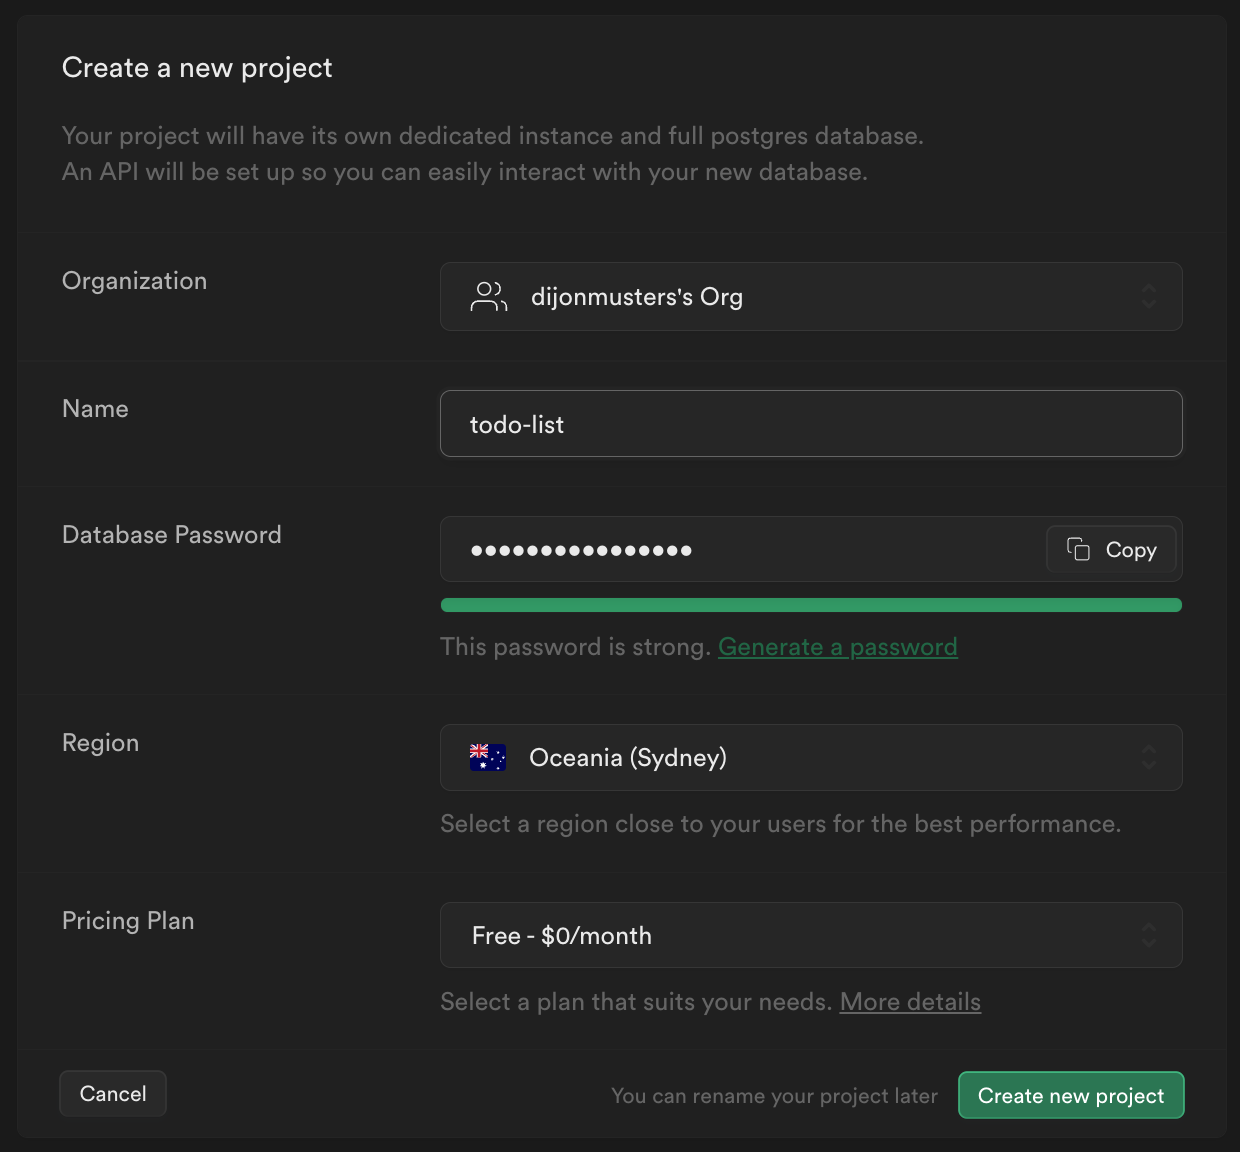
Make sure you choose a secure password, as this will be the password for your PostgreSQL Database.
It will take a few minutes for Supabase to provision all the bits in the background, but this page conveniently displays all the values we need to get our Next.js app configured.
You can also get them anytime from your project's API settings.
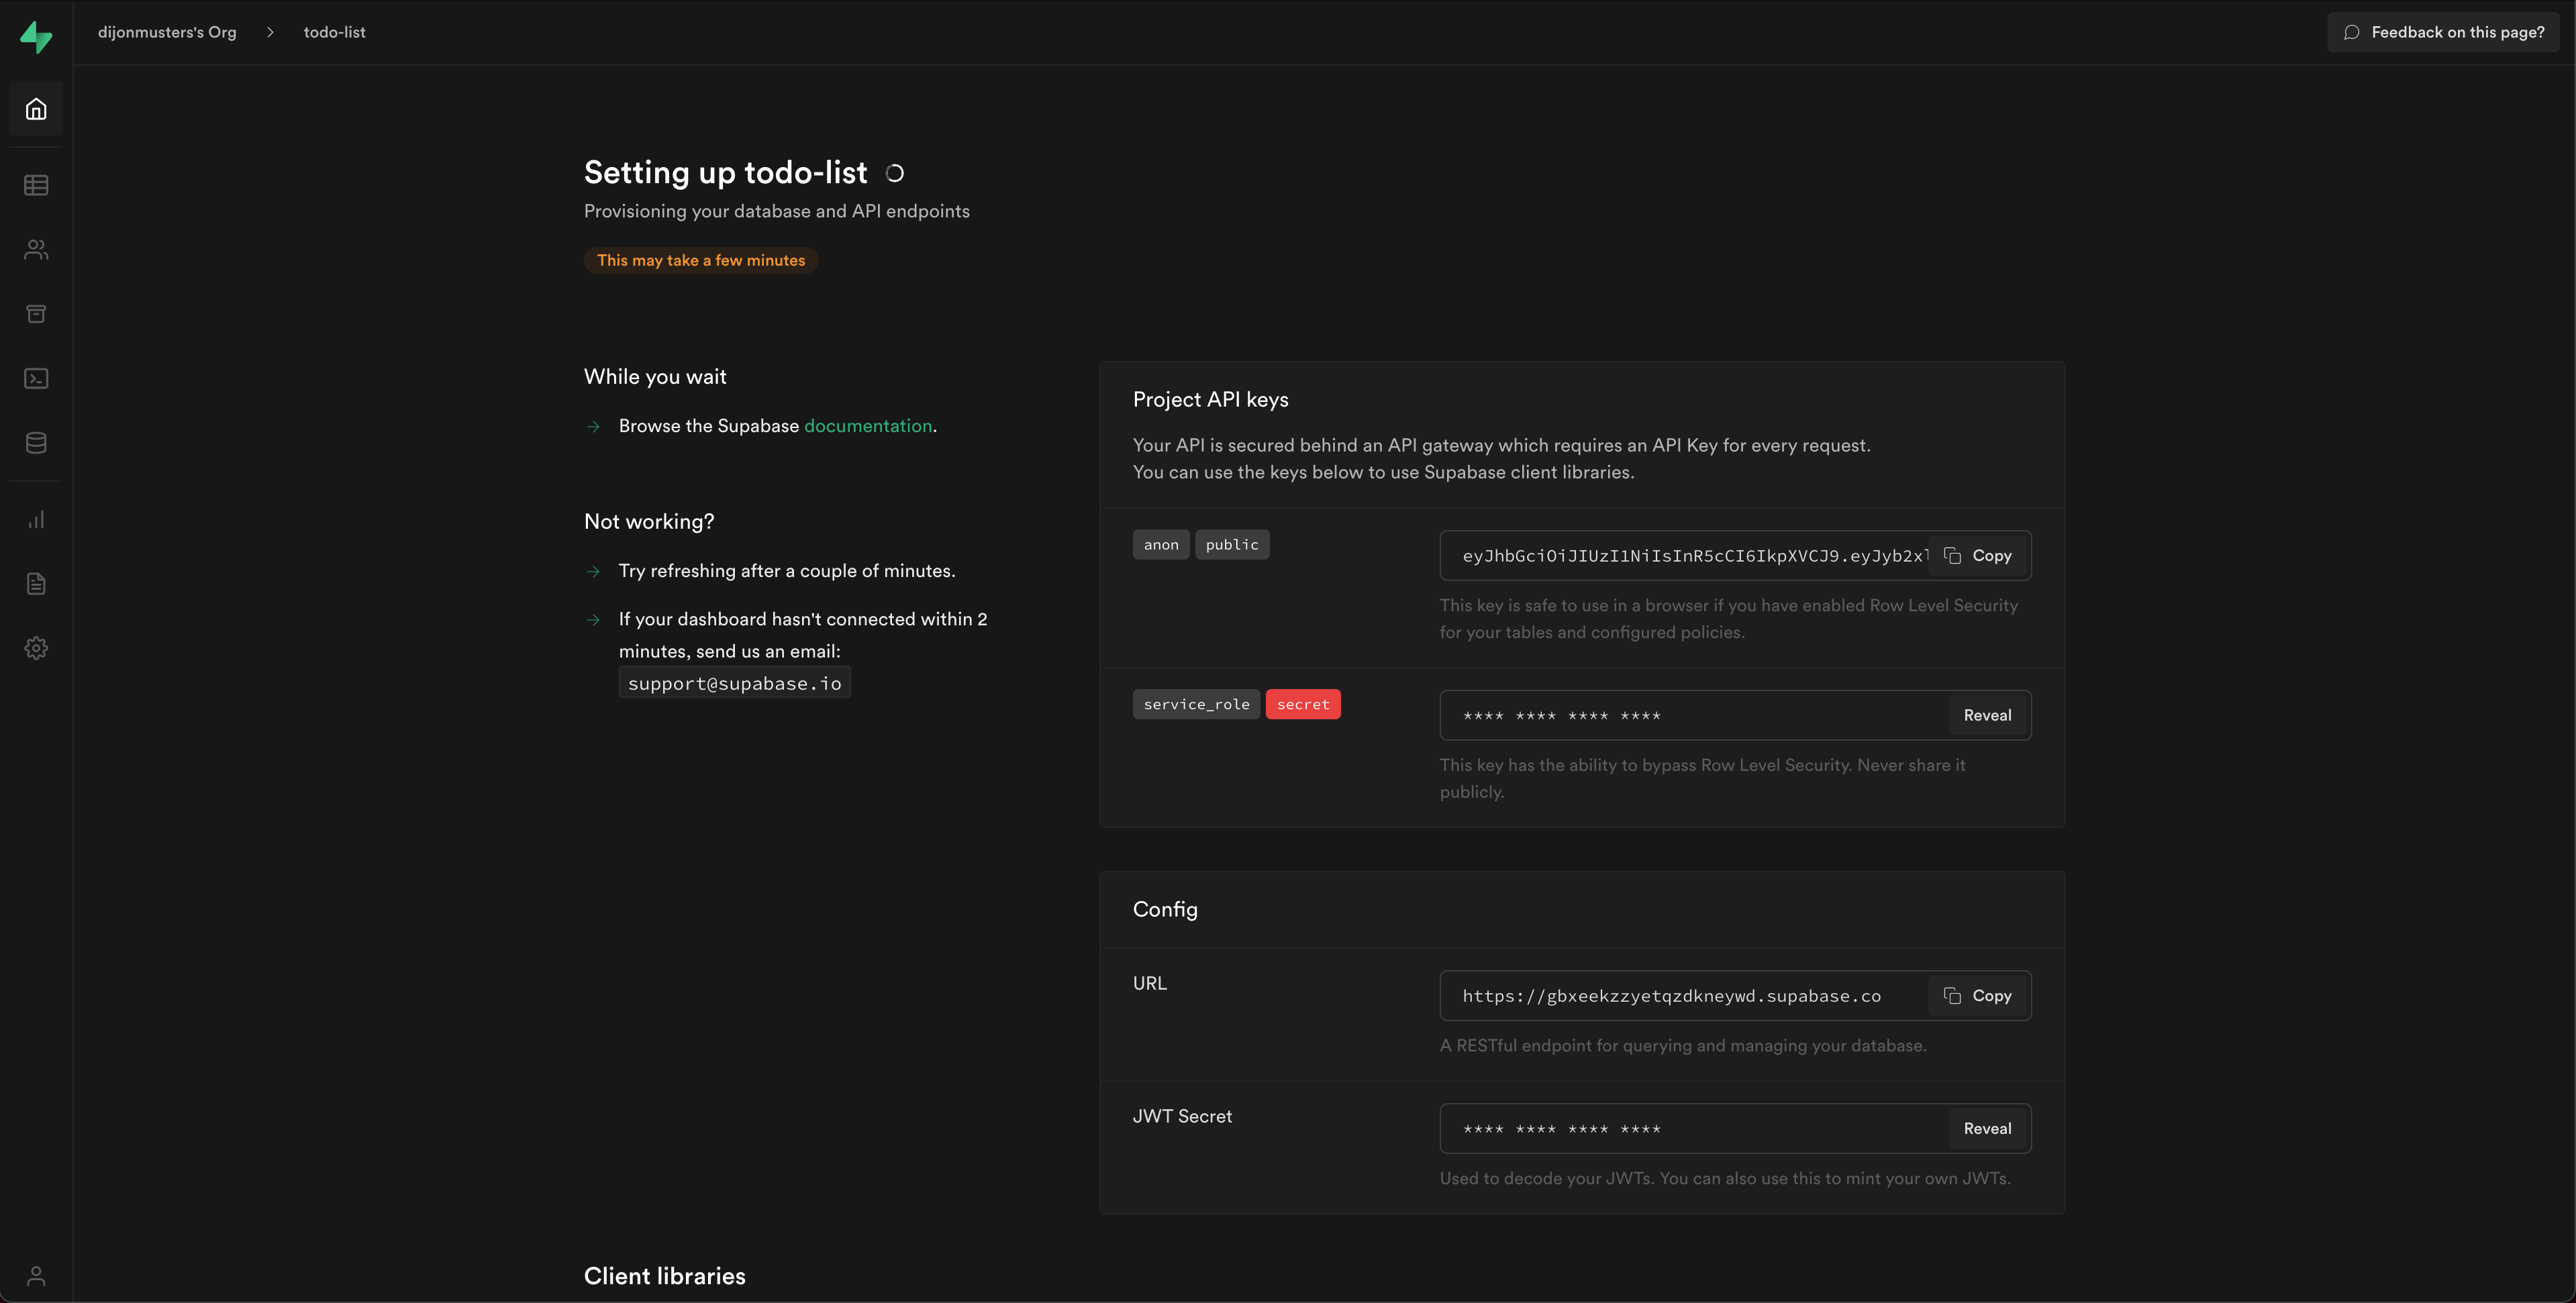
Add these values to the .env.local file:
NEXT_PUBLIC_SUPABASE_URL=your-url
NEXT_PUBLIC_SUPABASE_ANON_KEY=your-anon-public-key
SUPABASE_SIGNING_SECRET=your-jwt-secret
Prepending an environment variable with
NEXT_PUBLIC_makes it available in the Next.js client. All other values will only be available ingetStaticProps,getServerSideProps, and serverless functions in thepages/api/directory.
Adding new values to the
.env.localfile requires a restart of the Next.js dev server.
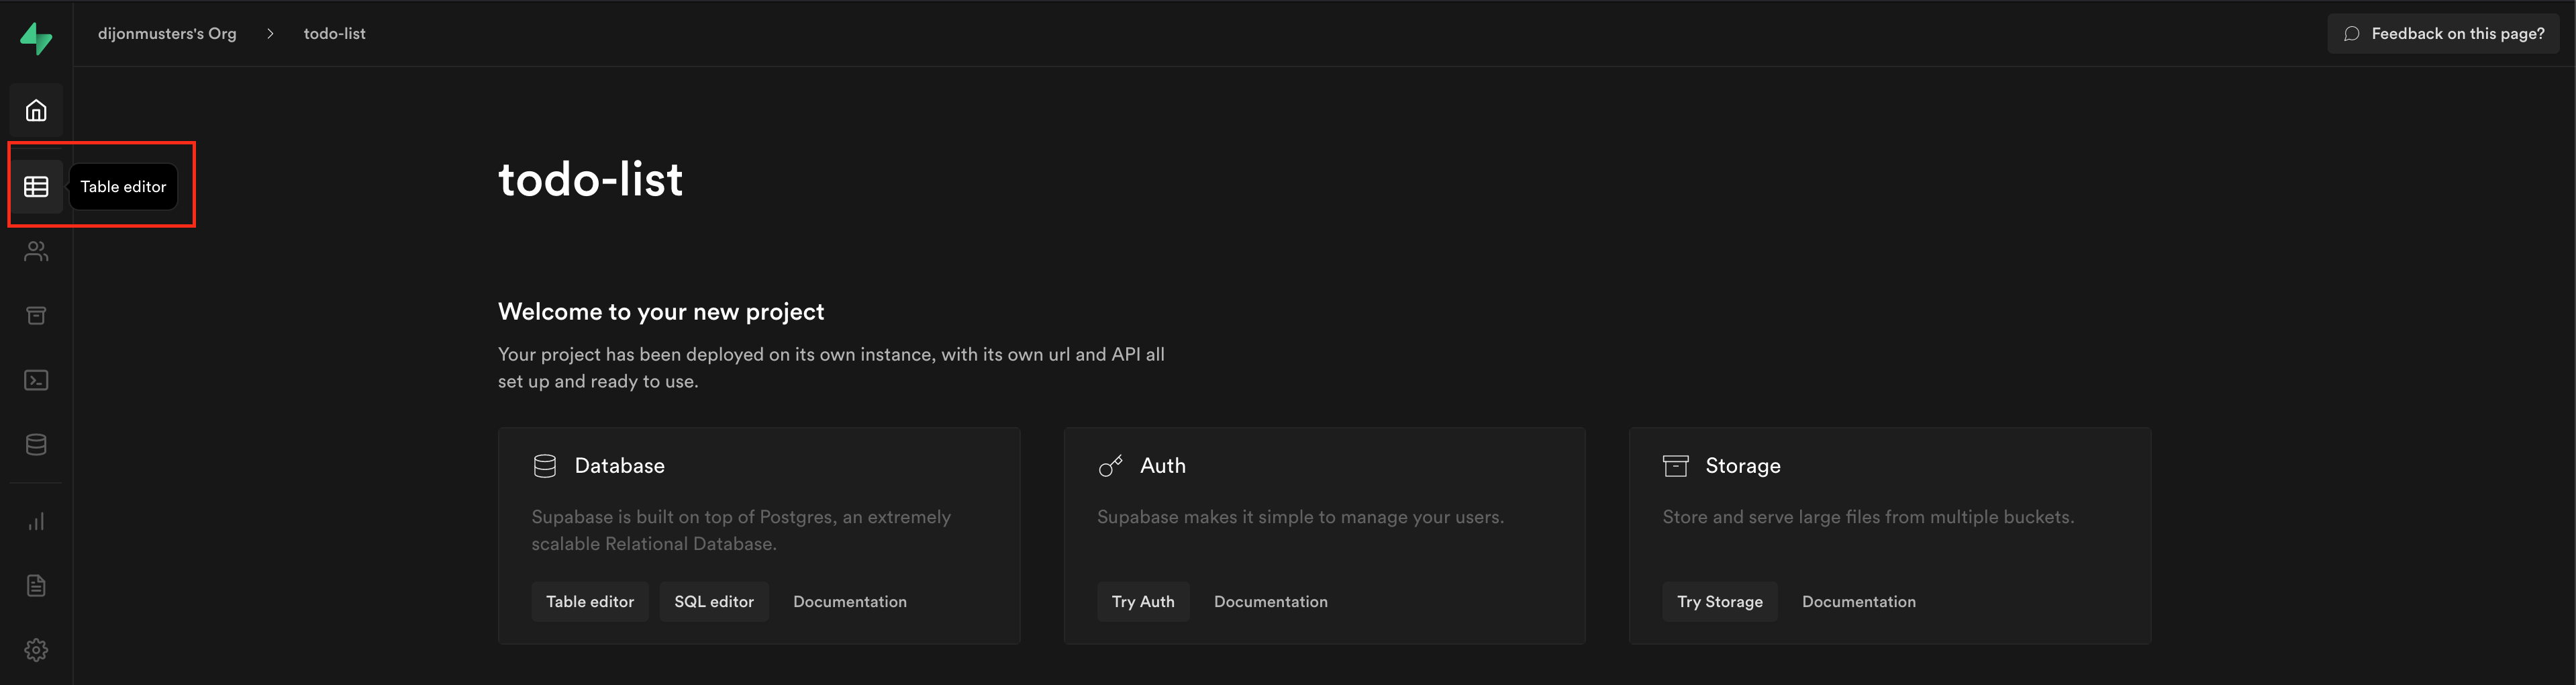
Hopefully, that stalled you long enough for provisioning to complete, and your Supabase project is ready to go.
Click the Table editor icon in the sidebar menu and select + Create a new table.
Create a todos table and add columns for content, user_id, and is_complete.
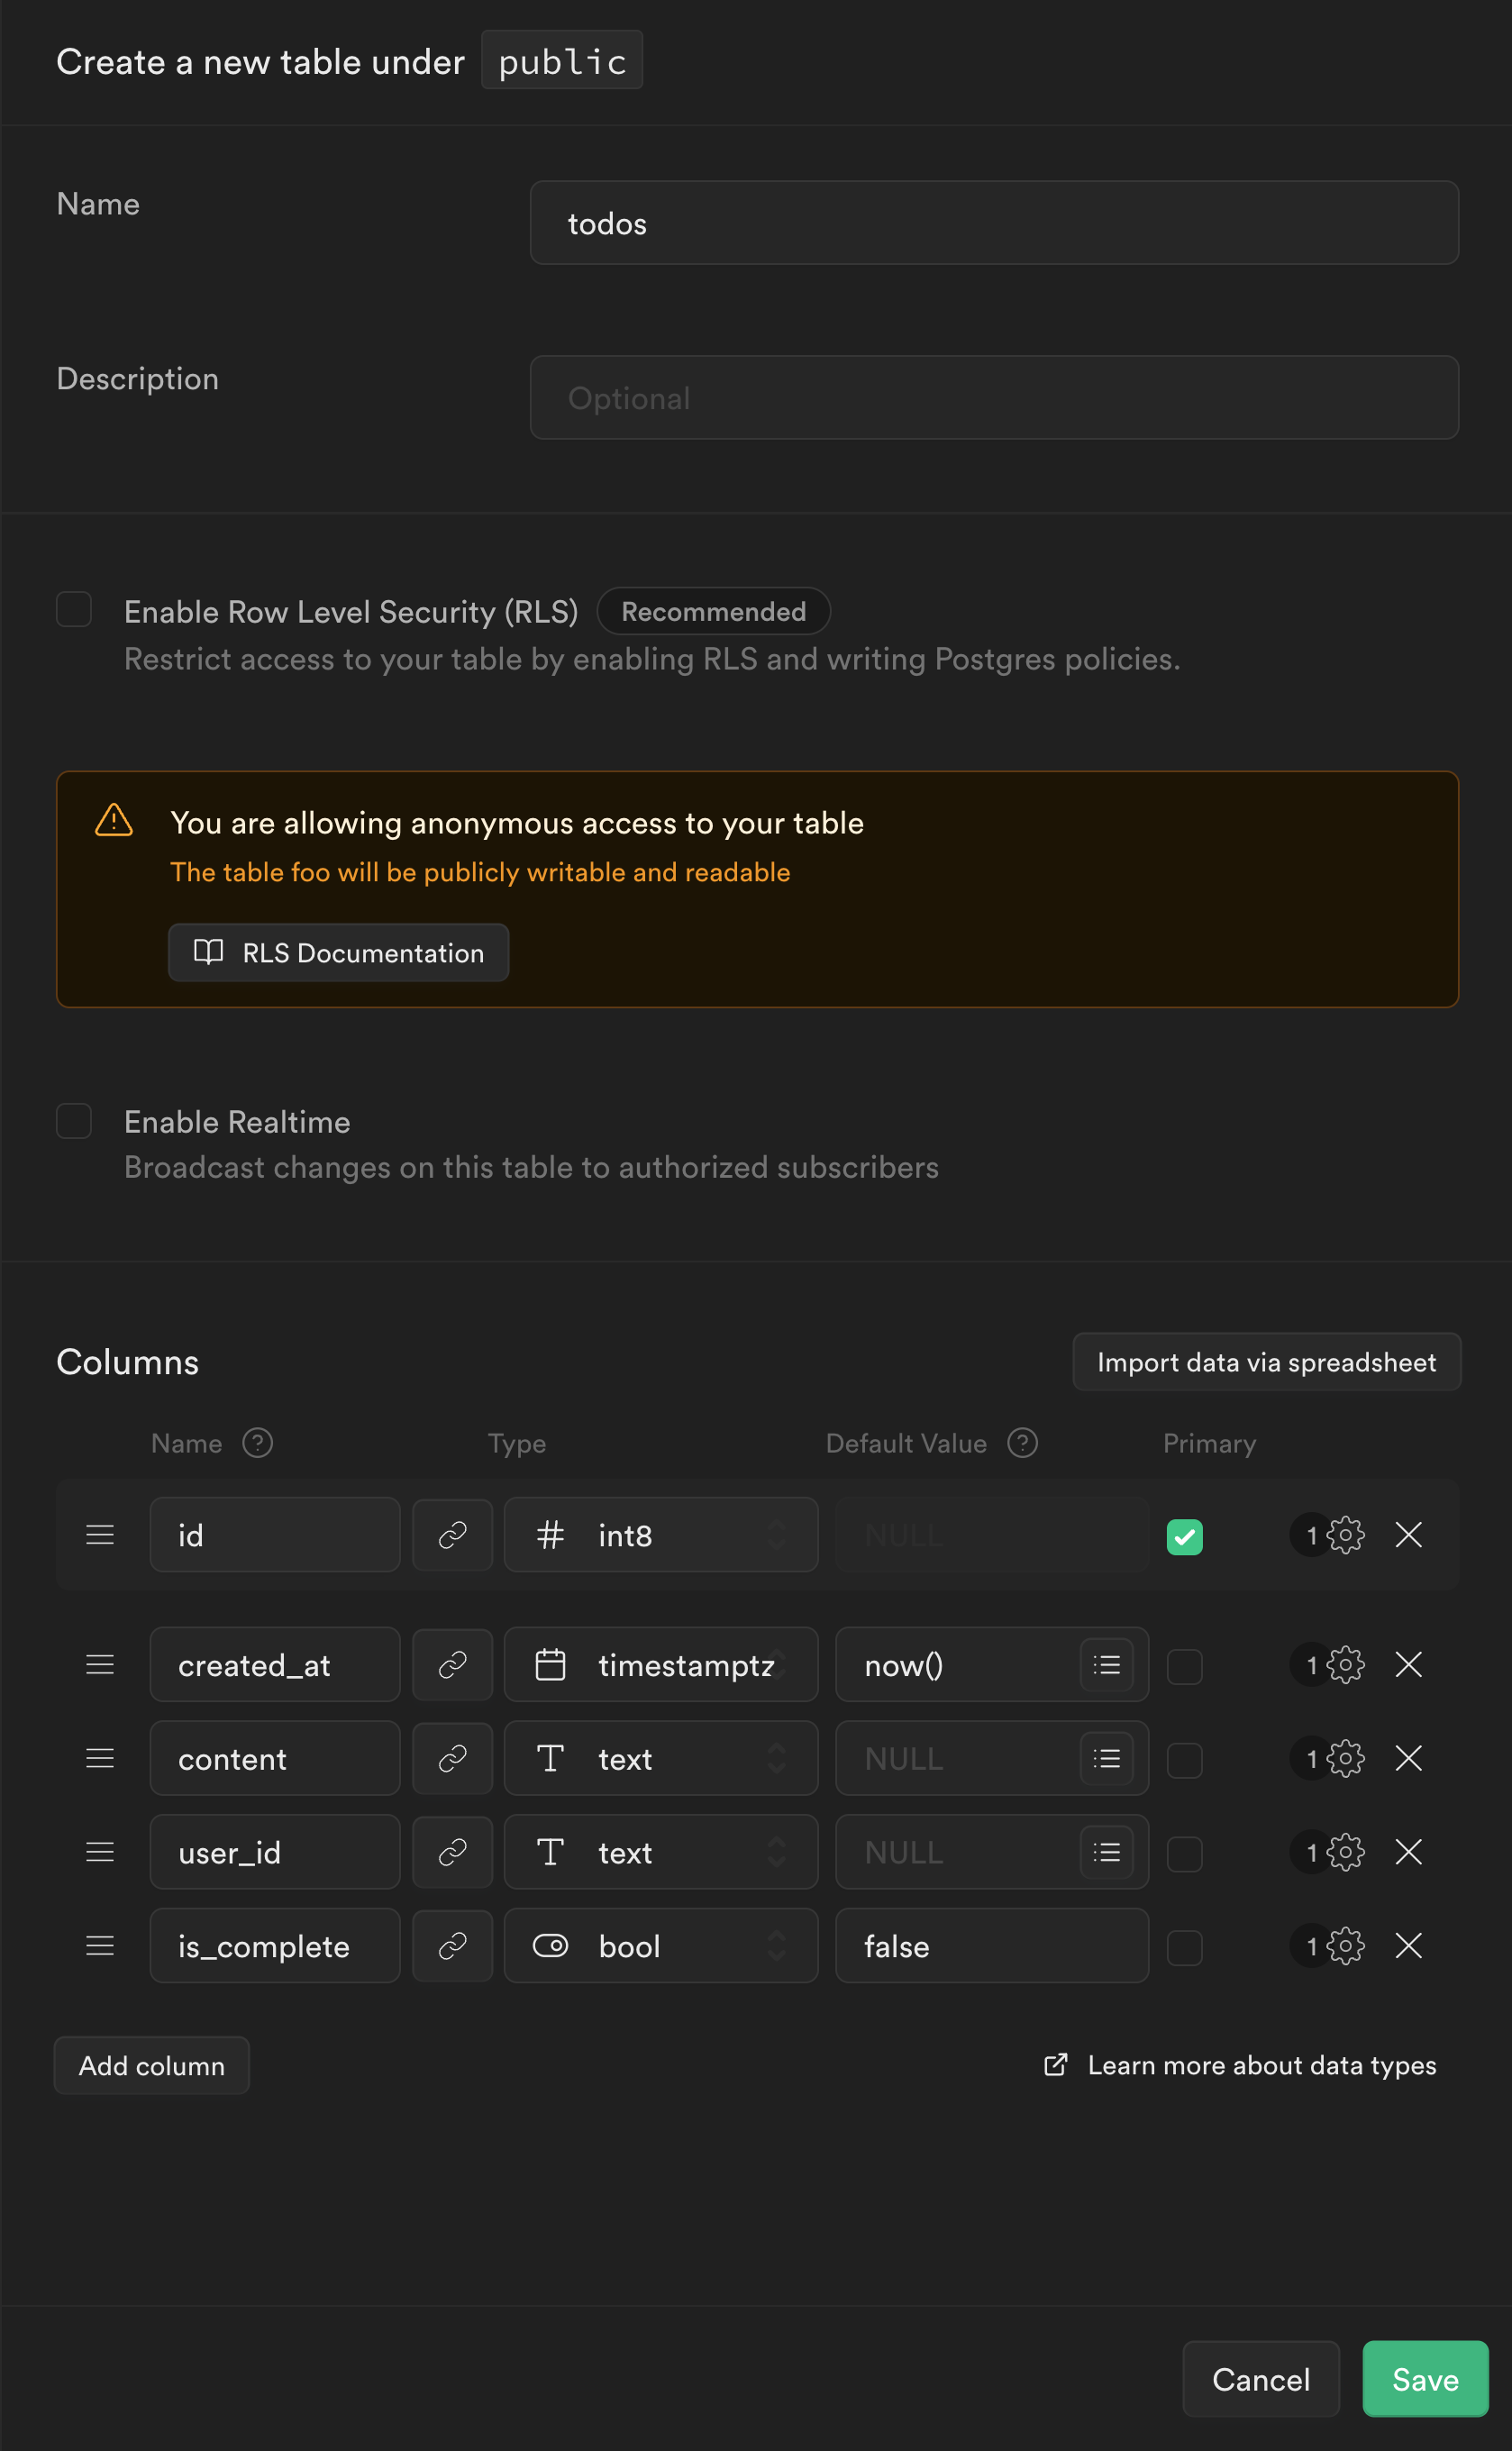
contentwill be the text displayed for our todo.user_idwill be the user that owns the todo.is_completewill signify whether the todo is done yet. We are setting the default value tofalse, as we would assume for a new todo.
Leave
Row Level Securitydisabled for now. We will worry about this later.
Click Insert row to create some example todos.

We can leave
user_idblank and the default value offalseforis_complete.
Let's head back to our Next.js application and install the supabase-js library:
npm i @supabase/supabase-js
Create a new folder called utils and add a file called supabase.js:
// utils/supabase.js

import { createClient } from "@supabase/supabase-js";

const getSupabase = () => {
  const supabase = createClient(
    process.env.NEXT_PUBLIC_SUPABASE_URL,
    process.env.NEXT_PUBLIC_SUPABASE_ANON_KEY
  );

  return supabase;
};

export { getSupabase };
We are making this a function as we will need to extend it later.
This function uses the environment variables we declared earlier to create a new Supabase client. Let's use our new client to fetch todos in pages/index.js.
We can pass a configuration object to the
withPageAuthRequiredfunction and declare our owngetServerSidePropsfunction, which will only run if the user is signed in.
// pages/index.js

export const getServerSideProps = withPageAuthRequired({
  async getServerSideProps() {
    const supabase = getSupabase();

    const { data: todos } = await supabase.from("todos").select();

    return {
      props: { todos },
    };
  },
});
We need to remember to import the getSupabase function:
import { getSupabase } from "../utils/supabase";
And now, we can iterate over our todos and display them in our component:
const Index = ({ user, todos }) => {
  return (
    <div className={styles.container}>
      <p>
        Welcome {user.name}! <Link href="/api/auth/logout">Logout</Link>
      </p>
      {todos.map((todo) => (
        <p key={todo.id}>{todo.content}</p>
      ))}
    </div>
  );
};
We can also handle the case where there are no todos to display:
const Index = ({ user, todos }) => {
  return (
    <div className={styles.container}>
      <p>
        Welcome {user.name}! <Link href="/api/auth/logout">Logout</Link>
      </p>
      {todos?.length > 0 ? (
        todos.map((todo) => <p key={todo.id}>{todo.content}</p>)
      ) : (
        <p>You have completed all todos!</p>
      )}
    </div>
  );
};
The
todos?.lengthstatement is using Optional Chaining. This is a fallback in case thetodosprop isundefinedornull.
Our whole component should look something like this:
// pages/index.js

import styles from "../styles/Home.module.css";
import { withPageAuthRequired } from "@auth0/nextjs-auth0";
import { getSupabase } from "../utils/supabase";
import Link from "next/link";

const Index = ({ user, todos }) => {
  return (
    <div className={styles.container}>
      <p>
        Welcome {user.name}! <Link href="/api/auth/logout">Logout</Link>
      </p>
      {todos?.length > 0 ? (
        todos.map((todo) => <p key={todo.id}>{todo.content}</p>)
      ) : (
        <p>You have completed all todos!</p>
      )}
    </div>
  );
};

export const getServerSideProps = withPageAuthRequired({
  async getServerSideProps() {
    const supabase = getSupabase();

    const { data: todos } = await supabase.from("todos").select();

    return {
      props: { todos },
    };
  },
});

export default Index;
Awesome! We should now be seeing our todos in our Next.js app.
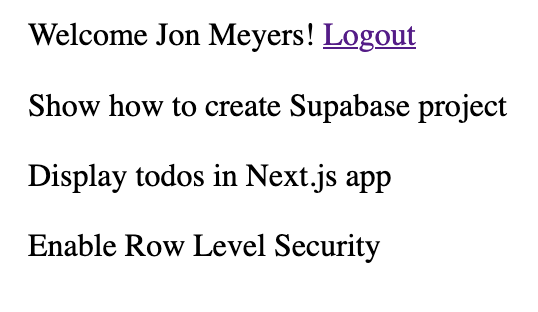
But wait, we see all the todos.
We only want users to see their todos. For this, we need to implement authorization. Let's create a helper function in Postgres to extract the currently logged-in user from the request's JWT.
PostgreSQL Functions
Head back to the Supabase dashboard, click SQL Editor in the side panel, and select New query. This will create a snippet entitled Untitled query. Add the following SQL blob and click RUN.
create or replace function auth.user_id() returns text as $$
  select nullif(current_setting('request.jwt.claims', true)::json->>'userId', '')::text;
$$ language sql stable;
Okay, this one may look a little intimidating. Let's break down the bits we need to understand:
- We are creating a new function called
user_id. - The
auth.part is just a way to namespace it as it is related to auth — also called a schema and is a convention in Postgres. - This function will return a
textvalue. - The body of the function is fetching the value from the
userIdfield of thejwtthat came along with therequest. We will talk about JWTs later in the article. - If there is no
request.jwt.claim.userId, we are just returning an empty string —''.
Not that scary!
Check out this video on Postgres functions to learn more.
Let's enable Row Level Security and use our new function to ensure only users who own the todo can see it.
Row Level Security
Because Supabase is just a PostgreSQL Database under the hood, we can take advantage of a killer feature — Row Level Security (RLS). RLS allows us to write authorization rules in the database itself, which can be much more efficient and much more secure!
Head back to the Supabase dashboard, and from the side panel, select Authentication > Policies and click Enable RLS for the todos table.
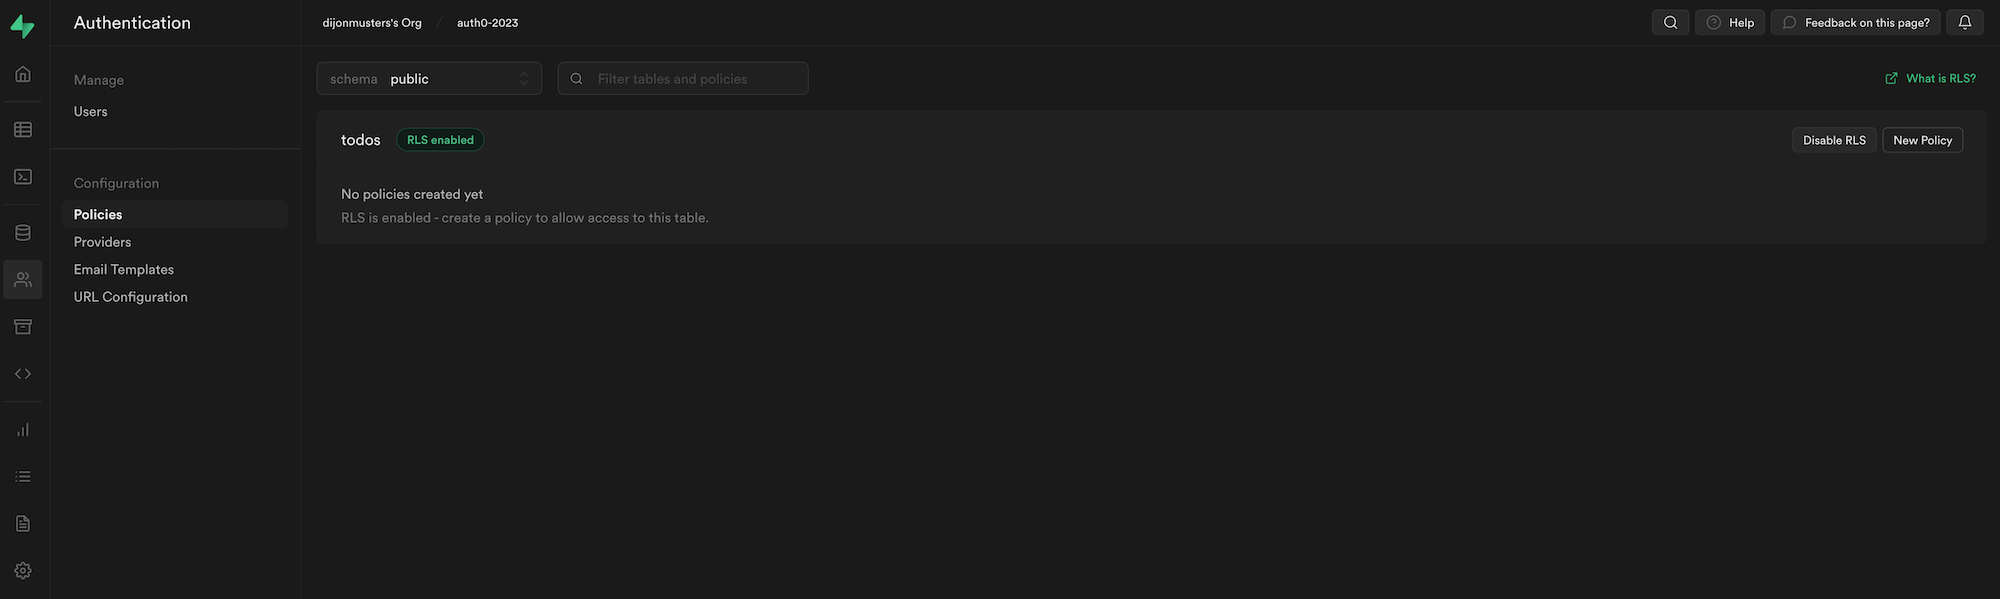
Now, if we refresh our application, we will see the empty state message.

Where did our todos go?
By default, RLS will deny access to all rows. If we want a user to see their todos we need to write a policy.
Back in the Supabase dashboard, click New Policy, then Create a policy from scratch and fill in the following:
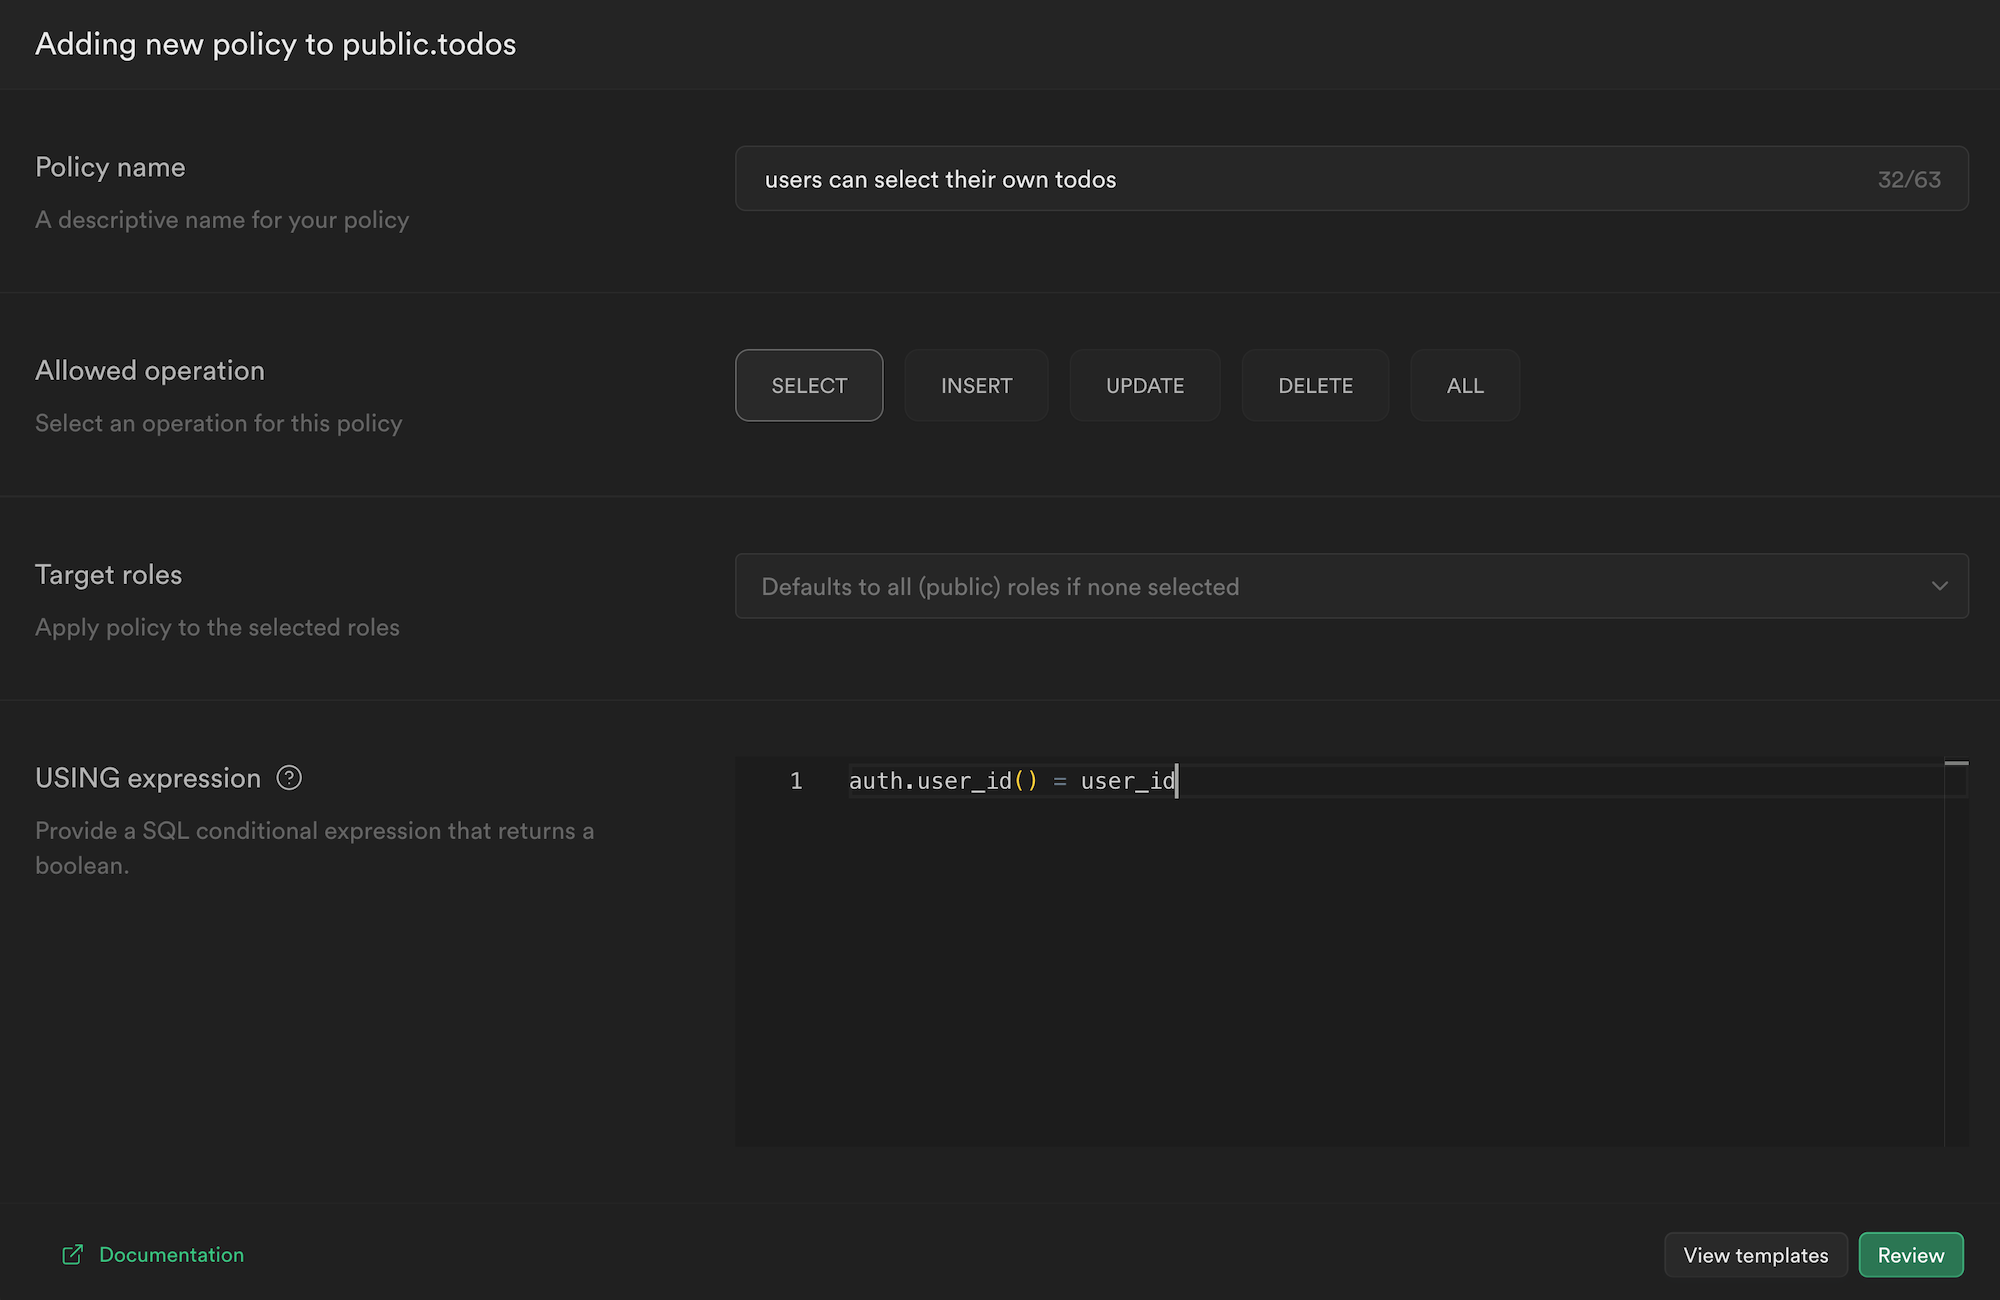
This might look a little unfamiliar, so let's break it down.
- We are giving our policy a
name. This can be anything. - We declare which actions we would like to enable. Since we want users to be able to read their own
todos, we are choosingSELECT. - Target roles allow us to scope down the policy even further, but we can just leave it as the default of
public. - We need to specify a condition that can be
trueorfalse. If it evaluates totruethe action will be allowed. Otherwise, it will continue to be denied. - We call our
auth.user_id()function to get the currently logged-in user'sidand compare it to theuser_idcolumn for thistodo.
I recommend checking out this video to learn more about how awesome and powerful Row Level Security is in Supabase.
Click Review to see the SQL that is being generated for us.
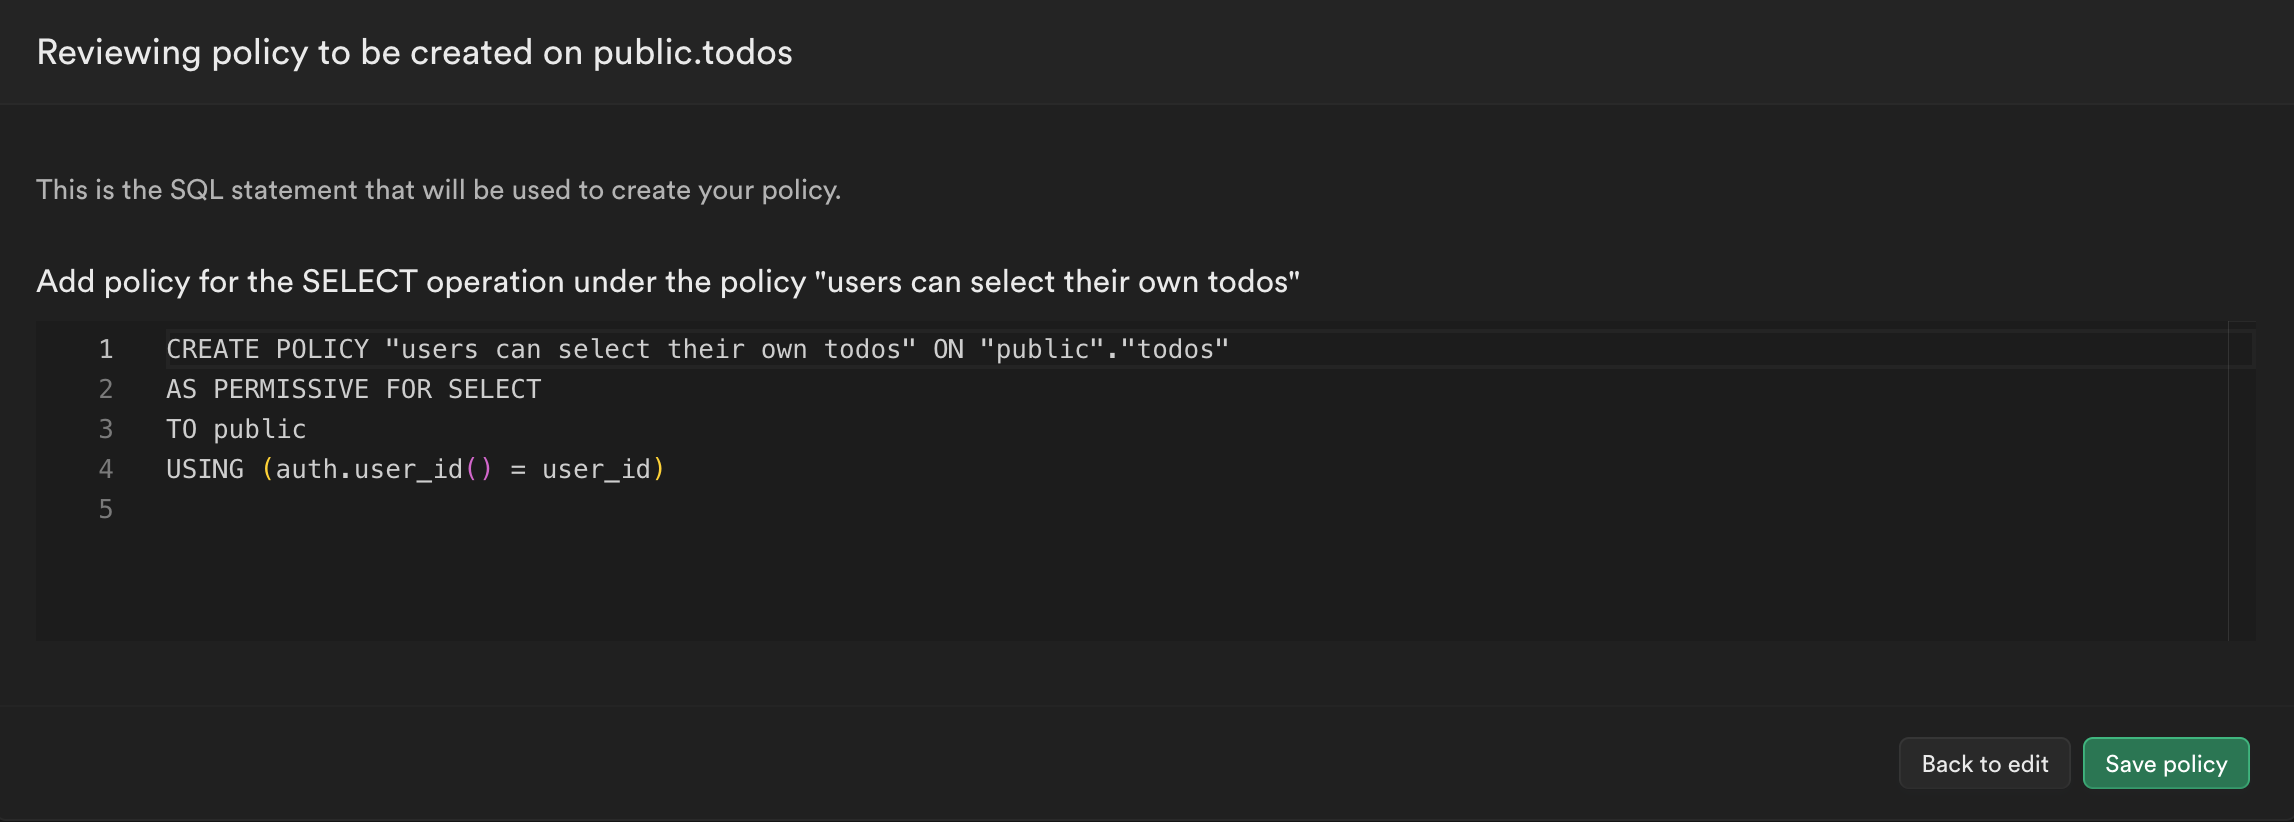
Not even scary. It has just formatted the fields we entered into the correct SQL syntax.
While we're here, let's add a policy for creating new todos. This will be an INSERT action:
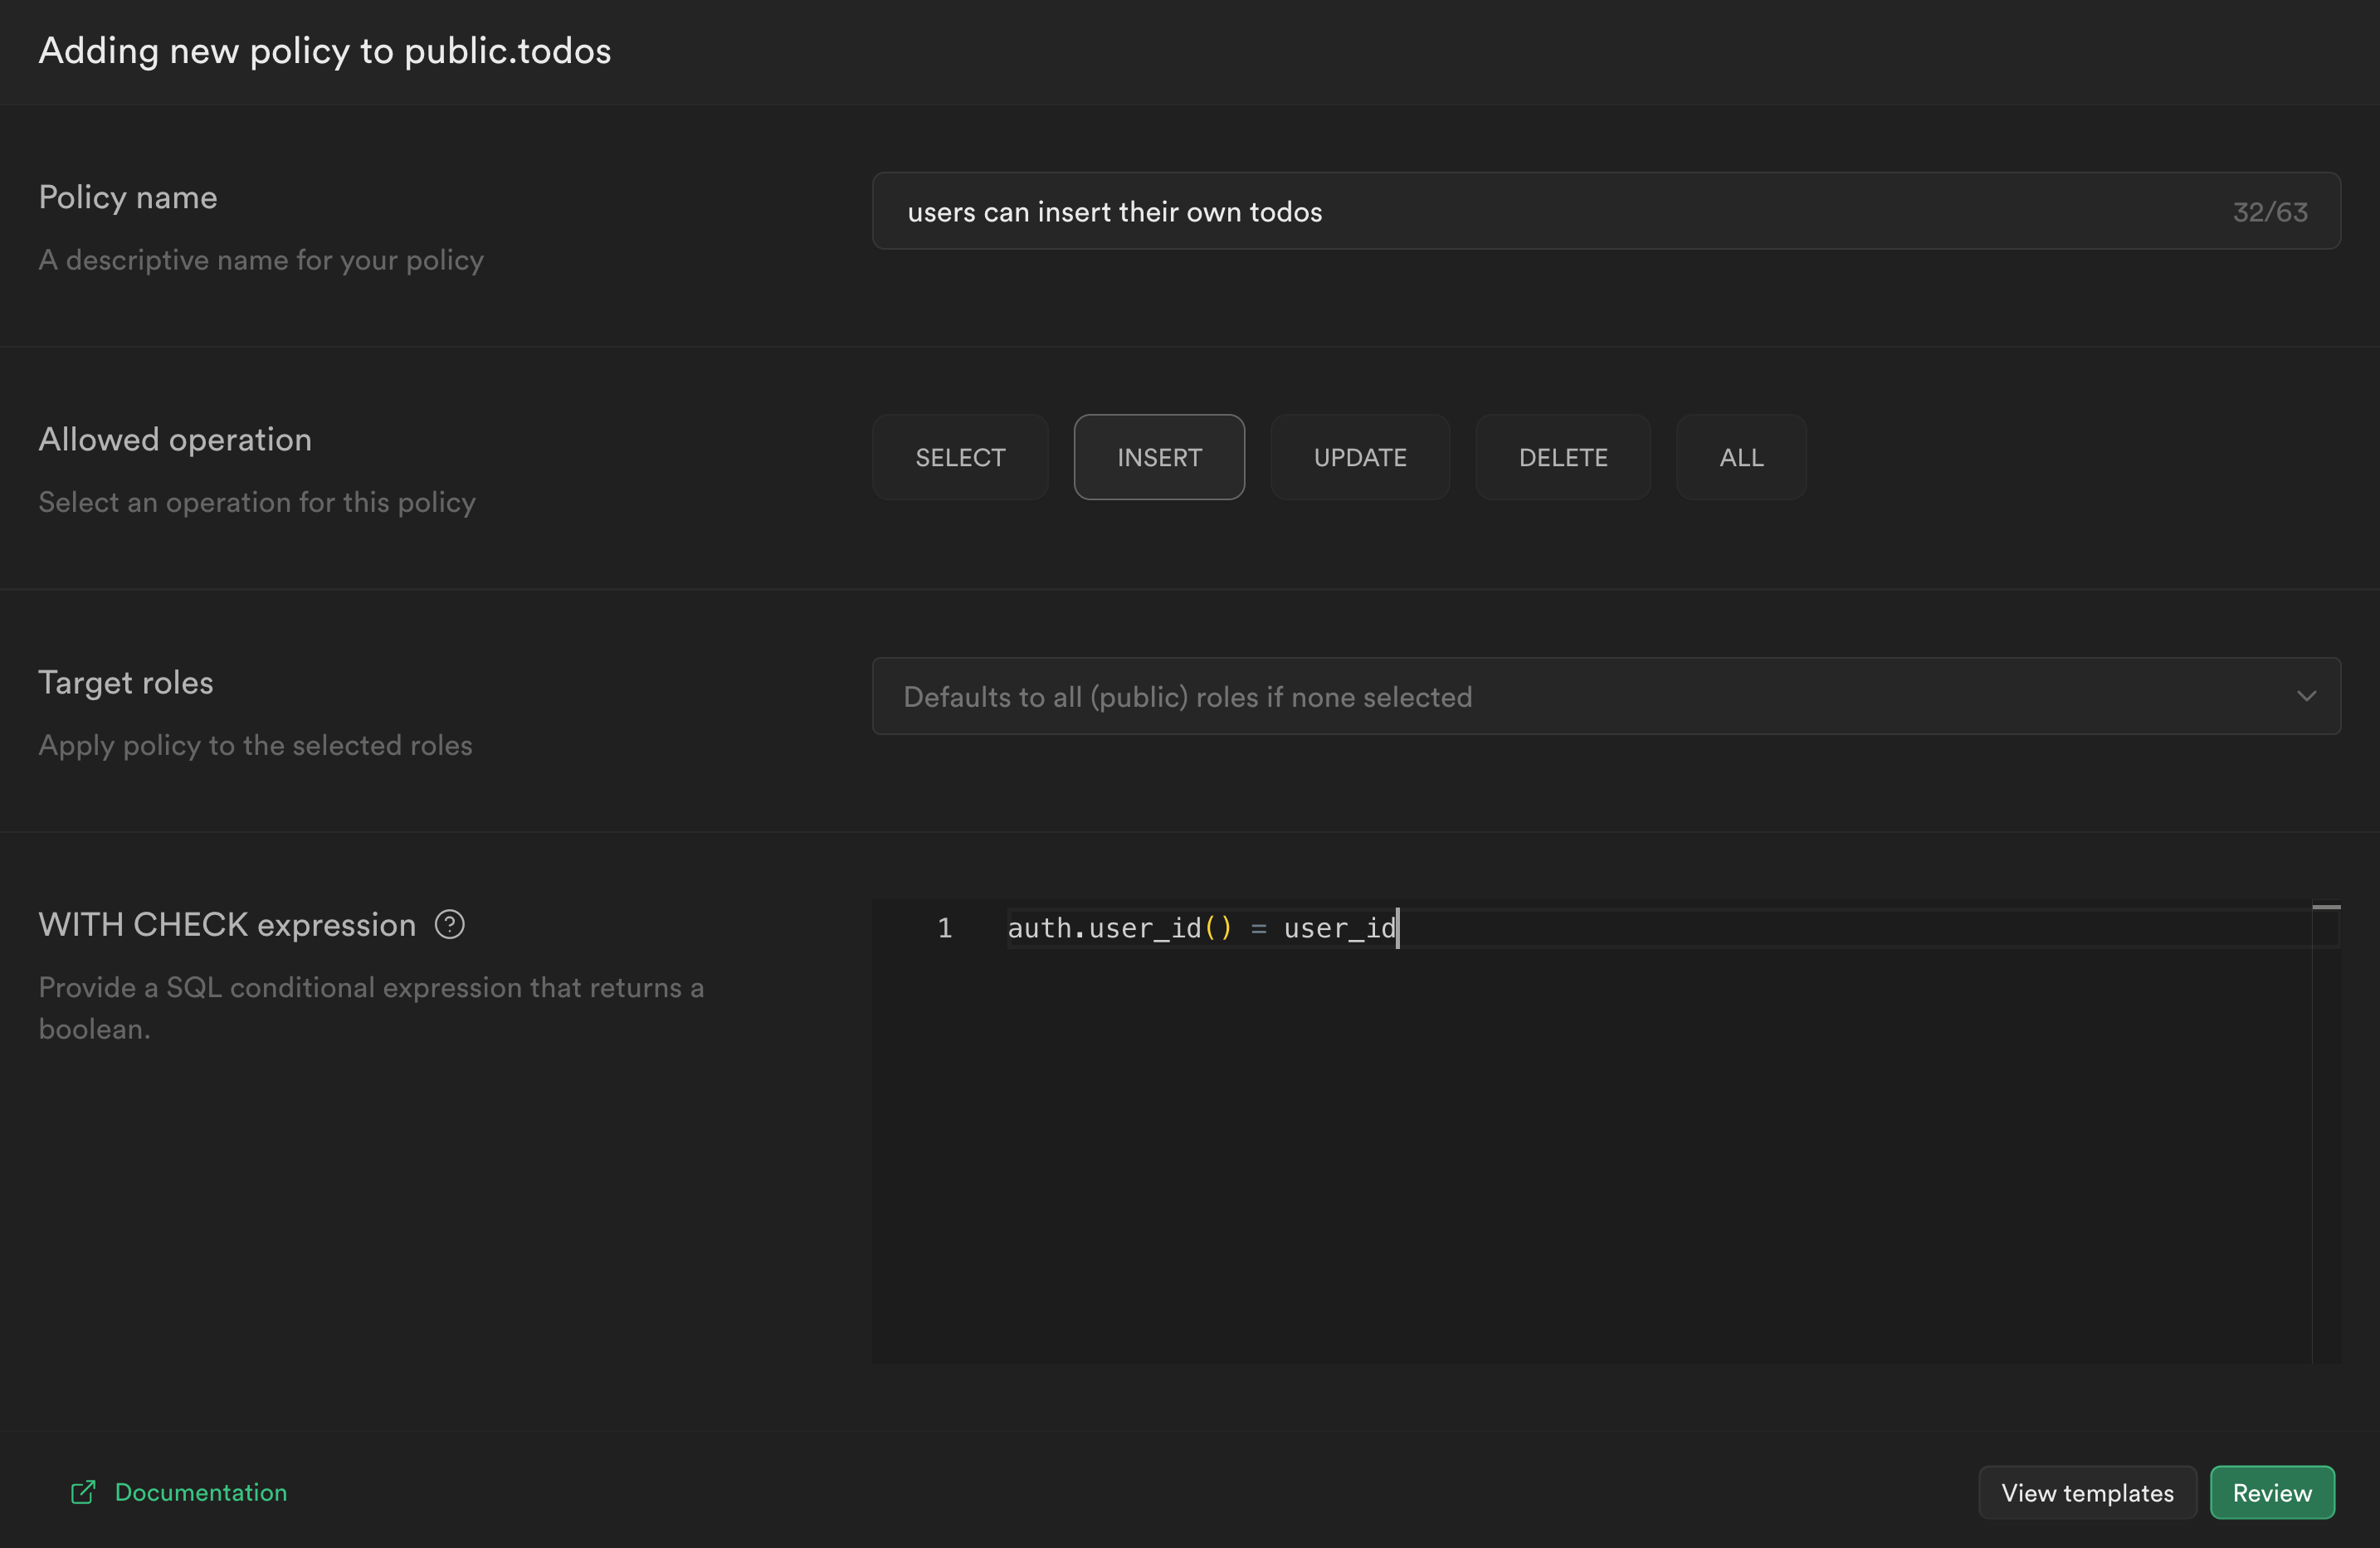
While we probably want to permit users to perform all CRUD actions, it is good practice to specify separate policies rather than selecting
ALL. This makes them easier to extend and remove in the future.
Our application does not yet need to be able to update or delete todos; therefore, we will not create policies for these actions.
It is good security practice to enable the minimum amount of permissions for the application to function. We can easily write policies for these actions in the future if we want to enable them.
Let's see if we can view our todos yet by refreshing our Next.js app.
Still no todos 🙁 Did we mess something up?
No! We just need to add a little bit more glue to transform the JWT that Auth0 is giving our Next.js application to the format that Supabase is expecting.
What is a JWT?
To understand this problem, we must first understand what a JWT is. A JWT encodes a JSON object into a big string that we can use to send data between different services.
By default, the data in a JWT is not encrypted or private, just encoded.
Aditya Shukla wrote a great article about the differences between encoding, encryption, and hashing. Give it a read to learn more.
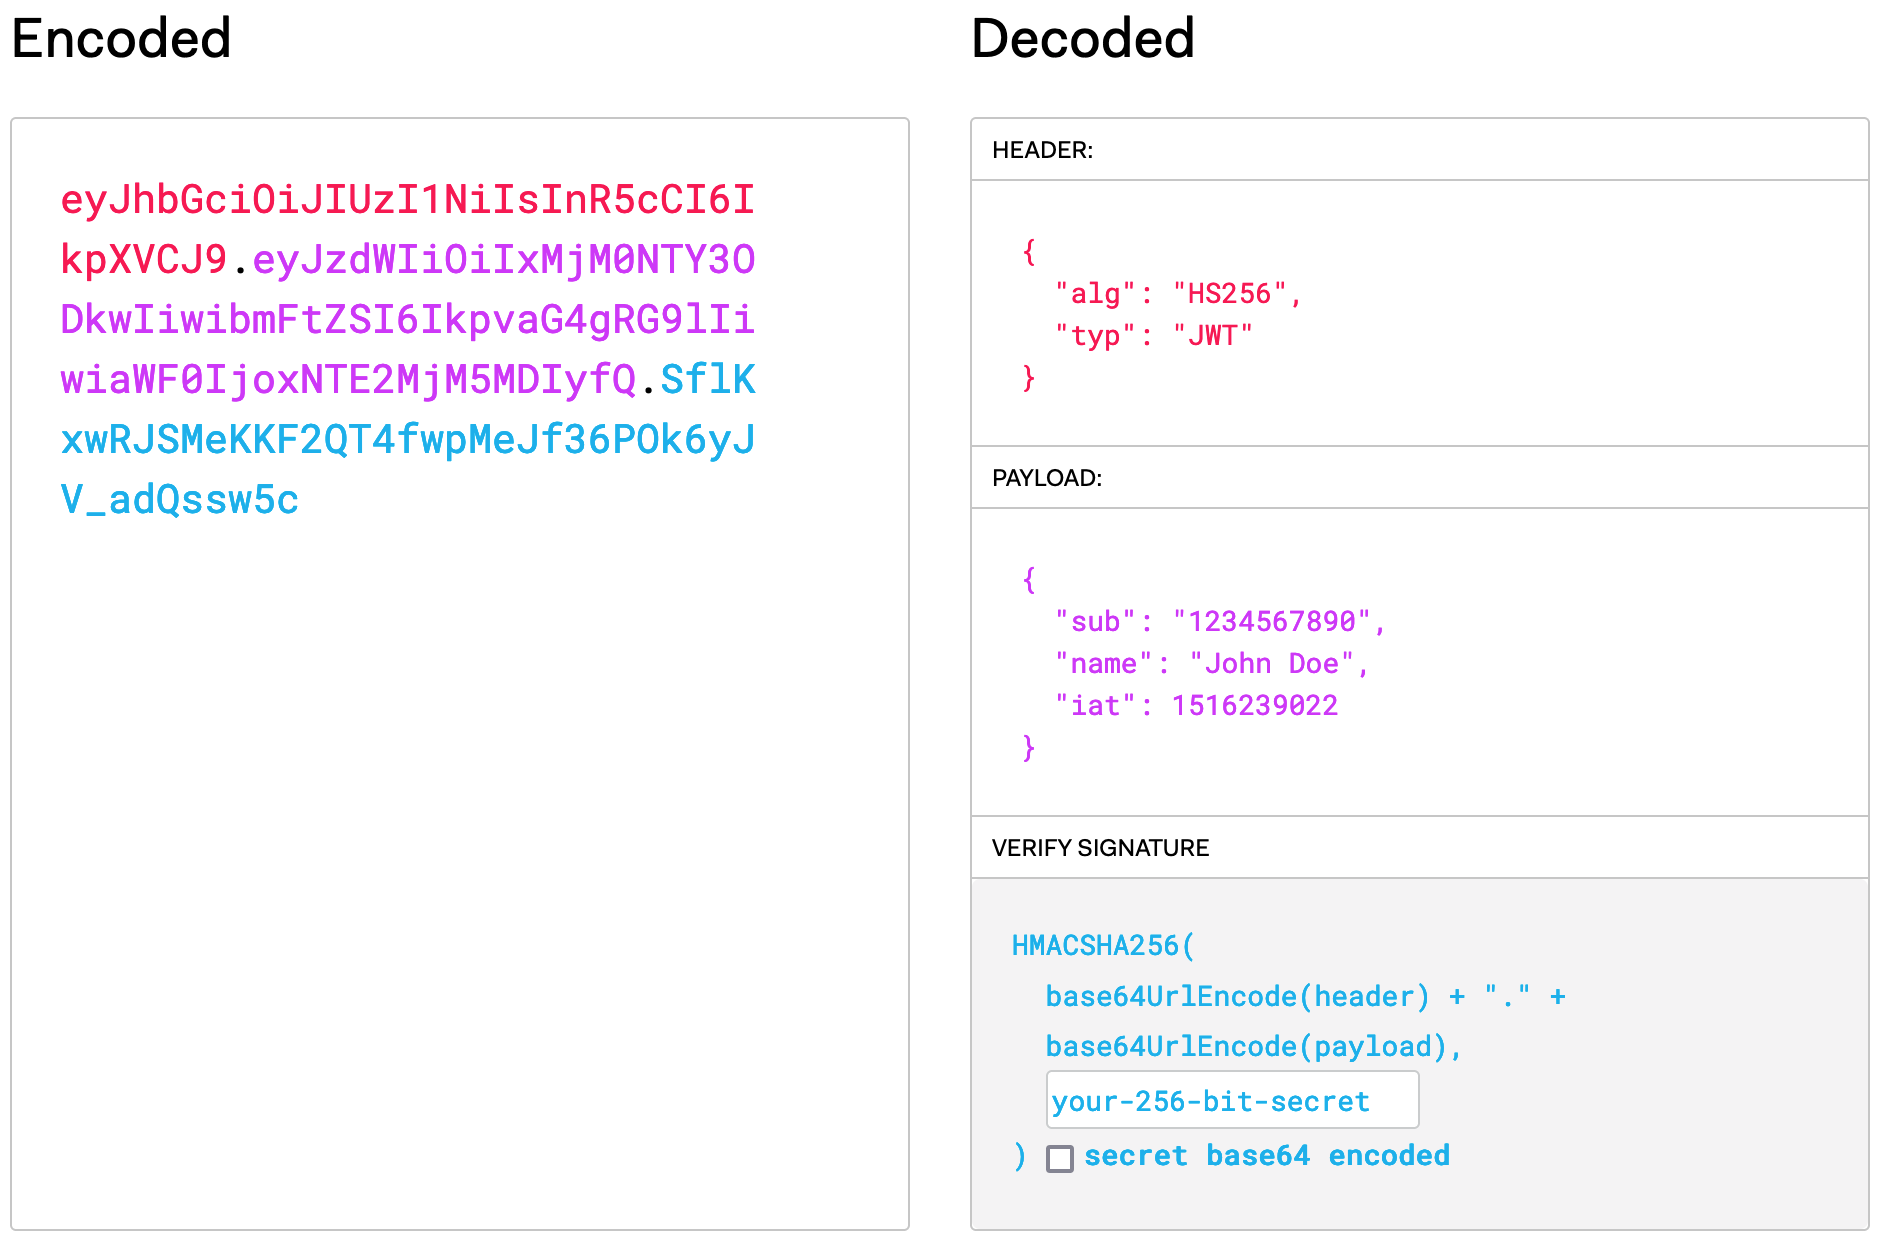
This is an example taken from jwt.io — a great tool for working with JWTs. On the left, we can see the JWT value. On the right, we can see what each part represents when decoded. We have some header information about how the JWT was encoded, the payload of user data, and a signature that can be used to verify the token.
Don't put secret things in a JWT!!
The reason we can trust JWTs for authentication is that we can sign it using a secret value. This value is run through an algorithm with the payload data, and a JWT string comes out the other side. We can use the signing secret to verify the JWT on our server. This ensures that an attacker hasn't tinkered with our token in transit. If they have, the value of the JWT will be different, and it will fail verification.
The only way it could be modified and pass the verify step is if someone has your signing secret. This would be bad. And this is why we can only sign JWTs with our server — or in the case of Next.js, the getStaticProps, getServerSideProps or API routes in the pages/api directory.
Never expose the signing secret to the client!!

Okay, so now that we understand JWTs, what is the problem?
The signing secret used by Auth0 does not match Supabase's signing secret. While we're not using Supabase for authentication, it still uses the secret to verify the JWT each time we request data. Neither of these services makes the signing secret's value configurable.
To solve this problem, we can just grab the sub property — the user's ID — from Auth0 and sign a new token using the signing secret that Supabase is expecting.
Signing a JWT
When working with JWTs, we want to use a well-trusted library from a reputable source. Auth0 has a very widely used and trusted one called jsonwebtoken.
Let's install it:
npm i jsonwebtoken
We can use another hook that the @auth0/nextjs-auth0 library gives us to run some logic after the user signs in. This is called afterCallback and can be passed as a configuration to our handleAuth function. Let's replace the contents of the pages/api/auth/[...auth0].js file with:
// pages/api/auth/[...auth0].js

import { handleAuth, handleCallback } from "@auth0/nextjs-auth0";

const afterCallback = async (req, res, session) => {
  // do some stuff
  // modify the session

  return session;
};

export default handleAuth({
  async callback(req, res) {
    try {
      await handleCallback(req, res, { afterCallback });
    } catch (error) {
      res.status(error.status || 500).end(error.message);
    }
  },
});
In this function, we want to:
- get the user object from Auth0's session
- create a new payload
- sign a new token using Supabase's signing secret
Let's extend our afterCallback function to perform this logic:
// pages/api/auth/[...auth0].js

// other imports
import jwt from "jsonwebtoken";

const afterCallback = async (req, res, session) => {
  const payload = {
    userId: session.user.sub,
    exp: Math.floor(Date.now() / 1000) + 60 * 60,
  };

  session.user.accessToken = jwt.sign(
    payload,
    process.env.SUPABASE_SIGNING_SECRET
  );

  return session;
};
The sub field represents Auth0's unique ID for this user. Since this is the only value we actually need to tell Supabase who our user is, we can create a new payload that contains only this value.
It is good security practice to only give things the minimum amount of data and permissions they need to handle the task.
Additionally, we are setting an expiry for our token — 1 hour. This means that if someone does get a hold of our token, they do not have access to our database indefinitely.
Lastly, we are signing a new token with that payload using the SUPABASE_SIGNING_SECRET.
Awesome! Our whole file should look something like this:
// pages/api/auth/[...auth0].js

import { handleAuth, handleCallback } from "@auth0/nextjs-auth0";
import jwt from "jsonwebtoken";

const afterCallback = async (req, res, session) => {
  const payload = {
    userId: session.user.sub,
    exp: Math.floor(Date.now() / 1000) + 60 * 60,
  };

  session.user.accessToken = jwt.sign(
    payload,
    process.env.SUPABASE_SIGNING_SECRET
  );

  return session;
};

export default handleAuth({
  async callback(req, res) {
    try {
      await handleCallback(req, res, { afterCallback });
    } catch (error) {
      res.status(error.status || 500).end(error.message);
    }
  },
});
Let's extend our getSupabase function in utils/supabase.js to accept an accessToken parameter.
// utils/supabase.js

import { createClient } from "@supabase/supabase-js";

const getSupabase = async (accessToken) => {
  const supabase = createClient(
    process.env.NEXT_PUBLIC_SUPABASE_URL,
    process.env.NEXT_PUBLIC_SUPABASE_ANON_KEY,
    {
      global: {
        headers: {
          Authorization: `Bearer ${accessToken}`,
        },
      },
    }
  );

  return supabase;
};

export { getSupabase };
Now we can attach an accessToken from an external source - like Auth0 - and this will be sent along with all requests to Supabase, making it available to our select and insert RLS policies.
Let's extend our getServerSideProps function in pages/index.js to get the accessToken from the session's user and pass it to the getSupabase function:
// pages/index.js

export const getServerSideProps = withPageAuthRequired({
  async getServerSideProps({ req, res }) {
    const {
      user: { accessToken },
    } = await getSession(req, res);

    const supabase = getSupabase(accessToken);

    const { data: todos } = await supabase.from("todos").select();

    return {
      props: { todos },
    };
  },
});
We also need to remember to add getSession to the import from @auth0/nextjs-auth0:
import { withPageAuthRequired, getSession } from "@auth0/nextjs-auth0";
Our whole component should look something like this:
// pages/index.js

import styles from "../styles/Home.module.css";
import { withPageAuthRequired, getSession } from "@auth0/nextjs-auth0";
import { getSupabase } from "../utils/supabase";
import Link from "next/link";

const Index = ({ user, todos }) => {
  return (
    <div className={styles.container}>
      <p>
        Welcome {user.name}! <Link href="/api/auth/logout">Logout</Link>
      </p>
      {todos?.length > 0 ? (
        todos.map((todo) => <p key={todo.id}>{todo.content}</p>)
      ) : (
        <p>You have completed all todos!</p>
      )}
    </div>
  );
};

export const getServerSideProps = withPageAuthRequired({
  async getServerSideProps({ req, res }) {
    const {
      user: { accessToken },
    } = await getSession(req, res);

    const supabase = await getSupabase(accessToken);

    const { data: todos } = await supabase.from("todos").select();

    return {
      props: { todos },
    };
  },
});

export default Index;
Since Auth0's afterCallback function runs after the user signs in, we need to log out of our application by clicking the Logout link on the landing page or manually navigating to http://localhost:3000/api/auth/logout.
This will sign us out and automatically redirect us to Auth0's sign in page.
Sign back in, and we should have our new JWT attached to our Auth0 session's user.
Now when we refresh our application, we should finally see todos.
Nope!
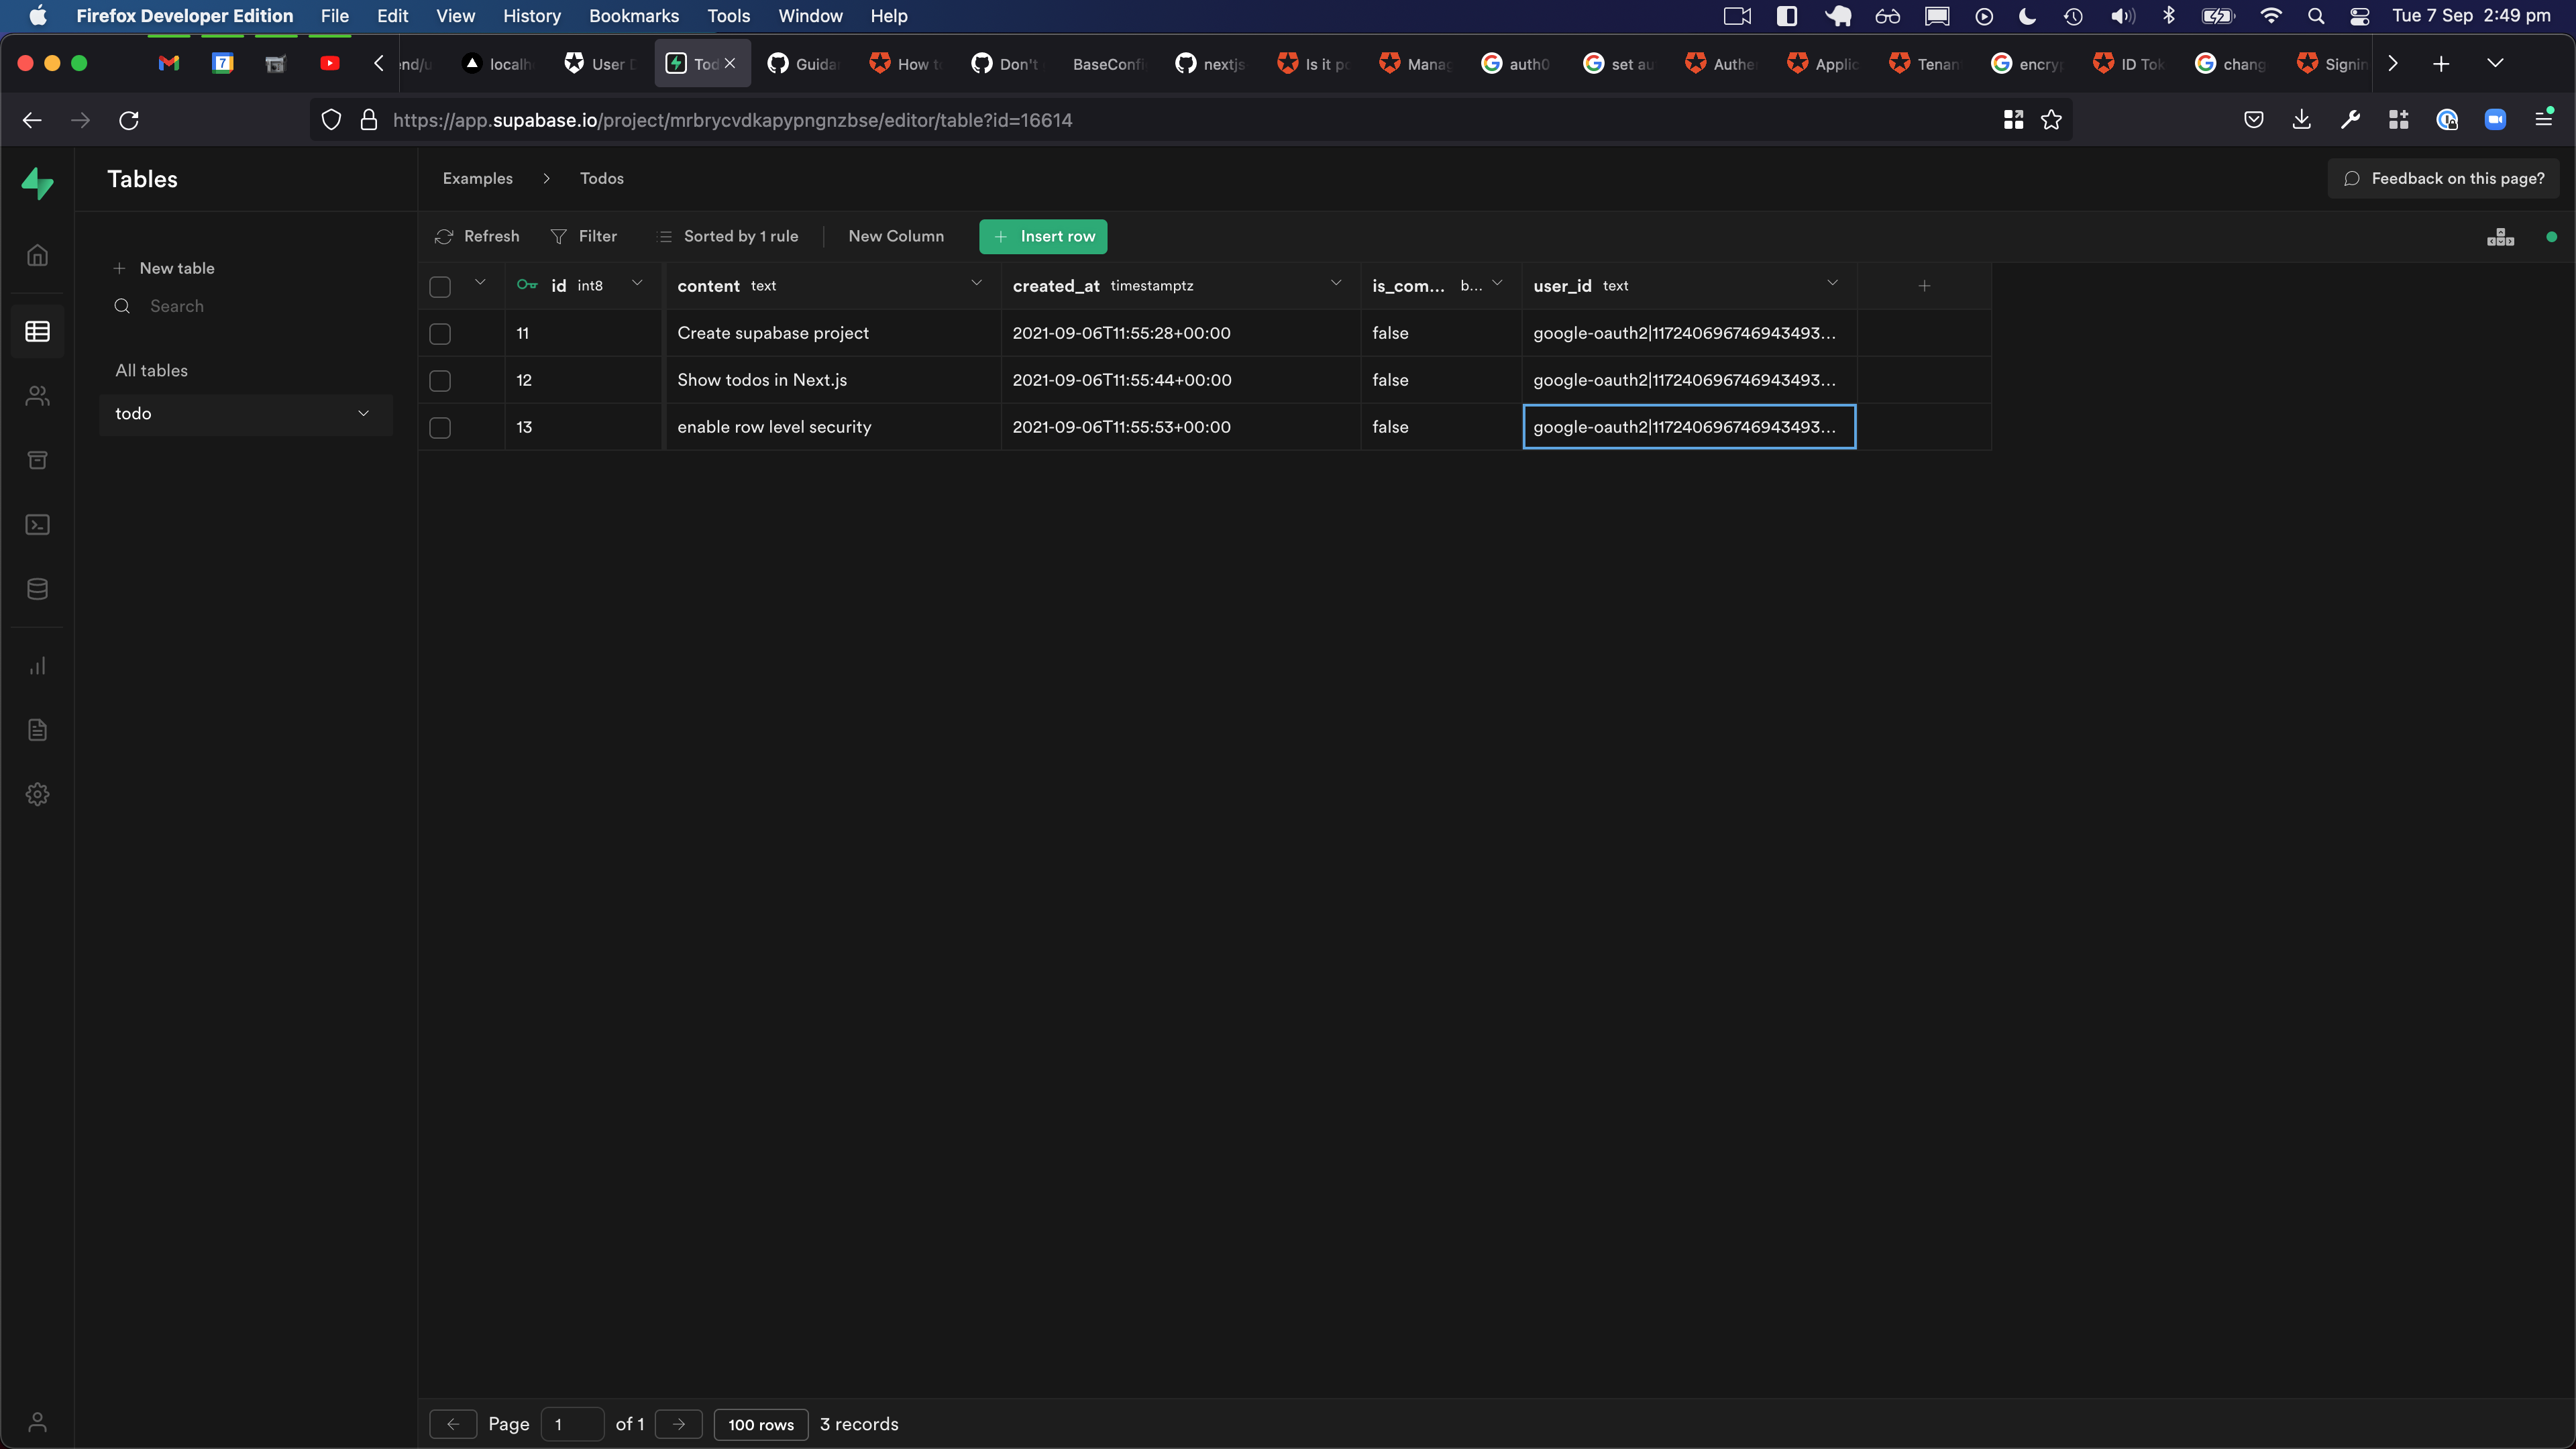
But we are very close. If we look at the Table Editor in the Supabase dashboard, who is the user that owns the todos?
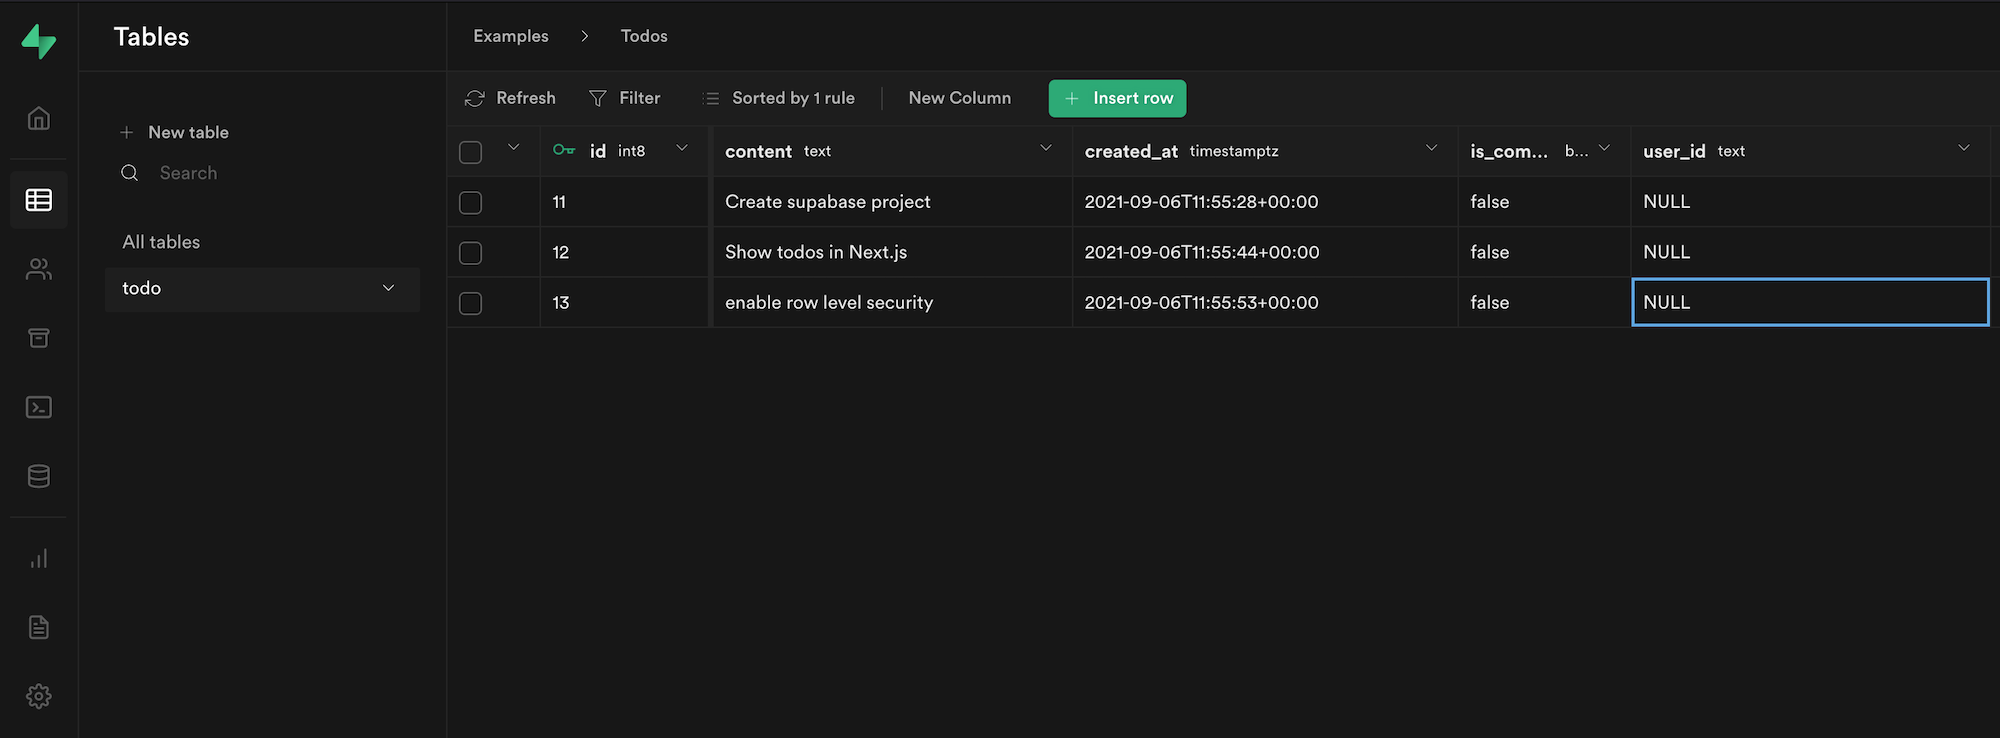
NULL!!
So we just need to find out what our current user_id is and add it to those rows.
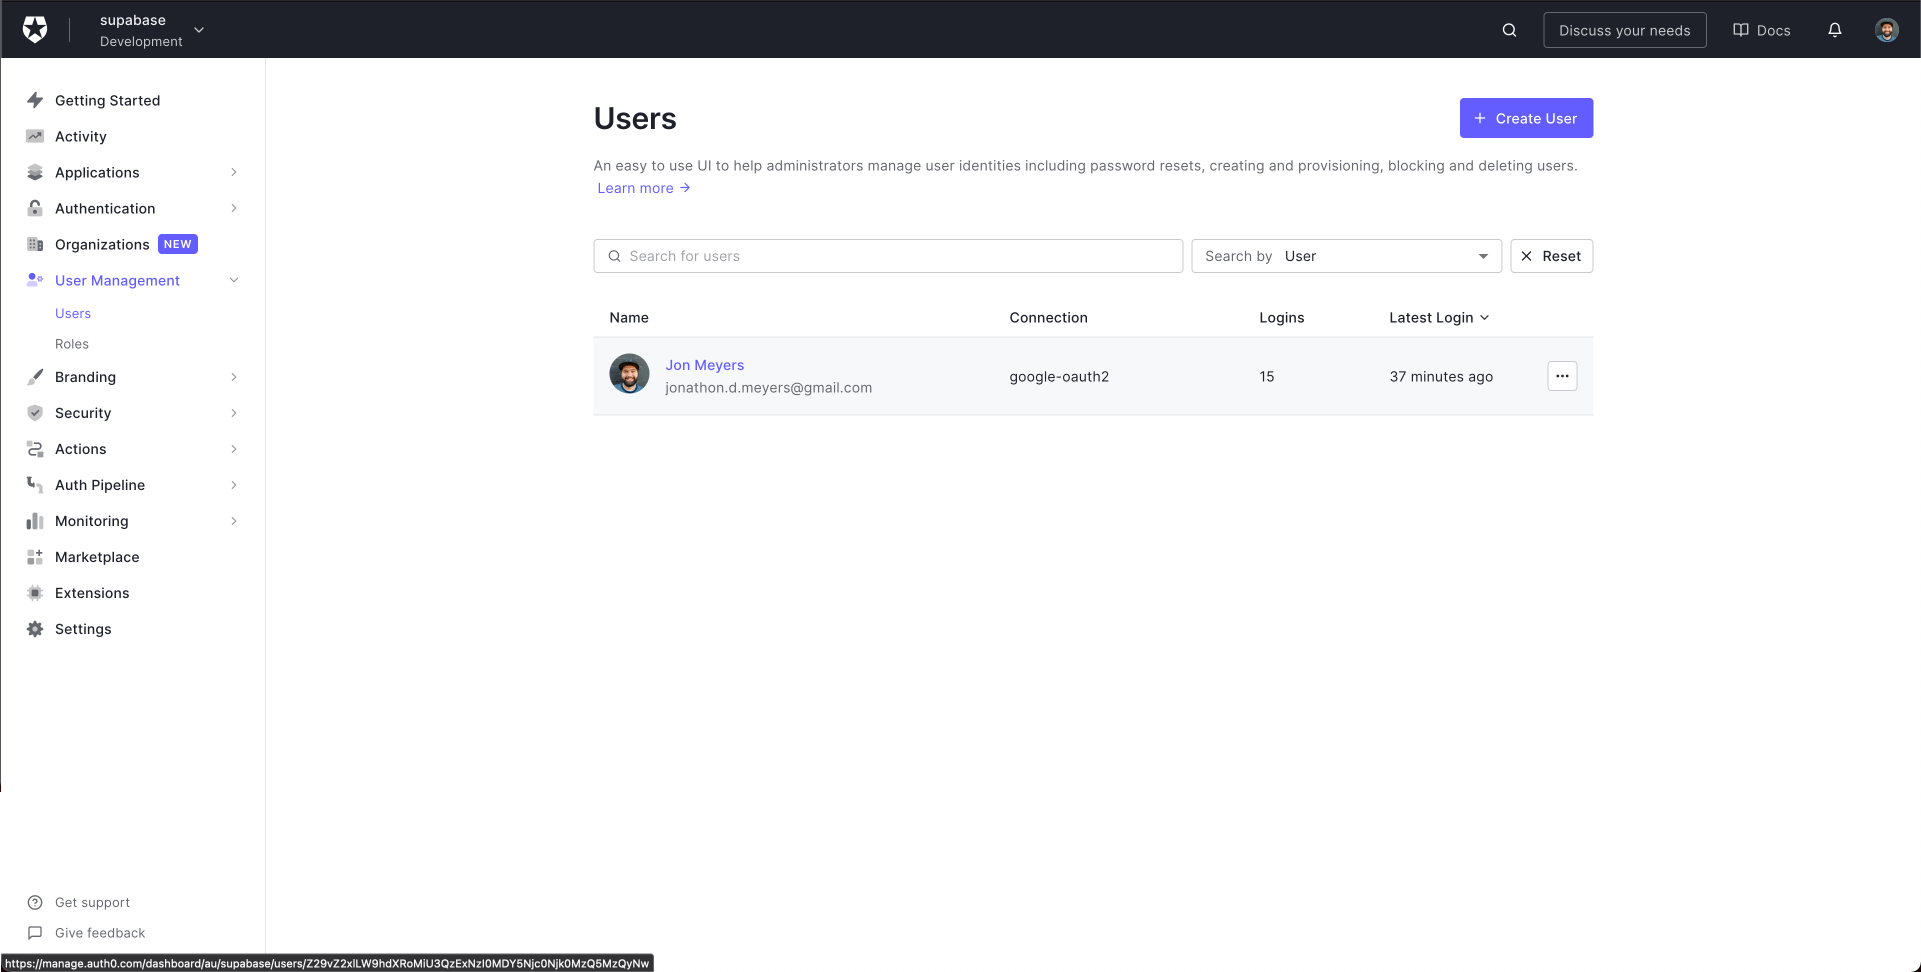
Head back to the Auth0 dashboard, click User Management > Users in the sidebar, and select your user.
The user_id is displayed at the top of your user's details page.
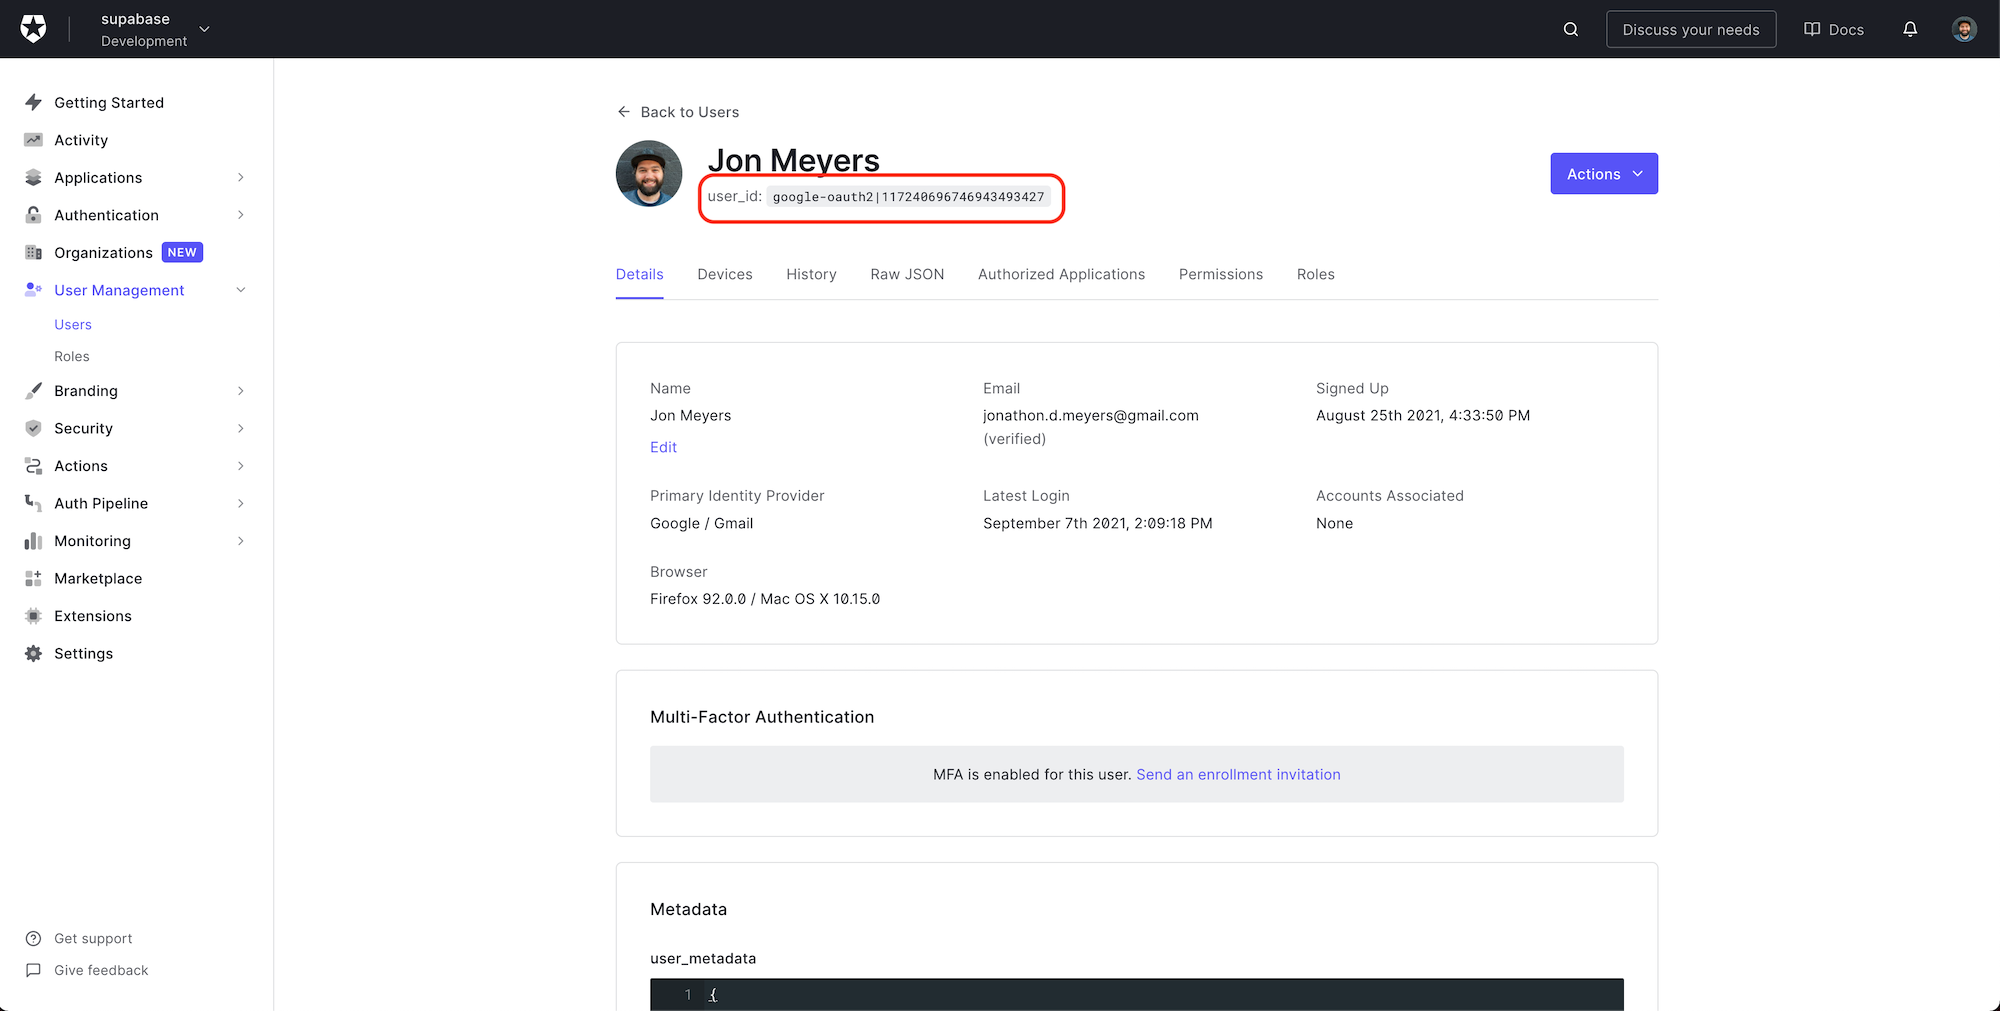
Let's copy this value and paste it as the user_id for the todos.
Refresh our Next.js application.
Voilà! Todos!!!
The last thing we need to implement is the functionality to add a todo.
Let's add the form logic to our pages/index.js component.
// pages/index.js

// other imports
const Index = ({ user, todos }) => {
  const [content, setContent] = useState("");
  const [allTodos, setAllTodos] = useState([...todos]);

  const handleSubmit = async (e) => {
    e.preventDefault();
    const supabase = await getSupabase(user.accessToken);

    const { data } = await supabase
      .from("todos")
      .insert({ content, user_id: user.sub })
      .select();

    setAllTodos([...todos, data[0]]);
    setContent("");
  };

  return (
    <div className={styles.container}>
      <p>
        Welcome {user.name}! <Link href="/api/auth/logout">Logout</Link>
      </p>
      <form onSubmit={handleSubmit}>
        <input onChange={(e) => setContent(e.target.value)} value={content} />
        <button>Add</button>
      </form>
      {allTodos?.length > 0 ? (
        allTodos.map((todo) => <p key={todo.id}>{todo.content}</p>)
      ) : (
        <p>You have completed all todos!</p>
      )}
    </div>
  );
};

// exports
Our final component should look something like this:
// pages/index.js

import styles from "../styles/Home.module.css";
import { withPageAuthRequired, getSession } from "@auth0/nextjs-auth0";
import { getSupabase } from "../utils/supabase";
import Link from "next/link";
import { useState } from "react";

const Index = ({ user, todos }) => {
  const [content, setContent] = useState("");
  const [allTodos, setAllTodos] = useState([...todos]);

  const handleSubmit = async (e) => {
    e.preventDefault();
    const supabase = await getSupabase(user.accessToken);

    const { data } = await supabase
      .from("todos")
      .insert({ content, user_id: user.sub })
      .select();

    setAllTodos([...todos, data[0]]);
    setContent("");
  };

  return (
    <div className={styles.container}>
      <p>
        Welcome {user.name}! <Link href="/api/auth/logout">Logout</Link>
      </p>
      <form onSubmit={handleSubmit}>
        <input onChange={(e) => setContent(e.target.value)} value={content} />
        <button>Add</button>
      </form>
      {allTodos?.length > 0 ? (
        allTodos.map((todo) => <p key={todo.id}>{todo.content}</p>)
      ) : (
        <p>You have completed all todos!</p>
      )}
    </div>
  );
};

export const getServerSideProps = withPageAuthRequired({
  async getServerSideProps({ req, res }) {
    const {
      user: { accessToken },
    } = await getSession(req, res);

    const supabase = await getSupabase(accessToken);

    const { data: todos } = await supabase.from("todos").select();

    return {
      props: { todos },
    };
  },
});

export default Index;
We now have an input field above our list of todos. When we enter the content for our todo and click add, a new todo will be inserted into our DB. We are also setting the user_id column to the value of our user.sub, so we know who the todo belongs to.
We're introducing
allTodosso that we can callsetAllTodosafter the insertion of a newtodo. It will trigger a partial re-render, displaying the newly insertedtodowithout a full page refresh.
Awesome! We now have a Next.js application using Auth0 for all things authentication and Supabase with RLS policies for authorization. We learned about JWTs and how to sign our own, as well as writing a Postgres function to look up values in a JWT in our database.
If you liked this article, follow me on Twitter, check out my blog, and subscribe to my newsletter for exclusive content and early access to courses.
For all things Supabase follow our Twitter, subscribe to the YouTube channel, and check out our blog.
Thanks for reading!
About the author

Jon Meyers
Developer Advocate at Supabase