
TL;DR: In this article, we're going to continue developing the Kanban Board application from part 1 of this series to add basic data persistence, and Progressive Web Application features, such as offline support and adding to your mobile home screen.
The source code for this project is available in a GitHub repository.
Progressive Web Applications (PWAs) are normal web apps that exhibit a few important properties that aim to enrich the user experience of the application in a few different ways. Some of these are:
- Progressive
- The application must gracefully degrade or enhance based on the capabilities of the user's browser
- Responsive
- The application displays appropriately for a wide variety of screen sizes and devices
- Available everywhere
- The application should work whether you have a great internet connection or no connectivity at all!
- Secure
- The application must make use of HTTPS technology to help keep users safe
- App-like
- The application should employ techniques and features that make it feel more like a regular mobile application, such as push notifications and home screen buttons
In this tutorial, we're going to take the Kanban Board application from part 1 and fulfill some of this criteria that we haven't already covered. In addition, we're going to add some basic data persistence that records the backlog items into Local Storage, so that the items are persisted whenever the page is refreshed. Not only is this quite easy to do, but it will make your life a lot easier when it comes to adding the other features and testing out your application.
If you haven't managed to complete part 1, the source code for part 1 of the tutorial is available in on GitHub, so you can pick right up from here. To get started with the application, clone the GitHub repository to your local machine, and navigate your terminal to the project directory. You can then run the following commands to start the application:
$ npm install
To run the application:
$ npm run dev
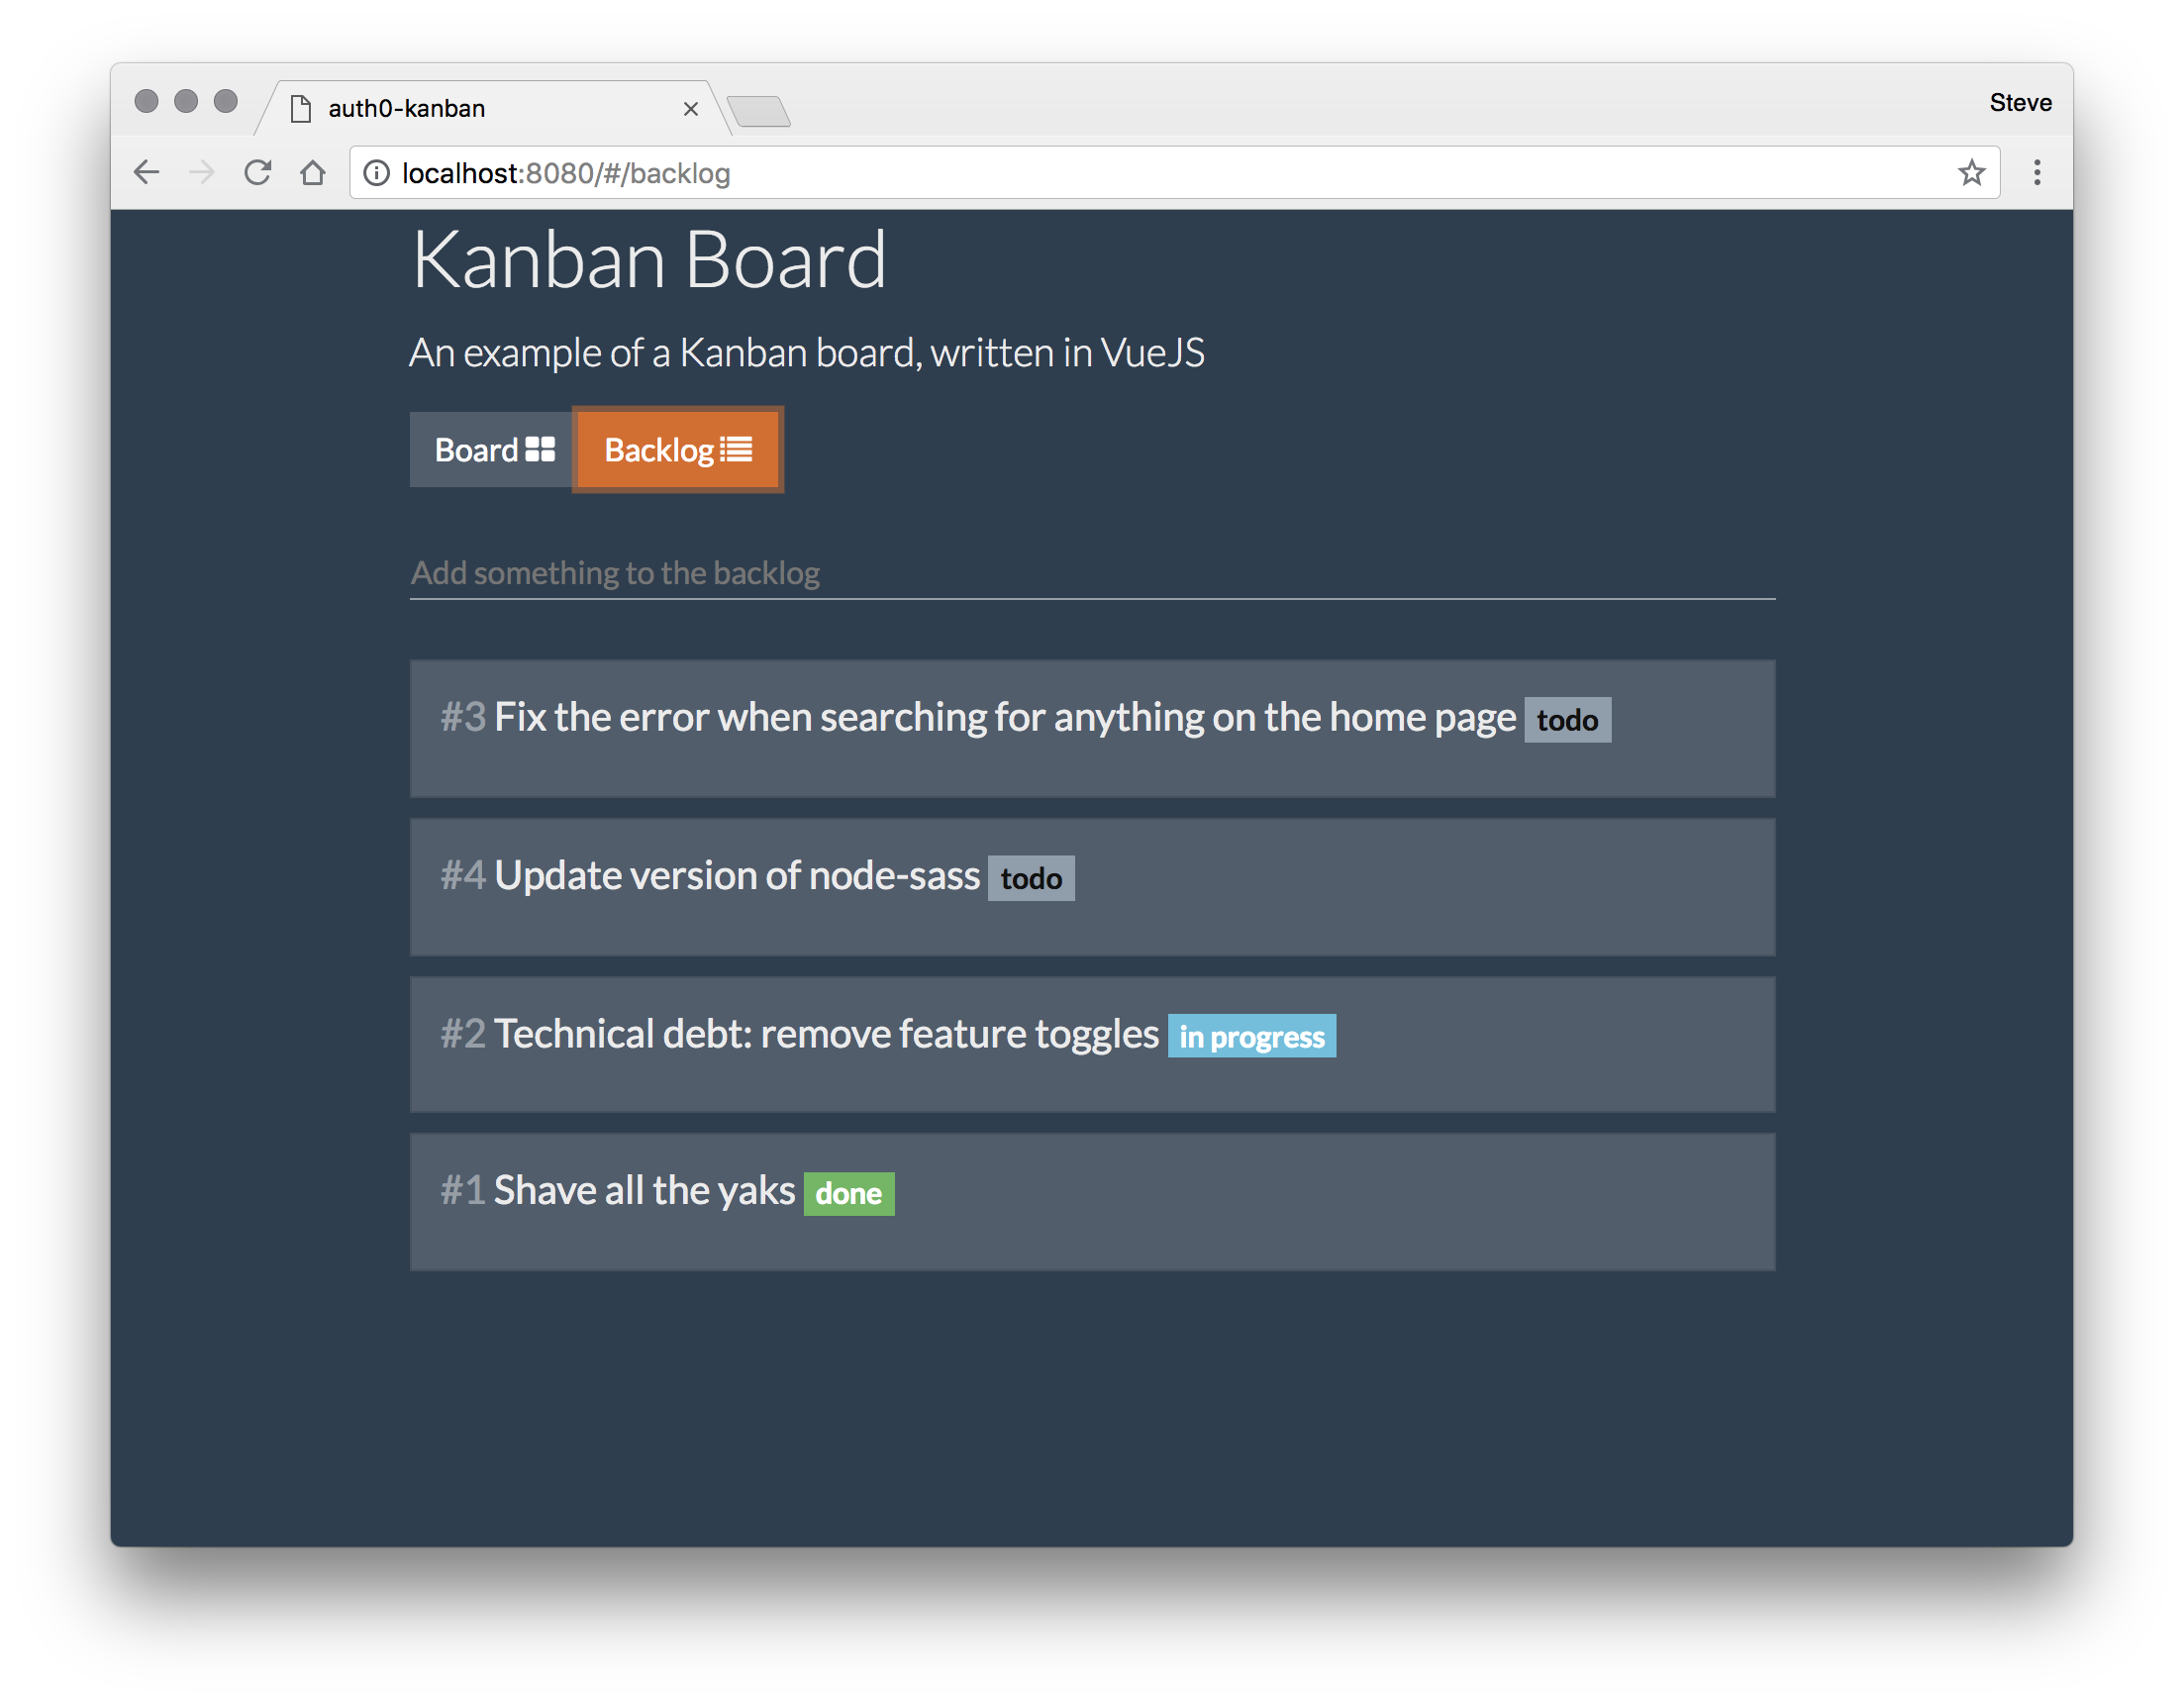
To see the application running, you should then be able to open http://localhost:8080 in your browser. Here's an example of the running application with some sample data:
Integrating Vuex with Local Storage
The first thing we're going to tackle is the ability to persist our data store so that when the page is refreshed not all of the data is lost. Since we've previously put all of our data storage logic in one place, this task is fairly trivial but wins us a lot of user experience points.
To do this, we're going to create a Vuex Plugin that will serialize our Vuex state into Local Storage. Then, we can easily register our plugin with our store.
Begin by creating a new folder called plugins inside the src folder, and then create a new file inside plugins called localStorage.js. Your folder structure should look something like this:
├── src
│   ├── App.vue
│   ├── assets/
│   ├── components/
│   ├── main.js
│   ├── plugins/
│   │   └── localStorage.js
│   ├── router/
│   ├── store.js
Then, populate localStorage.js with the following:
// src/plugins/localStorage.js

export default store => {
  store.subscribe((m, state) => {
    // Save the entire state to Local Storage
    localStorage.setItem('boardState', JSON.stringify(state));
  });
};
Here we use the subscribe method on the store to register an event handler function, which is executed every time the store's state is changed. The function is given two parameters: m, which is the name of the mutation that caused the state to change, and state, which is the store's current state. By handling this event, we can save the entire state of the store to Local Storage whenever it is changed. This is OK for this application since nothing particularly sensitive lives in the Vuex store: only what you as the user have typed in yourself when creating your backlog items on your kanban board.
For the plugin to take effect, it needs to be registered with the store. Open src/store.js and modify the definition of the store so that it includes the plugin.
// src/store.js
import Vue from 'vue';
import Vuex from 'vuex';

// Import the plugin module here
import localStoragePlugin from './plugins/localStorage';

Vue.use(Vuex);

export default new Vuex.Store({
  // Next, register the plugin using the `plugins` property on the store
  plugins: [localStoragePlugin],

  // The rest of the store remains the same..
  state: { ... },

  mutations: { ... }

});
Now that we can save our backlog items, the next piece to implement is the ability to recall them when the application starts up. We're going to add a method to our store that will allow us to do that. Still, within src/store.js, add a new mutation to the store which will read the data from local storage and overwrite the current state of the store:
// src/store.js
import Vue from "vue";
import Vuex from "vuex";
import localStoragePlugin from './plugins/localStorage';

Vue.use(Vuex);

/* eslint-disable no-param-reassign */
export default new Vuex.Store({

  // .. other store creation options

  mutations {

    // .. other mutations

    // Add this mutation which allows us to load our state from the store
    initializeStore() {
      const data = localStorage.getItem('boardState');

      if (data) {
        this.replaceState(Object.assign(this.state, JSON.parse(data)));
      }
    }
  }
})

// ...
This new method will fetch the items from Local Storage, deserialize them using JSON.parse then call replaceState on the Vuex store. replaceState is a Vuex API method which will replace the entire Vuex state with whatever data we give it. In this case, it will have the effect of overwriting the store data with whatever we just fetched from Local Storage.
The last task is to call this new method at the right time, and we're going to do that once the Vue system has been initialized. Open src/main.js and modify the view options to call our method when the created lifecycle hook is called:
// src/main.js

new Vue({
  el: '#app',
  router,
  store,
  template: '<App/>',
  components: { App },

  // New code - initialize the store
  created() {
    store.commit('initializeStore');
  }
});
Because initializeStore is a mutation, we "call" it by using the store's commit method with the mutation name. Normally, mutations would be accompanied by data that describes how the store is to mutate but, in this case, we have no data to commit since the mutation itself will supply the data.
If you run the application now, you should find that you can add in new backlog items, refresh the page, and see that your items are still there. Great! One final thing I'm going to cover is how to delete items, as we will quickly start to build up a set of backlog items and it could get a bit messy if we had no way at all to delete them.
Deleting Backlog Items
We can begin by adding a new mutation into our store that will allow us to remove items as and when we need. This mutation will take the item to be deleted as its single argument. The implementation is as follows:
// src/store.js

export default new Vuex.Store({

  // .. other options

  mutations: {

    // .. other mutations

    // Add this mutation which removes an item from the backlog, given the item id
    removeItem(state, item) {
      [state.items.todo, state.items.inProgress, state.items.done].forEach(
        array => {
          const indexInArray = array.findIndex(i => i.id === item.id);
          if (indexInArray > -1) {
            array.splice(indexInArray, 1);
          }
        }
      );
    }
  }
});
The code may look a little confusing at first, but let me explain what it's doing. As a quick recap, the store works by keeping three arrays to track the backlog items: todo, inProgress and done, where a 'todo' item will appear in the todo array, items in progess in the inProgress array, and so on. In order to delete an item, we need to know which of the three arrays the item is in. We can do that by creating a new array that contains these three arrays, iterating over them, and then using findIndex to find out which one has an index of zero or greater. Once we have found that array, we can remove the item.
As this is a mutation, we need to call it from somewhere. We'll do this by adding a new "delete" button to each item in the backlog, which will allow the user to delete that particular item.
Let's start by modifying the src/components/Backlog.vue template so that it includes the new button. Be careful as I've also moved the position of the badge element slightly. Your component should end up looking something like this:
<!-- src/components/Backlog.vue --> <template> <div class="backlog-view"> <new-item></new-item> <div class="card" v-for="item in items" :key="item.id"> <div class="card-block"> <h5 class="card-title"><span class="text-muted">#{{item.id}}</span> {{item.text}} <!-- NEW - button to delete the item --> <button type="button" class="close-button pull-right" @click="removeItem(item)"> <span>×</span> </button> <span :class="badgeClass(item)">{{badgeText(item)}}</span> <!-- /NEW --> </h5> </div> </div> </div> </template>
The button we've added works by invoking the removeItem method whenever it's clicked, passing along item. We can implement that method on the component now. Further down the same code file, modify the component code so that it includes the new removeItem method:
// src/components/Backlog.vue

export default {

  // .. other component options

  methods: {

    // .. other methods

    removeItem(item) {
      this.$store.commit('removeItem', item);
    }
  }
};
As you can see, the method itself simply executes the mutation that we have already implemented on our store, giving it the item that we want to delete. At this point, you should be able to run the app, see the delete button, and begin to remove items from your backlog!
Finally, you'll notice that the styling is a little off. We can put in some minor fixes here to make the application look a little more pleasing. To start, find the badgeClass method inside the component script and add in the pull-right class from Bootstrap. To do this, I've reworked the string into a template literal, just to make it a little easier to work with:
// src/components/Backlog.vue

badgeClass(item) {
  const lane = this.itemLane(item);
  return `${badgeDetail[lane].class} pull-right`;
}
Then, inside the <style> tag of the App component, add in these rules:
/* src/App.vue */

.card-title {
  margin-bottom: 0;
}

h5 {
  margin-bottom: 0;
}

.close-button {
  background: transparent;
  border: 0;
  margin: 0 0 0 20px;
  padding: 0;
  color: white;
  opacity: 0.3;
}

.close-button:hover {
  cursor: pointer;
}
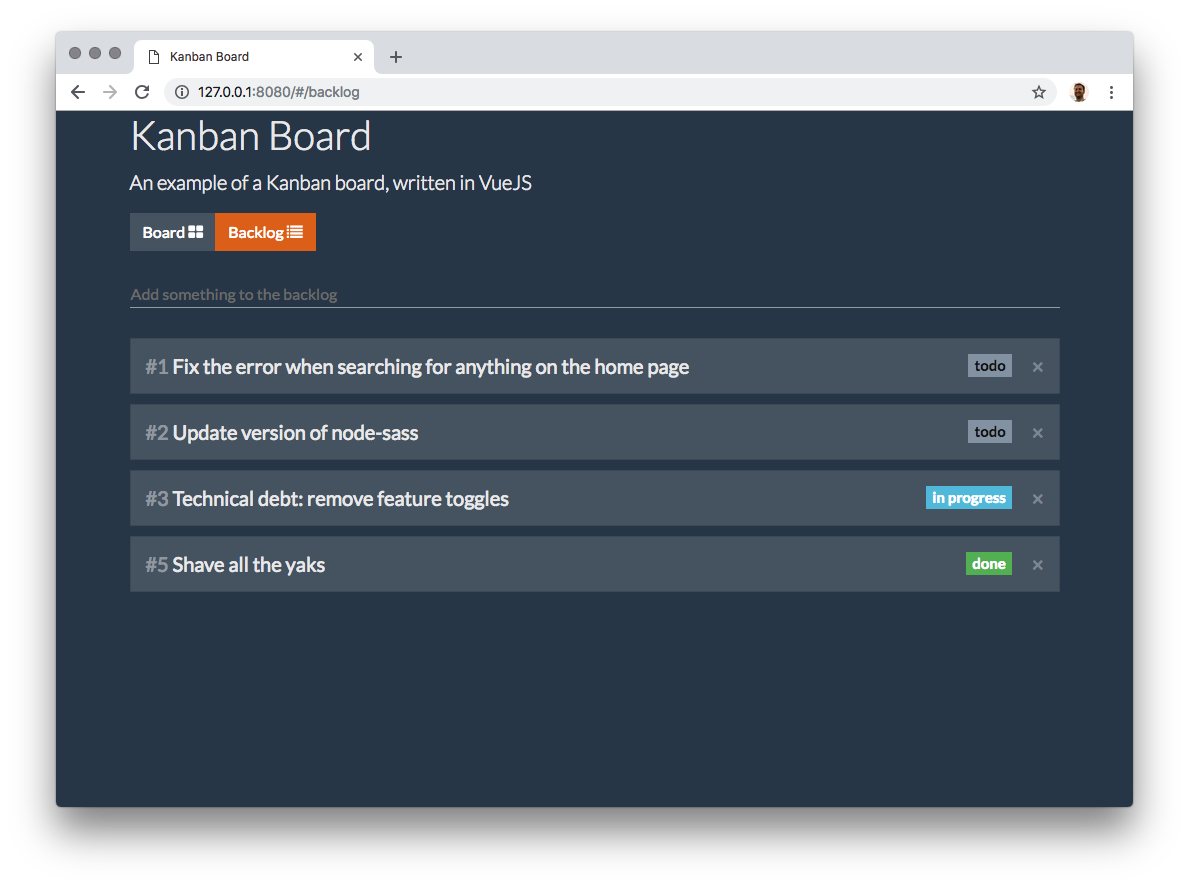
When you look at the page now, everything should be nicely aligned and a little more pleasing to the eye.
Now that we can persist and remove our backlog items, let's look at how we can make the whole application work offline!
An Introduction to Service Workers
Service workers are pieces of JavaScript, registered by your application, that execute in a thread separately from your main JavaScript thread. They have a few limitations, most notably that they can't access the DOM, local storage or session storage. In addition, service workers can only be used on pages served over HTTPS. All of these limitations serve to make using service workers safe and secure.
However, they do have access to other important resources, such as the cache API, and IndexedDB. In addition, they are able to intercept network requests that are generated from the browser and return modified responses. Together with strong browser support, these capabilities make Service Workers extremely suitable for helping us provide offline support to our app users.
“Learn how to use Service Workers to add offline capabilities to an existing web app”
Tweet This
Implementing a Service Worker for Offline Access
We're going to implement a service worker which will allow us to cache all the assets that we need in order for the application to work offline. These assets are:
- The web page that serves the JavaScript and CSS assets
- The compiled JavaScript files as output by Webpack
- The stylesheets and fonts that make up our application's look and feel
These will be cached in two stages:
- We will first pre-cache the web page and the application JavaScript files, as we know what those are up-front
- We will then cache the stylesheets and fonts in real-time as they are made in the browser. These are Cross-Origin Requests (CORS) that we can cache as-and-when they come through
Relating to this particular project, there are a few requests that we don't want to bother caching — mainly relating to Webpack's hot module replacement feature — but we will get to that soon. I also want to mention the fact that if you were to create a new Vue project using the CLI tool, there is a built-in template that allows you to create a PWA out of the box without having to write your own service worker. However, we're not using that here since writing the service worker for offline access is part of the point of this article!
With that in mind, let's begin to implement our service worker. We need to do two things:
- Create our service worker script
- Configure Vue to load it for us into our HTML template
Creating the service worker script
Start by creating a new file in the src directory, called sw.js. We can start by implementing the ability to pre-cache assets that we know about:
// src/sw.js

// ESLint global registration
/* global serviceWorkerOption: false */

const cacheName = 'kanban-cache';
const isExcluded = f => /hot-update|sockjs/.test(f);

const filesToCache = [
  ...serviceWorkerOption.assets.filter(file => !isExcluded(file)),
  '/',
  'https://maxcdn.bootstrapcdn.com/bootswatch/4.0.0-beta.2/superhero/bootstrap.min.css',
  'https://maxcdn.bootstrapcdn.com/font-awesome/4.7.0/css/font-awesome.min.css'
];

// Cache known assets up-front
const preCache = () =>
  caches.open(cacheName).then(cache => {
    cache.addAll(filesToCache);
  });

// Handle the 'install' event
self.addEventListener('install', event => {
  event.waitUntil(preCache());
});
The first thing we do is set up some constants and functions that we're going to use in our service worker. One is the name of the cache, then we have a helper method which allows us to determine whether or not the request — based on the URL — should be excluded from the cache or not.
The next thing we do us to create a list of the known URLs and files that we know we want to cache. For us, this includes everything in the serviceWorkerOptions.assets array (filtered using our exclusion function), the root URL /, and our Bootstrap and FontAwesome assets. It would be beneficial to cache these assets up-front, so that we can make sure the user doesn't see an unstyled application if they happen to go offline immediately after hitting the application.
serviceWorkerOptionis an object given to us by a Webpack plugin that we will install in the next section.
Finally, we use addEventListener to handle the install event and use that opportunity to call preCache, which caches all of the resources that we know about up-front. This involves opening the cache using a given name, adding all of the files to it that we want and then wrapping it in event.waitUntil, which waits until preCache is finished.
Integrating our service worker
At this point, we have a basic service worker which caches our known assets and the root URL. Although we haven't quite finished our service worker implementation, let's see how we can integrate it into our application.
Normally we integrate the service worker by referencing it inside a script tag on our HTML template and then writing some code to register it with the browser. However, we have the added problem that the assets we want to cache are dynamically generated by our build system — Webpack. So how do achieve this?
There are is a Webpack plugin that can help us here: serviceworker-webpack-plugin. This plugin provides a small API to help us register our service worker as well as the files we need to cache. Remember serviceWorkerOption from the previous code snippet? This plugin is what provides this list of files to us, based on the assets that have flowed through the Webpack compilation pipeline. This is extremely convenient since Webpack could be configured to output files that contain hashes that you have no way of calculating up-front. A Webpack configuration can also emit different file names depending on whether you are in production or development mode, for example. This way the service worker simply gets told what the file names are, by making serviceWorkerOption available to us inside the service worker script.
To get this working, first install the serviceworker-webpack-plugin dependency using the command line.
$ npm install -D serviceworker-webpack-plugin@0.2.3
Note that I'm installing version
0.2.3, even though the latest version (at the time of writing) is1.0.1. This is because0.2.3supports Webpack 3, which is how our project is configured by default. If you use a different template that uses Webpack 4 or have upgraded your project to use Webpack 4, then you will want to install the latest version ofserviceworker-webpack-plugin.
Next, we need to modify the Webpack configuration to load this new plugin. Open build/webpack.base.conf.js and make the following changes:
const utils = require('./utils')
const config = require('../config')
const vueLoaderConfig = require('./vue-loader.conf')

// NEW - include the plugin
const ServiceWorkerWebpackPlugin = require('serviceworker-webpack-plugin')

//...

// Modify the exports to include a new 'plugins` key containing
// the ServiceWorkerWebpackPlugin configuration
module.exports = {
  context: path.resolve(__dirname, '../'),
  entry: { ... },
  output: { ... },
  resolve: { ... },
  module: { ... },
  node: { ... },
  plugins: [
    new ServiceWorkerWebpackPlugin({
      entry: path.join(__dirname, '../src/sw.js')
    })
  ]
}
The plugins key won't exist in the default template, so it should be added inside module.exports. The only thing we need to do with it is to specify where our service worker script is, and the plugin will take care of the rest.
The last thing we need to do is register the service worker when the application starts up. We can do this from our main startup script, so open src/main.js and make the following changes:
// src/main.js

import Vue from 'vue';

// NEW
import runtime from 'serviceworker-webpack-plugin/lib/runtime';

// ...
Vue.config.productionTip = false;

// NEW - register the service worker
if ('serviceWorker' in navigator) {
  runtime.register();
}
Verifying service worker installation
At this point, you will be able to start the application and find that the service worker has been registered and that two requests have been cached: /app.js, and /. Using Chrome, let's see how we can verify the installation of the service worker and that the URLs have been cached.
Start the application using npm run dev in the command line, or restart the application if it's already running, and then browse to http://localhost:8080. Once the page has been loaded, open up the Chrome Developer Tools and open the Application tab. If you click the Service Workers option on the left, you'll see information about the service workers that have been registered for this application. If you have followed the steps until now, you should see that our service worker has been registered and it is running.
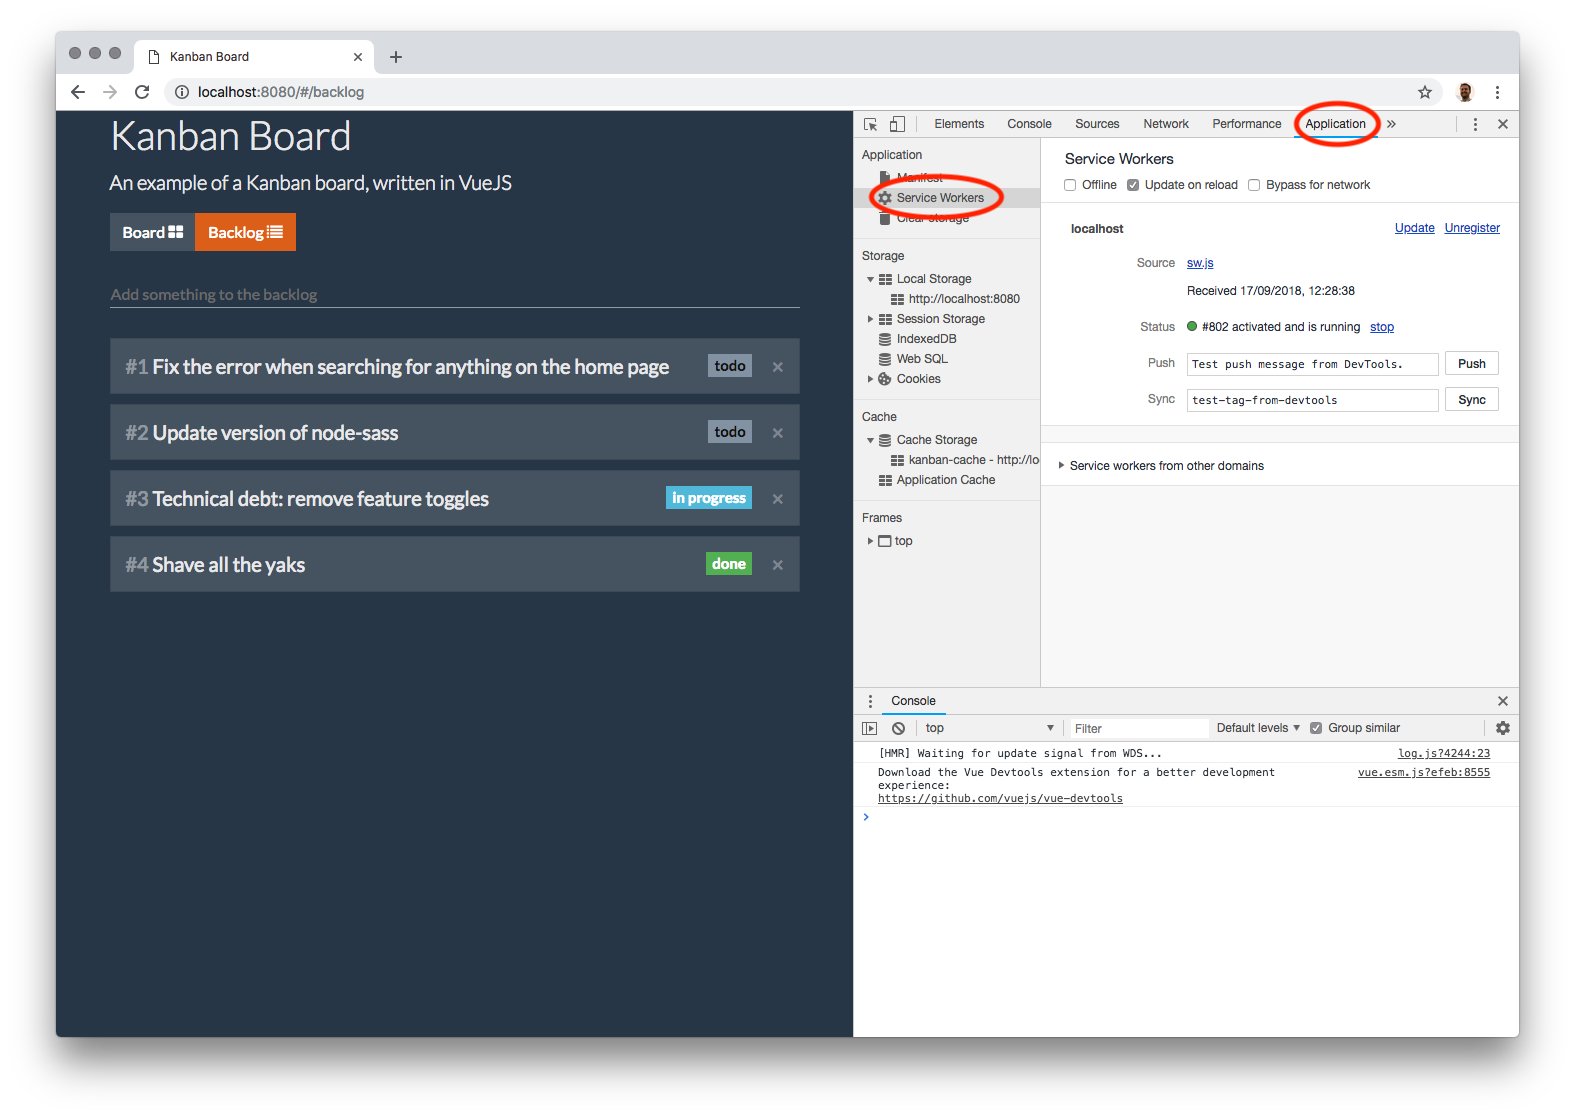
There are a couple of important options at the top of this screen which aid the development of your service worker:
- Offline — simulates the disconnection of your network, allowing you to test that your application works when it is offline
- Update on reload — normally the service worker is only reloaded if it has changed, and you have started a new browser session (i.e. closed and reopened the browser window or tab). Checking this box means that, to speed up development, you can get your service worker to update whenever you reload the page.
You may also see service workers for your application that have been stopped on this screen. These are old service worker instances that have been replaced by new versions whenever you update the service worker script, and will be removed once the browser tab is closed.
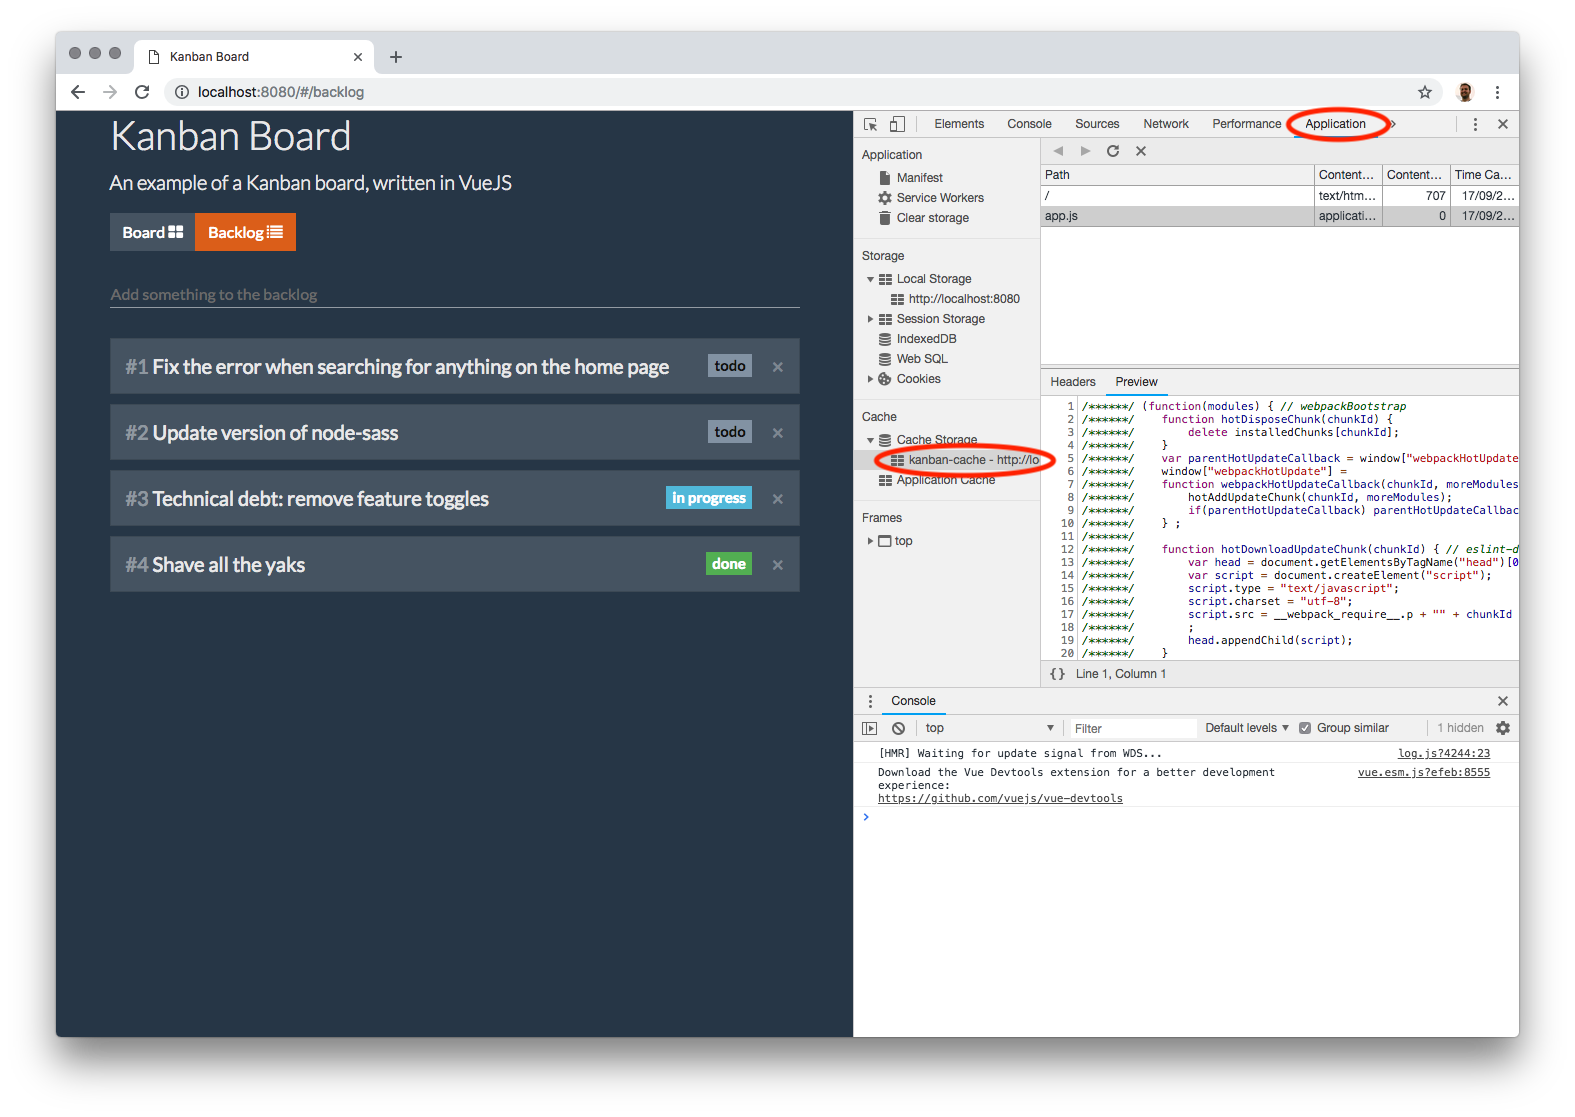
Next, we can inspect the cache to see if the URLs we expect are there. Further down the Application pane, expand the Cache Storage item and click the 'kanban-cache' item. This will bring up the list of requests that are currently in the cache, and you should be able to see our two items in there.
Let's see whether our application works offline with what we have. Go back to the Service Worker tab inside Chrome Developer Tools, and check the "offline" option at the top. As far as your application is concerned, you now have no internet connection. When you refresh the page, you'll find that you're still unable to access the app; whilst we have written the code to pre-cache our known files, we still have to write the logic for retrieving items from the cache. Let's do that now.
Implementing the fetching strategy
A service worker is incredibly flexible in that you can completely control which assets are cached, and when. For this reason, the implementation of a service worker can grow to be quite complex.
Let's start by handling the fetch event, which is the event that is raised when a resource needs to be fetched from somewhere. You can put this code underneath the code we already have in src/sw.js:
// src/sw.js

self.addEventListener('fetch', event => {
  event.respondWith(
    fetchFromNetwork(event.request).catch(() => fetchFromCache(event.request))
  );
});
Hopefully, the code here is fairly self-descriptive. Our basic strategy for getting our application to work offline is to try fetching from the network first — as the browser would normally do — and if that fails, try to fetch from the cache. The hidden detail here is that fetchFromNetwork will place things into the cache as it receives the responses. Let's implement that now. Add the following method above our preCache method we defined earlier:
// src/sw.js

const fetchFromNetwork = request =>
  new Promise((resolve, reject) => {
    fetch(request).then(response => {
      if (!isExcluded(request.url) && response) {
        updateCache(request, response.clone()).then(() => resolve(response));
      } else {
        resolve(response);
      }
    }, reject);
  });

const preCache = ...
Here we fetch the resource from the network and assuming we receive a valid response, and it does not match our exclusion filter, then we can put it into the cache. The whole operation is wrapped inside another Promise so that we can more precisely control exactly when the promise is fulfilled or rejected.
You'll also notice in the call to updateCache that, instead of passing response to the function, we pass a clone of the response (through response.clone). We do this because when we're dealing with responses, we're actually dealing with streams of data. Once a stream has been read, it can't be used again. In our case the response is ultimately used twice — once to put it into the cache, and again to return it to the browser client. Therefore, we must clone the response so that we can have two copies of it and fulfill both actions.
Two more functions to implement; next is the fetchFromCache function:
// src/sw.js

const fetchFromNetwork = ...

// Try to fetch existing responses from the cache
// Implement this between fetchFromNetwork and preCache
const fetchFromCache = request =>
  caches.match(request).then(response => response || Promise.reject('failed'));

const preCache = ...
This is a very simple case of just calling the match method on the Cache API, which will return a response. The response could be valid or undefined if nothing was found.
Finally, let's implement updateCache. This will take the request and response objects, and again make a call into the Cache API to save those items into the cache:
// src/sw.js

// Store a response inside the cache
// Implement this above fetchFromNetwork
const updateCache = (request, response) =>
  caches.open(cacheName).then(cache => cache.put(request, response));

const fetchFromNetwork = ...
Testing offline access
With these functions in place, you should now have the capabilities to run your application offline! To test this out, make sure your assets appear in the cache, and then do one of these things:
- Use the 'offline' checkbox at the top of the Application window inside Chrome Developer Tools
- Simply stop your server running in the command line (Ctrl+C)
You should find that you can refresh the page and your application still appears and works as normal!
As a further test of the caching strategy, make a change to your index.html file in the root of the project so that the changes would be visible in the browser (e.g. add some text or a heading). When you refresh the app while it's still offline, your changes will of course not appear. However, come back online by restarting the application (or untick 'Offline' in Chrome Developer Tools, depending on which method you used earlier) and your changes should now appear immediately.
At this point, you now have an application which will work when there is no internet connection (or the server is down), as well as one that prefers the most up-to-date content if it is available.
Note: At the time of writing, support for offline access varies across the different platforms. For example, service workers are currently supported on Chrome for Android, but not Chrome for iOS (Chrome for iOS uses WKWebView). However, Safari 11.4+ on iOS does now support service workers. Remember that, when testing on mobile, the application must be served from an HTTPS endpoint. That means either generating a self-signed certificate or hosting your application on a platform that supports HTTPS.
Adding to the Home Screen
To make this web application appear more integrated and "app-like", we can further enhance the experience by providing the ability to add the application to the home screen of your mobile phone. To get started, we need to create a Web App Manifest file. This file describes particular aspects of your application, e.g. it's full name, a short name, icons, colors, and a few other things. Devices can use this file to best describe your application when it comes to running them from your home screen.
Creating the application manifest file
Let's create a manifest file for our application. We can do this by creating a static JSON file and then linking to it inside our index.html page. Create the file static/manifest.json and populate it with the following content:
{
  "name": "Kanban Board",
  "short_name": "Kanban Board",
  "start_url": "/",
  "background_color": "#263e52",
  "theme_color": "#263e52",
  "orientation": "portrait-primary",
  "display": "standalone",
  "lang": "en-US",
  "description": "A Kanban Board written in Vue.js, with Progressive Web App features",
  "icons": [
    {
      "src": "/static/app_icon_512.png",
      "sizes": "512x512",
      "type": "image/png"
    },
    {
      "src": "/static/app_icon_192.png",
      "sizes": "192x192",
      "type": "image/png"
    }
  ]
}
Some of these properties are straightforward, but let me explain some of them:
- start_url
- the URL that should be loaded first when starting the application from the home screen
- background_color
- the color of the background that should be used on the splash screen
- theme_color
- Some browsers use this to set the color of the chrome around the web page
- orientation
- the primary orientation of the application. Other values include ones that allow you to specify that your application should be viewed in landscape mode
- icons
- various sizes of icons that different devices use. Google specifies that, for an application to be considered a PWA and for certain features to work, at least 192x192 and 512x512 icons must be specified
- display
- indicates the preferred display mode for the app. Valid values are: 'fullscreen', 'standalone', 'minimal-ui' and 'browser'
I've used an icon here courtesy of Anton Sapturo and www.flaticon.com, and you can download them to your repository using the following commands in your terminal in the project's root directory:
curl -o static/app_icon_192.png -O https://raw.githubusercontent.com/elkdanger/kanban-board-pwa/master/static/app_icon_192.png
curl -o static/app_icon_512.png -O https://raw.githubusercontent.com/elkdanger/kanban-board-pwa/master/static/app_icon_512.png
curl -o static/CREDITS.md -O https://raw.githubusercontent.com/elkdanger/kanban-board-pwa/master/static/CREDITS.md
Now, open index.html in the root of the project and add in the link to the manifest file. While we're here, we're also going to set an additional meta tag which affects the color of the browser chrome for Chrome on Android, just to make it look that little bit more integrated:
<!DOCTYPE html>
<html>
  <head>
    <meta charset="utf-8">
    <meta name="viewport" content="width=device-width,initial-scale=1.0">

    <!-- NEW - specify the theme color for Chrome on Android -->
    <meta name="theme-color" content="#263e52">

    <title>Kanban Board</title>

    <link rel="stylesheet" href="https://maxcdn.bootstrapcdn.com/bootswatch/4.0.0-beta.2/superhero/bootstrap.min.css">
    <link href="https://maxcdn.bootstrapcdn.com/font-awesome/4.7.0/css/font-awesome.min.css" rel="stylesheet" integrity="sha384-wvfXpqpZZVQGK6TAh5PVlGOfQNHSoD2xbE+QkPxCAFlNEevoEH3Sl0sibVcOQVnN" crossorigin="anonymous">

    <!-- NEW - specify the manifest file -->
    <link rel="manifest" href="/static/manifest.json">
  </head>
  <body>
    <div class="container">
      <div id="app"></div>
    </div>
    <!-- built files will be auto injected -->
  </body>
</html>
With this in place, you should be able to add the application to the home screen of your mobile device and have it pick up some of the metadata present in the manifest file. To reiterate, support for some or all of the metadata right now is patchy across different devices, and your experience may differ slightly from that outlined here.
Note: In order to connect to your running application from your mobile device, you may have to start the application so that it binds to the address 0.0.0.0. You can do this from the command line:
HOST=0.0.0.0 npm run dev
Then you should be able to connect to the app using the IP address of the machine that the app is running on.
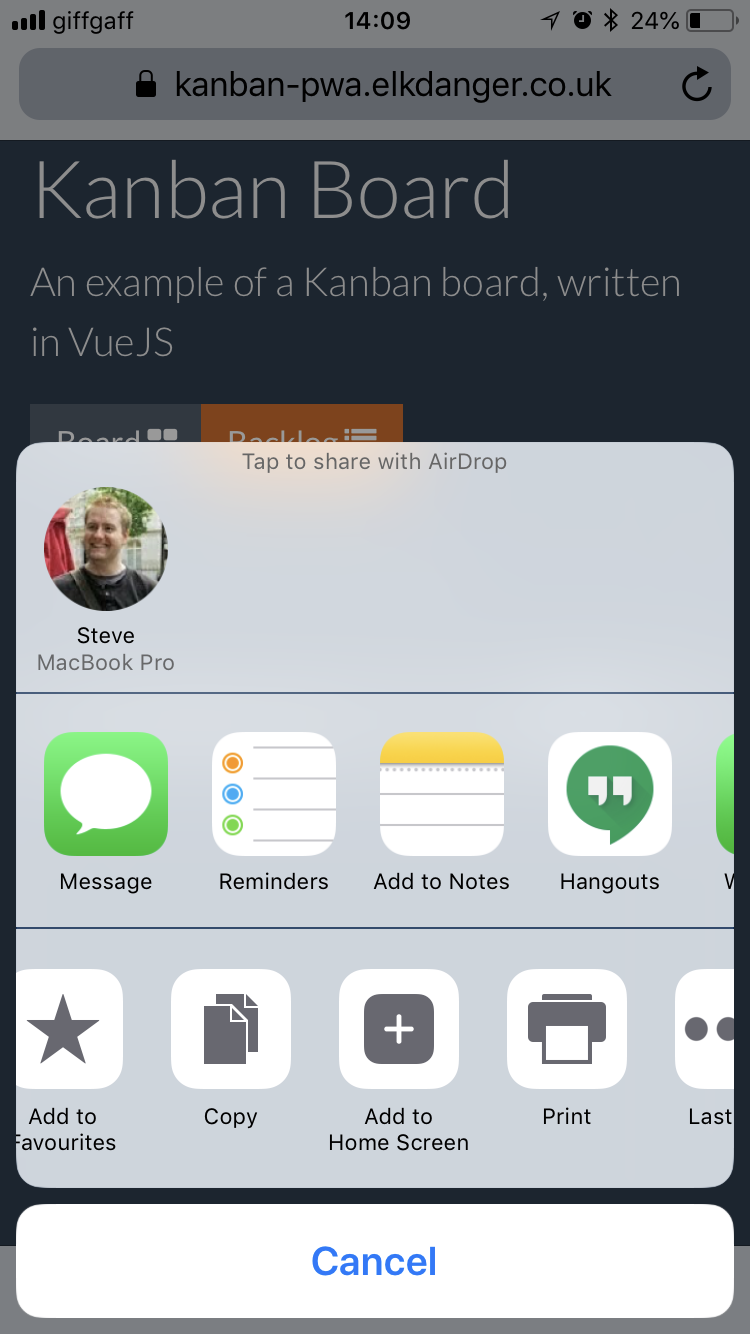
To illustrate the mobile features, on Safari on iOS, you can add your application to the home screen by hitting the 'share' button at the bottom of the screen.
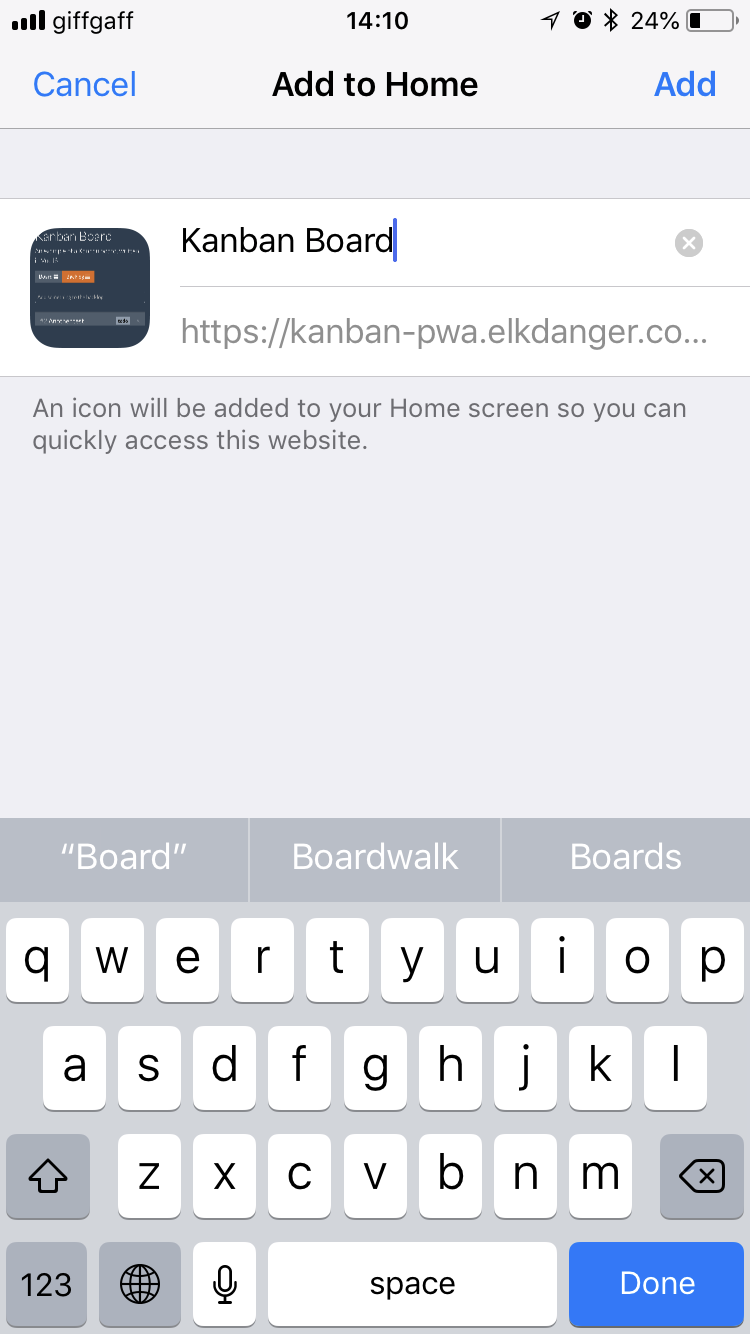
Then you have the opportunity to tweak the application name:
Finally, running the application from the home screen removes all of the browser chrome, making it feel more like an integrated app.

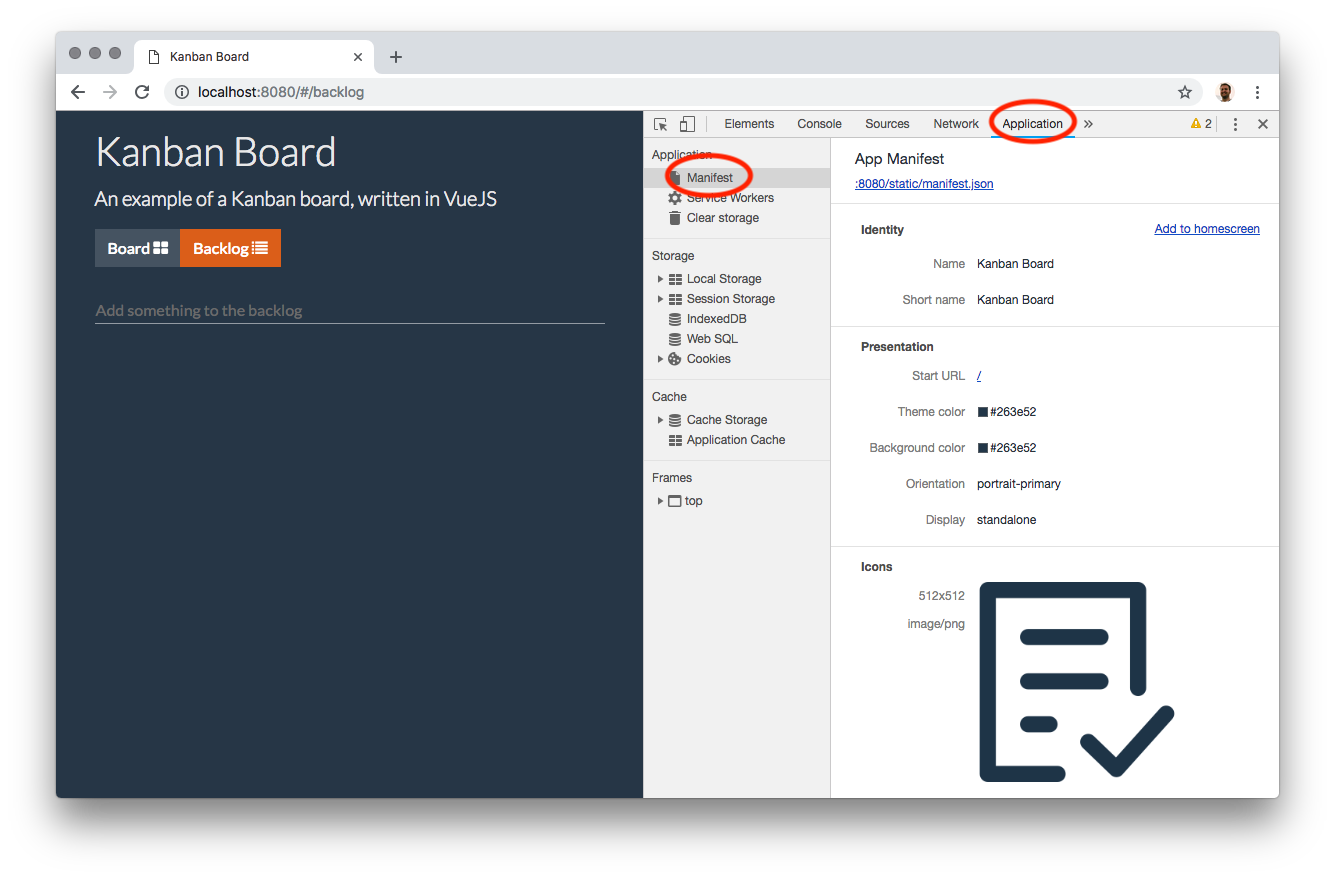
In Chrome, there is a further way to test that the manifest file is being registered correctly. With the application loaded in Chrome, open the Chrome Developer Tools, switch to the Application tab and click the Manifest tab on the left. All the information about your manifest file and any registered icons should appear here. Chrome will even warn you if something doesn't look quite right.
Creating an Install Prompt
Chrome on Android goes a little bit further in that it can raise DOM events inside your application which you can use to prompt your users to install your application, increasing engagement with your users and a better user experience. This event has limited support right now and it's not on the standards track, so do not rely on its availability. However, if you are looking to integrate a similar feature into your application, let's see how it's done.
The general workflow is as follows:
- If the application can be installed locally, the browser raises the
beforeinstallpromptevent on thewindowobject - We present some UI to the user, prompting them to install the application
- If they choose to install the application, we call the
promptmethod on the event object given to us in step 1, which causes the browser to do its thing and install the app
This is known as the deferred flow. This flow is necessary because prompt can only be called as a result of the user performing some gesture or action (such as a button click) and cannot be called on behalf of the user without some kind of interaction from them.
It's worth noting at this point that the beforeinstallprompt is only fired if the browser is satisfied that the application can be installed locally. In the case of Chrome, there are a few properties of your manifest file that must hold to in order to determine if the application can be installed. These are:
- It must have
nameorshort_namepopulated - It must have at least 512px and 192px icons
start_urlmust be set- The
displayfield must be set tostandalone,fullscreenorminimal-ui
In addition to the manifest file criteria, the event is only fired if the following are also true:
- You are serving the application over HTTPS
- The application is not already installed
- You have a service worker that handles the
fetchevent
Creating the install prompt component
Let's create this as a new component and display it at the top of the application. Create a new file in the components folder called InstallPrompt.vue. Start populating it by adding the template:
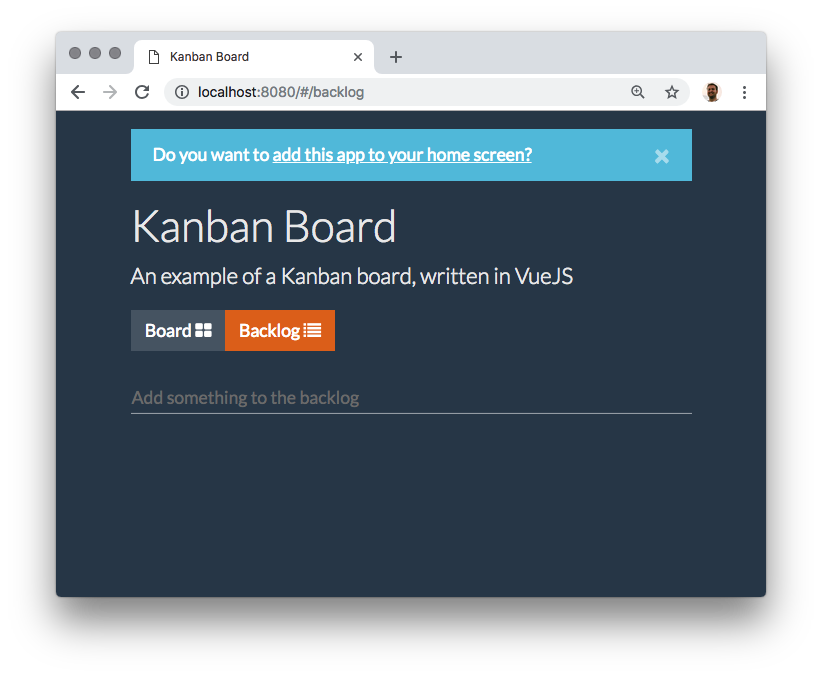
<!-- src/components/InstallPrompt.vue --> <template> <div class="alert alert-dismissible alert-info" v-if="showInstallBanner"> <button type="button" class="close" data-dismiss="alert">×</button> Do you want to <a href="#" @click.prevent="install">add this app to your home screen?</a> </div> </template>
This is just a standard Bootstrap alert box. The real functionality is encapsulated in the install function, which executes when the user clicks the link. Note that this alert is only shown to the user if showInstallBanner is true; this value is driven from our event handler when the beforeinstallprompt event is raised by the browser.
Underneath the template, add the functionality for installing the application inside a script tag:
<script>
// src/components/InstallPrompt.vue
let installEvent;
export default {
  name: 'installPrompt',
  data() {
    return {
      showInstallBanner: false
    };
  },
  created() {
    window.addEventListener('beforeinstallprompt', e => {
      e.preventDefault();
      installEvent = e;
      this.showInstallBanner = true;
    });
  },
  methods: {
    install() {
      this.showInstallBanner = false;
      installEvent.prompt();
      installEvent.userChoice.then(() => {
        installEvent = null;
      });
    }
  }
};
</script>
This component works by handling beforeinstallprompt when it is raised on the window object. If that event is fired, we first prevent the default action, we save the event object for later and we then set showInstallBanner to true (note that this flag is false by default). This mechanism of saving the event object for later is part of the deferred flow we talked about earlier; calling prompt on this object now would not work as we're not currently in the context of a user action or gesture.
At some point later, when the user clicks the link to install the application, the install method is called which in turn calls installEvent.prompt(). At this point the browser will show its own dialog, asking the user if they really want to install this application. We then get to handle the result of that action by waiting on the userChoice promise. In our case, we can just set installEvent to null and carry on with our business.
The last thing to do is put this new component on the page somewhere. Open up src/App.vue and modify it to include our new InstallPrompt component:
<!-- src/App.vue -->
<template>
  <div id="app">
    <div class="page-header">
      <!-- NEW - put the InstallPrompt component on the page -->
      <install-prompt></install-prompt>
      <h1>Kanban Board</h1>
      <p class="lead">An example of a Kanban board, written in VueJS</p>
    </div>
    <menu-bar></menu-bar>
    <router-view/>
  </div>
</template>
<script>
import MenuBar from '@/components/MenuBar';
// NEW - import the new component
import InstallPrompt from '@/components/InstallPrompt';
// NEW - register the InstallPrompt component
export default {
  name: 'app',
  components: {
    'menu-bar': MenuBar,
    InstallPrompt
  }
};
</script>
<style>
.page-header h1 {
  font-weight: 300;
}
/* NEW - added a bit of padding to the top of the screen */
body {
  padding-top: 1rem;
}
</style>
These changes just amount to the normal component registration changes that you've done before. Note that I've tweaked the styles a little just to add a bit of padding to the top of the screen.
With the component in place, you should be able to load the application in the browser and the banner will not be visible. There are a couple of ways you can test its functionality. One is to load the site on an Android phone (you'll need to host it with an SSL certificate), or you can use Chrome Desktop.
“I just added an 'install to desktop' feature to my Vue.js application!”
Tweet This
Testing using Chrome Desktop
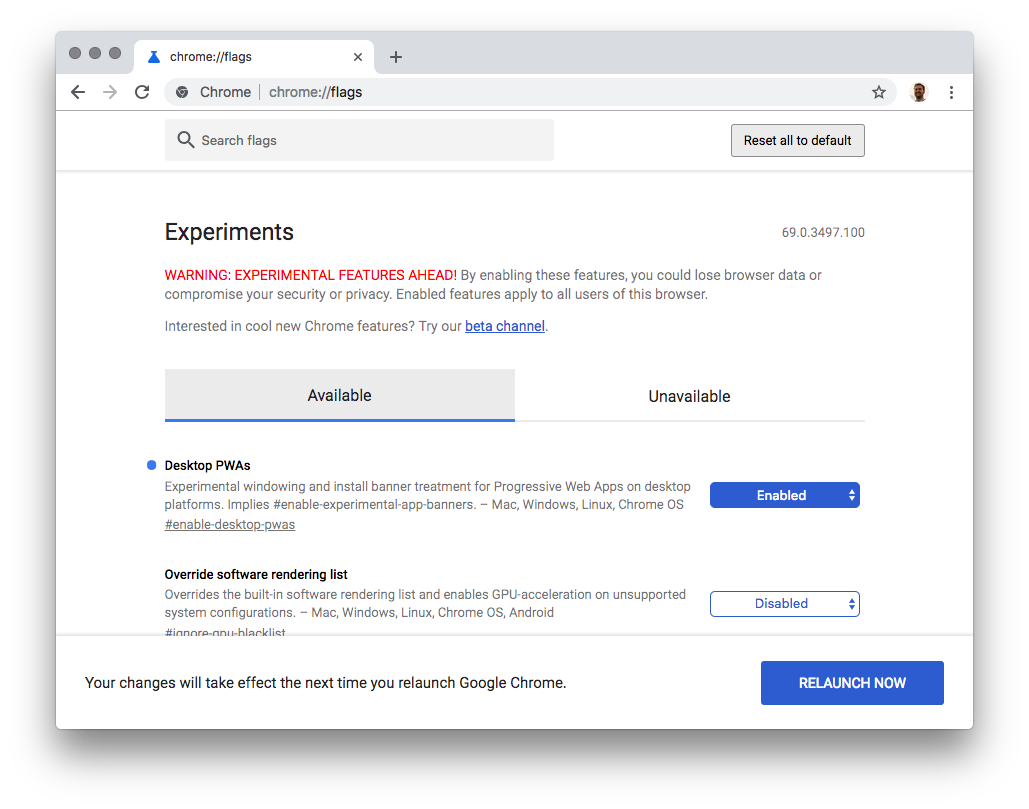
To test using Chrome Desktop, we need to turn on a Chrome Flag to allow it to install applications locally. To do this, browse to chrome://flags in the address bar and search for 'Desktop PWAs'. Once you've found the flag, make sure it is enabled and then click the button to relaunch the browser.
Now, when you refresh our Kanban Board application in the browser, the banner to install the application should appear and allow you to install the application to your machine.
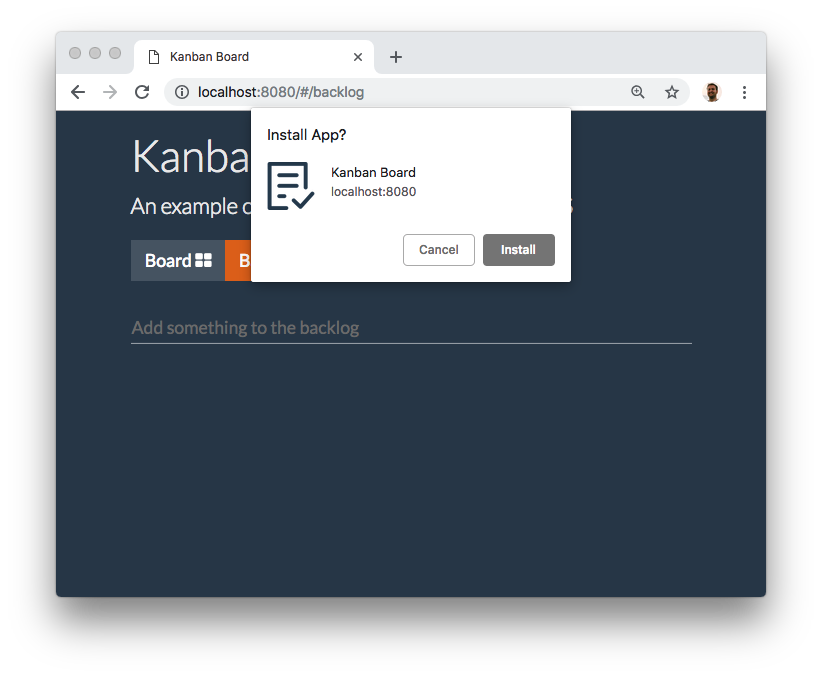
Clicking the link to install the application will invoke Google Chrome's own UI for installing the application to the user's machine as a Chrome App.
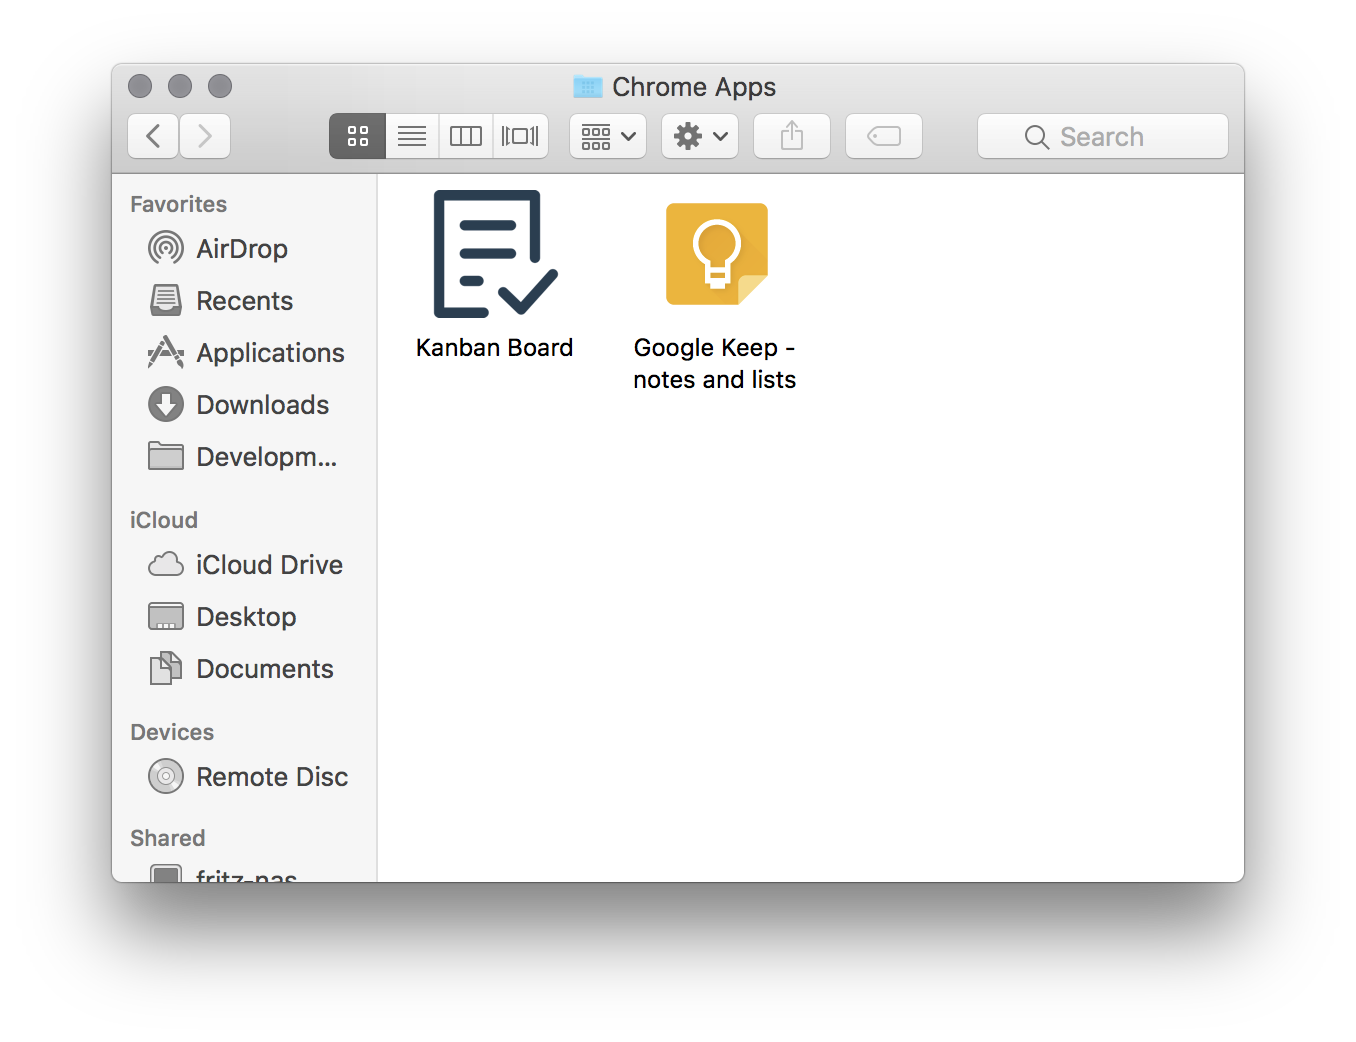
The application then becomes available in the normal place for Chrome Apps on your operating system.
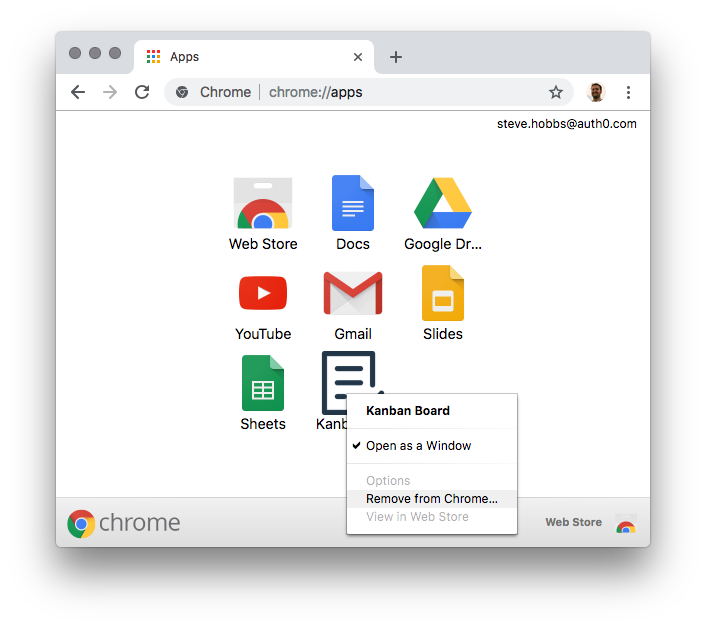
When looking at your application, you should no longer see the install prompt at the top of the page as the application is now installed, and the beforeinstallprompt will not fire. To test that flow again, you will first have to uninstall the application in Chrome Apps so that the event will fire, causing the install prompt to appear once more. To uninstall the application, browse to chrome://apps, right-click on the application icon and select "Remove from Chrome"
Using Lighthouse to Test Your PWA
As a final note, I also wanted to mention a very useful tool that exists as part of the Chrome Developer Tools — Lighthouse. Lighthouse can be used to examine various aspects of any website, including SEO, accessibility, performance, and Progress Web App capabilities. It gives you a score in each of these areas with suggestions for improvement, or things that should be fixed in order to increase your score.
To run it, browse to the Kanban Board application locally and open Chrome Developer Tools and open the Audits tab. You will be able to toggle various tests that you might be interested in, and also whether the CPU is throttled during the test. You might want to use CPU throttling if you're interested in seeing how your application performs on slower devices.
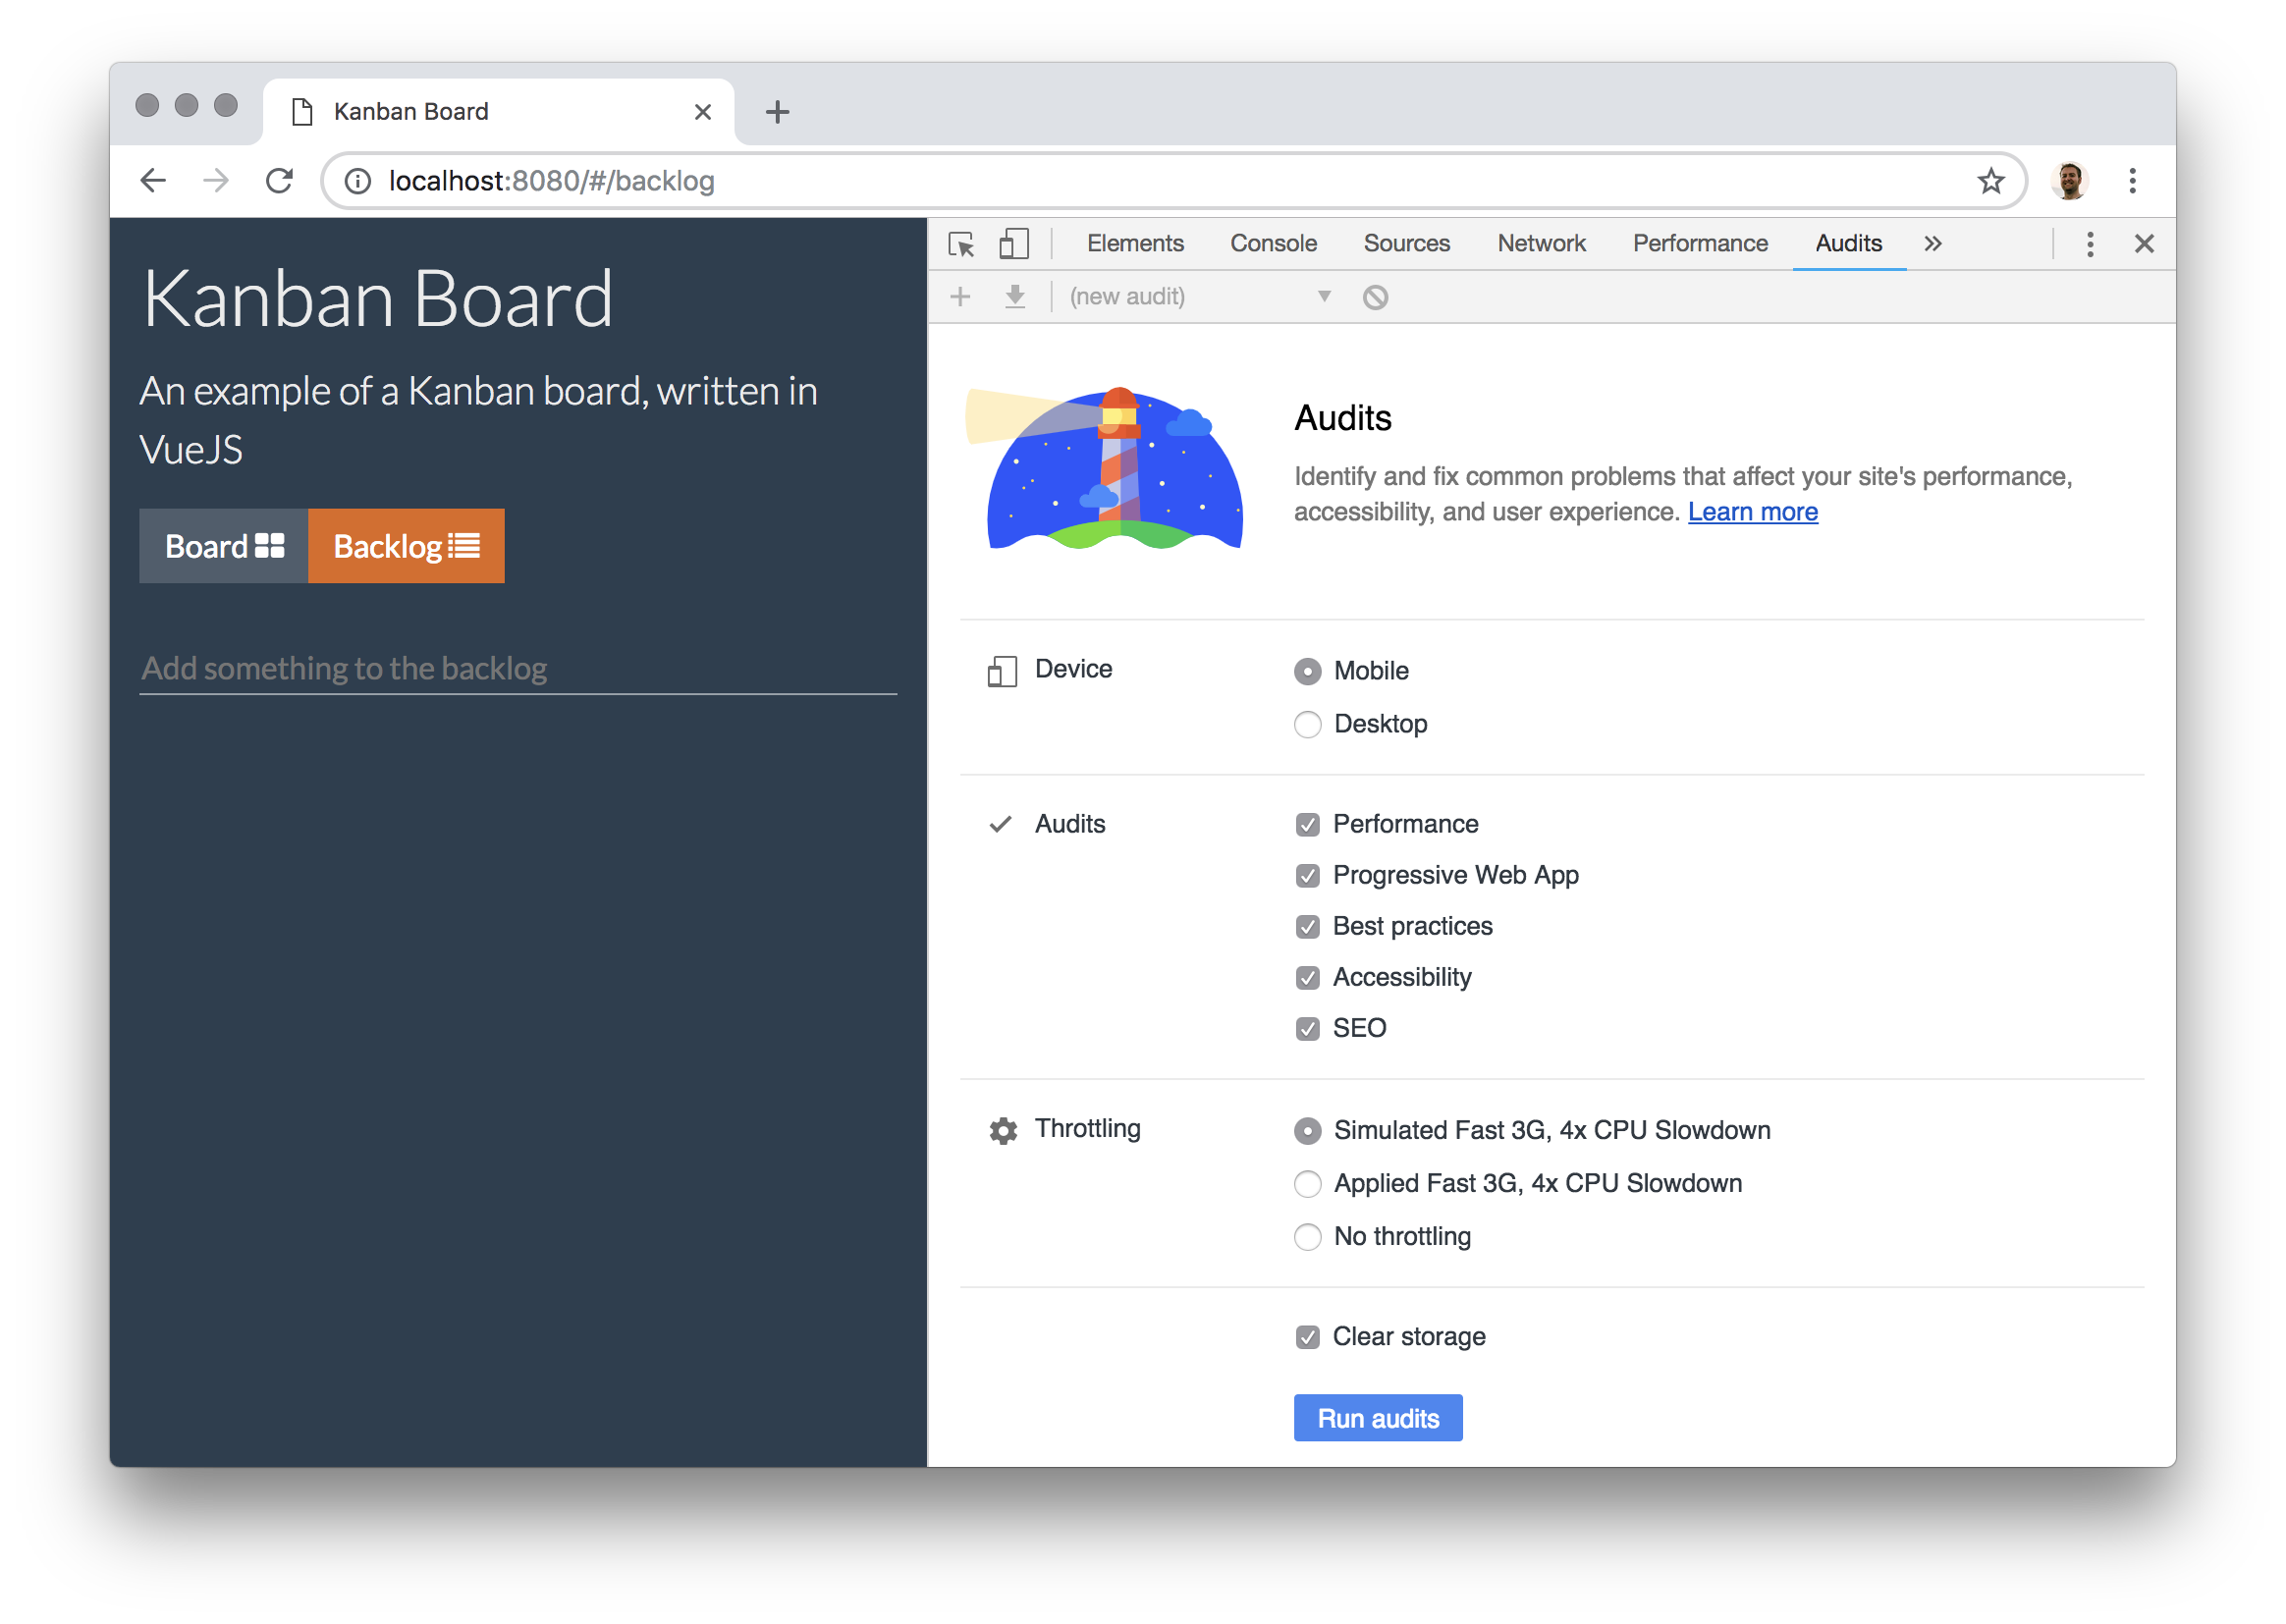
Clicking the "Run Audits" button will start the tests, and after a few seconds, you should have your results.

In the screenshot above, we have clear indicators that we've done a good job with implementing PWA features, SEO and followed some good practices, but not such a good job on performance or accessibility. Drilling down into each section gives you more detail about the score, which audits passed successfully, and which of those weren't so successful. Let's dig into the PWA score to see how we could improve that.
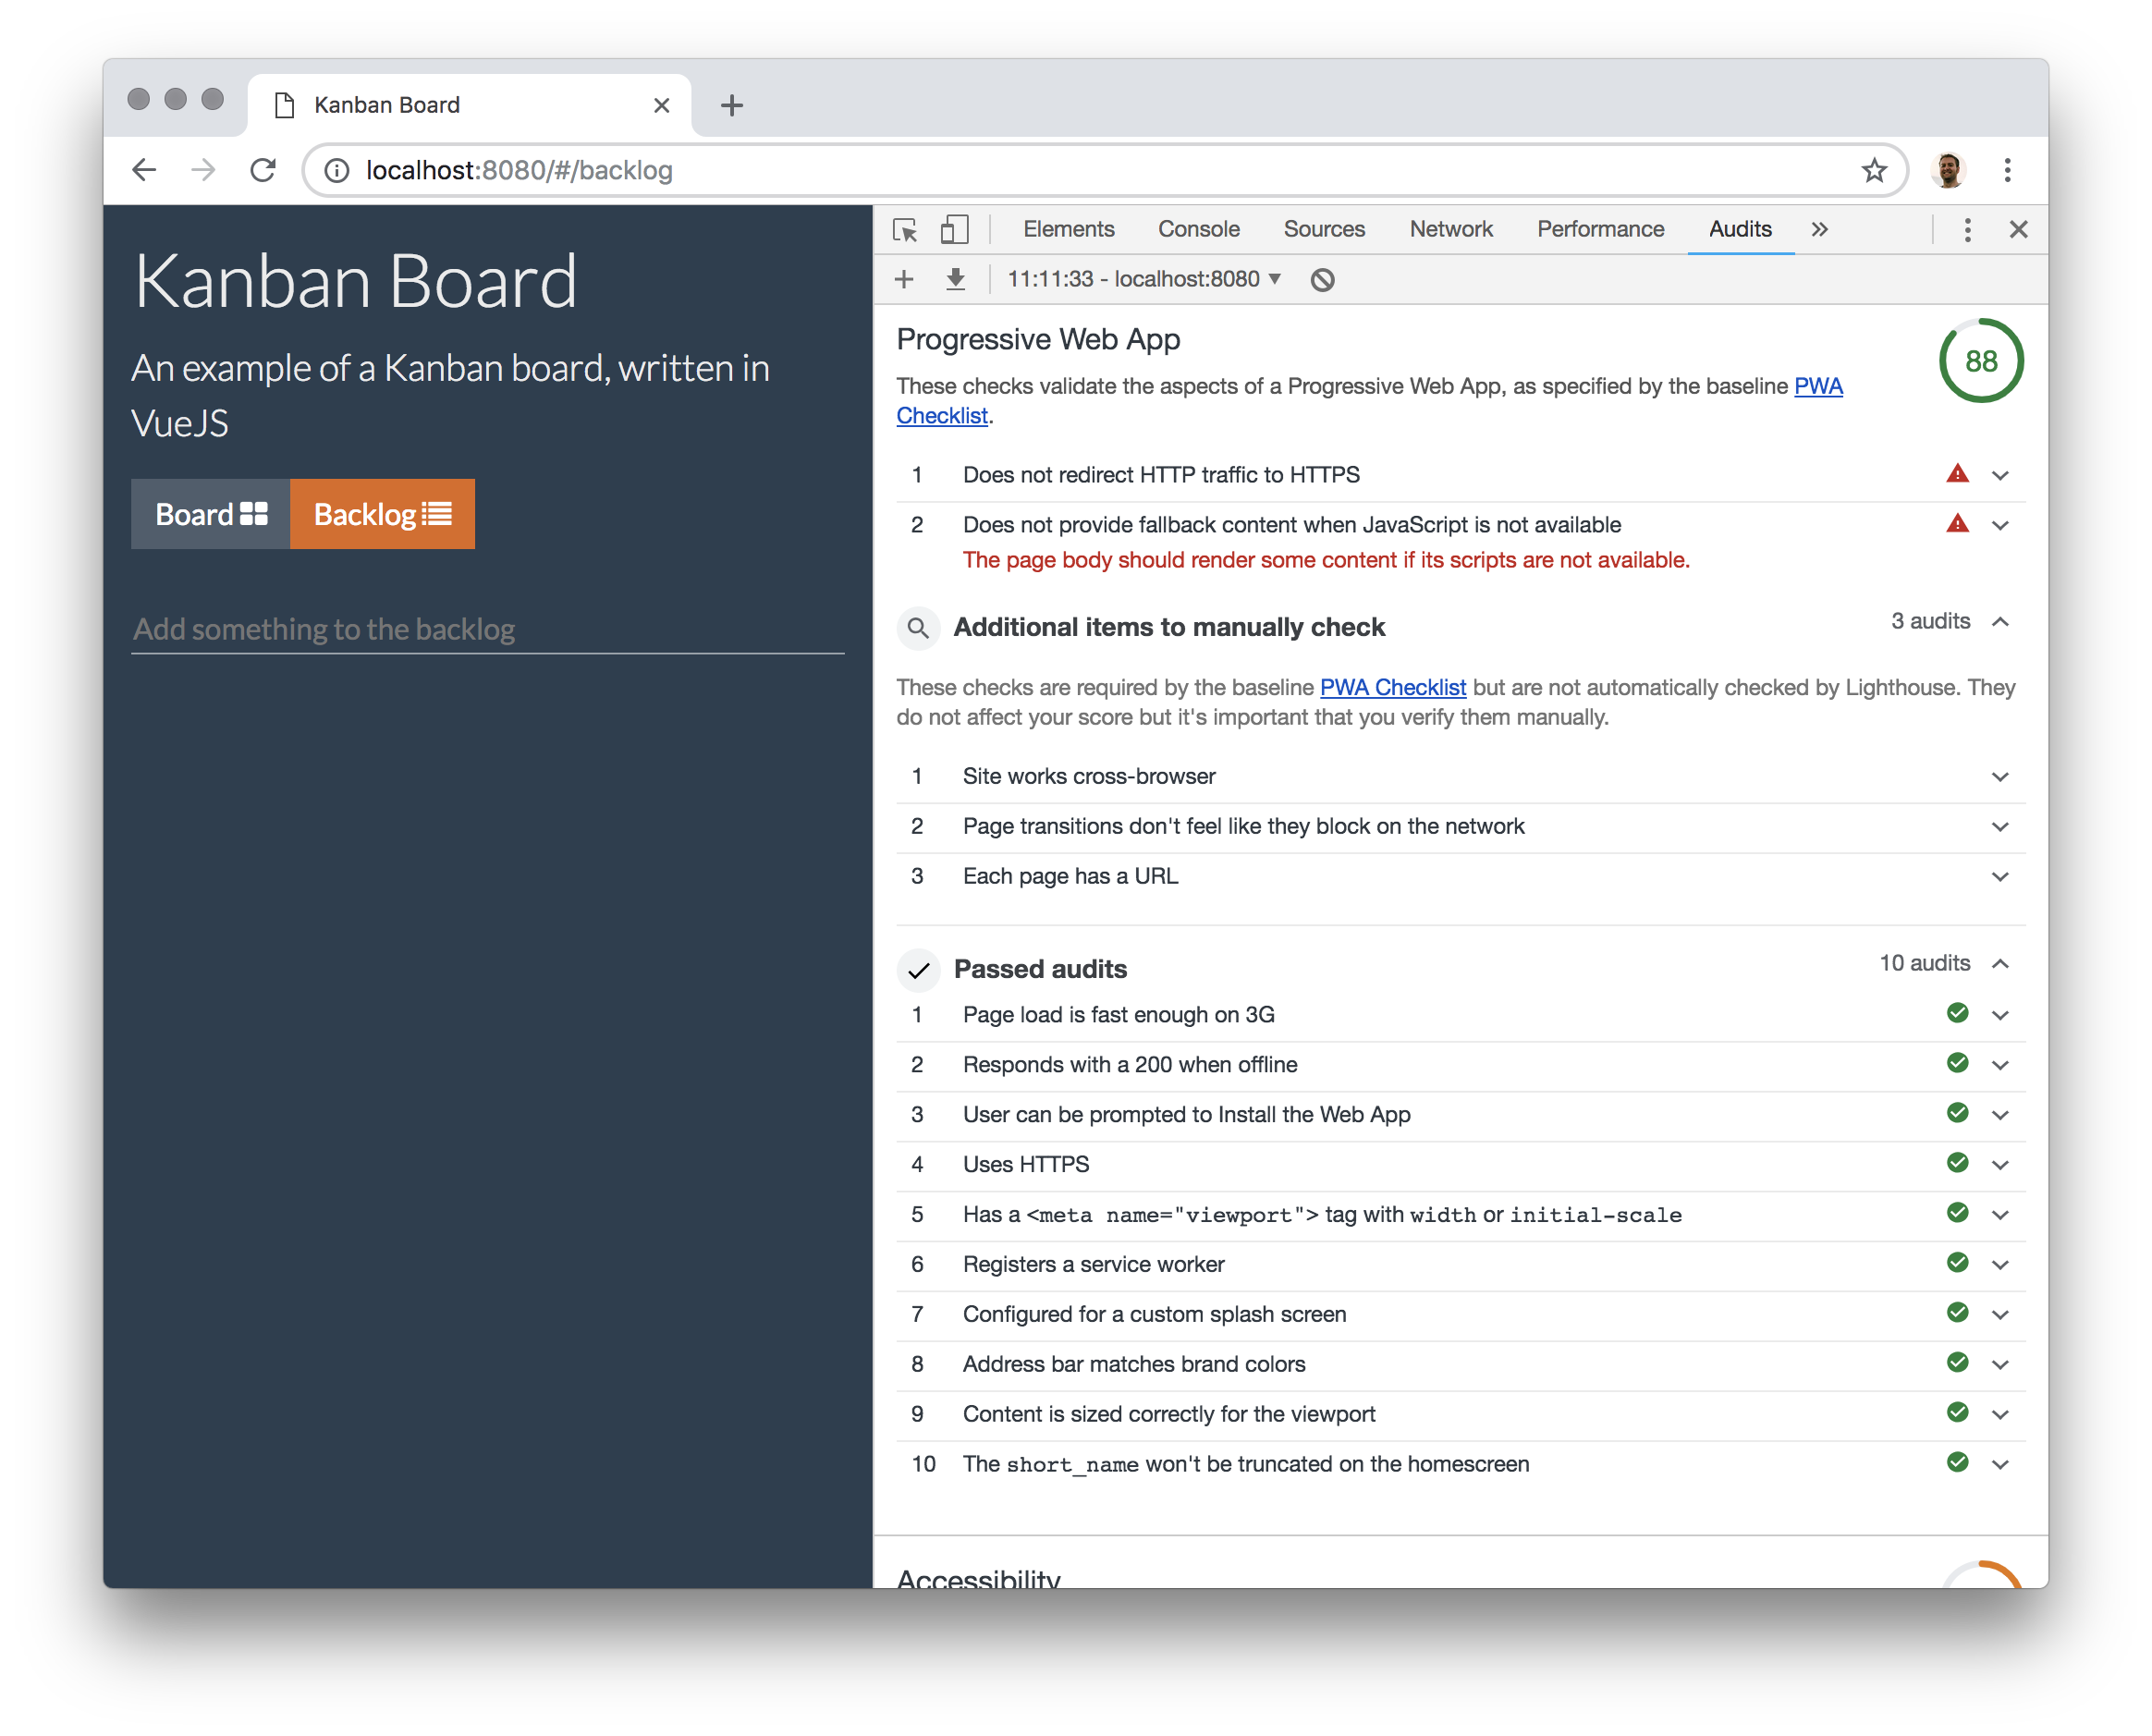
While we have a good score of 88 on the PWA front, the audit has flagged two things that would improve our score, both of which are fairly easy to solve:
- Serving content over HTTPS
- Providing a fallback when JavaScript is not available (even if it's just a message that says "JavaScript must be enabled")
What's also interesting about this report is the level of detail it goes into when checking your application for PWA compliance, as you can see by the "Passed audits" report, as well as the manual checks that it suggests be performed in order to make sure that your application is the most compliant that it can be.
Aside: Authenticate a Vue App
Using Auth0, you can protect your applications so that only authenticated users can access them. Let's explore how to authenticate a Vue application.
If you would like to have a more in-depth explanation of protecting a Vue application, you can follow this fantastic article: Beginner Vue.js Tutorial with User Login.
Setting up Auth0
To begin, you will need an Auth0 account. You can sign up for a free Auth0 account here. Once you are logged in, follow these steps to set up an Auth0 application.
- Go to your Auth0 Dashboard and click the "+ CREATE APPLICATION" button.
- Name your new app and select "Single Page Web Applications". Hit "Create".
- In the Settings for your new Auth0 application, add
http://localhost:8080to the Allowed Callback URLs, Allowed Logout URLs, Allowed Web Origins. Hit "Save Changes" at the bottom of the page.
Vue application
You will need to install the Auth0 auth0-spa-js SDK. To do so, run the following command:
npm install @auth0/auth0-spa-js
Next, within your src/ folder, create an auth folder. Within the auth folder, create a file named index.js. You should now have a path that is src/auth/index.js.
Within that newly created file, paste in the following code:
// src/auth/index.js

import Vue from 'vue';
import createAuth0Client from '@auth0/auth0-spa-js';

/** Define a default action to perform after authentication */
const DEFAULT_REDIRECT_CALLBACK = () =>
  window.history.replaceState({}, document.title, window.location.pathname);

let instance;

/** Returns the current instance of the SDK */
export const getInstance = () => instance;

/** Creates an instance of the Auth0 SDK. If one has already been created, it returns that instance */
export const useAuth0 = ({
  onRedirectCallback = DEFAULT_REDIRECT_CALLBACK,
  redirectUri = window.location.origin,
  ...options
}) => {
  if (instance) return instance;

  // The 'instance' is simply a Vue object
  instance = new Vue({
    data() {
      return {
        loading: true,
        isAuthenticated: false,
        user: {},
        auth0Client: null,
        popupOpen: false,
        error: null,
      };
    },
    methods: {
      /** Authenticates the user using a popup window */
      async loginWithPopup(o) {
        this.popupOpen = true;

        try {
          await this.auth0Client.loginWithPopup(o);
        } catch (e) {
          // eslint-disable-next-line
          console.error(e);
        } finally {
          this.popupOpen = false;
        }

        this.user = await this.auth0Client.getUser();
        this.isAuthenticated = true;
      },
      /** Handles the callback when logging in using a redirect */
      async handleRedirectCallback() {
        this.loading = true;
        try {
          await this.auth0Client.handleRedirectCallback();
          this.user = await this.auth0Client.getUser();
          this.isAuthenticated = true;
        } catch (e) {
          this.error = e;
        } finally {
          this.loading = false;
        }
      },
      /** Authenticates the user using the redirect method */
      loginWithRedirect(o) {
        return this.auth0Client.loginWithRedirect(o);
      },
      /** Returns all the claims present in the ID token */
      getIdTokenClaims(o) {
        return this.auth0Client.getIdTokenClaims(o);
      },
      /** Returns the access token. If the token is invalid or missing, a new one is retrieved */
      getTokenSilently(o) {
        return this.auth0Client.getTokenSilently(o);
      },
      /** Gets the access token using a popup window */

      getTokenWithPopup(o) {
        return this.auth0Client.getTokenWithPopup(o);
      },
      /** Logs the user out and removes their session on the authorization server */
      logout(o) {
        return this.auth0Client.logout(o);
      },
    },
    /** Use this lifecycle method to instantiate the SDK client */
    async created() {
      // Create a new instance of the SDK client using members of the given options object
      this.auth0Client = await createAuth0Client({
        domain: options.domain,
        client_id: options.clientId,
        audience: options.audience,
        redirect_uri: redirectUri,
      });

      try {
        // If the user is returning to the app after authentication...
        if (
          window.location.search.includes('code=') &&
          window.location.search.includes('state=')
        ) {
          // handle the redirect and retrieve tokens
          const { appState } = await this.auth0Client.handleRedirectCallback();

          // Notify subscribers that the redirect callback has happened, passing the appState
          // (useful for retrieving any pre-authentication state)
          onRedirectCallback(appState);
        }
      } catch (e) {
        this.error = e;
      } finally {
        // Initialize our internal authentication state
        this.isAuthenticated = await this.auth0Client.isAuthenticated();
        this.user = await this.auth0Client.getUser();
        this.loading = false;
      }
    },
  });

  return instance;
};

// Create a simple Vue plugin to expose the wrapper object throughout the application
export const Auth0Plugin = {
  install(Vue, options) {
    Vue.prototype.$auth = useAuth0(options);
  },
};
The comments in this file go over what each section does. To find more details about this file, please visit this blog post section.
Connecting Auth0 and the Vue application
To connect your Auth0 app and your Vue app, you will need to bring over some data from your Auth0 app that you set up earlier. You will want those values protected. To do so, create a file named auth_config.json in the root of your Vue application. Then in the .gitignore, you will want to put that newly created file in there.
In that file, put the following values:
// auth_config.json

{
  "domain": "your-domain.auth0.com",
  "clientId": "yourclientid"
}
Back in your Auth0 dashboard, click on the Settings tab of your Auth0 application. You will find the values "Domain" and "Client ID". Copy and paste those values into this file.
Using authentication globally in Vue
To use this authentication globally within the Vue app, you need to update the src/main.js file. Delete everything in the file and replace with the following code:
// src/main.js

import Vue from 'vue';
import App from './App.vue';
import router from './router';

// Import the Auth0 configuration
import { domain, clientId } from '../auth_config.json';

// Import the plugin here
import { Auth0Plugin } from './auth';

// Install the authentication plugin here
Vue.use(Auth0Plugin, {
  domain,
  clientId,
  onRedirectCallback: (appState) => {
    router.push(
      appState && appState.targetUrl
        ? appState.targetUrl
        : window.location.pathname,
    );
  },
});

Vue.config.productionTip = false;

new Vue({
  router,
  render: (h) => h(App),
}).$mount('#app');
Log in and log out buttons
In order to use all this, you will want to add "Log In" and "Log Out" buttons. To do that, wherever you would like your buttons to be in your application, add this code within the <template> section of that file:
<div v-if="!$auth.loading">
  <!-- show login when not authenticated -->
  <a v-if="!$auth.isAuthenticated" @click="login">Log in</a>
  <!-- show logout when authenticated -->
  <a v-if="$auth.isAuthenticated" @click="logout">Log out</a>
</div>
In that same file within the <script> tag, add in these methods:
<script>
  export default {
    name: 'App',
    methods: {
      // Log the user in
      login() {
        this.$auth.loginWithRedirect();
      },
      // Log the user out
      logout() {
        this.$auth.logout({
          returnTo: window.location.origin,
        });
      },
    },
  };
</script>
You now have the necessary code to authenticate your Vue.js application!
More resources
Wrapping Up
Over the course of this article, we improved the original Kanban Board application to include persistent data storage using local storage, as well as added the facility to delete items from the data. We then advanced to looking at service workers and how we could implement one to allow our application to work offline using the Cache API. We then looked at creating a manifest file, and techniques for installing our application to local devices, as well as testing our application for correctness in terms of being a PWA.
Further Reading and References
About the author

Steve Hobbs
Developer Experience Engineer