

TL;DR: This article is the first part of a two-part series tutorial in which you will learn how to build modern web apps using Vue.js, Spring Boot, Kotlin, and GraphQL. In addition, you will also learn how to secure your backend and frontend apps using Auth0. For a quick glance at the application you will be building in this series, check this GitHub repository.
“Learn how to build modern web apps using Vue.js for the frontend and a Spring Boot, Kotlin, GraphQL API for the backend.”
Tweet This
Prerequisites
To effectively follow this tutorial, you will need the following tools installed on your system:
- JDK: Since Kotlin is a JVM based language and you will bootstrap Spring Boot with JDK 8, you need to have installed JDK 8 or above. If you don't have it installed, you can get it here
- Node.js and NPM for your frontend development. If you don't have Node.js installed, checkout this resource. To check if you have it installed run
node -vin your command line and you should see the version of Node.js that was installed. Don't worry about NPM, most Node.js installations come with NPM. - Vue CLI: Install it using this resource if you don't already have it. This page also shows you how to inspect which version of Vue is installed on your system. Vue CLI is a command line tool for scaffolding Vue.js apps. It is Vue's equivalent of Create React App for React.js.
- Finally, any text editor or IDE of your choice, though I will recommend VSCode or IntelliJ IDEA.
In addition to these tools, this tutorial assumes beginner knowledge in Spring Boot and Kotlin, Vue.js, Vuex, and Vue Router.
Modern Web App Architecture
Most modern web apps are built as Single Page Applications (SPA) which communicate with a backend API. Why SPA? SPAs are broswer-based apps where the server provides a single template to the browser and JavaScript is used to dynamically render other pages. Although SPAs usually take some time on initial page load, they provide a sleek user experience after the initial page load. For content updates, SPAs rely on querying a backend API with JavaScript. Traditionally, APIs have been designed following the REST pattern, nowadays many people build their APIs using GraphQL mostly because its efficiency compared to REST. This is because GraphQL can convert multiple back-to-back REST API request into one API request.
Why Kotlin and Vue.js?
- Kotlin because it provides great developer productivity.
- Vue.js because of its good documentation.
What You Will Build
In this series, you will be building a "Movie Review Board" app which will be an application where users can see their favorite movies with their directors and rate them. As you might have guessed from the title of series, you will build a SPA with Vue.js, Vuex, Vue Router, Vue's Event Bus and a backend API with Spring Boot, Kotlin and GraphQL.
Bootstrap Your Spring Boot Application
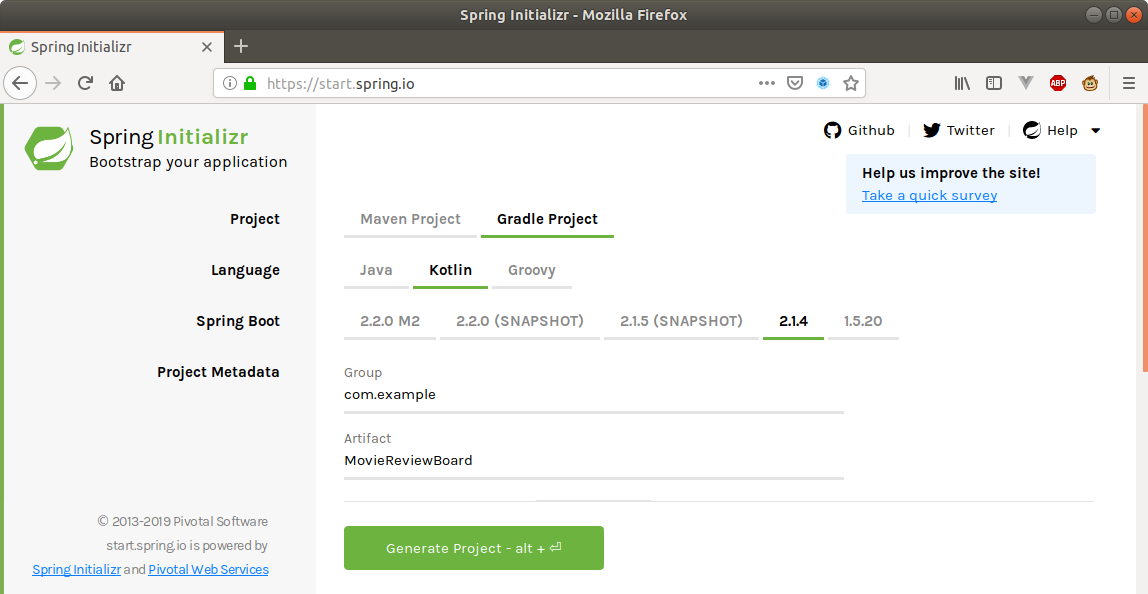
Now that you have an idea on what you will build, head to Spring Initializr and select the tools and libraries you will need. On the Spring Initializr page, the form should have the following items selected:
- Project: Gradle Project
- Language: Kotlin
- Spring Boot: 2.1.5
- Group: com.example
- Artifact: MovieReviewBoard
Then, in the "Dependencies" section, use the search box to include: the Web, H2 and JPA libraries.
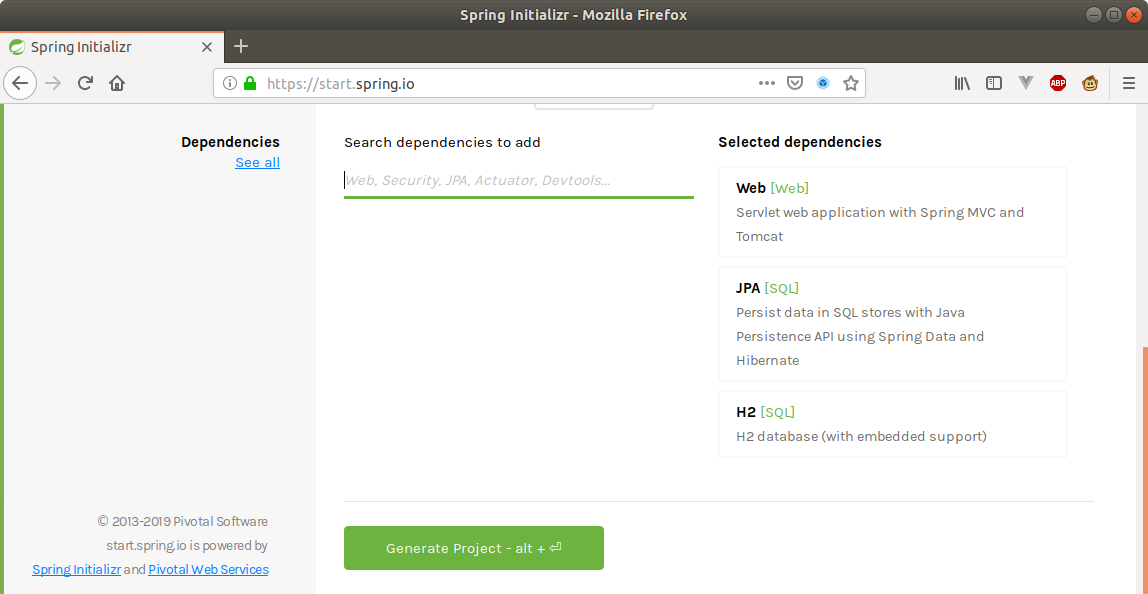
Now, go ahead and generate your project. This will download a .zip file in your browser. Unzip this folder and create a backend folder in it. The path to this backend folder should be MovieReviewBoard/backend. Then put all the content of your MovieReviewBoard folder in the backend folder. You can now load the content of the backend folder into your favorite Spring Boot IDE.
Note: By default, the servlet container in Spring Boot listens on port 8080, therefore your system will not allow any other program to listen on that port. Unfortunately, Webpack (the server used by Vue.js) also runs on port 8080 so your system will not allow you to run both programs at the same time. To solve this problem, go to
/MovieReviewBoard/backend/src/main/resources/application.propertiesfile in your app and addserver.port=8888to it. Now Spring Boot will listen on port 8888 instead of 8080. Next, create a helloworld endpoint in your Spring Boot app by creating aHelloWorldController.ktin yourcom.example.MovieReviewBoardpackage. After adding the linepackage com.example.MovieReviewBoardto the top of that new file, add in the following code:.
import org.springframework.boot.web.servlet.FilterRegistrationBean
import org.springframework.context.annotation.Bean
import org.springframework.core.Ordered
import org.springframework.web.bind.annotation.GetMapping
import org.springframework.web.bind.annotation.RestController
import org.springframework.web.cors.CorsConfiguration
import org.springframework.web.cors.UrlBasedCorsConfigurationSource
import org.springframework.web.filter.CorsFilter
import java.util.*
import javax.servlet.Filter

@RestController
class HelloWorldController {

    @GetMapping("/helloworld")
    fun greet(): String {
        return "helloworld!"
    }

    @Bean
    fun simpleCorsFilter(): FilterRegistrationBean<*> {
        val source = UrlBasedCorsConfigurationSource()
        val config = CorsConfiguration()
        config.allowCredentials = true
        // *** URL below needs to match the Vue client URL and port ***
        config.allowedOrigins = Collections.singletonList("http://localhost:8080")
        config.allowedMethods = Collections.singletonList("*")
        config.allowedHeaders = Collections.singletonList("*")
        source.registerCorsConfiguration("/**", config)
        val bean = FilterRegistrationBean<Filter>(CorsFilter(source))
        bean.setOrder(Ordered.HIGHEST_PRECEDENCE)
        return bean
    }
}
Note: The
simpleCorsFilter()method adds cross-origin support to your backend API. This method sets theAccess-Control-Allow-Originheader on HTTP responses sent by your server. Setting the value of this header tohttp://localhost:8080signals the browser that it is okay for this domain to make a request to your server. With that in place, run your backend server by executing./gradlew bootRuninMovieReviewBoard/backend/via the command line or running it in your IDE. If you now visit http://localhost:8888/helloworld in your browser you should see the following page.

Bootstrap Your Vue.js App
Now that you have the building blocks of your backend, you have to scaffold your frontend application with Vue CLI. Make sure you have Vue CLI installed as per the instructions in the prerequisites section above. To scaffold the app, open your terminal and navigate to the MovieReviewBoard directory and execute the following command:
vue create frontend
This will create a dialog in your terminal with setup questions which you should answer as follows:
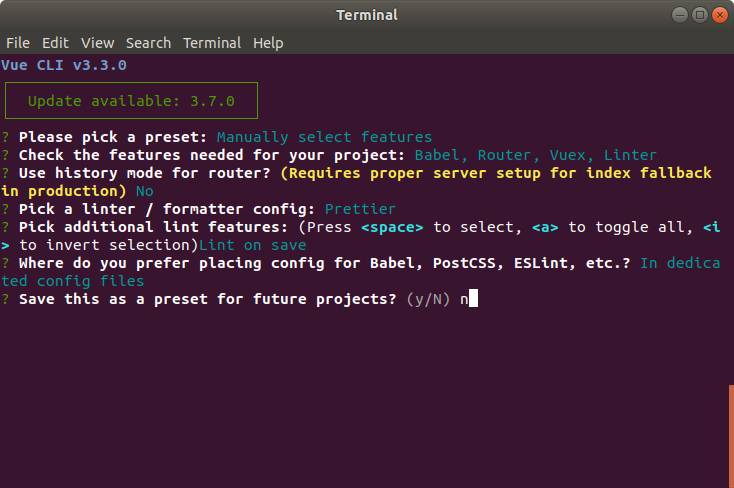
Once you validate the answer to the last question, the Vue CLI will generate a frontend folder with your Vue app in it. Now, go ahead and add a button that consumes the helloworld endpoint of your backend API. To do this, you need to change the MovieReviewBoard/frontend/src/views/About.vue page as follows:
<template>
<div class="about">
<h1>This is an about page</h1>
<button @click="callAPI">Call API</button>
<h2>{{ greeting }}</h2>
</div>
</template>
<script>
import axios from "axios";
export default {
name: "about",
data() {
return {
greeting: ""
};
},
methods: {
callAPI() {
axios
.get("http://localhost:8888/helloworld")
.then(resp => {
this.greeting = resp.data;
})
.catch(err => {
this.greeting = err;
});
}
}
};
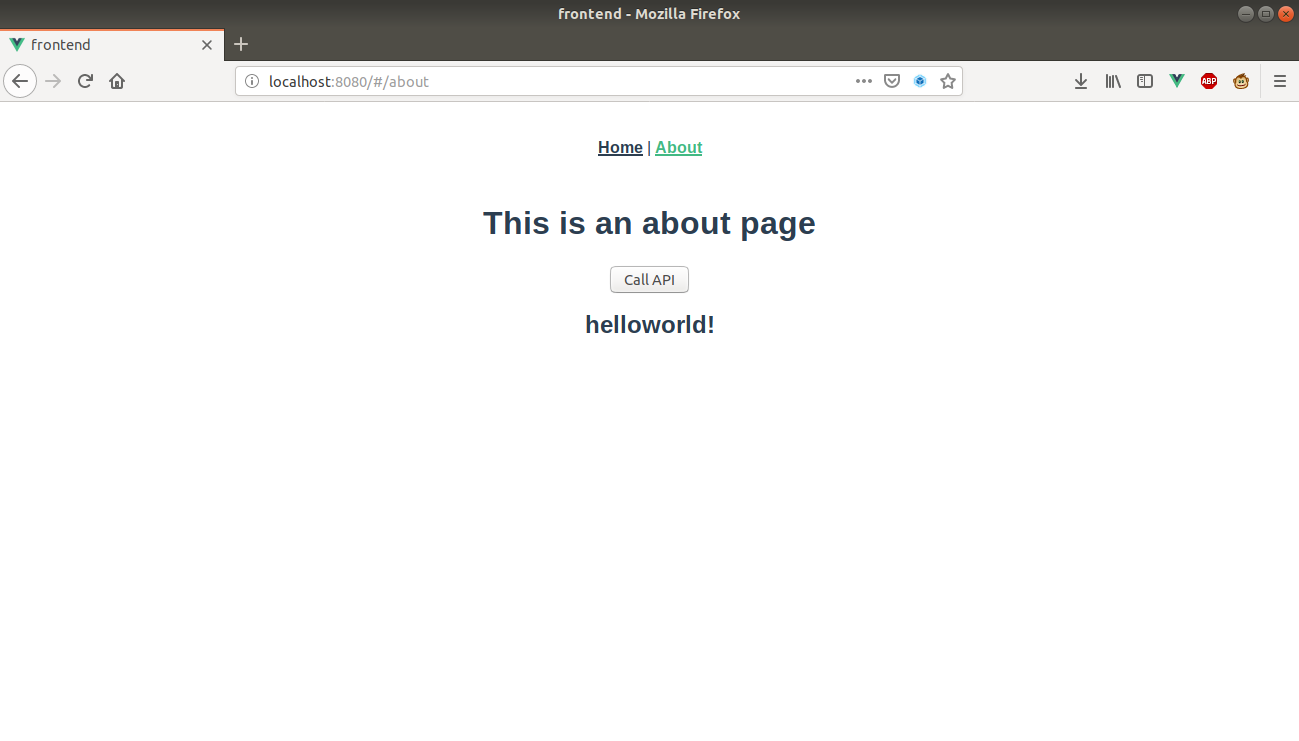
</script>The .vue file above adds a button to the template of the About page and it also adds the callAPI() method as an onClick event handler for this button when it sets the @click attribute to callAPI. When the callAPI method is called, it calls your helloworld endpoint from your backend and updates the greeting data attribute which reactively updates your template with the helloworld! message. Before you test this, add axios (the HTTP client module used in callAPI() to make calls to your backend API). Move to your MovieReviewBoard/frontend/ directory on your command line and run:
npm install axios --save
With these changes in place, start your frontend server by running npm run serve in MovieReviewBoard/frontend/ and your backend server by executing ./gradlew bootRun in MovieReviewBoard/backend/ via the command line or running it in your IDE. Once both servers are running, navigate to your browser at http://localhost:8080/#/about and click on the Call API button and you will see the helloworld message from the server.
Securing Spring Boot and Vue.js Applications
Now, you need to secure your API because as it stands anyone can access your backend and this is not good for your business. To secure your API you will need an identity provider like Auth0. In order to use Auth0 for security, you will need to create an account if you don't already have one or log in if you have one.
After signing up for your Auth0 account, you will need to create an API with Auth0 to represent your backend API and configure it to authenticate requests. To do this, head to the APIs section on your Auth0 dashboard and click on the Create API button. After that, the dashboard will show you a form where you will have to enter:
- Name: This is just a label for your API (this could be something like Spring Boot Kotlin);
- Identifier: This is the URL identifier of your API (in this case, it can be http://localhost:8888 or anything that resembles a valid URL);
- Signing Algorithm: choose RS256 for this field.
Then finalize the API creation by clicking the Create button. Next, open your backend/build.gradle file and add the following code to it.
// ...

dependencies {
  // ...
  implementation 'org.springframework.security.oauth.boot:spring-security-oauth2-autoconfigure:2.1.3.RELEASE'
}

// ...
This dependency will add functionality for you to secure your API with OAuth 2.0. To add the configuration necessary for using this library you have to do two things, first create a security package in com.example.MovieReviewBoard package and create a SecurityConfig.kt file in it. Then, copy the following code into your SecurityConfig.kt file in com.example.MovieReviewBoard.security.
package com.example.MovieReviewBoard.security

import org.springframework.beans.factory.annotation.Value
import org.springframework.context.annotation.Configuration
import org.springframework.security.config.annotation.web.builders.HttpSecurity
import org.springframework.security.oauth2.config.annotation.web.configuration.EnableResourceServer
import org.springframework.security.oauth2.config.annotation.web.configuration.ResourceServerConfigurerAdapter
import org.springframework.security.oauth2.config.annotation.web.configurers.ResourceServerSecurityConfigurer

@Configuration
@EnableResourceServer
class SecurityConfig : ResourceServerConfigurerAdapter() {

    @Value("${security.oauth2.resource.id}")
    private lateinit var resourceId: String

    @Throws(Exception::class)
    override fun configure(http: HttpSecurity) {
        http.authorizeRequests()
                .mvcMatchers("/helloworld").authenticated()
                .anyRequest().permitAll()
    }

    @Throws(Exception::class)
    override fun configure(resources: ResourceServerSecurityConfigurer) {
        resources.resourceId(resourceId)
    }
}
The @EnableResourceServer annotation above is convenient for resource servers secured with OAuth 2.0. It automatically enables a Spring Security filter that authenticates incoming requests. For Spring Boot to do this, you need to register your Auth0 API identifier aka resourceId and specify which endpoint you want to secure (in this case /helloworld).
Secondly, you need to define the resourceId and an endpoint for your API to get public keys in order to validate access token sent to your API. To do this, open MovieReviewBoard/backend/src/main/resources/application.properties and add the following configuration:
# ...
security.oauth2.resource.id=<YOUR-AUTH0-API-IDENTIFIER>
security.oauth2.resource.jwk.keySetUri=https://<YOUR-AUTH0-DOMAIN>/.well-known/jwks.json
With that covered, the helloworld endpoint of your API is now secured. If you run both applications and then visit http://localhost:8080/#/about in your browser and click on the Call API button, you should see the page display an error message with a 401 status which means you are not authorized to see the content at the helloworld endpoint. Now, your about page should look like the following:

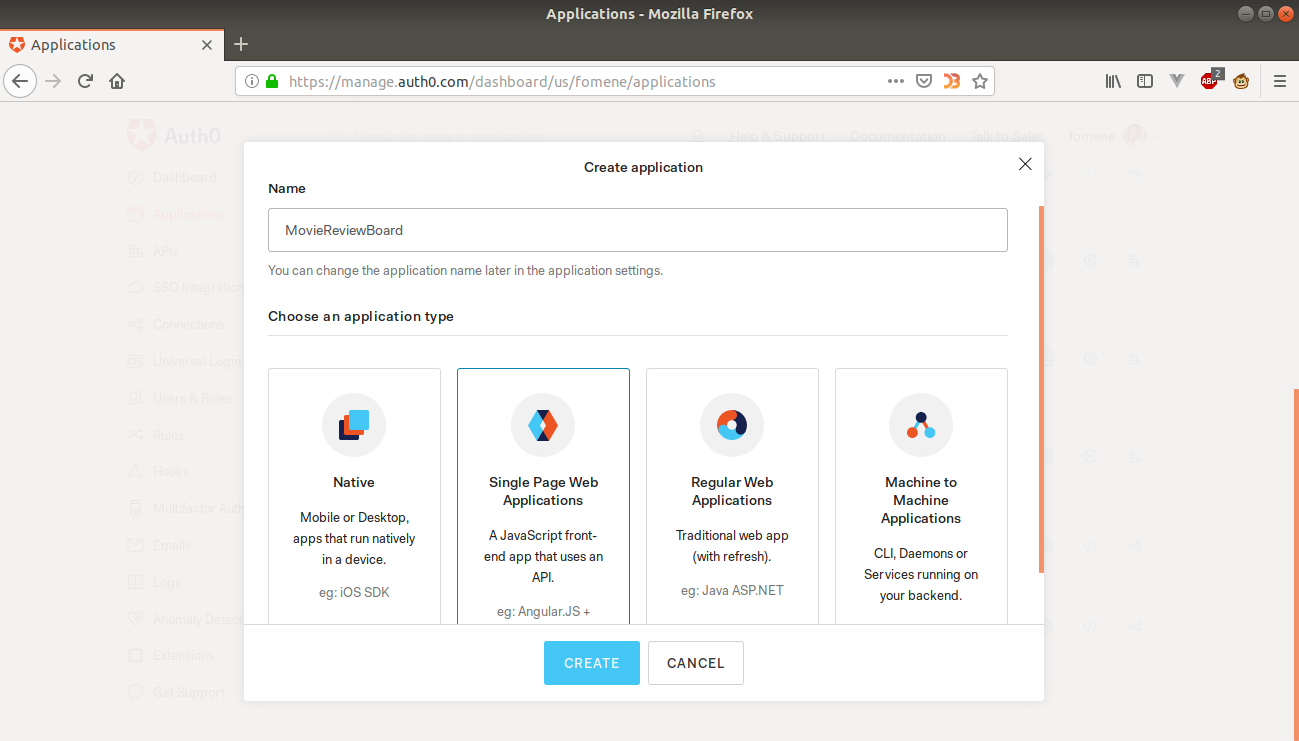
Having secured your API with Auth0, you now need an access token from Auth0 to make any request to your API. To get an access token in your SPA, you also need to secure it with Auth0. To implement authentication in your SPA with Auth0 you need to start by creating an Auth0 application. To do so, head to the Applications page in your Auth0 dashboard and click on Create Application. After clicking on it, Auth0 will show a dialog where you have to input a name for your app (you can call it "MovieReviewBoard" or anything like that) and select SPA for the type of the application.
Now, click on the Create button and then Auth0 will redirect you to the Quick Start section of your new app. From there, click on the Settings tab and add http://localhost:8080/callback to the Allowed Callback URLs field and http://localhost:8080 to the Allowed Web Origins, Allowed Logout URLs and Allowed Origins (CORS) fields. Now, click on Save Changes to save your settings. Next, you need to integrate Auth0 in your SPA. To do this, start by installing auth0.js into your application by running the following command in your project's frontend directory.
npm install --save auth0-js
Now that you have the auth0.js dependency in your project, you need to create an authentication service using it. To do that, create an auth directory in MovieReviewBoard/frontend/ then create an authService.js file in it. Finally, add the following code to authService.js:
import auth0 from "auth0-js";
import authConfig from "../auth_config.json";
import eventBus from "../event-bus";

const webAuth = new auth0.WebAuth({
  domain: authConfig.domain,
  redirectUri: `${window.location.origin}/callback`,
  clientID: authConfig.clientId,
  audience: authConfig.audience,
  responseType: "token id_token",
  scope: "openid profile email"
});

class AuthService {
  accessToken = null;
  idToken = null;
  profile = null;
  tokenExpiry = null;
  // Starts the user login flow
  login(customState) {
    webAuth.authorize({
      appState: customState
    });
  }
  // Handles the callback request from Auth0
  handleAuthentication() {
    return new Promise((resolve, reject) => {
      webAuth.parseHash((err, authResult) => {
        if (err) {
          reject(err);
        } else {
          this.localLogin(authResult);
          resolve(authResult.idToken);
        }
      });
    });
  }
  localLogin(authResult) {
    this.idToken = authResult.idToken;
    this.profile = authResult.idTokenPayload;
    this.accessToken = authResult.accessToken;
    // Convert the JWT expiry time from seconds to milliseconds
    this.tokenExpiry = new Date(this.profile.exp * 1000);
    localStorage.setItem("loggedIn", "true");
    eventBus.$emit("login");
  }
}

export default new AuthService();
As of now, this code might seem like gibberish but let me walk you through it. The above file starts by importing auth0-js authentication library, then a JSON file auth_config.json which contains some of your Auth0 application's settings (don't worry, I will show you how to create this file) and a Vue event bus. Then it creates an Auth0 web authentication instance using the settings in auth_config.json and signals Auth0 to return the id_token, access token and user profile. Here are the functionalities of each method above:
login: Contacts Auth0 to start the login flow.handleAuthentication(): Once Auth0 authenticates you, you will be redirected to theredirectUriwhich was set in your Auth0 web authentication instance and yourid_token,access_tokenandexpires_in(expiration time for the access token) will be provided in your browser's URL. This method will get these values from your URL, parse them and calllocalLoginto save them to memory.
Ouf!, that was a lot. Now, go ahead and create auth_config.json in MovieReviewBoard/frontend/ and add your Auth0 application settings to it like this:
{
    "domain": "<Auth0-domain>",
    "clientId": "<Auth0-App-ClientId>",
    "audience": "<Auth0-API-IDENTIFIER>"
}
Next, create event-bus.js file in MovieReviewBoard/frontend/ and add the following code to it.
import Vue from "vue";
const EventBus = new Vue();
export default EventBus;
With this in place, your application will be able to create and handle events using Vue's event bus. In your authService.js file, you defined a redirectUri property in your Auth0 web authentication instance but you haven't created a route and component for this redirect url. To fix this issue, start by creating a route for it in your MovieReviewBoard/frontend/src/router.js file as below.
// ..................
import Callback from "./components/Callback.vue";

export default new Router({
  mode: "history",
  routes: [
    //..............
    {
      path: "/callback",
      name: "callback",
      component: Callback
    },
    //.....................
  ]
});
This file will add a route for the Callback component to your app and change the routing mode to history mode(Read more about routing modes here). Next, create a Callback.vue file in your MovieReviewBoard/frontend/src/components directory and add the following code to it.
<template>
  <div>Loading.............</div>
</template>

<script>
import eventBus from "../../event-bus";
import authService from "../../auth/authService";
export default {
  name: "callback",
  methods: {
    handleLogin() {
      this.$router.push("/about");
    }
  },
  created() {
    authService.handleAuthentication();
    eventBus.$on("login", () => this.handleLogin());
  }
};
</script>

<style scoped></style>
When this component is created after authentication with Auth0, you will have your Auth0's tokens in the URL which will be parsed by the handleAuthentication() method on your authentication service. handleAuthentication() will emit a login event through locallogin(). This event will then be handled above in the created() method by calling handlelogin() which redirects you to the about page. Now that you are on the about page and you have been authenticated you can now make authorized requests to your Spring Boot API by changing your About.vue page like so.
<!-- leaving everything else unchanged -->
<script>
import axios from "axios";
import authService from "../../auth/authService";
export default {
  name: "about",
  data() {
    return {
      greeting: "",
      accessToken: null
    };
  },
  created() {
    this.accessToken = authService.accessToken;
  },
  methods: {
    callAPI() {
      axios({
        method: "GET",
        url: "http://localhost:8888/helloworld",
        headers: { authorization: `Bearer ${this.accessToken}` }
      })
        .then(resp => {
          this.greeting = resp.data;
        })
        .catch(err => {
          this.greeting = err;
        });
    }
  }
};
</script>
Notice that with HTTP calls to your API you set an authorization header with your token. With that covered, your app should now be able to authenticate users, right? Well, not quite yet. You haven't added the login button that will kickstart the authentication process. To do this modify your Home.vue page as follows.
<template>
  <div class="home">
    <img alt="Vue logo" src="../assets/logo.png" /><br />
    <button @click="login">Login</button>
    <HelloWorld msg="Welcome to Your Vue.js App" />
  </div>
</template>

<script>
// @ is an alias to /src
import HelloWorld from "@/components/HelloWorld.vue";
import authService from "../../auth/authService";
export default {
  name: "home",
  components: {
    HelloWorld
  },
  methods: {
    login() {
      authService.login();
    }
  }
};
</script>
Notice the addition of the break and button tag in the template. The button tag has an event listener @click which listens for a click event on the button and calls the login() method which kickstarts the authentication process for your application. If you run both of your servers, authenticate and click on the Call API button, you should see the following.
“Securing Vue.js and Spring Boot apps is easy with @Auth0.”
Tweet This
Conclusion
This marks the end of the first part of this series. In this part, you were able to lay the groundwork for part 2 of this series by bootstrapping both your frontend and backend. Securing them with Auth0 and showing how your frontend consumes data from your backend. In part 2, your focus will be on building a GraphQL API, managing state with Vuex, routing with Vue-Router and polishing your UI with Bootstrap, Google Fonts, and Font Awesome.