
You need a private key to communicate with web3 blockchains; it’s the only way to confirm your own assets on blockchains. However, Private keys pose a usability challenge, and despite being around since the 70s, they’ve seen poor adoption. Web3 wallets, software that stores a private key and creates a communication framework around it, have improved the usability a bit, but it’s still not seamless. Some web3 organizations have tried to solve this problem with custodial wallets, where they manage the key for the user. That solution is contrary to the web3 goals of user control and ownership. Web3Auth’s innovative social authentication tools create a non-custodial wallet that the user controls and is still user friendly, and you can now integrate those tools in your Auth0 tenant!
How Web3Auth is an Advance in Web3 Usability
To get access to any blockchain application, a user needs a web3 public-private key pair. The public key functions as the user’s “address” on the blockchain. The address is an ID used to record the ownership of blockchain assets. It can also be used to encrypt messages that only the private key can decrypt. Only the address owner has access to the private key stored in a web3 wallet, which is how blockchains ensure that only the address owner can buy and sell assets associated with the address.
A major usability challenge about keys for the average end user is that if you lose access to it or the private key is exposed; you can’t update it like you would update a password. The most popular web3 wallets typically manage keys by creating a seed phrase of 12 to 24 words, which can be used to create an array of public keys tied to a private key. Provided you can find your seed phrase backup, you can recover access to the assets associated with your blockchain address. It's a single point of failure, and expecting users to securely backup their seed phrase does not provide a good user experience.
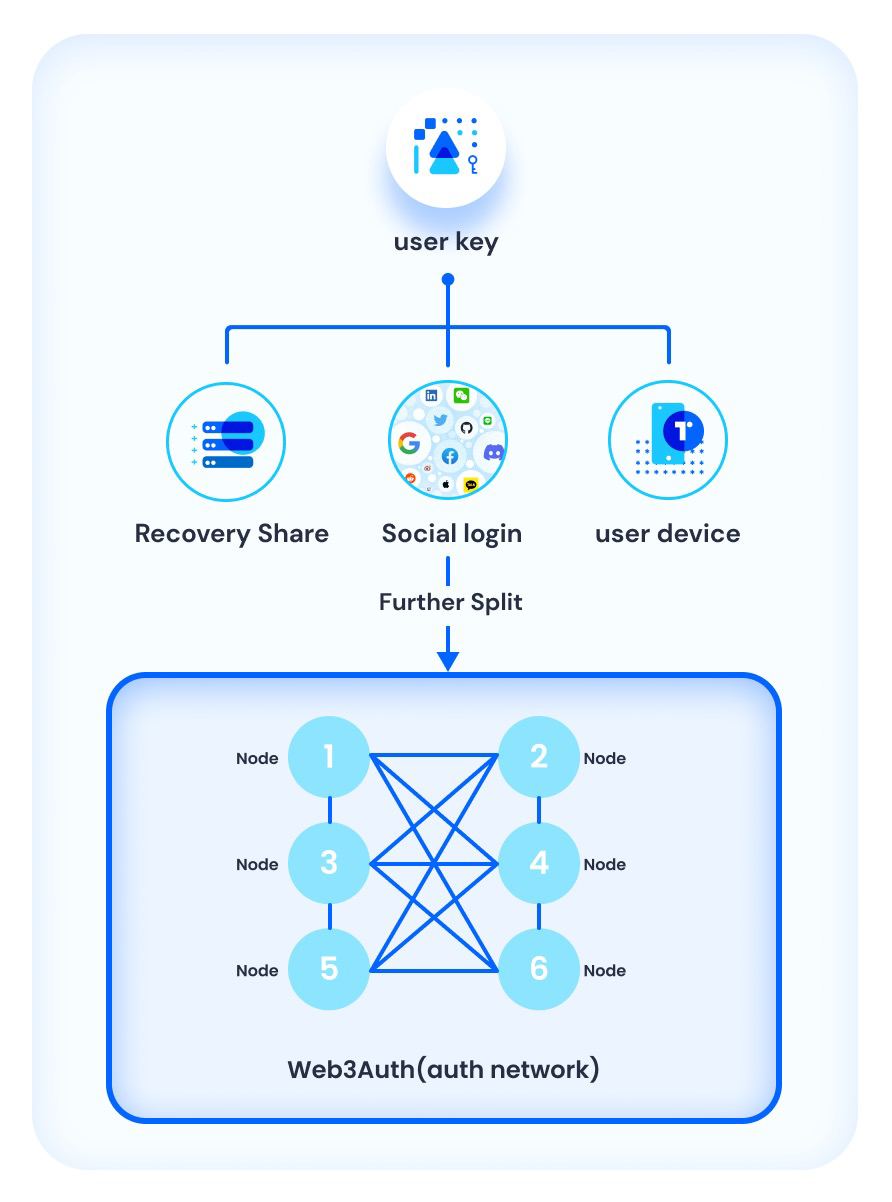
Web3Auth’s platform uses Shamir Secret Sharing to split the key and save it in the user’s device, a social login provider, and a recovery method. Web3Auth can then look into the device storage and social sign-in to recreate the user’s key, which creates the web2 authentication experience with a non-custodial web3 wallet. If the user is using a new device, they just need to confirm their identity via a recovery option with an email or other method.
This solution provides a developer:
- A non-custodial wallet to use with web3 blockchains.
- An easier way to create user-friendly web3 onboarding in their application.
- The ability to deploy a social login experience associated with a web3 wallet.
- The best of Web3 security and privacy by design for their end-users.
Implementing social logins with Auth0 lets you quickly add a web3 wallet to your existing application. Web3Auth works with a host of blockchains, including the main layer1 chains (Ethereum, Solana, Avalanche), and layer 2 chains (Polygon, Starkware, Arbitrum and more). By the end of the sign-in process, the user has a valid web3 wallet. It’s a frictionless, secure, self-custodial way to onboard users into the web3 world.
How It Works
Below we have a high-level overview, but if you want the full details, check out the installation guide.
Regular Web Application Flow

- A user initiates their sign-in request, which opens the Auth0 login experience. They select their preferred social identity provider.
- Auth0 manages the OAuth flow, relaying information to the identity provider.
- The identity provider relays the identity information to Auth0 based on permissions configured in the Auth0 dashboard.
- Auth0 sends your application server an authorization code as per the normal authentication flow.
- Your server adds a client ID and client secret to request an ID token for the user.
- Your application server sends the ID token to the Web3Auth SDK in the front-end client application.
- The Web3Auth SDK passes the ID token information to the Web3Auth network, which converts it to a piece of the private key share.
- The key share is relayed back to the front-end application, which uses it to reconstruct the private key of the user to use in the application.
Setup Steps
Working knowledge of JavaScript or Mobile SDKs is required depending on your application type. There are four main steps to getting the integration setup. Each of these steps are spelled out in the integration guide.
- Configure your Auth0 tenant and Web3Auth dashboard.
- Select and install the appropriate Web3Auth SDK based on your application type.
- With the SDK installed, you’ll need to initialize your Web3Auth application.
- Finally, you’ll need to use the
connect.tofunction to authenticate the user.
What's Next?
The Auth0Lab team is actively exploring the best ways to enable developers to build applications that rely on Web3 identity constructs and help bridge the Web2 and Web3 worlds. You can follow our progress on Twitter. If you're interested in speaking with the team, join our Discord and start a thread.
The Auth0 Marketplace is looking for Web3 partners to build new extensions onto Auth0. Visit https://auth0.com/integrate to learn more.
About the author

Samuel Frank
Senior Product Manager (Auth0 Alumni)