GDPR:カスタムUIで同意を追跡する
チュートリアルでは、auth0.jsまたはAuth0 APIを使用して同意情報を要求し、入力内容をユーザーのメタデータに保存する方法を説明します。詳細については、「ユーザープロファイルでのメタデータの使い方」をお読みください。
Lockを使用して同意を追跡する場合は、GDPR:Lockで同意を追跡するをご覧ください。
この文書の内容は法的な助言を意図したものではなく、また法的支援に代わるものとしてみなされるべきではありません。GDPRを理解し順守することの最終責任はお客様にあり、Auth0は可能な限りにおいて、お客様がGDPR要件を満たすことを支援します。
概要
さまざまなシナリオで同意情報を取得し、これをユーザーのメタデータに保存します。
すべてのシナリオで、次のプロパティがユーザーのメタデータに保存されます。
consentGiven
(true/false)は、ユーザーの同意(true)または不同意(false)を示しますconsentTimestamp
(Unixタイムスタンプ)は、ユーザーが同意した日時を示します
例:
{
"consentGiven": "true"
"consentTimestamp": "1525101183"
}
Was this helpful?
これには次のような4種類の実装があります。
1つはフラグを表示し、データベース接続で機能し、auth0.jsライブラリを使用してユーザーを作成します(シングルページアプリケーションで使用)。詳細については、「Auth0.js v9の参考情報」をお読みください。
1つはフラグを表示し、データベース接続で機能し、Authentication APIを使用してユーザーを作成します(通常のWebアプリで使用)
1つはフラグを表示し、ソーシャル接続で機能し、Management APIを使用してユーザーの情報を更新します(SPAまたは通常のWebアプリで使用)
1つは利用規約やプライバシーポリシー情報を確認したり、同意情報を提供したりできる別のページにリダイレクトします(SPAまたは通常のWebアプリで使用)
オプション1:auth0.jsを使用する
このセクションでは、シンプルなシングルページアプリケーションを使用して、ログインウィジェットをカスタマイズし、ユーザーが同意情報を提供するために使用できるフラグを追加します。アプリを最初から構築するのではなく、Auth0のJavaScriptクイックスタートサンプルを使用します。また、Auth0のユニバーサルログインページを使用して、アプリにログインを埋め込む代わりにユニバーサルログインを実装できるようにします。ユニバーサルログインの詳細については、「Auth0ユニバーサルログイン」をお読みください。ユニバーサルログインと埋め込みログインの違いについて詳しくは、「中央集中型のユニバーサルログインと埋め込みログイン」をご覧ください。
これは、データベース接続に対してのみ機能します(独自のデータベースをセットアップするのではなく、Auth0のインフラストラクチャを使用します)。
[Auth0 Dashboard]>[Applications(アプリケーション)]>[Applications(アプリケーション)]に移動して、新しいアプリケーションを作成します。タイプとして
[Single Web Page Applications(シングルWebページアプリケーション)]
を選択します。[Settings(設定)]に移動し、[Allowed Callback URL(許可されているコールバックURL)]にhttp://localhost:3000
を設定します。このフィールドには、Auth0が認証後にユーザーをリダイレクトできるURLのセットが格納されます。サンプルアプリは
http://localhost:3000
で実行されるため、この値を設定します。クライアントIDとドメイン値をコピーします。これらは後で必要になります。
[Auth0 Dashboard]>[Authentication(認証)]>[Database(データベース)]に移動して、新しい接続を作成します。[Create DB Connection(DB接続の作成)]をクリックし、新しい接続の名前を設定して、[Save(保存)]をクリックします。接続の[Applications(アプリケーション)]タブに移動し、新しく作成したアプリケーションが有効になっていることを確認します。
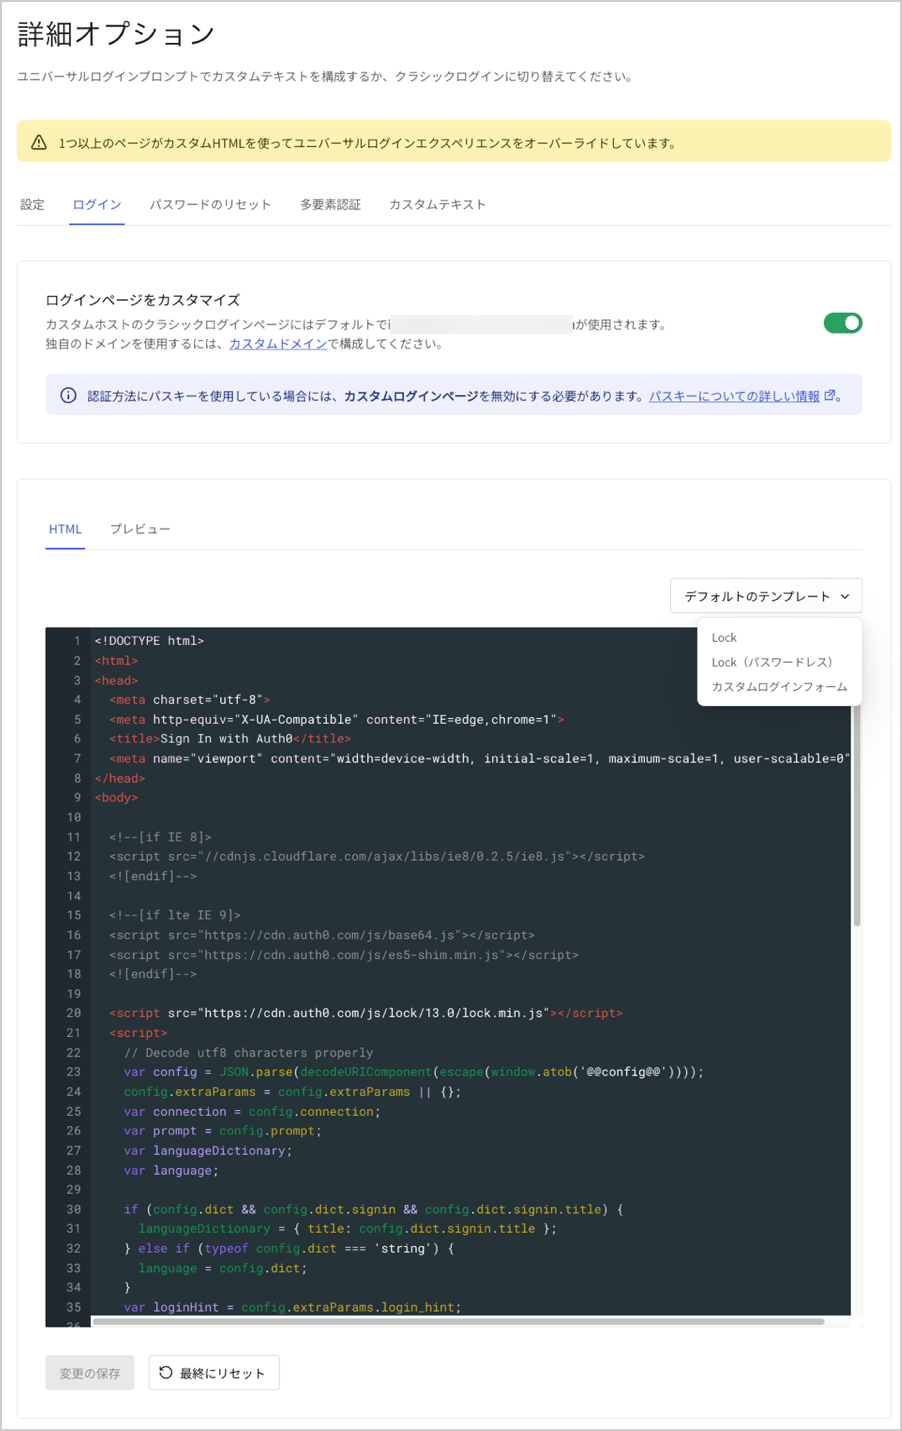
[Auth0 Dashboard]>[Branding(ブランディング)]>[Universal Login(ユニバーサルログイン)]に移動します。[Login(ログイン)]タブでトグルを有効にします。
[Default Templates(デフォルトテンプレート)]ドロップダウンで、
[Custom Login Form(カスタムログインフォーム)]
が選択されていることを確認します。コードは事前に入力されています。databaseConnection
変数の値を、アプリが使用しているデータベース接続の名前に設定します。//code reducted for simplicity var databaseConnection = 'test-db'; //code reducted for simplicity
Was this helpful?
/consentGiven
メタデータのフィールドを追加するには、フォームにチェックボックスを追加します。この例では、チェックボックスはデフォルトでチェックが入っており、ユーザーがチェックを外せないよう無効になっています。これはビジネスニーズに応じて調整できます。//code reducted for simplicity <div class="form-group"> <label for="name">I consent with data processing</label> <input type="checkbox" id="userConsent" checked disabled> </div> //code reducted for simplicity
Was this helpful?
/サインアップ関数を編集してメタデータを設定します。メタデータの値をブール値ではなく、値が
true
の文字列に設定し、toString
を使用して数値を文字列に変換していることに注意してください。これは、値として文字列のみを受け入れるAuthentication APIサインアップエンドポイントの制限によるものです。//code reducted for simplicity webAuth.redirect.signupAndLogin({ connection: databaseConnection, email: email, password: password, user_metadata: { consentGiven: 'true', consentTimestamp: Date.now().toString() } }, function(err) { if (err) displayError(err); }); //code reducted for simplicity
Was this helpful?
/ログインウィジェットの外観を確認するには、[Preview(プレビュー)]タブをクリックします。

この構成をテストするには、アプリケーションを実行して、
http://localhost:3000
に移動します。新しいユーザーでサインアップします。次に[Auth0 Dashboard]>[User Management(ユーザー管理)]>[Users(ユーザー)]に移動し、新規ユーザーを検索します。[User Details(ユーザーの詳細)]に移動し、[Metadata(メタデータ)]セクションまでスクロールします。user_metadataテキスト領域で、consentGiven
メタデータがtrue
に設定されていることを確認します。
オプション2:API(データベース)を使用する
独自のサーバーからログインページを提供する場合は、ユーザーがサインアップすると、Authentication APIサインアップエンドポイントを直接呼び出すことができます。
これまで説明してきたのと同じシナリオで、新しいユーザーをサインアップすると、次のスニペットを使用してAuth0でユーザーを作成し、メタデータを設定できます。必ず、consentTimestamp
要求パラメータの値を、ユーザーが同意したときのタイムスタンプに置き換えてください。
curl --request POST \
--url 'https://{yourDomain}/dbconnections/signup' \
--header 'content-type: application/json' \
--data '{"client_id": "{yourClientId}","email": "YOUR_USER_EMAIL","password": "YOUR_USER_PASSWORD","user_metadata": {"consentGiven": "true", "consentTimestamp": "1525101183" }}'
Was this helpful?
var client = new RestClient("https://{yourDomain}/dbconnections/signup");
var request = new RestRequest(Method.POST);
request.AddHeader("content-type", "application/json");
request.AddParameter("application/json", "{\"client_id\": \"{yourClientId}\",\"email\": \"YOUR_USER_EMAIL\",\"password\": \"YOUR_USER_PASSWORD\",\"user_metadata\": {\"consentGiven\": \"true\", \"consentTimestamp\": \"1525101183\" }}", ParameterType.RequestBody);
IRestResponse response = client.Execute(request);
Was this helpful?
package main
import (
"fmt"
"strings"
"net/http"
"io/ioutil"
)
func main() {
url := "https://{yourDomain}/dbconnections/signup"
payload := strings.NewReader("{\"client_id\": \"{yourClientId}\",\"email\": \"YOUR_USER_EMAIL\",\"password\": \"YOUR_USER_PASSWORD\",\"user_metadata\": {\"consentGiven\": \"true\", \"consentTimestamp\": \"1525101183\" }}")
req, _ := http.NewRequest("POST", url, payload)
req.Header.Add("content-type", "application/json")
res, _ := http.DefaultClient.Do(req)
defer res.Body.Close()
body, _ := ioutil.ReadAll(res.Body)
fmt.Println(res)
fmt.Println(string(body))
}
Was this helpful?
HttpResponse<String> response = Unirest.post("https://{yourDomain}/dbconnections/signup")
.header("content-type", "application/json")
.body("{\"client_id\": \"{yourClientId}\",\"email\": \"YOUR_USER_EMAIL\",\"password\": \"YOUR_USER_PASSWORD\",\"user_metadata\": {\"consentGiven\": \"true\", \"consentTimestamp\": \"1525101183\" }}")
.asString();
Was this helpful?
var axios = require("axios").default;
var options = {
method: 'POST',
url: 'https://{yourDomain}/dbconnections/signup',
headers: {'content-type': 'application/json'},
data: {
client_id: '{yourClientId}',
email: 'YOUR_USER_EMAIL',
password: 'YOUR_USER_PASSWORD',
user_metadata: {consentGiven: 'true', consentTimestamp: '1525101183'}
}
};
axios.request(options).then(function (response) {
console.log(response.data);
}).catch(function (error) {
console.error(error);
});
Was this helpful?
#import <Foundation/Foundation.h>
NSDictionary *headers = @{ @"content-type": @"application/json" };
NSDictionary *parameters = @{ @"client_id": @"{yourClientId}",
@"email": @"YOUR_USER_EMAIL",
@"password": @"YOUR_USER_PASSWORD",
@"user_metadata": @{ @"consentGiven": @"true", @"consentTimestamp": @"1525101183" } };
NSData *postData = [NSJSONSerialization dataWithJSONObject:parameters options:0 error:nil];
NSMutableURLRequest *request = [NSMutableURLRequest requestWithURL:[NSURL URLWithString:@"https://{yourDomain}/dbconnections/signup"]
cachePolicy:NSURLRequestUseProtocolCachePolicy
timeoutInterval:10.0];
[request setHTTPMethod:@"POST"];
[request setAllHTTPHeaderFields:headers];
[request setHTTPBody:postData];
NSURLSession *session = [NSURLSession sharedSession];
NSURLSessionDataTask *dataTask = [session dataTaskWithRequest:request
completionHandler:^(NSData *data, NSURLResponse *response, NSError *error) {
if (error) {
NSLog(@"%@", error);
} else {
NSHTTPURLResponse *httpResponse = (NSHTTPURLResponse *) response;
NSLog(@"%@", httpResponse);
}
}];
[dataTask resume];
Was this helpful?
$curl = curl_init();
curl_setopt_array($curl, [
CURLOPT_URL => "https://{yourDomain}/dbconnections/signup",
CURLOPT_RETURNTRANSFER => true,
CURLOPT_ENCODING => "",
CURLOPT_MAXREDIRS => 10,
CURLOPT_TIMEOUT => 30,
CURLOPT_HTTP_VERSION => CURL_HTTP_VERSION_1_1,
CURLOPT_CUSTOMREQUEST => "POST",
CURLOPT_POSTFIELDS => "{\"client_id\": \"{yourClientId}\",\"email\": \"YOUR_USER_EMAIL\",\"password\": \"YOUR_USER_PASSWORD\",\"user_metadata\": {\"consentGiven\": \"true\", \"consentTimestamp\": \"1525101183\" }}",
CURLOPT_HTTPHEADER => [
"content-type: application/json"
],
]);
$response = curl_exec($curl);
$err = curl_error($curl);
curl_close($curl);
if ($err) {
echo "cURL Error #:" . $err;
} else {
echo $response;
}
Was this helpful?
import http.client
conn = http.client.HTTPSConnection("")
payload = "{\"client_id\": \"{yourClientId}\",\"email\": \"YOUR_USER_EMAIL\",\"password\": \"YOUR_USER_PASSWORD\",\"user_metadata\": {\"consentGiven\": \"true\", \"consentTimestamp\": \"1525101183\" }}"
headers = { 'content-type': "application/json" }
conn.request("POST", "/{yourDomain}/dbconnections/signup", payload, headers)
res = conn.getresponse()
data = res.read()
print(data.decode("utf-8"))
Was this helpful?
require 'uri'
require 'net/http'
require 'openssl'
url = URI("https://{yourDomain}/dbconnections/signup")
http = Net::HTTP.new(url.host, url.port)
http.use_ssl = true
http.verify_mode = OpenSSL::SSL::VERIFY_NONE
request = Net::HTTP::Post.new(url)
request["content-type"] = 'application/json'
request.body = "{\"client_id\": \"{yourClientId}\",\"email\": \"YOUR_USER_EMAIL\",\"password\": \"YOUR_USER_PASSWORD\",\"user_metadata\": {\"consentGiven\": \"true\", \"consentTimestamp\": \"1525101183\" }}"
response = http.request(request)
puts response.read_body
Was this helpful?
import Foundation
let headers = ["content-type": "application/json"]
let parameters = [
"client_id": "{yourClientId}",
"email": "YOUR_USER_EMAIL",
"password": "YOUR_USER_PASSWORD",
"user_metadata": [
"consentGiven": "true",
"consentTimestamp": "1525101183"
]
] as [String : Any]
let postData = JSONSerialization.data(withJSONObject: parameters, options: [])
let request = NSMutableURLRequest(url: NSURL(string: "https://{yourDomain}/dbconnections/signup")! as URL,
cachePolicy: .useProtocolCachePolicy,
timeoutInterval: 10.0)
request.httpMethod = "POST"
request.allHTTPHeaderFields = headers
request.httpBody = postData as Data
let session = URLSession.shared
let dataTask = session.dataTask(with: request as URLRequest, completionHandler: { (data, response, error) -> Void in
if (error != nil) {
print(error)
} else {
let httpResponse = response as? HTTPURLResponse
print(httpResponse)
}
})
dataTask.resume()
Was this helpful?
メタデータの値は、ブール値ではなく文字列を値として受け入れるというAPI制限により、ブール値ではなく、値がtrue
の文字列に設定されていることに注意してください。
ブール値の設定が必要な場合は、代わりにManagement APIを使用できます。このシナリオでは、通常どおりユーザーをサインアップし、ユーザーが作成された後、Management API更新ユーザーエンドポイントを呼び出して必要なメタデータを設定します。その方法の詳細については、後述します。次の段落ではそのエンドポイントを使用します。
オプション3:API(ソーシャル)を使用する
ソーシャル接続を使用する場合、そのエンドポイントはデータベース接続にのみ機能するため、Auth0でユーザーを作成するためにAuthentication APIを使用することはできません。
代わりに、ユーザーにソーシャルプロバイダーへのサインアップ(Auth0でユーザーレコードを作成)を許可し、Management APIを使用してユーザーの情報を更新する必要があります。
Management APIを呼び出す前に、有効なトークンを取得する必要があります。詳細については、「運用環境のManagement APIアクセストークンを取得する」をお読みください。
リンク先の記事では、クライアントの資格情報フローを使用してトークンを取得していますが、これはブラウザで実行されているアプリからは使用できません。使用できるのは暗黙フローです。クライアントの資格情報フローの詳細については、「クライアントの資格情報フロー」を参照してください。暗黙フローの詳細については、「暗黙フロー」をご覧ください。
オーディエンス要求パラメータをhttps://YOUR_DOMAIN/api/v2/
に設定し、スコープパラメータをスコープcreate:current_user_metadata
に設定します。応答で取得したアクセストークンを使用して、Management API更新ユーザーエンドポイントを呼び出すことができます。
有効なトークンを取得したら、次のスニペットを使用してユーザーのメタデータを更新します。
curl --request POST \
--url 'https://{yourDomain}/api/v2/users/%7BUSER_ID%7D' \
--header 'authorization: Bearer YOUR_ACCESS_TOKEN' \
--header 'content-type: application/json' \
--data '{"user_metadata": {"consentGiven":true, "consentTimestamp": "1525101183"}}'
Was this helpful?
var client = new RestClient("https://{yourDomain}/api/v2/users/%7BUSER_ID%7D");
var request = new RestRequest(Method.POST);
request.AddHeader("authorization", "Bearer YOUR_ACCESS_TOKEN");
request.AddHeader("content-type", "application/json");
request.AddParameter("application/json", "{\"user_metadata\": {\"consentGiven\":true, \"consentTimestamp\": \"1525101183\"}}", ParameterType.RequestBody);
IRestResponse response = client.Execute(request);
Was this helpful?
package main
import (
"fmt"
"strings"
"net/http"
"io/ioutil"
)
func main() {
url := "https://{yourDomain}/api/v2/users/%7BUSER_ID%7D"
payload := strings.NewReader("{\"user_metadata\": {\"consentGiven\":true, \"consentTimestamp\": \"1525101183\"}}")
req, _ := http.NewRequest("POST", url, payload)
req.Header.Add("authorization", "Bearer YOUR_ACCESS_TOKEN")
req.Header.Add("content-type", "application/json")
res, _ := http.DefaultClient.Do(req)
defer res.Body.Close()
body, _ := ioutil.ReadAll(res.Body)
fmt.Println(res)
fmt.Println(string(body))
}
Was this helpful?
HttpResponse<String> response = Unirest.post("https://{yourDomain}/api/v2/users/%7BUSER_ID%7D")
.header("authorization", "Bearer YOUR_ACCESS_TOKEN")
.header("content-type", "application/json")
.body("{\"user_metadata\": {\"consentGiven\":true, \"consentTimestamp\": \"1525101183\"}}")
.asString();
Was this helpful?
var axios = require("axios").default;
var options = {
method: 'POST',
url: 'https://{yourDomain}/api/v2/users/%7BUSER_ID%7D',
headers: {authorization: 'Bearer YOUR_ACCESS_TOKEN', 'content-type': 'application/json'},
data: {user_metadata: {consentGiven: true, consentTimestamp: '1525101183'}}
};
axios.request(options).then(function (response) {
console.log(response.data);
}).catch(function (error) {
console.error(error);
});
Was this helpful?
#import <Foundation/Foundation.h>
NSDictionary *headers = @{ @"authorization": @"Bearer YOUR_ACCESS_TOKEN",
@"content-type": @"application/json" };
NSDictionary *parameters = @{ @"user_metadata": @{ @"consentGiven": @YES, @"consentTimestamp": @"1525101183" } };
NSData *postData = [NSJSONSerialization dataWithJSONObject:parameters options:0 error:nil];
NSMutableURLRequest *request = [NSMutableURLRequest requestWithURL:[NSURL URLWithString:@"https://{yourDomain}/api/v2/users/%7BUSER_ID%7D"]
cachePolicy:NSURLRequestUseProtocolCachePolicy
timeoutInterval:10.0];
[request setHTTPMethod:@"POST"];
[request setAllHTTPHeaderFields:headers];
[request setHTTPBody:postData];
NSURLSession *session = [NSURLSession sharedSession];
NSURLSessionDataTask *dataTask = [session dataTaskWithRequest:request
completionHandler:^(NSData *data, NSURLResponse *response, NSError *error) {
if (error) {
NSLog(@"%@", error);
} else {
NSHTTPURLResponse *httpResponse = (NSHTTPURLResponse *) response;
NSLog(@"%@", httpResponse);
}
}];
[dataTask resume];
Was this helpful?
$curl = curl_init();
curl_setopt_array($curl, [
CURLOPT_URL => "https://{yourDomain}/api/v2/users/%7BUSER_ID%7D",
CURLOPT_RETURNTRANSFER => true,
CURLOPT_ENCODING => "",
CURLOPT_MAXREDIRS => 10,
CURLOPT_TIMEOUT => 30,
CURLOPT_HTTP_VERSION => CURL_HTTP_VERSION_1_1,
CURLOPT_CUSTOMREQUEST => "POST",
CURLOPT_POSTFIELDS => "{\"user_metadata\": {\"consentGiven\":true, \"consentTimestamp\": \"1525101183\"}}",
CURLOPT_HTTPHEADER => [
"authorization: Bearer YOUR_ACCESS_TOKEN",
"content-type: application/json"
],
]);
$response = curl_exec($curl);
$err = curl_error($curl);
curl_close($curl);
if ($err) {
echo "cURL Error #:" . $err;
} else {
echo $response;
}
Was this helpful?
import http.client
conn = http.client.HTTPSConnection("")
payload = "{\"user_metadata\": {\"consentGiven\":true, \"consentTimestamp\": \"1525101183\"}}"
headers = {
'authorization': "Bearer YOUR_ACCESS_TOKEN",
'content-type': "application/json"
}
conn.request("POST", "/{yourDomain}/api/v2/users/%7BUSER_ID%7D", payload, headers)
res = conn.getresponse()
data = res.read()
print(data.decode("utf-8"))
Was this helpful?
require 'uri'
require 'net/http'
require 'openssl'
url = URI("https://{yourDomain}/api/v2/users/%7BUSER_ID%7D")
http = Net::HTTP.new(url.host, url.port)
http.use_ssl = true
http.verify_mode = OpenSSL::SSL::VERIFY_NONE
request = Net::HTTP::Post.new(url)
request["authorization"] = 'Bearer YOUR_ACCESS_TOKEN'
request["content-type"] = 'application/json'
request.body = "{\"user_metadata\": {\"consentGiven\":true, \"consentTimestamp\": \"1525101183\"}}"
response = http.request(request)
puts response.read_body
Was this helpful?
import Foundation
let headers = [
"authorization": "Bearer YOUR_ACCESS_TOKEN",
"content-type": "application/json"
]
let parameters = ["user_metadata": [
"consentGiven": true,
"consentTimestamp": "1525101183"
]] as [String : Any]
let postData = JSONSerialization.data(withJSONObject: parameters, options: [])
let request = NSMutableURLRequest(url: NSURL(string: "https://{yourDomain}/api/v2/users/%7BUSER_ID%7D")! as URL,
cachePolicy: .useProtocolCachePolicy,
timeoutInterval: 10.0)
request.httpMethod = "POST"
request.allHTTPHeaderFields = headers
request.httpBody = postData as Data
let session = URLSession.shared
let dataTask = session.dataTask(with: request as URLRequest, completionHandler: { (data, response, error) -> Void in
if (error != nil) {
print(error)
} else {
let httpResponse = response as? HTTPURLResponse
print(httpResponse)
}
})
dataTask.resume()
Was this helpful?
この呼び出しを行うには、一意のuser_id
を知っている必要があることに注意してください。応答からIDトークンを取得した場合、IDトークンのsub
クレームからこれを取得できます。詳細については、「IDトークン」をお読みください。または、メールしかない場合は、Management APIの別のエンドポイントを呼び出してIDを取得できます。詳細については、「ユーザー検索のベストプラクティス」をお読みください。
オプション4:別のページへリダイレクトする
ユーザーに追加情報を表示したい場合は、サインアップ時に同意と追加情報を求める別のページにユーザーをリダイレクトし、その後、認証処理を終了するために再びリダイレクトして戻すことができます。これは、リダイレクトルールを使用します。同じルールを使用して、ユーザーのメタデータに同意情報を保存し、この情報を追跡して次回のログイン時に同意を求めないようにすることができます。詳細については、「ルール内でユーザーをリダイレクトする」をお読みください。
このフォームをホストする必要があり、フォームのURLは公開されている必要があります。このチュートリアルの後の手順で、フォームにアクセスできるURLをAuth0に提供する必要があります。
リダイレクトルールを追加します。[Auth0 Dashboard]>[Auth Pipeline(Authパイプライン)]>[Rules(ルール)]に移動して、[Create Rule(ルールを作成)]をクリックします。ルールテンプレートで、[empty rule(空のルール)]を選択します。デフォルトのルールの名前を、
[empty rule(空のルール)]
からわかりやすい名前(例:同意フォームにリダイレクト
)に変更します。スクリプトエディターに次のJavaScriptコードを追加し、変更を[Save(保存)]します。
exports.onExecutePostLogin = async (event, api) => { const { consentGiven } = event.user.user_metadata || {}; // redirect to consent form if user has not yet consented if (!consentGiven && api.redirect.canRedirect()) { const options = { query: { auth0_domain: `${event.tenant.id}.auth0.com`, }, }; api.redirect.sendUserTo(event.secrets.CONSENT_FORM_URL, options); } }; // if user clicks 'I agree' on the consent form, save it to their profile so they don't get prompted again exports.onContinuePostLogin = async (event, api) => { if (event.request.body.confirm === "yes") { api.user.setUserMetadata("consentGiven", true); api.user.setUserMetadata("consentTimestamp", Date.now()); return; } else { return api.access.deny("User did not consent"); } };
Was this helpful?
/[Auth0 Dashboard]>[Auth0 Pipeline(Auth0パイプライン)]>[Rules(ルール)]に戻り、ページの下部にある[Settings(設定)]セクションまでスクロールします。次のように変数キー/値ペアを作成します。
キー:
CONSENT_FORM_URL
値:
your-consent-form-url.com
同意フォームがある、公開されているURLを必ず提供してください。
本番環境で使用するために同意フォームへのリダイレクトをセットアップする場合は、セキュリティ上の懸念事項に関して信頼できるCallback URLとデータ整合性を確認してください。
保護者の同意など、特別な同意プロンプトが必要な場合は、独自のカスタム同意フォームを作成する必要があります。国によって法律が異なるのでご注意ください。
構成部分が完了しました。テストしてみましょう!
構成をテストする
アプリケーションを実行して
https://localhost:3000
に移動します。新しいユーザーでサインアップします。同意フォームにリダイレクトされます。
[I agree(同意する)]フラグをチェックし、[Submit(送信)]をクリックします。
[Auth0 Dashboard]>[User Management(ユーザー管理)]>[Users(ユーザー)]に移動し、新規ユーザーを検索します。
[User Details(ユーザーの詳細)]に移動し、[Metadata(メタデータ)]セクションまでスクロールします。
user_metadataテキスト領域で、
consentGiven
メタデータがtrue
に設定され、consentTimestamp
がユーザーが同意した時のUnixタイムスタンプに設定されていることを確認します。
これで終了です。